SQLj Programs
Dynamic SQL provides flexibility and a means to construct universal interfaces with which to develop database applications. One of the drawbacks, however, is that query performance can suffer because of run-time access plan generation. Also, it often takes time to master an API such as JDBC as compared to directly embedding statements into your application. Although C/C++ programmers have always had a choice of writing their applications using static or dynamic embedded SQL, or using a dynamic SQL API such as ODBC, these options were not open to Java programmers. The only way for a Java application to execute static SQL was to write static embedded SQL code in C, and invoke it using the JNI. Obviously, this is not a pure Java solution, and the benefits of Java portability are sacrificed by considering it.
However, DB2 v8 provides two solutions for writing static SQL programs in Java. As described in the previous topic, the DB2 CLI driver can be configured to create static queries. Because this requires adding keywords to the db2cli.ini file, this is not the easiest solution to implement as a programmer. With Java, it is better to use SQLj instead. SQLj provides Java programmers with a means to obtain the performance benefits of static query execution by embedding SQL queries into Java applications similar to DB2's own embedded SQL development specifications.
SQLj is not a replacement for JDBC. In fact, SQLj run-time classes execute their queries using JDBC (see Figure 12.4). So, how does SQLj work, when it is a layer on top of JDBC itself? To understand this, you must understand the steps required to compile and run an SQLj program. Analogous with embedded SQL, SQLj programs have source files with the extension .sqlj, which are translated into .java files. During this translation process, the .java file is compiled into corresponding classes by default, and an SQLj serialized profile is also created as an .ser file. The serialized file contains all of the SQL statements in the original SQLj source file, each of which is called a profile element. If you view the .java file that was generated, you will also notice that the SQL statements are replaced with calls to the SQLj run-time libraries.
Figure 12.4. SQLj interface with DB2 UDB.

At this point, you can run your SQLj application as dynamic SQL using the generated classes and the serialized profile. To go a step further and bind this application statically to a DB2 database, you must use the DB2 Profile Customizer tool. The executable for this tool is called db2profc and is distributed along with the SQLJ translator in the Application Development Client. The db2profc tool accepts arguments that enable it to connect to the database being accessed in your source file, and bind a package on that database using the serialized profile. The package is created with sections corresponding to each SQL query in the serialized profile. The serialized profile is subsequently converted to a format that references the appropriate sections in the DB2 packages. When you run your application now, you will be using static SQL!
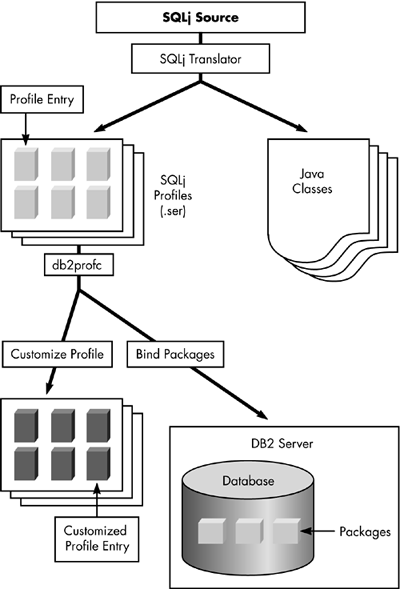
But how is this possible when SQLj uses JDBC, which we know uses CLI? Since CLI has its own packages, how does the application have packages of its own? DB2 solves this problem using a special client-side stored procedure. This implementation may change in the future for performance improvements. Figure 12.5 illustrates this entire process. Each of these steps is described in the following sections in detail.
Figure 12.5. SQLj application development process.
Required Packages
In each of your SQLj source files, make sure you include the following import statements:
import java.sql.*;
import sqlj.runtime.*;
import sqlj.runtime.ref.*;
The java.sql packages import the JDBC API that SQLj uses, while the other two packages provide the SQLj run-time classes. These classes are all found in runtime.zip in sqllib/java.
SQLj Syntax
In your SQLj source file, you should write your Java code as you normally would, with the exception of SQLj specific code. Each SQLj statement has the following general form:
#sql <SQLj syntax>;
The variable element here is called “SQLj syntax.” In general, all SQL statements are encased in curly braces {}. For example, code a literal INSERT query as follows:
#sql { INSERT INTO T1 VALUES (1, 2) };
The syntax for a SELECT statement is a little different. Because most SELECT statements require you to use a cursor to process the result set, the initial SELECT query in SQLj returns a cursor to you in an SQLj object known as an iterator. We will discuss iterators in detail a little later, however, for the moment, simply be aware that the general form of a SELECT query is as follows:
#sql myIterator = { SELECT * FROM PRODUCT };
In this syntax, the iterator is an instance of an Iterator class that declared in the code.
Host Variables
In most cases, you will need to have variable terms in your SQL queries, such as terms in a WHERE clause, or the values to UPDATE or INSERT. In this case, we use host variables in the SQL queries, similar to embedded SQL. In fact, host variables are prefaced with a colon, “:”, just as in embedded SQL applications. Host variables are easier to manipulate in SQLj, however, because they do not require a DECLARE section as in embedded SQL. You can use any method parameters, local, or instance variables as a host variable. As an example, here is a code fragment that shows an integer value inserted into a table:
public void insertIntoT1(int myInt) {
   #sql { INSERT INTO T1 VALUES(:myInt) };
}
A method argument is used as a host variable. Thus, we could call this method with a different argument each time, and thereby insert a different value into the table.
NOTE
An array element cannot be used as a host variable.
Result Set Iterators
Unlike JDBC, in which a result set is returned in a generalized ResultSet object, result sets in SQLj are individually tailored in Iterator classes, based on the specific return types or column names. There are two types of Iterator classes to accomplish these tasks: Positional Iterators and Named Iterators. In both cases, there are five steps you need to perform:
1. | Define the Iterator class using an SQLj declaration. |
2. | Declare a variable of the Iterator class. |
3. | Assign the Iterator variable as the return value of an SQLj SELECT query. |
4. | Access each of the Iterator columns for each row of data. |
5. | Close the Iterator object by calling the close() method of the variable. |
Steps 2, 3, and 5 are performed in the same way for both types of iterators, while steps 1 and 4 differ. In general, you may find that using Named Iterators is easier and more flexible. The next sections describe each type of iterator separately so you can become familiar with their use. Table 12.5 also compares each type of iterator.
| Positional Iterator | Named Iterator |
|---|---|
| Iterator column set declaration must match positions of columns in SELECT statement column list. | Iterator column list created using names of columns in SELECT statement. |
| Columns must be retrieved in the order specified in the iterator declaration. | Columns can be retrieved in any order. |
| Two columns in the result set can have the same name. | Two columns in the result set cannot have the same name. |
| FETCH INTO syntax used to retrieve values into host variables. | Methods with the same name as the column are used to retrieve the value of the column in a particular row of the result set. |
| endFetch() call used to determine if end of result set was reached. | next() call used to fetch next row of data and indicate whether end of result set was reached. |
Positional Iterators
When you declare a positional iterator, you specify the return types that the iterator will handle. In addition, in your SELECT query itself, you must ensure that you explicitly specify the column names in the order you have specified the return types in your iterator. Let's say you have a table called MYTABLE, with the following definition:
CREATE TABLE MYTABLE ( C1 CHAR(1), C2 INT, C3 REAL )
You have a query to execute against this table, which will return the values for each column in the table:
SELECT c2, c1, c3 FROM MYTABLE WHERE c2 > value
Notice that we have purposely requested that C2 is the first column returned in our query. Here is the complete code required to execute this query and retrieve the result sets using a positional iterator:
public class MyTableQuery {

// A positional iterator to retrieve results for QUERY
#sql private iterator MyTablePosIter(int, String, float);

// Run the following query using the DefaultContext:
// SELECT c2, c1, c3 FROM MYTABLE
// WHERE c2 > greaterThanValue
// Output the results of this query to System.out.
/////////////////////////////////////////////////////////
public void executeQuery(int greaterThanValue)
                                  throws SQLException {
// Local instance of MyTablePosIter
MyTablePosIter results;

// Embedded query to be executed.
#sql results={SELECT c2,c1,c3 FROM MYTABLE
              WHERE c2 > :greaterThanValue};

      while(true) {
         // Process result set using local variables
         int c2=0;
         String c1=null;
         float c3=0;
         #sql { FETCH :results INTO :c2, :c1, :c3 };

         // Test if end of result set was retrieved
         // after FETCH
         if(results.endFetch()) break;

         // Output results
         System.out.println("c1 is: " + c1);
         System.out.println("c2 is: " + c2);
         System.out.println("c3 is: " + c3);
      }
      // Close the iterator
      results.close();
   }
}
The class, MyTableQuery, has a single method, executeQuery(), which allows you to specify the value of the condition in the WHERE clause. The first non-Java line of code you likely noticed was the iterator declaration:
#sql private iterator MyTablePosIter(int, String, float);
As already mentioned, a positional iterator only provides the data types for the return values in the SELECT query. The data types are specified in the same order as the positions of the columns specified in the query. This Iterator class is named MyTablePosIter, and we declare an instance of this class as follows:
MyTablePosIter results;
This example used the input parameter for the executeQuery() method as the host variable name and then looped through the result set using a FETCH INTO statement, which populated additional host variables with the contents of the current row of the iterator. After each FETCH INTO operation, it was necessary to call the endFetch() function, which returns a boolean indicating if the most recent FETCH operation was successful. If you do not call this method immediately after the FETCH operation, and choose to access the host variables that were populated in the FETCH, you will see the same values as the previous row, because the iterator was not repopulated.
Named Iterators
A named iterator is declared with the names of the columns that will be returned in the query. For example, you can easily modify the previous example to use a named iterator. The iterator declaration would be as follows:
#sql private iterator
MyTableNamedIter(String c1, int c2, float c3);
There are no constraints on the order of the data types in the iterator declaration anymore because we specify each column in the result set by name. The executeQuery() would then have the following body:
MyTableNamedIter results;
#sql results= {SELECT c2,c1,c3
               FROM MYTABLE
               WHERE c2 > :greaterThanValue};

// Process result set using local variables
while(results.next()) {
   System.out.println("c1 is: " + results.c1());
   System.out.println("c2 is: " + results.c2());
   System.out.println("c3 is: " + results.c3());
}
// Close the iterator
results.close();
With named iterators, we use the next() method, analogous to the same method in the JDBC ResultSet interface. When the SQLj source file is translated, the named iterator class is also generated with a method for each named column. These methods serve as getters for that column's value in the currently retrieved row of the result set.
Default Connection Context
You have probably noticed that none of the examples made mention of a database connection, so you might wonder how the executeQuery() method worked. Connections in SQLj are addressed via a connection context defined in the ConnectionContext interface of the SQLj run-time libraries. An implementation of a connection context is included in the run-time libraries, known as the DefaultContext. The DefaultContext class (and all connection contexts in general) contains a static ConnectionContext singleton as a property, which itself is known as the DefaultContext. The DefaultContext class provides static getter and setter methods to access it.
When you execute a query in SQLj as in the first few examples, you are always addressing the DefaultContext. For this to work, you need to establish a connection before calling executeQuery(). This is quite easily accomplished using the following line of code:
DefaultContext.setDefaultContext(
       new DefaultContext(
          DriverManager.getConnection("jdbc:db2:sample")));
We have invoked one of the DefaultContext constructors which takes a JDBC Connection as its parameter. The DefaultContext class also provides more functionality than simply its static defaultContext property. In fact, you can create multiple instances of DefaultContext, and establish a separate database connection in each. For example, you might have a method called executeInsert() that performs a simple INSERT operation. You can provide an argument to this method indicating the DefaultContext object to address when performing the INSERT operation, instead of using the defaultContext property:
public void executeInsert(DefaultContext ctx)
throws SQLException {
   if (ctx != null) {
      #sql  [ctx] { INSERT INTO MYTABLE
                    VALUES('Y', 123, 123.2);
   }
}
Notice that the SQLj syntax has been slightly modified to specify the variable name of the ConnectionContext addressed in the query. To generalize this method further, you could declare it as follows:
public void executeInsert(ConnectionContext ctx);
This still allows you to provide a DefaultContext object as a parameter, but you can now also provide any other type of ConnectionContext as well.
User-Defined ConnectionContext Classes
There is a limitation when using multiple instances of the DefaultContext class, in that if you have connections to two different DB2 databases in different instances of DefaultContext referenced in the same SQLj source file, all of your queries must be valid using either instance of DefaultContext. In other words, the conceptual or exemplar schema must be the same. For example, you may have two connections to the same DB2 database, but each connection accesses objects in a different schema. This is common when you have identical tables defined for different users.
The reason this limitation exists is because only a single serialized profile is generated per context type referenced in an SQLj source file. You can work around this by creating separate source files (and thus, different classes) to handle queries against different conceptual schemas. However, this often does not lead the best application design.
For this reason, SQLj allows you to define your own ConnectionContext classes. You can create multiple instances of each ConnectionContext class that you define, and in an SQLj source file, a separate serialized profile will be generated at translation time for each type of ConnectionContext. For example, you can declare two different ConnectionContext classes as follows:
#sql context MyCtx1;
#sql context MyCtx2;
Instantiating a class of each type is accomplished using the same type of constructors in DefaultContext and ConnectionContext. You can then refer to each ConnectionContext class separately in a method as long as their type is explicitly declared. For example, let's add a second query into the executeInsert() method:
public executeInsert(MyCtx1 ctx1, MyCtx2 ctx2) {
   if (ctx1 != null) {
      #sql  [ctx1] { INSERT INTO MYTABLE
                      VALUES('Y', 123, 123.2);
   }
   if (ctx2 != null) {
      #sql  [ctx2] { INSERT INTO MYTABLE
                     VALUES('Y', 123, 123.2);
   }
}
Notice that in the method arguments, each ConnectionContext is distinguished as a different type of class. Thus, when you translate the SQLj source file containing this method, you get two serialized profiles, one per unique ConnectionContext class. Notice that this won't hold true if both of your parameters are ConnectionContext objects of the same type. Thus, if both parameters are MyCtx1 objects, you only get a single serialized file upon translation. As described at the beginning of this topic, a serialized file is statically bound against a database, so all of the statements in a serialized file must access valid objects in the database to which you are trying to bind it. The constructors and methods for a user-defined ConnectionContext class are implemented from the ConnectionContext interface, and extended from the ConnectionContextImpl abstract class.
Execution Contexts
Execution contexts are synchronized objects that you can use to get and set additional properties about SQLj statements in your application. You can directly create an object of type ExecutionContext using the default class constructor as follows:
ExecutionContext eCtx = new ExecutionContext();
In addition, every ConnectionContext class has a default associated ExecutionContext class that can be returned using the getExecutionContext() method. However, this creates some confusion because any instance of the ExecutionContext class can be associated with as many ConnectionContext objects as desired. This is because an ExecutionContext is associated with a particular statement, not a ConnectionContext. This is particularly useful when your applications are multithreaded, and you are referencing the same ConnectionContext object in different threads. It is better under these circumstances to use separate ExecutionContext classes. You can associate an ExecutionContext variable called eCtx with the DefaultContext property using the following syntax:
#sql [eCtx] { INSERT INTO MYTABLE VALUES('Y', 123, 123.2) };
To associate an ExecutionContext with a particular ConnectionContext, on the other hand, precede it with the ConnectionContext variable, as follows:
#sql [ctx, eCtx] { INSERT INTO MYTABLE
                   VALUES('Y', 123, 123.2) };
The ConnectionContext is referred to as ctx and the ExecutionContext is referred to as eCtx.
Properties of User-Defined SQLj Classes
As discussed, defining an iterator or ConnectionContext actually generates code that defines a class in your translated SQLj source. You can see this code if you look at the .java file produced after translating an SQLj source file. It is important to note here that each type of class you specify has scope and visibility. You can define your iterator and ConnectionContext objects in their own separate files if you choose. In some cases, this might be advantageous and suitable for the design of your application. For example, you could create an SQLj source file called Ctx1.sqlj, with a single entry:
#sql public context Ctx1;
With this simple declaration, you can translate this SQLj source file into equivalent Java source. The resulting class will have public visibility. You also can define this class as part of another SQLj source file called MyClass.sqlj:
#sql context Ctx1;
public class MyClass {
   // Class definition
}
You cannot have public visibility because only MyClass and its inner classes can have public visibility in a source file called MyClass.java. This leads to our final case, in which you can define iterator classes as inner classes. ConnectionContext classes cannot be defined as inner classes because they contain static variables. If you are using JDK 1.1.x, you can only define an inner class within the class definition, but outside of a method. With the Java 2 SDK, you can define a class within a method.
SQLj Translator
As previously described, SQLj source files are translated into Java source and compiled into classes using the SQLj translator. During this translation process, a serialized (.ser) file is created per ConnectionContext type, and each serialized file has the queries addressed to its corresponding connection context. While the SQLj translator has many options, this is the simplest way to invoke it:
sqlj <source-file>
This will generate a .java and .class file with the same name as the SQLj source filename. Additional .class files are generated for inner classes and embedded classes such as iterators and connection contexts. If the source file also contains SQL queries, a serialized profile is generated. Thus, for source files that only define an iterator or a connection context, you will not get a serialized file.
DB2 Profile Customizer
When you have translated the SQLj source file, you can execute the SQLj application using dynamic SQL. This may be useful for testing, however, in most cases you will want to statically bind each of your serialized files to a DB2 database. Each serialized file is named using the following conventions:
ClassName_SJProfileSequenceNumber.ser
Therefore, if your MyTableQuery class has two distinct ConnectionContext classes, each of which performs at least one SQL query, you would get the following two files:
MyTableQuery_SJProfile0.ser
MyTableQuery_SJProfile1.ser
You can bind these files against a DB2 database using the following syntax:
db2profc –url:jdbc:db2:db2mall -prepoptions="bindfile
using  mtq.bnd package using mtq"
MyTableQuery_SJProfile0.ser
db2profc –url:jdbc:db2:db2mall -prepoptions="bindfile
using mtq1.bnd package using mtq1"
MyTableQuery_SJProfile1.ser
In each command, we have specified the JDBC URL to connect for binding. We have also included two prepoptions (precompile options): package using and bindfile using. The former indicates the name of the package to create on the database, and the latter generates a bindfile. A bindfile is necessary if your SQLj source will be used against multiple databases. You should only run db2profc once, and then statically bind the generated bindfiles to additional databases, using the BIND command as described in Chapter 4.
NOTE
In DB2 v8 for Windows and UNIX platforms, db2profc has been renamed to db2sqljcustomize, however, the db2profc executable is also included.