
Chapter 12. Release Upgrades
After your system goes live, it churns away in the background handling requests day in and day out. It self-heals when issues occur and restarts automatically after power outages or system reboots. But as with any piece of software, you are bound to continue optimizing it, fixing bugs as they are reported and adding new features. Irrespective of having thousands of instances of your coffee machine running on dedicated hardware monitored through a wireless link, or any other system whose requirements state that it must service its requests with 100% availability, upgrades included, then Erlang/OTP’s software upgrade capabilities are something to study carefully. Imagine you not being able to have your morning coffee because of an ongoing firmware upgrade of your office coffee machine!
The built-in functionality in the Erlang VM that allows dynamic module loading might work for simple patches where the upgrade is backward-compatible. But have you thought of the cases where you’ve changed the functional API? Or where a process running a call to completion with an old version of the code cannot communicate with a process running a new version because of a change in the protocol? How do you handle state changes in your loop data between releases or database schema changes? And even more importantly, what if an upgrade fails and you need to downgrade?
Complex systems need to be upgraded in a coordinated and controlled manner. The built-in functionality used to dynamically load new modules, like everything else, of Erlang and OTP provides the foundations used to build the tools that coordinate and control these upgrades, greatly reducing and even hiding their complexity. Before introducing the tools themselves, let’s review the semantics, terminology, and most commonly used functions relevant to our example to ensure we are all on the same page.
Software Upgrades
We cover module upgrades in “Upgrading Modules”. If you’ve already
read it, you might recall that you can load a new module in the Erlang
runtime environment by using the shell command l(Module),
calling code:load_file(Module), or compiling
the source code using c(Module) or
make:files(ModuleList,[load]). At any one time, your runtime environment can have two versions of code for the same module loaded. We refer to them as the old and
current versions. A process running the
old module version will continue doing so until it issues a fully
qualified function call; i.e., a call of the format
Module:Function(...), where the module name is used as a
prefix to the function.
When a fully qualified function call occurs, the runtime checks to ensure that the process is running the current version of the code. If it is, the call continues using the current code. But if the process is still running the old version, the pointer to the code is switched to the current version before the call is made.
Calls to library modules have to be fully qualified because you are calling another module, so such a call will automatically use the current version. Recursive calls controlling process receive-evaluate loops, however, tend to recurse locally without a fully qualified call. We need to either change these local calls to be fully qualified, or add a new message that triggers a fully qualified function call in the receive-evaluate loop. Depending on the complexity of the upgrade, this function could either call the loop function in the new module or call a hook in the new module that handles any change of the process state, including loop data, ETS tables, and database schemas, before returning into the loop.
When not executing a fully qualified call, a process running the
current version of a module will continue running it even after a new
version is loaded in the system. If a process is already running the old
version of a module—not the current version—when a version newer than
the current one is loaded, that process will be unconditionally terminated.
Processes will also be unconditionally terminated if they are running an
old module version forcefully removed using the code:purge(Module) call.
With two versions of the code allowed in the runtime system, we need
a way to determine the current version of the module. The
-vsn(Version). module attribute helps us achieve exactly that.
Version can be any Erlang term, but it is most commonly a
string, number, or atom. More often than not, it is set by a script
triggered by the revision control system when committing the code to the
repository (for example, if you use Git for source control, you could set
Version to a string containing the output of git describe --long, which provides the most
recent Git tag, the number of commits made since that tag, and the current
commit hash). Placing the vsn attribute at the beginning of
the module with the other attributes gives us the ability to determine the
version of the code we are upgrading from, using it to control changes to
the state, database schemas, protocols, and other non–backward-compatible
internal data formats. You can find the version of the current module
using the Mod:module_info/0,1 call.
The vsn attribute is not mandatory. If omitted, the
compiler generates it at compile time using the beam_lib:md5/1 call to generate a 128-bit
md5 digest of the module. The md5 digest is based on properties of the module, but excludes compile
date and other attributes that are irrelevant to the code, since they may
change without the code itself changing. This guarantees that a version
will be tagged with the same 128-bit key regardless of compilation time,
spaces, carriage returns, or comments in the code.
Remember the example FSM we looked at in “Coffee FSM”? Let’s dust off the Erlang version and compile it
to better understand how the vsn module attribute works. If
you are using modules from the book’s GitHub repository, the module we are using is
under ch12/erlang/coffee.erl.original. Don’t forget to change
its filename to coffee.erl. You can then compile it as follows:
1>c(coffee).{ok,coffee} 2>coffee:module_info(attributes).[{vsn,[293551046745957884913825426256179654413]}] 3>{ok, {coffee, MD5Digest}} = beam_lib:md5(coffee).{ok,{coffee,<<220,215,224,7,110,247,231,148,86,224,44, 74,197,2,111,13>>}} 4><<Int:128/integer>> = MD5Digest, Int.293551046745957884913825426256179654413
In shell command 2, a call to coffee:module_info/1
returns the md5 digest in the vsn module attributes,
something we confirm in shell commands 3 and 4 by getting the digest from
the module and reversing the digest process. Let’s now add the
-vsn directive manually in our module and recompile:
-module(coffee).-export(...).-vsn(1.0)....
This ensures the compiler will not override the version with the md5 digest and sets it instead to 1.0:
5>c(coffee).{ok,coffee} 6>coffee:module_info(attributes).[{vsn,[1.0]}]
Let’s continue working with the Erlang version of the coffee machine FSM, adding a new upgrade message that triggers a fully qualified function call. This will allow us to upgrade the server in a controlled way, understanding the how and why of all the steps involved in the process. After that, we explore how it is done using OTP.
The First Version of the Coffee FSM
You might recall that the Erlang version of the coffee FSM consisted of three states, selection, payment, and remove (Figure 12-1). In our software upgrade example, we add a new state called service, which allows us to open the cabinet door and service the coffee maker. But before going there, let’s add some generic code that executes the fully qualified call, giving us a baseline we can use to perform the upgrade itself. We can do this either by fully qualifying every call to the receive-evaluate loop, or by sending the process a message that triggers a fully qualified call.
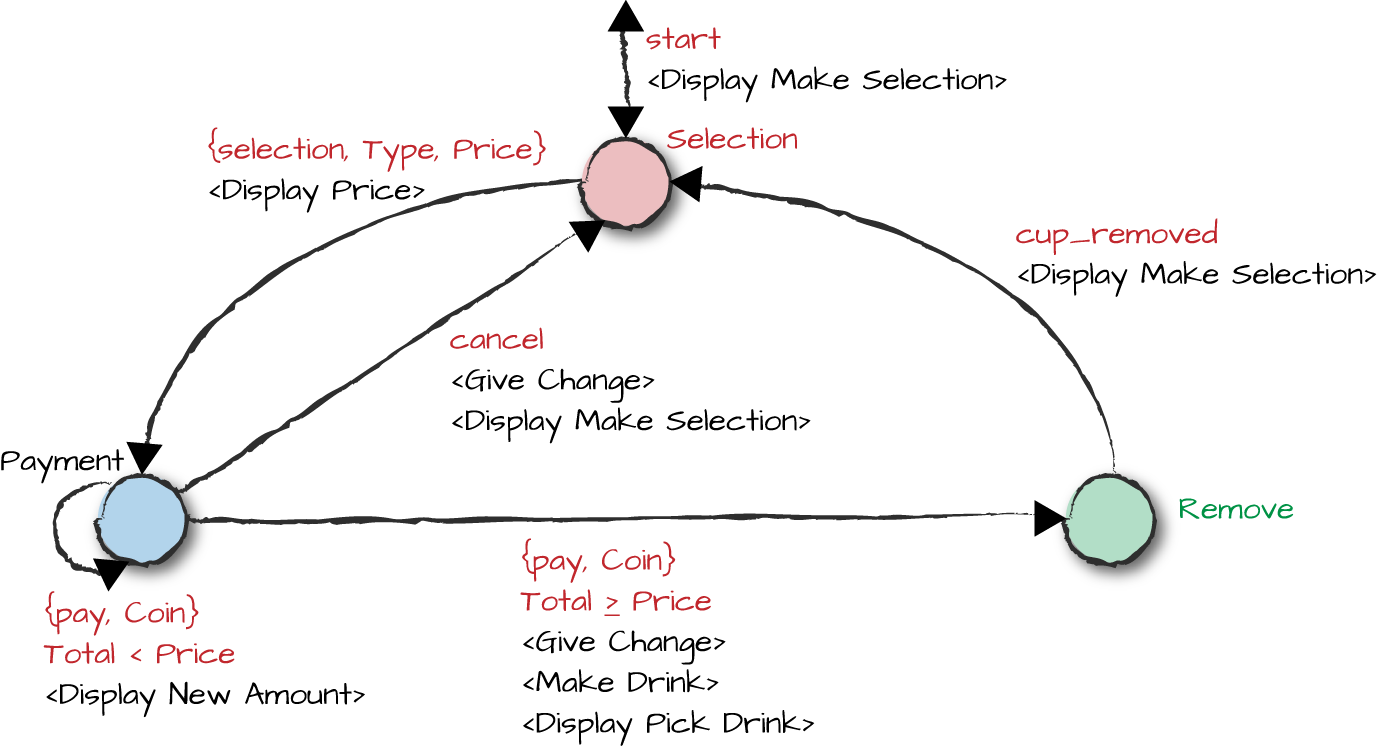
Figure 12-1. Coffee FSM
The recommended approach to upgrading your code is to separate the
loading of the new module from each process’s trigger of the upgrade. In
our generic upgrade code, we load the module using
module:load_file/2. We then inform the processes that have
to trigger an upgrade through a fully qualified call by sending them the
{upgrade, Data} message.
Data is an opaque data type containing
upgrade-specific information used by the new module. It is there to act
as a placeholder and to future-proof the code, allowing us to manipulate
the process state in conjunction with the transition to the new module.
As an example, pretend we are upgrading our frequency server and want to
add more frequencies. We could use Data to pass the new
frequencies to the server during the upgrade. A process that receives
the upgrade message and its data then issues a fully qualified function
call to code_change/2, where the first argument is the
process state and the second is Data. In this function, we
could append the new frequencies to the list of available ones, entering
the receive-evaluate loop in the new module with the newly updated loop
data.
Let’s have a look at what the generic upgrade code for the coffee FSM looks like. Notice that we have added a version number to the module:
-module(coffee).-export(...).-export([...,code_change/2]).-vsn(1.0)....%% State: drink selectionselection()->receive...{upgrade,Data}->?MODULE:code_change(funselection/0,Data);...end.%% State: paymentpayment(Type,Price,Paid)->receive...{upgrade,Extra}->?MODULE:code_change({payment,Type,Price,Paid},Extra);...end.%% State: remove cupremove()->receive...{upgrade,Data}->?MODULE:code_change(funremove/0,Data);...end.code_change({payment,Type,Price,Paid},_)->payment(Type,Price,Paid);code_change(State,_)->State().
Note how we need to handle the {upgrade, Extra}
message in all states. Upon receiving it, we do a fully qualified
function call to code_change/2, where the first argument is
the FSM state and loop data and the second is Extra, which
we transparently pass to the call. The code_change/2
function in the new module provides a place to change the old process
state to one compatible with the new code base, possibly using
Extra. Changes in the process state could include
adaptations to the loop data format and contents, database schema
changes, synchronization with other processes, changing process flags,
or even going as far as manipulating messages in the mailbox.
Once done, code_change/2 yields control by calling
the tail-recursive function returning the process to its new
receive-evaluate loop. In our example, these functions are the FSM state
functions selection/0, payment/3, and
remove/0. This is the first version of the module, so we do
not expect the code_change/2 clauses we’ve added to do
anything; they simply return to the state from which the call
originated. Adding these clauses avoids the undefined
function runtime error that we explained will result if you
attempt an upgrade and a process is running an old version of the
coffee module.
This is our baseline code. If you are using the code in the book’s repository, you will find it in the erlang directory for this chapter. Let’s compile it, start the Erlang VM, and get our coffee FSM up and running, making sure it works before creating a new version of the module and doing a software upgrade:
$cd erlang$cp coffee.erl.1.0 coffee.erl$erl -makeRecompile: coffee Recompile: hw $erl -pa patchesErlang/OTP 18 [erts-7.2] [smp:8:8] [async-threads:10] [kernel-poll:false] Eshell V7.2 (abort with ^G) 1>coffee:start_link().Machine:Rebooted Hardware Display:Make Your Selection {ok,<0.36.0>} 2>coffee:module_info(attributes).[{vsn,[1.0]}] 3>coffee ! {upgrade, {}}.{upgrade,{}} 4>coffee:module_info(attributes).[{vsn,[1.0]}]
Note how in shell command 3 we trigger an upgrade without having
loaded a new version of the FSM. This results in an execution of the
code_change/2 call in the current version of the module.
Adding a State
Let’s add a state for servicing the coffee FSM. It gets triggered when the coffee FSM is in the selection state and the cabinet door is opened. In any other state, the open door event is ignored. As we can see in Figure 12-2, closing the cabinet door triggers a reboot of the hardware and a transition back to the selection state. The closing door event is ignored in all other states.
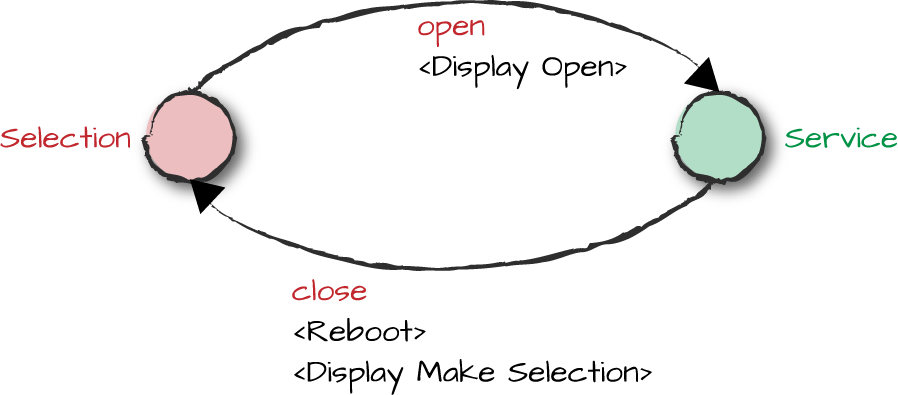
Figure 12-2. Service state
We’ve opted to keep the example simple, but could have easily
inserted locks in the hardware by upgrading hw.erl to add the functions
hw:lock() and hw:unlock(). These would
represent safeguards that would ensure that the coffee
machine door could be opened only in the selection
state and would keep it locked when the machine is in other
states.
Let’s look at the new module, where we’ve highlighted the changes
from version 1.0. The major differences are the addition of the
service state, the open and close events, and actions executed in the
code_change/2 function clauses.
First, we see the client functions open/0 and
close/0, which respectively generate an event when the
coffee machine door is opened and closed. In state selection, upon
receiving the open event, we show
Open in the display and transition to
the service state.
The service state ignores all events except
for users inserting coins and the closing of the coffee machine door.
Upon closing the door, the hardware is rebooted and the display
instructs the customer to make a selection. The open and close events are ignored in all other states:
-module(coffee).-export([tea/0,espresso/0,americano/0,cappuccino/0,pay/1,cup_removed/0,cancel/0,open/0,close/0]).-export([start_link/0,init/0,code_change/2]).-vsn(1.1).start_link()->...open()->?MODULE!open.close()->?MODULE!close....selection()->receive{selection,Type,Price}->hw:display("Please pay:~w",[Price]),payment(Type,Price,0);{pay,Coin}->hw:return_change(Coin),selection();{upgrade,Extra}->?MODULE:code_change(funselection/0,Extra);open->hw:display("Open",[]),service();_Other->% cancelselection()end....service()->receiveclose->hw:reboot(),hw:display("Make Your Selection",[]),service();{pay,Coin}->hw:return_change(Coin),service();_Other->service()end....code_change({payment,_Type,_Price,Paid},_Extra)->hw:return_change(Paid),hw:display("Make Your Selection",[]),selection();code_change(State,_)->State().
In our code_change function, if a user has selected a drink and is
in the process of paying for it, we return whatever amount has been paid and transition to
the selection state. For all other states, we
transition back to the state we were in prior to the upgrade. In our
example, we don’t need Extra, but as we are preparing the
code for potential upgrades without knowing what these upgrades will be,
the argument is worth including to future-proof our code and allow us
to pass the variable and use it to change the process state in a later
upgrade.
We place version 1.1 of the source code in the patches directory
and compile it. Note how we started the Erlang runtime system with the
-pa patches directive. When we first start the coffee FSM,
this directory is empty. As we find and fix bugs, we place the new beam
files here. Because this directory appears first in the code search
path, beam files we put here will override beam files of the same module
appearing later in the code search path. In another shell, type:
$cd erlang/patches/$erl -makeRecompile: coffee
Using the same Erlang node where we started version 1.0 of the
coffee FSM, we load the new version of the module by calling
code:load_file/1. The code server looks for the first
version of the coffee beam file in its code search path, and because the
patches directory is at the top of list, the version we just compiled is
chosen. The success of the operation is confirmed in shell command 6,
showing us that the version attribute is now set to 1.1:
5>l(coffee).{module,coffee} 6>coffee:module_info(attributes).[{vsn,[1.1]}]
At this point,
we have two versions of the coffee module loaded in the runtime system:
the current one we just loaded and the old one used by the FSM process.
When we order an espresso in shell command 7 and start paying for it in
the subsequent command, the shell does a fully qualified call using the
current version of the code—namely,
the one we just loaded. The FSM process, however, is still using the
old version of the coffee
module.
If we were to load another version of the coffee module at this point, even 1.0, the coffee FSM process would be terminated because it is running the now deleted old version of the code. The current version would become the old version, while the newly loaded module would become the current one. We are not doing it in our example, but try it out yourself if you’ve compiled the code and are following along.
In shell command 9, we trigger an upgrade. This causes the coffee
machine FSM, currently in state payment,
to call code_change/2 in the new module. It returns the
change and, thanks to the new state service, now allows us to open and
close the machine door so we can service it:
7>coffee:espresso().Display:Please pay:150 {selection,espresso,150} 8>coffee:pay(100).Display:Please pay:50 {pay,100} 9>coffee ! {upgrade, {}}.Machine:Returned 100 in change Display:Make Your Selection {upgrade,{}} 10>coffee:open().Display:Open open 11>coffee:espresso().{selection,espresso,150} 12>coffee:close().Machine:Rebooted Hardware Display:Make Your Selection close
This is how basic Erlang can handle upgrades. The generic code
is the handling of the {upgrade, Extra} message and the
calling of code_change/2, which does a fully qualified call
back to the receive-evaluate loop. This will be the same across all
processes. What will differ among processes is what we do in
code_change/2 depending on the loop data, the process
state, and the contents of Extra itself. Using these
foundations, let’s read on and see how we do it with OTP.
Creating a Release Upgrade
To upgrade releases using the tools and design principles provided by OTP, we have to start with a baseline consisting of a properly packaged and deployed OTP release following the principles covered in Chapter 11. We also need:
One or more new versions of existing applications
Zero or more new applications
An application upgrade file for each application that has been changed
Release resource and release upgrade files
The modules containing the bug fixes and new features are packaged into new or existing applications, where their version numbers are bumped up. Application upgrade files contain commands that tell us how to upgrade or downgrade from one application version to another. The release resource file, covered in “Release Resource Files”, is the file containing the emulator and application versions that make up the new release. Together with the application upgrade files and the release file of the baseline system we are upgrading from, the new release file is used to generate the release upgrade file. This file contains all the commands that have to be executed during the upgrade itself. After having installed the new code on the target machine, we run the instructions in the release upgrade file. If anything fails, the system is restarted using the old release. Through tests and observations, you have to determine if the system is stable. If so, it is made permanent. Restarting the system prior to it being made permanent will result in the old release being restarted. Let’s do an upgrade and see how the different steps and components all work together.
In this chapter’s section of the book’s code repository, you will find the files used to create our first deployment. We’ve taken the coffee_fsm.erl example and created an OTP application out of it, supervisor and application behavior files included. We also created the coffee.app file and placed it in the ebin directory. Download it, compile it, and make sure you can get it up and running:
$cd coffee-1.0/src ; erl -make ; mv *.beam ../ebin ; cd ../..Recompile: coffee_app Recompile: coffee_fsm coffee_fsm.erl:2: Warning: undefined callback function code_change/4 (behaviour 'gen_fsm') coffee_fsm.erl:2: Warning: undefined callback function handle_event/3 (behaviour 'gen_fsm') coffee_fsm.erl:2: Warning: undefined callback function handle_info/3 (behaviour 'gen_fsm') coffee_fsm.erl:2: Warning: undefined callback function handle_sync_event/4 (behaviour 'gen_fsm') Recompile: coffee_sup Recompile: hw $erl -pa coffee-1.0/ebinErlang/OTP 18 [erts-7.2] [smp:8:8] [async-threads:10] [kernel-poll:false] Eshell V7.2 (abort with ^G) 1>application:start(sasl), application:start(coffee)....<snip>... =PROGRESS REPORT==== 10-Jan-2016::21:27:28 === application: coffee started_at: nonode@nohost ok 2>coffee_fsm:module_info(attributes).[{behaviour,[gen_fsm]},{vsn,['1.0']}]
Even if the coffee application directory is not in the lib directory (yet), we’ve given it a version number for the sake of clarity. Note how, when compiling the code, we get the following warning:
Warning: undefined callback function
           code_change/4 (behaviour 'gen_fsm')
Up to now, we asked you to patiently bear with us and ignore this
warning message, but no more. You should by now understand what it is for
and have figured out how we are going to use it when we upgrade the
coffee_fsm module. Note also how, when retrieving the module
attributes in shell command 2, we get both the behavior type and the
current module version number.
With our application running, let’s create the boot file, a release file, and the target directory structure. We use the empty sys.config and coffee-1.0.rel files in the book’s code repository. If you are typing along as you are reading this, getting your own version up and running, don’t forget to update the standard OTP application and erts versions in the rel file to the Erlang release you are currently using. If you are not typing along, or do not have access to the code, we’ve included the contents of the sys.config and coffee-1.0.rel files for your convenience. If you are running the tests, based on the version of Erlang you are using, you might have to modify the standard OTP application version numbers:
$cat sys.config[]. $cat coffee-1.0.rel{release, {"coffee","1.0"}, {erts, "7.2"}, [{kernel, "4.1.1"}, {stdlib, "2.7"}, {sasl, "2.6.1"}, {coffee, "1.0"}]}. $mkdir ernie$erlErlang/OTP 18 [erts-7.2] [smp:8:8] [async-threads:10] [kernel-poll:false] Eshell V7.2 (abort with ^G) 1>systools:make_script("coffee-1.0", [{path, ["coffee-1.0/ebin"]}]).ok 2>systools:make_tar("coffee-1.0",[{erts, "/usr/local/lib/erlang/"}, {path, ["coffee-1.0/ebin"]}, {outdir, "ernie"}]).ok 3>halt().$cd ernie; tar xf coffee-1.0.tar.gz; rm coffee-1.0.tar.gz$mkdir bin; mkdir log$cp erts-7.2/bin/run_erl bin/.; cp erts-7.2/bin/to_erl bin/.$cp erts-7.2/bin/start.src bin/start$cp erts-7.2/bin/start_erl.src bin/start_erl$perl -i -pe "s#%FINAL_ROOTDIR%#$PWD#" bin/start$diff erts-7.2/bin/start.src bin/start27c27,28 < ROOTDIR=%FINAL_ROOTDIR% --- > ROOTDIR=/Users/francescoc/ernie $echo '7.2 1.0' > releases/start_erl.data
Hello Joe, coffee machine working? Seems to be. We now need to create the releases/RELEASES file, required for upgrading and downgrading releases. We got away without it in the previous chapter, as it is only really required when downgrading to this release after a failed upgrade. When we do an upgrade and this file is not present, a new one is created, but it contains only information for the upgraded release. This is fine if the upgrade is successful, because when we upgrade a second time, we should be able to downgrade to the first upgraded version. The downside is that if the first upgrade fails, we are unable to downgrade to the original version once we’ve made the upgrade permanent, and we’ll have to reinstall the node instead. Create the file as follows:
$bin/start$bin/to_erl /tmp/Attaching to /tmp/erlang.pipe.1 (^D to exit) 1>application:which_applications().[{coffee,[],"1.0"}, {sasl,"SASL CXC 138 11","2.6.1"}, {stdlib,"ERTS CXC 138 10","2.7"}, {kernel,"ERTS CXC 138 10","4.1.1"}] 2>RootDir = code:root_dir()."/Users/francescoc/ernie" 3>Releases = RootDir ++ "/releases"."/Users/francescoc/ernie/releases" 4>RelFile = Releases ++ "/coffee-1.0.rel"."/Users/francescoc/ernie/releases/coffee-1.0.rel" 5>release_handler:create_RELEASES(RootDir, Releases, RelFile, []).ok
The RELEASES file contains a list with an entry for every release that has been installed. Every entry has information similar to that found in the rel file, including release and erts versions. Together with the application names and versions, however, an absolute path to the application directory is also included. While the first version of the RELEASES file will contain a single entry on the first release, subsequent upgrades will result in multiple entries:
%% File:releases/RELEASES[{release,"coffee","1.0","7.2",[{kernel,"4.1.1","/Users/francescoc/ernie/lib/kernel-4.1.1"},{stdlib,"2.7","/Users/francescoc/ernie/lib/stdlib-2.7"},{sasl,"2.6.1","/Users/francescoc/ernie/lib/sasl-2.6.1"},{coffee,"1.0","/Users/francescoc/ernie/lib/coffee-1.0"}],permanent}].
The Code to Upgrade
Now that we have our first OTP-compliant release up and running, let’s
create the new version of the coffee_fsm module, adding the
new service state and its client
functions. We start by bumping up the version attribute to
1.1. It might not mean much now, but if you have kept the
discipline of bumping up the version (or doing it automatically through
a script when tagging your code or building your release), payback time
will come many upgrades later, in the early hours of the morning, when
you are figuring out why the version of the code you think is running in
production is actually not the one that should be running.1
We export the state functions service/2 and
service/3 (you might recall that the gen_fsm
callback State/2 handles asynchronous events and
State/3 handles synchronous ones). We also export two
client functions, open/0 and close/0, which
asynchronously send the coffee machine door open and close events to the FSM. And finally, we export
code_change/4, a behavior callback used to update the state
of the behavior. All these should be familiar from reading “Adding a State”:
-module(coffee_fsm).-behavior(gen_fsm).-vsn('1.1').-export([start_link/0,init/1]).-export([selection/2,payment/2,remove/2,service/2]).-export([americano/0,cappuccino/0,tea/0,espresso/0,pay/1,cancel/0,cup_removed/0,open/0,close/0]).-export([stop/0,selection/3,payment/3,remove/3,service/3]).-export([terminate/3,code_change/4]).start_link()->gen_fsm:start_link({local,?MODULE},?MODULE,[],[])....cup_removed()->gen_fsm:send_event(?MODULE,cup_removed).open()->gen_fsm:send_event(?MODULE,open).close()->gen_fsm:send_event(?MODULE,close)....
In state selection, we handle the open event. This is the only state/event
combination in which the transition to our new service state is allowed. In the
service state, upon receiving the close event, we transition back to the
selection state. In all other states,
open and close events are
ignored. The service/3 state callback function also handles
the synchronous stop event, which
stops the FSM and triggers a call to terminate/3:
%% State: drink selectionselection({selection,Type,Price},LoopData)->hw:display("Please pay:~w",[Price]),{next_state,payment,{Type,Price,0}};selection({pay,Coin},LoopData)->hw:return_change(Coin),{next_state,selection,LoopData};selection(open,LoopData)->hw:display("Open",[]),{next_state,service,LoopData};selection(_Other,LoopData)->{next_state,selection,LoopData}.%% State: serviceservice(close,LoopData)->hw:reboot(),hw:display("Make Your Selection",[]),{next_state,selection,LoopData};service({pay,Coin},LoopData)->hw:return_change(Coin),{next_state,service,LoopData};service(_Other,LoopData)->{next_state,service,LoopData)....service(stop,_From,LoopData)->{stop,normal,ok,LoopData}....
We now need to implement our new code_change/4
callback function. This callback takes three arguments when called
within an event handler or a generic server, and four when called from
within an FSM:
Mod:code_change(Vsn,State,LoopData,Extra)->{ok,NewState,NewLoopData}|%Finite State Machines{error,Reason}Mod:code_change(Vsn,LoopData,Extra)->{ok,NewLoopData}|%Generic Servers{error,Reason}Mod:code_change(Vsn,LoopData,Extra)->{ok,NewLoopData}|%Event Handler{error,Reason}
The first argument, Vsn, is the version of the old
module you are upgrading from, or the version you’re going to when
downgrading back to the old module. In this example it is
1.0, and it could also be {down, 1.0} when
downgrading to a previous version. When a module does not have a version
directive, use the md5 module checksum, and when versions do not matter
at all, use wildcards.
State is passed only to FSMs, and contains the state
the FSM was in when the upgrade was triggered.
The final two arguments include the loop data and any extra
arguments passed in the upgrade instructions specific for this module.
In our example, we don’t do anything with the _Extra
arguments, nor do we manipulate the loop data.
The code_change/4 callback, when successful, has to
return {ok, NewState, NewLoopData}. Returning {error,
Reason} will cause the upgrade to fail and the node to restart
the previous version when dealing with generic servers or FSMs. In the
case of event handlers, returning anything other than {ok,
NewLoopData} or terminating abnormally will cause the handler to
be removed from the event manager, but the node will not revert to its
previous version and be restarted.
This is what our coffee FSM’s code_change/4 OTP
callback function looks like:
code_change('1.0',State,LoopData,_Extra)->{ok,State,LoopData};code_change({down,'1.0'},service,LoopData,_Extra)->hw:reboot(),hw:display("Make Your Selection",[]),{ok,selection,LoopData};code_change({down,'1.0'},payment,{_Type,_Price,Paid},_Extra)->hw:return_change(Paid),hw:display("Make Your Selection",[]),{ok,selection,{}};code_change({down,'1.0'},State,LoopData,_Extra)->{ok,State,LoopData}.
We’ve changed the behavior slightly from the Erlang example. Regardless of the state we are in, payment included, we do not change the loop data and remain in the state we were originally in. This is normal in cases where we simply add functionality or a state. If we were to change the state or loop data as part of the upgrade, it would occur here.
If an upgrade failure triggers a downgrade and we are in the
service state, we reboot the hardware
and return to the selection state,
because the service state does not
exist in version 1.0. If the user is in the process of paying for a
coffee, we return whatever amount the user has paid and move back to the
selection state. Downgrades, as we
will see, will cause the system to reboot and start the old version from
scratch. So if your old version is dependent on some persistent values
that were set at startup and later changed, make sure your
code_change reverts to the correct values.
When we are done implementing the new modules, we package them in
an application, bumping up the version. In our case, our new coffee
application version is “1.1,” whereas the versions of the hw, coffee_app, and coffee_sup modules are the same as in the
application version. The version of the coffee_fsm module is now also 1.1.
Application Upgrade Files
Now that we have the new version of our coffee machine FSM up and running, we
need an application upgrade file containing a set of actions to be
executed when upgrading or downgrading to other versions of the same
application. Application upgrade files are similar in concept to app files, because
they are used by systools to create
the upgrade script. They have the name of the application with the
.appup suffix and are placed in the
ebin directory, alongside the
app file.
Go into the Erlang root directory of your installation and type
ls lib/*/ebin/*.appup. The call
will return all application upgrade files installed as part of your
Erlang release. Starting with Erlang/OTP version 17, .appup files are included in every application.
Prior to that, you could upgrade only some core applications, as not all
applications provided an .appup file.
Let’s have a look at the sasl.appup
file for its version 2.6.1:
{"2.6.1",%% Up from - max one major revision back[{<<"2\.[5-6](\.[0-9]+)*">>,[restart_new_emulator]},% OTP-18.*{<<"2\.4(\.[0-9]+)*">>,[restart_new_emulator]}],% OTP-17%% Down to - max one major revision back[{<<"2\.[5-6](\.[0-9]+)*">>,[restart_new_emulator]},% OTP-18.*{<<"2\.4(\.[0-9]+)*">>,[restart_new_emulator]}]% OTP-17}.
Based on its contents, we should be able to figure out what happens when application version 2.6.1 is upgrading or downgrading between OTP versions 17 and 18. When upgrading from application version 2.4.X, 2.5.X, or 2.6, or downgrading to 2.6, 2.5.X, or 2.4.X (where X is the patch release number), we need to restart the emulator. Notice how regular expressions, placed in binaries, create a range of subreleases and point to a list of upgrade and downgrade instructions. Instead of regular expressions, you can also use strings defining specific versions, e.g., “2.4.5.”
Inspect any other .appup files in the release you have installed and you will notice they all follow this format:
{Vsn,
  [{UpFromV1, InstructionsU1}, ...,
{UpFromVK, InstructionsUK}],
  [{DownToV1, InstructionsD1}, ...,
 {DownToVK, InstructionsDK}]}.
Vsn
is the application version to which you are upgrading.
UpFromV<N> are the application versions from which
you will be upgrading. In case something goes wrong,
DownToV<N> are the application versions to which
you will be able to downgrade Vsn. Vsn can be
either a string with the exact version numbers, or a binary containing a
regular expression allowing you to describe multiple application
versions on which to execute upgrade and downgrade instructions. If you
have installed OTP version 17 or later, look at the various .appup files and you will notice that OTP
standard applications usually allow you to upgrade or downgrade by
two revisions.
If you plan on using regular expressions, the following constructs will be more than enough to denote ranges of versions:
A period (
.) matches any character, so the expression1.3will match any combination of characters starting with 1 and ending with 3.An asterisk (
*) matches the preceding element zero or more times.A plus sign (
+) matches the preceding element one or more times.A question mark (?) matches the preceding element zero or one times.
The range
[0-9]matches the elements between 0 and 9.The sequence
\. returns a period. You need to escape the backslash because Erlang itself uses the backslash to escape characters.A caret (
^) at the beginning of the regular expression anchors the match to the beginning of the version string.A dollar sign (
$) at the end of the regular expression anchors the match to the end of the version string.
As an example,
<<"^1\.[0-9]+$">> matches all versions of 1.X,
<<"^1\.0\.[0-9]+$">> matches all versions of
1.0.X, and
<<"^1\.([0-9]+\.)?\.[0-9]+$">> will match
versions 1.X or 1.X.X, where X is an integer.
If you are not sure of your regular expressions, test them using
re:run(Vsn, RegExp), which returns
nomatch if the match fails and
{match, MatchData} otherwise. You can read more about the
format of regular expressions in the manual pages for the re module.
Browsing the .appup files, you
should have come across lists of actions associated with different
versions. They include elements such as restart_new_emulator (used only when upgrading
the erts, kernel, stdlib, and
sasl applications), load_module, apply, restart_application, and update. In some cases, when no actions have to
be taken, you will find a tuple {Vsn, [], []} with two
empty lists. Actions are divided into high-level instructions and
low-level ones. High-level instructions are translated to low-level ones
when creating the release upgrade script.
Let’s go back to our example, where we are going to upgrade the
coffee FSM application from version 1.0 to 1.1.
It will not be a complicated upgrade because no drivers or NIFs are
involved, no new applications or modules are added to the release, and
there are no interprocess and intermodule dependencies to worry about,
let alone internal state or loop data changes. Behind the scenes, all we
need to do is suspend all behavior processes with a dependency on the
module coffee_fsm, load the new
version of the module, purge the old one, call code_change, and resume the processes (Figure 12-3).
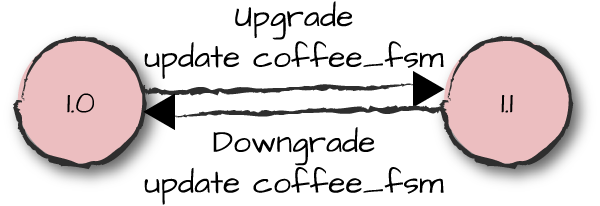
Figure 12-3. Coffee FSM version transitions
Our coffee.appup file contains a tuple containing the
version we are upgrading to along with the high-level upgrade and
downgrade instructions. In our case, update loads the new
module and {advanced, {}} triggers the
code_change/4 call, passing {} as the last
argument:
%% File:coffee.appup{"1.1",% Current version[{"1.0",[{update,coffee_fsm,{advanced,{}}}]}],% Upgrade from[{"1.0",[{update,coffee_fsm,{advanced,{}}}]}]% Downgrade to}.
During both an upgrade and a downgrade, the update
high-level instruction will translate to the following set of low-level
instructions:
Search for the object code for the module, load it from file, and cache it. This ensures that time-consuming file operations are done prior to suspending the processes.
Suspend any process that specified the module as a dependency in its child specification, using
sys:suspend/1.Purge any old version of the module being upgraded.
Load the new version of the module, making the current version the old one.
Purge any old version of the module, which prior to step 4 was the current version.
Call
Mod:code_change/4.Resume the suspended processes with
sys:resume/1, allowing them to continue handling new requests.
So far, so good, but how do we associate a module dependency with a behavior process? Remember that in the supervisor child specification, you had to list the modules that implement the behavior:
{coffee_fsm,{coffee_fsm,start_link,[]},permanent,5000,worker,[coffee_fsm]}
We have to list them because this is where, during an upgrade or
downgrade, systools tells the
supervisors to suspend a particular process when upgrading one or more
of its core modules. In behaviors such as event handlers and other
special processes where the modules are not known at compile time, we
would replace the module list with the term dynamic and query the process prior to an
upgrade.
OTP needs to distinguish between dynamic and static module sets for scalability reasons. There is no point in asking millions of behaviors what modules they are running every time we do a software upgrade, only to discover they do not include the one being upgraded. Processes with dynamic modules are few and far apart, and rarely have an impact on performance when doing an upgrade. If you have dynamic children where you know millions of instances will coexist concurrently and the modules are not known at compile time, pick an upgrade strategy that scales or do not upgrade at all.
High-Level Instructions
Actions in our .appup file are grouped into high-level and low-level instructions, with high-level instructions being mapped to low-level ones when the upgrade scripts are generated. For the sake of simplicity (and your sanity), you are encouraged to use high-level instructions and avoid low-level ones where possible, even though they can be mixed together. Let’s look at the high-level instructions in more detail:
{update, Mod}This instruction, and all of its variants, is used for synchronized code replacements where all processes dependent on
Modhave to be suspended before loading the new version of the module. When it is loaded and its old version is purged, the suspended processes are resumed. This is the simplest variant of a module update command, as thecode_change/3,4behavior callbacks are not invoked. You will want to synchronize and suspend all processes with a dependency onModwhen you want all processes to consistently display the same properties toward other processes that interface with them. If you don’t suspend them all prior to loading the new module, some processes might display the old behavior while others display the new one.{update, Mod, supervisor}You will want to use this high-level instruction if
Modis a supervisor callback module and you are changing the supervisor specification returned by theinit/1callback function. Any change in the supervision tree needs to be handled using thesupervisor:start_child/2function if you are adding children. Usesupervisor:terminate_child/2andsupervisor:delete_child/2if you are removing children. We covered these functions in “Dynamic Children”. The update becomes even more complicated if you are changing the order in which you start the children because ofrest_for_onedependencies. You will have to terminate children and restart them in the order specified in yourinit/1callback function.{update, Mod, {advanced,Extra}},{update, Mod, DepMods},{update, Mod, {advanced,Extra}, DepMods}If we include the
{advanced,Extra}tuple, the upgrade script invokes theMod:code_change/3,4callback function, passingExtraas the last argument. You will need this option when the upgrade requires a change of your behavior state and loop data. For this and all otherupdateinstructions, you can omit{advanced,Extra}or replace it withsoft, both of which result incode_changenot being called.DepModsis a module list on whichModdepends. Behaviors using these modules will also be suspended.{update, Mod, {advanced,Extra}, PrePurge, PostPurge, DepMods}PrePurgeandPostPurgeare by default set tobrutal_purge. Use this option when you want processes running the old version ofModto be unconditionally terminated before the updated module is loaded and after the module upgrade when the release is made permanent. You can override this behavior by settingPrePurgetosoft_purge. If some processes are still running a version of the old code,release_handler:install_release/1, which triggers the execution of the relup file, returns{error,{old_processes,Mod}}. IfPostPurgeis set tosoft_purge, the release handler will purgeModonly after the processes executing the old version have terminated their calls.{update, Mod, Timeout, {advanced,Extra}, PrePurge, PostPurge, DepMods}Remember that behaviors are implemented as callback functions, so for a purge to fail, they must be executing in a callback for an unusually long amount of time or have an unusually long message queue. The default timeout value when trying to suspend a process is 5 seconds, but this can be overridden by setting the
Timeoutfield to an integer in milliseconds or the atominfinity. If a behavior does not respond to thesys:suspend/1call and the timeout is triggered, the process is ignored. It might later be terminated if the module it is executing is purged, or as the result of a runtime error when it starts running the new version of the module without properly going through the upgrade procedure. Use theTimeoutoption when, after testing your upgrades under heavy load, you see there is a need to increase the value.{update, Mod, ModType, Timeout, {advanced,Extra}, PrePurge, PostPurge, DepMods}By default, one of the
code_change/3,4callback functions is executed after loading the new module. In the case of a downgrade,code_change/3,4is called before loading the module. You can override this by settingModTypetostatic, which loads the module and callscode_change/3,4before an upgrade or downgrade. If not specified, or if you want the default behavior, setModTypetodynamic.{load_module, Mod},{load_module, Mod, DepMods},{load_module, Mod, PrePurge, PostPurge, DepMods}You want to use this low-level instruction for upgrades where you do not need to suspend the process. We refer to these upgrades as simple code replacements. The same applies to the instructions used for adding and deleting modules.
DepModslists all the modules that should be loaded beforeMod. This argument is an empty list by default.PrePurgeandPostPurgecan be set to eithersoft_purgeorbrutal_purge(the default). They work the same way as they do with theupdatecommand. Use this instruction when dealing with library modules or extending functionality that does not affect running processes.{add_module, Mod},{delete_module, Mod}These commands translate to low-level instructions that add and delete modules between releases.
{add_application, Application},{add_application, Application, Type}This instruction will add a new application to a release, including loading all of the modules defined in the app file and, where applicable, starting the supervision tree. The application types, covered in Chapter 9, defaults to
permanent, butTypecan also be set totransient,temporary,load, ornone.{remove_application, Application},{restart_application, Application}You will want to use these commands when removing or restarting an application. Removing an application shuts down the supervision tree, deletes the modules from memory, and stops the application. If the upgrade or downgrade requires an application restart, this high-level command will translate to commands that stop and start the application and its supervision tree. You usually find application restarts in .appup files belonging to noncore OTP applications such as tools and libraries that can be restarted without affecting traffic in the live system.
You can mix high- and low-level instructions in the same .appup file, but for the vast majority of use cases, high-level instructions will be enough as most of your actions can be completed with them. We cover low-level instructions in the next section, as soon as we’ve done our first upgrade.
Release Upgrade Files
Now that we have our coffee.appup file and understand what the
high-level instructions do, let’s use this knowledge to generate an
upgrade package. The first step is to create a new boot file using systools:make_script/2. It is not used
for the upgrade itself, but is part of the package we deploy in case the
upgraded node has to be rebooted (for whatever reason) after the
upgrade. In the second shell command, we create a release upgrade file
called relup, which is placed in
the current working directory. This file is generated using the emulator
and application versions specified in the rel and .appup files, using them to retrieve and map high-
and low-level instructions in the .appup files to a sequence of low-level ones.
Compile all the code in your coffee-1.1 application directory, and run
the following commands:
1>systools:make_script("coffee-1.1", [{path, ["coffee-1.1/ebin"]}]).ok 2>systools:make_relup("coffee-1.1", ["coffee-1.0"],["coffee-1.0"], [{path, ["coffee*/ebin"]}]).ok 3>systools:make_tar("coffee-1.1", [{path, ["coffee-1.1/ebin"]}, {outdir, "ernie/releases"}]).ok
In our third shell command, we create the tar file coffee-1.1.tar.gz. It contains the lib and
releases directories specified in coffee-1.1.rel. Calling
make_tar/2 picks up the relup, start.boot, and sys.config files automatically and creates a
version 1.1 directory under releases. Note that, unlike in our first
installation, we did not include the erts option. We are going to use
the one already installed.
Let’s look at the relup file more closely now that the low-level instructions have been generated. We explain them all in “Low-Level Instructions”, but even without having covered them, you should get a good idea of what is going on:
{"1.1",[{"1.0",[],[{load_object_code,{coffee,"1.1",[coffee_fsm]}},point_of_no_return,{suspend,[coffee_fsm]},{load,{coffee_fsm,brutal_purge,brutal_purge}},{code_change,up,[{coffee_fsm,{}}]},{resume,[coffee_fsm]}]}],[{"1.0",[],[{load_object_code,{coffee,"1.0",[coffee_fsm]}},point_of_no_return,{suspend,[coffee_fsm]},{code_change,down,[{coffee_fsm,{}}]},{load,{coffee_fsm,brutal_purge,brutal_purge}},{resume,[coffee_fsm]}]}]}.
Before covering the low-level commands in more detail, let’s look
at the systools:make_relup/3,4 call we used to generate the file itself:
systools:make_relup(RelName,UpFromList,DownToList,[Options])->ok|error|{ok,Relup,Module,Warnings}|{error,Module,Error}
The call takes RelName, the name of a release to
which we are upgrading or downgrading. This points to the RelName.rel file, used to determine the
version of the Erlang runtime system and the versions of the various
applications. RelName can also be a tuple {RelName,
Descr}, where Descr is a term that is included in
the upgrade and downgrade instructions, returned by the function
installing the release on the target machine.
The second and third arguments, UpFromList and
DownToList, include the list of releases we want to upgrade
from or downgrade to, respectively. They are all names that point to a
specific version of a rel file used to determine which applications need
to be added, removed, or upgraded. Using their respective .app and .appup files, the call also determines the
sequence of commands that need to be executed. The fourth, optional,
argument is a list of options that may include:
{path, DirList}Adds paths listed in
DirListto the code search path. You can include wildcards in your path, so the asterisk in"lib/*/ebin"will expand to contain all of the subdirectories in lib containing an ebin directory. The code search path of the node creating the relup file must have paths to the old and the new versions of the .rel and .app files, as well as a path to the new .appup and .beam files.{outdir, Dir}Puts the relup file in
Dirinstead of the current working directory.restart_emulatorGenerates low-level instructions that reboot the node after an upgrade or downgrade.
silentReturns a tuple of the format
{ok, Relup, Module, Warnings}or{error, Module, Error}instead of printing results to I/O. Use this option when callingsystoolsfunctions from scripts or integrating the call in your build process where you need to handle errors.noexecReturns the same values as the
silentoption, but without generating a relup file.warnings_as_errorsTreats warnings as errors and refuses to generate the relup script if warnings occur.
The format of the relup file itself is similar to the .appup file:
{Vsn,
[{UpFromV1, Descr, InstructionsU1}, ...,
{UpFromVK, Descr, InstructionsUK}],
[{DownToV1, Descr, InstructionsD1}, ...,
{DownToVK, Descr, InstructionsDK}]}.The Descr term contains a term passed in the
{RelName, Descr} tuple of the
systools:make_relup/3,4 call. If Descr was
omitted from the call, it defaults to an empty list. You will notice
this in our example, as we left it out for the coffee machine relup
example. Descr becomes relevant when automating the
installation of the upgrade on the target machine, as its values can be
used by the programs or scripts installing the upgrade.
Low-Level Instructions
Relup files consist of low-level instruction sets generated from the .appup files. For complex upgrades, you can write your files using low-level instructions or edit generated ones by hand. Low-level instructions consist of the following:
{load_object_code, {Application, Vsn, ModuleList}}Reads all the modules from the
Applicationebin directory, but does not load them into the runtime system. This instruction is executed prior to suspending the behaviors and special processes. This differs from the high-level instructionloadthat not only loads the module, but also makes it available to the runtime.point_of_no_returnThis instruction should appear once in the relup script and should be placed where the system cannot recover after failing to execute one or more of the instructions in the relup file. Crashes occurring after this instruction will result in the old version of the system being restarted. It is usually placed after the
load_object_codeinstruction.{load, {Module, PrePurge, PostPurge}}Makes a module that has been loaded using
load_object_codethe current version.PrePurgeandPostPurgecan be set tosoft_purgeorbrutal_purge(the default).{apply, {Mod, Func, ArgList}}Calls
apply(Mod, Func, ArgList). If theapplyis executed before the point of no return and fails or returns (or throws){error,Error}, the call torelease_handler:install_release/1returns{error,{'EXIT',Reason}}or{error,Error}, respectively. If it’s executed after the point of no return and fails, the system is restarted with the old version of the release. This instruction could be used instead of thecode_change/3,4callback function.{remove, {Module, PrePurge, PostPurge}}Used together with
loadandpurge. This instruction makes the current version ofModuleold.{purge, ModuleList}Purges the old versions of all modules in
ModuleList. Behaviors and special processes executing the old version of the code being purged are terminated.{suspend, [Module | {Module, Timeout}]}Suspends behaviors that depend on the
Modulelist.Timeoutis an integer in milliseconds or the atomsdefault(set to 5 seconds) orinfinity. If the call tosys:suspend/1does not return withinTimeout, the process is ignored but not terminated.{resume, ModuleList}Resumes suspended processes that depend on modules listed in
ModuleList.{code_change, [{Module, Extra}]},{code_change, Mode, [{Module, Extra}]}Triggers the
Module:code_change/3,4call, passingExtrain all behavior processes runningModule.Modeisupordown, defining the call as either an upgrade or a downgrade. If omitted,Modedefaults toup.{stop, ModuleList}This instruction results in the
supervisor:terminate_child/2call for all behaviors with a dependency on one of the modules specified inModuleList.{start, ModuleList}Starts all stopped processes with a dependency on a module in
ModuleListby callingsupervisor:restart_child/2.restart_new_emulatorThis instruction is used when upgrading the emulator or the kernel, stdlib, and sasl core applications. The emulator needs to be restarted right after upgrading these applications, but before executing the remainder of the relup file. All other applications will be restarted with their old versions running in the new emulator and upgraded when running the remainder of the relup file in the new emulator. When different processes end up running different application versions in this manner, non–backward-compatibility clashes between them can occur, so ensure all possible scenarios in your upgrade procedure have been properly tested before using this technique. If you are worried about the order of your low-level instructions, use high-level ones and let
systools:make_relup/3,4generate the relup file. This instruction should be executed only once during the upgrade.restart_emulatorThis instruction is used when an emulator restart is required as part of an upgrade that does not involve the core applications or an emulator upgrade. It may appear only once in the relup file and has to be the last instruction.
Installing an Upgrade
Let’s go back to the coffee-1.1.tar.gz file we generated and use
it for our live upgrade. We assume that it has been placed in the
releases directory of the target
environment. From the ernie root
directory, we connect to the coffee_fsm node that we left
running version 1.0. If it is not running, start it with bin/start. We unpack the new release using the release_handler:unpack_release/1 call,
uncompressing all the files, adding the coffee-1.1 application to the lib directory, and creating the version 1.1 directory
in the releases
directory. We can see in shell commands 2 and 3 that after unpacking the
new release it resides alongside 1.0, and that 1.0 is still
running:
$bin/to_erl /tmp/Attaching to /tmp/erlang.pipe.1 (^D to exit) 1>release_handler:unpack_release("coffee-1.1").{ok, "1.1"} 2>release_handler:which_releases().[{"coffee","1.1", ["kernel-4.1.1","stdlib-2.7","sasl-2.6.1","coffee-1.1"], unpacked}, {"coffee","1.0", ["kernel-4.1.1","stdlib-2.7","sasl-2.6.1","coffee-1.0"], permanent}] 3>application:which_applications().[{coffee,"Coffee Machine Controller","1.0"}, {sasl,"SASL CXC 138 11","2.6.1"}, {stdlib,"ERTS CXC 138 10","2.7"}, {kernel,"ERTS CXC 138 10","4.1.1"}] 4>coffee_fsm:espresso().Display:Please pay:150 ok 5>coffee_fsm:pay(100).Display:Please pay:50 ok 6>release_handler:install_release("1.1").{ok,"1.0",[]} 7>coffee_fsm:cancel().Display:Make Your Selection ok Machine:Returned 100 in change 8>coffee_fsm:open().ok Display:Open 9>coffee_fsm:close().Machine:Rebooted Hardware Display:Make Your Selection ok 10>application:which_applications().[{coffee,"Coffee Machine Controller","1.1"}, {sasl,"SASL CXC 138 11","2.6.1"}, {stdlib,"ERTS CXC 138 10","2.7"}, {kernel,"ERTS CXC 138 10","4.1.1"}] 11>init:restart().ok 12> Erlang/OTP 18 [erts-7.2] [smp:8:8] [async-threads:10] [kernel-poll:false] ...<snip>... Eshell V7.2 (abort with ^G) 1>application:which_applications().[{coffee,"Coffee Machine Controller","1.0"}, {sasl,"SASL CXC 138 11","2.6.1"}, {stdlib,"ERTS CXC 138 10","2.7"}, {kernel,"ERTS CXC 138 10","4.1.1"}]
Next, we upgrade the release by executing the
release_handler:install_release/1 call. If issues arise and
a restart is triggered, the system will reboot and revert to the old
version. If the system is stable, the current (new) version is made
permanent by calling
release_handler:make_permanent/1.
We then use the new client functions we’ve added to test the transition to and from state service before rebooting the node in shell command 11. Because we never made the release permanent, the node restarts version 1.0.
Next, in shell commands 2 and 3, we reinstall the release and make
it permanent. At this point, we do not need files specific to 1.0
anymore. Unused releases can be removed from the system using the
release_handler:remove_release/1 call. The call removes the applications that are only part of that
release from the lib directory,
removes the directory from releases, and updates the RELEASES file there. To revert back to the
old version we have to reinstall it, covering all the steps we’ve just
described, including creating an .appup
file for version 1.0 of the coffee application, a relup file, and a tar file:
2>release_handler:install_release("1.1").{ok,"1.0",[]} 3>release_handler:make_permanent("1.1").ok 4>release_handler:remove_release("1.0").ok 5>release_handler:which_releases().[{"coffee","1.1", ["kernel-4.1.1","stdlib-2.7","sasl-2.6.1","coffee-1.1"], permanent}] 6>halt().[End] $ls lib/coffee-1.1 kernel-4.1.1 sasl-2.6.1 stdlib-2.7
That’s it! A software upgrade during runtime, with the ability to fall back to old releases when issues occur or remove them when they are no longer needed.
Warning
The release handler is intended to work with embedded target systems. If you use it with simple target systems, you need to ensure the correct boot and config files are used in the case of a restart. How you do it is entirely up to you. You could replace existing files or have OS environment variables pointing to the correct ones.
The Release Handler
We introduced the SASL application in Chapter 9. It is one of the core OTP applications that has to be part of every release because it contains tools required to build, install, and upgrade the release itself. If you looked at SASL’s supervision tree (Figure 12-4), you might have noticed the release handler process. It is responsible for unpacking, installing, and upgrading releases locally on each node. It also removes them and makes them permanent. We used the release handler and went through these phases in our example.

Figure 12-4. The release handler process
The release handler assumes a release tar file, created using systools:make_tar/1,2 and placed in
the releases
directory. Each release version can be in one of the following states, as seen in Figure 12-5:
unpacked, current, permanent, and old. State transitions occur when functions in
the release_handler module are
called or a release that has not been made permanent fails, triggering a
system restart. At any one time, there is always a release that is
either current or permanent. Let’s look at the functions exported by the
release_handler module, including
those that trigger the transition more closely.
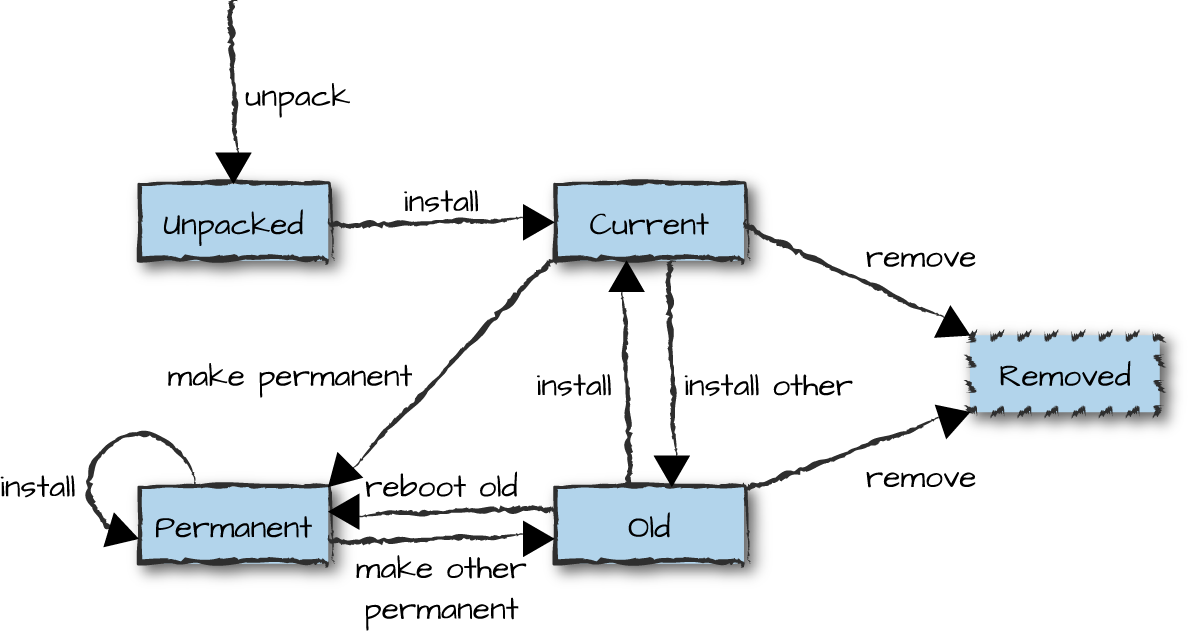
Figure 12-5. Managing a release
When dealing with your first target installation, the release
handler becomes relevant only if Erlang is already installed on the
target machine. As it wasn’t when we created the first coffee_fsm release, everything had to be done
manually. If you follow the steps, you will notice that the first call
we did once version 1.0 of the system was up and running was to create the RELEASES file:
release_handler:create_RELEASES(Root,RelDir,RelFile,AppDirs)->ok|{error,Reason}
This call creates the first version of the RELEASES file, stored in the releases directory. It contains the
persistent state of the release handler, which includes the release
applications, their versions, and their absolute paths. The Erlang VM executing
this function must have permission to write to the releases directory. Root is the
Erlang root directory, while RelDir is the path pointing to
the releases directory. The
releases directory is often located
in the Erlang root directory, but you can override this by setting the
OS or OTP environment variables described in “Release Directory Structure”. RelFile points to
the release file located in the releases directory, while AppDirs
is a list of {App, Vsn, Dir} tuples used to override the
applications stored in lib. It is most commonly used when distributing
Erlang in OS-specific packages and not OTP ones. This function unpacks the Name.tar.gz file located in the releases directory:
release_handler:unpack_release(Name)->{ok,Vsn}|{error,Reason}
It checks that all
mandatory files and directories are present, adding the applications in
the lib and release directories under releases. It fails if
the string Name is an existing release, or if there are
issues unpacking or reading the mandatory files and directories. When we have unpacked the release,
install_release/1,2 triggers the software upgrade (or
downgrade), executing the instructions specified in the relup file:
release_handler:install_release(Vsn)release_handler:install_release(Vsn,OptList)->{ok,OtherVsn,Descr}|{error,Reason}|{continue_after_restart,OtherVsn,Descr}
OptList is a list of
options that allow us to override some of the default settings. They
include:
{error_action, restart | reboot}to specify if the runtime system is rebooted (init:reboot()) or restarted (init:restart()) as the result of an upgrade failure.{suspend_timeout, Timeout}to override the default (5-second) timeout for thesys:suspend/1call, used to suspend a process prior to upgrading the code.{code_change_timeout, Timeout}to override the default (5-second) timeout for thesys:change_code/4call, used to tell a suspended process to upgrade the code.{update_paths, Bool}, used when overriding the defaultlib/App-Vsndirectory provided in theAppDirsargument in thecreate_RELEASES/4call. SettingBooltotruewill cause all code paths of the applications inAppDirsto be changed, including applications that are not being upgraded. Setting it to its default value offalsewill cause only the paths of the upgraded applications to be changed.
You might recall that the relup file contains tuples of
the format {Vsn, Descr, Instructions}. Descr
is part of the return value when the upgrade or downgrade was
successful. If {continue_after_restart, OtherVsn, Descr} is
returned, the runtime system and the core applications are being
upgraded, requiring an emulator restart before the remainder of the
script is executed.
If errors we can recover from have occurred, {error,
Reason} is returned. Recoverable errors include Vsn
already being the permanent release or the relup file missing, along with others that
will result in the installation of the release failing, but not
requiring a node restart. If the upgrade fails due to an unrecoverable
error, the node is restarted or rebooted.
Installing releases and upgrading code can be a risky and
time-consuming operation. This function mitigates risks of issues
happening, checking if Vsn can be installed, ensuring that
all mandatory files are available and accessible, as well as evaluating
all low-level instructions in the relup file prior to the point_of_no_return:
release_handler:check_install_release(Vsn)release_handler:check_install_release(Vsn,Options)->ok|{error,Reason}
Options is a
list containing [purge], which soft purges the code when
doing the checks. This will speed up the installation of the release
itself, as all modules are soft purged prior to the upgrade itself.
When we have installed a new release and executed the instructions
in the relup file, we keep the nodes under observation, possibly running
diagnostic tests. If there are issues, restarting the node will use the
old boot file and cause a restart of the old version. Calling
make_permanent/1, makes the boot script that points to the
upgraded release be the one used when rebooting or restarting the
node. This call can fail for a variety of reasons, including
Vsn not being the current version or not being a release at
all:
release_handler:make_permanent(Vsn)->ok|{error,Reason}
If a release has been made permanent, files specific to old
releases can be removed. Calling remove_release/1 will delete old applications no
longer in use, with the Vsn directory containing the .rel, .boot, and sys.config files in the releases/Vsn directory. This call also
upgrades the available releases in the RELEASES file. It fails if Vsn
is a permanent or nonexisting release:
release_handler:remove_release(Vsn)->ok|{error,Reason}
Houston, we have a problem. If your current release is not operating as expected and you need to revert to an old release (which you have not removed), this call reboots the runtime system with the old boot file, making it the new, permanent version:
release_handler:reboot_old_release(Vsn)->ok|{error,Reason}
This call uses the RELEASES
file and returns all the releases known to the release handler. Status
is one of unpacked, current, permanent, or old:
release_handler:which_releases(Status)release_handler:which_releases()->[{Name,Vsn,Apps,Status}]
The release_handler module exports functions that
make it possible to upgrade and downgrade single applications, creating
a release upgrade script on the fly and evaluating it. These functions
(which we are not covering in this book) are meant to facilitate and
automate testing of application upgrades. They should not be used in
production systems, as the changes are not persistent in the case of
system restarts.
It is possible to install upgrades without the release handler
while keeping its view consistent and up to date. This functionality
comes in handy when dealing with OS-specific packages, when you do
deployments and upgrades with other tools, or even when you write your own. There
are functions that allow us to inform the release handler process of the
addition and removal of releases and release-specific files. You can
read about these functions as well as the ability to upgrade and
downgrade single applications in the release_handler manual
pages that come with the standard Erlang distribution.
Upgrading Environment Variables
When upgrading your release, the new package will include the new (and
mandatory) sys.config. It will also
contain a new app file for every new
and upgraded application. These files might contain new or updated
application environment variables, or if the files are no longer
needed, they will have been omitted altogether. During the upgrade,
the application controller will compare old environment variables with
their current counterparts in the start scripts (set with the -application
key value flag),
config files, and app files, updating any differences
accordingly. When done, the following callback function is called in the
new application callback module, prior to resuming the processes:
Module:config_change(Updated,New,Deleted)
Updated, New, and Deleted
are lists of {Key, Value} tuples, where each key is an
environment variable and the value is what you want the variable set to.
This is an optional callback that can be omitted, but is useful when
process states depend on environment variables read at startup.
Making a release permanent will change the sys.config file pointed to by the start scripts to the new version. It is done only now because rebooting a node with a release that is not permanent reverts back to the previous release.
Upgrading Special Processes
Upgrading special processes is no different from upgrading behaviors. If you
are doing a simple code replacement, load the new module through the
add_module instruction. If the upgrade
has to be a synchronized code replacement, use the same
update high-level instruction you would use for OTP
behaviors. Upon receiving a message of the format {system, From,
Msg}, the special process invokes
proc_lib:handle_system_msg/6, which suspends the process. (We
covered system messages in “System Messages”.) If the
update command had the {advanced,Extra} parameter in its
Change field, the following callback function is called in
the special process callback module:
Mod:system_code_change(LoopData,Module,Vsn,Extra)->{ok,NewLoopData}
This call returns the tuple {ok, NewLoopData}.
Module is the name of the callback module, and Vsn
is either the version to which you are upgrading or, in the case of a
downgrade, {downgrade, Vsn}. Vsn is a
string in both cases.
One final note: remember the system message {get_modules,
From} that special processes have to handle when they are not aware
of their dependent modules? Those for which we use the
dynamic atom in the supervisor specification, covered in
“Dynamic Modules and Hibernating”? When upgrading, all processes whose
child specifications in the supervisor have module dependencies set to
dynamic reply to such a message with From!{modules,
ModuleList}, containing the list of modules on which the special
process currently depends. This will inform the release handler
coordinating synchronized upgrades if this special process is part of a
dependency chain and should be suspended during the upgrade of a
particular module.
Upgrading in Distributed Environments
Synchronized software upgrades in distributed environments? Is that possible? Are we crazy enough to try it? If you have a small cluster, trust your network, and have dependencies connected to your upgrade across your nodes, then why not? Remember that distributed Erlang was originally intended for clusters that ran behind firewalls in the same data center, and more often than not, also in the same subrack. If you were upgrading a switch, distributed Erlang often ran on the same backplane the switch was controlling, so if you lost your network, there was nothing to control because you also lost your switch.
In a small cluster with a few nodes running in the same subrack, you have little to worry about. For larger clusters, clusters across data centers, or where networks are unreliable, devise a strategy to upgrade a node without the need to synchronize.
Enough warnings. Let’s drink some Red Bull and get on with it. If
you include the sync_nodes
low-level instruction in your .appup
file, the relup script that gets
generated will synchronize with the other nodes also waiting to be
upgraded and upgrade them too when they are also attempting to
synchronize.
Synchronization is triggered by one of the following instructions:
{sync_nodes,Id,NodeList}{sync_nodes,Id,{Mod,Func,ArgList}}
You can either hardcode
NodeList in the .appup
file, as in the first instruction, or use the second instruction to invoke
apply(Mod, Func, ArgList) to get the list of nodes that
recognize Id, which are the nodes to synchronize.
Id can be any valid Erlang term. For the synchronization to
be successful, remote nodes must be executing the same instruction with
the same Id.
If you lose connectivity toward a remote node with which you are
attempting to synchronize, either because of a network partition or
because the remote node crashed, the node is restarted with the old
release. There is no timeout, so if a remote node is not being upgraded or
is out of sync, the local node attempting to upgrade will hang until all
remote nodes have executed sync_nodes
or connectivity toward one of the nodes is lost. This is why the technique
in this section has some risks for nodes distributed across a wide-area
network.
If you have not synchronized your upgrades properly, your cluster will hang waiting for all the other nodes. And if there are issues with your network connectivity or the upgrade in one of the other nodes fails, you will trigger a series of node restarts that will hopefully recover and continuing running the old release. But in the worst case, this technique might cause a cascading failure where you knock out one node after another when they fail to cope with the restart. You have been warned! Use synchronized distributed upgrades only when it is safe and the use case motivates it. If in doubt, perform rolling upgrades across your cluster instead, one node at a time, after making sure that nodes running the new release are interoperable with those still running the old.
Upgrading the Emulator and Core Applications
You upgrade the emulator and the core applications by providing their new
versions in the new release file.
The rest is taken care of for you when generating the relup file. Just remember to include the
erts option in the systools:make_tar/2 call when
upgrading the Erlang runtime system, as it will include the emulator in
the new tar file. If you think it sounds simple, it is, but there are a
few catches of which you need to be aware.
Upgrading the emulator and core applications
(erts, kernel,
stdlib, and sasl) requires a
restart of the virtual machine, usually triggered by the restart_new_emulator
instruction. Unlike with other upgrades, this will be the first instruction
executed in the file, starting the new emulator and the new core
applications, together with the old versions of the remaining
applications. This two-phase approach allows the remaining behaviors and
special processes being upgraded to call code_change as part
of their upgrade, using new versions of the core applications while doing
so.
If you are not happy with this approach, you can edit the relup file by hand. Replacing
restart_new_emulator with the restart_emulator
instruction will restart the emulator with the new versions for all
applications. A restart of the emulator (which is not the new emulator) is
the last instruction you should be executing in your relup file, as all it does is restart the
system with the new boot file. This means that any instructions that
follow restart_emulator are ignored, while any instructions
before it are executed with the old emulator. A helpful instruction you
have to add manually is apply, which
you could use instead of code_change if opting to start the
new versions of the applications directly.
Upgrades with Rebar3
Now that you understand all the details of upgrades, let’s look at how to do them using the rebar3 tool introduced in “Rebar3”. First, let’s use rebar3 to build a release, starting again with the code from coffee-1.0. The required commands are similar to those we used in “Rebar3”:
$mkdir ernie$cd ernie2$rebar3 new release coffee desc="Coffee Machine Controller"$cd coffee$perl -i -pe 's/0.1.0/1.0/' ./apps/coffee/src/coffee.app.src ./rebar.config$cp <path-to-coffee-1.0>/coffee-1.0/src/*.erl apps/coffee/src$rebar3 as prod compile===> Verifying dependencies... ===> Compiling coffee _build/default/lib/coffee/src/coffee_fsm.erl:2: Warning: undefined callback function code_change/4 (behaviour 'gen_fsm') _build/default/lib/coffee/src/coffee_fsm.erl:2: Warning: undefined callback function handle_event/3 (behaviour 'gen_fsm') _build/default/lib/coffee/src/coffee_fsm.erl:2: Warning: undefined callback function handle_info/3 (behaviour 'gen_fsm') _build/default/lib/coffee/src/coffee_fsm.erl:2: Warning: undefined callback function handle_sync_event/4 (behaviour 'gen_fsm') $rebar3 as prod release===> Verifying dependencies... ===> Compiling coffee ...<snip>.... ===> Starting relx build process ... ===> Resolving OTP Applications from directories: /Users/francescoc/ernie2/coffee/_build/prod/lib /Users/francescoc/ernie2/coffee/apps /usr/local/lib/erlang/lib /Users/francescoc/ernie2/coffee/_build/prod/rel ===> Resolved coffee-1.0 ===> Including Erts from /usr/local/lib/erlang ===> release successfully created!
We use the rebar3 release
template to set up an area for our coffee application, change
the version number to 1.0, copy our coffee-1.0 sources into
the new release area, run rebar3
compile to verify that the code is valid (which, as we saw
previously, results in compilation warnings from compiling coffee_fsm.erl due to missing callback
functions), and then build a release using the prod profile.
We can now start our release to make sure it runs correctly:
$./_build/prod/rel/coffee/bin/coffee console...<snip>.... Machine:Rebooted Hardware Display:Make Your Selection =PROGRESS REPORT==== 24-Jan-2016::16:06:10 === supervisor: {local,sasl_safe_sup} started: [{pid,<0.213.0>}, {id,alarm_handler}, {mfargs,{alarm_handler,start_link,[]}}, {restart_type,permanent}, {shutdown,2000}, {child_type,worker}] ...<snip>.... =PROGRESS REPORT==== 24-Jan-2016::16:06:10 === application: sasl started_at: coffee@francescoc Eshell V7.2 (abort with ^G) (coffee@francescoc)1>application:which_applications().[{sasl,"SASL CXC 138 11","2.6.1"}, {coffee,"Coffee Machine Controller","1.0"}, {stdlib,"ERTS CXC 138 10","2.7"}, {kernel,"ERTS CXC 138 10","4.1.1"}]
This gives us a release for coffee version 1.0. Next, we need a release for version 1.1, so we copy that version of coffee_fsm.erl into our source directory, bump our version numbers, and then generate a new release:
$cp <path-to-coffee-1.1>/coffee-1.1/src/coffee_fsm.erl apps/coffee/src$perl -i -pe 's/1.0/1.1/' ./apps/coffee/src/coffee.app.src ./rebar.config$rebar3 as prod release===> Verifying dependencies... ===> Compiling coffee ...<snip>.... ===> Resolved coffee-1.1 ===> Including Erts from /usr/local/lib/erlang ===> release successfully created!
Before we can generate a relup
file, we need our coffee.appup file.
Because rebar3 doesn’t create an ebin
directory in the usual place, we create one, copy the coffee.appup file there, and then use the
rebar3 relup command:
$mkdir apps/coffee/ebin$cp <path-to-coffee-1.1>/coffee-1.1/ebin/coffee.appup apps/coffee/ebin$rebar3 as prod relup===> Verifying dependencies... ===> Compiling coffee ===> Starting relx build process ... ...<snip>.... ===> Resolved coffee-1.1 ===> Including Erts from /usr/local/lib/erlang ===> release successfully created! ===> Starting relx build process ... ...<snip>.... ===> Resolved coffee-1.1 ===> relup successfully created!
If we look at the contents of the generated
relup file, we find that it’s identical to that
generated by systools:make_relup/4 in “Release Upgrade Files”:
$ cat ./_build/prod/rel/coffee/relup
{"1.1",
 [{"1.0",[],
   [{load_object_code,{coffee,"1.1",[coffee_fsm]}},
    point_of_no_return,
    {suspend,[coffee_fsm]},
    {load,{coffee_fsm,brutal_purge,brutal_purge}},
    {code_change,up,[{coffee_fsm,{}}]},
    {resume,[coffee_fsm]}]}],
 [{"1.0",[],
   [{load_object_code,{coffee,"1.0",[coffee_fsm]}},
    point_of_no_return,
    {suspend,[coffee_fsm]},
    {code_change,down,[{coffee_fsm,{}}]},
    {load,{coffee_fsm,brutal_purge,brutal_purge}},
{resume,[coffee_fsm]}]}]}.From here, you can create a tarball with rebar3 as prod tar and install and upgrade as
shown in “Installing an Upgrade”.
Assuming you use rebar3 as your build and release tool, it’s worth your while to check out the relflow tool, written by Richard Jones. It is purpose-built for systems that use Git for version control and rebar3 to generate releases and upgrades, and it is designed to address all the tedious parts of upgrades, such as bumping version numbers and creating .appup files.
Summing Up
As with most things we’ve seen in this book, Erlang provides
powerful basic language constructs that OTP uses to build libraries and
frameworks that hide complexity, simplifying the development, deployment,
and maintenance of Erlang-based systems. Starting with
code:load_file/1, which handles the loading of a module in
your runtime system, we looked at how to manage state changes in
processes, database schema changes together with synchronization of
processes and their dependencies, and dependencies in distributed
environments.
In order to upgrade a target system, you need to start with a baseline installation. It will usually be the first release, the one you created manually. Unless you were using rebar3, it has to be a manual task, because most of the release-upgrade tools are written in Erlang and will not run without your baseline system. It’s a classic chicken-and-egg problem.
With the baseline release in place, you need to follow these steps to successfully upgrade your system. Don’t panic, as a lot of these steps are either automated, handled by existing tools, or both:
Add the new functionality, package it into the respective modules and applications, and bump up the module and application versions.
Create the new rel file containing new and upgraded applications while omitting the deleted ones.
Generate your start scripts and new sys.config file, ensuring you can boot the new release on its own.
If any of your behaviors or special processes require a state change or use a different data format (including database schema changes) as part of the upgrade, migrate your state and data format from the old version to the new one and back in your
code_changefunctions.Write an .appup file for each application you are upgrading. Place these files in the ebin directory.
Create a relup file containing all the low-level instructions executed during the upgrade.
Create a package that you can deploy in the releases directory of the installation you are upgrading.
Unpack the release and install it.
If stable, make your new release permanent. If unstable, reboot the node, restarting the old release.
Once the release is unpacked, a number of transitions can take place on the node being upgraded. When you install a release and the upgrade is successful, the system starts running the new version. If the upgrade fails for any reason, the system is rebooted and reverts to the previous version. When running the new version, it can be made permanent. When this happens, any subsequent node restart will restart the latest version (Figure 12-6).
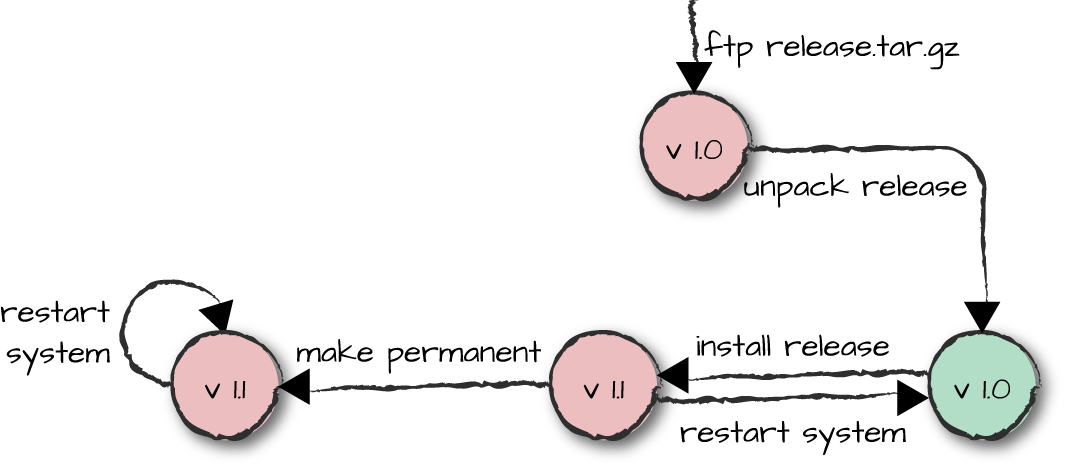
Figure 12-6. Upgrading a release
We also covered upgrades in distributed environments, which allow you to synchronize the nodes. This happens in the real world, but only for very small clusters where the network is reliable. If you are dealing with distributed data centers, cloud computing, virtualization, as well as lots of other layers of complexity and instability, you need to take a different approach to upgrades. Make sure that old and new nodes are backward-compatible and interoperable with each other, allowing them to coexist in the same cluster. Upgrade a few nodes, monitor them to ensure all is well, and keep on upgrading. If you lose a few machines or get a network partition or upgrade failures, keep on trying until all nodes have been successfully upgraded.
Let’s take this argument a step further. For clusters where you have no single point of failure with multiple instances of the nodes running, do live upgrades really make sense? If you are able to do a rolling upgrade, cleanly shutting down nodes without losing any requests and stopping traffic, isn’t it easier to shut down one node at a time, upgrade its code, then restart it to bring it back into the cluster? You would be able to upgrade your code without showing the embarrassing Our system is down for maintenance, bear with us, we are doing this because your business is important and we value you as a customer screen most online banks show us a little too frequently, and ensuring that you do not lose any requests as a result of the upgrade.
How you do your upgrades depends entirely on the size of your cluster, the infrastructure you have in place to control it, your redundant capacity, and the experience and size of your team. Software upgrades take time and money to implement, test, and deploy. And if things go wrong, most of the time, they will go wrong during an upgrade. If you are a startup that does not have to provide 99.999% availability, no one will care whether you bounce your nodes every now and then. If you are upgrading tens of thousands of switches, however, where each switch handles traffic for millions of subscribers with contractual penalties for downtime and outages, or an e-commerce site generating thousands of dollars in revenue every minute, users will care!
Software upgrades are a unique and powerful feature you can use in rare, but critical, moments. Use them where the extra effort makes sense, ensuring you test your upgrades and downgrades under heavy load, covering as many failure scenarios as possible.
If this chapter is not enough, the user guides and reference
manuals, along with the module documentation that comes with the standard
Erlang distribution, contain scattered but detailed information on release
upgrades. You should start with the section on “Creating and Upgrading a Target System” in the
OTP System Principles User’s Guide. Tools
are covered in the module documentation for systools and release_handler. Finally, relup and .appup files both have manual pages that describe
the formats of the files, including all the instructions they may contain.
Don’t miss the “Appup Cookbook” chapter
in the OTP Design Principles User’s Guide. The same
guide also contains descriptions of the code_change functions
in the respective sections for every behavior and special process.
At the end of the day, though, our advice echoes what we recommended in the previous chapter: it’s important to understand the underlying concepts, tools, and procedures, but unless your project requires extremely special considerations, you’re best off using rebar3. It will handle many of the tedious tasks associated with releases and upgrades, can be extended if necessary, and has community support that you’ll find helpful if you need advice or assistance.
What’s Next?
With the knowledge provided in this chapter on how to package releases and perform live upgrades without affecting traffic, the time has come to look at how to architect a system. If you want a system with five-nines availability, what basic functionality should all of your production nodes have? What distributed architectural patterns should you be applying to get your nodes to scale? In the next chapter, we look at what it takes. So what are you waiting for? Turn the page and read on!
1 Please don’t ask us about this one!