Identifying the modes and settings on your digital camera
Adjusting your focus and light metering for more interesting shots
Making flowing water look like silk
Taking pictures with long shutter speeds
Using camera filters in your photo art
In Hollywood, you think of special effects as Jurassic Park stuff or maybe Harry Potter zooming about, playing a game of Quidditch. In magic, a special effect is pulling a rabbit out of a hat. In math, a special effect is that the digits of multiples of nine add up to nine. In traditional photography, you might think of a special effect as water flowing in a stream, looking as if it were billows of steam. Special effects, really, are what you want them to be. After all, they're what's inside your head — what ultimately comes out when you set and focus your camera on something — anything, invented or otherwise.
My definition of special effects (as I use this term in this chapter for the purposes of creating digital art photography), however, encompasses using particular measures — tweaking camera modes, using time lapse, employing video techniques, and so on — while shooting photographs that achieve certain creative results. Using these techniques are the sort of special effect this chapter covers. If you want to add Jurassic Park dinosaurs to your photographs, you have to use Photoshop.
Capturing an image of a unique home at dusk, your best friend up close with a blurred background, a gorgeous landscape, a flower, or a tennis player on the court requires only a simple move of your camera's modes. In this section, I show you how to take the traditional uses of these modes and then bend the rules to create some fantastic art shots.
Digital cameras are a funny lot. Some come with all the nuts and bolts you could possibly need to take a shot that's not only interesting but also mind-boggling. Others come with an odd assortment of stuff that can take comparable shots after you fool around with them to see how they work.
Take, for instance, the point-and-shoot models — yes, some are very powerful (5MP or more) — that have no manual modes. (Manual modes allow you to change the f-stop or shutter speed yourself in the little knobs at the top of the body, within the menu on the LCD screen. These controls open your photographic world so that you can use a multitude of aperture openings and shutter speeds without the limitations of the point-and-shoots. For more on f-stops and shutter speeds, see Chapter 6.) Tweaking with a point-and-shoot, where everything is preset, can be done but only by tricking the camera — say, setting your shutter speed to stay open for a second but being limited to only shooting in a dark space. Remember that if the shutter is left open for a long time, no matter what your aperture is, your exposure will turn to white because of too much light.
So the modes do it for you, right? You really don't need anything but the auto settings to be a great photographer? Well, in some ways, how well they really do work is pretty incredible. But much of the time, you want more — more setting choices, that is — especially the more you photograph.
With film and digital point-and-shoot cameras, you have many automatic settings from which to choose that do affect your f-stops (how wide your lens opens) and shutter speeds (how long the shutter stays open).
Note
Every time you set your camera in an auto mode, it calculates an f-stop and shutter speed.
You can set both your shutter speed and your f-stop manually using the M mode. When doing so, you'll also want to refer to the camera's light meter to make sure that the exposure is correct. Your camera will use the EV — the exposure value — to let you know if there's too much or too little light. Then you can adjust the f-stop or shutter speed to get the exposure that you want.
Note
On some point-and-shoot models, the only way to adjust the shutter speed is via choices within a limited set of values that are controlled as a setting. They can't be adjusted as a mode (by turning the knob on the body of your camera). Most camera modes are on the external portion of your camera. Look for a knob (as shown in Figure 11-1) with tiny pictures of each mode drawn on it. Sometimes this portion of your camera is called a programmed image control zone.
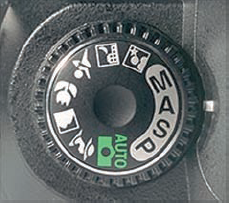
You can tweak any of your digital camera's settings for special effects, but first you have to introduce yourself to them. The following list describes the modes on your digital camera, explaining how you would traditionally use each and giving you hints for tweaking those modes to achieve a different type of effect:
Auto (A): Use this mode in places with good lighting, sun or shade, during the daylight hours and in shots with little or no action. Put masculine shadows (for a masculine effect) over subjects by shooting into the sun.
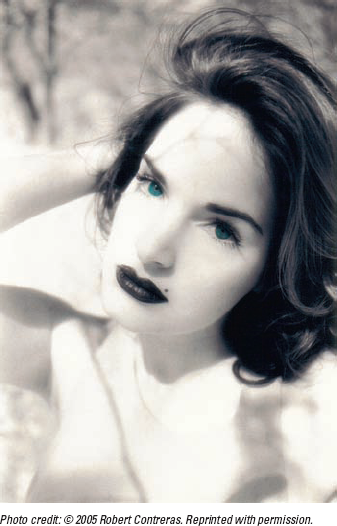
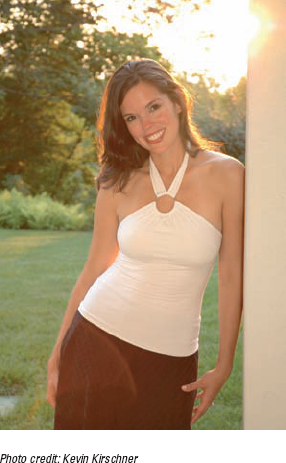
Portrait: This mode is perfect when you want a clear shot of your subject's face up close. Figure 11-2 shows a woman photographed in portrait mode. Soften the look of animals by shooting them up close in portrait mode.
Landscape: When you're shooting to the horizon, with lots of distance to cover and you want it all to come out sharp, use the landscape mode.
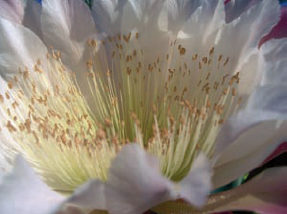
Close-up or macro: For those times when you want one or two objects in focus and everything else in the background/foreground blurred, the macro mode is your friend. You can teach botany with this handy feature on many camera models. Figure 11-3 shows clearly a flower's stigma, style, anther, and filament.
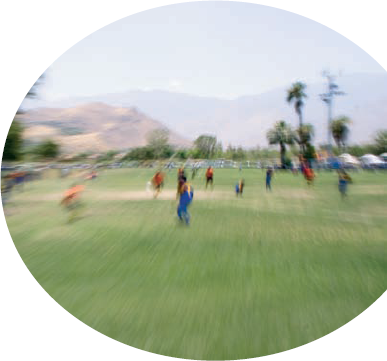
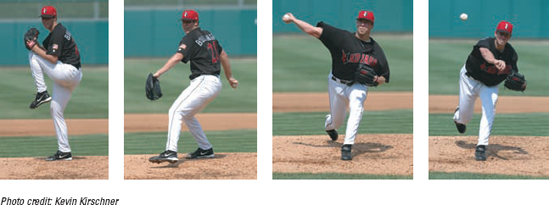
Action: This mode uses higher shutter speeds to stop action with little or no blur. Figure 11-4 shows a pitcher in action. Action mode will give you a shot that isn't blurred when you're moving, also.
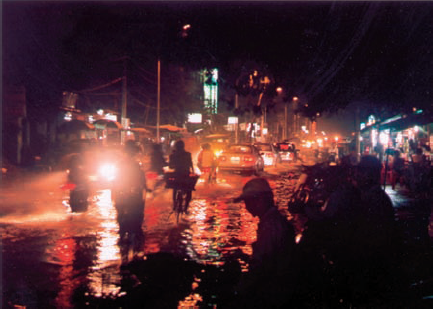
Night: This mode will come in handy when you're photographing a scene at night without a flash. Remember to keep the camera very still to avoid a blurry photo — this mode generally uses a slower shutter speed. Figure 11-5 shows the added effect of wet streets shot at night. Shoot at night when the streets are wet for extra-glimmery photos.
This list briefly describes the main settings that you need to tweak to achieve great effects when shooting:
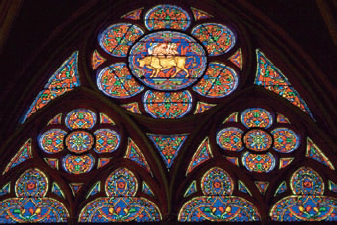
Exposure compensation values: Increases or decreases the exposure, making the image lighter or darker. Generally use the default setting (what your camera automatically has when you turn it on). For stained glass indoors backlit by bright sunlight, drop it down by −1 EV for bright colors, as shown in Figure 11-6.
White balance: Compensates for the temperature (color) of the existing light to prevent an unwanted color tint to the photo. This is something Photoshop can also do. Many models of digital cameras have a white balance setting for different types of light, both indoors and outdoors. See Chapter 8 for a description of what the settings do. A camera set at automatic can sense each of the light types — fluorescent, tungsten, and sunlight — but you can set to the daylight mode inside with fluorescent lights on and get no correction, that is yellow, in your shot.
ISO: Increasing the ISO setting alters the sensitivity of the camera's sensor to capture more light quickly — crystal clear if you set it low (100 or 200) with a greater chance of blur in low light, and grainy if you set it high (above 400). If you shoot for special effects, anything goes here; you just have to experiment. Use high ISO speeds like 1600 to pick up reflected color that happens in low-light situations.
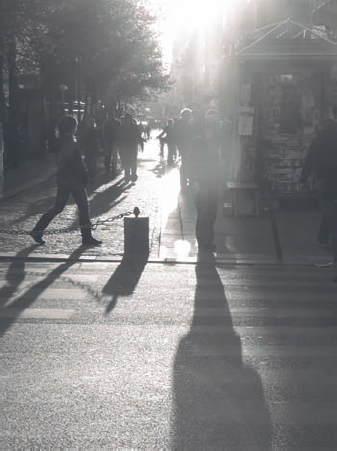
Color: Some cameras offer a choice between sRGB and Adobe RGB as the color space, and some also offer faux sepia and black-and-white (B&W) settings. Use Adobe RGB if you'll be working in an image editing program; sRGB if not. Shoot into the sun at dusk in black-and-white mode for mysterious shadows and wild light, as in Figure 11-7. Chapter 9 covers shooting in B&W.
Focus zone: Uses the designated area of the image as the point for autofocus. Adjust the focus point if the subject is off center in the frame. Use low f-stop settings to get a focused off-center subject and a blurry background.
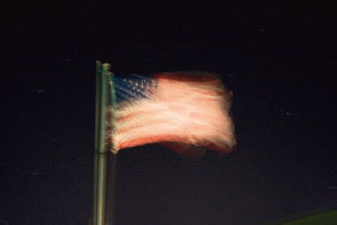
Exposure metering setting: This changes how much light your camera uses for a shot. Most digital and film cameras use the lighting throughout your whole frame. Some digital camera models let you reset this so that only the light from the center (or just a spot in the center) is used. For example, use this for a clear shot of the moon. Set your camera to center-weight at night and put something moving and well-lit in the center of your frame — it will look as if it's wrapped in cellophane. The flag (taken at night without a flash) in Figure 11-8 was shot with the focus zone set for center-focus, the gathering place for all the light.
You can trick the light meter of your camera to enhance your photo by giving it better color and more depth. Usually your camera assesses what it sees in terms of light while you press your shutter halfway down. If you keep holding it, the camera will remember the first place you took the reading.
Tip
You can press your shutter halfway down to set the autofocus and exposure, and then point your camera in another direction while you keep holding the button halfway down. You might, for example, set the camera while aiming at a brightly lit area, and then actually shoot while aimed at an area more dimly lighted, thereby producing an underexposed photo.
Note
To create a special effect from how your camera perceives light, press the shutter halfway down in one place and move to another place to shoot a picture, like this:
Set your camera to auto mode.
Turn off the flash.
Sit by a window.
Point your camera out the window so that your entire frame is in daylight.
Press the shutter release halfway down.
Point the camera inside the room to where there is some color or a little light (less than what was out the window).
Press the shutter button all the way down.
Congratulations! You just messed around with your camera's light meter.
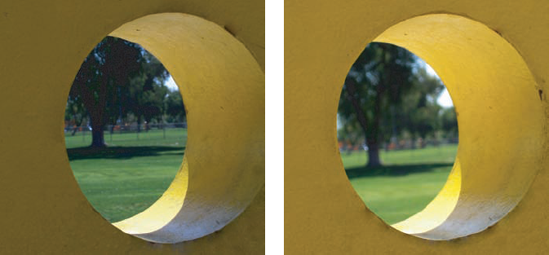
Experiment with the light meter and the settings and modes (see the preceding section) in as many ways as you can to see what your camera can and can't do. The images in Figure 11-9 show that by focusing on a spot in the shade and then moving your camera to shoot your composition as you want it framed, your image is brightened up significantly. The image on the left in Figure 11-9 is not as bright as the image on the right.
In the previous sections of this chapter, I explain how to manipulate your camera's settings, modes, and light meter (tools used generally to achieve a "good" photograph) to achieve artsy effects your viewers will find unexpected and wonderful. But there are other ways to capture special effects while shooting photos — including using time lapse and special filters. I show you some of these tricks in this section.
Double exposures are a funny lot. Love 'em and have your camera snapping two or more shots on the same frame of film. A double exposure occurs when your film camera takes two pictures without advancing the film.
Figure 11-10 shows a double exposure shot at dusk without a tripod of birds flying out of a palm tree. To combine multiple digital images to create a double exposure, you have to use an image editing program, such as Photoshop. See Chapter 13 for more about combining images digitally.
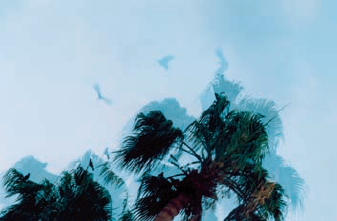
In order for the frame (which was exposed to light twice because the shutter opened to take the two shots that were imprinted on it) not to be overexposed — that is, turn white — set your exposure compensation to −1 (see Chapter 9).
You can also take triple exposures and more. It's best to do this at dusk or at night, though, because one frame can only take so much light before it turns white.
A panorama is generally constructed from multiple images taken side by side (or up and down) that are then stitched together in the darkroom or digitally. Figure 11-11 shows a sample panorama. There are film cameras available that specialize in panoramas, rotating the lens to expose a long strip of film, but when shooting digitally, you need to combine exposures in an image editing (or dedicated panorama) program. I recommend using a tripod and manual exposure when capturing frames to use in a panorama, and allowing at least 15 percent overlap on each side for proper alignment.
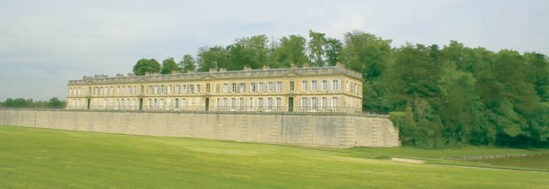
Figure 11-11. Use a wide angle lens or zoom to 100mm or more to grab a vast area of land and/or sea.
Tip
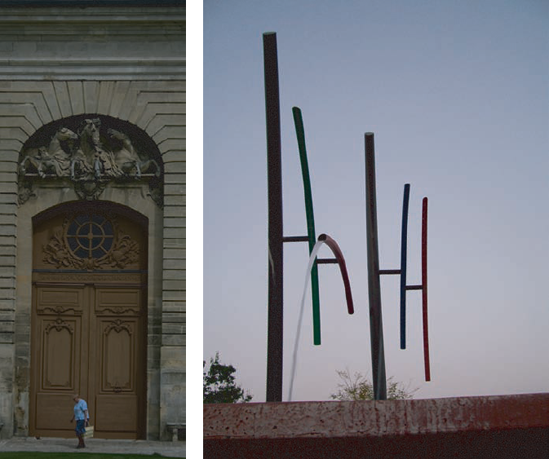
Panoramic shots are not only landscapes (horizontal) but can also be vertical shots, like architectural and sculptural elements. For more about panoramas, see Chapter 13.
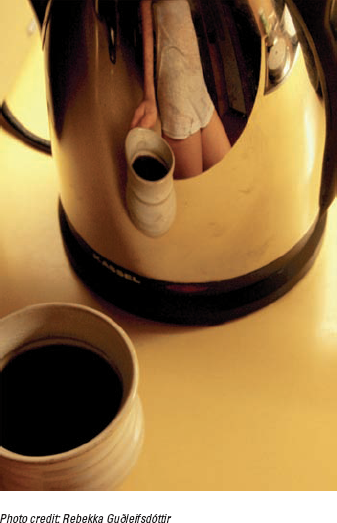
Reflections offer your viewers two ways to see the world: the real image and the one that's reflected. The distortion of a subject can vary, depending on the reflective material. You've probably seen reflections on water, from the almost mirror effect it can produce in the right light when there is no wind, to interesting distortions on a sea of light chop. Other materials reflect light, too, as shown in the coffee pot in Figure 11-12.
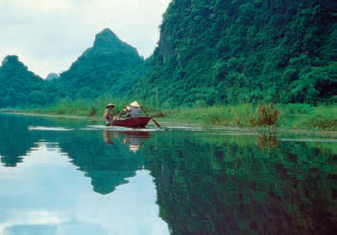
Second on the reflection front is the reflection of glass. To be sure, there are the ins and outs of light bouncing through, around, and among glass windows, doors, and panels. Last is the glory of reflection, that of a string of mountains reflected on the water in Figure 11-13.
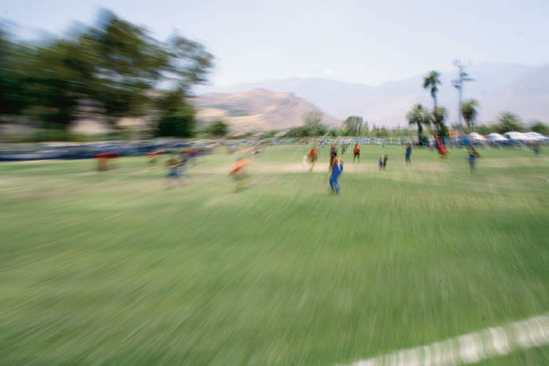
Zooming while shooting can be a tricky proposition, but the effects are unreal — literally. Figure 11-14 shows the sense of motion created by zooming with the shutter open. (Don't look at it too long, or you'll get motion sickness.)
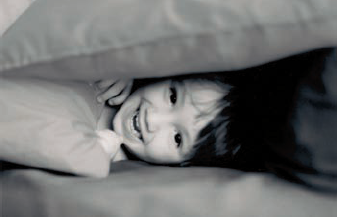
Have you ever tried to turn off your autofocus? Seems like we've become so enamored with it that we forget that we don't have to use it. Experiments conducted by creating blur can create results that are much like a soft pillow. Matching a pillows' softness in Figure 11-15 are the toddler's eyes and face that are just slightly out of focus. Soft focus can be an extremely flattering effect, especially as we age. You might also want the camera to be slightly out of focus to create a great background into which you can drop another image. Take a slightly blurred photo of a building, crop out everything except the blurry building, and voilá!
You can read tons about how to properly expose a shot. However, you can create some really cool shots by breaking those standards — purposefully under- or overexposing for a great in-camera art effect.
Underexposed: Compare the two shots shown in Figure 11-16. On the left is a photo that would be good had it been properly exposed. As it is, the detail in the image is lost because of a lack of contrast. On the right, however, slightly underexposing the image allows the subject to remain a dark mystery and prevents the sky from becoming featureless white.
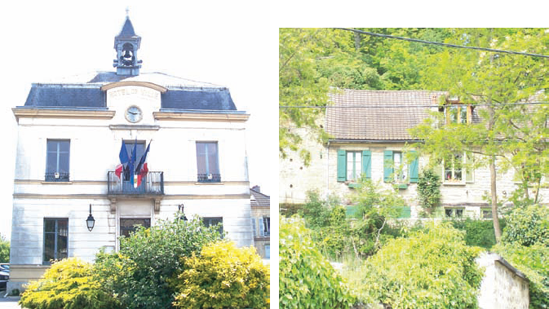
Overexposed: Compare the two images in Figure 11-17. On the left, overexposing has reduced the detail in the photo's subject, the hotel, and allowed the sky to become a featureless void, neither of which makes this a particularly compelling image. On the right, overexposing minimizes much of the detail of the house in the background, allowing the detail of the subject, the foliage, to remain prominent. (You might also find that when shooting greenery, slightly overexposing helps you capture more detail.)
For a special effect, slow down the shutter speed (on dSLR or SLR cameras) so that the lens stays open for almost one-half second. This can produce some interesting effects.
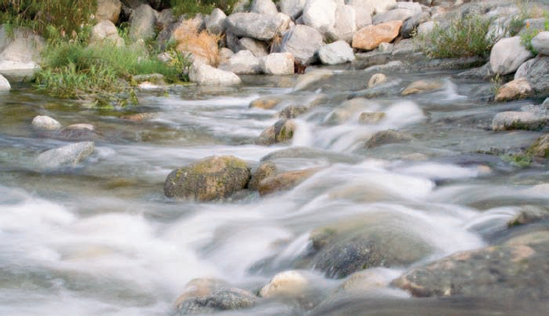
Shots that have flowing water turn to silk — on rocks, over bumps and curves, and through tunnels — are the shots that are always popular. To get flowing water looking like flowing velvet, you need to film in low light:
At dusk or dawn
In fog or in winter
When the sun is low on the horizon
In a shady spot
Take a walk to a fountain during one of these days and bring your tripod. You'll find an adventure in shutter speed awaiting you.
dSLR models and SLR models offer time exposure using the Tv mode, as I explain here.
Note
Load your SLR film camera with ISO 100 speed film or set your dSLR camera to ISO 100 or 200.
Find a place by a body of moving water that's flowing with bubbly excitement where it's shady — or better yet, at dusk when the sun has just fallen below the horizon.
Frame your picture.
Set your camera on a tripod and compose the image.
Set your camera to Tv mode, the shutter priority mode.
Set your camera to a slow shutter speed — say, 1/60 of a second.
Set your camera's timer so that the camera doesn't shake when you try to push the shutter button.
Look for the little clock icon/button at the top of your camera.
Release your shutter and wait for the camera to take a picture.
Reset your camera to a slower shutter speed — say, 1/30 of a second.
Repeat Steps 4 through 6, using a slower shutter speed each time, until the flowing water looks like velvet.
The result is shown in Figure 11-18, which was captured with a shutter speed of 0.6 seconds at f/22.
Note
Use low light when filming anything with your shutter speed open longer than 1/60 of a second.
Tip
For art photos that are correctly exposed, rather than calculating a shutter speed and an aperture, let your camera do some of the work by choosing the Av or Tv mode. You select an aperture and the camera picks an appropriate shutter speed (Av) or you select your desired shutter speed and let the camera determine the best aperture (Tv).
Camera filters help make a better picture when you are shooting during the day because the sun's glare can affect both the color and the details of your subjects and backgrounds. dSLR and SLR cameras have a ring around which you screw the filter onto your lens.
There are dozens of types of filters, each with a specific function:
UV/skylight: Ultraviolet (UV) filters get rid of the haze and UV light that your sensor or film picks up but that you can't see. This is the most common kind of filter that most professionals have with them at all times.
Polarizing: These filters reduce the sun's glare. They also help if you're shooting through glass. These filters give improved clarity and color balance to your photographs. Figure 11-19 compares an image taken with a polarizing filter (on the top) and no filter (on the bottom).
Neutral density: These filters reduce the amount of light that gets to your lens. In the earlier section, "Making flowing water turn to silk," I discuss how there's a period around dusk where the light is just right so that you can keep your shutter open a bit longer. Using this filter blocks out some of the light so that you can keep your shutter open longer — long enough for water to turn to silk in broad daylight!
Close-up filters: Also known as a magnifying glass that you can attach to your lens, close-up filters are pretty nifty and cheap, but the quality can be dicey, with blur and whatnot.
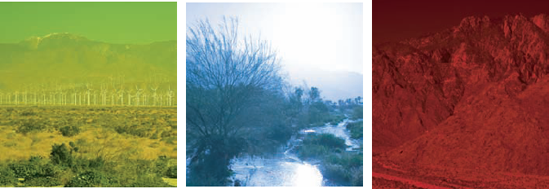
Color conversion: These filters stop certain wavelengths of light from reaching your film or sensor, thus changing the color in your entire photo. These are actually colored glass that you put over the lens of your dSLR or SLR camera to change the color of your photo.
Yellow: Yellow works with the sun's color to make your shots look more vivid (see the leftmost image in Figure 11-20). If you live near L.A. (like I do) or some other hazy metropolis and you want a landscape that frees up some of the yellow haze, this filter will help.
Blue: Blue enhances the sky and/or water to the way they'd appear in a dream. Use the filter to let the blues from the lens soak in to both sky and water by looking for rays of sunlight striking directly on water and shooting so part of the sun's reflection on the water is evident (center image in Figure 11-20). This causes a part of the water to turn yellow and white, adding more tones of color to the enhanced blues that are everywhere else in your shot.
Red: A red filter heats up your environment, kind of like if you were living on an angry red planet. The rightmost image in Figure 11-20 shows the Mars-like landscape that a red filter can provide.
Tip
Color conversion filters can be improvised by using transparent or translucent Mylar or plastic — the same stuff that some report covers are made from. You can get this stuff at an office supply store.
Special effects: These filters come in all types of configurations and colors. There are pop filters of bright red, blue, and green that you can use separately or together. There are also soft-diffused filters, which change the light to create effects such as fog.
Diffusion: Pictures taken with diffusion are usually used on shots of women, but you can use them on anything you want to soften. For instance, you can soften even the hardest metal and dark colored subjects taken at midday with a diffusion filter.
Tip
Use a woman's stocking over your camera lens for a similar effect to a diffusion filter.
Infrared: An infrared filter gives images a surreal, other-worldly quality, as shown in Figure 11-21. The filter itself is really dark — to block all visible light — so when you use film, it has to be a special film that can record the image. To see whether you can shoot infrared with your digital camera, point a television remote control at the lens, press and hold down the shutter button, and take a picture. If you can see the light in the photo, you can probably take infrared images with an appropriate filter (such as a Hoya R72). You can tweak your digital camera by bumping up your ISO setting to 800 or above and bumping up your exposure compensation to at least +1 EV. If your camera doesn't offer that level of control over the settings, try the Night Portrait mode for the longest exposure.
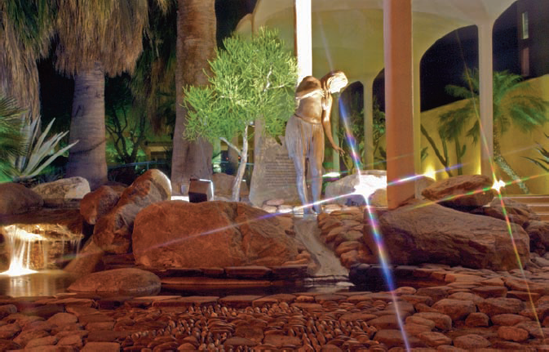
Star: This type of filter makes it look as though points of light radiate outward from any light source in your shot. A star filter makes any scene more glittery and glamorous, as shown in Figure 11-22.