
Setting your digital camera for indoor light
Blurring images to create movement effect
Discovering when to take an indoor picture with a flash
Using indoor light fixtures to make art shots
Seeing one-point perspective
Shooting indoors is inherently more difficult than shooting outdoors because you don't have optimal light — and what light you do have is often garish and harsh (creating sharp unintentional silhouettes) or has a color temperature that can give you unnatural tones (like how people turn green when shot under fluorescents or orange when shot under tungsten). And, after all, light is what drives photography. In this chapter, I show you tricks and tools for how to take that disadvantage and turn it into an artistic opportunity.
Finding the right type of light for your indoor shots is like performing a science experiment. Remember when you had to write a hypothesis in the form of a question and then answer that question? In an experiment with indoor lighting, your questions might be, "How do I light my object or scene so that my shot is clear and natural looking? Or interesting? Or have movement?" You can make dozens of hypotheses (questions) about using natural or man-made lighting — or both — to create a unique scene or present an object from either a traditional or a new viewpoint.

Start by thinking about the tools at your disposal (your camera and flash) and then factor in the world around you (man-made or natural ambient lighting). Next, determine whether the lighting that you're using answers your questions. Finally, consider the results: Did you get the results you expected, or were your results better than you could have hoped for?
This chapter takes you through the process of asking — and more importantly, answering — the questions involved with taking indoor art photographs so great that people clamor to buy them.
When you shoot indoors, you (understandably) have less light than what is available outdoors. To compensate for this — without using flash — you need to adjust your camera's ISO speed. You also need to know when to choose manual over automatic exposure settings and also how to work toward achieving good white balance.
To compensate for shooting with not-always-optimal available light indoors, you need to adjust your camera's ISO speed. In terms of a digital camera, ISO could be called sensor sensitivity. Strange but true. With film, you have film sensitivity — that is, how sensitive the film is to light. These standard film ratings are set by the ISO (International Standards Organization). You might also see ASA film ratings, but ISO and ASA are similar.
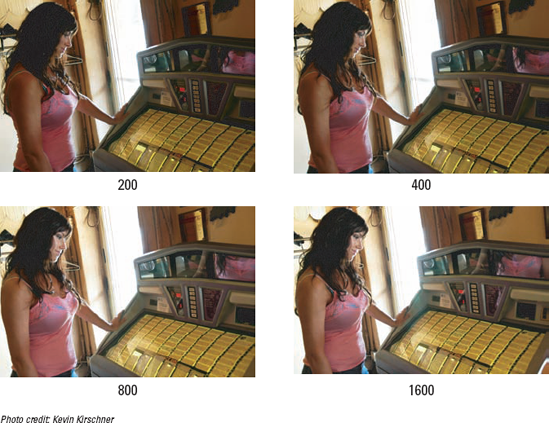
The lower the ISO number, the less sensitive film is to light. Thus, 100 ISO film needs more light to capture the same shot than 400 ISO film does. The same holds true when shooting on a digital camera. All you really need to know in terms of the settings on your digital camera are the 100, 200, 400, and 800 ISO settings. Some cameras go lower and higher. However, when you set ISO lower than 100, you can get a lot of blur if you don't use a tripod. Shooting at ISO settings above 400 (or 800 for some cameras) can produce digital noise (unwanted red, green, and blue specks in the image) or luminance noise (undesirable light specks in the image). Digital noise is generally most evident in areas of shadow and solid color. When using your camera's flash, the ISO is usually set to either 100 or 200, depending on the model.
Figure 6-1 shows a picture at various ISO values. Note that the higher the ISO, the more noisy the image becomes.
Tip
If you have a tripod, use it and shoot using a lower ISO and a slowed shutter speed. If not, brace the camera on a stable surface and use a slightly higher ISO. If neither a tripod nor a stable surface is available when shooting in low-light situations, you need to choose between possible blurring (low ISO) or noisy shadows (high ISO).
So, what's the setting verdict for taking pictures of stuff inside? That's one of the easiest tricks in photography, digital or film. Simply set your ISO speed at 400 (or buy 400 ISO film for your film camera and then digitize your prints/negative/positives).
Determining the proper setting — manual or auto — to use when you shoot indoors without a flash all depends on whether you shoot with a tripod:
Most shots indoors come out great in auto mode without a flash, but only if you use a tripod. In auto mode, most cameras default to low ISO values. If you want special effects — such as blur from movement — you need to use a tripod and you also must keep your shutter open longer than what your camera would in auto mode.
If you hand-hold your camera, set your ISO values high (greater than 400). Many cameras allow you to change the ISO and yet still shoot in auto mode.
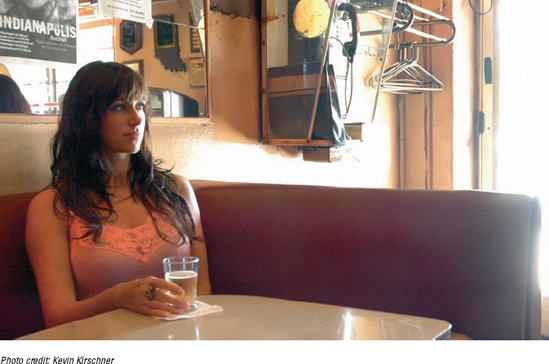
When you take a photo indoors without a flash, the color of the light you're shooting is enhanced, sometimes greatly. Figure 6-2 shows a golden hue that happens automatically (due to the color of the lights) when you take a picture without a flash indoors (with 400 ISO to reduce blur). Many digital cameras automatically correct this when they're set to indoors, but maybe you don't want to — to gain that artistic edge. (You can read more about white balance in Chapter 8.)

The simplest scenario when shooting indoors is to just shoot — no flash, no nothing. Just shoot and go. You can get some decent shots that way, using only what light is available.
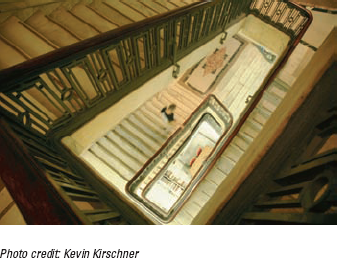
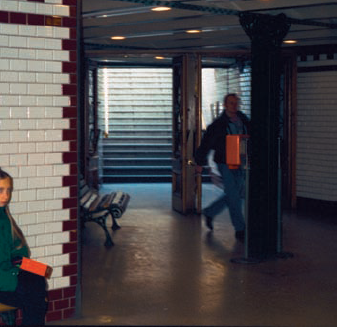
Photographing light as it is — flickering, glimmering, glistening, raining, shadowing, frightening, trickling, and twinkling — with all indoor light or outdoor light coming indoors in all its lit glory sometimes is best done without the help of your flash. Take a look at Figure 6-3. I took this photograph (with no flash) inside a subway station, using only the lighting there. (This photograph also offers an example of using the vanishing point to create visual interest.)

No flash? Indoors? No worries. With today's digital photo technology, you can indeed take a picture indoors without a flash. At higher ISO speeds and under the right circumstances, you don't need a flash. The right circumstances, mind you, have to do with the availability of light. Eye the light around you, seeking some for your picture when you don't plan on using a flash.
Note
When filming indoors, set your digital camera no higher than 400 ISO to find a compromise between graininess and blur.
So why not just use a flash instead of moving around the camera and yourself and/or your object, seeking out available light? Although flash as fill light can be your friend, flash light can also be a little obtrusive and difficult to control. For example, flash light sometimes interrupts what you're photographing, smacking it with a big white splash in just the part that you wanted to show up clear. This will happen without a doubt when you film shiny, plastic, flat surfaces with dark colors, or when you shoot through glass.
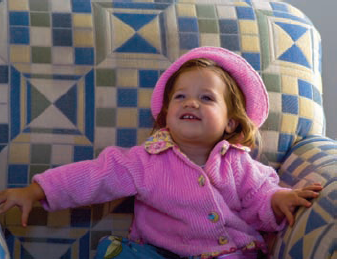
Trust me, though; it's okay to shoot indoors without a flash. To get great shots indoors without a flash, you just have to position yourself and your subject to make the best of indoor lighting. For instance, in Figure 6-4 (taken without a flash and obviously indoors), the little girl is lit with natural light coming through a window to her left. Because I didn't shoot directly into the light, the girl is evenly and softly lit, illuminating her perfectly and giving nice, soft colors suitable for a little girl.
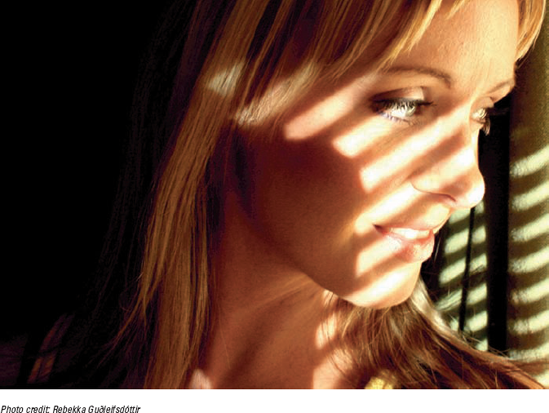
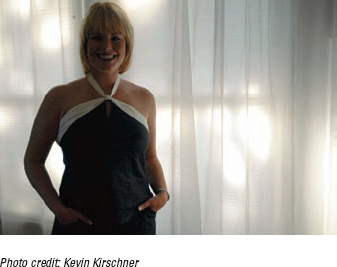
In Figure 6-5, again, only available light is used. The young woman is positioned next to half-closed blinds so that she is lit by the natural light while shadows caused by the blinds also add a slightly dramatic effect.
When shooting indoors, you can use a seeming disadvantage — not much available light in which to shoot — to your advantage. For example, without enough light, moving subjects can be blurry. Hmmm. Take that information and turn it into an art photo opportunity.
Indoor photography has gotten much easier with the advent of digital photography. You can shoot on the spot without having to go out and buy film. (See the earlier section, "ISO speed," for more information about exploiting ISO speeds.) You also set your digital camera to the correct ISO without having to change cameras (like with film) or wait till one roll of an ISO film is done before changing to another. Before you read on, though, I want to take a moment to discuss blur. Blur is an oft-spurned element of photography that is usually left to the professionals. I can't think of any logical reason for this except that maybe people thought the pros had better control over the beast.
But blur is not such a wily beast; you can tame it under the right circumstances. This is not new stuff, either, but it is as modern as photography. When the 19th century came to an end, photographers began shooting images not to solely copy real life but in an attempt to change it, following literature and other visual arts in taking the viewer away from what was thought of as real to the artist's subjective world — real and otherwise. In the late 19th and early 20th centuries, photographers began using blur as a tool to create their art. Figure 6-6 shows a blurred image that was produced at a low ISO in low light and shot in auto setting. That's one of the easiest, but not most effective, ways to produce controlled and artistic blur.
Blur is like poetry: Its interpretation can be left to your viewer. Basically, you just create it — either you plan for it, let it happen intentionally, or have it happen by mistake. However it happens to be created, you can be sure that each time blur is created, it always sparks curiosity:
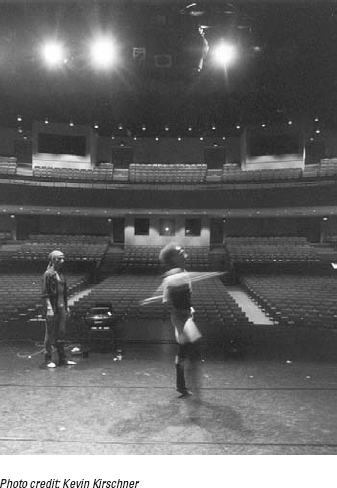
Make blur a strong element in your art photos. Blur makes scenes anonymous, adding mystery to people and/or scenes. If either a part/person or the entire image of an image is blurred (as in Figure 6-7), you sense added thoughtfulness, such as the passage of time among life's fleeting moments.
Create blur as an intended effect in your images. Sometimes you just don't have enough light indoors to create a clear image, no matter what you do. However, if your subject moves in real life anyway, blurring it in the photo can make it look like it's moving.
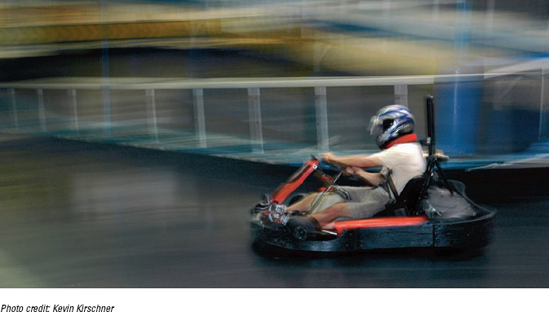
Create blur by panning your camera. If you pan just right, you can get a clear picture of your subject, which I discuss further in Chapter 11. Or you can just swing your camera following your subject to blur it, as in Figure 6-8.
A picture can be a big disappointment if your subject comes out too light. This happens sometimes when you're filming a person within a bright background. Your camera's light meter probably calculated the shot. The light meter is the device inside your camera that evaluates how much light is in a scene so that your camera's sensor can produce a properly lit picture, unlike the one shown in Figure 6-9, which is too light.
Sometimes, though, the sensor can't calculate it accurately because there's too much light around the subject. If you're photographing in an automatic setting and don't want to fool around with your camera's setting, move closer (or zoom in) to the subject so that there's little or no background, like in the photo shown in Figure 6-10.

Adjust your exposure compensation for more light to go to the sensor. Most high-end and midrange digital cameras offer a feature called exposure compensation. To give your subject more light, you need to overexpose, or add more light to your shot: You need to adjust exposure compensation to the positive values that your camera displays. Negative values underexpose your shot, which is a concept that I discuss further in Chapter 8. (Keep in mind, however, that when you're talking about digital images you plan to manipulate in Photoshop, overexposure is more damaging than underexposure. The reason for this is that after pixels are "whited out," no information is available. True, moderately underexposed images produce more grain when you correct them in Photoshop, but at least you have some information to work with.)
When you photograph a person in a bright background and you overexpose your shot, it evens out the available light that's there. And although certain reflective backgrounds, like glass, will blast with white, this effect can be quite undesirable.
Tip
The flashes on many prosumer and dSLR cameras do a great job in filling in uneven ambient light. I suggest using it inside for portraits of people.
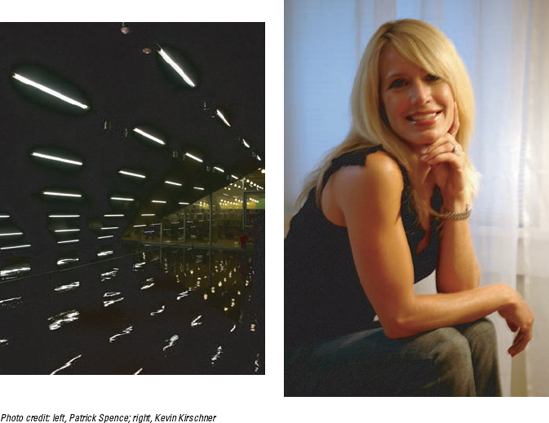
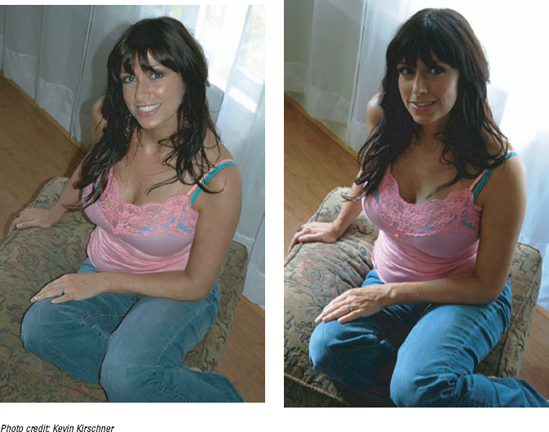
What at first sight might look like the wrong hue or tone in a photo might not really be wrong at all. Sometimes the tones and hues produced by indoor light can be mesmerizing, bringing the viewer to what looks like the future (very white light) or the past (light with a mustard tone). Fluorescent light appears white and gives that futuristic-looking effect shown in the left image in Figure 6-11. Tungsten appears yellow in the right image of Figure 6-11. For more about color imbalance, check out Chapter 8.
Finding fascinating light indoors is not that hard. After all, light is everywhere, but sometimes there just isn't enough to properly expose a shot. What should you do? The obvious answer is to shoot with a flash. Filming without a flash usually yields better results because using ambient light provides a total lighting effect that is more even. However, using a flash is not a panacea to low-lighting blues because a flash can travel only a short distance.
Note
A traditional rule of photography is to not mix light — that is, indoor and outdoor — in the same picture. In traditional portrait and landscape photography, combining light sources is probably not a good idea because it can cause your camera's light meter to read parts of your picture in error. However, sometimes mixing light in an art photo — augmenting indoor light — can create a distinctive effect. For more about light and light temperatures, see Chapter 8.
Figure 6-12 shows how a camera's light meter has no trouble reading the yellow light (tungsten). However, the other light within the frame is misread as pure blaring white that looks like the film and/or sensor has been burned.
Your camera's built-in flash can leave white blotches on your image. Sure, you probably can take out these flash blasts in Photoshop later, but that's time-consuming. The best solution to this problem is to either move the image to better light or to use a tripod.
Tip
If you have a situation where you don't have enough light (or where you're not sure whether you have enough light), take two photographs — one with a flash and one without a flash — as in Figure 6-13.
Each exposure has its own merit:
In Figure 6-14, the light peeks from outside in the top of the picture, giving the viewer a sense of a way in and a way out. A couple of things about the light in this shot makes it interesting:
The reflection from the indoor lights sink into the floor, mixing brown tones with yellow, which is a good color match.
The outdoor light in the back of the photo is natural, contrasting the indoor light in color and intensity.
The outdoor light provides a background for the moving man — one that brings the image of him forward, propelling him in the direction that he is moving.
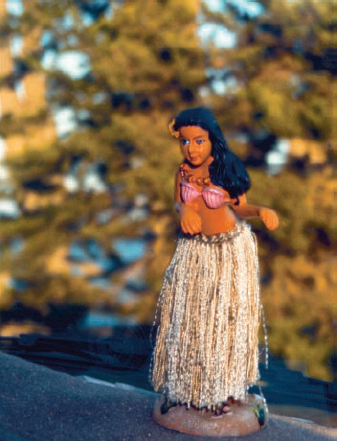
Here's another way to combine indoor and outdoor light. Figure 6-15 has been taken from inside a truck. The camera is inside a truck, using the light coming through the windshield. This light creates excellent back light, meaning that the subject (the dashboard scene) is lit from the back. Also notice the fill light — the light coming from the windows on either side. Fill lights, well, fill the front and back to reduce shadow. The front light here is very subtle and smooth (coming from the rear window), just where the sun is peeking through, creating an almost perfect lighting situation for a dancing hula girl. For more about fill lights and back lights, see the later section, "Adding extra light sources; studio set up."
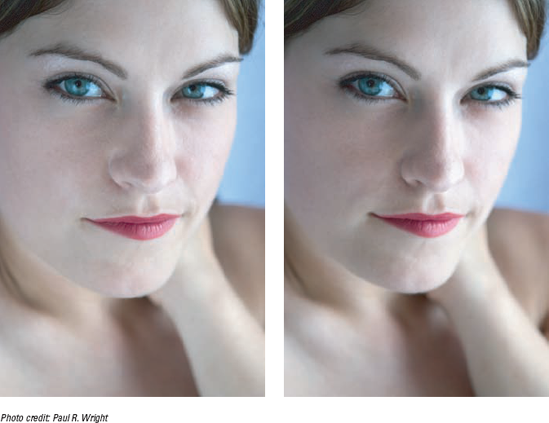
You need to use whiteboards (or reflectors) when you're shooting in a room with only one or two fluorescent or tungsten lamps. Notice the difference when you use a whiteboard (left image in Figure 6-16) compared with not using one (image on the right in Figure 6-16). Whiteboards are easy to make. Because a whiteboard can be made out of any type of board that is white, you can find something to use in almost a dozen sizes at any office store. Styrene boards are great stuff to use to make reflectors. Just cut your whiteboard in two, hinge the pieces, and tape it together so it can sit on a table like an open book.
Tip
When you photograph in many offices or stores, you won't need to use a whiteboard because these places already have lots of fluorescent lights that offer you enough light to take a good picture. And if you can't obtain a whiteboard when photographing in a poorly lit area, you can use other flat, reflective items in place of a whiteboard, like a regular ol' umbrella (yes, opened) or even a tray.
Sometimes the available light indoors or reflective devices are just not enough light for your needs. When that happens, you might have to resort to adding light sources for your shoot.
Although not the route many digital photographers are going to take while photographing scenes and objects, professional lighting such as that done with portable fluorescent lights and stands offers some good concepts about how to create different effects in your photographs.
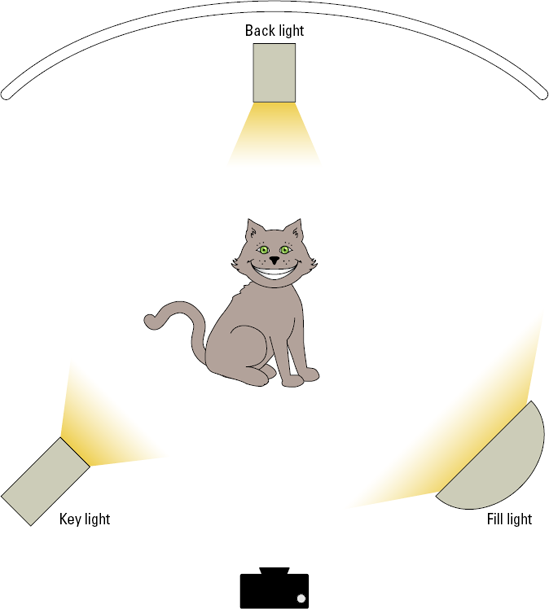
A photograph of a hula girl earlier in this chapter (refer to Figure 6-15) shows you how light from all around an object — the back, the front, and the sides — can create a good picture without shadows and with softened controlled light. In contrast, Figure 6-17 shows the placement of lights in a studio or for a TV production — ideas that you can use by looking around at the light you have available:
Key light effect: This effect is achieved when you place your object directly in front of a strong light source, with no other light around it. Using only a key light produces harsh shadows if the surface isn't flat. If it is flat, it could produce great color. (See Chapter 8, where I discuss getting great color in your photographs.)
Fill light effect: Place your object near a weak light to get a fill light effect. For example, if you place an object on the side of a 60-watt lamp (or to the side of the sun at dusk or dawn), and that is the only light source, you get a mysterious effect, or even a spooky one. The subway picture earlier in this chapter (refer to Figure 6-2) uses many fill lights.
Back light effect: Place a light behind an object to get a back light effect. This produces almost the same effect as shooting into the sun, as I discuss in Chapter 5.
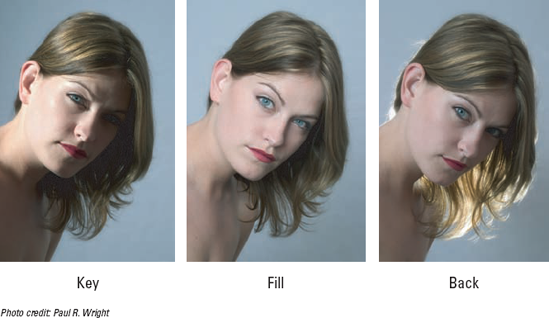
The images in Figure 6-18 show how using each of these lighting techniques can affect your shot.
You can use these light placements in combination inside your home and anywhere else by renting studio lighting. Studio lighting usually comes in kits, some with two lights and a reflector umbrella. Instead of using a fill light, the umbrella bounces the light off the key light.
Tip
Beginning studio lighting kits are available for purchase on the Internet and start at around 300. Type the keywords "studio lighting" into your search engine to shop.
In the earlier section, "Comparing shooting with and without flash," I discuss how flash photography indoors is a viable alternative to lighting your subject, provided that your subject
Is close enough to the camera: Your camera's flash spreads light only a few feet in front of you; this depth varies depending on your flash. The light that it spreads is white light and quite effective on human subjects.
Doesn't have a reflective surface: If you're shooting from behind glass with a flash, you'll get a lot of light bouncing all over the place. You probably should think about that when taking a picture of a framed picture behind glass.
Tip
Many digital cameras will use a low ISO when your picture is taken with a flash so that your image is crystal clear. If you provide your own light, it automatically sets the ISO higher, resulting in a less clear shot. For more on ISO settings and auto mode, see the beginning of this chapter.