
14. Mixing Basics
Mixing is a process of slowly building and shaping multiple tracks of audio into a balanced and coherent presentation. There are no absolute rules in mixing—following your own ears and tastes is essential. There are, however, a few important basics that you need to know if you want to turn a rough mix into an exciting sound production.
This chapter starts with an in-depth look at creating stereo mixes. We’ll describe how stereo imaging is used to simulate a three-dimensional acoustic space and explain how panning, equalization, and spatial effects can create the perception of width, height, and depth in a stereo mix.
We’ll also discuss how audio signal flows through individual channel strips, as well as how to assign track inputs and outputs. Next, we’ll cover inserts: how they operate, how signal flows through them, and the basics of mono and stereo DSP effects plug-ins. Then we’ll show you how to assign sends and how to use send and track Output windows.
Last up, we’ll cover the useful trick of creating submixes, which can help conserve track space and system resources.
Creating Stereo Mixes
A stereo mix refers to mixing multiple tracks of audio down to two channels (a left channel and a right channel). Stereo mixes are designed for listening over two speakers (a left speaker and a right speaker).
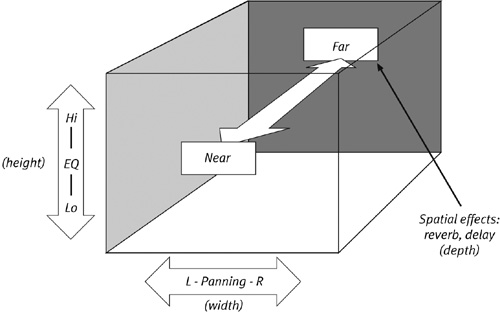
When we create a stereo mix, we’re actually constructing a simulation or “image” of a three-dimensional acoustic space. To construct this stereo image, we use various techniques to trick our binaural (two-ear) auditory system into perceiving sound in the three dimensions of width, depth, and height. These techniques include left/right panning, spatial effects (reverb, delay, chorus, and flange), and EQ shaping (Figure 14.1).
Figure 14.1. A stereo image is a simulation of a three-dimensional acoustic space: Left/right panning simulates width, EQ shaping simulates height, and spatial effects simulate depth.
The process of creating a stereo image begins during recording: The size, shape, and reflectivity of the recording space all contribute to the character of the sound. Various miking techniques, such as close miking, distant miking, ambient miking, and stereo miking, let you capture the three-dimensional character of the recording space. For more information on miking techniques, see the Microphone Placement Techniques sidebar in Chapter 6: Getting Ready to Record.
Creating width
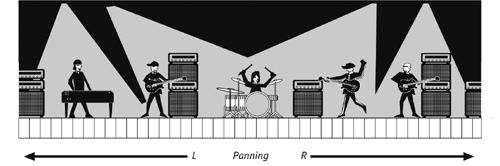
When we create a stereo mix, we use left/right panning to spread tracks out across the stereo image. This separation lets us hear tracks with more clarity and introduces the perception of width in the stereo image (Figure 14.2). Panning tracks tastefully is key to making mixes sound balanced and spacious.
Figure 14.2. Left/right panning lets you simulate the acoustic spread of a band on stage. The perception of width is created by panning elements from left to right.
Left/right panning gives sound a location within the stereo image as a result of the precedence effect. The precedence effect describes how we locate sounds in a three-dimensional space: Whichever of your ears first hears a sound perceives it as significantly louder than your other ear does. Our binaural (two-ears) auditory system uses this difference in perceived loudness to automatically triangulate the location of the sound source.
Panning a track to the left or right changes the proportional level of the track in each speaker. Due to the precedence effect, we can create the illusion that a sound is coming from any point between the left and right speakers. When the level of a track is equal in both speakers, we perceive it as coming from straight ahead.
Creating depth
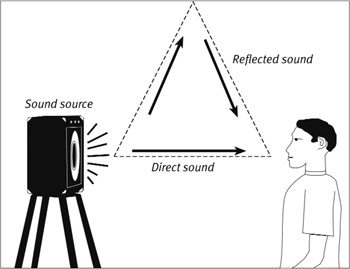
When a sound occurs within an acoustic space, we hear both direct sound and reflected sound. Direct sound emanates from the sound source and travels unimpeded to the listener. Reflected sound bounces off surfaces such as floors, ceilings, and walls; thus, it takes longer to reach the listener (Figure 14.3). The time delay between direct sound and reflected sound, combined with their relative volumes, lets us perceive depth (front to back) within an acoustic space.
Figure 14.3. The direct sound and reflected sound from an audio source reach the ear at different times. This time delay creates the perception of depth.
In stereo mixing, we use spatial effects to simulate the characteristics of acoustic spaces. Most reverbs provide pre-set room shapes with adjustable parameters (including room size, reverb decay time, and number of reflections), so you can define the character of the acoustic space.
We then mix the direct sound (uneffected signal) with the reflected sound (effected signal) to place the sound at the desired depth within the stereo image. For example, a sound placed in a large hall with many reflections (high diffusion), slow reverb decay, and no direct sound mixed in will sound distant. The same sound placed in a small room with few reflections, quick reverb decay, and lots of direct sound mixed in will sound “in your face.”
For more information on spatial effects, see Chapter 15: Adding Effects to a Mix.
Creating height
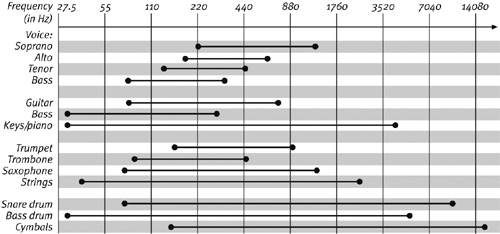
Humans hear sounds in a frequency spectrum between 20 Hz and 20 kHz. In audio production, this spectrum is generally broken down into four frequency bands: low (20 Hz–200 Hz), low-middle (200 Hz–1 kHz), high-middle (1 kHz–5 kHz), and high (5 kHz–20 kHz). Every instrument occupies a different range in this spectrum (Figure 14.4). Low-pitched instruments such as bass and tuba tend toward the lower end of the spectrum, whereas higher-pitched instruments such as flute and piccolo tend toward the higher end.
Figure 14.4. Frequency ranges of common instruments.
When we talk about creating height in a stereo mix, we’re referring to using equalization, or EQ, to open up spaces within these frequency ranges to enhance the clarity and separation of sounds within the stereo image.
Most instruments have fundamental frequencies within the low-mid range. Making small decreases (or cuts) or increases (or boosts) in this frequency range can dramatically alter the character of an instrument’s sound. Higher-pitched instruments have more frequencies in the high-mids. Boosting these frequencies can help enhance clarity, brightness, and definition.
Keep in mind that most instruments also generate harmonics up into the highs. Boosting these high harmonics can add sparkle and brilliance to a track.
For more information on EQ, see Chapter 15: Adding Effects to a Mix.
About mono compatibility
Many people still listen to music over car radios that have only one speaker. So, before you call the mix a wrap, listen to it for mono compatibility. If you notice a decrease in clarity, or if lower frequencies seem unstable, you may have some phase cancellation in the stereo mix. Phase cancellation occurs when sound waves overlap in such a way that they cancel each other out. This can cause frequencies to lose clarity or drop out entirely.
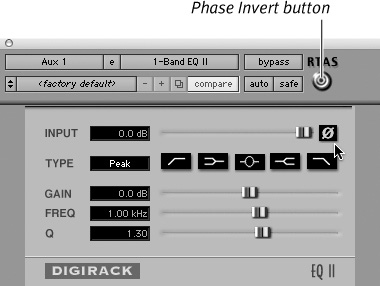
If you hear phase cancellation, try reversing the phase on any stereo-pair microphones. It’s not uncommon for improperly placed stereo microphones to introduce phasing problems. Several Pro Tools plug-ins provide phase invert buttons, including the DigiRack EQ and delay plug-ins (Figure 14.5). Also, double-check any stereo effects in the mix—some stereo effects processors can introduce out-of-phase signals.
Figure 14.5. The Phase Invert button on the DigiRack EQ plug-in.
Understanding Audio Signal Flow
Audio signal flow refers to the path that audio takes through the Pro Tools mixer. Generally, this path is fixed, moving from top to bottom through audio track, auxiliary input, and master fader channel strips.
Don’t confuse audio signal flow with I/O Setup—they’re related but not identical. Audio signal flow refers to the path audio takes within channel strips, whereas I/O Setup determines the specific channel assignments for inputs, outputs, inserts, and busses. For more information on I/O Setup, see Chapter 2: Software Basics, and Chapter 4: Starting a New Session.
About audio tracks and auxiliary inputs
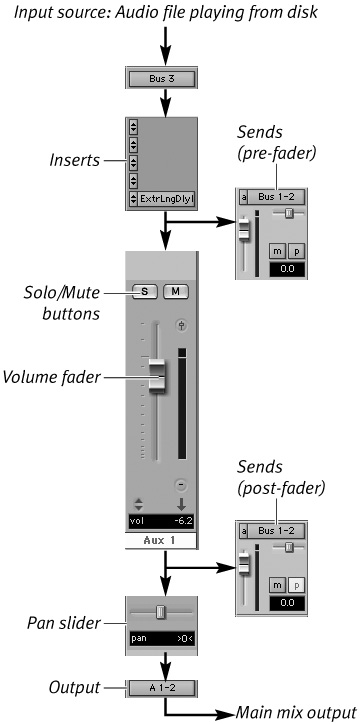
Audio tracks and auxiliary inputs have the same top-to-bottom audio signal flow: Audio travels first to any inserts, then to sends and faders, and lastly to the outputs. The main difference between audio tracks and auxiliary inputs is the audio input source: Audio tracks receive input from external audio sources or from audio files playing back on disk (Figure 14.6). Auxiliary inputs receive audio signal from internal busses or external hardware sources (Figure 14.7).
Figure 14.6. Audio signal flow through an audio track channel strip.

Figure 14.7. Audio signal flow through an auxiliary input channel strip.
Audio tracks and auxiliary inputs are designed for different mixing tasks. Audio tracks let you control the playback parameters (such as mute, solo, pan, volume level, and automation) of individual audio files as they play back from disk.
Auxiliary inputs are designed for creating submixes. A submix is created when you bus an audio signal from multiple audio tracks to a single auxiliary input. For instance, you can create a stereo submix of drums and bass by busing their tracks to an auxiliary input. This lets you control the entire rhythm section using one fader. Or, you can use an auxiliary input to create a send-and-return submix, also called an effects loop, which lets you add an effect to multiple tracks of audio simultaneously. For more information on submixes, see Creating Submixes later in this chapter. For more information on effects loops, see Chapter 15: Adding Effects to a Mix.
For additional information on audio tracks and auxiliary inputs, see Chapter 3: The Mix and Edit Windows.
About master faders
Master faders control the main volume levels of outputs and bus paths. You can use master faders for many purposes, such as to control the main mix output, submix levels, send levels, or bus levels, or to apply effects to a main mix.
Master fader inserts are always post-fader (unlike the inserts for audio tracks and auxiliary inputs, which are always pre-fader). This means the Main Mix fader always comes before the Inserts section (Figure 14.8). Thus, you can insert an effect (such as dither or an aural exciter) on the final main mix output. But use effects on the main outputs cautiously. Adding compression to a main mix is not a good idea—this is better left until mastering. Compressing the main outputs can reduce the openness of a mix and limit a mastering engineer’s options for enhancing the final output. For more information on compression and other effects, see Chapter 15: Adding Effects to a Mix.
Figure 14.8. Audio signal flow through a master fader.

For more information on master faders, see Chapter 3: The Mix and Edit Windows.
To use a master fader as a master volume control for the main mix
1. Select Track > New.
The New Track dialog box appears.
2. Select Mono or Stereo from the pop-up menu.
3. Select Master Fader from the pop-up menu (Figure 14.9).
Figure 14.9. To create a new master fader, select File > New Track. Select Master Fader from the pop-up menu.

4. Enter the number of master faders and click Create.
5. Set the outputs of all audio tracks in the session to the main mix outputs (typically 1–2) (Figure 14.10).
Figure 14.10. Set the outputs of each track in the mix to the main mix outputs (typically 1–2).
6. Set the panning position of each track.
7. Set the output of the master fader to the main mix output (Figure 14.11).
Figure 14.11. Set the output of the master fader to the main mix output (typically 1–2).
• You can make audio tracks, auxiliary inputs, and master faders inactive. Making these tracks inactive can help you conserve your system’s overall mixer and DSP resources. For more information on making tracks inactive, see Chapter 5: Working with Tracks. Or, see the Pro Tools Reference Guide.
Assigning Inputs and Outputs
Audio tracks and auxiliary inputs have Input selectors and Output selectors that let you route audio to and from their respective channel strips.
Input selectors let you assign audio input from external sources (via the Pro Tools interface) or from internal busses. Output selectors let you route audio output to external destinations (via the Pro Tools interface) or to internal busses.
Master faders, on the other hand, have only Output selectors, which let you route audio output to the main mix or to internal busses.
For more information on assigning inputs and outputs, see Chapter 5: Working with Tracks.
To assign inputs to audio tracks or auxiliary inputs
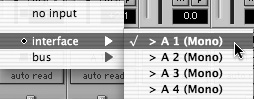
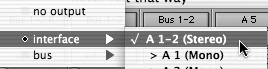
• In the Mix or Edit window, click the track Input selector and choose from the available audio interface channels and busses (Figure 14.12).
Figure 14.12. Click the track Input selector and choose from the available audio interface channels and busses.
Select No Input to remove all the input assignments on that track.
To assign outputs to an audio track or auxiliary input
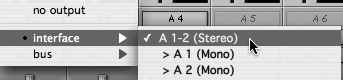
• In the Mix or Edit window, click the track Output selector and choose from the available audio interface channels and busses (Figure 14.13).
Figure 14.13. Click the track Output selector and choose from the available audio interface channels and busses.
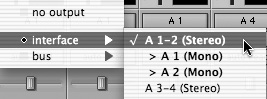
Select No Output to remove all the output assignments on that track.
To assign outputs to a master fader
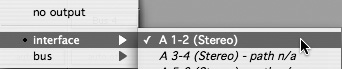
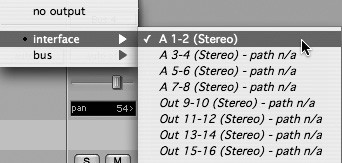
• In the Mix or Edit window, click the master fader Output selector and choose from the available audio interface channels and busses (Figure 14.14).
Figure 14.14. Click the master fader Output selector and choose from the available audio interface channels and busses.
• You can make output paths inactive. Making a track output inactive silences output while maintaining all automation and playlist data. Pre-fader sends continue to feed audio signal to their assigned destination. This can help you conserve your system’s overall mixer resources while maintaining your track configuration and effects output.
• To make an output inactive/active: Command-Control-click (Macintosh) or Control-Start-click (Windows) on the desired output. Or, uncheck/check the inactive/active box for the desired output in the I/O Setup window.
• For more information on making outputs inactive, see the Pro Tools Reference Guide. For information on making tracks inactive, see Chapter 5: Working with Tracks or the Pro Tools Reference Guide.
About Inserts
Pro Tools provides five insert slots on each audio track, auxiliary input, and master fader channel strip. Inserts can be either hardware inserts or software plug-in inserts.
In terms of audio signal flow, audio travels through the inserts section of a channel strip sequentially from top to bottom (Figure 14.15). Therefore, a plug-in inserted in a higher position will deliver an effected audio signal to a plug-in inserted in a lower position. For example, if you insert a reverb below a delay, the audio signal entering the reverb will already have delay on it. You can change the order of inserts by dragging them up or down (Figure 14.16).
Figure 14.15. Audio flows through the Inserts section of a channel strip sequentially from top to bottom.

Figure 14.16. You can change the order of inserts by dragging them up or down.

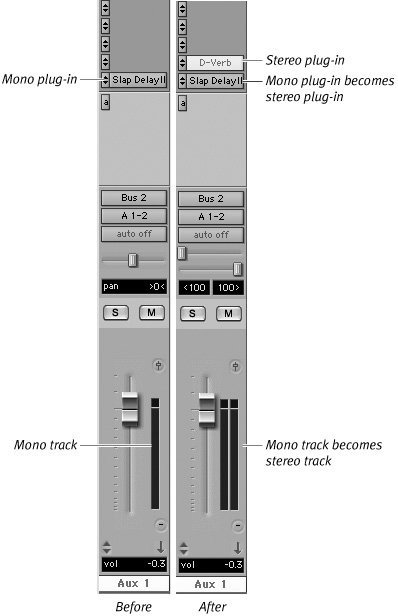
When you insert a stereo plug-in on a mono channel strip, all subsequent mono plug-ins convert to their stereo equivalents, and the mono channel strip becomes a stereo channel strip (Figure 14.17). This lets Pro Tools quickly accommodate stereo effects during a mix. For more information on using inserts, see Chapter 3: The Mix and Edit Windows or Chapter 15: Adding Effects to a Mix.
Figure 14.17. When you insert a stereo plug-in on a mono track, all subsequent mono plug-ins convert to their stereo equivalents, and the mono track becomes a stereo track.
Assigning Sends
Pro Tools 7 provides up to ten mono or stereo sends on each audio track and auxiliary input (Figure 14.18). Sends let you route audio to internal busses or external outputs. You can send audio via internal busses to auxiliary inputs to create submixes or to add plug-in effects, or you can send audio via external outputs to a headphone mix, or to external hardware effects. Sends always receive audio after it passes through the Inserts section of a channel strip.
Figure 14.18. Pro Tools 7 provides up to ten mono or stereo sends on each audio track and auxiliary input.

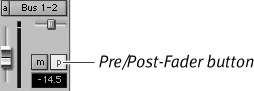
You can set a send to either Pre- or Post-Fader mode (Figure 14.19). When a send is in Pre-Fader mode, audio signal first passes through the send, and then goes to the fader. In Post-Fader mode, the signal first passes through the fader, and then travels to the send. Post-fader sends are frequently used for effects processing; pre-fader sends are used for headphone and monitor mixes.
Figure 14.19. Post-fader sends are frequently used for effects processing; pre-fader sends are used for headphone and monitor mixes.
You can control send parameters (including level, pan, mute, and pre- and post-fader) through a send Output window or by using individual send controls that appear within the Sends view. For more information on sends, see Chapter 3: The Mix and Edit Windows. or Chapter 15: Adding Effects to a Mix.
To assign a send to a track
1. Click a Send button and choose an output or bus path (Figure 14.20).
Figure 14.20. To assign a send to a track, click a Send button and choose an output or bus path.

2. Set the output level of the send in the individual send control or in a send Output window.
To open a send Output window
• Click a Send button.
A send Output window appears (Figure 14.21).
Figure 14.21. A stereo send Output window.

To open individual send controls
1. Select View > Mix Window > Sends A–E and/or Sends F–J.
The selected Sends view appears in the channel strip.
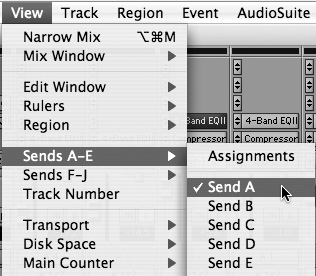
2. Select View > Sends A–E or Sends F–J and choose the desired send (Figure 14.22).
Figure 14.22. To open individual send controls, select View > Sends A–E or Sends F–J. Select any individual send (Send A through Send J).
Send controls appear for the chosen send (Figure 14.23).
Figure 14.23. An individual send control.

To display send level meters for individual send controls
1. Choose Setup > Preferences.
2. Click the Display tab.
3. Select Show Meters in Sends View (Figure 14.24).
Figure 14.24. To display send level meters for individual send controls, select Setups > Preferences, click the Display tab, and then select Show Meters in Sends View.
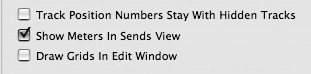
4. Click OK.
• If you’re using a slow computer, try hiding send level meters to improve screen redraw times. Also, making a send inactive releases its processing resources and helps improve system performance.
• To quickly set the send output level to zero, Option-click (Macintosh) or Alt-click (Windows) the Send fader.
• To set the default level for new sends to 0 dB (unity gain), choose Setup > Preferences > Operations. Deselect Sends Default to “-INF.”
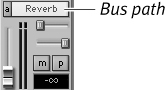
• Naming bus paths in the I/O Setup can help you keep track of send assignments (Figure 14.25). For more information on I/O Setup, see Chapter 4: Starting a New Session.
Figure 14.25. Naming bus paths in the I/O Setup can help you keep track of bus assignments.
Using Output Windows
Pro Tools provides dedicated Output windows for tracks and sends. Output windows look just like channel strips, but are larger and can hover independently over the Mix and Edit windows. This lets you easily access the output controls of the track or send during editing or mixing.
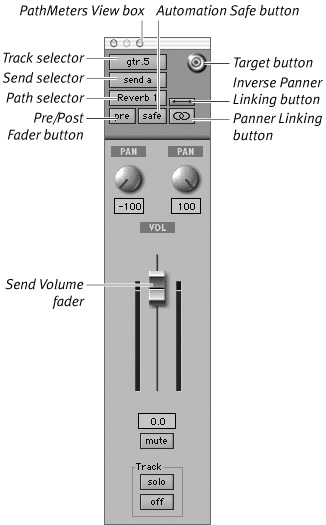
Track Output windows provide Track Volume faders, Pan sliders, Mute and Solo buttons, and automation controls (Figure 14.26). Send Output windows provide Send Volume faders, Pan sliders, Mute and Solo buttons, and automation controls (Figure 14.27).
Figure 14.26. A stereo audio track Output window.
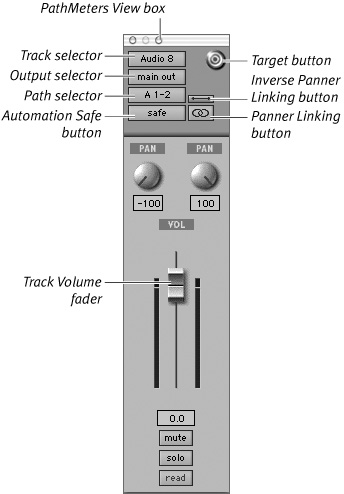
Figure 14.27. A stereo send Output window.
All Output windows have these additional controls:
Track selector: The Track selector lets you choose any audio track, auxiliary input, or master fader in the session.
Output selector: The Output selector lets you access any existing outputs.
Send selector: The Send selector lets you access any existing sends on the track.
Path selector: The Path selector lets you assign the Output path for the current track or send.
Panner Linking button: The Panner Linking button lets you link and unlink the left and right pan knobs of stereo Output windows.
Target button: The Target button lets you keep the current Output window open when you open a new Output window. Clicking the target changes it from red to gray and anchors it to its current location and output assignment.
Automation Safe button: The Automation Safe button places the track in Safe mode and prevents existing automation from being overwritten.
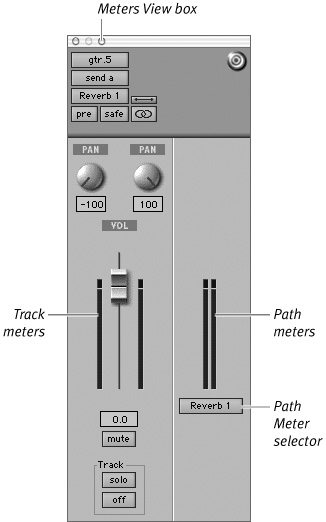
Meter View box: The Meter View box opens an expanded Output window that includes path level meters (Figure 14.28).
Figure 14.28. The expanded meter view in the stereo send Output window lets you view path level meters.
To open a track Output window
• Click the Output Window button of an audio track, auxiliary input, or master fader channel strip (Figure 14.29).
Figure 14.29. To open a track Output window, click the Output window button.
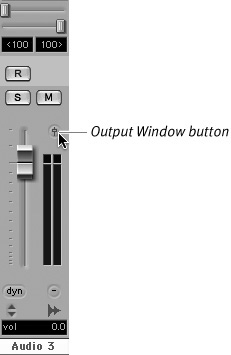
The track Output window appears.
• When the Sends view is showing assignments, click on the send (Figure 14.30).
Figure 14.30. To open a send Output window, click the send itself.

or
• When the individual send controls are showing, click the send Output selector button.
A sends Output window appears.
Linking stereo pans
Stereo Output windows provide a Panner Linking button that lets you move left and right pan knobs simultaneously. When linked, left and right pan knobs move in the same direction in unison.
Pro Tools also provides Inverse Panner Linking, which lets you move the pans in mirror opposite directions.
To enable Panner Linking
• Click the Panner Linking button (Figure 14.31).
Figure 14.31. The Panner Linking button. Click this button to move stereo pans in unison.
![]()
The Panner Linking button becomes highlighted. The stereo pans now move together in unison.
To enable Inverse Panner Linking
1. Click the Panner Linking button.
2. Click the Inverse Panner Linking button (Figure 14.32).
Figure 14.32. The Inverse Panner Linking button. Click this button to move stereo pans in mirror opposite directions.
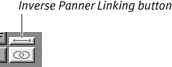
The Inverse Panner Linking button becomes highlighted. The stereo pans now move in mirror opposite directions.
• To open multiple track or sends Output windows, Shift-click any Output button or send assignment.
• To keep an Output window open, click the red Target button (Figure 14.33). The Output window remains open when other output windows are opened.
Figure 14.33. The Target button.
![]()
Creating Submixes
When you create a submix, multiple tracks of audio are merged into a single track. Submixing is useful if you’re running low on tracks and you want to free up additional track space. Submixes also let you control groups of instruments from a single set of track controls. For instance, creating a stereo submix of multiple drum tracks lets you control the entire drum section from a single stereo fader.
When you create a submix, audio is routed from either sends or track outputs to available busses. The audio is then received by audio tracks or auxiliary inputs whose track inputs are assigned to the same bus. To merge source tracks into a single destination track, you must record the combined signals to a new audio track.
When creating a stereo submix, make sure the sound quality, relative levels, and stereo panning are how you want them to be in the final mix. It’s a good idea to save the original audio files in case you decide later that you don’t like the submix—this way you can import the original files and start over.
You can also create submixes to add effects to multiple audio tracks simultaneously. This is called an effects loop. When you create an effects loop, you send the audio (on a bus) to an auxiliary input. The signal is then routed through any effects inserted on the auxiliary input. The auxiliary input then returns the effected signal to the main mix. For more information on creating effects loops, see Chapter 15: Adding Effects to a Mix. For more information on creating submixes, see the Pro Tools Reference Guide.
To create a submix of multiple audio tracks to a single audio track
1. Choose Track > New.
2. Create a stereo audio track.
A new stereo audio track appears. This is the destination audio track for the submix.
3. Assign a send or track output to a bus path for each source track you want in the submix (Figure 14.34).
Figure 14.34. When creating a submix, assign send or track outputs to a bus path for each track you want in the submix.

4. Assign the destination track inputs to the same bus path assigned to the source tracks (Figure 14.35).
Figure 14.35. Assign the inputs of the destination track to the same bus path assigned to the source tracks.
5. Assign the outputs of the destination audio track to the main mix (Figure 14.36).
Figure 14.36. Assign the outputs of the destination audio track to the main mix.

6. Record-enable the destination audio track.
7. Using either the sends output controls (for sends) or track controls (for track outputs), adjust the relative volumes and stereo panning of the source tracks. (To accurately monitor the submix when using sends, make sure the source track’s outputs are set to the main mix outputs.)
8. In the Transport window, click Record-Play to record the submix to the destination stereo audio track.
9. Listen to the submix.
Make any necessary volume or panning adjustments to the source track’s output controls. Repeat as many times as necessary.
• If you’ve used up all available tracks in a session, you can still free up tracks by bouncing a submix to disk. Bouncing to disk does not require any additional tracks. You can bounce as many or as few tracks as you want, including the entire final mix (with effects and automation). For more information on bouncing to disk, see Chapter 17: Mixdown and Mastering.
• An advantage of using sends instead of track outputs to bus audio is that each send has separate output controls. This lets you adjust volume, pan, and mute for each track without changing the track control settings on the actual audio track.
• If you have open tracks (and don’t need to merge tracks into a submix for effects processing or any other reason), consider creating mix groups. Mix groups let you control the parameters (such as volume, solos, mutes, send levels, and automation) for all grouped tracks from a single set of track controls. For more information on mix groups, see Chapter 5: Working with Tracks.