
15. Adding Effects to a Mix
Adding effects can help you transform a flat and lifeless rough mix into a spacious and exciting sound production. Effects let you shape a mix in many ways: You can balance track levels with compression or open up frequency ranges with equalization (EQ). You can even place tracks inside spacious sonic landscapes with reverb and delay.
Pro Tools lets you use both internal software effects, called DSP plug-ins, and external hardware effects. Third-party vendors offer numerous RTAS plug-ins, many of which use the same algorithms as their hardware ancestors. And if you have a roomful of vintage gear that you’re aching to use, it’s a snap to patch in external hardware.
Think of this chapter as a primer on effects. We’ll cover plug-in and external hardware effects, and we’ll introduce you to three useful types of effects: EQ, dynamic effects, and spatial effects. With a little practice you’ll be sending your mixes into new dimensions... literally.
What Is a DSP Plug-in?
A DSP (digital signal processing) plug-in is software that lets you add effects such as reverb, compression, and EQ to audio signals within the Pro Tools environment.
Real-time and non-real-time DSP plug-ins
Real-time DSP plug-ins process audio signals non-destructively while a session is playing (the original audio file is unchanged). Real-time plug-ins can receive existing audio signals playing back from disk, or live audio signals as they are being recorded to disk.
You can monitor the output and adjust the parameters of a real-time plug-in at any point during the production process until you are satisfied with the effect. The effect is not recorded into the session until you mix it down to an external 2-track recording machine or bounce it to hard disk in Pro Tools.
Non-real-time effects operate independently of session playback. These effects alter the original audio file and replace it with a new audio file containing the effect.
Pro Tools 7 systems support the following real-time and non-real-time DSP plug-ins:
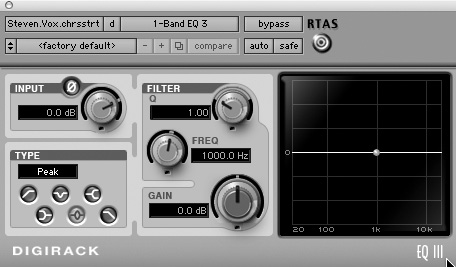
RTAS (Real-Time AudioSuite): (Pro Tools LE and HD systems) RTAS plug-ins use your computer’s CPU to process audio non-destructively in real time (Figure 15.1). Pro Tools LE ships with Digidesign’s DigiRack RTAS plug-ins.
Figure 15.1. The DigiRack RTAS 1-Band EQ III plug-in.
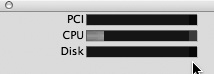
Using large numbers of RTAS plug-ins can tax CPU resources and hamper the performance of other Pro Tools features such as track count, edit density, graphics, and automation. Keeping an eye on the System Usage window (Figure 15.2) can help you manage CPU resources and get the most out of RTAS plug-ins.
Figure 15.2. The System Usage window can help you manage CPU resources.
TDM (Time-Division multiplexing): (Pro Tools HD systems only) Unlike RTAS plug-ins that rely entirely on a host computer’s processor, TDM plug-ins use dedicated DSP processing chips provided with higher-end Pro Tools HD. For more information on TDM plug-ins, see the Pro Tools Reference Guide or the DigiRack Plug-ins Guide.
AudioSuite: (Pro Tools LE and HD systems) Pro Tools ships with a diverse set of non-real-time AudioSuite plug-ins. You can configure AudioSuite plug-ins to either destructively alter the original audio file on disk or to create an entirely separate new audio file containing the effect.
About Plug-ins as Inserts
Pro Tools lets you use up to five real-time DSP plug-ins as inserts on each track. You can use these inserts in two ways:
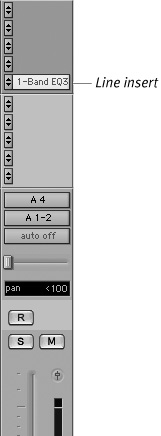
Line Inserts (single tracks): You can use plug-ins as line inserts on individual audio tracks, auxiliary inputs, and master faders (Figure 15.3). A line insert applies its effect only to the track on which it’s inserted. For example, you can add compression to a lead vocal by simply inserting a compressor on the lead vocal track. Inserts on audio tracks and auxiliary inputs are always pre-fader. Inserts on master faders are always post-fader.
Figure 15.3. A 1-Band EQ III plug-in used as a line insert. A line insert applies its effect only to the track on which it’s inserted.
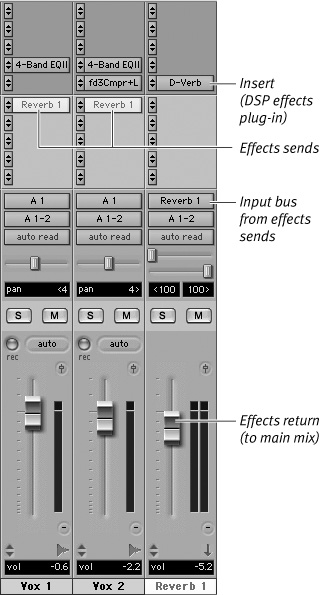
Effects Loop (multiple tracks): You can use a plug-in in a send-and-return submix, known as an effects loop (Figure 15.4). An effects loop lets you add an effect to multiple tracks simultaneously. To create an effects loop, you insert a plug-in on an auxiliary input, and then bus as many tracks as you want to the auxiliary input for simultaneous processing. The auxiliary input then returns the processed audio to the main mix outputs. Because effects loops process multiple tracks simultaneously, they can help you conserve CPU resources. For more information on effect loops, see Creating Effects Loops later in this chapter.
Figure 15.4. An effects loop. The effects sends on each track bus audio to the auxiliary input. The auxiliary input’s volume fader acts as the effects return. For an example of an effects loop, see Figure 15.32.
Understanding plug-in formats
Pro Tools lets you use the following plug-in formats:
Mono plug-ins: Mono plug-ins are designed for use on mono tracks. They have mono (one-channel) outputs.
Mono/stereo plug-ins: Mono/stereo plug-ins are designed for use on mono tracks; however, they have stereo (two-channel) outputs. When a mono/stereo plug-in is inserted on a track, all subsequent inserts (and the track itself) become stereo.
Multi-channel (stereo) plug-ins: Multi-channel plug-ins are designed for use on stereo or larger multi-channel tracks. In Pro Tools LE, all multi-channel plug-ins are stereo.
Multi-mono plug-ins: Multi-mono plug-ins are designed for use on stereo or larger multi-channel tracks when a multi-channel version of the plug-in is not available. Parameters for all channels are linked by default. You can, however, unlink parameters using the Master Link button. Unlinking parameters lets you control the parameters for each channel separately.
Inserting Plug-ins on Tracks
In order to use an RTAS plug-in in Pro Tools, you must first insert it on a track. You can do this in the Inserts view of either the Mix or Edit window. Both windows display all currently inserted plug-ins (Figure 15.5).
Figure 15.5. The Inserts view displays all currently inserted plug-ins.

To insert a plug-in on a track
1. Choose View > Mix Window > Inserts.
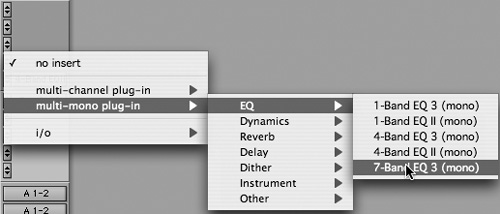
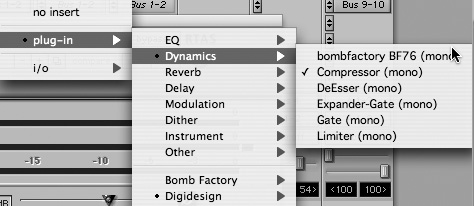
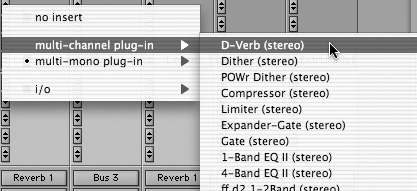
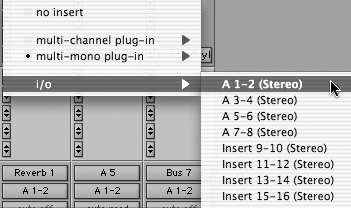
2. Click an Insert selector on the track and choose the desired plug-in (Figure 15.6).
Figure 15.6. To choose a plug-in, click an Insert selector and choose from the plug-ins menu. Multi-channel plug-ins offer 2-track L/R (stereo) output. Multi-mono plug-ins are one track (mono).
The plug-in window appears.
Inserting plug-ins during playback
You can insert plug-ins during playback, with the following restrictions:
• Plug-ins cannot be inserted or removed during recording.
• Plug-ins that change a track’s format cannot be inserted or removed during playback. (For instance, when you insert a stereo plug-in on a mono track, the track automatically becomes a stereo track.)
• Plug-ins that contain automation cannot be removed during playback.
• Plug-in automation cannot be enabled during playback.
• Side-chain inputs cannot be created during playback.
Moving and duplicating inserts
You can move or duplicate already inserted plug-ins by dragging them to open insert slots on the same track or on another track. When you move or duplicate inserts, they retain their original settings and automation.
To move an insert
• Drag the insert to the desired location (Figure 15.7).
Figure 15.7. You can move inserts by dragging them between slots in the Inserts view.

The moved insert appears in the new location.
To duplicate an insert
• Option-drag (Macintosh) or Alt-drag (Windows) the insert to the desired location.
A copy of the insert appears in the new location.
For more information on inserts, see Chapter 14: Mixing Basics and Chapter 3: The Mix and Edit Windows.
• A lit Insert button in the Inserts view indicates that the corresponding plug-in window is open (Figure 15.8).
Figure 15.8. When a line insert is lit, the corresponding plug-in window is open.

Organizing the Plug-ins menu
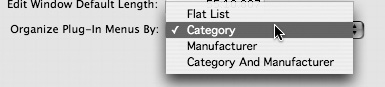
The Plug-ins menu is displayed when you click on insert selectors and plug-in window selectors. You can organize the Plug-ins menu by selecting an option from the “Organize Plug-In Menus By” pop-up menu, in the Display tab of the Preferences menu, as follows:
• Flat List: Flat List organizes all plug-ins available in alphabetical order.
• Category: Category organizes the Plug-in menu according to effects type, including EQ, Dynamics, Delay, Reverb, Pitch Shift, Noise Reduction, Modulation, Dither, Hardware, Instrument, and Other. Plugs-ins can appear in more than one category.
• Manufacturer: Manufacturer organizes the Plug-in menu by the company that makes the plug-in, such as Digidesign, Propellerheads, Eventide, and so on.
• Category and Manufacturer: Category and Manufacturer organizes plugs-in on two levels. The top level orders them according to effect type, and the second level places them under manufacturer headings (Figure 15.9).
Figure 15.9. The Plug-ins menu organized by Category and Manufacturer.
To organize the Plug-ins menu
1. Choose Setup > Preferences.
2. Click the “Organize Plug-in Menus By” pop-up menu and select an option (Figure 15.10).
Figure 15.10. To organize the Plug-ins menu, choose Setup > Preferences. Then select an option from the “Organize Plug-in Menus By” pop-up menu.
3. Click Done.
The Plug-ins menu will organize plug-ins according to the selected option.
• The insert selector in the Mix and Edit window also functions as a “clip indicator” for certain plug-ins. When a plug-in’s processed signal has clipped, the indicator turns red. To clear the clip indicator, click the LED in the plug-in header.
Using Plug-in Windows
When you click on an insert, a window for the assigned plug-in appears. This window lets you adjust the parameters of the corresponding DSP plug-in.
By default, Pro Tools displays one plug-in window at a time, but for convenience, you can display multiple plug-in windows. You can also open and adjust parameters on individual channels of multi-mono plug-ins.
Plug-in windows share the following parameters (Figure 15.11):
Key Input selector: The Key Input selector lets you select audio on a particular input or bus and route it to the plug-in. This menu only appears on plug-ins that feature side-chain processing.
Librarian menu: The Librarian menu lets you recall settings files saved in the plug-in’s root settings folder or in the current session’s Settings folder.
Settings menu: The Settings menu lets you copy, paste, save, and import plug-in settings.
Track selector: The Track selector lets you choose any non-MIDI track in the session.
Insert Position selector: The Insert Position selector lets you choose any insert on the current track.
Plug-in selector: The Plug-in selector lets you choose any real-time plug-in from the Plug-ins folder.
Compare button: The Compare button toggles between the original saved plug-in setting and the current plug-in setting.
Effect Bypass: The Effect Bypass disables the currently displayed plug-in. This lets you hear the track with and without the plug-in.
AutomationEnable button: This feature lets you enable automation recording for individual plug-in parameters.
Automation Safe button: The Automation Safe button protects plug-in automation from being overwritten.
Link Enable buttons: The Link Enable buttons let you link channels of a multi-mono plug-in. Each square represents a channel. (The Master Link button must be disabled to use the Link-Enable buttons.)
Channel selector: The Channel selector lets you access specific channels within a multi-channel track. This feature appears on multi-mono plug-ins only. Shift-click the Channel selector to open a separate plug-in window for each channel.
Master Link button: The Master Link button links the parameter controls on all channels of a multi-mono plug-in. This lets you adjust multiple channels simultaneously.
Target button: The Target button lets you select a plug-in as the target for any keyboard commands.
Phase Invert button: The Phase Invert button lets you invert the phase polarity of the input signal.
Figure 15.11. The DigiRack RTAS Compressor plug-in window.

• Click on an insert (Figure 15.12).
Figure 15.12. To open a plug-in window, click the insert in the Inserts view.
The selected plug-in window appears.
To open multiple plug-in windows
• Click the red Target button on each plug-in window that you want to remain open (Figure 15.13).
Figure 15.13. The red Target button.
![]()
The Target button becomes grayed out and the window remains open when other plug-in windows open.
or
• Shift-click the Insert button of the desired plug-in.
The selected plug-in window opens, and any open plug-in windows remain open.
To select a different plug-in on the same track
• Click the Plug-in selector and choose a plug-in from the pop-up menu (Figure 15.14).
Figure 15.14. To select a different plug-in on the same track, click the Plug-in selector and choose a plug-in from the pop-up menu.
The window for the new plug-in appears.
To select a plug-in on a different track
• Click the Track selector and choose a track from the pop-up menu (Figure 15.15).
Figure 15.15. To select a plug-in on a different track, click the Track selector and choose a track from the pop-up menu.

To open plug-in windows for each channel of a multi-mono plug-in
1. Option-click (Macintosh) or Alt-click (Windows) the Channel selector in the plug-in window of the desired plug-in (Figure 15.16).
Figure 15.16. To open plug-in windows for left and right channels of a multi-mono plug-in, Option-click (Macintosh) or Alt-click (Windows) the Channel selector.

2. Select the desired channel.
The plug-in window of the desired channel appears.
Bypassing Plug-ins
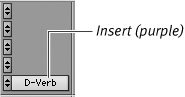
Pro Tools lets you bypass a plug-in by clicking its Effect Bypass button (Figure 15.17). Bypassing a plug-in lets you compare the effected signal with the original dry signal. When a plug-in is in Bypass mode, the Insert appears blue (Figure 15.18). If one channel (left or right) of an unlinked multi-mono plug-in is bypassed, the Insert appears purple (Figure 15.19).
Figure 15.17. An Effect Bypass button.
![]()
Figure 15.18. When a plug-in is in Bypass mode, the Insert selector appears blue.
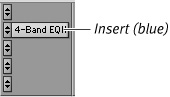
Figure 15.19. If one channel (left or right) of a multi-mono plug-in is bypassed, the insert appears purple.
Bypass is different from using the Compare button, which lets you compare the original saved effect settings with the current plug-in setting configuration.
To bypass a plug-in
• Click the plug-in window’s Bypass button.
or
• Command-click (Macintosh) or Control-click (Windows) the plug-in’s Insert button.
Adjusting Plug-in Parameters
One nice thing about real-time plug-ins is that you can adjust them in real time—in other words, you can make changes to their parameters during playback. You can edit a plug-in’s parameters by dragging its controls or by typing values into its value fields.
For instructions on adjusting individual RTAS plug-ins, see the DigiRack Plug-ins Guide, or consult the documentation that came with your third-party plug-in.
To adjust a plug-in parameter
1. Begin audio playback so you can hear parameter changes in real time.
2. Adjust the parameters of the plug-in to achieve the desired effect.
To fine-tune plug-in parameter settings
• Command-drag (Macintosh) or Control-drag (Windows) on the desired parameter control.
To return a control to its default value
• Option-click (Macintosh) or Alt-click (Windows) on the desired parameter control.
• If you have multiple plug-in windows open, click the Target button of the plug-in window that you want to make active.
• You can use the computer keyboard to make the following edits:
Click in the value field of the parameter that you want to edit. Enter the desired value (Figure 15.20).
Figure 15.20. Use the computer keyboard to input values directly into the value field of any plug-in parameter.

In fields that support values in kilohertz, typing “k” after a number value will multiply the value by 1000. For example, for 4000, enter 4k.
To increase a value, press the Up Arrow key on your keyboard. To decrease a value, press the Down Arrow key.
To move downward through the different parameter fields, press the Tab key. To move up, press Shift-Tab.
Types of Effects
Audio effects act upon the basic properties of a sound wave to create a new sound wave with different characteristics. Effects influence audio frequencies, volume, pitch, and duration, and simulate acoustic spaces that reflect and absorb sound waves. The most common types of audio effects are
Equalization (EQ): Equalizers let you adjust the volume of selected frequencies of a sound wave.
Dynamics: Dynamic effects (such as compressors, expanders, limiters, and noise gates) let you control the volume of a sound at specific threshold volume levels.
Delay: Delay effects (echo) let you repeat a sound at select delay times.
Reverb: Reverbs simulate the complex reflections (reverberations) of a sound within an acoustic space.
Other common audio effects include the following:
Pitch Shift: Pitch Shift changes the tuning of a musical part by percentages of a musical octave.
Time Compression/Expansion: Time Compression/Expansion effets change an audio signal’s duration (length) without changing its pitch.
Dither: Dither uses a technique known as “noise-shaping” to minimize digital quanitization error and the resultant noise it can produce.
What Is EQ?
Equalization (EQ) refers to cutting or boosting the volume level of specific frequencies of an audio signal. EQ is used to open up frequency ranges, and thus enhance the clarity, spaciousness, and blending of sounds in a mix.
Every instrument occupies its own frequency range (Figure 15.21). When you record multiple tracks of audio, the frequency ranges of various instruments overlap, often creating a unique blend of sound. But overlapping frequencies can also interfere with each other and produce frequency build-ups that make a mix sound unbalanced, cloudy, and flat.
Figure 15.21. The frequency ranges of some familiar instruments. All instruments have high harmonics that contribute to the character of a sound.

This is where EQ enters. EQ lets you adjust the volume level of specific audio frequencies. Using EQ, you can turn down the volume of interfering frequencies and open up spaces for the main frequencies of instruments in the mix. This EQ carving enhances the clarity, spaciousness, and perceived height of the stereo image. For more information on stereo images, see Chapter 14: Mixing Basics.
EQ effects are most frequently used as line inserts on individual tracks. When you apply EQ to a track, it’s a good idea to begin by gently cutting (or subtracting) frequencies on other tracks that may be interfering with the track you want to bring out. Subtracting EQ opens up space for the desired frequency range without adding new frequencies and boosting the overall mix volume.
You can then (sparingly) boost the frequency range of the track you want to bring out. For example, if you’re mixing bass and kick drum, you may want to cut the kick and boost the bass at 100 Hz, and also boost the kick and cut the bass at 60 Hz. This will bring out each instrument’s primary frequency ranges and add definition to both the kick and bass.
Remember, you don’t want to “box” sounds into narrow frequency ranges by cutting off all their highs and lows. The interplay of harmonics and blending of frequency ranges gives a mix much of its unique character.
For more information on EQ, see the Plug-ins Guide that comes with your system.
Using EQ
Pro Tools’ DigiRack plug-ins provide both one-band and four-band parametric EQs. A parametric EQ lets you choose the specific range of frequencies that you want to change. When you use a parametric EQ, you dial in a specific frequency, and then set the range around that frequency. This range is referred to as Q. The Q represents the number of octaves that the applied EQ affects. You can usually adjust Q to affect frequencies between one-half and two octaves wide.
The DigiRack 1-Band EQ (Figure 15.22) lets you apply a single EQ filter to an audio signal. The DigiRack 4-Band EQ (Figure 15.23) lets you apply up to four different EQ filters simultaneously. The DigiRack 7-Band EQ (Figure 15.24) lets you apply up to seven different EQ filters to a signal.
Figure 15.22. The DigiRack 1-Band EQ III plug-in lets you apply a single EQ filter to an audio signal.
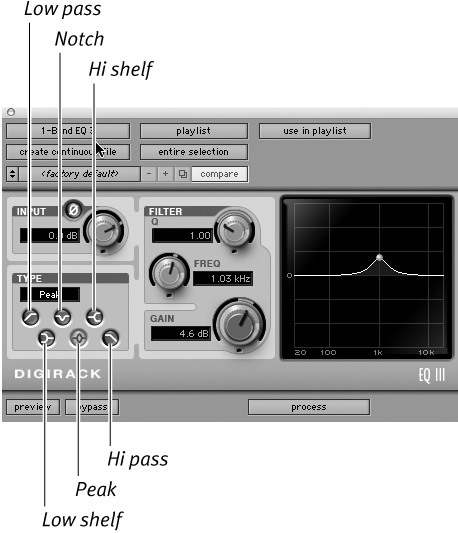
Figure 15.23. The DigiRack EQ II 4-Band EQ plug-in lets you apply up to four different EQ filters simultaneously.
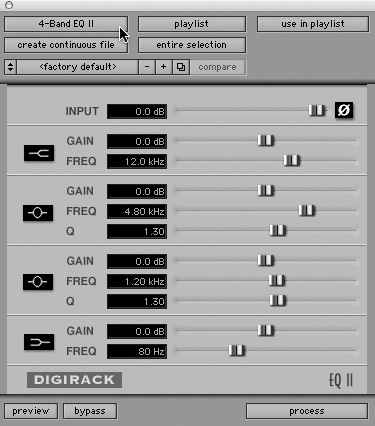
Figure 15.24. The DigiRack EQ III 7-Band EQ lets you apply seven different EQ filters simultaneously.

DigiRack EQ plug-ins include the following EQ filters:
Hi Pass/Low Pass: Pass filters are useful for eliminating unwanted high- or low-frequency ranges. A hi-pass filter lets high frequencies pass through, but cuts off low frequencies. A low-pass filter lets low frequencies pass through, but cuts off high frequencies.
Hi Shelf/Low Shelf: Shelf filters let you cut or boost both high- and low-frequency ranges. A hi-shelf filter lets you cut or boost frequencies above a chosen target frequency. A low-shelf filter lets you cut or boost frequencies below a chosen target frequency.
Hi Notch/Low Notch: Notch filters let you cut or boost an ultra-narrow band of frequencies. The Q button lets you set the width notch filter’s frequency range. The Notch filter is found on the DigiRack EQ III plug-in only.
Peak: Peak filters let you cut or boost frequencies around a selected frequency. The Peak filter’s Q button lets you set the frequency range that the Peak filter affects.
Using Dynamic Effects
Dynamic effects such as compressors, limiters, gates, and expanders let you control the dynamic range of an audio signal. The dynamic range is the difference between the softest and the loudest volume produced by a sound source. Controlling the dynamic range lets you smooth out performances that have erratic spikes in volume. It also lets you eliminate unwanted background noise.
Pro Tools’ DigiRack RTAS plug-ins include the following dynamic effects:
Compressor: The Compressor plug-in (Figure 15.25) lets you reduce the dynamic range of signals that exceed a specified volume threshold. This lets you reduce extreme volume peaks on tracks that are prone to erratic levels (such as vocals and bass). For example, you can use compression to smooth out a vocal track that has both overly loud and overly soft moments. Once the extreme volume peaks are tempered, you can then turn up the volume of the track. This helps even out the volume of the vocal track, and in some cases, adds more presence and punch to a track.
Figure 15.25. The DigiRack RTAS Compressor plug-in.
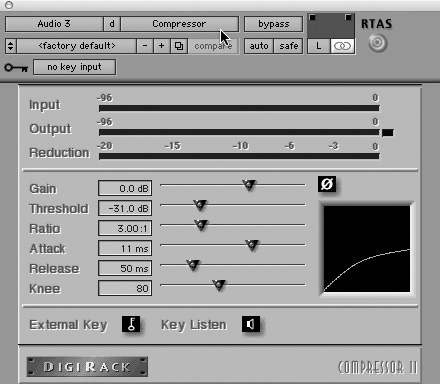
The DigiRack RTAS Compressor plug-in has the following adjustable parameters:
• Threshold: The threshold is the level at which compression kicks in.
• Ratio: Ratio is the amount that a signal’s volume is decreased (relative to the signal’s original volume).
• Attack: Attack refers to the speed at which the compressor reacts to a loud signal.
• Release: The release is the speed at which the compressor lets go of the compression.
• Knee: The knee refers to the rate at which the compressor reaches full compression once the threshold has been exceeded.
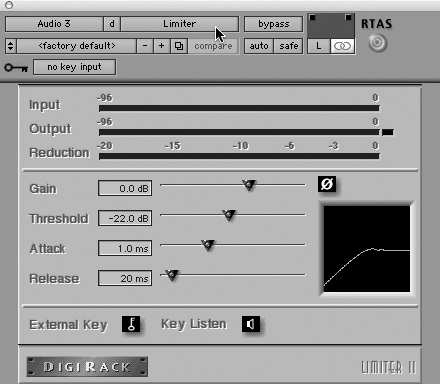
Limiter: The Limiter plug-in (Figure 15.26) is a compressor that removes (rather than reduces) all signal exceeding the specified volume threshold. Limiters eliminate extreme volume spikes and thus prevent clipping. Because they eliminate loud volume peaks, limiters, like compressors, let you turn up the overall volume of a track. The DigiRack RTAS Limiter plug-in has the same adjustable parameters as the DigiRack RTAS Compressor plug-in.
Figure 15.26. The DigiRack RTAS Limiter plug-in.
Gate: The Gate plug-in (Figure 15.27) lets audio signals above a selected volume threshold pass through, whereas signals below the threshold are attenuated (decreased) by a specified amount. Gates (or noise gates) are the opposite of limiters: Rather than limit how loud a sound can get, they limit how soft a sound can get. Gates are useful for removing unwanted background noise on tracks. When recording drums, for instance, gates are often applied to each drum track to eliminate extraneous low-level noise coming from other drum mics. This not only helps make drum tracks less noisy, but can also increase their punch.
Figure 15.27. The DigiRack RTAS Gate plug-in.

The DigiRack RTAS Gate plug-in has the following parameters:
• Threshold: Threshold refers to the volume level below which the gate closes and attenuates the signal.
• Attack: Attack refers to the speed at which the gate reacts to a signal below the threshold.
• Range: Range is the amount (in decibels) that the gate attenuates the signal. For example, a range of 50 dB decreases any signal below the threshold by 50 dB.
• Decay: Decay determines the rate at which the gate closes after the signal reaches the threshold.
• Hold: Hold refers to the length of time that the gate stays open after the signal falls below the threshold. When the hold time is reached, the gate slams shut. This can sometimes produce a chopped-off sound.
Expander-Gate: The Expander–Gate plug-in (Figure 15.28) attenuates any signal falling below a specified volume threshold by a user-defined ratio. Compared to a gate alone, which reduces sounds below a set threshold by a specified amount, an expander’s ratio changes the signal gradually. This makes the resulting signal sound more natural. Expanders are useful when you want to subtly reduce noise from a track rather than completely filter it out. For example, when dealing with a singer’s breaths, you may want to use an expander rather than a gate. The expander will reduce the volume of the breath gradually, creating a more natural breathing sound than a gate, which would chop off the breath entirely.
Figure 15.28. The DigiRack RTAS Expander-Gate plug-in.

The DigiRack RTAS Expander-Gate plug-in has the same parameters as the Gate plug-in.
Using Key Inputs for Side-chain Processing
Many RTAS plug-ins let you set up side-chain processing. Side-chain processing occurs when an effect on a track is triggered by audio from a different track. The audio source used to trigger the effect is called the key input. In Pro Tools you can use any bus or input as the key input.
Side chains and key inputs are typically used with dynamic effects such as compressors and noise gates (although you can no doubt find many other creative uses for them). For example, a kick drum can be used as the key input to trigger gating on a bass guitar.
To use a key input for side-chain processing
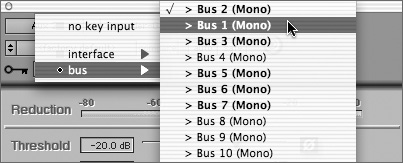
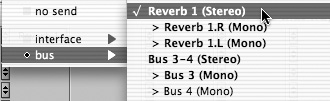
1. From the Key Input menu, choose the input or bus carrying the audio that you want to trigger the plug-in (Figure 15.29).
Figure 15.29. To activate a plug-in from a side chain, click the Key Input selector and choose a bus or input.
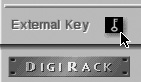
2. Click External Key to activate side-chain processing (Figure 15.30).
Figure 15.30. The External Key button activates side-chain processing.
3. Click Key Listen to audition the key input audio source (Figure 15.31).
Figure 15.31. The Key Listen button lets you audition the key input audio source.
![]()
4. Begin playback.
The plug-in uses the key input to trigger its effect. Adjust plug-in parameters, if necessary, to achieve the desired effect.
• Certain plug-ins feature key input filters (such as hi- and low-pass filters), which let you define specific frequency ranges as key inputs to trigger the plug-in effect. This is useful for filtering instruments so that only specific high frequencies (such as a hi hat) or low frequencies (such as a kick drum) trigger the effect. For more information on key input filters, see the DigiRack Plug-ins Guide.
Creating Effects Loops
Pro Tools lets you create send-and-return submixes, known as effects loops (Figure 15.32). Effects loops are used to process multiple tracks of audio simultaneously through a single effect. For example, you might route several band tracks (such as drums, vocals, piano, and guitars) through a reverb to create the impression that a song is being played live inside a large hall. Effects loops can also help save DSP resources by minimizing the number of plug-ins used in a session.
Figure 15.32. An effects loop. Arrows show audio signal path.
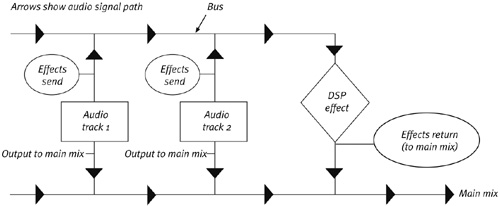
When you create an effects loop, you bus audio from multiple tracks to an auxiliary input. (This is called an effects send.) A plug-in or hardware effect inserted on the auxiliary input then adds the desired effect to the signal. You then return the output of the auxiliary input to the main mix. (This is called an effects return.)
1. Create an effects send: Assign a send on each source track to a mono or stereo bus path (Figure 15.33).
Figure 15.33. Create an effects send by assigning audio tracks to busses.
2. Assign each track’s main output to the main mix outputs.
3. Choose Track > New.
The New Track dialog box appears.
4. Choose Auxiliary Input (stereo or mono), and click Create.
5. Insert a real-time plug-in or external hardware effect on the auxiliary input (Figure 15.34).
Figure 15.34. On the destination auxiliary input, insert the real-time effect that you want to use in the effects loop.
6. Set the plug-in or external effect to 100% Wet, and configure any other parameters as needed.
7. Click the Input selector of the auxiliary input and assign it to the same bus path as the source tracks.
8. Click the Output selector of the auxiliary input and choose the main mix outputs (Figure 15.35).
Figure 15.35. Create an effects return by assigning the outputs of the auxiliary input to the main mix outputs. Use the effects return to mix varying amounts of the treated signal into the mix.
This turns the auxiliary input into an effects return.
9. Adjust the level of the auxiliary input to balance the effects return in the mix.
Using Delay Effects
Delay effects let you add depth and dimension to sounds in a mix. All delay effects are created the same way—by repeating sounds at various delay times. But small changes in delay time can produce very different sounding delay effects (Figure 15.36).
Figure 15.36. Delay times (in milliseconds) of common delay effects.
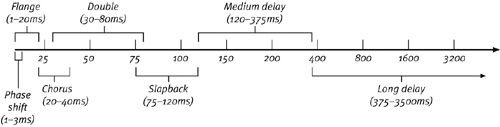
Many delay effects such as doubling, slapback, and echo simply repeat a signal at a specified delay time. Shorter delay times are useful for thickening sounds; longer delay times help reinforce rhythms, or create the perception of large spaces.
Some delay effects such as phase shifting, flanging, and chorus use short delay times together with modulation. Modulation occurs when the delay time is changed over time. When you add modulation to a delayed signal, slight pitch variations occur. These modulating delays can produce pretty far-out effects—from disembodied voices in desolate windscapes to shimmering choral effects.
Of course, take care not to oversaturate the mix with delay and reverb—a little takes you pretty far. Sometimes, spaces are best defined by what’s not there. Like everything else in mixing (and recording), there are no absolutes with adding delay. As always, it’s important to follow your ears.
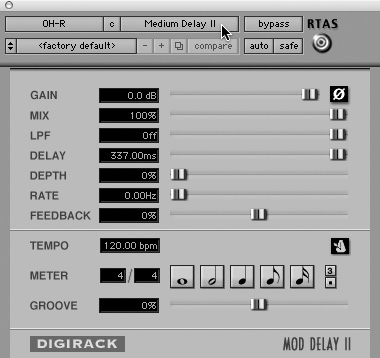
DigiRack RTAS Mod Delay II plug-ins let you create the following delay effects:
Doubling: Doubling uses a single delay repeat at delay times between 30 and 80 ms. Repeats with delay times less than 50 ms are not discernable as discrete echoes; instead, they’re perceived as additional voices or instruments. Doubling can help make a track sound thicker.
Slapback: Slapback usually consists of one or two repeats at delay times between 75 and 120 ms. Slapback is good for creating punchy vocal tracks or reinforcing the beat or tempo of a song.
Echo: Echo refers to one or more discretely audible repeats of the original source sound. Repeated signals with delay times longer than 50 ms are usually audible as discrete signals. Echoes produced by medium and long delay times (120–1000 ms or more) are useful for simulating large spaces. For example, adding a long delay to a guitar lead can make it sound like it’s in a huge, cavernous space.
Phase shifting: Phase shifting uses very short delay times (1–3 ms) and modulation. Mixing the delayed signal with its original nondelayed source signal produces a slightly out-of-phase effect with a subtle yet distinctive “whooshing” sound.
Flanging: Flanging uses short delay times (1–20 ms) and modulation. This produces a more dramatic “whoosh” than phase shifting, which makes it good for creating frightening voices and otherworldly sound effects.
Chorus: Chorus uses short delay times (20–40 ms) and modulation. By modulating repeated signals at these times and mixing them with the source signal, you can create the perception of multiple instruments and voices.
The DigiRack RTAS Mod Delay II plug-ins (Figure 15.37) include the following user-adjustable parameters:
Delay: Delay lets you set the delay time of the effect.
Feedback: Feedback controls the number of delay repeats. The higher the feedback level, the greater the number of delay repeats.
Depth: Depth lets you adjust the amount of modulation applied to the delayed signal.
Rate: Rate lets you adjust the speed of the modulation applied to the delayed signal.
Figure 15.37. The DigiRack RTAS Mod Delay II plug-in.
What Is Reverb?
Reverb is a natural property of any enclosed room that occurs when sound waves bounce off walls, ceilings, and floors. You’ve probably experienced reverb, even if you’re not familiar with the term—it’s what makes singing in the shower sound so good. Reverb effects let you simulate acoustic spaces of all sizes, shapes, and reflectivity.
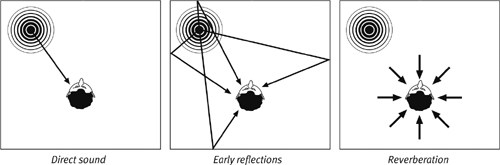
Reverb has three basic sound components (Figure 15.38):
Direct sound: Direct sound is what you hear when sound waves travel unimpeded from the source to your ears. Direct sound cues you to the location of the sound source in a three-dimensional space.
Early reflections: Early reflections are the first reflected sound waves to reach your ears after bouncing off the primary surfaces in a given room. Early reflections cue you to the size and shape of a room.
Reverberations: Reverberations are the final reflected sound waves to reach your ears. They consist of multiple sound reflections traveling from surface to surface within the confines of a room. The delay times of these reflected sound waves are so close together that you hear them as one long, decaying signal.
Figure 15.38. The three basic sound components of reverb.
Using Reverb
When you apply reverb to a sound, you’re essentially bouncing that sound off the walls, floors, and ceilings of a simulated room. Adjusting reverb parameters (such as room size, decay, pre-delay, diffusion, and density) lets you create the illusion that a sound is inside of a space of almost any size or shape. For instance, if you want to place a pipe organ sound into a cathedral space, you’d run the organ through a reverb with long decay times and long pre-delay times. Then, by returning more of the reverb signal than the original signal to the main mix, you can create the distant vastness of a cathedral.
You can also combine delays and reverbs to create even more spacious sounds. For example, by adding short delay (doubling) to a background vocal, and then sending the delayed signal into a big reverb, you can create the illusion of a choir in a large hall.
In addition to its preset room algorithms such as halls, churches, plates, and rooms, Pro Tools’ RTAS D-Verb reverb plug-in has the following user-adjustable parameters (Figure 15.39):
Size: The Size button lets you choose from three room sizes: small, medium, and large.
Decay: Decay is the length of time that the reverb lasts. Use longer decay times to simulate larger rooms.
Pre-delay: Pre-delay determines the amount of time between the beginning of an audio signal and the beginning of its reverberations. It lets you add definition to the source sound by separating it from its reverb.
Diffusion: Diffusion determines the rate of increase of sound reflections in the room. You can use diffusion to adjust the perceived reflectivity of a room. Higher diffusion simulates a more reflective room; lower diffusion simulates a less reflective room.
Hi Frequency Cut: The Hi Frequency Cut filter lets you control the decay of high-frequency components in the reverb. Use it with the Low Pass filter to shape the overall high-frequency contour of the reverb.
Low Pass: The Low Pass filter controls the volume of high frequencies in the reverb. The Low Pass filter attenuates by 6 dB all sounds above a user-defined frequency.
Many third-party reverb plug-ins include these additional adjustable parameters:
Room size: In addition to preset room sizes, many reverbs let you adjust the actual room size in meters or feet. This gives you more control over the size of a reverb space.
Density: Density refers to the level of early sound reflections that a room produces. Because early reflections reach your ear before the main body of reverb, density can cue you to the size of the space. The higher the density setting, the larger the apparent space.
Figure 15.39. Digidesign’s D-Verb reverb plug-in.

Using External Hardware Effects
You can use external hardware effects such as reverbs or delays as in-line inserts or as send-and-return effects loops. To use external hardware, you must map the insert’s inputs and outputs to audio interface channels in the I/O Setup dialog box. You must also connect the external hardware device to the corresponding inputs and outputs of the audio interface.
For more information on I/O Setups, see Chapter 4: Starting a New Session. For information on connecting external hardware devices, see Appendix A: Connecting Your Studio or the Pro Tools Reference Guide.
To define hardware inserts
1. Choose Setup > I/O.
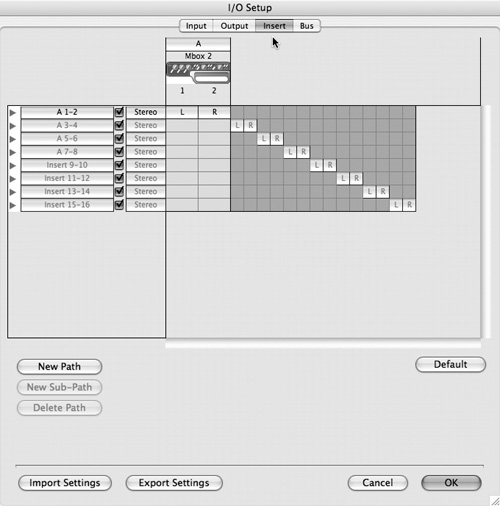
The I/O Setup dialog box appears (Figure 15.40).
Figure 15.40. The I/O Setup dialog box.
2. Click Insert.
3. Select an insert path (Figure 15.41).
Figure 15.41. To define hardware inserts, select an insert path in the I/O Setup dialog box.
or
Click New Path to create a new insert path.
4. Set the insert to the correct format (mono or stereo).
5. Map inserts in the Channel Grid as needed.
To assign a hardware insert to a track
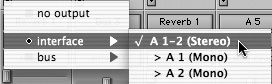
• Select an insert from the track Insert selector (Figure 15.42).
Figure 15.42. To assign a hardware insert to a track, choose an insert from the track Insert selector.
• To save DSP resources, make external hardware inserts inactive. Inactive inserts retain their routing assignments but do not let signal pass through.
• To make an insert inactive: Command-Control-click (Macintosh) or Control-Start-click (Windows) on the insert you want to make inactive. Inactive inserts appear shaded and italicized.
• Making inserts inactive can also work as a mute or bypass for hardware inserts that don’t have their own Bypass button.
• For more information on Active and Inactive modes, see Chapter 21: Optimizing Performance.
Using AudioSuite Plug-ins
Unlike RTAS (and TDM) plug-ins, AudioSuite plug-ins do not process audio in real time. Instead, they process audio directly to disk, creating a new audio file that includes the effected signal.
When using an AudioSuite plug-in, you must first select the audio region that you want to process. Keep in mind that delay or reverb effects will add additional material at the end of the selected audio region (a delay repeat or a reverb decay, respectively). For this reason, it’s important to make the selection longer than the source audio. If there isn’t enough room to write the effect into the audio file, the effect will be unceremoniously chopped off.
For more details on AudioSuite plug-ins, see the DigiRack Plug-ins Guide that came with your system.
To process audio with an AudioSuite plug-in
1. Select the regions that you want to process.
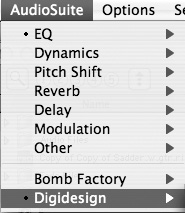
2. Choose the desired AudioSuite plug-in from the AudioSuite menu (Figure 15.43).
Figure 15.43. The AudioSuite plug-in menu.
3. Click the Preview button to audition the effect (Figure 15.44).
Figure 15.44. To audition an AudioSuite plug-in, click the Preview button.

4. Adjust the plug-in parameters to achieve the desired effect.
5. Click the Process button.
The selected audio is processed. Pro Tools appends an acronym to the region’s name, indicating the AudioSuite process that has been applied. The new audio file then appears in the session.
• To configure the plug-in for destructive processing, choose Overwrite Files from the File Mode pop-up menu. This will overwrite and permanently modify the original source audio files.
• To configure the plug-in for non-destructive processing, choose Create Individual Files from the File Mode pop-up menu. This will create a new audio file for each region that has been processed with the AudioSuite plug-in and leave the original source audio files unaltered.
• To process the selected region only in the track in which it appears, choose Playlist from the Selection Reference pop-up menu.
• To process and update every occurrence of the selected region throughout the session, enable the Use In Playlist button (and also choose Regions List from the Selection Reference pop-up menu).
• For additional AudioSuite processed-file handling options, see the DigiRack Plug-ins Guide that came with your system.
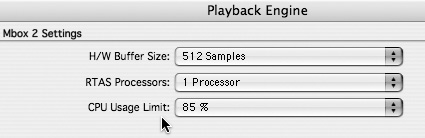
Improving RTAS Plug-in Performance
Pro Tools 7 adds support for multiprocessor computers. If you have a multiprocessor computer, you can boost your performance by dedicating additional processors to RTAS plug-in processing.
To specify the number of RTAS processors
1. Choose Setup > Playback Engine.
2. From the RTAS Processing pop-up menu, choose the number of available processors you want to dedicate to RTAS plug-in processing.
You can also improve the performance of RTAS plug-ins by increasing Pro Tools’ hardware buffer size and CPU usage limit. This will dedicate more processing power to RTAS plug-ins and other host processor tasks.
To set CPU Usage Limit for RTAS plug-in processing
1. Choose Setup > Playback Engine.
2. From the H/W Buffer Size pop-up menu, select the desired hardware buffer size.
3. From the CPU Usage Limit pop-up menu, select the percentage of CPU power you want to dedicate to RTAS plug-ins and host processor tasks (Figure 15.45).
Figure 15.45. To improve RTAS plug-in performance, choose Setup > Hardware. Increase the CPU usage limit to dedicate more processing power to RTAS plug-ins. Multi-processor computers can select additional RTAS Processors from the pop-up menu.
For more information on improving system performance, see Chapter 21: Optimizing Performance or the Pro Tools Reference Guide.