
A. Troubleshooting
This appendix has been designed to help you understand how you can best set up your computer so it provides optimal performance for NLE work. If you’re having trouble with Liquid, I suggest that you read through this appendix and try out the three basic NLE tests before you start altering any significant part of your computer’s setup. This appendix assumes that you know the basic functions of Liquid. If you’re unsure of how something works, refer to the specific chapter where it is covered first to make sure that what you are seeing is actually a problem.
Ultimately, the best help you can find is via Avid’s own support area and on the community-run forums where many problems are solved by ordinary users. These forums are a veritable gold mine of information frequented by both longtime expert users of the program and Liquid’s own technical support team. If you have an interest in developing your skills with Liquid 7, you should make your way to at least one of these community-run forums.
The Three Basic Suitability Tests
If you’re having problems with Liquid or you want to test your computer to see if it’s suitable for running Liquid, then follow these three basic tests. The result of each one should be positive, but if it isn’t, refer to the section noted at the end of each test stage for possible solutions. Don’t give up right away; you’ll seldom find a system that works with NLE without a little bit of tweaking here and there.
Test 1: Playback
The first test determines whether your computer can play back the sample project correctly. Playback under yellow slices (indicating Realtime previews are being displayed) will place a greater strain on your system than under green slices (indicating that rendering has completed), but you need to know now what your computer is capable of.
If you have started a new project, switch back to the old project by clicking on File > Recent Projects and then selecting “X”:Program filesLiquidProjectStart_NTSC (or PAL), where “X” is the drive you have installed Liquid to. Once you have finished testing, switch back to your project using the same method.
To determine whether your computer can play back
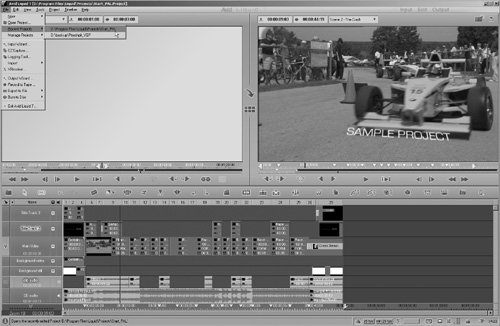
1. Launch Liquid. A Timeline displays containing a sample project of a racing track with titles, music, and effects. The sequence lasts around a minute.
If you do not see this project, select File > Recent Projects and select the appropriate Start_PAL or Start_NTSC project (Figure A.1). Once the project is loaded, select Sample Sequence from the drop-down menu.
Figure A.1. The sample project can be used to test your PC’s NLE readiness.
2. Play back this demo first without rendering yellow slices.
Watch the display carefully to see if it plays out smoothly or if there is any jerkiness. Also, watch the speed indicator in the Liquid taskbar to see if it falls into the red.
3. Open the render box by clicking the Render icon in the bottom-right corner of the interface.
4. Click the include yellow slices check box.
5. Once all slices have changed to green, play back the demo sequence again.
If you are unsure of how to do this, refer to this book’s index and look up “render.”
Once again, watch the display carefully to see if it plays out smoothly, and watch the speed indicator to see if it falls into the red.
• If you see problems with the display, such as black inlays or a stuttering playback, see the “Playback Problems” sidebar.
• If the playback is good, the displays aren’t black, and you can hear the audio, then you have passed Stage 1. Give a big cheer and move on to Stage 2.
• Speed up playback under yellow slices by making sure no unnecessary programs are running in the background that are stealing resources from Liquid.
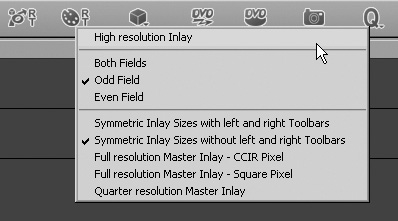
• On some systems, you may see an improvement if you click on the “Q” button ![]() and deselect the High resolution Inlay setting (Figure A.2). However, you should be aware that doing so will also alter the output quality through the Pro Breakout Box. Currently this is being looked at by the developers and may be solved by the time you read this, but users who experience dropped frames under yellow slices would be best to turn off High resolution Inlay during editing.
and deselect the High resolution Inlay setting (Figure A.2). However, you should be aware that doing so will also alter the output quality through the Pro Breakout Box. Currently this is being looked at by the developers and may be solved by the time you read this, but users who experience dropped frames under yellow slices would be best to turn off High resolution Inlay during editing.
Figure A.2. Turning off high resolution can help performance under yellow slices. Just make sure you turn it back on again before outputting to tape.
• However, don’t forget to turn High resolution Inlay back on again before outputting the finished project to tape.
• If you still have problems, see the “Optimizing for NLE” section later in this appendix.
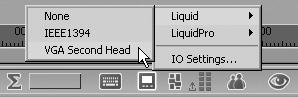
New in Version 7—VGA Second Head Output
Figure A.3. The Second Head option in action
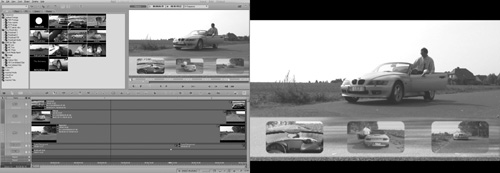
Figure A.4. Selecting the VGA Second Head option.
Test 2: Capture
The second test determines whether your computer can correctly communicate with a FireWire device. This is imperative if you’re ever going to capture anything into Liquid.
• Some users who have experienced problems using the Logging tool have found that a third-party application, such as Scenalyzer from www.scenalyzer.com, can be used instead. The Scenalyzer program even has a specific setting for Liquid and a downloadable demo.
To determine whether your computer can capture
1. Connect your camera to your FireWire card or via the Pro Breakout Box.
2. Open the Logging tool by clicking the Logging tool icon or by pressing F6 on the keyboard.
3. Once the Logging tool opens, begin capturing a tape as described in Chapter 2, “Logging and Digitizing.”
Always make sure the camera is actually in Playback mode and that some footage is on the film you’re using.
4. Open the small LCD panel on the DV device to monitor the video and audio on the tape.
5. Make sure the hard drive you select to capture the clip to has enough free space and is formatted with NTFS.
Capture at least 15 minutes of footage before you end this test.
6. Assuming the captured clip is in the Rack, double-click it to send it to the Source Viewer.
7. Click Play and watch your clip play in the Source Viewer.
• If your clip doesn’t appear in the Source Viewer or if the control buttons are grayed out, refer to the “DV Device Problems” sidebar.
• If you have control over your DV device and a clear overlay both during the capture and playback of the captured file, then give another cheer, you have just passed Stage 2.
Test 3: Output
Assuming that you’ve passed the last two tests, you now need to test the output potential of your NLE system. After all, there’s little point in creating a video project if no one ever gets to see it.
To determine whether your computer can burn a DVD/SVCD
1. Return to the sample project by clicking the Sequence menu in the top-right corner, and then select NTSC or PAL from the list.
2. Open the Render box by clicking the Render icon in the bottom-right corner of the interface; then click the include yellow slices check box.
3. Once rendering is complete, access the DVD export menu by clicking File > Export, and then select DVD/SVCD.
4. Keep the default settings for burning your DVD/SVCD (Liquid auto-detects your burner’s capabilities), and then click the check mark to proceed with the burn.
• If the burn engine fails to start or gives an error message and doesn’t create a DVD/SVCD, refer to the “DVD Problems” sidebar.
To determine whether your computer can output to tape
1. Make sure your camera is correctly connected and that you’ve inserted a blank tape.
If the camera didn’t pass the Stage 2 test, you probably won’t be able to complete this test either.
2. Click File/Record to Tape.
This brings up the Record To Tape interface. Make sure that Dump To Tape and Entire Sequence are selected.
3. Click Play to determine whether there is a connection between the camera and Liquid and also to check if the tape really is blank. The overlay should display nothing if it is, but you should also view the tape through the camera’s LCD screen or viewfinder. Remember: erased is erased.
4. Activate Record To Tape by clicking the record button once. More details on how to use this interface can be found in Chapter 13, “Exporting the Timeline.”
5. Play back the recorded tape to see if it has successfully transferred the Timeline to the tape.
• If the tape is fine and you encountered no obvious problems, give a final cheer. Your system has passed all three tests and is suitable for NLE and Liquid.
• If the controls are grayed out and/or the Device is not Ready sign is flashing, go to the “DV Device Problems” sidebar earlier in this appendix.
• If you bought your DV camera in Europe, the camera may not be DV-In–enabled. You can enable some of these cameras by using a widget that updates the camera’s firmware, but doing so voids your warranty.
Figuring Out What’s Wrong
If you’re reading this section, it’s because the quick-fix techniques listed in the “The Three Basic Suitability Tests” section haven’t solved your problems. In this section, I hope to help you out, but please bear in mind this rather brutal truth about PCs in general:
Sometimes there may not be a solution to your problem.
The problem with PCs is simply that not all hardware is created equal; not all the hardware that costs megabucks is guaranteed to be the best; and sadly, not all PCs are destined to ever become NLE workstations.
This all might sound a little on the bleak side, but it’s worth bearing in mind this important rule before you start endlessly trying to reconfigure your system. Otherwise you could end up stuck in a circle where you wind up reformatting the drive to reinstall the OS in order to reconstruct perhaps a little sanity back into your relentlessly PC-persecuted life.
Keeping it in perspective
Try to remember that drivers for graphics cards and sound cards can be and often are bugged; hard drives can go wrong just after you buy them; and PC motherboards are updated so often that compatibility lists are often pretty meaningless. RAM is also a massive problem in the PC world. The single biggest reason for the Blue Screen of Death (BSOD) or a Crash to Desktop (CTD) is probably faulty or cheap memory chips.
Pretty scary, huh? But if you know about this in advance, then you’re prepared (at least mentally) for the road ahead.
Optimizing for NLE
Optimizing a PC is the Holy Grail for NLE workstation owners. They spend hour upon hour adjusting and tweaking the machine so that it runs silky smooth and problem free. The trick, of course, is to spend more time editing. If you follow the basic optimization tips I describe in the next couple of sections, doing so should be possible.
The optimization of a PC is split into two sections: optimizing Windows XP and optimizing the hardware. Both are complementary, and you’ll have more success delving into both rather than just the one. However, a word of warning: always make sure you set a Restore point using the built-in function you find in XP. This, at least, allows you to reset any changes that have screwed up your system beyond usability.
Optimizing Windows XP
Of all the culprits in your PC, of all the suspects for making your NLE experience a painful one, it is unlikely that Windows is it. Really, I am not a Microsoft fan, but I do recognize that finally, after all these years, Windows XP is the operating system they got right. However, as good as this OS is, you can still do some basic things to try to optimize it, or in laymen’s terms, get the darned thing to do the job it was designed to do.
Windows Updates
Generally speaking, you should apply all Windows security updates when they are available. However, it’s a good idea to take a look at the Web forums to make sure this will not cause Liquid any problems. For this reason, I recommend turning off Automatic Updates and applying updates manually.
However, turning off the auto-update function does mean that you have to remember to check the Microsoft update page on a regular basis to keep your computer secure.
Service Pack 2
Liquid was built and tested using SP2 for Windows XP, so it stands to reason that you should be using it too.
However, if you have only recently installed SP2, two warning messages from the Windows firewall may appear the first time you start Liquid 7. In this case, you need to click Unblock to add the Render Manager and Desktop applications to the list of allowed applications. These two applications are required by Liquid to function correctly. Once they’re added, you should no longer see this prompt.
Hard Drives—FAT32 or NTFS?
Possibly the very first optimization you need to check for is to make sure all your hard drives are configured and formatted to NTFS and not FAT32.
Today, Windows systems use one of two types of file systems on their hard drives: FAT32 (File Allocation Table 32 bit), or NTFS (New Technologies File System).
Most Windows XP systems are shipped using NTFS because it is a more secure file format. But if you’re adding a second hard drive just for capture, you will have a choice and should always choose NTFS for this one simple reason.
• FAT32 has a maximum file length of 4 gigabytes (GB), about 18 minutes of DV, whereas
• NTFS has a maximum file length of 12 terabytes (TB), more than 1000 hours of DV.
At the moment, no 12-TB drives are being sold (not this year anyway), but the obvious restrictions of FAT32 are plain to see. Digitizing a standard 60-minute tape to FAT32 will mean each clip can only be 4 GB, or 18 minutes long.
Your wedding scene is just a bit longer than this? Sorry, hard luck. You will have to capture it in two pieces and hope for a seamless join.
NTFS, on the other hand, can capture the whole tape (however long) in one continuous AVI. The only limitation is the available space on your hard drive. Serious editors will not choose anything other than NTFS.
Defragmentation and other disk maintenance
A hard drive is one of the few moving parts of your PC, and as such, a target for wear and tear. To reduce this, you should defragment your drives on a regular basis. This allows the drive heads to locate the data they are looking for without traveling all over the hard drive to find it, thus cutting down on wear.
XP has a very workable defragmentation program, but others are available that do the job faster and give you more options.
Setting the swap file location
The old school of thought with PC optimization was to set your swap file to 2.5 times the amount of physical RAM. However, now that RAM is so cheap and 1 GB is commonplace, this rule no longer applies. In general, a swap file larger than 1534 MB is unnecessary, and it eats up precious hard drive space.
Where to place the swap file is also a matter of heated discussion among the geeky part of the computer community. Some reason that placing the swap file on a second hard drive improves performance, while others say it just needs to be on a separate partition. My advice is to keep it on the C drive unless you see some really serious performance problems.
To change the swap file location
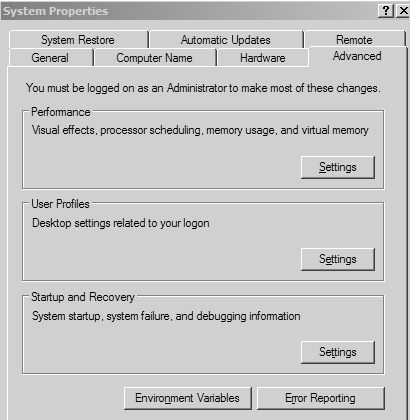
1. Access the swap file by entering the System Properties for your computer and selecting the Advanced tab. Then click the Performance section’s Settings button (Figure A.5).
Figure A.5. Setting the Windows XP swap file via System Properties...
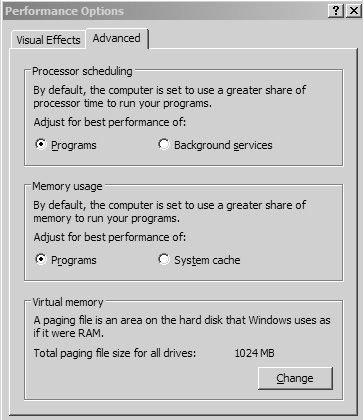
2. In the resulting Performance Options dialog, select the Advanced tab and then click the Change button in the Virtual memory section (Figure A.6).
Figure A.6. ...and the Performance options.
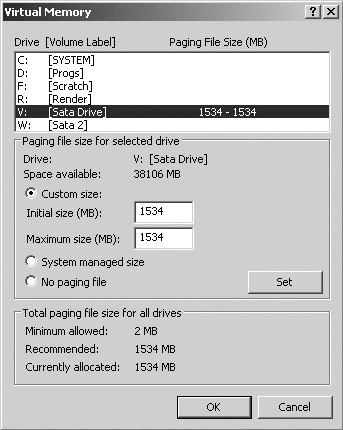
3. Click the drive of your choice, and then click the Custom size radio button. Change the swap file to an appropriate drive and size, and then click the Set button (Figure A.7).
Figure A.7. The swap file can be set here.
You will need to reboot XP in order for these changes to take effect.
Reducing the XP eye candy
XP has been compared to a toy interface, with too many unwanted features such as fading menus and brightly colored window buttons. Although this is a subjective comment, it’s true to say that the default XP interface uses a lot of resources that could be better used elsewhere.
To reduce the interface overhead
1. Access the System Properties for your computer, select the Advanced tab, then click the Performance section’s Settings button.
2. Select the Visual Effects tab if it is not already selected.
3. Click the Adjust for best performance radio button from the resulting Options available (Figure A.8).
Figure A.8. Adjusting the look of XP.

• Many Internet sites offer further advice on how to turn off unwanted services—the parts of XP that operate in the background. Performing a Google search for “XP services disable” reveals plenty of help. One such site is www.pcpitstop.com, which has an online diagnostic program to help identify areas of your computer that are underperforming. However, always make sure you are turning off something you really don’t need.
Optimizing Hardware
Hardware optimization is largely about setting up your computer correctly in the first place. To use this section, you need to understand at least the basics of the components that lie beneath your computer’s (quite possibly beige-colored) case. If you don’t have this knowledge and you also have a deep-rooted fear of all things electrical, you should skip this section and head to “Getting Further Help.”
For those of you still reading, here is a breakdown of how your computer should be set up.
Configuring the hard drive
If you’re using IDE or SATA, you should have a minimum of two separate hard drives in your system. Note that this means two separate drives, not a single drive with two partitions.
A drive with two partitions is still only one drive. It still only has one set of drive heads to read data with and is unlikely to cope with the high data streams that are transferred during a normal editing session.
In the case of EIDE drives, you should connect the drive containing your operating system and the drive you want to use for Video capture on the primary channel of the motherboard. If you have a separate RAID IDE port, then by all means, use that, but don’t, under any circumstances, have either your system drive or your capture drive on the same cable as your CD player or DVD/CD burner. If you do, you’ll slow down the data rate of the hard drive and impair its performance—this is sometimes called negotiating down.
SATA users will obviously not face this problem, as each drive will have its own dedicated channel.
• Avoid filling your hard drive all the way up. Once it gets above 85 percent of its total capacity, you’ll begin to see performance problems.
Memory—RAM
Memory is the central transfer hub for everything. Without good, reliable, fast RAM, the PC suffers problems.
First, you need to make sure you’re using the correct slots. Again, your computer system’s manual tells you which slots you should populate first and which amounts you can use. Always consult your manual before buying more RAM because you want to make sure there is no upper limit to the amount of RAM your system can use. Second, you should purchase the fastest RAM your system supports and no faster.
If you suspect a problem with your RAM, download Memtest86 from www.memtest86.com. This is a Stand-alone memory diagnostic program that will probe at your memory chips to see if everything is as it should be. You need to follow the instructions carefully, and the program takes several hours to run, but for peace of mind it can’t be beat, and it’s free.
Power supply
The power supply is the much-ignored component of your PC, and ironically, one of the most important. Certain processors, particularly AMD, require very specific voltage across specific pins. They are tolerant of minor variations, but a cheap unbranded power supply often fails to deliver (on a constant basis) the correct amps the processor needs when working flat out. As most NLE tasks ask the processor to work flat out, it doesn’t take a brain surgeon to figure out what happens when the power supply is erratic.
If you’re running large hard drives, a DVD burner, and a fast CPU, you probably want a power supply that delivers in excess of 450 watts. But check to make sure it can deliver the required voltage to the required pins. If in doubt, check the AMD and Intel Web sites, which carry a list of recommended Power Supply Units (PSUs).
When you purchase a power supply, you might want to give some thought as to how loud it will be. A giant turbine in your computer may become a point of fractious discussion with other members of your household.
Getting Further Help
The Self-help Webboard (www.avid.com) is the new version of the official online Liquid community. There is a vast pool of knowledge here, and it is in your interest to check it out.
Although the official board is a mine of information and friendly advice, other unofficial support boards exist. Below is a non-definitive list of these sites:
• Planet Liquid (www.planetliquid.us)—Set up by Joe Figura, who used to moderate the official Liquid Webboard. This is a new venture that hopes to offer profiles with pictures; member blogs; and the ability to post HTML, Flash, pictures, audio, and video right to the Webboard post itself. Members also get free space to host demo videos.
• Creative Cow (http://forums.creativecow.net)—This is currently moderated by Paul Mitton and Stephen Noe, two veterans of Liquid with years of experience. Posts here tend to be of technical-help nature, but you can also ask questions on technique too. This site also caters to SmartSound and other NLE applications that might be of interest to Liquid users.
A large number of enthusiast sites can also be found by visiting the following sites:
• User Groups of the U.S. (www.alug.us)—This is an umbrella organization that joins together the various U.S. groups.
• Avid Liquid User Group of the Carolinas (www.plug-nc.com)—This site features tutorials and articles on using Liquid.
• Avid Liquid Edition User Group of Colorado (http://vfwtech.com/Liquid/index.htm)—This site is similar to the above site, but is for the good folks of Colorado.
For a full list of these groups, visit www.avid.com/community/usergroups/find.html. Here you’ll find lists of some of the more well-known Liquid groups around the world.
Getting professional help
In each country, there is a network of Avid partners who are very well experienced and can offer either help or advice, or (for a fee) take a look at your system. They may be able to save you a great deal of time and money by simply suggesting either an upgrade or confirming that your system will never function correctly as an NLE workstation.
You can find Avid partners via the main Web site from which you can choose a country and search for a dealer near you.