
Chapter 10. Multithreaded Programming
IN THIS CHAPTER
- The Basics of Threaded Programming
- Writing your First Multithreaded Application
- Dealing with Thread Synchronization and Contention
- Using the
ThreadPoolClass
When considering multithreaded techniques for an application, many developers assume that the only place where multithreaded techniques are valuable is in Windows Forms applications. In reality, the use of threading to increase performance and responsiveness is applicable to all kinds of applications, whether you’re creating an ASP.NET application, a web service, a Windows Forms application, or even a Windows service. This chapter introduces you to the concepts and concerns related to programming in a multithreaded environment, and then gradually leads you on a tour of the various techniques involved in utilizing the .NET Framework’s powerful multithreading systems to their fullest.
Throughout this chapter you will see examples of where threads are useful, and how to work with them properly. The topic of multithreaded programming is long and often complex, and extremely hard to pack into a small chapter in a compendium book such as this. Using the guidelines in this chapter, you should be able to intelligently discuss the topic of multithreaded programming as well as put it into practice in any of the applications you write as you progress through this book.
The Basics of Threaded Programming
Threads are units of work that are created by a parent process to perform some task. By utilizing multiple threads, an application can delegate the work to multiple workers to reduce the time it takes to complete a relatively long task.
In addition, a background task can be used to perform some long-running or expensive processing in the background while the foreground remains responsive. This allows web applications to process extremely lengthy requests while not blocking out small, lightweight requests in the meantime. It also allows the user interface in a Windows Forms application to remain responsive while large amounts of data are downloaded or processed in the background. Threading has a virtually unlimited number of applications.
However, using threads just because you think they will make your application run faster can often backfire. In fact, using too many threads can actually cause your application to run slower. For example, you could have so many threads running that your application is spending more time swapping context between the threads than it is performing the tasks within the threads. In this case, your application will actually run slower than if it had no threading support whatsoever.
No matter what task you’re performing in a multithreaded environment, you will be working with the Thread class in one form or another. Tables 10.1 and 10.2 show some of the commonly used methods and properties of the Thread class.
Table 10.1 Thread Properties
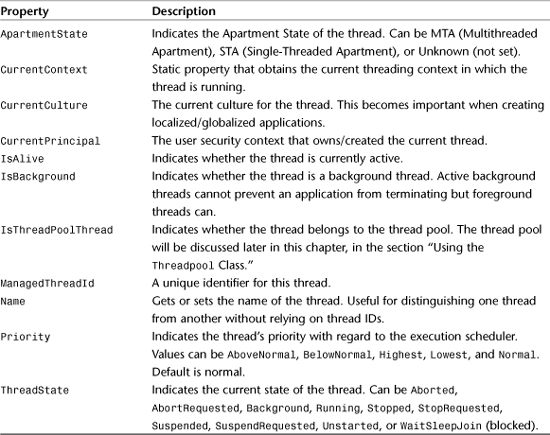
Table 10.2 Thread Methods
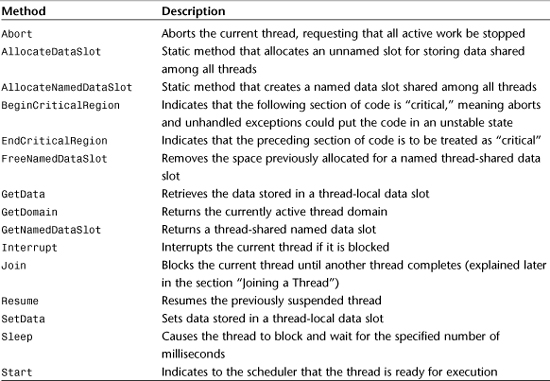
Don’t worry if some of the properties or methods of the Thread class don’t make much sense yet. By the time you’ve finished this chapter, it should all be clear.
Essentially, two main concepts are involved in creating any good multithreaded application:
- Thread scheduling—You will need to know how to start, stop, suspend, pause, and terminate threads in your applications.
- Thread contention—With multiple threads running at the same time, you will need to learn the techniques required to ensure that you don’t have multiple threads modifying the same piece of data at the same time, or that you end up with incomplete modifications of shared data.
Writing Your First Multithreaded Application
For your first multithreaded application, you will learn the basic techniques of working with the scheduler. This means that you will learn the syntax to create, terminate, suspend, sleep, and join threads, as well as what the uses are for each of those operations.
Creating and Running a Thread
When creating a thread, you need to use a special delegate called ThreadStart. This delegate will contain a reference to the method that contains the work you want to be performed in the thread. As explained in Chapter 9, delegates are really nothing more than special types that contain methods with specific signatures. You can invoke delegates the same way you invoke methods, and you can pass delegates as parameters to other methods, which is exactly what needs to be done when creating a thread.
To create a thread, you pass a ThreadStart delegate to the constructor of the Thread class, as shown in the following example:
ThreadStart myThreadDelegate = new ThreadStart(MyWork);
Thread workerThread = new Thread(myThreadDelegate);
What you will often see in many code samples is the preceding two lines of code consolidated into the following:
Thread workerThread = new Thread(new ThreadStart(MyWork));
In this line of code, MyWork is the name of the method that matches the signature defined by the ThreadStart delegate. All ThreadStart delegates must be void methods.
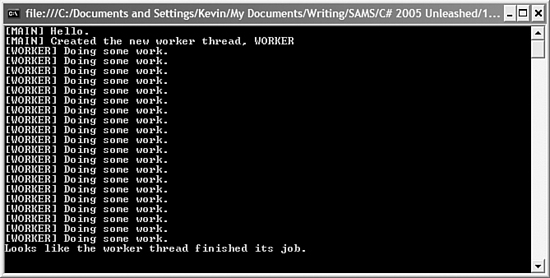
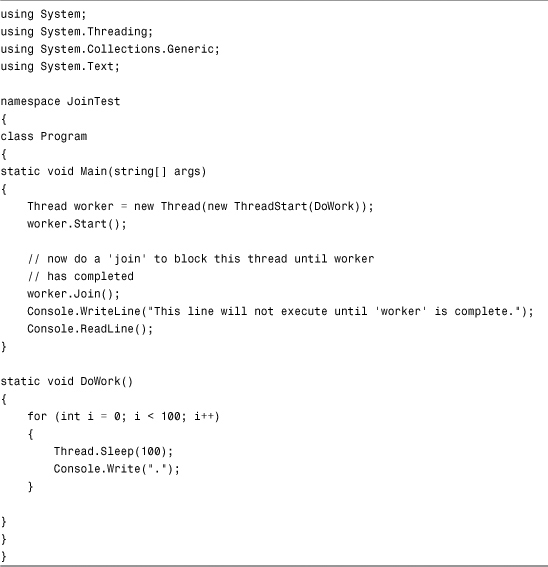
The code in Listing 10.1 shows how to create and start a thread, as well as how to continuously poll the status of a thread as a crude way of checking to see if it’s finished. You’ll see a more elegant solution later.
Listing 10.1 Starting and Running a Thread
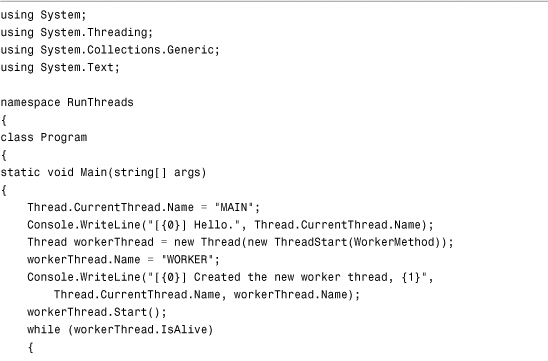
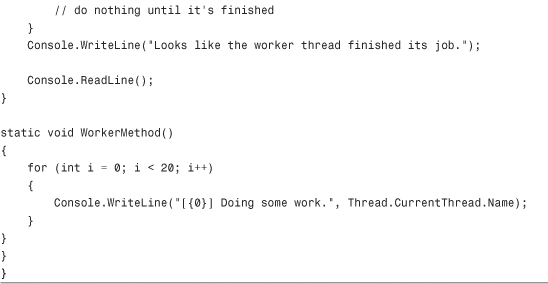
Figure 10.1 shows the output of this sample.
Figure 10.1 Starting and running a thread—sample output.
Terminating a Thread
Terminating a thread involves using the Abort method on the thread. Abort can either be called on the thread instance by the block of code that initially created it, or it can be called by the running thread itself.
When a thread is aborted, a ThreadAbortException is thrown. As you will find out in various samples throughout this book, you can trap and suppress most exceptions. The ThreadAbortException is the one exception in the .NET Framework that cannot be ignored—with good reason. This exception must be allowed to travel up the chain of exceptions in order for aborted threads to know to stop working. You can manually suppress this exception with the Thread.ResetAbort() method, as shown in Listing 10.2, which illustrates aborting a running thread.
Listing 10.2 Aborting a Running Thread
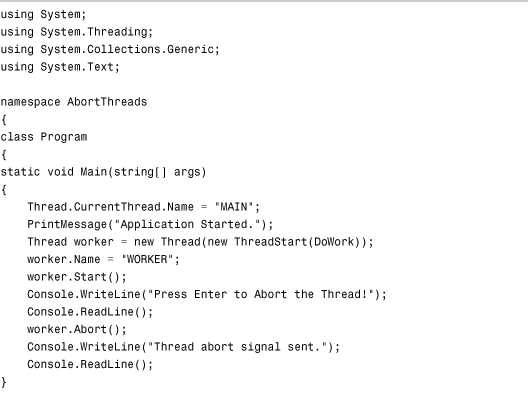
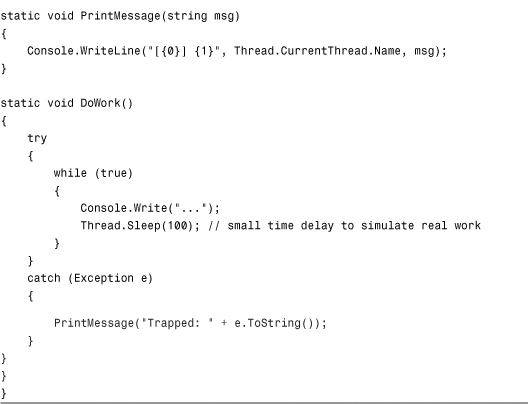
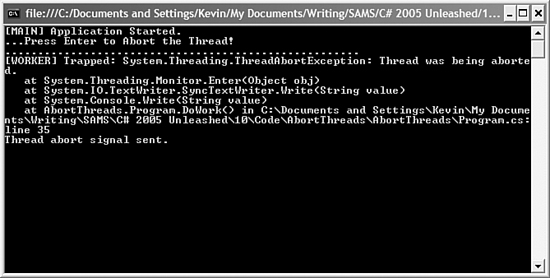
Figure 10.2 shows a screenshot of the console output of this program. As soon as the user presses Enter, the thread abort signal is sent, and the worker thread catches (and suppresses) the ThreadAbortException exception. If the worker method didn’t suppress this, the exception would “bubble up” and eventually cause the main application to stop—typically an undesired result.
Figure 10.2 Thread abort demo output.
Suspending a Thread
When you suspend a thread, you tell the scheduler that the thread no longer needs to be swapped to the foreground for execution. What this means is that as soon as the thread stops executing to give time to another thread, the thread will not continue until it has been resumed.
You suspend a thread with the Suspend method. It takes no arguments and works fairly simply. To resume the thread at will, you can simply call the Resume method on that same thread.
Sleeping a Thread
You saw in Listing 10.2 that there is a method called Sleep that does exactly what it sounds like: causes the thread to sleep. By supplying a time interval in milliseconds, the thread will stop executing at that line for the specified duration. You can also pass a 0 as the argument, which will cause the thread to be suspended. If you specify System.Threading.Timeout.Infinite as the value, the thread will block indefinitely.
Joining a Thread
The Join method serves as a way to block the current thread until the specified thread has completed. This essentially allows the thread to wait for the completion of another method. This is where the term join comes from, where the current thread will wait for another thread to “catch up.” Listing 10.3 illustrates the use of the Join method.
Listing 10.3 Joining a Thread
The use of Join replaces the loop seen in an earlier example where the code executed a while loop that continuously looped until the IsAlive property of the executing thread was false. As mentioned earlier, using Join is a far more elegant (and thread-safe) solution.
Dealing with Thread Synchronization and Contention
All current versions of Microsoft Windows utilize something called pre-emptive multitasking. This means that any currently running thread can be interrupted (preempted) in order to allow another thread to execute. This type of multitasking environment is far more reliable than previous versions of Windows (16-bit) and drastically reduces the number of times the operating system will hang or freeze unexpectedly due to poorly behaved applications.
The downside to pre-emptive multitasking is that if you want to make your application aware of this, you need to be aware of the fact that your application is executing in a multithreaded environment, and you need to be aware of the consequences. The key thing to remember when building multithreaded applications is synchronization.
Synchronization refers to conditions that arise from having multiple threads attempt to perform the same task or access the same data at the same time, or where a thread may stop unexpectedly and potentially leave data in an indeterminate state.
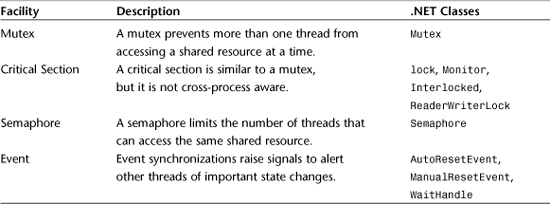
Various facilities are available within the .NET Framework’s core threading library that allow you to manage contention for shared resources within a multithreaded application as well as timing and synchronization issues. Table 10.3 provides an overview of these. Each one will be discussed in more detail in the following subsections.
Table 10.3 Synchronization Handling Facilities
Using the lock Keyword
The lock keyword is one of the simpler synchronization facilities available to you. When you wrap a code block inside a lock statement, the code block is guaranteed to allow only one thread at a time to access it. This means that any code written inside that block is thread-safe and you can be sure that there won’t be indeterminate or inconsistent data within that block.
When you create a lock block, you pass the lock keyword an object as a parameter. This object is used to determine the scope of re-entrance around which to build the critical section, as shown in the following code:
lock(this)
{
// thread-safe code
}
Using Mutexes
The Mutex class is a special type of class that is an extremely powerful thread synchronization tool. A Mutex not only provides the ability to synchronize multiple threads, but it can also synchronize those threads across multiple processes. The purpose of the Mutex is to prevent unwanted simultaneous access by multiple threads on a single shared resource.
When the first thread to access a shared resource acquires a Mutex, all subsequent threads that want to access that shared resource must wait until the first one has released the resource. The release of the resource is signified by the release of the Mutex. The Mutex class enforces thread identity. This means that only the thread that requested the Mutex to begin with can release it. In contrast, the Semaphore class can be modified by any thread.
As mentioned before, a Mutex can actually be used to synchronize cross-process activities as well as multithreaded activities within the same application. When you create a new instance of a Mutex, you can choose to create a local mutex (visible only to the process under which it was created) or a named system mutex (visible to all processes so long as each process knows the name of the mutex).
Be extremely careful when using cross-process mutexes. Because the scope of the mutex is at the operating system level, it is possible that logic failures or unexpected application crashes can cause the mutex to be in an unpredictable state.
When protecting resources with a Mutex, the first step is to call WaitOne, which will wait until the Mutex receives a signal. After the call to WaitOne, you can access the shared resources without fear of synchronization problems. Finally, when the method is complete, you must call ReleaseMutex(). If a thread stops before a Mutex is released, the Mutex will be considered abandoned. If you encounter an abandoned Mutex, the protected data could be in an inconsistent state. In other words, an abandoned Mutex constitutes a coding error that needs to be corrected, especially if that Mutex is a system-level global Mutex.
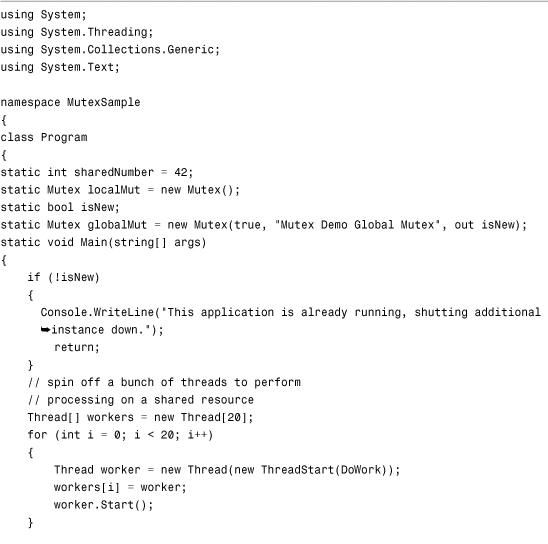
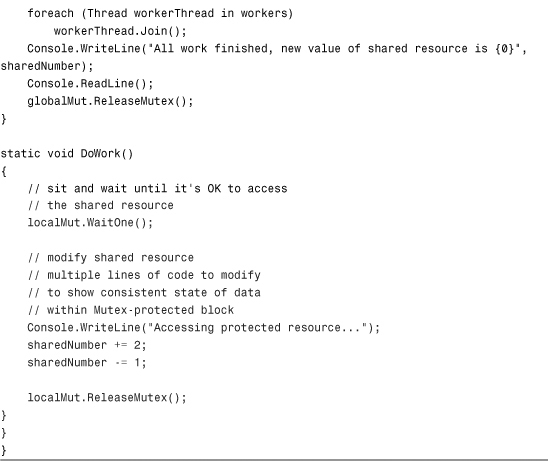
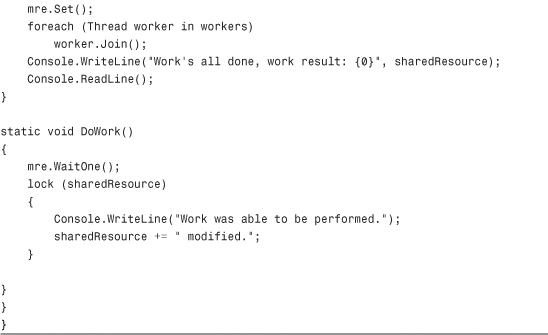
Listing 10.4 shows both uses of a Mutex. First, a global mutex is created. This actually allows the application to tell if another instance of itself is already running (a task that is fairly common, yet often considered difficult). The second Mutex is a local Mutex used to protect access to a specific shared resource. As you will see when you run the output, the protection of the shared resource by the Mutex block is actually forcing the threads to access the data serially (one item after another), instead of simultaneously, thereby ensuring that the calculations on that shared resource will result in consistent and predictable values.
Listing 10.4 System and Local Mutexes
Using Monitors
At first glance, the Monitor class might appear to function very much like the lock keyword. You use Monitor.Enter in much the same way you use lock(object), and Monitor.Exit marks the end of a critical section the same way that the last curly brace marks the end of a lock block, as shown in the following example:
Monitor.Enter(this);
// thread-safe code
Monitor.Exit(this);
Unlike the lock keyword, however, the Monitor class implements some other methods that give it some added functionality. The following is a list of the methods that set the Monitor class apart from the lock keyword:
TryEnter—You can specify a time period in milliseconds, or pass aTimeSpaninstance to this method. This method will then wait for that time period to acquire an exclusive lock on the protected resource. If the timeout period expires, the code will returnfalseand allow the thread to continue execution. This is an invaluable technique for preventing an application from hanging while waiting on one “stuck” thread or a stale/abandonedMutex.Wait—Releases the current lock on the resource (if any) and then waits to reacquire the lock. If the timeout period expires, this method will return afalse, allowing your code to respond appropriately to a failed attempt to obtain a thread-safe lock on the shared resource.Pulse—Sends a signal to the next waiting thread to start up. This allows the thread to start working before the acquisition of the lock held by the current thread. This is a way that allows your synchronized block of code to signal the next thread in line that your code is about to release the lock.PulseAll—Works just likePulse, except that it sends the signal to all waiting threads.
Using the Interlocked Class
As you’ve probably guessed by now, the more synchronized code blocks you have in your application, the more bottleneck points you create for your background threads because they all have to queue up in line and wait nicely for their turn to access the shared resource.
This means that one of the things you want to watch out for in your code is excessive or unnecessary use of synchronized blocks. Quite often, developers will create a synchronized block just so that they can increment or decrement some shared value safely.
This is where the Interlocked class comes in. This class provides methods that allow you to increment, decrement, or exchange values in a synchronized, thread-safe manner without burdening your application by having to waste a synchronized block on a simple operation.
The following code snippet shows the Interlocked class in action:
Interlocked.Increment(ref sharedInteger);
Interlocked.Decrement(ref sharedInteger2);
int origValue = Interlocked.Exchange(ref sharedInteger, ref sharedInterger2) ;
Using the ReaderWriterLock Class
So far you’ve seen quite a few ways to protect a block of code in such a way that multiple write operations to the same data cannot happen at the same time. If a piece of code just wants to read from a shared location instead of writing to it, using the methods already discussed would be an unnecessary performance hit and a waste of shared resources (especially if you’re using system-level Mutexes).
To get around this problem, the ReaderWriterLock class allows you to read shared data from a thread without having to create a synchronized section that blocks all requests. Instead, the ReaderWriterLock allows us to block only if the thread needs to update, and to not bother locking if the thread wants to perform a simple read operation.
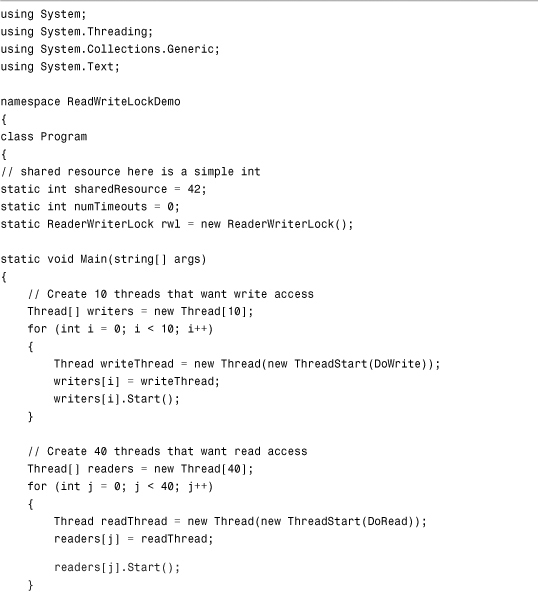
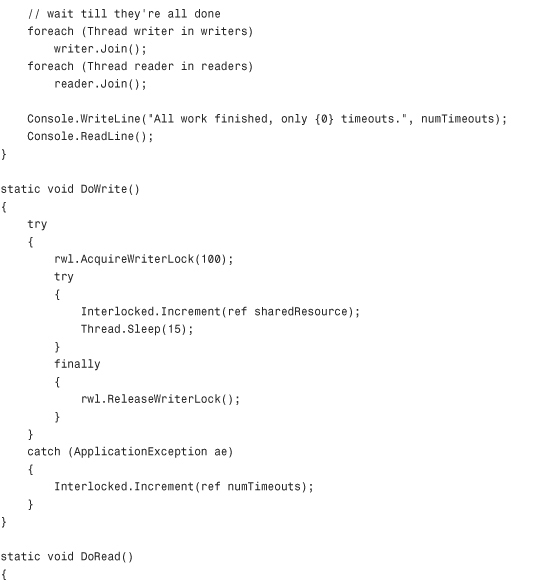
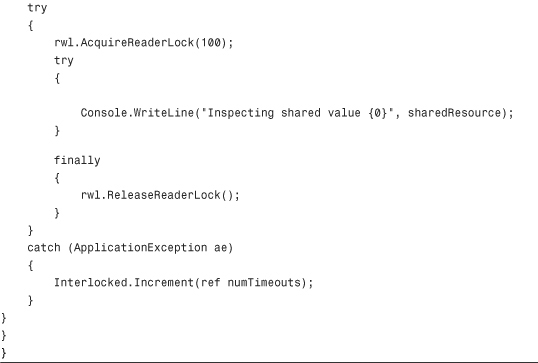
Listing 10.5 shows the use of the ReaderWriterLock to acquire locks for reading and locks for writing. It also illustrates the use of the timeout value. The code in Listing 10.5 generates between one and two timeouts when attempting to acquire locks when run on my laptop. Feel free to play with the number of threads and the timeout period to see the results of increasing the number of timeouts. One obvious result is that every time the writer lock fails to acquire, you don’t increment the shared resource value, so the more timeouts you end up with, the smaller the final result number will be a the more timeouts you end up with.
Listing 10.5 Using the ReaderWriterLock Class
Working with Manual and Auto Reset Events
You can create synchronized blocks of code in many ways, including ways to protect shared resources against multiple inconsistent writes. As you saw with the Mutex class and others, there are ways to acquire locks and then write code within a thread that waits for the lock to be released, for example, with the Wait method.
Reset events are even more tightly controlled synchronization techniques. The basic premise is that you create an instance of a reset event. Then, in a thread, you call the Wait method on that event. Instead of waiting for a lock to be released, your code will then wait until another thread sends a signal on that same wait event.
Two kinds of reset events are available to you: Manual and Automatic reset events. In almost all aspects they are identical. The two differ only in that an Automatic reset event will set the event’s signaled state to unsignaled when a waiting thread is released.
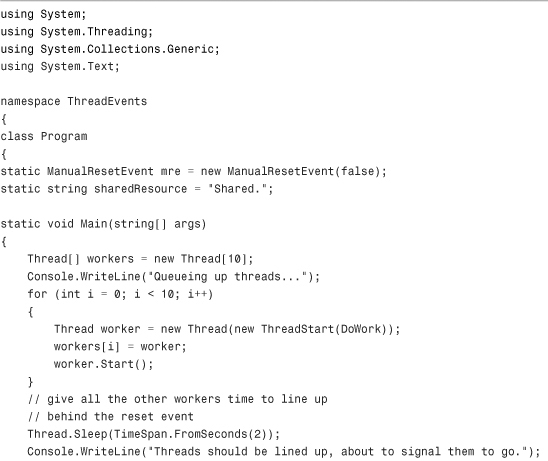
Listing 10.6 shows how to use a ManualResetEvent to line up several threads that are all waiting for the last thread to execute before they can continue. This allows you to tightly control the order in which tasks are completed, regardless of when the thread was started or what its execution priority is. This kind of cascading scheduling is important in many multithreaded applications where progress milestones need to be reached before other tasks can be completed. For example, suppose that you are writing a multithreaded application that processes data, writes that data to a file, and then e-mails the file to someone. You might create reset events so that the thread responsible for e-mailing the file can’t do anything until the thread(s) responsible for data processing signal that the file is ready for reading, even if the threads themselves might not be complete.
Listing 10.6 Using Reset Events to Force Execution Order
You can think of reset events like the childhood game of “red light/green light.” The threads are all lined up and ready to go, but they’re waiting for the signal. You can set these staggering points anywhere you like to gain a lot of tight control over what can be done in what order. When you combine the ability to signal threads in this way with the ability to create thread-safe locked synchronized code blocks, Mutexes, the Monitor class that allows timeout periods when requesting exclusive locks, and the vast array of other tools available, writing multithreaded code looks extremely promising, powerful, and far less intimidating than it does in other languages and platforms.
Using the ThreadPool Class
When it boils down to it, one of the most common states of any application is the “idle” state. Applications spend a lot of time sitting around waiting for something to happen. They’re either waiting for a user to click something on a form, or they’re waiting for a request to come in on a network port like HTTP or a custom service port. Using full-fledged foreground threads when sitting around waiting for something to happen is more expensive than necessary.
To allow you to create tasks that will operate in the background, but consume the smallest amount of resources possible, the .NET Framework has the thread pool.
The thread pool uses a WaitCallback delegate instead of a ThreadStart delegate to indicate the work that should be done in the background. In addition, the thread pool makes it easy to queue up a work item and let it run. You can also pass in a state object so that you can supply a worker thread with the data it needs to perform its task without having to rely on static members or complicated scope management techniques. Without the state object being passed to a worker thread, the worker thread would need to pull its information from global or static objects. When this happens, the thread needs to worry about synchronization of that data. Using the private state object that is scoped at the thread level, there is no need for synchronization since the data belongs only to the current thread.
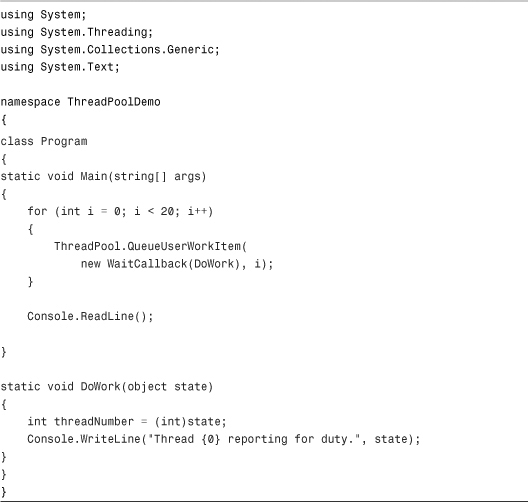
Listing 10.7 provides a quick illustration of how to queue a user work item. Note that you don’t have to explicitly Start the background thread from the pool. The upside of the thread pool is its ease of use. However, if you need complex synchronization techniques such as events, or if you need to call Join on a list of threads as shown in preceding examples, you may find the thread pool insufficient for your needs.
Listing 10.7 Using the ThreadPool
Summary
Threading is a topic that many people avoid because on the surface it seems intimidating. There are a lot of terms like mutex, semaphore, synchronization, and so on that might be unfamiliar to developers. Hopefully, this chapter has demystified multithreaded programming to the point where it is no longer intimidating.
The key to developing high-quality multithreaded applications lies in knowing when you should create thread-safe synchronized blocks and when you can get by with a ReaderWriterLock, and to make use of mutexes, monitors, semaphores, and the various properties and methods of the Thread class itself to create an application that remains responsive and reliable even while performing complex, resource-intensive tasks.
Throughout this book, you will learn many techniques for working with data, working with ASP.NET web applications, working with Windows Forms applications, and much more. As you learn these new techniques, you may want to return to this chapter and see how you can apply your new knowledge of the .NET Framework’s multithreading capabilities to increase the performance and responsiveness of your application.