
Chapter 29. Creating Custom ASP.NET Providers
IN THIS CHAPTER
ASP.NET 2.0 is built around the concept of providers. In previous versions of ASP.NET, you could customize various aspects of ASP.NET’s behavior, but the methods for doing so and the difficulty of doing so varied greatly from one task to another.
With providers, there is a standard way to customize and replace different aspects of ASP.NET with your own code. With this version of ASP.NET, you can customize how ASP.NET does everything from authentication to authorization and even storing user profiles, session state, and site maps.
This chapter introduces you to the many providers available for your customization. It includes three fully functioning custom providers based on XML files, as well as information on the other providers. This chapter is very code-heavy, so I don’t recommend trying to read this chapter in a few quick minutes. The code listings in this chapter tend to be longer than most of the code listings in the rest of the book. As such, to follow along you may want to use the actual code accompanying the book rather than trying to type the samples line-by-line.
The Membership Provider
The Membership provider is what ASP.NET uses to store and validate user credentials. Through a consistent API and object model, developers can create code that works with Membership providers that will continue to function properly, regardless of the underlying credentials database (SQL, XML, Oracle, Access, and so on). In fact, ASP.NET ships with several visual controls that work with the Membership provider, such as the Login, LoginStatus, and LoginView controls. This section shows you the functionality provided by the MembershipProvider abstract base class, discusses the creation of a Membership schema, and then shows you the code and installation instructions for a sample custom Membership Provider.
Introduction to the MembershipProvider Base Class
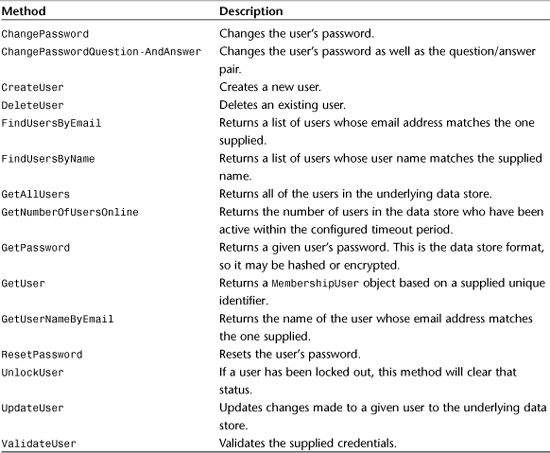
To create your own custom Membership Provider, you need to create a class that inherits from MembershipProvider. Before doing that, you should know what methods and properties are exposed by this class, their purpose, and what functionality you should include in your derivative class. Tables 29.1 and 29.2 illustrate the properties and methods you will be overriding in your custom implementation.
Table 29.1 MembershipProvider Properties
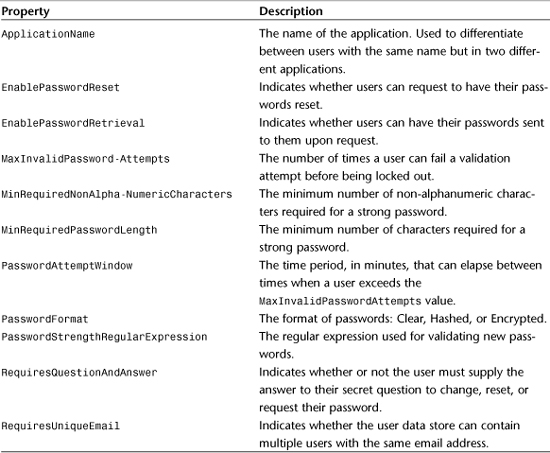
Table 29.2 MembershipProvider Methods
Implementing a Membership Schema
When working with your own custom Membership Provider, the main thing to keep in mind is that the Membership provider works almost exclusively with the following classes: MembershipUser and MembershipUserCollection. The MembershipUserCollection class is just a simple collection class containing MembershipUser instances. The MembershipUser class will provide you with your biggest clue as to what information your MemberShip schema needs to define. This class is a fairly straightforward placeholder with a few methods and the following properties:
Comment—Application-specific (string) data related to the user.CreationDate—The date the user was created.Email—The user’s email address.IsApproved—Whether the user has been approved or not.IsLockedOut—The user’s locked-out status.IsOnline—Indicates whether the user is online.LastActivityDate—The last time the user performed an action related to membership.LastLockoutDate—The last time the user was locked out.LastLoginDate—The last time the user logged in.LastPasswordChangedDate—The last time the user’s password was changed.PasswordQuestion—The user’s secret question used for password operations.ProviderName—The name of the Membership Provider. This always corresponds to the name as defined inWeb.config.ProviderUserKey—The provider-specific unique identifier for the given user. The actual key depends on which provider you’re using.UserName—The user’s name.
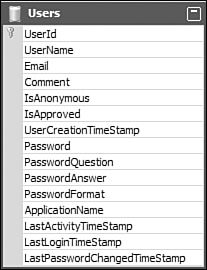
As with all of the schemas for all custom providers in this chapter, I am designing an XML-based custom provider. The quickest and easiest way to get some code up and running that will read and write to and from an XML file while still maintaining a relational view for easy access is to use a typed dataset. The typed dataset, like a regular dataset, can easily persist itself in an XML file. Figure 29.1 shows this typed dataset in the Visual Studio Designer.
Figure 29.1 The MembershipDataSet typed dataset.
Creating a Custom Membership Provider
Now that you’ve seen the typed dataset that is going to be the XML file in which the custom Membership information will be stored and you’ve also seen the list of properties and methods that you need to override in order to create your own Membership provider—you can finally get started on the coding.
To get started, create a C# Class Library called XMLProviders. You can delete the Class1.cs file that comes in the library because you have to rename it anyway. Next, make sure that this Class Library has a reference to System.Configuration. If it doesn’t have a reference to System.Web, make sure it has that as well.
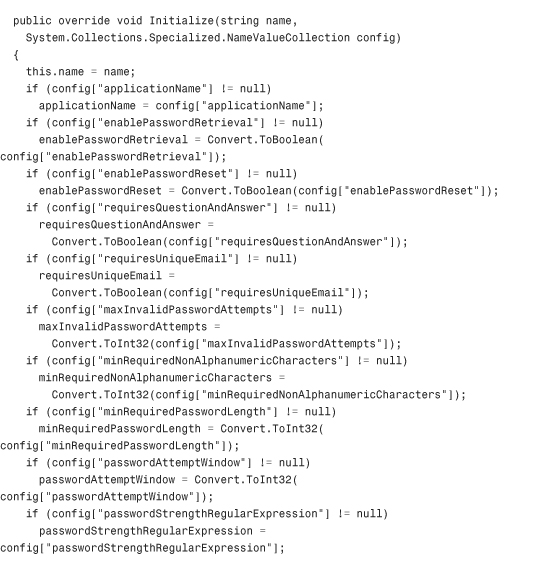
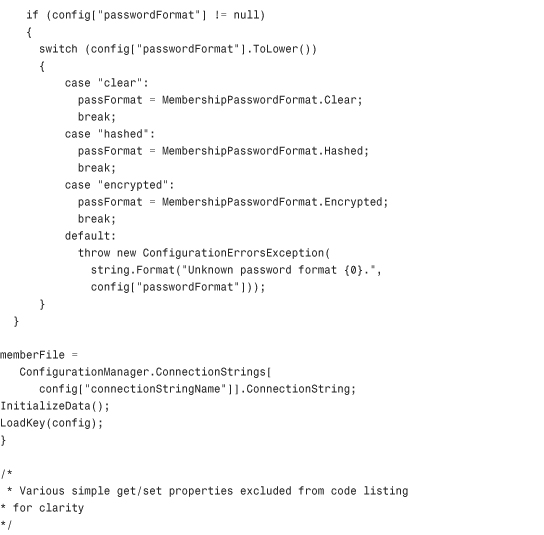
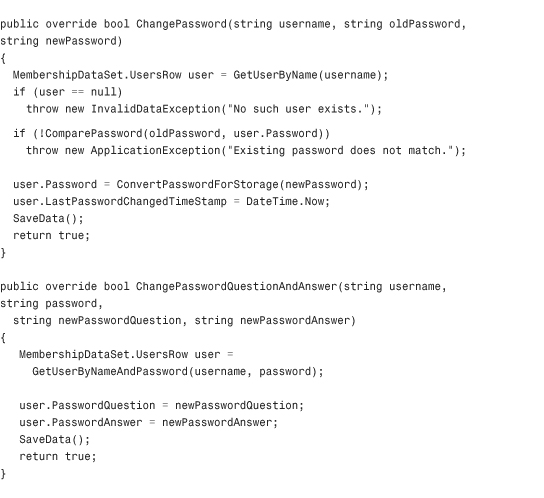
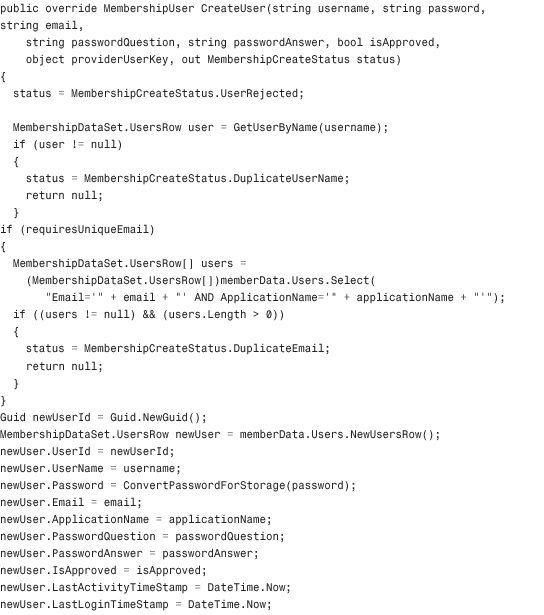
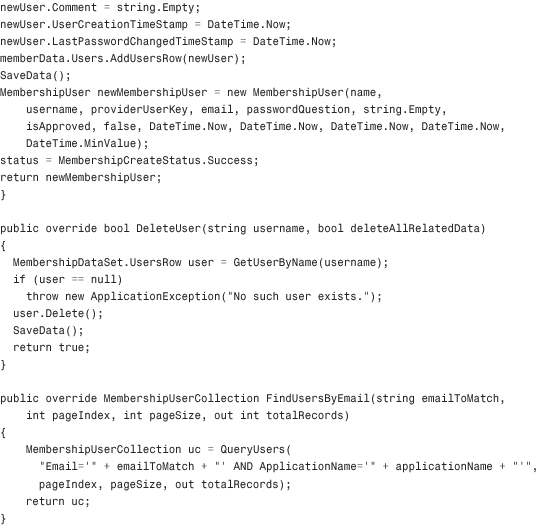
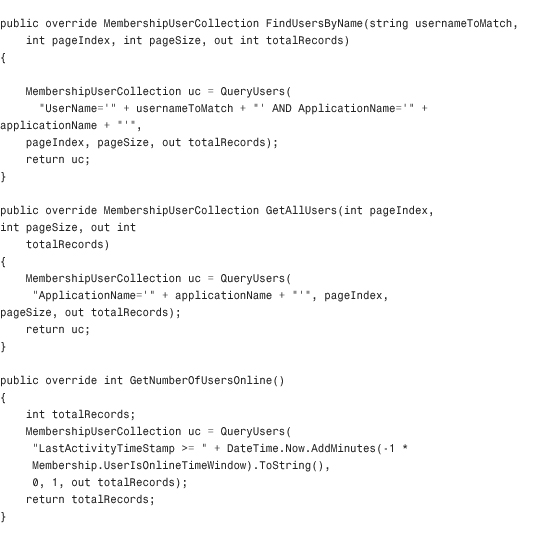
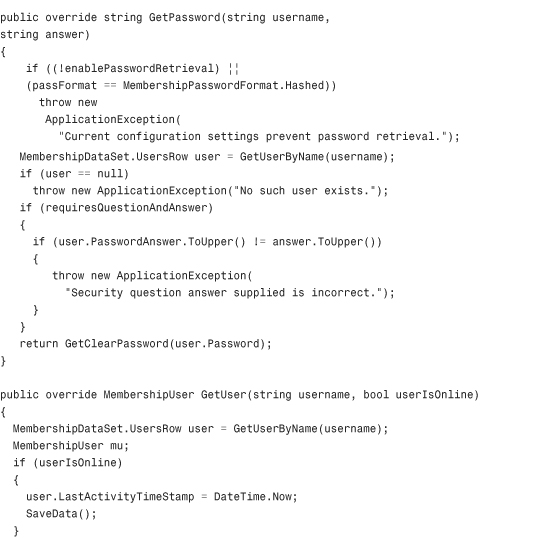
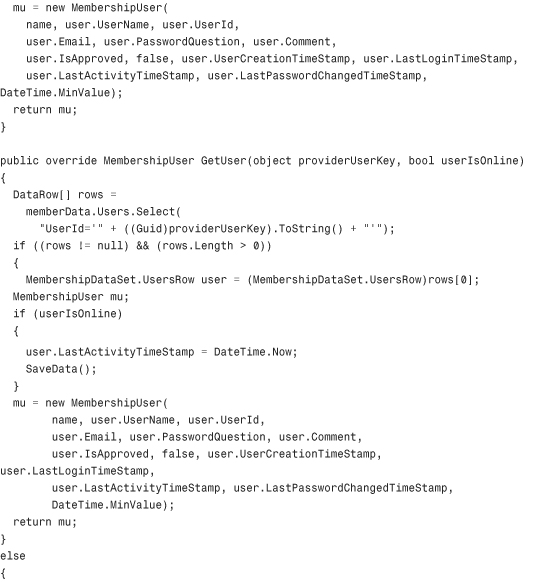
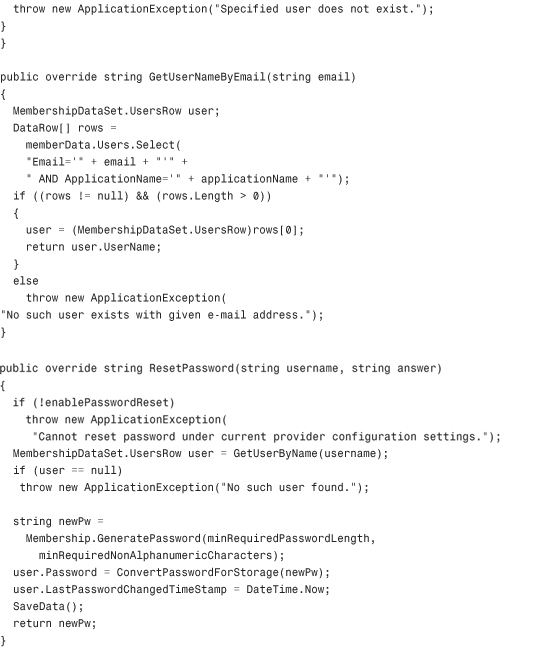
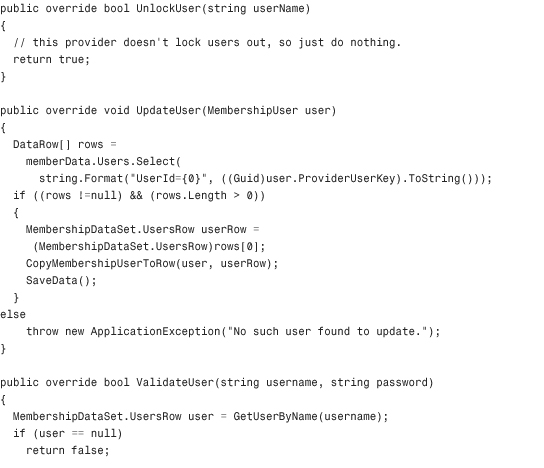
The basic premise behind this custom Membership provider is that every call to the provider that normally would have connected to a SQL Server database, an Oracle database, or an Access database is going to instead connect to a single XML file on the hard disk of the server. The code in Listing 29.1 contains the first class in this Class Library: MembershipProvider.cs.
Through the magic of partial classes, some of the private utility methods that make the code in Listing 29.1 possible are contained in a separate file called MembershipProvider_Utils.cs, but are still part of the class. These have been omitted from the listing to save room in the chapter, but the methods are available in the code accompanying the book. The methods in that file include InitializeData, SaveData, LoadKey, HexStringToByteArray, ComparePassword, GetClearPassword, ConvertPasswordForStorage, GetUserByName, CopyUserRowToMembershipUser, CopyMembershipUserToRow, QueryUsers (the workhorse of the entire class), and GetUserByNameAndPassword. Most of the encryption code in the utility file is inspired by some of the sample code for a custom Membership provider in the WinFX SDK published by MSDN. You are free to choose your own encryption methods if you like, but the code in this file and in the WinFX SDK samples is quite secure.
Listing 29.1 The XML Membership Provider Class

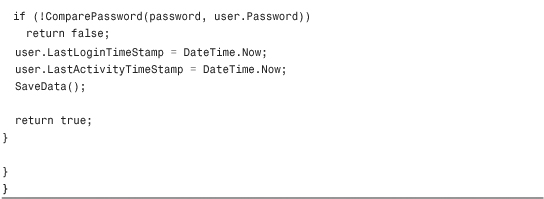
Configuring and Installing the Membership Provider
After you have created the Membership Provider class and your XMLProviders Class Library compiles without a hitch, you need to configure your provider for use with an ASP.NET application. This is done through a Web.config setting called <membership>. You saw a little bit about this element in Chapter 28 where you learned how to use the Membership provider. The following is a sample <membership> element element (Web.config files);Membership provider, configuring> that is configured to use the custom XML membership provider created in Listing 29.1:
The first important attribute is the type attribute. This tells ASP.NET where to find the class that derives from MembershipProvider, as that class will be instantiated the first time any Membership operations are performed in the application. In the case of my sample provider, the type is SAMS.CustomProviders.XML.MembershipProvider. In order for this to work, the web application needs to have a copy of the Assembly in which that type is defined in its bin directory. The easy way to do this is just to make sure that the web application references the XMLProviders project. If you are deploying your providers without regard to application, you can install them in the Global Assembly Cache (GAC), in which case you would need to supply a fully qualified type name including the type name, Assembly name, version number, and culture identifier for the type attribute.
The Role Provider
The Role provider is used for determining user authorization. It performs a fairly simple function: maintain which users belong to which Roles. One really key thing to remember is that the Role provider can function independently of (and even without) the Membership provider. This means that the user names used in conjunction with the Role provider don’t have to match the user names used for Membership. Obviously it is in your best interest to allow them to match, but it is helpful for the custom RoleProvider programmer to know that you don’t need access to the Membership database to create a Role provider. This section of the chapter introduces you to the RoleProvider abstract base class, shows you how to create your own Role schema, and then shows you how to create your own custom RoleProvider.
Introduction to the RoleProvider Base Class
The RoleProvider base class is a fairly straightforward class. By inheriting from that class and overriding its implementation with your own, you can allow the user role membership data to be stored anywhere you like. In the example discussed in this section, I’m using an XML file on the web server. Tables 29.3 and 29.4 give you a list of the properties and methods of the RoleProvider class that you will be overriding to create your own implementation.
Table 29.3 RoleProvider Properties

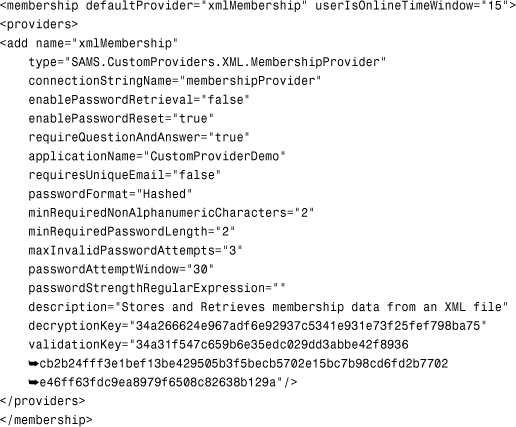
Table 29.4 RoleProvider Methods
Implementing a Role Schema
As with the Membership schema, the data you need to maintain in your custom provider implementation is dictated by the methods exposed by the provider, and the classes utilized by that provider. The Role provider has fewer rules that need to be followed than the Membership provider, so there is more flexibility with how you store the underlying data. For example, the Membership provider made extensive use of the MembershipUser and MembershipUserCollection classes, and as such the properties of those classes dictated the schema of the stored data.
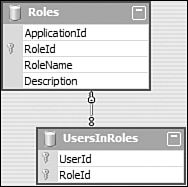
The RoleProvider interface consists mainly of passing strings and arrays of strings, and returning strings, arrays of strings, and Boolean values indicating membership in Roles. This makes the typed dataset fairly straightforward. You’ll need a table to store the list of Roles, and then you’ll need a table to store the list of users that belong to each role. Because all Role membership checking is done on the user’s name or ID (the string UserName property in the Membership provider, also the UserName property used by the IPrincipal interface), you only need to store the user name in the detail table, as illustrated in Figure 29.2.
Figure 29.2 The RoleDataSet typed dataset.
Creating a Custom Role Provider
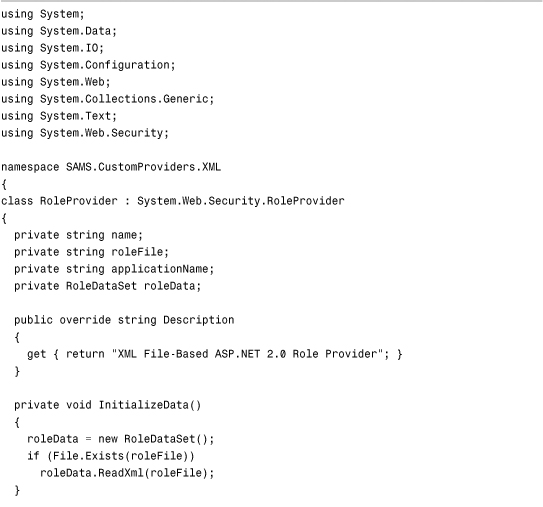
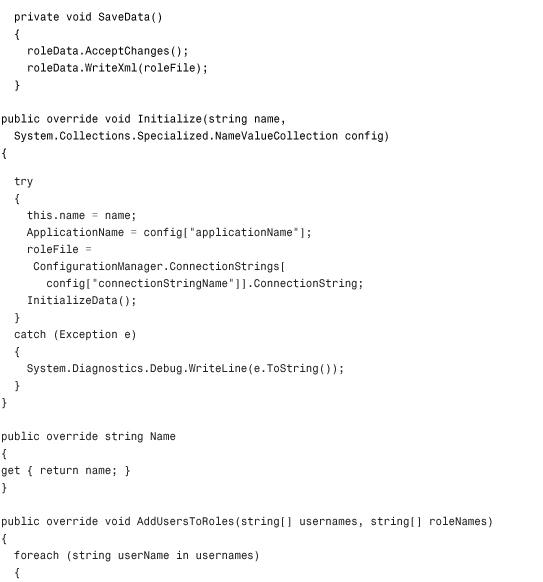
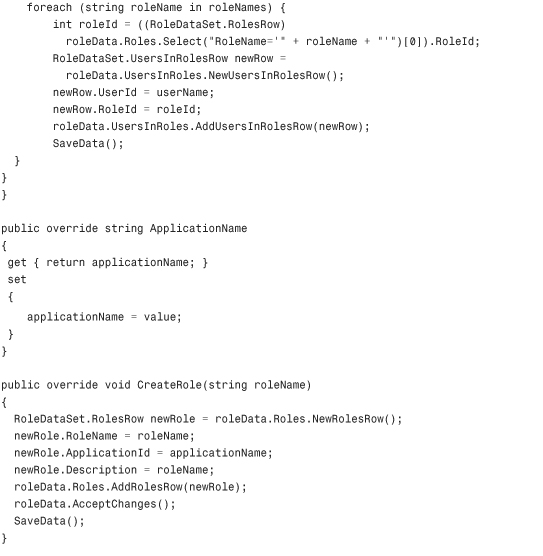
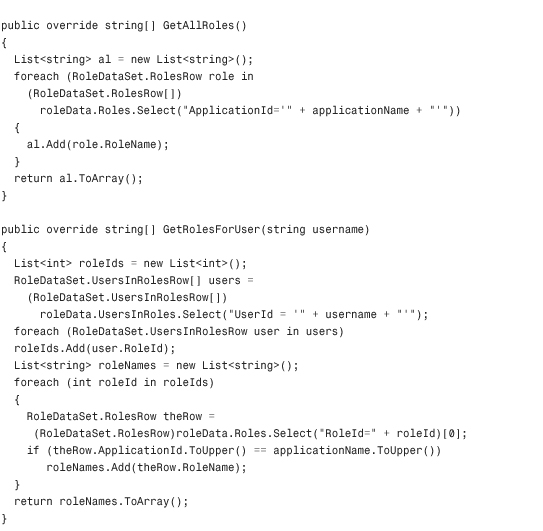
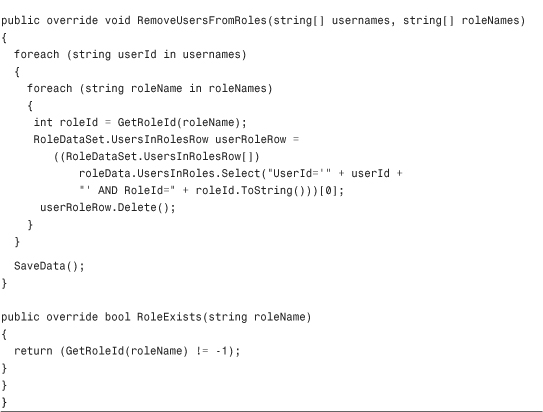
The code for the RoleProvider is fairly straightforward. After you add the RoleDataSet to the XMLProviders project, you can then add the RoleProvider class shown in Listing 29.2. The main thing to keep in mind when looking at this class is that the ultimate reason for the Role provider is to simply determine the roles to which each user belongs, and nothing more. Often the hardest part about creating custom providers is avoiding the pitfall of trying to make them do more work than they are responsible for.
Listing 29.2 The XML RoleProvider Class


Configuring and Installing the Role Provider
The configuration and installation of the Role provider follows the same rules as the Membership provider. If you want your provider to be shared among more than one application on a server, you should probably install the provider into the GAC so that you don’t have to have multiple copies of your provider scattered throughout a server.
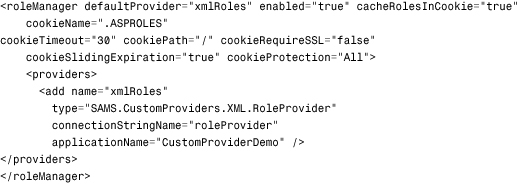
To configure the Role provider, you use the <roleManager> Web.config element that you were introduced to in Chapter 28. A sample <roleManager> element designed to work with the code in this chapter is shown in the following code:
The connectionStringName attribute points to the following connection string stored in the <connectionStrings> element, which is just the physical location of the XML file:
<add name="roleProvider"
connectionString="D:SAMSC# Unleashed 2005Chapters29CodeDataRoles.XML"/>
The ProfileProvider
The ProfileProvider is probably one of the most versatile providers in ASP.NET. It doesn’t store user credentials or user role membership. Instead, this provider is responsible for storing arbitrary properties about the users themselves. As you have seen in previous chapters, when you define user profile properties in the Web.config file, you can use them in a strongly typed fashion at compile time in the Visual Studio environment using the Profile static class within a Web Form.
Introduction to the ProfileProvider Base Class
The ProfileProvider abstract base class provides methods that deal with locating user profiles, reading and writing properties on those profiles, and modifying, creating, and deleting those profiles. Table 29.5 contains the methods that you will be overriding in your custom implementation of the ProfileProvider class.
Table 29.5 ProfileProvider Methods

Implementing a Profile Schema
A quick examination of the ProfileProvider abstract base class reveals that a lot of the interface takes place with the ProfileInfo and ProfileInfoCollection classes. The ProfileInfo class has very few properties and only tracks basic information such as UserName, IsAnonymous, LastActivityDate, LastUpdatedDate, and Size. More important than storing the user name is the storage of profile properties. In most Profile providers, developers can create arbitrary properties.
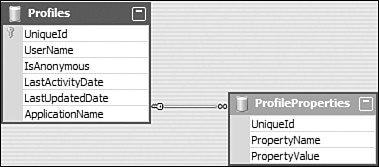
If you are going to create a custom provider, you will need to be able to store arbitrary data associated with a given user. To do this, I used a parent-child table where the child table contained rows of name-value pairs associated with a specific user. Figure 29.3 shows the typed dataset ProfileDataSet. The only really important thing of note in the schema shown in Figure 29.3 is that the UniqueId column is a System.Guid and it is generated programmatically each time a new row is created.
Figure 29.3 The ProfileDataSet typed dataset.
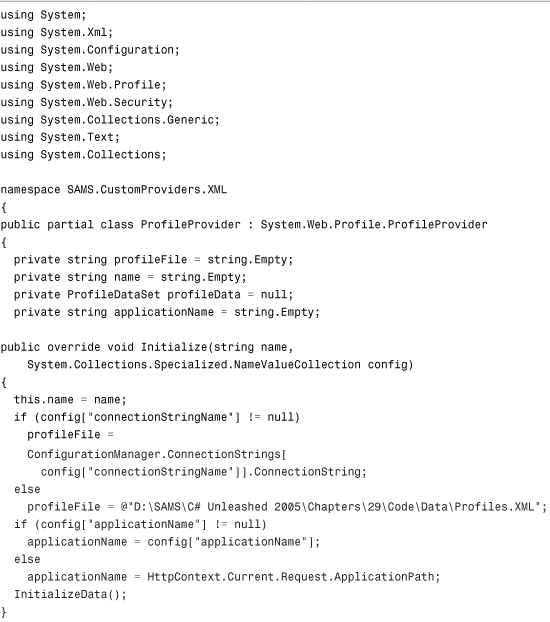
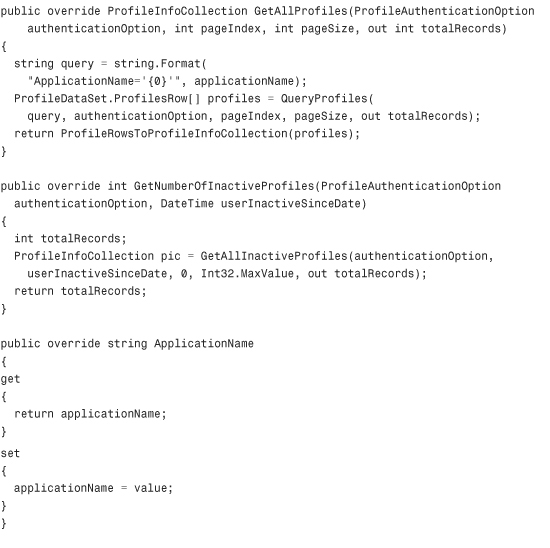
Creating a Custom Profile Provider
As with the previous providers, I have split the Provider implementation and the private utility methods into two files so that the code is easy to read and follow. The utility methods that are not included in Listing 29.3 are: InitializeData, SaveData, AppendAuthOptionToQuery, GetProfileByUserName, CreateUserProfile, QueryProfiles, ProfileRowsToProfileInfoCollection, ProfilesRowToProfileInfo, GetProfileProperty, and TouchActivityDates.
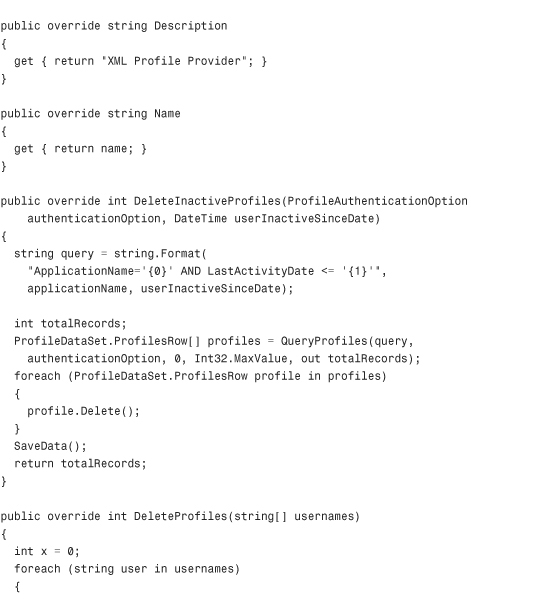
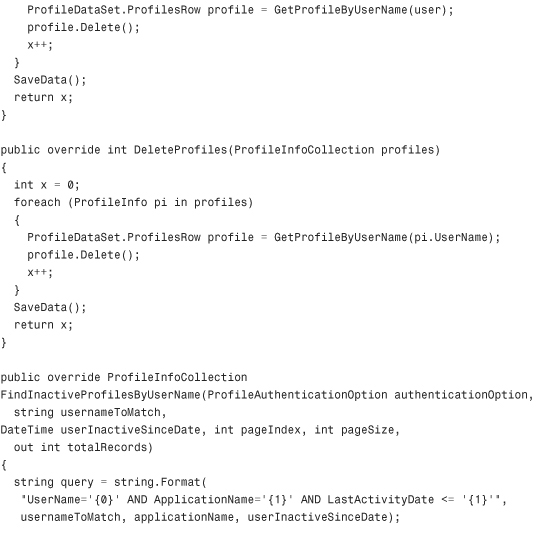
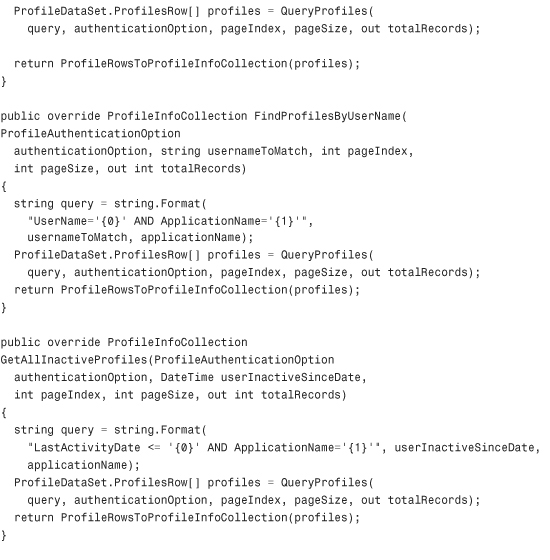
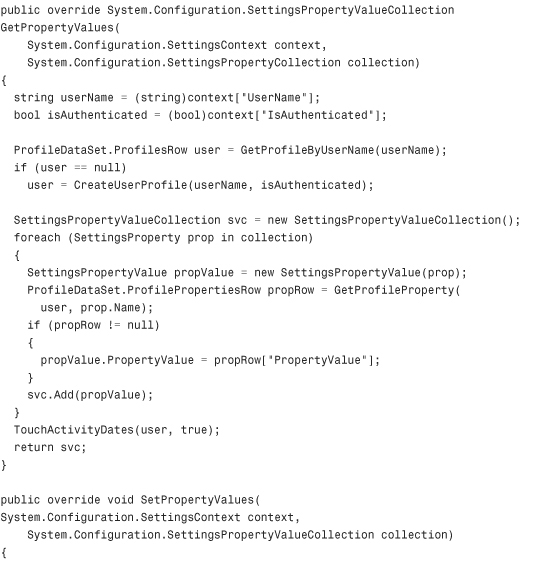
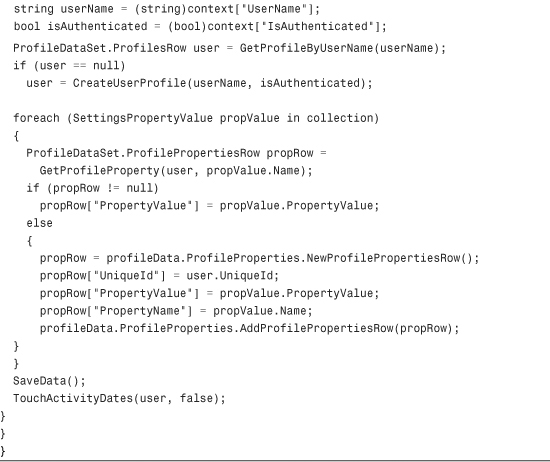
Listing 29.3 The XML Profile Provider
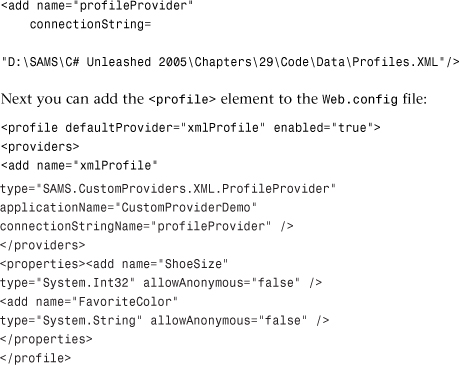
Configuring and Installing the Profile Provider
The Profile provider also has its own Web.config entry. As with the other providers, if you plan on sharing the provider among multiple applications on the same server, you should install the provider into the Global Assembly Cache. Otherwise, you are fine just ensuring that the provider’s Assembly is in your web application’s bin directory.
The first thing you need is a connection string in the <connectionStrings> Web.config element:
Additional Providers
This section provides you with a brief introduction to some of the other providers that you can customize. Given what you have learned already about customizing the ProfileProvider, the MembershipProvider, and the RoleProvider, you should have no trouble using that knowledge to create your own custom providers for each of the items discussed in the rest of this section.
Introduction to the SessionState Provider
The session state provider is used to maintain session state for a web application. The session state is essentially a collection of name-value pairs that are associated with a session identifier. This session identifier is stored as a cookie (or embedded in the URL depending on session state configuration) on the client’s machine. Each time a user requests a page, the session state for that user is accessible by means of the user’s session identifier.
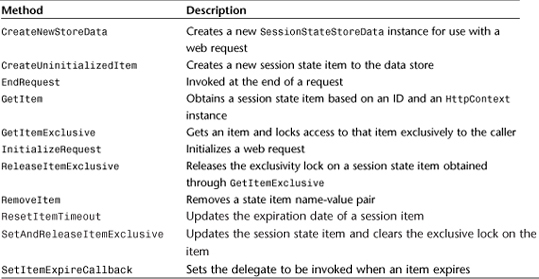
To create your own session state provider, you must override the SessionStateProviderBase class in the System.Web.SessionState namespace. The list of methods for that class is shown in Table 29.6.
Table 29.6 SessionStateStoreProviderBase Methods
Introduction to the SiteMap Provider
The SiteMap Provider is responsible for maintaining a site hierarchy. Essentially it is responsible for storing a tree structure, where each node in the tree has a description of a page as well as a link to that page. Site Map Providers make it possible to create “bread-crumb”-style controls that illustrate where a user is within a site hierarchy.
To create your own Site Map Provider, you need to create a class that inherits from System.Web.SiteMapProvider. The good thing about this particular provider is that not only does ASP.NET ship with an XML version, but the XML version is the default. Microsoft has provided an XmlSiteMapProvider that allows you to define your site map within an XML file.
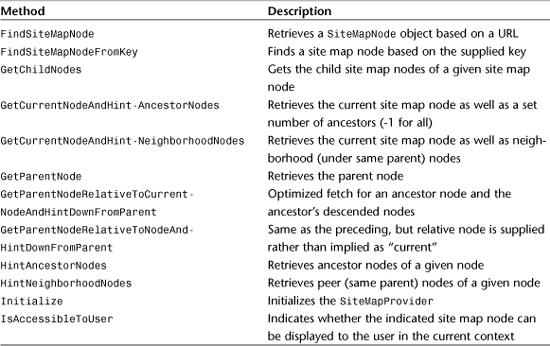
However, if you are already storing your site map in a database such as SQL Server or Oracle in your own schema, you might want to create your own provider. Table 29.7 illustrates the methods of the SiteMapProvider class that you must override in order to implement your own custom Site Map Provider.
Table 29.7 SiteMapProvider Methods
The basic idea behind the site map provider is that the code is maintaining a tree structure with page-related information. You can come up with a fairly simple schema to manage this. The caveat here is that often many tree structures in relational databases perform slowly, so when implementing your own Site Map provider make sure to take advantage of the Hintxxxx methods and provide very fast (and cacheable) results.
Summary
As I explained at the beginning of this chapter, this was an extremely code-heavy chapter. Even though one of the most significant additions to ASP.NET 2.0 is the fact that virtually everything is faster, easier, and achievable with less code—you can still roll up your sleeves and get down in it.
This chapter showed you that, with a little bit of effort in the creation of your own custom providers, you can do some up-front work that will allow you to create sites that will seamlessly plug into your own authentication, membership, roles and profile stores, regardless of where they’re stored or how they’re stored. ASP.NET’s core utilizes the provider model for everything, so as long as your code inherits from one of the base provider classes, your code will cooperate fully with ASP.NET. You saw custom XML-based implementations of the ProfileProvider class, the RoleProvider class, and the MembershipProvider class as well as introductions to the SiteMapProvider class and the SessionStateStoreProviderBase class.
When creating custom providers, you can find the list of requirements for a given provider in its associated interface. For example, IMembershipProvider tells you everything you need to know in order to create your own membership provider.
You also saw a good example of using partial classes. The implementations of the providers were split into multiple files: one file containing the strict interface implementation and the other file containing private utility methods. This is done to make the code easier to read and maintain.
After completing this chapter, you should have a thorough knowledge of how all of the various ASP.NET 2.0 providers work as well as how to implement your own. You should also be able to determine when you need to create your own and when you can rely on the existing providers that come with ASP.NET 2.0.