
Appendix A. Quick Reference Guide
In this appendix
Basics of SAP R/3 Query-Based Reporting 300
Creating a Basic List Query by Using the SAP Query Tool 304
Creating a Statistics List with the SAP Query Tool 310
Creating a Ranked List by Using the SAP Query Tool 313
Creating a QuickView with QuickViewer 315
Report Distribution Strategies 316
This appendix is designed to be an easy, quick-reference guide of the material that is covered in this book, and it should prove helpful for your organization with regard to SAP Query-based reporting, administration, and deployment.
Basics Of Sap R/3 Query-Based Reporting
The following SAP R/3 query reporting options are delivered with a standard SAP installation:
• The SAP Query tool
• The InfoSet (Ad Hoc) Query tool
• The QuickViewer tool
The Query tools in SAP have four technical aspects:
• Query areas
• Query groups
• InfoSets
• Administrative decisions (company-specific)
Configuring The Sap Query Tools
Configuring the SAP Query tools involves four steps:
• Step 1: Create query groups.
• Step 2: Assign users to query groups.
• Step 3: Create InfoSets.
• Step 4: Assign InfoSets to query groups.
Step 1 Of 4: Create Query Groups
To do the one-time configuration required for using the SAP Query tool, follow these steps:
1. Log in to the area of your SAP client where your query groups will be maintained.
2. Navigate to the User Groups: Initial screen by using the transaction code /nSQ03.
3. Ensure that you are in the appropriate query area by following the menu path Environment, Query Areas and selecting Standard Area.
4. Type the name for your query group in the User Group field (for example, ZTEST). Then click the Create button.
5. When a dialog box appears, asking you to provide a description for your query group, type Test Query Group 1 and then click the green checkmark Save button.
Step 2 Of 4: Assign Users To Your Query Groups
To assign users to a query group, perform the following steps:
1. Click the Assign Users and InfoSets button.
2. Type in the SAP user IDs of any users you wish to include in your query group, making sure to include your own user ID.
3. Click the Save button on the toolbar. A message appears in your SAPGUI status bar, saying “User group ZTEST saved.”
Step 3 of 4: Create InfoSet
To create a new InfoSet, you perform the following steps:
1. Log in to the area of your SAP client where your InfoSets will be maintained.
2. Navigate to the InfoSet: Initial screen by using the transaction code /nSQ02.
3. Ensure that you are in the appropriate query area by selecting Environment, Query Areas and then selecting Standard Area.
4. Type in a name for your InfoSet (for example, ZTEST). Then click the Create button.
5. On the InfoSet: Title and Database screen, type an InfoSet description in the Name field (for example, Test InfoSet 1).
6. On the InfoSet: Title and Database screen, select the Logical Database radio button, select or input logical database f1s in the field to its right, and then press Enter. A Change InfoSet screen appears, displaying a list of all tables available in the selected logical database for your InfoSet. The logical database selected, f1S, contains three test tables, called SPFLI, SBOOK, and SFLIGHT, which correspond to the three field groups listed at the top right. The field groups are what the end users will actually see when they are creating reports using the SAP Query reporting tool.
7. To view the fields in each of the three tables, use the expand subtree button next to each table name. The table selected expands and displays the fields underneath.
8. Assign fields to the field groups (shown on the top right of the screen) within the InfoSet. These field groups will display in the SAP Query tool during reporting. Only the fields that you include in your field groups will be available for field selection in the SAP Query tool that uses this InfoSet as its data source. By default, these field groups will be empty.
9. Place your cursor on the first field group, Flight Schedule, and double-click to highlight that field group as the selected field group. Next, select fields from the left side of the screen from the Flight Schedule table and add them to the Flight Schedule field group by placing your cursor on a field on the left side of the screen, right-clicking, and selecting the option Add Field to Field Group.
10. When the field you just added to the Flight Schedule field group appears at the top right of the screen, add fields to your selected functional group by following the procedure outlined in step 9. Be sure to add fields to the appropriate field groups.
For example, fields in the Flight Schedule table should be added to the Flight Schedule field group, and fields from the Flight Booking table should be added to the Flight Booking field group.
11. After you have added a series of fields to your field groups, click the Save button on the toolbar. A message appears in the status bar, saying that your InfoSet was saved.
12. Generate the InfoSet by clicking the Generate button (the red beach ball) from the Application toolbar. A message appears in the status bar, saying that the InfoSet was generated.
13. Exit the Change InfoSet screen by clicking the green Back button.
Step 4 of 4: Assign Infoset To Query Group
To assign an InfoSet to a query group, you follow these steps:
1. On the InfoSet: Initial screen (which you reach by entering transaction code /nSQ02), make sure your InfoSet name (for example, ZTEST) is present in the InfoSet text box, and click the User Group Assignment button.
2. In the InfoSet: Assign to User Groups screen that appears, highlight your query group (for example, ZTEST) by selecting the gray button to the left of it, and then click the Save button. A message appears in the status bar, saying that the assignment of InfoSet has been saved.
3. Exit the InfoSet: Assign to User Groups screen by clicking the green Back button.
Query Configuration Maintenance Functions
To return to a data source and make changes to it, you follow these steps:
Returning to an InfoSet to Add Fields
To add an additional field to your InfoSet, follow these steps:
1. Log in to the area of your SAP client where your InfoSets are maintained.
2. Navigate to the InfoSet: Initial Screen by using the transaction code /nSQ02.
3. Ensure that you are in the appropriate query area by selecting Environment, Query Areas and then selecting Standard Area.
4. Type the name of the InfoSet that you want to make changes to and then click the Change button.
5. Review the fields that are currently present in the field groups (shown on the top right of your screen) in your InfoSet.
6. When you initially created the InfoSet, it is likely that you did not add all fields in the logical database to your field groups. Determine which field group is the appropriate one to add a field to. Place your cursor on that field group and double-click it to highlight it as the selected field group. Then select fields from the left side of the screen from the corresponding table and add them to the highlighted field group by placing your cursor on a field on the left side of the screen, right-clicking, and selecting the option Add Field to Field Group Remember to ensure that you add fields to the appropriate field group. Your newly added fields now appear in your selected field group.
7. When you have finished adding fields, click the Save button on the toolbar. A message appears in the status bar, saying that the InfoSet was saved.
8. Generate the InfoSet by clicking the Generate button on the Application toolbar. A message appears in the status bar, saying that the InfoSet has been generated.
Returning to an InfoSet to Delete Fields
To delete a field from your InfoSet, follow these steps:
1. Log in to the area of the SAP client where your InfoSets are maintained.
2. Navigate to the InfoSet: Initial screen by using the transaction code /nSQ02.
3. Ensure that you are in the appropriate query area by following the menu path Environment, Query Areas and selecting Standard Area.
4. Type in the InfoSet name and then click the Change button. The Change InfoSet screen appears, displaying a list of all the tables available in your InfoSet. The logical database f1S that is selected contains three test tables, called SPFLI, SBOOK, and SFLIGHT, which correspond to the three field groups listed at the top right.
5. To view the fields in each of the three tables, use the expand subtree button next to each table name. The table selected expands and displays the fields underneath.
6. Review the fields that are currently present in the field groups (shown on the top right of your screen) in your InfoSet.
7. Determine which field group you want to delete fields from and place your cursor on it. Double-click the field group to highlight it as the selected field group. Next, place your cursor on a field in the field group on the top-right side of the screen, right-click, and select the option Delete Field from Field Group. The deleted fields no longer appear in your selected field group.
8. When you have finished deleting fields, click the Save button on the toolbar. A message appears in the status bar, saying that the InfoSet was saved.
9. Generate the InfoSet by clicking the Generate button on the Application toolbar. A message appears in the status bar, saying that the InfoSet has been generated.
Changing The Name of A Field or Column Header
You can alter the name of a field and its column heading when it appears in a query-based report by simply following these steps:
1. Select a field by double-clicking it in the top-right side of the screen. The details of that field appear on the bottom-right side of the screen.
2. Alter the field name by editing the text in the Long Text field, and edit the column heading of the field as it will appear in reports by editing the text in the second line of the Header field at the bottom right.
3. Click the Save button on the toolbar. A message appears in the status bar, saying that the InfoSet was saved.
4. Generate the InfoSet by clicking the Generate button on the Application toolbar. A message appears in the status bar, saying that the InfoSet has been generated.
Reverting The Name Of A Field Or Column Header To Its Original Name
If you have altered the name of a field or column heading, you can revert it to the standard SAP-delivered text by following these steps:
1. Select a field by double-clicking it in the top-right side of the screen. The details of that field appear on the bottom-right side of the screen.
2. Click the Get Default button. The field and column names revert to their original names.
3. Click the Save button on the toolbar. A message appears in the status bar, saying that the InfoSet was saved.
4. Generate the InfoSet by clicking the Generate button on the Application toolbar. A message appears in the status bar, saying that the InfoSet has been generated.
Creating A Basic List Query By Using The Sap Query Tool
To create a basic list query by using the SAP Query tool, follow these steps:
1. Log in to your SAP client where your query reports will be created.
2. Navigate to the Maintain Queries Initial screen by using the transaction code /nSQ01. SAP offers a graphical version of the SAP Query tool, called the Graphical Query Painter; if you have not used the SAP Query tool, the Graphical Query Painter is set as your default. To turn off the Graphical Query Painter and learn to create easy step-by-step reports by using the SAP Query tool, select Settings, Settings and then deselect the Graphical Query Painter check box.
3. The title bar lists the query group you are currently in. For example, your title bar might read Query from User Group ZTEST: Initial Screen. If you are assigned to multiple query groups, press F7 to see a list of them all.
4. As discussed in Chapter 1, “Getting Started with the SAP R/3 Query Reporting Tools,” it is recommended that you create your queries in the standard query area. Ensure that you are in the standard query area by selecting Environment, Query Areas and then selecting Standard Area.
5. In the Query field, type DLS_QUERY_01 where DLS is your initials) as the name for the query you are creating and then click the Create button.
6. The InfoSets of User Group ZTEST window appears, listing all the available InfoSets (that is, data sources) for your query group. Because you created only one (in my example, ZTEST) in Chapter 2, “One-Time Configuration for Query Tool Use,” it is the only one listed. Select the InfoSet you created (ZTEST, in my example) and then click the green check mark button.
7. The Create Query Title Format screen appears. This screen allows you to save the basic formatting specifications for your query, including the name (title) and any notes you want to store for the query. The only required field is Title (long report description). For this example, fill in only the Title field and then click Save. (For my example, I used the title (DLS) SAP Query Exercise #01.)
8. Navigate to the next screen in the SAP query creation process by selecting the Next Screen (white navigational arrow) button on the Application toolbar. (You can use the navigational arrows to navigate between the different screens of the SAP Query tool.) The Select Field Group screen appears, listing all the Field groups available within your InfoSet. (In my example, the field groups Flight Schedule [SPFLI], Flight Demo Table [SFLIGHT], and Flight Booking [SBOOK] are listed.)
9. Place a check mark next to each field group from which you want to include fields in your report. Navigate to the next screen in the SAP query creation process by selecting the Next Screen (white navigational arrow) button on the Application toolbar. The Select Field screen appears, showing a list of all the available fields in the selected field groups.
10. Place a check mark next to each field that you want to include in your report. You can use the Page Up and Page Down keys to navigate between all the fields. Select the Next Screen (white navigational arrow) button on the Application toolbar to open the Selections screen, which lists all the fields you have selected.
11. If desired, add any of the fields to the selection screen that will be presented when you execute your report. You can add a field to the Selections screen by placing a check mark next to each one.
12. Click the Basic List button on the Application toolbar to create an SAP basic list query. The Basic List Line Structure screen appears, showing a list of the fields that you selected to include in your report.
13. For each field, specify the line and sequence number, as you want them to appear on your report. Also use this screen to indicate sort order, totals, and counts, if needed. Start by entering the line and sequence numbers.
14. For this example, proceed directly to the report by pressing F8, which causes the report to execute.
15. As with almost all other reports in SAP, when you execute this report, you see the report’s selection screen. Specify any criteria for the output of your report. Notice that any fields indicated on the Selections screen are included on your selection screen, under the heading Program Selections.
16. Select the F8 Execute button on your Application toolbar (it looks like a clock) to display your finished report. Your report output appears. (Keep in mind that the actual values vary by organization: The output of the report corresponds to the specification entered on the Basic List Line Structure screen.)
Query Maintenance Functions
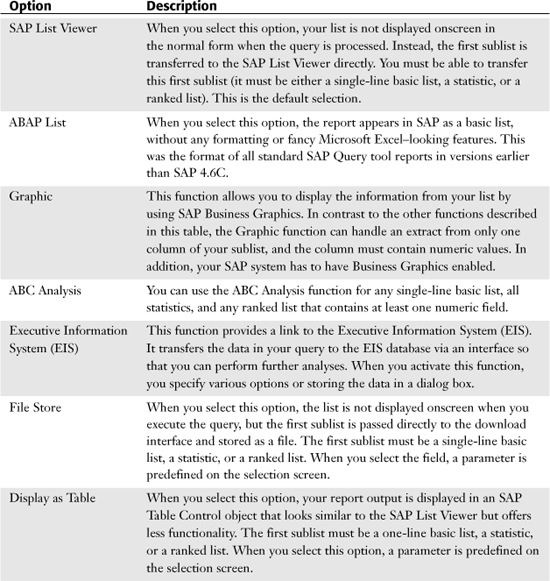
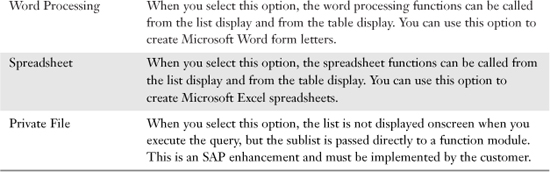
Table A.1 provides detailed descriptions of each of the output format options.
Table A.1. SAP Query Reporting Output Options
Copying Existing SAP Queries (Same Client, Same Query Group)
Follow these steps to copy a query:
1. Navigate to the main screen of the SAP Query tool by using transaction code SQ01 and select from the list the query you want to copy (or type the query’s name in the Query box at the top of the screen).
2. Click the white copy button on the Application toolbar. The Copy a Query dialog box appears.
3. Type in a new name for your copied SAP query in the To Query Name box and then press Enter. Be sure to follow the naming rules discussed earlier in this appendix when naming the copied query.
4. When your copied SAP query appears in the same user group as the original, change the long report title (description) of the copied query to distinguish it from the original.
Copying Or Moving Existing Sap Queries (Same Client, Different Query Group)
Follow these steps to copy a query to a new query group:
1. Navigate to the main screen of the SAP Query tool by using transaction code SQ01 and select from the list the query you want to copy (or type the query’s name in the Query box at the top of the screen).
2. On a scrap of paper, write down the name of the query and the name of the query group in which it currently resides.
3. Press Shift+F7 to view a list of all query groups to which you are assigned.
4. Double-click the query group you want to move the query to. You are now on the main screen of the SAP Query tool, and the query group is listed on the top left of the screen.
5. Click the white Copy button on the Application toolbar.
6. When a dialog box appears, take a look at your scrap of paper and type the query and query group names into the form.
7. Type a new name for your copied SAP query in the To Query Name box, ensuring that the Query (User) Group lists the new query group name to which you are moving the query.
8. Press Enter. Your copied SAP query, with its new name, appears in the new query group, along with the original query group.
9. Be sure to change the long report title (description) of the copied query to distinguish it from the original (as needed), and be sure to follow the naming rules discussed earlier in this chapter when naming the copied query.
Deleting SAP Queries
To delete an SAP query, follow these steps:
1. Navigate to the main screen of the SAP Query tool by using transaction code SQ01 and select from the list the query you want to delete (or type the query’s name in the Query box at the top of the screen).
2. Select the trash can Delete button on the Application toolbar.
3. When the Delete Query dialog box appears, confirm that you want to delete the query by pressing Enter. A message appears in the bottom left of the screen, letting you know that the query has been successfully deleted.
Creating a Variant for an SAP Query
You can create a variant in several different ways. The following instructions work for any version of SAP, beginning with version 4.0:
1. Begin at the main screen of the SAP Query tool, which you reach by using transaction code SQ01. Select the query for which you would like to create a variant by selecting (highlighting) the gray bar to the left of the table or by typing the query name in the box at the top of the screen.
2. Select Goto, Maintain Variants. The screen ABAP Variants - Initial Screen appears.
3. Type a name for your variant and then click the Create button. You are presented with the selection screen for the report for which you decided to create a variant in step 1. This screen gives you the opportunity to input selections that will be saved as a variant.
4. Input values on the selection screen that you want to save and then click the Save button on the Application toolbar. The first time you save the variant, the Save Attributes screen appears. When you modify an existing variant, you can click the Variant Attributes button to access this screen.
5. The only required field for entry on the Save Attributes screen is the Description field. Enter a description for your variant in this field and then click the Save button to complete the variant creation process. It is a good idea to use a description that describes the variant.
6. Click the green Back button to return to the Maintain Variants screen.
7. Click the green Back button again to return to the main SAP Query tool screen.
Executing A Report With A Variant (Execute With Variant)
Multiple variants can exist for a report, and you can decide which one to use prior to report execution by following these steps:
1. Begin at the main screen of the SAP Query tool, which you reach by using transaction code SQ01. Select your report and then click the Execute with Variant button on the Application toolbar. A dialog box that contains a drop-down field of all the variants for the selected report appears.
2. Select the variant you want to use and then press Enter.
3. Click the Execute button. The report executes, displaying the saved variant.
Executing A Report With A Variant (Execute)
Multiple variants can exist for a report, and you can decide which one to use upon report execution by following these steps:
1. Begin at the main screen of the SAP Query tool, which you reach by using transaction code SQ01. Select your report and then press F8 or click the Execute button. The report’s selection screen appears.
2. On the selection screen’s Application toolbar, click the Get Variant button (immediately to the right of the Execute button). A dialog box containing a drop-down field of all variants for the selected report appears.
3. Select the variant you want to use and then press Enter.
4. Click the Execute button. The report executes, displaying the selected variant.
Saving An Sap Query With A Variant
In addition to selecting a variant prior to or upon report execution, you can save a variant with a query as a default, such that when the report is executed, that variant is automatically used to populate the report’s selection screen:
1. Begin at the main screen of the SAP Query tool, which you reach by using transaction code SQ01. Select your report and then click the Change button. The Title, Format screen of the SAP Query tool appears.
2. In the Special Attributes section of the Title, Format screen, select the Variant drop-down box to see a list of all variants that exist for the selected report.
3. Select the variant you want to use and then press Enter.
4. Check the Execute Only with Variant check box.
5. Click the Save button and then press F8 or click Execute.
6. Click the Execute button. The report executes, displaying the saved variant. Because it was saved with the query, every time it is executed, the saved default variant will be used. The variant can be overwritten with new values, or a new variant can be selected after execution; however, it will always be presented as the default.
Editing A Variant For An Sap Query Directly From The Selection Screen
After a variant is created, you can modify it on the selection screen by following these steps:
1. On the selection screen, change the values as desired and then click the Save button on the Application toolbar. A confirmation box appears, asking if you want to overwrite the existing variant.
2. Click Yes. The changes to your variant are saved.
Editing A Variant For An Sap Query From The ABAP Variants - Initial Screen
After a variant is created, you can modify it on the screen ABAP Variants - Initial Screen by following these steps:
1. Begin at the main screen of the SAP Query tool, which you reach by using transaction code SQ01. Select the query for which you would like to modify the variant by selecting (highlighting) the gray bar to the left of the table or by typing the query name in the box at the top of the screen.
2. Select Goto, Maintain Variants. The screen ABAP Variants - Initial Screen appears.
3. Select your variant from the drop-down box and then click the Change button. You are presented with the selection screen for the report.
4. Modify the values on the selection screen as you like and then click the Save button on the Application toolbar.
5. To modify the attributes, click the Variant Attributes button and make the desired changes.
6. Make any other modifications desired on this screen and then click the Save button to complete the variant modification process.
Creating A Statistics List With The Sap Query Tool
To create a statistics list report by using the SAP Query tool, you follow these steps:
1. Navigate to the Maintain Queries Initial screen by using transaction code /nSQ01.
2. Ensure that you are in the standard query area by selecting Environment, Query Areas and then choosing Standard Area (Client-Specific).
3. In the Query field, enter a name for the query you are creating (for example, DLS_Exercise_12, where DLS is your initials) and then click the Create button.
4. When the InfoSets of User Group ZTEST window appears, listing all the available InfoSets (that is, data sources) for your query group, select the ZTEST InfoSet and then press Enter. The Create Query Title Format screen appears, allowing you to save the basic formatting specifications for your query, including the name (title) and any notes you want to store for the query. The only required field is Title. Click the Save button on the toolbar.
5. Click the Next Screen button on the Application toolbar to navigate to the Select Field Group screen.
6. When the Select Field Group screen appears, listing all the field groups available in your InfoSet, place a check mark next to each field group whose fields you want to include in your report. (In my example, I selected all of them.) Click the Next Screen button on the Application toolbar.
7. When the Select Fields screen appears, giving you a list of all the available fields within the selected field groups, place a check mark next to each field that you want to include in your report. You can use the Page Up and Page Down buttons to navigate between all the fields. For this example, include the following fields:
• Airline Carrier ID
• Arrival City
• Airfare
• Text: Flight Class
8. Click the Next Screen button on the Application toolbar to continue. The Selections screen appears, listing all the fields you selected on the Select Fields screen, giving you the opportunity to add fields to your report’s selection screen.
9. Add to your report’s selection screen any fields you want by placing a check mark next to each field.
10. Click the Statistics button on the Application toolbar to create a statistics list in the SAP Query tool. The Statistics Line Structure screen appears, giving you an opportunity to define your compressed list report.
11. Use the Statistics Line Structure screen to dictate how you want your report to appear, including sequence and summing specifications. You determine the statistics in this series of screens. Each statistic must have its own unique title, because you might generate several statistics. Specify the sequence in which you want to output the fields and state whether you want them to be sorted in ascending or descending order. Totals are always calculated for numeric fields. You can therefore determine average values, the number of selected records, and the percentage share.
12. Press F8 to execute the report. As with almost all other reports in SAP, upon execution, you see the report’s selection screen. The selection screen gives you an opportunity to specify any criteria for the output of your report. Notice that any fields indicated on the Selections screen are included on your selection screen, under the heading Program Selections.
13. Click the F8 Execute button on the Application toolbar to display your finished report.
Creating A Subtotaled Statistics List With The Sap Query Tool
To create a subtotaled statistics list report with the SAP Query tool, follow these steps:
1. Navigate to the Maintain Queries Initial screen by using transaction code /nSQ01.
2. In the Query field, enter a name for the query you are creating (for example, DLS_Exercise_12B, where DLS is your initials) and then click the Create button.
3. When the InfoSets of User Group ZTEST window appears, listing all the available InfoSets (that is, data sources) for your query group, select the ZTEST InfoSet and then press Enter. The Create Query Title Format screen appears. Enter a title and then click the Save button on the toolbar.
4. To navigate to the next screen in the SAP query creation process, click the Next Screen (white navigational arrow) button on the Application toolbar. The Select Field Groups screen appears, listing all the field groups available within the InfoSet. Place a check mark next to each field group from which you want to include fields in your report (I selected them all). Click the Next Screen button on the Application toolbar.
5. When the Select Fields screen appears, listing all the available fields within the selected field groups, place a check mark next to each field that you want to include in your report. You can use the Page Up and Page Down arrows to navigate between all the fields. For this example, include the following fields:
• Airline Carrier ID
• Arrival City
• Airfare
• Text: Flight Class
6. Click the Next Screen button on the application toolbar to continue.
7. When the Selections screen appears, listing all the fields you selected on the Select Fields screen, add any of the fields to the selection screen that will be presented when you execute your report. You can add any fields you want to the selection screen by placing a check mark next to each field. For this example I have not added any.
8. Click the Statistics button on the application toolbar to create a statistics list in the SAP Query tool.
9. When the Statistics Line Structure screen appears, define your compressed list report. Specify the sequence in which you want to output the fields, and state whether you want them to be sorted in ascending or descending order. Indicate the Text option for each of the fields. Indicate a subtotal for the Airline Carrier ID field.
10. Press the F8 button on your keyboard to execute the report. As with almost all other reports in SAP, upon execution, you are presented with the report’s selection screen.
11. Click the F8 Execute button on the Application toolbar to display your finished report. Your report output appears.
Creating A Ranked List By Using The Sap Query Tool
To create a ranked list by using the SAP Query tool, follow these steps:
1. Navigate to the main screen of the SAP Query tool by using transaction code SQ01, select the query you want to work with (for example, DLS_QUERY_14, where DLS is your initials), and click the Change button.
2. Navigate to the Select Field Groups screen and select the field group names that contain the fields you want to include in your report. (In my example, I selected all three.) Click the Next Screen button on the Application toolbar to access the Select Fields screen.
3. Select the fields you want to include in your report: Airline Carrier ID, Flight Date, Maximum Capacity, and Total of Current Bookings.
4. If the short names are not already displayed, select Edit, Short Names, Switch On/Off to turn them on. Enter the short name MAX for the Maximum Capacity field and the short name OCC for the Occupied Seats field.
5. Create a calculated field that determines how many seats are free on each flight by taking the number of available seats (Maximum Capacity field) and subtracting the number of seats taken (Occupied Seats field). Position your cursor in the Occupied Seats field to base your calculated field on it.
6. Select Edit, Local Field, Create. The Define Field dialog box appears. Input Free as the short name for your newly created local field and input the field description Free Seats, which will be the heading for the column in the report.
7. Define the attributes for the new field. It should have the same attributes as the Occupied Seats field (OCC).
8. Select the Calculation Formula option button at the bottom of the dialog box (it should be selected by default) and then enter the basic mathematical formula MAX – OCC in the box to the right of it. This formula will start with the total maximum capacity for the flight and subtract the number of seats currently occupied to yield the number of available or free seats left over.
9. Click the Continue button to close the Define Field dialog box and return to the Select Field Groups screen.
10. Navigate to the Ranked List Structure screen by clicking the Ranked List button on the Application toolbar. The Ranked List Structure screen appears, allowing you to define your report output. Name your compressed list report Ranked_List_1.
11. Use the Ranked List Structure screen to dictate how you want your report to appear, including rank number specifications. Assign a sequence number to each field that appears in the ranked list to determine the sequence in which they are output. Review the nine options available on this screen.
12. Assign the sequence numbers, starting with 1 and in ascending order, without breaks. Indicate that you want to output the fields Airline Carrier ID, Flight Date, Free Seats, and Maximum Capacity. Specify the sequence in which you want to output the fields, and state whether you want them to be sorted in ascending or descending order.
13. Indicate that you want to rank on free seats.
14. To execute the report and view the selection screen, press F8.
15. Press F8 to display your finished report. Your report output should appear. Keep in mind that the actual values vary by organization.
Creating A Basic Query With The Infoset (Ad Hoc) Query Tool
To create a basic report with the InfoSet (Ad Hoc) Query tool, follow these steps:
1. Log in to the area of your SAP client where your query reports will be created.
2. Access the InfoSet (Ad Hoc) Query tool in one of the three possible ways:
• Through an application-specific role, using the Easy Access menu
• Via the SAP Query tool, by using transaction code SQ01 and then clicking the InfoSet Query button
• Via transaction code /nPQAH
When you navigate to the InfoSet (Ad Hoc) Query tool main screen using any of these methods, you see a dialog box that prompts you to select your InfoSet (data source) from the designated environment (QUERY group).
3. Select your InfoSet and then press Enter. The main screen of the InfoSet (Ad Hoc) Query tool appears. The main screen of the InfoSet (Ad Hoc) Query tool has three sections:
• The actual InfoSet from which you select and choose your fields (top left)
• A Selections section (top right)
• A sample report display (bottom)
4. To create an InfoSet (Ad Hoc) Query report, select the check box in the Output column next to each field you want to include in the output of your report.
5. Notice that any field selected for layout is now displayed at the bottom of the screen (with bogus data) to assist you in seeing what your report will look like.
6. Add fields to your Selections section (which functions as the report’s selection screen) by selecting the appropriate check box in the Selection column next to each field you want to be able to select on (that is, specify) when executing your report. Any field(s) indicated for selection now appear on the top-right side of the screen. The Selections section works just as a standard selection screen works, allowing you to input values before execution to further specify your reporting output. (For example, you could specify to include only business class (Type C) flights in a report.)
7. To proceed to your InfoSet (Ad Hoc) Query report output, click the Start Output button on the Application toolbar (or press the F8 key on your keyboard) to execute the report. By default, your report displays in the SAP List Viewer (previously known as the ABAP List Viewer [ALV]), from which you can easily drag and drop the columns and/or manipulate the look of the output.
Creating A Quickview With Quickviewer
Creating a QuickView by using the QuickViewer tool is simple. You just follow these steps:
1. Navigate to the main screen of the SAP R/3 QuickViewer by using transaction SQVI. (You can also open the QuickViewer’s main screen by clicking the QuickViewer button on the main screen of the SAP Query tool or by choosing an application-specific role from the Easy Access menu.)
2. On the main screen, enter a name for your QuickView (for example, QUICKVIEW_1) and then click the Create button. A dialog box appears, asking you to select your data source.
3. On the Create QuickView: Choose Data Source dialog box, insert a title (for example, Sample QuickView) and, if desired, insert comments (for example, the date it was created).
4. Identify where your data is coming from by selecting an option in the Data Source field (for example, a logical database). When you select a data source, the bottom of the screen changes to show suboptions specific to the data source (for example, a specific logical database). For this example, enter the logical database Flight Scheduling System (f1S).
5. At the bottom of the dialog box, indicate to create the QuickView in Basic mode. When you are done making entries and selections in this dialog, click the green arrow Enter button.
6. Select the first tab on the main screen, the List Fld. Select tab, which lists the output fields. Select any fields on the right side of the screen, listed in the Available Fields grouping, by selecting the gray keys to the left of the field names, and then click the left-pointing single-arrow button between the two groupings. To move all fields in the data source so that they will be included in your report output, click the left-pointing double-arrow button.
7. Select the second tab, Sort Sequence, to dictate the sort order for the selected fields. Indicate a desired order by selecting fields on the right side of the screen, in the Available Fields grouping, and then click the left-pointing single-arrow button between the two groupings. The selected fields appear in the Fields in List column, in the order in which they were selected. Use the radio buttons to the left of the fields to specify that you want the field to be sorted in ascending or descending order.
8. Select the third tab, Selection Fields, to indicate what fields to include on the QuickView’s selection screen upon execution. (Note that some fields already exist, as indicated by a lock icon, based on designations in the logical database—f1S in this case—selected for the QuickView.) Select fields on the right side of the screen, in the Available Fields grouping, and then click the left-pointing single-arrow button between the two groupings. The selected fields (for example, the Flight Class field) appear in the Selection Fields column.
9. Select the fourth tab, Data Source, to confirm that the QuickViewer is using the correct data source for this QuickView.
10. Note in the middle of the screen that you have different export options for the QuickView. SAP List Viewer is the default, but you can select a different option from the Export As drop-down box.
11. Click the Execute button on the Application toolbar to view the report’s selection screen. If needed, further specify your selections on the selection screen.
12. Click the Execute button to see your completed QuickView.
Report Distribution Strategies
You have multiple options for distributing SAP R/3 query-based reports:
• Adding queries to transaction codes (and subsequently to Favorites menus)
• Adding queries to menu paths
• Scheduling reports to run as jobs with automatic distribution to an email address in various forms (PDF, XLS, TXT, and so on.)
• Creating a report tree