In this chapter
In many instances, a single computer is used by more than one user, which creates some challenges. While we sometimes use computers to share information, we often want to keep information confidential. We want to customize our desktop settings, and want the computer to look and behave the same way every time we use it, no matter who has used it in the meantime. Furthermore, we might want to prevent other users and network visitors from seeing or changing our files. These issues can make sharing a computer troublesome, and the Windows 9x product line addressed them poorly. Windows XP is a great improvement thanks to the following features:
User Accounts let you set up access for each individual who wants to use the computer. Each account has its own name and optional password.
User Profiles let users configure their own personalized desktop scheme, icons, preferences, and settings, and give users their own personal My Documents folder.
Access control or file permissions let users specify just who is permitted to have access to which of their files.
In this chapter, we'll go over these features so you can decide how much control you want to exercise over your computer. Using these features is optional—you can make your system as secure or as open as you wish.
First, though, there is a bit of background on accounts that we need to cover. If you already know about user accounts (or don't care to know about them), you can skip ahead to the section “Working with Passwords.”
Each user identifies him- or herself to Windows with a username and an optional password (or in high-tech environments, perhaps with a smart card or a fingerprint scanner). Windows keeps track of each user in its list of accounts, or known users. For each user, Windows associates information such as whether the user has Administrator privileges, the user's desktop and sound preferences, and the location of the user's My Documents file folder.
A list of valid users is stored in each Windows XP computer. These are called local accounts because the information about the user is stored on the computer itself, and the username and password are recognized only on this one computer. If the computer is a member of a domain-type network, the network's domain controller holds a master list of all accounts for the entire domain, for example the entire corporation. These are called global accounts or domain accounts, because the account information is accessible anywhere on the network, and any member computer can validate the user's name and password.
Whether this matters to you depends on what kind of network your computer is connected to:
If your computer is not connected to a network, all the users of your computer are local users and you don't need to worry about this distinction. You will be interested in reading about User Profiles, however, later in this chapter.
If you're a member of peer-to-peer workgroup network, each of your computers will have its own separate list of local users. This can be inconvenient, because users of one computer won't necessarily be recognized by your other computers. We'll talk more about this later on in the Simple File Sharing section.
If you're a member of a domain network, your computer can have both local and global users. If you want, you can define local accounts that only have access to the individual computer. There is also a local Administrator account for each computer, with its own password. This lets you maintain and update your computer without knowing the master domain Administrator's password. Your domain administrator may prevent you from creating or using local accounts, however.
If you installed Windows XP Professional yourself, during the installation process you had the opportunity to enter the names of several users. In addition to any individual users you specified, two special user accounts were automatically created on your machine: Administrator and Guest.
The Guest user account provides access to your computer by people who don't have a predefined username and password, without you needing to set up a new account for them. This account is disabled by default, to prevent unauthorized local or network access to your computer. I strongly urge you to leave this account turned off. Even though the Guest account has lower privileges than a normal user account and can't modify system settings or install software, it's still risky to let random people have access to a computer, especially in a business setting.
The Administrator user account is the opposite of the Guest account. Logging on using the Administrator account (or any account with Computer Administrator privileges) gives you the power to read or modify any file on your computer, change any local user's password, install or remove software, or anything else you please. The Administrator account can bypass all security measures.
As I'll discuss in the next section, by default, Windows XP Professional gives all of the user accounts you create Administrator privileges unless your computer is a member of a domain-type network. I don't think giving all users such a high privilege is a good idea because any programs you run will have full access to the computer—and virus software takes advantage of this. I recommend that you remove the Administrator privileges from your regular user accounts, and use the Administrator account directly only when you
Don't have permission to access a file you need
Need to create or change the password of another user account
Need to install new hardware or software
Microsoft gave all users Administrator privileges to make these actions easier for you, but I think they're needed seldom enough that it's not worth the added risk. I'll tell you how to remove the default Administrator privileges later in this chapter under Assigning Permissions to Groups.
When you do want to log on using the actual Administrator account, if you use the Welcome screen, you will notice that Administrator doesn't appear as a choice, unless it's the only account with Administrator privileges. No worries: Just press Ctrl+Alt+Del twice while viewing the login screen to display the old-style login dialog. In it, you can type “Administrator” and enter the password, as shown in Figure 28.1.
Figure 28.1. To log on as Administrator, press Ctrl+Alt+Del twice to switch from the graphical XP login screen to the old-style Windows logon dialog.
TIP
I strongly suggest that you do not use the Administrator account or any account with Administrator privileges on a day-to-day basis. Running Windows XP as Administrator makes you especially susceptible to Trojan horses and viruses, because the Trojan horse code then runs with full privileges to your machine. If you are logged on as a normal user, the virus is limited in what it can damage.
If you find that you are logging in and out frequently to run administrative programs, try using the Run As command. You can do so by opening the Start menu or Windows Explorer and locating the program that you want to run. (It could be a Control Panel item, the Microsoft Management Console, or any other application.) Right-click the program name, and select Run As, as shown in Figure 28.2. (If Run As doesn't appear, try pressing the Shift key while you right-click.) You then can type the username and password of the privileged account you want to use. If you need to, you can enter a domain account using the username@domain format.
Figure 28.2. You can choose to run selected applications in the security context of a different user.
NOTE
Run As doesn't work with Windows Explorer, the Printers folder, or desktop icons. Run As also doesn't work with user accounts that are set up with SmartCard authentication systems.
CAUTION
Be sure the Administrator password is kept secure. Remember that the Administrator password is the master key to your computer.
You can also run programs in the context of another user account through the command line. For instance, you can open a command prompt window and type something like
runas /user:Administrator "control userpasswords"
to run the User Accounts control panel as the Administrator.
Windows XP requires that you add a separate user account for each person that uses your computer. Using separate accounts makes good sense:
Each user can set their desktop, color, sound, and application preferences separately.
Each user has their own “desktop” so downloads and icons won't accumulate from other users (I know some people whose desktop is completely covered with icons. This would drive me crazy!)
Email, My Documents, and other files are stored separately, so each user has some measure of privacy.
When you create accounts, you should consider what kind of privileges to grant the users. As I mentioned earlier, Windows XP provides three types of account privilege levels:
Computer Administrators have privileges equal to the Administrator account.
Power Users can add and remove software but can't modify information for other users' accounts.
Limited Users can't install programs or make changes to important system settings.
Children and non-technical users, for example, probably should have Limited privileges, so they don't accidentally erase files or programs. In a business setting, no regular day-to-day user account should have Administrator privileges—the risk of someone running virus-infected software from a highly privileged account is too great.
As I mentioned earlier, Windows asks for one or more account names when it's first installed, and these are all created with Administrator privileges. If you set up extra accounts when you installed Windows, you probably want to change their status. I'll describe how in the next few sections. When you're creating new accounts using the Control Panel, you can set their privilege level as you go.
TIP
Microsoft's basic User Accounts control panel only lets you choose between two extremes: Computer Administrator and Limited privileges. I recommend that you read the section titled “Removing Users from the Administrators Group” to see how to set up users with the Power Users setting. I would use that category for most users.
By default, Windows does not create passwords for user accounts when they're created. You really should set a password for every account on your computer. Not only do passwords prevent people from using your computer without permission, but Windows disables some features on accounts without passwords. For example, the Remote Desktop feature isn't available to you if your account doesn't have a password.
So, to get the most out of Windows and for safety's sake, create a password on every account on your computer.
You can create or change your own password at any time. Computer Administrator users also can change the passwords for other local users' accounts. The exact procedure depends on whether or not your computer is a member of a domain network.
If you are a member of a domain network
You also can edit account passwords using the User Accounts Control Panel applet, as described later in this chapter under “User Management for Domain Networks.”
If your computer is not part of a domain network, or is not part of any network
Click Start, Control Panel, User Accounts.
Select your account if necessary, and choose Create a Password or Change My Password.
If you're adding a password for the first time, you'll be asked to enter the password twice, to be sure of the spelling. You also should enter a password hint, something that will remind you (and only you) what your password is. The hint will be displayed on the Welcome screen if you mistype you password when you try to log on. Remember that anyone can see the hint, so “My husband's name” is not a good choice. Then, click Create Password.
If you're changing your password, you'll have to enter your current password, and then type in your desired new password twice as indicated. Then click Change Password.
If you're entering a password for your own account for the first time, you'll be asked if you want to make your My Documents folder private. (This privacy feature works only if your hard disk was formatted with or updated to use the NTFS file system, as discussed in Chapter 29, “Managing the Hard Disk.”) If you choose to make it private, other users will not be able to see into it or view its files.
If you change your mind about this later, open My Computer, right click your My Documents folder, select the Sharing tab, and check or uncheck Make This Folder Private. Click OK to confirm the change.
Because passwords aren't created when you first installed Windows, you'll probably want to change your password the first time you log on. That's a good time to go ahead and make a password reset disk, as described later in this chapter.
There are two times you may have to change someone else's password: First, when you're setting up a new computer, you probably don't want to leave the newly created accounts unprotected. Second, people forget their passwords from time to time. While no one can find out what the lost password was, a Computer Administrator user can set a new password for the account so the user can log on again.
On Windows XP, if a user has made a Password Reset disk, they can solve the problem themselves with that. But, if a reset disk is not available, the password can be changed by a Computer Administrator user. But this has a significant cost: As a security measure, Windows will erase any other passwords it has associated with that user, including the key needed to read encrypted files and email.
NOTE
Computer Administrator users can change any local user account's password through the User Accounts control panel—just select the desired account's icon and click Change Password or Create Password. However, the actual “Administrator” account itself doesn't appear in the User Accounts list. You can change the Administrator account password with the Local Users and Groups computer management tool, which I'll discuss later in this chapter.
You also can change passwords that Windows has stored for other computer networks. Whenever you access a network resource on a workgroup computer you don't have an account on, or on a domain network you're not a member of, Windows will prompt you for a username and password to use while accessing just that resource. Windows stores the passwords in a list for reuse later on.
NOTE
You will rarely need to view or modify this list, but you may wish to delete entries in it if you've accessed sensitive network resources and you're worried that someone else might use your account to get access to them.
To modify or delete stored passwords for other computers, open Control Panel and select User Accounts. Then
If you don't have administrator privileges, Windows will display a dialog box with a link titled Manage Your Passwords. Choose this.
On a domain network, select the Advanced tab and click Manage Passwords.
If you have a workgroup network, select Manage My Network Passwords on the Related Tasks list.
Any stored passwords will be displayed in the dialog box shown in Figure 28.3. You can select and remove entries, or click Properties to change the username and password used to access the listed server.
Your password is the key to all the information you have stored in the computer. This includes not only private files and email, but also additional security information such as your Microsoft .NET Passport, Wallet, network passwords, and access to any files you've encrypted. The use of passwords to protect this information is essential. Then again, people tend to forget passwords or to leave jobs, so there has to be a way to gain access to a user's files without the password.
To this end, a Computer Administrator can reset any other user's password. But a security system wouldn't be worth much if the administrator could go in and read any user's “encrypted” files or get at their credit card information. The compromise reached in Windows XP is that the Administrator can change a user's password to regain access to an account, but as I noted earlier, there is a cost: as a security measure, Windows will erase any other passwords it has associated with that user, including the key needed to read encrypted files and email. Why? Since Windows offers to remember the passwords you type for Web sites, network computers, email, and other protected resources, these would become available to anyone who was able to change your Windows password. Erasing them after a forced password change eliminates this risk.
On a domain-type network, you'll have to contact a network administrator if you lose or forget your password. That's your only recourse. However, if you have a non-networked Windows XP computer, or you have a workgroup-type network, users can protect themselves from all this by creating password reset disks before a password emergency occurs. With a reset disk, you can change even a forgotten password without the risk of losing your encrypted files and your .NET Passport.
To create a password reset disk, you will need a blank, formatted floppy disk. Follow these steps:
Click Start, Control Panel, User Accounts.
Select your own account and, from Related Tasks, choose Prevent a Forgotten Password.
Then, follow the wizard's instructions. When the wizard has finished, be sure to label the disk clearly, like “Mary's password disk for Computer XYZ.”
CAUTION
A Password Reset Disk is as good as your password for gaining access to your computer, so store the reset disk in a secure place.
You don't have to re-create the disk if you change your password in the future. The disk will still work regardless of your password at the time. However, a password disk works only to get into the account that created it, so each user should create one for him or herself.
Forgetting the password to your computer account is an extremely unpleasant experience. It's definitely no fun to have your own computer thumb its proverbial nose at you and tell you it's not going to let you in to get your own files. If this happens to you, take a deep breath. You might be able to recover from this. Here are the steps to try, in order of preference:
If you created a password reset disk, as I described in the previous section, you're in good shape. Follow the instructions under “Using a Password Recovery Disk.”
If you are a member of a domain network, contact the network administrator to have her or him reset your password. The administrator might be able to recover any encrypted files you created.
Log on as Administrator or with any Computer Administrator user account and follow the procedure outlined under “Creating and Managing User Accounts,” later in this chapter, to reset your account's password. (If your computer uses the Welcome screen, you can sign on as Administrator by typing Ctrl+Alt+Del twice. This brings up the standard Windows logon dialog.)
If you don't remember the password to any Administrator account, or you can't find someone else who does, you're in big trouble. There are programs available that can break into Windows XP and reset the Guest or Administrator account password. It's a gamble—there's a chance these programs might blow out your Windows installation. Still, if you're in this situation, you probably will want to risk it. Here are some programs you might look into:
ERD Commander from Winternals.com is able to replace the Administrator or Guest password through an easy-to-use GUI interface.
Windows XP/2000/NT Key from LostPassword.com works just as well on Windows XP as it does on Windows NT and Windows 2000. In fact, this little guy saved my own you-know-what a couple of years ago. It creates a Linux boot disk, which pokes through an NTFS or FAT volume, finds the Windows security registry file, and replaces the administrator's password so you can reboot and log on.
There are some other password-reset programs that I haven't personally tested, but you might be able to use: NTAccess from www.sunbelt-software.com and NTAccess from www.mirider.com.
If you only need to retrieve files, you can remove the hard drive and install it in another Windows XP or 2000 computer as a secondary drive. Boot it up, log on as a Computer Administrator, and browse into the added drive.
If you get this far and are still stuck, things are pretty grim. You'll need to reinstall Windows using the Clean Install option, which will erase all your user settings. Then, as Administrator, you can browse into the Documents and Settings folder to retrieve files from the old user account folders.
If you are not a member of a domain network, I hope you can avoid all this by creating a password reset disk ahead of time. (I've had to go as far as step 4 myself, so I know how frustrating this can be.)
If you have lost your password and have a password reset disk, you can use it to log on and reset your password. Just attempt to sign on using the Welcome screen. When the logon fails, click Did You Forget Your Password, and then click Use Your Password Reset Disk. If you're using the old-style “classic” logon, click the Reset button when you get the Logon Failed dialog box.
Then, follow the Password Reset Wizard's instructions to change your password, and store the password reset disk away for another day. You don't need to make another recovery disk after using it.
To create new local user accounts or to modify an existing account, log on as Administrator or with a Computer Administrator account. Keep in mind that you don't need to log on as Administrator to manage your own account.
CAUTION
Every user account in Windows XP has a unique security identifier, a long string of numbers called an SID. This unique identifier ties all security settings to the user account. If you delete a user account, you also delete its SID, and it can never be used again. Even if you create a new user account with the same username and properties, the SID will be different for the new account. The new account will not be able to view the old account's My Documents files. You will be forced to regenerate all security data, such as group information, set file ownership and access permissions, and so on. As a general rule, you should delete user accounts only when absolutely necessary for organizational purposes.
Two programs are used to manage user accounts: the User Accounts control panel applet, and the Local Users and Groups management tool. I'll discuss both.
The easiest way to administer user accounts is with the Control Panel tool. Select Start, Control Panel, User Accounts.
NOTE
If your computer is a member of a domain network, you probably don't need—and might not be permitted—to add local user accounts. Check with your domain administrator.
What you'll see depends on whether or not your computer is a member of a Windows domain-type network. I'll cover standalone and workgroup computers first, and the domain version in the subsequent section.
On a standalone or workgroup network computer, the User Accounts program is shown in Figure 28.4. You can perform three tasks here:
To modify the password, name, picture, or security level of an account, or to delete an account, select Change an Account or click on one of the account icons.
To create a new account, (no surprise here) click Create a New Account.
To choose between the Welcome Screen (the graphical Windows XP login screen) and the older Windows Logon dialog box, choose Change the Way Users Log On or Off. (More on this topic later in the chapter.)
Figure 28.4. The User Accounts control panel applet lets you create, delete, and modify user accounts on a workgroup computer.
Microsoft has done a good job of designing the Windows XP account management tool, and most of the dialog boxes are self-explanatory. I'll go through them here to show you what's possible.
You can alter an account's settings at any time using the User Accounts control panel. You can always change your own account settings. In addition, Computer Administrator users can adjust any user's account.
Selecting Change an Account or clicking on an account icon displays the Change Account task list, as shown in Figure 28.5. Here you can
Change the name of a login account.
Add, change, or remove an account's password. Changing another account's password has consequences—please see the section “Working with Passwords,” earlier in this chapter.
Change the picture associated with an account. These pictures appear on the Welcome screen. You can select one of the several provided by Microsoft, or choose Browse to select one of your own digital photographs. You can use any image file in .BMP, .GIF, .JPG, or .PNG format. The picture will be displayed at about postage stamp size, so it's best to choose fairly small images of an object or person that fills the picture.
Change the account type from Computer Administrator to Limited or vice versa. (But, as I discussed earlier, I prefer to make most user accounts “Power Users,” following the instructions in the section titled “Removing Users from the Administrators Group.”)
Delete the account. (This option is available only when you're logged on with a different, Administrator-level account. You can't delete the account you're currently using, and you can't delete a Computer Administrator level account if it's the only one besides the Administrator account itself.) When you delete an account, you have the option of retaining or deleting the user's personal files stored in their My Documents and Desktop folders. If you want to keep them, they'll be put into a folder on your desktop.
Change your Microsoft .NET Passport. This is where your user account is matched up with a Passport email address. You can use this task to assign a Passport or change your Passport settings. (This task is only available when you're changing your own account.)
Modify passwords stored for access to other network resources, by clicking the Related Tasks option.

You cannot view or alter the Administrator account from the User Accounts control panel. Nor can you set user accounts to the Power Users privilege level, or set all of the displayed accounts to Limited. To do that, you need to use the more powerful Local Users and Groups management tool, discussed later in this chapter.
One of Windows XP's new features is the friendly graphical logon system called the Welcome Screen. There are actually three options for the Windows sign-on process:
The Welcome Screen allows users to choose their account names and passwords from a list. It's fast and user-friendly.
The Windows Logon dialog box requires users to enter a username, password, and optional network domain name. This enhances security by not presenting potential hackers with a visible list of logon names to try.
A higher-security option requires users to type Ctrl+Alt+Del before seeing the Logon dialog box. Ctrl+Alt+Del forces Windows to suspend any programs (including a virus that might be masquerading as the logon program) and to run the real logon system.
Unless your network administrator has prevented your changing these options, you can control which logon procedure is used on your computer. As a Computer Administrator user, run the User Manager by clicking Start, Control Panel, User Accounts. Under Pick a Task, select Change the Way Users Log On or Off.
Then, you can check or uncheck Use the Welcome Screen. When the Welcome Screen is enabled, you can enable or disable the Fast User Switching feature.
NOTE
You can enable Fast User Switching or the Offline Files feature, but not both at the same time. Offline Files was described in Chapter 18. To use one feature, you'll have to disable the other.
By the way, the Welcome Screen is not available if your computer is a member of a domain network: You'll always be presented with the old tried-and-true Windows logon dialog box when you go to sign on.
To enable the higher security “must hit Ctrl+Alt+Del to log in” feature, disable the Welcome screen as described. Then, open a command prompt window and type
control userpasswords2
This brings up the domain-style account manager shown in Figure 28.6 (shown later in this chapter). Select the Advanced tab, check Require User to Press Ctrl+Alt+Delete, and click OK.
Your computer can automatically log itself on and go directly to the desktop when it boots up, bypassing the sign-on process entirely. You might want do this if you have only one account on the computer and you are completely unconcerned about security, or if you are setting up a computer that will not directly interact with users, such as a kiosk or industrial control system. (The ticket dispensers in San Francisco's Bay Area Rapid Transit railway system are run by Windows 2000 computers that do just this. I saw one stuck partway through its startup process.)
You can't do this with a computer that's part of a corporate “domain” network. And, you can't actually eliminate the need for a user account and logon name. What you can do is tell Windows to automatically log on for you, by following this procedure:
Click Start, Run and enter
cmdinto the run field. With the Command Prompt window open, type the commandcontrol userpasswords2
If you are not currently logged on as a Computer Administrator, you will be prompted for the Administrator password.
On the Users tab, uncheck Users Must Enter a User Name and Password to Use This Computer.
Click OK. You will be prompted for the username and password to use when the system starts up. If the account has no password, leave the password field blank.
Now, every time Windows boots up, it will automatically log on with the specified username and password. If you want to use a different account, simply log off, and you'll get the Welcome Screen or logon dialog as usual.
You can go back to the normal logon-at-boot system by repeating this procedure, checking the box in step 2.
If your computer is a member of a domain network, Windows displays a different set of user management dialog boxes. To manage local users you must be logged on as the local or domain Administrator. Click Start, Control Panel, User Accounts. Windows displays the local user list as shown in Figure 28.6.
On a domain member computer, you can create new local accounts for local users, and also let members of other domains log on to your computer. (Anyone in your own domain can log on without doing anything extra.) There are different procedures for setting up each type of user.
To let an existing user from another domain log on to your computer, follow these steps:
Open the User Accounts control panel applet.
Click Add. Enter the user's logon name and domain name. You can click Browse to locate a user by searching Active Directory. When you have identified the user, click Next.
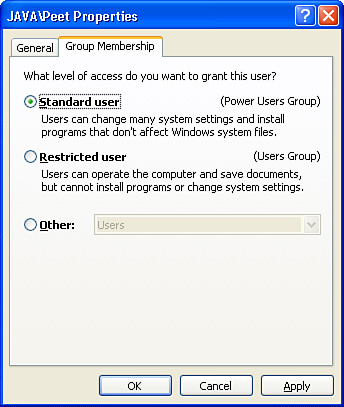
Select the desired privilege level for this user; this will assign the account to one of three groups: Power Users, Users, or Administrators, as shown in Figure 28.7. Click Finish. If you want this user to be prevented from installing or configuring software, select Users; otherwise you would generally want to select Power Users.
To create a new local account (one that will be able to use your computer but not necessarily other resources on your network), follow these steps:
Open the User Accounts control panel applet and select the Advanced tab.
Click Advanced to view the Local Users and Groups management tool.
Select the Users folder in the left pane.
Select Action, New User, or right-click User and select New User.
Fill in the new user information.
I'll discuss the Local Users and Groups management tool later in this chapter.
To edit an existing account, open the User Accounts Control Panel applet, and highlight the appropriate user entry.
If you have Administrator privileges, you can click Reset Password to change the account's password.
Select Properties to modify the account's username or security privileges. Change the user's basic security level by selecting the Group Membership tab (refer to Figure 28.7).
For more detailed control of user privileges and group membership, you can use the Local Users and Groups management tool.
The Advanced tab on the User Accounts control panel applet has three unrelated security management tools:
Passwords and .NET Passports—. Lets you delete or change passwords for other computer systems that Windows has remembered for you. For more information on maintaining other passwords, see “Changing Network Passwords” earlier in this chapter.
Advanced User Management—. Opens the Local Users and Groups computer management tool, which I'll discuss in the next section.
Secure logon—. Lets you determine whether users must press Ctrl+Alt+Del before logging on. This is a good idea because it eliminates the opportunity for Trojan horse virus programs to present a fake login dialog box to capture passwords. On a domain network, this feature is enabled by default, and you should think twice before disabling it.
The basic User Accounts control panel is adequate for most situations, but if you want to alter the Administrator account, or if you want to assign accounts to custom security groups, you must use the Local Users and Groups management tool.
To run Local Users and Groups on a domain member computer, open the User Accounts control panel. Select the Advanced tab and click the Advanced button. On a workgroup or standalone computer, click Start and right-click My Computer. Select Manage, and open the Local Users and Groups entry.
The utility appears in Figure 28.8.
Figure 28.8. The Local Users and Groups management tool lets you manage group membership and change settings for all user accounts.
TIP
If you can't get to the Local Users and Groups tool any other way, try this trick: click Start, Run, and enter mmc. Click File, Add/Remove Snap-In. Click Add. Select Local Users and Groups. Click Add, Finish, Close, and OK.
If you view Local Users and Groups on your own computer you will see your user accounts plus a few others, as listed in Table 28.1.
Table 28.1. Predefined User Accounts
You should not modify the settings or passwords for HelpAssistant, IUSR_xxxx, IWAM_xxxx, or SUPPORT_xxxx. Windows manages access to these accounts.
To create a new local user account, follow these steps:
Navigate to the Users folder in the left pane, click the Action button, and select New User. The New User dialog box then appears, as shown in Figure 28.9.
Enter the desired logon name and other information requested in the form. You may uncheck User Must Change Password if the new user doesn't mind that you know his or her password. You can check Password Never Expires if you don't want to enforce the good practice of frequent password changes.
Click Create to finish. The dialog will stay up and you can continue adding more new accounts, or click Close to remove the dialog.
You can change account passwords with this tool. Right-click an account name in the Users list and select Set Password. If you're changing another user's password, you'll be warned that doing this will erase any stored passwords they have, including the key needed to read encrypted files and email. Be sure the other user doesn't have a password reset diskette and can't change his or her own password before using this technique to change it.
(By the way, this is the only way another Computer Administrator can change the Administrator account's password, as Administrator doesn't appear in User Accounts control panel applet.)
To edit the properties of a user account, do the following:
Select the Users folder in the left pane.
Double-click the user account that you want to edit in the right pane to bring up the properties of the selected user.
In the Properties dialog box, you have the option of adding users to groups, editing logon scripts and profiles, and specifying password options.
There are three tabs on the User Properties dialog box:
General, shown in Figure 28.10, lets you configure the account's password properties. You can make it impossible for the user to change the password, or require frequent password changes. You can also disable the account, and remove the Account Is Locked Out check mark that appears for period of time after a user has failed to supply the correct password three times.
Member Of lets you add and remove the user from User Groups, which I'll discuss in the next section.
Profile lets you assign a User Profile folder, home folder, and logon script. These are described later in the chapter as well.
On the Member Of tab of the Properties dialog, you can add the user to any security groups necessary. By default, all user accounts are made members of the Users or Administrators group. I'll discuss groups and group privileges in more detail later in this chapter.
To add a user to a group, follow these steps:
On the Profile tab of the Properties dialog (see Figure 28.11), you can specify the location in which to store the account's user profile. A user profile is a folder in which a user's My Documents folder, Registry data (hive), temporary Internet files, and other personal folders and settings are kept. I'll discuss user profiles in more detail later in this chapter.
Figure 28.11. Profile properties let you specify an alternate path for the user profile, as well as a logon script and a home (default) folder or drive.
User profiles are normally kept in C:Documents and Settings, in subfolders with the same name as the user's account. On a domain-member computer, users can have roaming user profiles that are normally kept on a central server, and copied to and from local computers when the user logs in and out.
The following is the procedure to change an account's default profile path, although this is rarely necessary:
You can specify a logon script that runs automatically each time the user logs on. The logon script file is a batch file containing commands to set up the user's environment. One of the primary uses of logon scripts is to map network drives and printers. You can use other startup commands as necessary, though.
If you want to create logon scripts for your local users, you must save them in the local %SYSTEMROOT%System32ReplImportScripts directory, where %SYSTEMROOT% is normally windows or winnt. Be sure that all users have at least Read and Execute permissions to this directory, or their logon scripts will not run. The script files should be either batch files with a .BAT or .CMD extension, or a Windows Script Host script with a .VBS or other supported extension.
Note
→ If you want to learn more details about setting file permissions, see “NTFS File Permissions,” p. 1090.
TIP
I have found that the directory %SYSTEMROOT%System32ReplImportScripts does not exist by default on Windows XP Professional computers. You might have to create the subdirectory ReplImportScripts manually. After you do so, you can create and specify logon scripts to run.
Then follow these steps:
Move your cursor to the Logon Script field (see Figure 28.11).
Type just the name of the logon script file that you want to execute. Do not type the path; it is assumed to be %SYSTEMROOT%System32ReplImportScripts.
Click OK or Apply.
On the Profile tab of the user accounts Properties dialog, you also can specify the user's home directory. A home directory is a default directory that applications can use as a starting point for Save As dialog boxes.
On a LAN environment, it's very useful to locate the home directory on a network server, rather than on the local computer. This way, the same folder is always available every time the user logs in, and it can be placed on a computer that is frequently backed up. Roaming User Profiles accomplish this by copying the My Documents folder to and from the server, but the Home Directory mechanism is available on workgroup networks, not just domain networks.
Home directories are very useful in a LAN environment because they allow you to access your files from any computer that you log in to during the course of your day. The Home Directory entry on the Profile tab gives you the option either to
Specify a directory path on the local computer.
Connect a given drive letter to a specified network share name, in UNC format. You can use the string “%USERNAME”% in this field to stand for the user's logon name.
As an example, on a workgroup network you might create a shared folder named \AMBONHOME, with a subfolder for each user on your network. You can then set each user's profile to use drive H and path \AMBONHOME\%USERNAME% as the home directory. When any user logs in, drive H is automatically set up to use the correct shared folder. You'll have to do this for each user on each of your computers. On a workgroup network, however, all users have access to the other users' home directories, if you use Windows' default Simple File Sharing scheme.
When you set up multiple users on your computer, you'll notice that every user gets his or her own clean desktop and My Documents folder. In fact, if your hard drive is formatted using the NTFS file system, users have the option of making their My Documents folder private when they create a password, so that other users can't see into them.
That's great for keeping everyone's stuff separate, but what do you do when you want to have files that anyone can get to? This might come up when different people are working on a collaborative project, or when one you want to keep common non-confidential information in a shared place.
Windows provides a simple solution to this with the Shared Documents folder. In Figure 28.12, you can see that My Computer shows each user's My Documents folder, and the common Shared Documents folder. Shared Documents is a place to put files and folders that you want to make available to each user on the computer. (This folder is also automatically made available to your other computers, if you have installed a home or office network.)
Figure 28.12. My Computer shows each user's My Documents folder, plus the common Shared Documents folder.
Inside Shared Documents are folders named Shared Music and Shared Pictures, to help you start organizing your common files. You can create other folders in there as well, as you see fit.
Computer Administrator users can browse into other users' personal My Documents folder as long as they didn't choose to make them private when they created their password. In Figure 28.12 you can see the personal My Documents folders for several other users, along with my own. Limited Users can't view any other user's My Documents folder, so they are limited to using their own folder or Shared Documents.
For more information about making your My Documents folder private, see “Working with Passwords” earlier in this chapter.
Of course, you can also create other folders anywhere on your computer's hard drive, and any user can view and use these folders. The advantage of Shared Folders is that it appears on everybody's My Computer display, so it's quite convenient.
If your hard drive is formatted using the NTFS (New Technology File System) directory structure, Windows can let you prevent or allow others to access your My Documents folder. The first time you create or change the password for your own account using the User Accounts control panel applet, Windows asks: Do you want to make your files and folders private?
If you say yes, other users will not be able to browse into your My Documents folder (more precisely, they will not be able to get into your User Profile folder, which will be discussed later in this chapter). You can still share documents with other users and with network users using the Shared Documents folder, by creating new folders on the hard drive, or by using the other network shared folders.
You can change the Private/Public setting of your My Documents folder at any time. Just open My Computer, right-click your My Documents folder, select the Sharing tab, and check or uncheck Make This Folder Private. Click OK to confirm the change.
If your hard drive is formatted with the FAT file system, private folders will not be available. Any user can read any file on a FAT-formatted hard drive.
Note
→ To learn more about NTFS, see “Choosing a File System: FAT, FAT32, or NTFS,” p. 86. To see how to convert a FAT-formatted disk to NTFS, see “Convert”, p. 1127.
There are a couple of things you should consider, though, if you are counting on this feature for privacy.
First, remember that any Computer Administrator user can change your account's password, and log on as you. Then they'll have the ability to see your files without any problems. Folder privacy doesn't make your files completely inaccessible to everyone else, only a bit more difficult to get to.
Second, Windows XP Professional manages private folder security with the industrial-strength file protection system used by Windows NT and 2000 and their various server versions.
NOTE
Users of XP Home Edition don't have access to the settings and controls that let the users of these other, pricier operating systems adjust and manage file security. For Home users, however, that's fine because these features are complex and easy to mess up.
However, there is one confounding situation that could arise as a result of this. When you create files in a private My Documents folder and then move them to the Shared Documents folder or another public folder, the “privacy” attribute is moved along with the files. If the Simple File Sharing feature is enabled and you move the files with Windows Explorer (or My Computer or any of Explorer's other guises), you're okay because Explorer will take care of adjusting the files' security settings, and other users will then be able to read the files.
However, if you move the files using the command line (that is, with the Move command), or if Simple File Sharing is disabled, the files' security settings will not be reset and other users will be able to see these files listed, but will not be able to open, edit, or delete them.
While home users are typically happy letting anyone at any computer read or modify any file, business users usually need to restrict access to files with payroll, personnel, and proprietary information. Windows XP and its predecessors, Windows NT and Windows 2000, were designed for business use, so they require usernames and passwords for identification, and have a security system that lets computer owners restrict access to sensitive files on a user-by-user and file-by-file basis.
Unfortunately, on a Windows peer-to-peer or workgroup network, there is no centralized list of authorized usernames. This makes maintaining control of who is and isn't permitted to access network files on each computer difficult. Here's why: When you attempt to use a file or printer shared by another computer, Windows sends your username and password to the other computer. In versions of Windows prior to XP
If the username and password match a user account already set up on the other computer, Windows uses that account's permission settings to determine whether to grant you access to the file.
If the user information doesn't match, Windows prompts you to enter a username and password that the other computer will recognize.
If you do fail to provide a valid password, the remote Windows computer gives you the permissions assigned to the “Guest” account, which is usually disabled or does not have permission to access the resource you want.
An advantage of this system is that users can determine precisely which users could access files and folders. The disadvantage is that it would require you to set up identical user accounts for each network user on every computer, and then grant these users permissions to modify shared files and folders.
Smaller business and home users found this security setup cumbersome to use and difficult to set up properly. This pushed people into eliminating security restrictions completely, just to get the network to work. That's a risky approach, so Microsoft gave Windows XP a new feature called “Simple File Sharing.”
NOTE
Simple File Sharing applies only on a peer-to-peer network. Domain network users must live with the full, more complex security system.
The Simple File Sharing feature can be enabled or disabled from the Tools, Folder Options, View tab in any Windows Explorer window, as shown in Figure 28.13.
Figure 28.13. Simple File Sharing is enabled by default; disable it to use the old Windows NT/2000 access control system on a peer-to-peer network.
When you first install Windows XP Professional, it is enabled. (By the way, XP Home Edition users have Simple File Sharing too, and can't disable it.)
When Simple File Sharing is enabled
Network users are not prompted for a username or password. Instead they are automatically granted access using the permissions granted to the Guest account, even if Guest is disabled for direct logins.
The Security properties tab that is normally used to assign per-user permissions to files and printers is not displayed.
Windows automatically assigns appropriate security permissions to folders and printers when you share them. If you check Allow Network Users to Change My Files, all network users can read, write, rename, or delete the contents of the shared folder. If you don't check this option, network users can view but not modify the contents.
If you disable Simple File Sharing, or if your computer is a member of a domain network, your computer will display different dialog boxes when you go to share a folder, and you'll have access to the Security properties page on folders and printers.
It's generally not necessary to disable Simple File Sharing but it is important to protect your computer and your network from Internet hacking. Be sure to read Chapters 19, “Connecting Your LAN to the Internet,” and 21, “Network Security,” to be sure your network is protected.
If your hard drive is formatted using the NTFS (NT File System) directory structure, and you're not using Simple File Sharing, you can assign control of who is permitted to access files and folders on a per-user or per-group basis.
To display or modify NTFS permissions, select a file or folder in Windows Explorer, right-click Properties, and select the Security tab, as shown in Figure 28.14.
Figure 28.14. You can use the NTFS Permissions dialog box to a folder to restrict access to both network and local users.
In the top part of the dialog box is the list of users or user groups with access to the file or folder. You can select any of the names in the list to view their associated permissions in the bottom half of the dialog.
The permission properties can each be granted or revoked individually. The permissions are Full Control, Modify, Read & Execute, List Folder Contents, Read, and Write. Their properties are listed in Table 28.2.
Table 28.2. NTFS File Permission Settings and Their Functions
Note that each permission has both Allow and Deny check boxes. To get access to a given resource, a user must be explicitly listed with Allow checked or must belong to a listed group that has Allow checked, and must not be listed with Deny access or belong to any group with Deny marked. Deny preempts Allow.
All these permissions are additive. In other words, Read and Write can both be checked to combine the properties of both. Full Control could be marked Allow but Write marked Deny to give all access rights except writing. (This permission would be strange but possible.)
The most productive use of NTFS file permissions is to assign most rights by group membership. One exception is with user home directories or profile directories, to which you usually grant access only to the Administrators group and the individual owner.
TIP
If you edit Permissions, before you click OK or Apply, click the Advanced button and view the Effective Permissions tab, as discussed later in this chapter. Enter a few usernames to see that the permissions work out as you expected. If they do, only then should you click OK.
Normally, permissions are assigned to a folder (or drive), and all the folders and files within it inherit the permissions of the top-level folder. This makes it possible for you set permissions on just one object (folder), to manage possibly hundreds of other files and folders contained within. If necessary, explicit permissions can be set on a file or subfolder to add to or override the inherited permissions. Permissions displayed in the Security tab (as in Figure 28.13) will be grayed out if they have been inherited from a containing folder.
You can view or change the inheritance setting for a file or folder by clicking the Advanced button on the Security properties page. In Figure 28.15, the folder has a check in Inherit from Parent the Permission Entries that Apply to Child Objects. That's the usual case.
Figure 28.15. The Advanced Permissions dialog box lets you control the inheritance of permissions, and set detailed permissions for user and groups.
If you uncheck the box, Windows gives you the option of starting with a blank permissions list (Remove) or keeping a copy of the settings it had before (Copy). In either case, the item now has its own independent list of access rights, which you can edit at will.
When you change permissions on a folder, you may want to cancel any manually added permissions set on the files and folders it contains. Checking the Replace Permission Entries on All Child Objects box will reset the permissions on all files in this folder and in subfolders, and will force all subfolders to inherit permissions from this folder.
If you edit access permissions in the Advanced Security Settings dialog, you can exercise more “fine grained” control over permissions. It's rarely necessary, but for your reference, Table 28.3 lists the available permission settings.
Table 28.3. NTFS Advanced File Permission Settings and Their Functions
The Effective drive Permissions tab on the Advanced Security page lets you enter a username and see what privileges the user will have as a result of the current security settings on the file or folder, as shown in Figure 28.16.
Figure 28.16. Effective Permissions shows you how edited Permissions settings will work before they're actually applied to the file.
This dialog box displays the effective permissions as edited, before they are applied to the file folder. This lets you verify that the permissions you have set operate as desired before committing them to the file by clicking OK or Apply.
The Advanced Security drive Settings dialog provides a way for you to monitor access to files and folders through the Event Log. The Auditing tab (see Figure 28.17) lets you specify users and access types to monitor, and whether to record log entries for successful access, failure to access, or both. Auditing can be set for the use of each access attribute that you can set with Permissions: List Folder, Write Data, and so on.
Figure 28.17. Auditing properties record events in the Security Event log whenever the selected access privileges succeed and/or fail.
Auditing is useful in several situations:
To determine what files and folders an errant application program is attempting to use
To monitor users for attempts to circumvent security
To keep a record of access to important documents
To enable auditing, locate the folder or file you want to monitor, view its Security properties, click Advanced, view the Auditing page, and click Add. Select a specific user or group (or Everyone), and check the desired events to audit. You can prevent a new audit setting from propagating into subfolders by checking Apply These Auditing Entries to Objects and/or Containers Within This Container Only. You can enable the resetting of audit properties of all subfolders and files by checking “Replace Auditing Entries on All Child Objects…”
An entry is made in the Security Event log for each audited access, so be careful if you are enabling auditing on the entire hard drive!
Sometimes files or folders have security attributes set so stringently that even Administrator can't read or modify them. Usually this occurs when the file has permissions set only for its owner and not the usual list: Owner, Administrator, System, and Backup Operators, as when a user account is deleted. In this case, no user is able to access the files in that user's My Documents folder.
If you absolutely need to access such files, you can take ownership of the file or folder, and then assign permissions to read and write as appropriate. To take ownership of a file or folder
Log on as Administrator.
View the file or folder in Explorer, right-click it, and choose Properties.
View the Security tab and click Advanced.
View the Owner tab, and select Administrator (the user) or Administrators (the group) from the list. You may want to check the Replace Owner on Subcontainers box to change subfolders as well.
Click OK.
Add privileges as necessary to grant access to the desired user(s).
It's common in an office environment to want shared folders that are accessible by some users and not by others. For instance, you may wish to put payroll information in a shared folder and grant access only to certain administrative employees. In a school environment, you might want some folders that are accessible only by teachers, and others accessible only by members of a particular class. If you're using Simple File Sharing, this isn't possible, but if you are using manual permissions, it's fairly straightforward.
The best practice in this case is to create local user groups, which are collections of users that can be given privileges that carry over to the group's members. You can add the group and assign permissions for specific folders and files without having to list each of the qualified users separately. Another benefit is that you can add and remove users from the group later on without having to modify the settings of the various folders.
To create local user groups, follow these steps:
Right click My Computer, click Manage, and open Local Users and Groups; or, on a domain computer, click the Advanced button on the Advanced tab of the User Accounts control panel applet.
Right-click the Group entry in the left pane.
Select Actions, New Group.
Enter a name for the new group, such as Accounting.
Click Add and select users to add to the group.
To grant the group permissions to specific folders
Highlight the folder or file in Windows Explorer.
Right-click and select Sharing and Security.
Select the Security tab and click Add.
Select the group name (on a domain computer you may select domain groups or local groups by selecting Location and choosing a domain name or the local computer name).
Click OK, and then check the appropriate permissions for the group to have.
If Everyone or other groups are listed as having rights to this folder, you may want to select the group(s) and uncheck any undesired privileges. If the entry is grayed out, the privileges are inherited from a containing folder. In this case, select Advanced, uncheck Inherit from Parent, and choose Copy to retain copies of the current settings. You can then remove the entries you don't want.
Important: Before you click OK to commit the changes, use the Effective Permissions tab on the Advanced Properties dialog to check the effective rights of a few different users to be sure that the rights are what you intend. Be sure that Administrator has at least taken ownership privileges.
If you have a printer that uses expensive paper or ink, and are concerned that guests, kids or unauthorized persons might use your printer, you should know that printers can be secured in the same way that access is controlled for files and folders: through user and group privileges. In the case of printers, the privileges allow users to add jobs to the printer, delete other people's jobs, and so on.
On a domain network, the network manager usually takes care of this. And on a workgroup it's generally not important to restrict access to printers. If you are using Simple File Sharing, it's not even possible to set up specific printer access privileges.
If you decide to, however, you can set printer access permissions by right-clicking a printer in your Printers folder and selecting Properties. The Security properties tab resembles the properties tab of files and folders, and can be modified in the same way.
For reasons that I can't quite fathom, on Windows XP, Microsoft decided to make all local users members of the Administrators group by default. This may have been to reduce the number of support calls from people who said “My computer won't let me install this new hardware,”but I think it's a very bad idea to have users operate with Administrator privileges on a day-to-day-basis.
The Microsoft Users Accounts tool lets you assign users to either the Administrators group or the Users group, which has very restricted privileges. It also forces you to keep one regular user in the Administrators group, even though the Administrator account is still present (although usually hidden).
If you have a standalone computer or a computer on a workgroup network, I suggest that you do one of the following:
Set up one account to use as the additional Administrator, use it only for installing software and hardware, and make all of your regular user accounts Limited users.
Use the Local Users and Groups utility to remove your regular user accounts from the Administrators group, and add them to the Power Users group. This gives your users the ability to change settings like screen resolution without full Administrator power.
To set up Power User accounts, create the accounts using any of the normal means: User Accounts Control Panel, Local Users and Groups in Computer Management, and so on. Then, adjust their group membership by removing membership in the Administrators group and adding membership in the Power Users group. You can do this from the Local Users and Groups computer management too, but here's a trick you can use to make the job easier:
Open a Command Prompt window and type the command
control userpasswords2
If you are not currently logged on as a Computer Administrator, you will be prompted for the Administrator password.
On the Users tab, select the first user account to be modified and click Properties.
Select the Standard User setting. This assigns the user to the Power Users group.
Click OK, and repeat with any other accounts you need to change. Just be sure not to change the settings for the Administrator account.
User profiles contain all the information that the computer needs to personalize your system's look and feel. Your user profile contains your desktop icons, shortcuts, personalized Start menu, and your personal file folders such as My Documents and My Pictures. The profile also contains your network settings, network printer definitions, and desktop settings, which are stored in a Registry file named NTUSER.DAT. This file is accessed as part of the Windows Registry when you are logged in.
Normally, user profiles are stored under C:Documents and Settings, in folders with the same name as the user account. For example, the user profiles for Administrator is stored in C:Documents and SettingsAdministrator. When accounts are deleted and re-created, when Windows is reinstalled, or when users log on to domain accounts with the same name as local accounts, Windows may append something to the username—usually the name of the local computer, the domain, and/or a number.
A profile is really just an ordinary folder. It just contains some important stuff and it's used in a special way—the contents of its Desktop subfolder, for instance, appear on your desktop when you log on, and the contents of its Start menu subfolder appear when you click the Start button. The contents of a user profile are shown in Table 28.4. (Some of the listed folders are hidden. To see them in Windows Explorer, click Tools, Folder Options, select the View tab, and select Show Hidden Files and Folders.)
Table 28.4. Contents of a User Profile Folder
Item | Contains |
|---|---|
Application Data [*] | User-specific files needed by application programs such as Explorer and Outlook Express |
Cookies | Internet Explorer (IE) data |
Desktop | Icons and files displayed on the desktop. This is where desktop stuff is actually stored |
Favorites | Lists of shortcuts used by the Favorites menu in IE |
Local Settings | Like Application Data; includes temporary files |
Documents [**] | User's actual My Documents folder |
NTUSER.DAT | User's Registry data (HKEY_CURRENT_USER) |
NetHood | Shortcut icons used by My Network Places |
PrintHood | Shortcut icons used by Printers and Faxes |
Recent [**] | Shortcuts to recently accessed documents |
SendTo | Shortcuts used to fill the “Send To” context menu |
Start Menu | Shortcuts displayed on the user's Start menu |
Templates | Templates used by various applications to create blank documents |
[*] Some of these folders are hidden. You must select Tools, Folder Options, View, Show Hidden Files and Folders to see them. [**] Explorer plays games with the names it shows you. This table lists the folders' actual names, but Explorer displays “My Documents” when viewing your profile, and “So and So's Documents” when viewing someone else's. It always lists the “Recent” folder as “My Recent Documents.” | |
You might hear the phrase “user profile” used in four different contexts. They are
Local user profiles, which are stored on each computer's hard drive as I mentioned earlier.
Roaming user profiles, which are stored on a domain network file server, and are copied to and from individual computers as needed when you log on and off. This is how your personal settings “follow” you from one location to another. You should know that the copies—including potentially sensitive files—stay on each computer after you log out.
Mandatory profiles, which are set up by the network administrator and can't be modified by the user. They're copied to local computers for use when you log on, but aren't copied back to the server when you log off, as a roaming profile would be.
The default profile, which is stored on your computer (or domain server) and is copied for a user the first time he or she logs on. The default profile settings are stored in C:Documents and SettingsDefault User, a hidden folder.
You can't set up roaming or mandatory profiles as a Windows XP Professional user—you have to leave that to a domain network administrator. However, if you intend to set up several user accounts on your computer, and find that you have to make a lot of configuration changes for each, you can do some useful work ahead of time by modifying the default profile—I'll talk about that at the end of the chapter under “Tips from the Windows Pros.”
The Profile Manager will let you copy profile data from one account to another, as well as change an account's roaming/local profile status.
NOTE
The User Profile Manager only lists profiles for accounts that have logged on to the computer at least once. When a new account is created, its profile folder is not created at that time. When the user logs on for the first time, the user's profile is created by copying the contents of the Default User profile, which is stored in Documents and SettingsDefault User.
To start the Profile Manager, click Start, right-click My Computer, and select Properties. View the Advanced tab, and in the User Profiles section, click Settings. The Profile Manager lists all profiles for the local computer, as shown in Figure 28.19.
Figure 28.19. User profile folders contain the user's Registry settings, My Documents, desktop, and so on. They can be copied using the User Profiles tool.
Select a profile from the list and select one of the three action buttons. (Not all options may be available. You can't delete or copy the profile of an account that is currently logged on.) The buttons are
Change Type—. Lets you choose between a Local and Roaming profile. The Roaming option is available only when your computer is a member of a domain network.
Delete—. Deletes the profile from Documents and Settings. This does not delete the account itself, just the user's profile folder and Registry entries. You can use this button to remove an account's settings, files, and Registry entries if for some reason they have become corrupt. When the user logs back on, their profile will be copied from the Default User profile. However, deleting the profile deletes the user's My Documents file. You should make a copy of the user's My Documents folder and everything in it before deleting the original profile.
Copy To—. Lets you copy one user's profile to another. At the end of the chapter, I'll show you how to use this to set up the default profile given to newly added users.
When you use Copy To, the Copy dialog lets you select who is permitted to use the profile folder. You'll need to manually select the user accounts that will be using the profile in its copied location.
NOTE
You can't just manually copy the files and subfolders from one user profile to another. The files have exclusive security permissions, and the Registry file has security data inside it that makes the profile unusable by other users. The Profile Manager works because it changes the security data as it copies the profile.
You can configure several user accounts to use the same profile folder—in essence they'll share a common desktop, permissions, preferences, and so on. To do this, use the Profile Manager to copy an existing profile to a new directory, say C:Documents and SettingsShared. Be sure to click the Change button under Permitted to Use to select which accounts will use the new profile. (You may select Everyone to allow all users to access the profile.) Then use the Local Users and Groups management tool to change the profile directory for the user accounts to refer to this directory.
NOTE
On a workgroup LAN, you might be tempted to mimic the domain's roaming user profile feature by storing each user's profile on a shared network folder. This doesn't work because the user will have a different SID (security identifier) on each computer, even if she or he has the same login name on each computer. The registry file NTUSER.DAT is tied to the SID, so the profile will not function on machines other than the one that created it. This is one of the essential attributes of a domain LAN: Users have a global SID that follows them from computer to computer, and this makes roaming profiles possible.
You can at least get partway there on a Workgroup network by storing the user's Home Directory on a network shared folder. See “Setting Up Home Directories” earlier in the chapter for details.
You can copy your user profiles between computers using the Files and Settings Transfer Wizard. You might want to do this if you
Upgrade computers or operating systems
Switch between your home computer and a portable computer rented for a trip
Decide to erase your hard drive and start over with a fresh copy of Windows
The wizard can copy your user profile (My Documents folder, important Registry settings, and so on) to a floppy disk, but it's best to store the wizard's data on a zip drive, CD-RW, or a shared network folder because the amount of information can be quite large. You can also use a direct serial cable connection between two computers, but this requires you to purchase a “Serial PC to PC File Transfer Cable” from a computer store or other vendor.
Run the wizard first on the “old” computer, the one whose settings you want to move or save. The older computer can be running Windows 95, 98, 98SE, ME, NT, 2000, or XP. If it's running older versions of Windows, insert your Windows XP CD-ROM, and run the wizard from the Setup menu. On Windows XP, click Start, All Programs, Accessories, System Tools, Files and Settings Transfer Wizard. The wizard will give clear instructions as you go.
You can choose to copy settings only, files only, or both files and settings. Windows will display the list of file types and settings it will copy. You can choose Let Me Select a Custom List if you want to modify the list of files or directories to transfer.
Then, run the wizard on the “new” computer to transfer the documents and settings into your Windows XP user account.
NOTE
If you're responsible for migrating a large number of users between computers, or moving them to Windows XP, you should know that there is a command-line version of the wizard called the User State Migration tool that you can use to automate the process. For a nice article describing the process, do a Google search on "User State Migration Tools" "Charlie Russell".
If you find that you want to make the same desktop icons and Start menu applications available to all users on your computer, rather than for just your own account, you don't have to make copies for each user. Instead, you can take advantage of the All Users profile.
When Windows displays your desktop, it's actually displaying the merged contents of two folders: Your profile's Desktop folder, and the All Users desktop folder, stored in C:Documents and SettingsAll UsersDesktop. If you have an icon or shortcut that you'd like to share with all of your computer's users, you can store it in the All Users folder rather than make a copy for each user. Of course, if any user deletes the icon… it's gone for everybody.
The All Users profile contains four folders, listed in Table 28.5.
Table 28.5. Contents of the All Users Profile
Item | Contains |
|---|---|
Desktop | Files, Icons and shortcuts that will appear on every user's desktop |
Documents [*] | The Shared Documents folder |
Favorites | Shortcuts that will appear on every user's Favorites list |
Start Menu | Shortcuts that will appear on every user's Start menu. Shortcuts in the ProgramsStartup subfolder will be run when any user logs on |
Application Data [**] | User-specific files needed by application programs such as Explorer and Outlook Express. Quick Launch bar shortcuts, for example, are in Application DataMicrosoftInternet ExplorerQuick Launch |
Templates | Templates used by various applications to create blank documents |
[*] Windows Explorer displays this folder's name as “Shared Documents,” but that's done with smoke and mirrors. The folder's real name is Documents. [**] Some folders are hidden. To see them in Explorer, you have to select View Hidden Files in Tools, Folder Options, View. | |
When I try to install new software, use a Control Panel or Computer Management tool, or set up hardware like a printer or network adapter, I get an error message telling me I don't have sufficient privilege to perform the operation.
Limited User accounts are not allowed to perform many management functions, or to make changes to the Windows software folder. In general this is a good thing because it prevents unauthorized people (like young children, visitors, or meddlesome in-laws) from making changes to your computer setup. More subtly, it can help prevent rogue software from taking over your computer without your knowledge.
If you are using a Limited User account and run into a roadblock because of this, you can either get a Computer Administrator user to perform the task for you, or you can have them change your account to make you a Computer Administrator as well.
If you know the password to an Administrator account, just log off and log on again using that account.
When I attempt to open a document, I get the message Access is Denied.
This can sometimes occur if you are using Fast User Switching and the document is in use by another logged-on user, or if the document was in use by a crashed application. If this is the case, have the other user close the application, or use the Task Manager to kill the errant application.
This can also occur if your disk is formatted with the NTFS file system, and you move files from a private My Documents folder to a public folder using the command line move command, or using Windows Explorer on a domain network or on a computer with Simple File Sharing turned off. In this case, the file's security attributes have been moved with the file, so it's still “private.”
If Simple File Sharing is turned on, one way to fix this is to have the original owner of the file locate the file in Windows Explorer. She or he needs to drag the file to her or his My Documents folder, and then drag it back to the shared location. Explorer will then fix the security settings.
A Computer Administrator user can also use the cacls command to change the file's security settings. In a command prompt window, change to the directory containing the file, and type the following command
cacls filename /G Everyone:F
where filename is the name of the file you're trying to fix.
If Simple File Sharing is disabled, the file's owner can right-click the file or its containing folder, select Properties, Security, and add your account the access list. If modifying a folder, have him or her click Advanced and check Replace Permission Entries on All Child Objects.
Share permissions are set up with Everyone to have Full Control. The users get a message telling them they don't have permission to access the folder.
If you are not using Simple File Sharing, check to be sure that NTFS permissions are not overriding share permissions on the shared resource. Remember that between the two types of permissions, the most restrictive of the permissions apply.
I have set up logon scripts for the all users of my machine, but they run only when I log on.
Make certain that you have specified the logon script properly in the Profile tab of each user account. Enter just the name of the script file (for example, MYLOGON.BAT).
Make certain that the logon scripts are stored in the proper directory (%SYSTEMROOT% System32ReplImportScripts), and make certain that all users have at least Read and Execute permission to the directory.
A user in the Users local group has access to an object that the Users local group is not assigned permissions for.
Check to see whether the user belongs to any other groups that have been assigned permissions. Remember that permissions accumulate through groups. If necessary, you can remove groups from those listed as having access to the file, or you can list specific users and/or groups and check the Deny boxes to remove access rights.
When I select a file, folder, or printer's properties, there is no Security tab.
On a domain network, this can occur if the disk drive containing the folder is not formatted with the NTFS file format. If the disk drive is NTFS-formatted, your domain administrator may have disabled your access to the Security dialog.
On a standalone computer or workgroup LAN, the Security tab will not appear if the disk was not formatted with NTFS, or if you are using Simple File Sharing. In the latter case Windows manages the security settings for all folders so that it can successfully manage access to shared folders. You can temporarily disable Simple File Sharing while you make access-control changes to non-shared folders, if necessary.
To find out if the hard drive is NTFS-formatted, select the drive icon in My Computer. The format type is displayed under Details.
I have found some files or folders that can't be deleted even by Administrator. They don't have the Read-Only attribute set, but Windows informs me that access is denied.
Sometimes a file or more often a folder is set with access controls such that even Administrator can't access or delete it. To erase such a folder, take ownership of it as described earlier in this chapter. Give Administrator full access rights. Use the Advanced security button to view Advanced Permissions, and check Replace Permission Entries on All Child Objects. Click OK and Apply, and then try to delete the folder again.
If you are using Simple File Sharing you will need to disable it temporarily to view the Security properties dialog boxes. (Or, more drastically, boot up your computer in Safe Mode. Even Windows XP Home Edition displays the Security options in Safe Mode.)
I have a lot of (quirky, I'm told) preferences that I like to make when I set up a new computer: Start menu settings, application settings, icon placement, and so forth. If you are setting up multiple users for your computer, you can save everyone a lot of configuration-tweaking time by setting up the default user profiles before the users log on for the first time. To do this
As a Computer Administrator, create the new user accounts. Then, log off, and log back on using one of the new users.
Make the changes to the computer that you want all users to have, such as power management settings, desktop icons, Start menu, wallpaper, and so on. Install application software, load up shortcuts, whatever you want each user to have.
TIP
To prevent the “Tour Windows XP” pop-up from appearing when each new user logs on, run the registry editor
regeditand locate key HKEY_LOCAL_MACHINESoftwareMicrosoftWindowsCurrentVersionApplets. Create a subkey named Tour and open it. Create a DWORD value named RunCount and set the value to 0.To prevent the “Microsoft .NET Passport” pop-up from appearing, set Microsoft Messenger to not run automatically when Windows starts, or, open key HKEY_CURRENT_USERSoftwareMicrosoftMessengerService and set value PassportBalloon to the REG_BINARY value 0A 00 00 00.
For more information on editing the registry, see Chapter 32, “The Registry.”
Log off, and log back on with the Computer Administrator account you used to create the accounts in step 1.
Open My Computer, select Tools, Folder Options, select the View tab and check Show Hidden Files and Folders. Click OK.
Open the Start menu, right-click My Computer, and select Properties (or select View System Information from the System Tasks list). View the Advanced tab and click User Profile settings, to bring up the dialog previously shown in Figure 28.19.
Select the profile for the user you just configured and click Copy To.
Click Browse, and browse to Documents and SettingsDefault User. Click OK.
Click OK.
When a users logs on for the first time, Windows will create the user profile by making a copy of the Default Users folder, which now contains all of the settings you made. They will start out with a nicely configured computer.
Unfortunately, on a domain network, default profiles are taken from the domain server. Only the domain administrator can change the default profile there.
And, also unfortunately, on standard installations of Windows XP, Microsoft puts some icons like the Windows Media player icon back on the desktop and the quick-launch bar even if you deleted them in the Default User profile.