
In this chapter
The two types of graphics used in Fireworks are bitmap graphics and vector graphics (see Figure 4.1). The simplest way to explain the difference between the two is that bitmap graphics are made up of rows and columns of pixels, whereas vector graphics are made up of points in space that are connected by strokes and then colorized with fills. Each of these elements (points, strokes, and fills) are rendered mathematically on the screen as opposed to being displayed physically as pixels are.
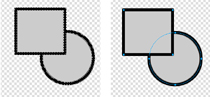
Figure 4.1. Notice the difference in selection between the bitmap graphics on the left and the vector graphics on the right. The bitmap graphics are selected by pixel, whereas the vector graphics are selected as individual objects.
Understanding how Fireworks handles and organizes the elements in your files will help you have a better understanding of how to create graphics for different mediums, as well as increase your productivity.
If you’re familiar with the form of painting called pointillism, where tiny primary-color dots are used to generate secondary colors, then working with bitmap graphics is nothing new. If you’ve never heard of pointillism, fear not. Simply magnify a bitmap graphic such as a photo to see the individual building blocks, or pixels, that create the graphic, as shown in Figure 4.2.
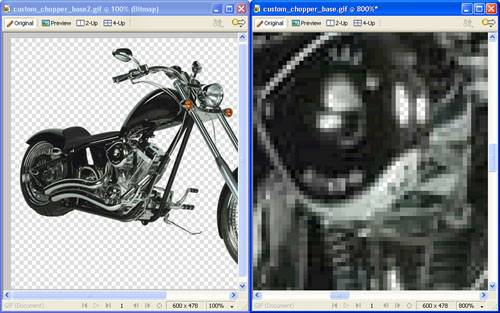
Figure 4.2. The image on the left is at normal (100%) magnification, whereas the image on the right has been enlarged 800% to show the individual pixels that comprise the image.
Each pixel can have only one color. When these pixels are arranged in rows and columns, the human eye blends the individual colors together to create the illusion of an image.
The more dots that are used to define an area of an image, the higher the overall quality of the image will be. Accordingly, bitmap images are quantified by the relationship between the number of pixels and the size of the image. This is known as resolution and is usually measured in dots per inch (dpi) for print, or pixels per inch (ppi) for the screen.
If you want to edit a bitmap graphic, you have to modify individual pixels. In addition, because a bitmap graphic is rendered with a finite number of pixels, there is no way to enlarge the image without lowering resolution.
Photographs are bitmap images and you will use Fireworks’s bitmap tools to modify photographs, as well as use bitmap effects such as blurring and color replacement.
Vector graphics rely on mathematical instructions that tell the computer how to draw graphics. As an example, a vector might have instructions such as “Draw a circle, starting 100 pixels to the right and 50 pixels down from the top-left corner, with a radius of 200 pixels; draw a red stroke over the circle path that is 2 pixels wide, and fill the circle with a yellow color.”
On the other side of the coin, the bitmap version would just describe the pixels that are white (background), red (stroke), and yellow (fill).
Here’s where an important concept comes into play. A vector graphic contains instructions for each object it contains. In the circle example, the instructions would create a circle object. The same file could have a line object, a square object, and a text object. Each object would be completely separate from the others.
Because all vector graphics are independent of each other and because a specific set of directions is used to construct them, they are always editable. In addition, because vector objects are independent of the canvas behind them, they are also independent of a graphic’s resolution. That’s the beauty of vector graphics: They’re scalable, whereas bitmap graphics are not.
The basic shape or line of a vector graphic is called a path. Every vector shape is a path. That path is the representation of a mathematical formula.
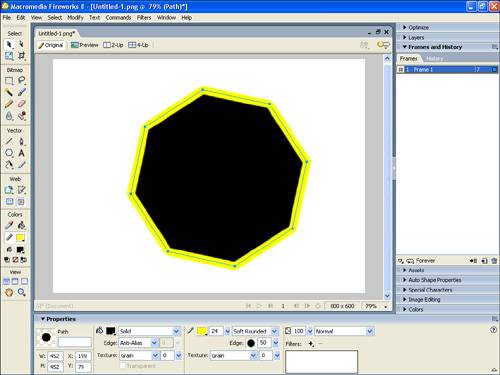
Accordingly, each path can have several attributes applied to it. These attributes are what you use to change the path and include stroke and fill color. A path’s stroke is the coloring that is painted on the path, whereas the path’s fill is the color, or pattern, that covers the area enclosed by the path (see Figure 4.3). Fireworks also enables you to add several more attributes to your paths known as effects, such as bevels, glows, drop shadows, and several others.
Even if you cannot see a stroke, the path is still there. It’s a confusing concept for many, but remember that you can have a path without a visually represented stroke, but you can’t have a stroke without a path.
To drive this home another way, modifying paths and modifying strokes are two different things. When you modify a path, you reshape it. When you modify a stroke, you can change its thickness, color, and visual appearance.
The best way to understand layers is to think of each layer as a sheet of acetate like those used with overhead projectors. Layers are independent levels that contain bitmap or vector graphics. The final image is made up of a stack of all the layers within the image, depending on the order in which the layers are laid and the transparency levels that are set for each layer. You can work on each layer as if it were an independent image, without interference from any graphical elements that are on other layers.
It is best to place every new element, or addition to an element, on its own layer. You can always merge (combine) layers, and it is much safer and faster to build each element a layer at a time. After you are satisfied with the look, you can then combine the elements that make up that object.
When you place bitmap graphics on top of each other in the same layer, the pixels of the top object replace the pixels of the object beneath it. After all, only one pixel can occupy a space at a time. To keep the bitmap objects separate, you use layers.
Unlike bitmaps, vector objects can be placed on top of one another on a single layer without affecting one another. They create their own sublayers. So, why use layers with vector objects? Simply put, for organization. Using layers, you can organize your content into logical hierarchies.
Any time you create or import an object, it appears in its own layer in Fireworks. A default name is automatically applied to the layer. I use the default name unless I’m working with files where several layers come into play. At that point, it’s handy to know how to organize the layers.
As was mentioned briefly in Chapter 3, “Introducing Fireworks 8,” the Layers panel enables you to control the object layers in your document. The Layers panel main area (see Figure 4.4) comprises five main columns:
Expand/Collapse Layer—. When a collapsed layer contains sublayers, a triangular arrow pointing down (Macintosh) or a + sign (Windows) is shown. Click that arrow or + sign to expand the layer. When the layer is expanded, you see an arrow pointing to the right (Mac) or a – sign (Windows). Click this icon to collapse the layer.
Show/Hide Layer—. This column contains the eye icon. When you see the eye, the object on the layer is visible. Click the eyeball to hide the object on the layer. The eyeball icon is also hidden. Hidden layers do not affect the contents of the file, and they are not exported with the file.
Lock/Unlock Layer—. The padlock icon indicates that a layer is locked and cannot be edited. Click the icon to lock or unlock the layer. You can lock only full layers, not sublayers.
Layer Column—. The layer column contains both the layer name and the thumbnail of the layer’s contents.
Object in Layer Column—. The last column doesn’t have an official name, so we’ll just use its function as a name. This column appears beside only full layers, not sublayers. When you select any sublayer, the little blue box (Object in Layer marker) appears for the layer that contains the selected sublayer. If you click the Object in Layer column in any other layer or drag the box to another layer, the selected sublayer is moved to the new layer.
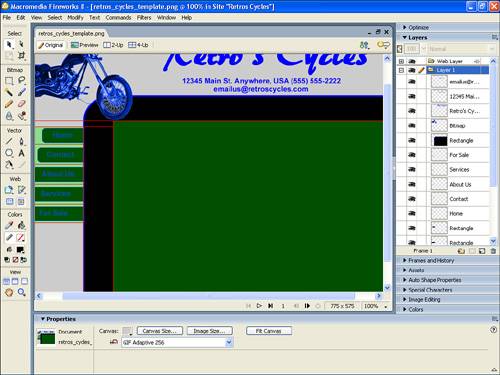
Figure 4.4. The Layers panel for a simple document with a bitmap image, vector graphic, and text. Note that each object appears in its own layer.
To move layers, or change the stacking order, you can drag the layer or sublayer up or down to a new position in the stack. You can also select a sublayer, and then click in the Object in Layer column of the layer where you want it to move. This option does not work on layers; it works only on sublayers.
To rename layers, double-click the layer and the name can be edited. Type the new name and press Return/Enter to seal the deal.
Whereas layers organize objects in space, frames organize objects based on time and state. Why does an image editing program need to worry about time or state, you might ask? Fireworks is used predominantly to create web graphics, which often include animations and images that change based on events such as the location of the mouse. In these cases, you need to be able to indicate what an image should do and in what state it should be when a certain period of time expires or an event occurs.
To handle how graphics change, Fireworks uses the concept of frames. Fireworks frames work along the same lines as frames in a movie reel, where each frame is the same size and is in the same position, but the visual contents may change to create the illusion of motion. As you roll through the individual frames, an animated effect is created.
The Frames panel works much like the Layers panel, except it is divided into three main columns (see Figure 4.5):
Skinning—. Onion Skinning is an animation technique that enables you to view multiple frames at the same time.
Frame Name and Number—. The main column displays the frame name, which is set to default to Frame X, where X represents the frame number.
Frame Delay—. This column contains the value for the frame delay, which is represented in 100ths of second. The frame is displayed for that duration of time before the animation advances to the next frame. This column also contains the Object in Frame marker, which functions the same way as the Object in Layer marker.

To move frames, drag them up or down in the stack.
To duplicate a frame—an excellent way to distribute positioned content across multiple frames—drag the frame to the New/Duplicate Frame button. When the button appears depressed, release the mouse. The frame and all its layers and sublayers are then copied.
To rename a frame, double-click the frame and the name can be edited. Type the new name and press Return/Enter to save the name.
When you create a new object, it appears on its own sublayer within a layer. As you continue to create your masterpiece, more layers and sublayers are added to the composition.
Let’s say you’re making an animation and start incorporating frames. Now you have several layers and will be adding several frames. How do layers and frames interact with each other?
The relationship between layers and frames is based on whether or not the layer is shared. Shared layers are the same in every frame. Unshared layers may be different in each frame.
When you add a new frame, Fireworks copies all the unshared layers into the new frame. If you decide to add a new unshared layer in any frame when you’re halfway through the project, Fireworks automatically adds that unshared layer to every other frame. Unshared Layers is the default setting for layers. If you want a new layer to be shared, you need to double-click on the layer name in the Layers panel and check the box to indicate that it should be shared.
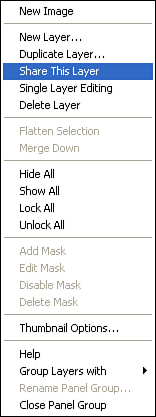
To share a layer, select the layer. In the Layers panel options menu, select Share This Layer (see Figure 4.6). A check appears beside the option and a Shared Layer icon next to the layer name.
A web layer is always shared. You don’t have a say in that. On top of every layer stack in Fireworks is the web layer. You cannot delete it, rename it, or do anything unsavory with it. The web layer is where all web objects, such as slices and hotspots, are stored.
To the right of the web layer’s name is the Shared Layer icon. This icon indicates that the web layer’s contents are available and identical for all frames in your document.
The most basic animation is the Simple Rollover. Rollovers are frequently seen in navigation bars and in buttons on web pages.
The rollover comprises two images: an Up image and an Over image. When a web page is first loaded, the Up image is displayed. When the mouse is moved over or rolls over the Up image, it is replaced with the Over image.
Caution
Because both images share the same space, they must be the same size in the overall image. Any variation in size ends up with a “hiccup” during the mouseover and causes the Over image to be distorted.
To create a Simple Rollover button, the first thing you need to do is to create the button’s Up and Over states, using Frames 1 and 2. For instance, you could create a piece of black text in Frame 1 for the Up state and then have the same text (same location and size) appear in red in Frame 2.
After you’ve created two visual arrangements for the button’s Up and Over states, use the Slice tool and drag it over the visuals you want to change to create a slice. With the slice still selected, open the Behavior panel Window, Behaviors and click the Behavior (+) button to open the list of behaviors. Select Simple Rollover from the list and Fireworks creates the rollover. The Up state is automatically set as the visual content under the slice in Frame 1, and the visual content in Frame 2 is the Over state.
For ease of use when the rollover graphic is exported to Dreamweaver, you can enter the URL in the Property Inspector’s Link field as well as the Alt text in the Alt field. You may also want to delete the default slice name and give each slice a more meaningful name.
You can test simple rollovers in Fireworks’ preview mode by clicking the Preview button at the top of the document window (see Figure 4.7).
Similar to the Simple Rollover is the Swap Image behavior. The Simple Rollover substitutes the contents of a frame slice with the contents of another frame slice. Although the Swap Image behavior can do that as well, it is mostly used to create disjoint rollovers.
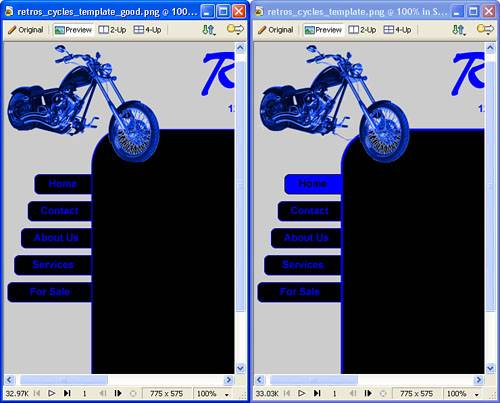
When rolling over one image causes a different image to change, you have a disjoint rollover. For example, rolling over Image A causes Image B to change to Image B1 (see Figure 4.8).

Figure 4.8. Rolling over the Home button causes the text below the navigation buttons to appear as well. An image can have both a simple rollover and a disjoint rollover. Using the previous example, rolling over Image A would replace Image A with Image A1 and Image B with Image B1.
To build a disjoint rollover, follow these steps:
Create all assets in their final positions. You need at least two frames and two slices. Use the Slice tool to add a slicing scheme over the affected areas of the document.
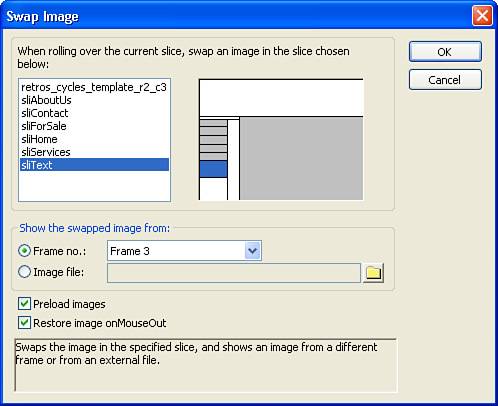
Select the slice covering the trigger image. The trigger image is the image that users will roll over or click to make the disjoint behavior work. Click the Add Behavior (+) button in the Behaviors panel. Select Swap Image from the menu and the Swap Image dialog box appears (see Figure 4.9).
Select the target slice. The target slice is the image that will be affected by the rollover action in the trigger image. You can select the slice in the list or select the slice thumbnail in the slice reconstruction window.
Next, select an image to swap from a different frame or an external file. In this example you’ve already created the image that will be swapped, so select another frame.
Tip
Preload Images is selected by default to ensure that the swapped image is loaded before the user mouses over the image. I would suggest leaving this option checked to ensure that the swapped image executes quickly, without the new image having to be downloaded at the time of the swap
Restore Image onMouseOut is also the default if you want the original image to be swapped back in after the user rolls out of the trigger image.
Click OK to apply the behavior and close the Swap Image dialog box.
Moving up the complexity ladder is a navigation bar with four-state buttons. The Set Nav Bar Image behavior is used to create this type of navigation bar, where the buttons not only have rollovers, but also communicate to the user which page is currently being browsed.
A navigation bar using this behavior has four states. Each state represents the button’s appearance in reaction to a mouse event:
To add the Set Nav Bar Image behavior, follow these steps:
First, you need to build a navigation bar. Begin by creating a background shape and a piece of text.
Next, make those graphics into a Button symbol by choosing Modify, Symbol, Convert to Symbol (F8) and select Button in the dialog box. Make sure you replace the default Symbol name with a more meaningful name.
Press OK to convert the text and image into a button symbol.
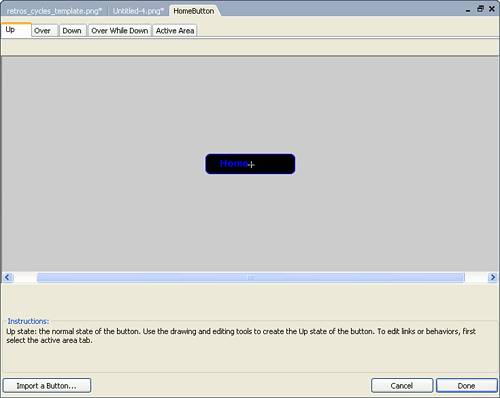
Double-click the new button symbol to launch the Button Symbol Editor. Modify the button attributes in the editor for each of the four states (see Figure 4.10).
In the Down and the Over While Down states, make sure that the Include in Nav Bar option (located at the top of the editor) is checked. These options should be checked by default.
Repeat this process for the rest of your navigation bar buttons.
Tip
To make life easier after you export the navigation bar, take a moment to select each slice and enter a name for the slice, a label for the button, and a URL in the Property inspector.
Double-check that everything is going to work by selecting each button and looking in the Behaviors panel. Each slice should now have the Set Nav Bar Image behavior applied to it (see Figure 4.11).
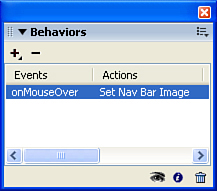
Figure 4.11. Select each slice and use the Behaviors panel to make sure the Set Nav Bar Image behavior is selected.
For the ultimate test, you need to export the file to HTML and view it in your browser. Choose File, Export to get started. In the Export dialog box, make sure that HTML and Images is selected in the Export field.
Click the Options button to launch the HTML Setup dialog box. Click the Document Specific tab. Make sure that the Export Multiple Nav Bar HTML Pages box is checked. Click OK to close the HTML Setup dialog box so Fireworks will export additional pages for each button in the navigation bar. Click Save to complete the export.
Open the page in your browser to see how it works or preview it by clicking the Quick Export button and choosing Preview in Browser from the context menu.
Creating animations for the web in Fireworks is a lot more fun to think about than to do. The best animation tool is obviously Flash because the program was designed for the job of creating motion.
That being said, however, Fireworks can be used to build simple animations. In fact, there are three different methods you can use to create animations: frame-by-frame, tweened, and animation symbols. Each has its own pros and cons and is discussed later in this chapter. Before you start tweening away to make the next full-feature animation, you should take a look at what’s involved in building a good animation.
Motion on the web, or on film, is an illusion. Animation is a series of still images, each with a slight change in appearance from the previous image, that are rapidly presented to the viewer. The human eye processes these images and blends them into a smooth motion. If the images move too slowly, the illusion is gone. This speed is measured as frame rate. Frame rate is measured in frames per second (fps). Most movies and television shows shot on film have a frame rate of 24 fps. Most shows shot on video have a frame rate of 30 fps.
Moving to the web, there is another concern to throw into the mix. The higher the resolution of a pixel-based image, or the more points in a piece of vector artwork, the higher the file size, which results in a longer download time. Increasing the frame rate in an animation also increases the file size.
Bitmap animations have a sequence of bitmap graphics. Each bitmap graphic is added together to complete the animation in terms of file size. Although file compression helps reduce the file size, bitmap graphics can get large quickly. The most common bitmap animation type is the Animated GIF.
Vector animations have vector graphics on each frame. Vector animations just change object parameters from frame to frame and are accordingly smaller in file size than bitmap animations. The most common vector animation type is Macromedia’s Flash SWF format.
Before you build an animation, however, there is another issue we need to discuss: What is the output format for the final animation?
An Animated GIF typically has a large file size, but is universally compatible with nearly all browsers. This type of animation is restricted by the GIF file format’s limited 256-color palette, and it cannot incorporate sound or any other interactivity. In addition, blends and complex patterns often lose their smooth transitions because of the palette limitations. The Animated GIF is, however, a piece of cake to implement.
The Flash SWF, on the other hand, typically has a small file size, can incorporate both pixel and vector-based artwork, and is compatible with all browsers with the Flash player installed. Currently the player penetration is rated at about 94% of all browsers for the Flash player. The Flash SWF offers the capability to add sound as well as complex interactivity. Mastering Flash, however, takes some expertise that you might wish to acquire by reading the Flash chapters in this book.
After you have decided the output format for your animation, you can start building your creative masterpiece of motion. Again, Fireworks enables you to build animations using the frame-by-frame method, the tweened method, or the animation symbols method.
Frame-by-frame animation is the most basic method of the three types of animation you can do in Fireworks. Each element in each frame is repositioned or modified to create the illusion of motion. Remember the stick figures you drew on your school notebooks and how you flipped through the pages to make them move? Those flip books used frame-by-frame animation.
Frame-by-frame animation requires the artist to create each frame by hand. Tweening and animation symbols use the computer to automate the drawing process required between frames.
The simplest way to create an animation is to create an object, add a new frame, place the object on the new frame, and modify it in some way (change color, reposition, and so on). Repeat each step of this process until the animation is built.
The rub with this method is that you cannot see the previous frame as a point of reference if you’re moving the object. If you’ve ever seen hand animators at work, they’re constantly flipping between sheets of tracing paper (also known as onion skin) to gather their reference points for the animation.
Fortunately, Fireworks offers two solutions to this dilemma: Onion Skinning and the Distribute to Frames command.
Onion Skinning pays homage to the traditional animation work process, where animators worked on translucent pieces of paper so they could see several layers of drawings simultaneously. In Fireworks, Onion Skinning simulates that process by displaying nearby frames partially grayed out (see Figure 4.12).
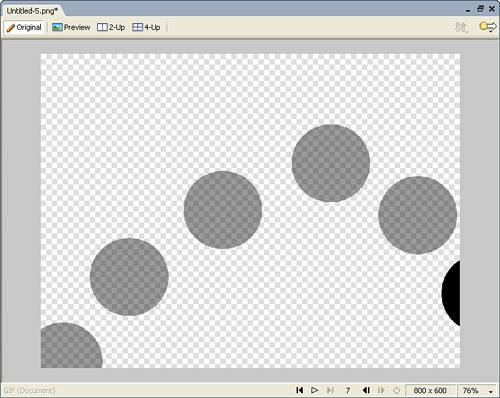
Figure 4.12. Onion Skinning enables you to use surrounding frames to aid in positioning graphics in the animation.
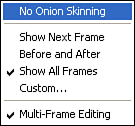
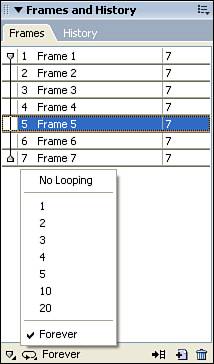
To use Onion Skinning, open the Frames panel. In the lower-left corner is the Onion Skinning button. Click the button to view the Onion Skinning menu (see Figure 4.13). The No Onion Skinning option turns off the feature and shows only the active frame. All other options show a user a selected range of frames. Note that all ranges are relative to the active frame. If you select the Multi-Frame Editing option, all visible objects can be edited, including those on inactive frames.
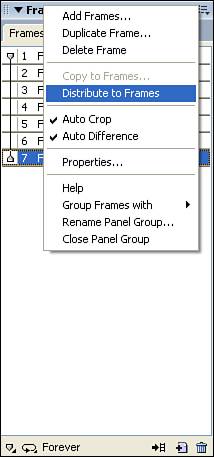
Another option is to use the Distribute to Frames command, which takes a group of selected objects and sends each to its own frame in the order in which it is stacked in the Layers panel.
To use the Distribute to Frames command, create all the objects in one layer. Notice that there are several sublayers, depending on how many objects you create. Use the Layers panel to make sure your objects are in the proper stacking order for the animation. Because objects are distributed from bottom to top, make sure the graphic that starts your animation is the bottom sublayer and the graphic that ends your animation is the top sublayer.
Select all the objects you want to include in the animation with Edit, Select All, or Shift-click if you want to selectively choose graphics. Click the Distribute to Frames button in the Frames panel and Fireworks automatically inserts each graphic in its own frame, in order (see Figure 4.14).
After you’ve created your animation, you’ll want to see whether you’ve effectively created the illusion of motion. Built right into the document window is a set of playback controls, similar to those found in a VCR (see Figure 4.15).
The animation plays back at a high frame rate and loops continuously. To change the frame delay, which determines how long the active frame is displayed, double-click in the frame delay of any frame. Remember that frame delay is measured in 100ths of a second. The default frame delay of 7 indicates the frame is delayed seven-tenths of a second. To hold the frame for 3 seconds, enter a value of 300.
To control the looping properties of your animation, click the GIF Animation Looping button at the bottom of the Frames panel (see Figure 4.16). Select an option (No Looping, 1–5, 10, 20 and Forever) to set the looping properties.
After you’ve worked with frame-by-frame animations, playing with tweened animations will appear to be a piece of cake. To build a tweened animation, you create a visual beginning and an end point, and then define the number of frames, or steps, in between. Fireworks does the rest. Most tweened animations involve visual changes such a position on the stage, rotation, or scale of the beginning instance and the ending instance.
To create a tweened animation, create a vector object and convert it to a graphic symbol by choosing Modify, Convert to Symbol (F8), and selecting Graphic Symbol in the Symbol Properties dialog box (see Figure 4.17). Drag two instances of the symbol onto the canvas from the Library tab or the Assets panel. Or select the first instance and duplicate it (Edit, Duplicate). They must be instances of the same symbol.
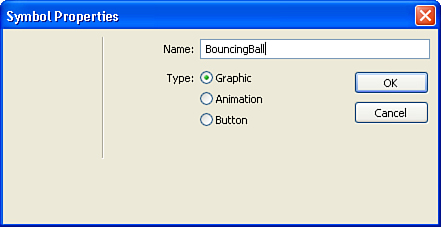
Figure 4.17. After creating the first object in a tweened animation, convert the object to a graphic symbol.
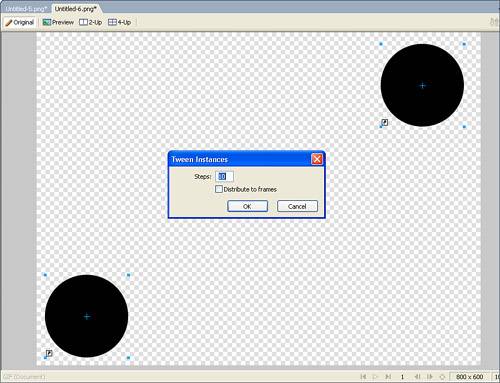
Position and modify each instance as desired. Select both instances and choose Modify, Symbol, Tween Instances (see Figure 4.18). Enter the number of steps in the Tween Instances dialog box. Select the Distribute to Frames option to distribute the symbols across frames. If you want to modify the symbols, leave this option unchecked.
Animation symbols are one of the three symbol types in Fireworks (animation, button, and graphic). They are stored in the Fireworks library, and you can use them by simply dragging each symbol onto the canvas. The beauty of using animation symbols is that they hold objects in multi-frame animations together as a single unit. If you move one of the objects, the rest of the visuals inside the symbol are automatically repositioned.
Although animation symbols are similar to tweened animations, there are a few differences. When you use animation symbols, Fireworks sees the entire animation as a single entity. Accordingly, you can make global changes to the entire animation.
Animation symbols are also created from a single object selection and parameters that you control (scaling, positioning, and rotation).
Because animation symbols are treated as a single object, you cannot visually set an endpoint as you could with tweened animations. Instead, you must numerically designate the animation’s endpoint along with its other parameters.
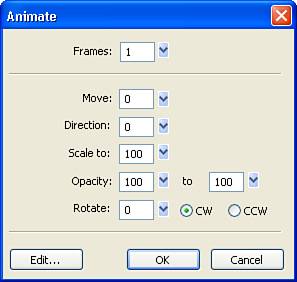
The first step in building an animation with animation symbols is to create the symbol. To create the symbol, select one or more objects on the canvas. Choose Modify, Animation, Animate Selection to open the Animate dialog box (see Figure 4.19), where you find the following options:
Frames—. Sets the number of frames used in the animation.
Move—. Controls the number of pixels the object is moved over the course of the animation. You can visually reposition the object later by modifying the motion path.
Direction—. Controls the direction, in degrees, the object is moved.
Scale To—. Controls the size of the final object compared to the first object. A relative percentage is used to measure this.
Opacity—. Changes the object’s opacity. The first number represents the opacity of the first object, whereas the second number represents the opacity of the last object.
Rotation—. Controls the number of degrees the object is rotated. The CW and CCW radio button options represent clockwise and counter-clockwise rotation, respectively.
You can modify animation symbols in several ways, including modifying the visual objects that are animated, editing the animation properties, and modifying the motion path.
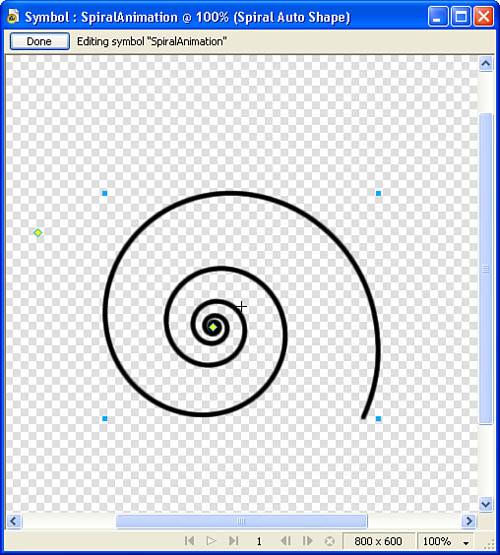
To modify the object(s) used in the animation, simply double-click an animated symbol instance and the Symbol Editor window appears (see Figure 4.20). You can then add new objects and modify or replace the existing object used in the animation. When you are finished editing the visuals used in the animation, press the Done button to return to your document stage. Note: All objects in the animation can be modified to add or subtract visuals, but the animation itself is not modified.
The easiest way to edit the animation settings is to select the animation instance on the stage and then make changes in the Property inspector. To make these same changes in the Animate dialog box, select the animation instance and choose Modify, Animation, Settings to see the Animate dialog box. Make your changes, press OK, and the animation is updated.
After you’ve created the animation symbol, select an instance and the motion path appears (see Figure 4.21). This path displays the length and direction of the trajectory. To change either setting, drag the first (green) or last (red) point on the path. All intervening frames are updated.
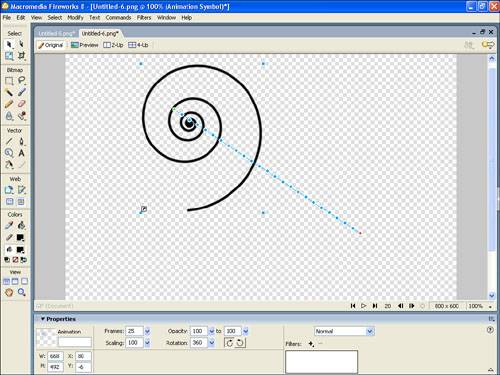
Note that the motion path is a straight line and not a curve. Because you can modify only the first (red) and last (green) points on the motion path, you can change only the length and direction of the trajectory.
You can also change the duration of any part of the animation by going into the Frames tab and double-clicking the Duration column. Enter a new duration in 100ths of seconds and press Return/Enter to accept the change. To view your animation, press the Play button in the bottom of the document window.
Now that you have created your animations, you need to get them out there for your adoring public to see. You can use the Export tool or the Export command (File, Image Preview) to start the process of creating an Animated GIF.
The Image Preview dialog box appears. Select Animated GIF from the Format pull-down menu under the Options tab.
Tip
The default export format is GIF. If you forget to choose Animated GIF, the Animation tab remains grayed out.
Note
The Image Preview command and dialog box was named Image Preview in previous versions of Fireworks.
Select the Animation tab to set the compression. A key difference between static exports and animation exports is that animated files require compression across frames.
Fireworks enables you to choose from among three levels of frame-to-frame compression (see Figure 4.22):
None—. This yields the largest file size because there is no compression. The Animated GIF describes complete bitmap images for each frame. None is the default setting.
Crop Each Frame—. The Animated GIF describes only the rectangular region where the pixels are changed.
Save Differences Between Frames—. The Animated GIF describes only the pixels that change within the rectangular region. Note that Crop Each Frame must be checked for Save Difference Between Frames to be enabled. Using Saving Differences Between Frames yields the smallest file size.

When you’re finished setting the export options, click the Export button, name the file, choose where to save it, and you’ve created an Animated GIF.
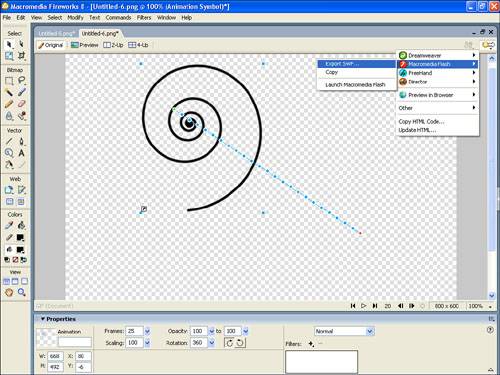
To create a Flash SWF animation file, choose the Quick Export button located at the top right of the document window. Select Macromedia Flash and Export SWF (see Figure 4.23). Enter a filename and press Save and you’re finished.
I added a cool pop-up navigation menu to my site that I created in a previous version of Fireworks. Can I update the JavaScript-based menu to the new CSS-based ones created by Fireworks 8?
Sure—as long as you saved the PNG file (the one with all the layers and behaviors intact) for the original menu. You did save that PNG file...right?
Because I’m positive that you saved that PNG file, all you have to do is open it in Fireworks 8 and re-export your navigation menu. After you have done that, just copy and paste the code generated by Fireworks into your web pages and you’re good to go.
I have made a few buttons on a black background by using the rectangle tool, black fill, no outer line. I converted those buttons to a symbol and adjusted the up, down, and over graphics. Everything is still black, but only the text changes color on the rollover. But when I view the buttons in a browser, they all have white lines! Help!
Check to make sure you are not working on a transparent canvas. To resolve this issue, change the canvas color to the color of the HTML page on which you’ll be putting the buttons and everything should be fine.
As you have seen, Fireworks can create some basic animations in a snap. Probably the most common use for animation within Fireworks is to develop different states for rollover buttons and the popular pop-up navigation menus. Beyond that, however, you’ll need to consider whether Fireworks is really the best tool for developing your animation.
For instance, if you begin to see your animations creep up in file size, or you find yourself wanting to add functionality such as sound, then you’re better off moving on to Flash and developing your animation there.
The trick here is to balance the ease of use but limited functionality found within Fireworks with the complex learning curve and enhanced functionality found in Flash. If you are confident that you can develop your animation in Fireworks without creating an overly large file size, then by all means develop it in Fireworks. If, however, you think that the graphic is complex enough that it might create a pretty hefty file, then you’d be better off creating it in Flash.