
In this chapter
Previous chapters have covered the Flash interface and all the building blocks that you can use in Flash. Now it’s time to look at one of the most fundamental skills you need to work in Flash: animating on the timeline.
Before jumping into the specifics of animating, this chapter explores ways that you can prepare your content so that when you start animating you’ll create small files and clean animations. The file size that matters is that of the .swf file you will publish, rather than the .fla document in which you work. To work effectively in Flash, you need to use symbols to organize your visual content.
You can think of a symbol in Flash as a container that holds your visual content. What makes symbols different than other visual content—such as shapes on the stage and even groups of shapes that you have created—is that they can be given a name and stored in the library for future use. They can be reused. You can even nest one symbol inside another symbol. The library itself is simply a list of all of the available reusable content in your movie: symbols.
So, making something you can reuse is pretty interesting, but there’s more: When you reuse the symbols in the library, you don’t increase the file size of your exported .swf. Okay, you do increase the file size by approximately .0012 bytes each time you reuse a library symbol in your movie, but that’s not significant, so really go after using them as often as you can.
To understand how this works is pretty simple when you know that the symbols stored in the library are called master symbols. When you use those symbols out on the stage in your Flash document, they are called symbol instances. The instances on the stage are actually just copies of the original master symbol in your document’s library. That’s why using multiple copies of the same symbol doesn’t increase the file size.
In the overall sense of how a Flash document functions, it’s also helpful to realize that the main timeline of your Flash document is the biggest container of all because it holds references for all the symbols, other internal assets, animations, and programming for your entire Flash movie. I like to think of the Flash document main timeline (and the .swf it creates) as the mother ship of all symbols.
While you’re thinking of symbols as containers, one more concept will be useful as you explore using symbols in Flash documents: You can open up that container and make changes to what’s inside. This is called editing a master symbol and all changes that are done while editing the symbol are reflected out to the instances of that symbol that you have on the stage. There are different types of symbols in Flash, and they each have different things happening on the inside. The following sections explore the different types of symbols you can create.
Creating a symbol is fairly simple, but you need to understand all your options. With this understanding of when and why to use different symbol types, you’ll make better choices as you prepare your Flash documents for animation.
Graphic symbols are the most basic type of symbol used to store the visual elements that are reused in illustrations and animations. Their functionality, beyond grouping shapes or animations with a name, is limited. For instance, you cannot access a graphic symbol instance with ActionScript, nor can you apply the new filters available in Flash 8 to a graphic symbol. This makes graphic symbols most useful for storing pieces of your illustrations so that you can animate them on the timeline.
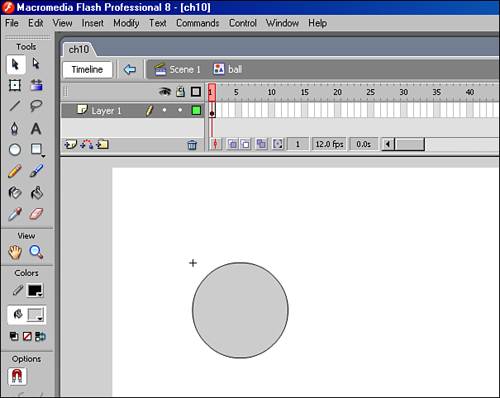
When you go inside your graphic master symbol you can see a timeline that looks exactly like the regular timeline. It is, however, a different timeline. Above the timeline, you can see the name of your symbol listed. This indicates which timeline is open for editing, on the stage (see Figure 10.1). Any animations that you put on this timeline are always “slaved” to the main timeline. This means that although you’ve created the animation inside the symbol, it plays on the main timeline as if it was built there. This enables you to compress many layered animations into a single symbol, which helps keep things tidy. It also enables you to store not only static symbols inside a graphic but also animations that you might want to reuse as well. This will become an exciting concept as you explore how to animate later in this chapter.
Graphic symbols can be nested inside other graphic symbols, and also in any of the other types of symbols. For example, you may have a background of trees for your animation. Creating a single leaf symbol, and arranging many copies of it within a tree symbol, will save considerable file size in the final project.
Movie clip symbols are also useful for storing your visual elements. But, unlike graphic symbols, they can be controlled with ActionScript. Each instance on the stage can be given its own name. This instance name is different from the master symbol name in the library and enables ActionScript to talk directly to that particular instance. The ability to be controlled by ActionScript is also the reason that things like the new filter effects work with this type of symbol.
Inside a movie clip master symbol is a timeline like the one on the main timeline. What makes this timeline different from the graphic symbol’s timeline is that any animation you place in this timeline plays independently of the main timeline. This means that if the main timeline were stopped, any animation on this timeline would continue playing independently of what is happening on that main timeline. You control a movie clip timeline the same way you would a main timeline animation. You also can set up the movieclip to respond to user input, such as a mouse click.
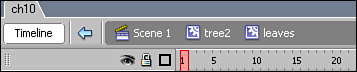
Movie clips can be nested inside each other or in any of the other symbol types. They can contain timeline elements of their own that operate independently of the main timeline. Figure 10.2 shows the timeline of a movie clip on the stage. Above the timeline, there is a special icon to indicate that this is a movie clip symbol’s timeline.

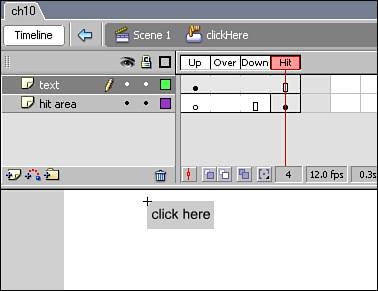
Button symbols are made specifically to let the user interact with your Flash movie. They have a specialized internal timeline consisting of four frames: Up, Over, Down, and Hit. The first three frames (Up, Over, and Down) hold the visual elements that appear when the user’s mouse interacts with the button. These frames are called button states. So, although this is still a timeline inside the button symbol, it changes visuals only when the particular type of interaction takes place rather than playing in a linear way as the main timeline and other symbols do.
The Hit frame always contains a shape that indicates the “hot spot” for the button. Any filled shape in this frame is used to tell the button when to display the Over and Down frame visual elements. It’s crucial that you always use a filled shape in this frame so that the button can be easily selected. If you have an unfilled shape, such as some text, the button is going to appear to flicker as the user moves the mouse across the filled and unfilled portions of the text. The solution is to simply place a filled rectangle that is larger than the text in the Hit frame. The rectangle is not displayed on the stage, but is available for the user’s mouse to interact with.
Button timelines can have layers and contain instances of graphic and movie clip symbols. Figure 10.3 shows the timeline of a simple button.
Now that you’ve had a primer on symbols, you can begin converting shapes and text into symbols that you will reuse. Planning ahead is the key to being efficient. It’s easiest to look at your illustrations carefully, and plan your animations and symbols in advance. You can follow a few simple rules when choosing what to make into a symbol.
First, look at any visual elements that you want as unique objects and might want to store in the library. Having named elements stored in the library is convenient when you start to place and arrange your content on the stage. If you accidentally delete one instance on the stage, you can pull another one out of the library. Also look for elements that can be reused. For instance, one window on a house could become a symbol that gets reused several times to create other windows.
Note
With some repeating elements you may want to use a few different elements in a single symbol. Imagine you wanted a night sky with about 50–60 stars in it. Although you’re going to save on size by using your star symbol, you will slow the processor down because it has that many individual elements to display each time it draws the screen. So, to get the best of both worlds—small file size and faster redraw on the screen—try putting five or six stars of different sizes and shapes inside a symbol and reuse that.
Another rule of thumb for deciding what to make into a symbol relates to animation. When you animate, typically you should separate out any element that will be animated individually. So if one element is going to be moving across the screen and another is going to bounce, each of those visual elements should be a separate symbol.
So how do you create these amazingly helpful symbols? There are two methods for creating a master symbol. The first method of creating a symbol enables you to convert any visual element already on the stage to a symbol. This process creates a master symbol in the library and automatically converts the selected elements into your first instance of that symbol.
The second way to create a symbol is simply to create a blank symbol, which takes you immediately into editing mode where you can fill the symbol with content. To use this master symbol you then need to go into the library, where it is stored, and pull it out onto the stage. The methods for creating symbols are covered in the following sections.
Note
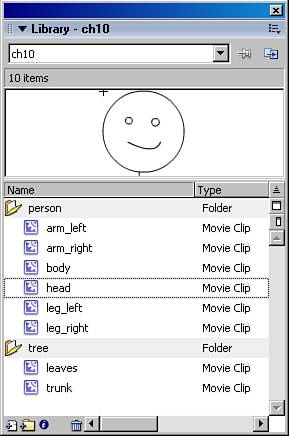
Be sure to have a naming convention for all your master symbols so you can find them easily in the library. Usually you view your library in alphabetical order, so indicating whether the element belongs with some particular animation or illustration is helpful. Names such as “arm_left” and “arm_right” are much more helpful as you work than relying on the default Symbol # naming.
You can also use folders to keep your library assets well organized (see Figure 10.4).
You’ve created an illustration and decided which elements to convert into symbols. To convert shapes and lines on the stage into symbols, follow these steps:
Select everything on the stage you want to include in your symbol.
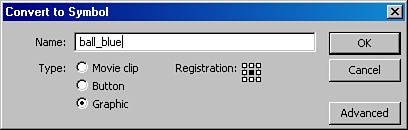
Choose Modify, Convert to Symbol, or press the F8 key on your keyboard. This brings up the Convert to Symbol dialog box (see Figure 10.5).
Give the symbol a name in the Name field and choose the type of symbol you want to create.
Set the symbol type.
Choose a registration point. The default registration point is in the upper-left corner.
Press the OK button to create the symbol.
Note
The registration point is the point inside the symbol in which all your selected content is aligned after it lands inside. Because the registration point for your symbol is what is used when you align your symbol instances on the stage, the real difference this makes is when you’re working out on the stage. The registration point is also used to define a rotation pivot point. For example, if the symbol contains the shape of an arm, placing the registration point at the corner with the shoulder would facilitate animating movement for that arm.
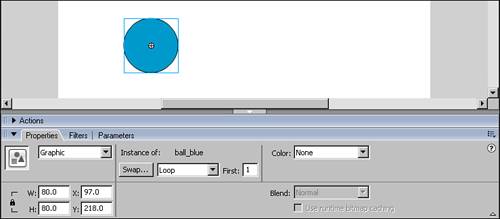
You can see that there is now an instance on the stage. You can tell it is a symbol instance because when you select it, the Property inspector changes to show you the symbol name and type (see Figure 10.6). You can also see the crosshair of a selected symbol. The crosshair represents the registration point inside the symbol.
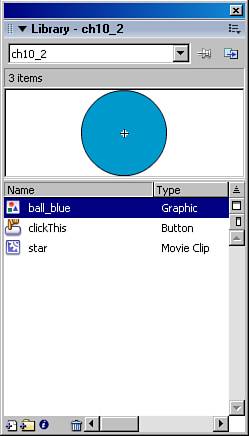
Now open your library (if you haven’t already) by choosing Window, Library. Each type of symbol has its own type of icon so you can quickly distinguish them in the library listing (see Figure 10.7). If you select the new symbol you just created, it should show you that the content you selected is now enclosed inside the symbol.
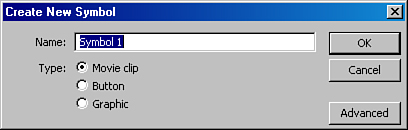
Occasionally, you might want to create the symbol first and then draw visual elements into it, rather than convert an existing visual element that you have on the stage. To create a blank symbol choose Insert, New Symbol, or press (Cmd-F8) [Ctrl+F8]. Give the symbol a name, type, and registration point in the New Symbol dialog box that pops up (see Figure 10.8), and then press OK.
Unlike converting a visual element to a symbol, when you create a new symbol you are immediately taken into Edit mode, where you can add content as if you were on the main timeline. Remember, though, that you are actually inside the symbol now. To get back out of the symbol press the back arrow or the Scene 1 link at the top of the page. This takes you out of symbol editing mode and back to the main timeline.
To use your symbol, you need to open the library and pull out a new instance to place on the stage.
It should be clear at this point that the master symbol controls what you see when you use instances on the stage. All the fun that you can have with changing some aspects of individual instances is discussed in the next sections, but first you need to be clear on how to change the content inside of a master symbol.
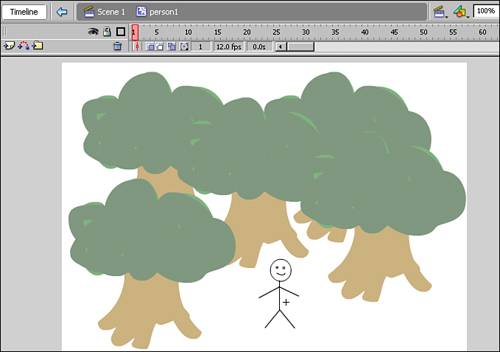
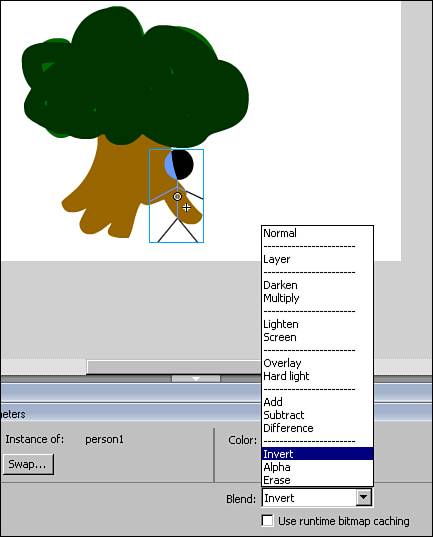
There are several ways to get into the editing mode of a symbol where you can play with the content inside. If your symbol has an instance on the stage, the easiest thing to do is to double-click the instance, which takes you into Edit in Place mode. In this mode, while you edit your symbol, you can see the stage itself and other elements on it, which are slightly grayed out (so you know you can’t affect them). This is particularly useful for making visual changes that will affect your overall layout. In Figure 10.9, a symbol named person1 is in Edit in Place mode, and the trees are in the background (slightly grayed out).
You can also double-click the icon for the symbol you want to edit, in the library. This takes you into Edit mode. This mode gives no reference to the stage and is the mode you see when you create a new, blank symbol.
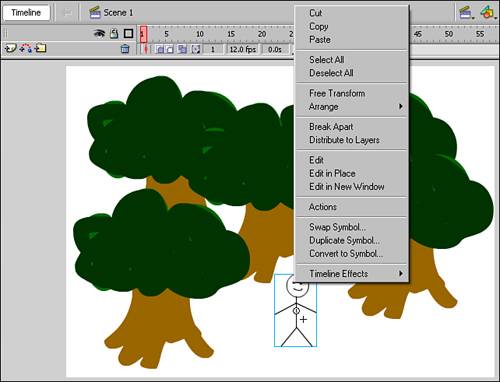
Finally, you can use the contextual menu. (Ctrl-click) [right-click] to select Edit (no reference to stage), Edit in Place or Edit in New Window (see Figure 10.10).
When you are in an editing mode, you can make changes just as you would if the visual elements were shapes on the stage. You can add layers and elements, as you wish, always remembering that you are changing the visuals for every instance of this symbol on the stage at once. You are editing the master symbol.
To exit any editing mode you can use the keyboard command (Cmd-E) [Ctrl+E] or click the Scene 1 link or Back button above the timeline (see Figure 10.11). From the Edit in Place mode you can also double-click on any blank area on the screen to return to the main timeline.
Note
It’s easy to forget that you’re editing in a symbol timeline rather than working on the main timeline. The only way you know for sure is to look at the icons above the timeline. Be sure to return to the main timeline as soon as you’re finished editing. It might be a good habit to get into to lock layers as you finish with them so you are forced to really look at the top of the document and see where you are when you want to make changes.
Master symbols are the stored templates in the library. The copies of the symbol out on the stage are the instances. You know that symbol instances are crucial for keeping file size down. This next section covers the specifics of how to work with instances on the stage.
For the most part, you work with symbol instances just as you do any other visual element on the stage. You can change their x and y locations by typing them in the Property inspector or by dragging them around the stage. All symbols are aligned to x and y on the main timeline by their upper-left corner, regardless of where the registration point is set inside the symbol. You can copy and paste them across layers, duplicate them, and if there is more than one symbol in a layer then you can even arrange them so that they fall in front of or behind the other instances on the same layer (Modify, Arrange). The true power of instances comes into play when you start changing some of their surface qualities (their properties) to make each instance somewhat unique.
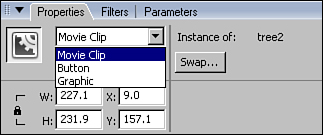
You can change the behavior of individual instances, such as a movie clip to a button or a graphic to a movie clip, essentially changing the type of symbol it is. To change the type of symbol of a single instance, first select it. In the Property inspector, pull down the menu that shows the current symbol type of your instance (see Figure 10.12). Changing the type makes the instance behave according to the rules already established in the earlier sections. Button symbols enable the user to click and have a four-frame timeline. Movie clips have independent timelines and can contain buttons, actions, and complete interactive timelines of their own. Graphic symbols are slaved to the timeline and have behaviors such as loop and single frame that are helpful in animation.
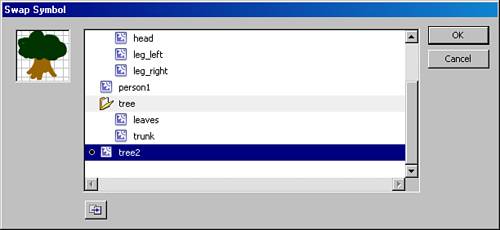
Another helpful way to change your symbol instance as you work is to swap the master symbol link for any instance with a different master symbol. Imagine you discover that instead of a blue flower in an animation, what you really need is that red flower you created a couple of hours ago. So you select the symbol instance of the blue flower, choose the Swap button in the Property inspector, and then select the red flower master symbol in the Swap Symbol dialog box (see Figure 10.13). Press the OK button and your symbol is now changed to the new symbol, retaining all the changes you made to your old instance but using another master symbol.
Although you can’t break the association with the visuals that live inside of the master symbol, you can make some physical changes to the instance on the stage by scaling, skewing, and rotating the instance without affecting the master symbol. This is when symbols really become useful as you create illustrations and animations that reuse symbols over and over, with slight variations to each instance.
For example, imagine you created a tree. You made the tree a symbol and then duplicated the instance on the stage. Now you can arrange those instances in front or in back of each other by using Modify, Arrange, Bring Forward, or Send Back. You can move one tree to the other side of the stage and choose Modify, Transform, Flip Horizontal and have it look like a very different tree. You can select the Free Transform tool and rotate the tree slightly or squash it down so that it can be used as a bush (see Figure 10.14).
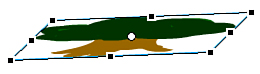
Figure 10.14. Using the Free-Transform tool to squash an instance of a tree symbol so that it looks like a bush.
Beyond those transformations you can also affect the overall color of the instance by applying a color effect to an individual instance. Select the instance and choose Brightness, Tint, Alpha, or Advanced from the Color menu in the Property inspector. Brightness gives a highlight or shadow affect. With Tint you can apply an overall color to the instance by choosing from the color picker and then changing how much it affects the color with a percentage slider. The Alpha effect enables you to change the transparency of the instance (see Figure 10.15). Be aware that this can be processor intensive if applied to many instances. And finally, the Advanced option enables you to work with individual color sliders to produce more complex color transformations.
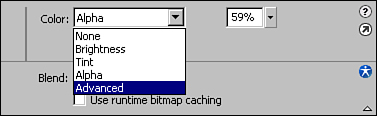
Figure 10.15. Using the Color menu to set the Alpha value and change the transparency of an instance.
Finally, with movie clip symbols you can apply a new effect called a blend. Blend modes enable your instance to interact with other elements on the stage in varying ways. For instance, if you select one instance that lies on top of another instance and choose Multiply from the Blend menu in the Property inspector, you can see both shapes with the overlap multiplying the combined colors and transparencies. Figure 10.16 shows the Invert Blend mode applied to a movie clip symbol.
One of the big concerns in Flash when using Blend effects is that, as with Alpha effects, using too many of them can slow down playback of your movie because of how long it takes to redraw each frame. One of the ways that Flash 8 helps with this issue is by enabling you to select Use Runtime Bitmap Caching (below the Blend menu in the Property inspector). This uses a sophisticated method of converting the vector graphics in your movie clip into a bitmap at run-time. It also eliminates the need for the Flash player to repeatedly convert vector descriptions of the shapes in the movie clip before redrawing them in a new position on the screen. An entire processing step is eliminated. This is particularly helpful for large and complex static vector illustrations that might slow down your animation. Make them into a single movie clip and turn on Use Cache As Bitmap. This improves the performance of the entire movie.
To remove any of these transformations and return to your symbol as it was originally, you can always select the instance and choose Modify, Transform, Remove Transform. This snaps the shape and alignment to their original specifications. This does not, however, remove any effects that you added. You must do this manually by setting each menu to None in the Property inspector.
Sometimes, as you work with instances, you might want to break your association with a master symbol and manipulate the shape directly. To do so you can simply choose Modify, Break Apart or press (Cmd-B) [Ctrl+B]. This breaks the link with the symbol and returns the internal contents to the stage as they were when you created them. You can then manipulate them as usual and reconvert them into another symbol if you wish.
Chapter 8, “Introducing Flash 8,” introduced the idea of the timeline in Flash being an amazing storage tool for information about changes over time (frames) and the visuals that appear at a particular time on the timeline (keyframes stacked in layers). Recall that a keyframe is a storage location on the timeline, telling the playback head what content to play when it reaches that frame. A keyframe is always a point on a layer where something changes. Frames just add time for a keyframe’s content to be displayed. A blank keyframe, following a frame with content, is used to indicate where something disappears from a layer.
Note
When you begin to copy and paste blocks of animation, it is helpful to have every layer in the animation be the same length. This means that all layers in your animation have the same total number of frames, even if they need to use a blank keyframe to have the content disappear before the end of the animation. This way when you copy and paste you’re sure that all the content comes across without strange keyframes being added and breaking your previous arrangement.
Now you can put all that knowledge to work as you read about animation in Flash. Much of the terminology of animation has come from the original hand-drawn animation techniques. You’ll see that many computer techniques borrow heavily from those early methods of creating the visual illusion of movement over time on a two-dimensional surface.
There are four types of animation in Flash: Static, Keyframe-by-Keyframe, Motion Tweening, and Shape Tweening. When you know how each functions you can start planning your own animations and choose the method that enables you to keep your file size small and reduce the amount of work you have to do.
Much of your content in an animation simply stands still. It’s basically a backdrop to the action. To achieve this on the timeline you need a filled keyframe where the content appears and then frames to the end of the animation, which you place by selecting the final frame and choosing Insert, Frame (F5). If you want the static content on a layer to disappear, choose Insert, Blank Keyframe (F7) in the correct frame of that layer. Do not place a keyframe at the end of the layer. Add a keyframe to a layer only when something changes on that layer because each keyframe adds to file size.
Keyframe animation exactly replicates, in the computer, the methods that early animators used to combine static backgrounds with moving elements to create the illusion of movement over time. In the hand-drawn process, each cell of drawn animation is photographed and then strung together to form the full animation. In Flash each keyframe of content is created and then played by the playback head.
The process is very simple. Draw a shape on the stage. This gives you your first filled keyframe on the layer. Select a frame farther down the timeline and choose Insert, Keyframe (F6). This makes an exact copy of the preceding keyframe. After you make sure the playback head is over the new keyframe, you can make changes to the content on the stage by moving the shape or deforming it in some way. Any time you want to give a keyframe on a layer more time to play you add more frames before the next keyframe on the layer.
The real skill to develop with keyframe-by-keyframe animations involves keeping the file size small. Use symbols for the content in each keyframe whenever possible, and put content that changes independently on different layers.
For instance, in an animation of a face while talking, perhaps only the mouth and eyes change and the rest of the facial features stay still. The eyes may move independently of the mouth. So you would put the content for the eyes on one layer, the mouth on another, and the face (particularly if it’s static) on a third layer. This allows you to animate each facial feature independently, with changes occurring more frequently on some layers than on others.
Keyframe animation is typically used for changes that need to move organically, such as smoke or a flower growing. It can also be used for fine control over what changes in every keyframe of your animation. Be aware that this takes more time than some of your other options and so may not always be the most efficient choice.
With motion tweening, you can have Flash create all the changes in the frames between two keyframes, each of which contains a single symbol instance. We can think of a motion tween as autoanimation for instances.
Note
The word tween comes from the traditional animation term in-between. In traditional animation a key animator is responsible for drawing each keyframe or major moment in the animation sequence. Then, in-betweeners (this is actually the name of the job) go in and create all the frames between those major keyframes. Flash uses exactly the same logic.
So, what is it that you can change about the symbol instance between one keyframe and the next? You can change the position, rotation, skew, scale, and color effect of the instance on stage for each keyframe. The difference between the symbol instances in each keyframe is what Flash is tweening for you. You can even make all these changes (transformations) at one time, although this may slow down the redraw if you have all those things happening on multiple layers at the same time.
The number of frames between the first keyframe and the second tells Flash how many steps to take for each change. If you have 20 frames, there will be 20 intermediate steps from one instance appearance to the other. To speed up or slow down the transition, remove or add frames.
Always be sure to use a single instance in each keyframe of your motion tween. This includes text fields, bitmaps, groups, shapes, and multiple objects that you want to motion tween together on the same layer. Simply select them and choose Insert, Convert to Symbol (F8). If you attempt to make a motion tween without first creating a single symbol instance, Flash silently “helps” you by automatically creating a symbol in your library. Any time you see Tween 1, Tween 2, and so on in your library, it means that you forgot to make a symbol before you created your tween. I usually rename the symbol immediately or swap it for another one.
To prepare your motion tween, begin with a single instance on a layer. Place the symbol instance on the stage, where you would like it to begin, and make any transformations needed. Then move down the timeline, select a frame where you would like the tween to end, and choose Insert, Keyframe (F6). This makes an exact duplicate of your symbol instance. Go onto the stage and make your changes to the instance’s position, transformation, or effect.
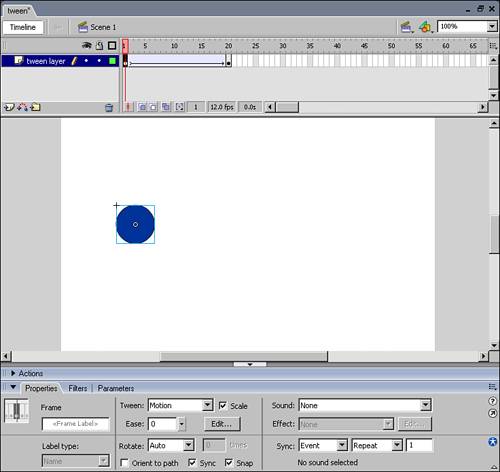
Now you are ready to create the motion tween. Select the first keyframe and then choose Motion from the Tween menu of the Property inspector. Alternatively, you can (Ctrl-click) [right-click] on the first keyframe. This brings up a contextual menu from which you can choose Create Motion Tween. The keyframe and frames between the two keyframes in your motion tween now turn blue and have an arrow between them, indicating the motion tween has been created (see Figure 10.17). Try pulling the playback head back and forth to see the animation you’ve created.
To gain more control over the changes, add additional keyframes into the middle of the tween. This gives you more instances to modify for position or transformations.
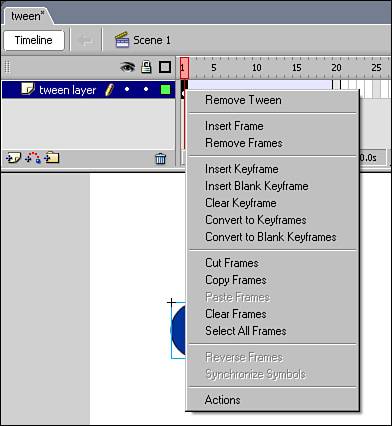
To remove a motion tween, either select the first keyframe and choose None from the Tween menu in the Property inspector, or use the frame’s contextual menu and choose Remove Tween (see Figure 10.18).
In Flash 8, you have more control over a feature of motion tweening called easing. The easing setting indicates to Flash how fast the changes between keyframes should occur, and whether to weight the changes to earlier in the cycle or later. Easing is one of the techniques used to create a feeling of motion or gravity as your objects move through your scene. The interface for setting easing is just below the Tween options in the Property inspector.
To ease in, starting slowly and speeding up toward the end, you would select the first keyframe in our tween and in the Property inspector choose a number from the slider below 0. To ease out, starting faster and slowing down as you approach the next keyframe, you would choose a positive number.
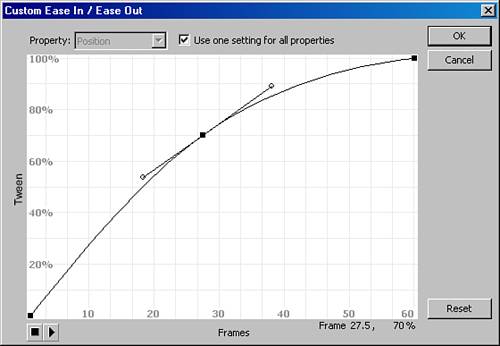
You can also gain more control by setting up a custom easing pattern. Select the first keyframe in your motion tween and choose the Edit button to the right of the Ease slider in the Property inspector. What appears in the Custom Ease In/Ease Out dialog box, shown in Figure 10.19, is a grid with a rubber band element. Click anywhere on the line to add a point and move it so it is positive or negative to speed or slow the transition at that point in the animation. Use the curve handles to change how the speed changes are distributed. Being able to ease in and out of the same motion tween is a very powerful addition to your animation toolbox.
If you’d like to gain even more control, try deselecting the Use One Setting for All Properties check box at the top of the dialog box. Then you have a different graph for position, rotation, scale, color, and filters (if you have a movie clip instance). You can make some stunning effects with these new features.
Now that you’ve created some linear changes to the positions of your instances, perhaps you’d like to be able to create a more organic path for them to follow. For instance, you might want to create a bumblebee and make it meander up and down and around as it crosses the stage.
To create a motion guide, follow these steps:
Create a motion tween with an instance starting in one position and ending in another.
After you have the motion tween created, create a new layer above it.
Double-click the icon to the left of the layer’s name and choose the Guide option. Rename the layer “motion guide.”
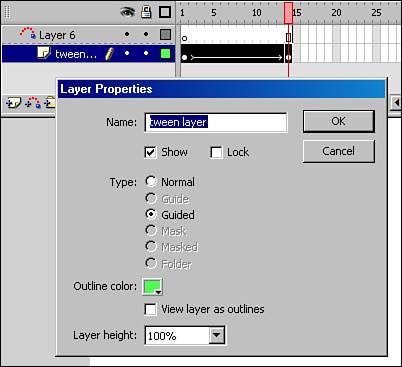
In the layer you first created, with the motion tween, double-click the icon to the left of its name. Choose the Guided radio button (see Figure 10.20). Press OK and you can see the icons change so that now the guide layer is linked to your motion tween layer.
Select the motion guide layer so it is active. This is crucial because if you draw on your motion guide layer the effect doesn’t work.
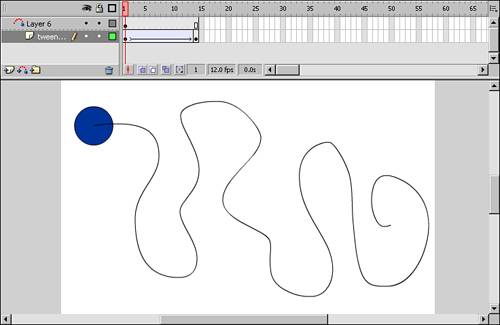
Choose the Pencil tool, setting the options to Smooth in the lower toolbar, and then draw a path with loops and ups and downs (see Figure 10.21). If you don’t like it, use Edit, Undo and redraw the path. The only rule is to have a single continuous path.
Now you just need to attach each instance in your motion tween to the path. Select the first keyframe in the motion guide layer and then click and drag your object by the transformation circle so that it snaps to the point on the line you want the object to start moving along the path. You can tell when it snaps because the circle indicator becomes larger. To edit the location of the transformation point of your instance, choose the Free Transform tool (Q) and move the circle. Return to the Move tool (V) and then resnap your instance to the path.
Select the second keyframe and drag the second instance to snap into the end point of your drawn path.
Try dragging your playback head back and forth to see how the instance now follows the path.
You can attach other objects to the same path by making a motion tween, placing them below the motion guide layer, and changing their layer property to Guided. Then snap the objects to the guide as you did with the first.
Shape tweening uses the same principle of filling in the in-between frames as motion tweening does. However, it works only with shapes. This means that the content of each keyframe in your motion tween needs to contain only shapes. If you have a piece of text, a bitmap, a group, or a symbol in a keyframe, you cannot use this type of tweening unless you first use the Modify, Break Apart command to break those groupings back into shapes on the stage.
Begin by creating or placing a shape in your first keyframe on your layer:
For this example, break apart a static text field with the text “Flash” in it. This makes it into a shape.
Insert a blank keyframe down the timeline.
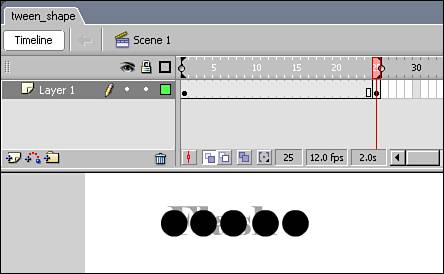
Turn on onion skinning (first blue button below the timeline) and set the framing so you can see the text shapes.
On the last frame of the tween, draw five circles that are approximately the same size as the text (see Figure 10.22).
Select the first keyframe, and in the Property inspector Tween menu, choose Shape.
Now move the playback head back and forth to see the changes.
Be aware that if the vector shapes you transform are very complex, it can slow down the playback. Shape tweening of very complex shapes requires a lot of calculations.
To place an animation inside a symbol nesting the animation, enter the editing mode for the master symbol and create your animation as you would on the main timeline. You can use layers, frames, and keyframes just as you learned previously.
Any time you want to have multiple types of animations happening at the same time, put some of the animation into a symbol and then use it. For instance, if you created a person walking with a keyframe-by-keyframe animation and then wanted to have that figure follow a motion guide path, you couldn’t do it on the main timeline. You could put a walking animation inside a symbol, though, and then motion tween that animated symbol and then add a motion guide for that symbol. The same thing applies to animations that you would like to mask. Put the animation inside a symbol and then mask the playback of the symbol on the main timeline. You’d be amazed at how this enables you to create incredibly complex visual combinations.
Most animations that are stored inside a symbol need to be used in as many ways as possible to be efficient. To change the playback behavior of an animated graphic symbol, place the symbol instance on the stage and then give the keyframe that references the instance some frames to play on the timeline. With the instance selected, look at the Property inspector where you’ll notice the menu that currently holds the Loop selection. This is the menu that controls the playback options for your graphic instance. Here you can set the graphic to play a single frame of the animation, play once, or loop continuously as long as it has frames on the timeline. This is extremely useful if you’re using animated graphics for sync with sound or other timed animations where certain parts of the sequence need to freeze occasionally.
Usually you put animations into a movie clip and use them in your animations if you want them to loop independently of what is happening on the main timeline. This is helpful any time you have simultaneous movements. For instance, if you have a car driving from right to left on screen, you want the wheels to keep turning the entire time the car is driving. Stars that need to twinkle even when the main timeline is stopped is another good example.
Timeline effects are automated versions of some of the animation types created manually in the previous sections. You might wonder why they weren’t discussed first. Now, though, you can appreciate what they do because you understand the mechanics behind them. You are also more likely to understand that with timeline effects, you are sacrificing customization and increasing file size for ease of creation.
A timeline effect can be applied to any piece of text, graphic symbols, groups, and even shapes. Select the object to which you would like to apply the effect and choose Modify, Timeline Effect. Most of the time you will want to use animation effects such as Transform (position, rotation, scale, and color effect changes) or Transition (fading up and/or wiping the object selected), Blur, Expand, Drop Shadow, or Explode. Many of these effects are made to be used specifically with a text field, but can make interesting effects when applied to other objects.
When the timeline effect is applied to the object, a new layer is created with a newly created symbol on it and the specified number of frames in the layer. In the library there is a new folder called the Effects folder that contains your new symbol with all the applied effects built in. Then, follow these steps:
Create text on a new layer.
Select the text and use the contextual menu or choose Insert, Timeline Effects, Transform/Transition, Transition from the top menu bar.
In the Transition dialog box remove the Wipe feature by deselecting the checkbox and choose the Direction as Out.
Then press the Update Preview button to see the effect and press OK to create the effect.
You can now see that when you move the playback head, the effect has been created. To remove the transition or edit it, choose Modify, Timeline Effects, Edit Effect or Remove Effect. The contextual menu provides a nice shortcut if you (Ctrl-click) [right-click] on the object and choose Timeline Effect, Edit Effect or Remove Effect from the menu.
There are a few limitations as you begin playing with these effects: First, you can only apply one effect to any object. You also cannot simply pull the symbol with the effect attached from the library to create a new object. In addition, you need to remember the settings from one transition to the next. Because of these limitations, timeline effects are most useful for creating on-the-fly presentations and slide transitions, but not for production work.
I created a symbol but when I look at it in the library there isn’t anything in it. What happened to my symbol?
There could be one of two issues. First, check to make sure that the object inside the symbol isn’t the same color as the background. You can do this by changing the background color of the movie, which automatically changes the color behind the symbols in your Library panel, or by double-clicking the symbol and then choosing Edit, Select All to see whether there is any content in the symbol.
If there really isn’t any content, it’s likely you simply didn’t have anything selected on the stage when you chose Convert to Symbol. Delete the symbol from the library and try the process again.
I keep getting symbols in my library named things like Tween 1, Tween 2, and so on. What are those and why do they appear?
These are symbols that Flash is creating to “help” you create a motion tween. Remember, the rule is that you have to create a single symbol for each layer on which you have a motion tween. If you forget or have multiple objects, Flash begins to create these automatic symbols in the library.
Be sure you create a symbol first when you use motion tweening. If you’ve forgotten, simply rename the symbol in the library so you know what it is for future use. Or if you already had a symbol made, but just forgot to use it, try selecting each instance in the tween and using the Swap button to reassign the master symbol. Then you can delete the Tween 1 reference from the library.
One of the most powerful ways to be efficient when creating animations and layout schemes for your Flash projects is to storyboard. Although it takes some time to actually sit down and do your planning, it saves enormous amounts of time later because you can simply go in and produce or experiment in certain directions based on those plans.
An animation storyboard does not need to be complex. Sit down and on a pad of paper write out in simple sentences what you would like to have happen.
The sun rises over the hill.
The barn door opens.
The pig walks out.
Now draw three rectangles and give some visual indication of where you would like everything to be placed on the stage. This can be as simple as circles and squares if you can’t draw very well. Then write the line beside it and show how you want things to move or a particular point where things change. One might show the sun low with an arrow indicating where it should come up. In another the barn door opens. In a third the pig is halfway out the door, with an arrow indicating where he will walk.
Now you can hand that off to someone else to produce, or produce it yourself. If you are creating it yourself, you can begin to write what animation types you need to accomplish those tasks and what symbols you need. For example, you would know that you could use a motion tween for the sun, so the sun needs to be a symbol on its own layer. The barn door should be its own symbol, and you would likely need to create a keyframe animation to give it the feel of a door opening. This might mean that you need three or four door symbols at different stages.
At this point, you’re ready to start collecting and creating your visual assets, and composing the movie and its layers.