
CHAPTER 15 Filling Objects
Ashape without a fill on your drawing page is like a brand-new coloring book. To make a coloring book—and your CorelDRAW artwork—more visually meaningful, you need to fill your shapes with colors and textures. CorelDRAW has more than a half-dozen different types of fill you can apply to your shapes, and these types have hundreds of variations. In computer graphics, you have over 16 million solid shades of color at your disposal; imagine what you can do with blends of colors, colors in different patterns, and colored textures! The worst part of filling CorelDRAW objects will be deciding on a style of fill. The best part, as you explore filling shapes in this chapter, is that it’s very difficult to color outside of the lines.
NOTE
Download and extract all the files from the Chapter15.zip archive to follow the tutorials in this chapter.
Examining the Fill Types
Each type of CorelDRAW fill has its own special characteristics:
• Uniform fills apply flat, solid color.
• Fountain fills make a color transition from one color to another, in different directions—sometimes also called a gradient fill. You can also create a fountain fill composed of more than two different colors. CorelDRAW ships with a lot of preset fills that this chapter demonstrates how to pick and apply.
• PostScript fills are good for repeating patterns. Although PostScript is a printing technology, you don’t need to print a CorelDRAW document to see a PostScript fill, and you can indeed export a PostScript filled object to bitmap format, and the fill will look fine. PostScript fills support transparency and are ideal for exporting to EPS file format to use in desktop publishing programs. And, naturally, a PostScript fill is valid for printing to a PostScript printer.
• Pattern and texture fills can fill shapes with bitmaps, including photographs, and a large supply of preset bitmaps is included with CorelDRAW.
• Mesh fills take multicolored fills and present you with the option of “smearing” colors within the fill, much like finger-painting.
Every fill type is applied in a slightly different way through the use of onscreen tools, docker windows, or the Interactive fill and Mesh fill tools (see Figure 15-1).
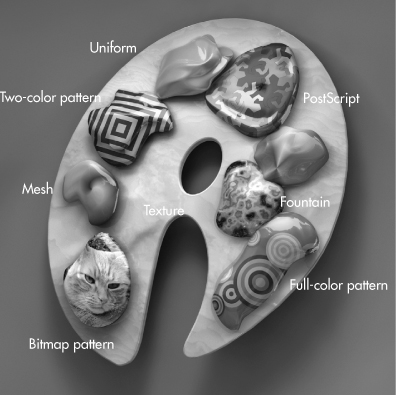
FIGURE 15-1 Fill your shapes in a composition with exactly the fill type that draws attention to your design work.
Using the Color Palette
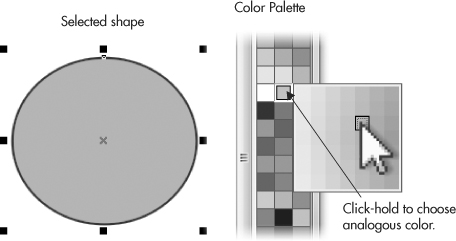
With color selection, the Color Palette is an excellent starting point, and to apply a uniform (solid) fill to a selected object, you just select an object with the Pick tool and then left-click a color on the Color Palette. You can also drag a well (a color swatch) from the Color Palette, drop it onto a shape (which does not have to be selected), and the object is filled.
Perhaps one of the most interesting features in CorelDRAW is selecting not only a color from the Color Palette, but also a shade or a tone of that color—in color theory terms, these are called analogous colors. To pick a shade of a color on the Color Palette, you first select the object you want to fill, click-hold on a well color, and a small pop-up menu of shades and tones of that color appears. While holding the mouse button, drag to the exact shade you want, release the mouse button, and the object is filled. This pop-up menu features shades that vary in hue from top to bottom, and in brightness as you drag your cursor from left to right. It’s like having 49 possible colors at your cursor tip when you choose one color.
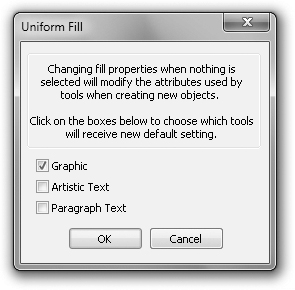
Uniform fills can also be assigned to all objects right from the get-go. With no objects selected in the drawing window, left-click a color you want to use for all objects, artistic text, and/or paragraph text from now on. CorelDRAW then displays a dialog, shown next, that asks what sort of object you want filled when it’s created from now on. You can cancel out of this operation, but you can choose objects, text, or both.
TIP
If you need to set the default fill for all documents you create in the future, go to Options | Document, where you can check Save Options As Defaults For New Documents, and then check Styles, which applies the fill you’ve chosen to Default Graphic (the properties for all new objects).
From Uniform to Non-Uniform Object Filling
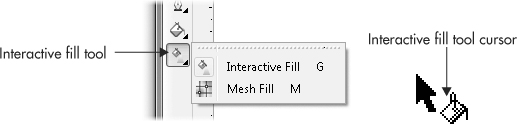
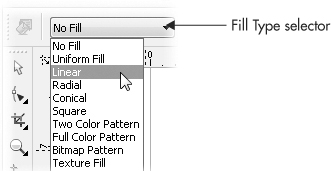
The quick way of applying any of the fill types is by using the Interactive fill tool, shown here. You’ll find it at the bottom of the toolbox; to quickly select it, press G. You’ll see a hint here that the Interactive fill tool is also a selection tool—the cursor is an arrow cursor with a paint bucket. You don’t need to have the object that you want to fill selected when you use this tool. You can click an unselected shape with the Interactive fill tool; it becomes selected, and then a second click-drag on the object by default applies the linear style fountain fill, making a transition from black to white. You can then change the colors used, or choose a different fill type from the property bar by clicking the Fill Selector drop-down list.
While you’re using the Interactive fill tool, the property bar displays fill options that change depending on the type of fill you choose from the selector. If your selected object features no fill color at all, the selector displays the type as No Fill, and the property bar displays no options. The selector, shown next, is where you can choose from any of ten fill types: Uniform Fill, four fountain fill types (Linear, Radial, Conical, and Square), two Color Pattern fill types (Two Color and Full Color), Bitmap Pattern, Texture Fill, and PostScript Fill. In this section, you’ll learn to control every fill type using property bar options and the control handles on the Interactive fill tool.
The technique you use to set angle and position (among other properties) of fills varies a little from fill type to fill type, so let’s run through the basics for a moment.
 Filling an Object, Setting Fill Properties
1. Select the object to fill, and then choose the Interactive fill tool (G) from the toolbox.
2. If your object already has a fill (excluding a shade of a color well on the Color Palette), the property bar automatically displays the fill type and the current properties of that specific fill.
3. Use the Fill Type selector to choose a fill type. As you do this, the object is filled with the selected style, and the property bar shows options for this style, which is applied with default color, direction, pattern type, and so on. Your object will also display control handles for the direct manipulation of the current fill type.
4. Use the property bar to define properties of your fill, which are instantly updated in the object in the drawing window.
The following section covers the property bar options specific to the fill type when the Interactive fill tool is selected.
Uniform Color Fill Options on the Property Bar
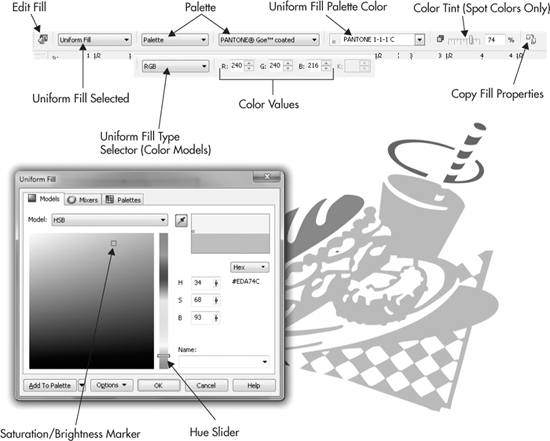
Uniform fills are like the paint chips at the hardware store; it’s a solid color, no variations, and a uniform fill floods an object within the boundaries of its outline with the color you choose. The Color Palette is a fast, easy way to assign a uniform color; however, when you choose the Interactive fill tool, you have several different color models from which to choose. See Chapter 17 for details on color theory—if you’re already familiar with the CMYK printing color model, the intuitive HSB color model, and others, you’ll feel right at home using the property bar to mix up color values (and better still, entering values a client might have telephoned to you for that big advertising job).
The following illustration shows the color models you can use the Interactive fill tool to choose when Uniform Fill is selected from the property bar Fill Type selector. Most of us prefer to visually mix up a color. So while the property bar displays fill options, click the Edit Fill button at the far left; this displays a palette in which you drag a marker and move sliders to specify the color you need, and then click OK to define it.
TIP
HSB and RGB color models occupy the same color space, the extent to which a color can be expressed onscreen. Therefore, you can arrive at an identical color using either color mode. This means you can switch color models for a filled object, and between RGB and HSB there will be no real color change.
Applying a Fountain Fill
Fountain fills can fill objects with a smooth transition between two (or more) colors, and they come in various styles. Many commercial pieces of artwork are created today that imitate the traditional airbrush (popular in the mid–20th century) by using fountain fills. You can apply a fountain fill in different ways, and the following tutorial shows you the quickest, most artistically satisfying way.
Creating Fountain-Filled Objects
1. Select an object and then choose the Interactive fill tool (G) from the toolbox.
2. Click-drag, beginning at one side of your object and dragging to the opposite side at any angle; try dragging from 10 o’clock to 4 o’clock, for example. A default linear fountain fill is created using the object’s current fill color, making a color transition from the defined color to white, indicated by settings in the property bar. If your object has no fill, a default black-to-white fountain fill is created.
3. For a different fountain fill type, choose Radial, Conical, or Square from the Fill Type selector. As you do this, the shape of your fountain fill (and the available property bar options) changes.
4. Experiment with changing the appearance of the fill by dragging to move the color markers and midpoint slider control. Notice how the position changes affect your fill. The midpoint slider is used to influence the point at which the From color and the To color in the fountain fill are exactly a 50/50 mix of the colors. So if, for example, you want to create a shaded sphere, you begin with an ellipse object, fountain fill it with the radial fill type, and then move the midpoint closer to the white marker than to the black to make a small, subtle, sharp highlight on the object: bingo, you have yourself a dimensional sphere!
Using these steps, your click-drag action specifies several properties. The first click sets the From color position, and the drag direction defines the angle. The length of the drag defines the distance, and the mouse release defines the To color position. A series of interactive markers shows the position of each of these values. It’s important to understanding how fountain fills are applied; other fountain fill operations are variations on this theme. The following sections examine each fountain fill type in detail (see Figure 15-2).
• Linear This is the default fountain fill style and is most useful for shading rectangular shapes to suggest lighting on a dimensional plane or 3D object. The color marker positions mainly control its appearance.
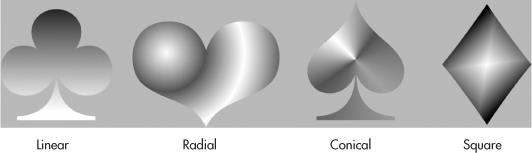
FIGURE 15-2 A different fountain fill type can bring out the dimensional qualities of almost any shape.
• Radial This type makes a color transition outward in a circular style, terrific for shading round objects and objects you’d like to soften in appearance. During use of radial fountain fills, the center offset controls where the fill begins.
• Conical This might not be a fill type you use every day, but if you need to simulate the look of the playing side of a DVD or an aerial view of a grain silo, Conical produces a strongly shaded and unique transition between two or more colors. The From color of a conical fill is the beginning and the end of the conical fill, and the To color shades all the in-between blend steps. The center control handle can be used to increase the contrast of the effect by dragging it toward the From color marker along the dotted-line arc of the control handles; dragging the center toward the To marker creates less contrast and a milder effect.
• Square This style produces a look like a four-pointed starburst. The center marker controls contrast; the To marker sets distance and direction for the fill.
Chapter 22 documents object transparency types. Here’s advance notice if you haven’t read this chapter yet: Fountain fill styles are also transparency styles—all four types of fountain fills can make a transition between opaque and transparent. You therefore can build an elegantly shaded object by, for example, applying a radial fountain fill to an object and then giving it a linear transparency property.
Controlling Fountain Fills Interactively
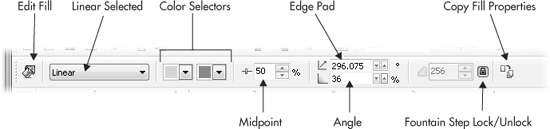
The interactive fountain fill markers (hovering on top of an object you’ve drawn), combined with the property bar, give you control over the look of your fill. Among these, you’ll see color selectors, a Midpoint option, Angle and Edge Pad options, and a Fountain Step Lock/Unlock option, shown here:
Many of these fountain fill property bar options correspond to interactive markers surrounding your object, but the marker positions can be changed to produce different looks, according to the type of fountain fill. Although the property bar offers precision, dragging the markers is extremely intuitive and often is a preferred method to make a custom fill. In Figure 15-3 you can see the different interactive marker positions that appear around each fountain fill type.
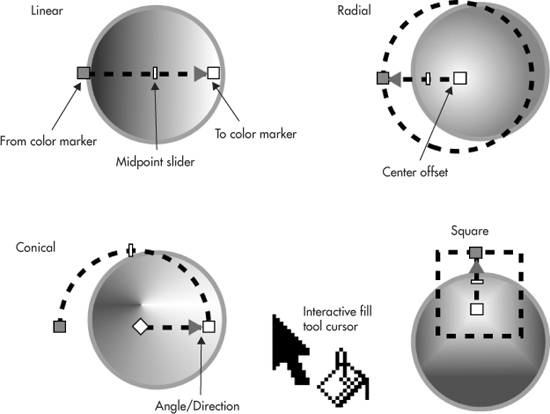
FIGURE 15-3 Interactive markers surround each fountain fill type while you’re using the Interactive fill tool.
Moving any of the markers will change the fill appearance in different ways. The following explains the purpose of options you’ll see in the property bar while dragging interactive markers and what the effect is on the fill:
• Color Markers Use these to set the position and colors in your fountain fill. Each fountain fill type has to have at least two colors. To change a color, click to select it and click a color well in your onscreen palette, or drag a color well directly onto a color marker. To move a marker, click-drag it in any direction, which changes the properties of the filled object, usually relocating the center of the fountain fill.
• Midpoint This slider control is available only while a two-color fountain fill is applied; if you use more than two colors for the fill, the midpoint marker goes away. The midpoint marker is used to set the point at which the From and To colors are equal in value. This value is measured in terms of percentage—by default, it’s 50 percent.
• Angle The Angle value applies to linear fountain fills and is set in degree values between 360 and –360 (a negative value). Positive angles rotate the fill counterclockwise, while negative values rotate the fill clockwise.
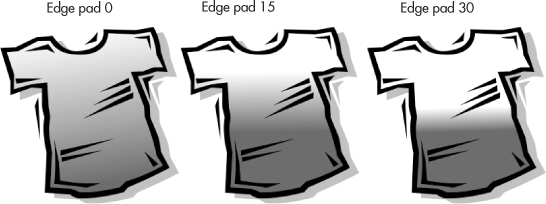
• Edge Pad This option sets the amount of contrast between the To and From colors, expressed as a percentage. The default setting, 0, creates smooth, even blends at the slowest possible rate. Increasing this setting causes colors to change more abruptly, as shown next. Edge Pad can be set within a range of 0 to 49 percent, and this can also be adjusted in Object Properties (ALT+ENTER) and in the Fountain Fill dialog (F11). Moving the color markers of a linear fill away from or toward your object’s outline increases or decreases this value; try dragging the To and From color markers to positions outside of the object, for example, to decrease the edge pad effect.
• Center Offsets Radial, conical, or square fountain fills feature this marker; you change the center position of the fill relative to your object’s center by dragging the marker. Dragging the center marker of a radial, conical, or square fill away from or toward your object’s center also increases or decreases the edge pad value.
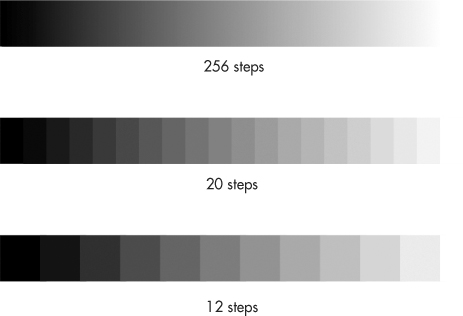
• Steps This setting affects both the display and printing of fountain fills. A fountain fill is actually calculated by blending neighboring bands of color in succession, but you don’t see this banding effect because so many shades of intermediate colors are used between the To and From color. The Fountain Steps option is fixed at the maximum setting of 256 by default, but can be increased to a maximum of 999. However, you might be looking for a banding effect, to create shirt stripes or other geometric patterns. To lower this setting, click to unlock the Lock button. Lowered step values cause the color gradation in your fill to become unsmooth, as shown next. While 256 steps is set and locked, fountain fills will display and print using the maximum capabilities of your monitor and printer resolution.
Using Custom Fountain Fills
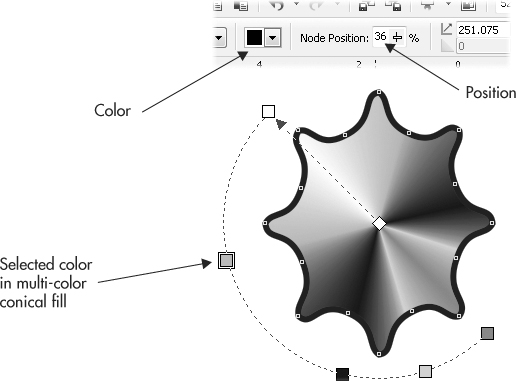
A default fountain fill features two colors, but you can add colors to make any type of fountain fill into your own version. When you make multi-colored fountain fills, the appearance of your artwork can change dramatically. The position of added colors is shown by node positions on the dashed line guide joining the two default colors. After you’ve added color markers and clicked them to select them on the object, the property bar will display their position and color, as shown here:
You can add, move, and delete fountain fill colors you’ve added to a default fountain fill type in several ways, but you must have both the object and the Interactive fill tool selected, or you’ll wind up editing the object and not the fill. To explore doing this, follow the steps in this tutorial.
Editing a Fountain Fill In-Place
1. Select the object to be filled, choose the Interactive fill tool (G), and then apply a fountain fill by choosing Linear, Radial, Conical, or Square from the property bar Fill Type selector.
2. With a default fill applied, double-click a point on the guide between the two existing color markers where you want to add a color marker. Doing this adds a color that is based on an average of two existing marker colors, so your custom fountain fill probably looks the same as the default fill.
3. Decide on a new intermediate color (choose one in this example on the Color Palette), and drag a color from the color well (drag the swatch) onto your new marker. You have a three-color gradient now.
4. Try a different technique to add a color marker position and a color at the same time: drag a Color Palette well directly onto the same fountain fill guide, but at a different location.
5. To reposition an added color, click-drag it along the guide path. As you do this, the color’s node position changes, as indicated by the Node Position value on the property bar.
6. To change any fountain fill color, click to select it, and choose a color from the property bar selector, or click a color well on the Color Palette.
7. To delete an added color, right-click or double-click it on the guide. To and From color nodes can’t be deleted, but they can be recolored.
Additionally, color can be added when a color node position is selected, and you choose from the color selector to the right of the Fill Type selector on the property bar.
TIP
You can drag a color marker “through” a neighboring marker to change the order of color nodes along any fountain fill object.
Setting Fountain Fill Dialog Options
The interactive way is great for controlling fountain fills, but if you want deeper and more precise controls, you can use the Fountain Fill dialog, shown in Figure 15-4.
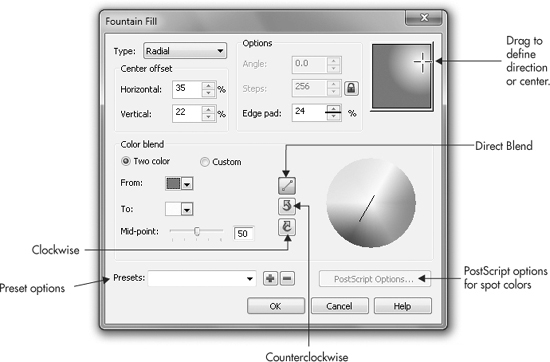
FIGURE 15-4 The Fountain Fill dialog provides some options common to the property bar and others unique to this dialog.
You can open the Fountain Fill dialog while a fountain fill is applied to a selected object and while using the Interactive fill tool by clicking the Edit Fill button in the property bar. Or, with your object selected and while any tool is in use, press F11.
The Fountain Fill dialog options that aren’t available while you’re using the Interactive fill tool property bar are listed and explained here:
• Color Wheel Rotation This option is available only while a two-color blend is selected. You can choose to blend directly from one color to the other (the default), more or less “jumping” the hue cycle the traditional color wheel goes through, or choose Counterclockwise or Clockwise to blend between colors while cycling through a standard color wheel’s colors, traveling around the outside edge of the wheel. This might seem like a trivial option, but CorelDRAW is one of the few design programs that can shortcut through the traditional model of visible colors. For example, in other applications, a fountain fill that goes from red to blue necessarily has to travel through green, somewhat muddying the fountain fill. Not so if you choose Direct Blend here.
• Interactive preview You have some manual control over where you want the center and/or direction of a fill to take place within an object by dragging in the preview window. In Figure 15-4, you can see that the radial fountain fill will be positioned beginning in the upper-right of the filled object because this is where the center has been dragged in the small preview window.
• PostScript Options When a two-color fountain fill is selected with both the From and To colors specified as spot color inks, the PostScript Options button becomes available. PostScript Options offer halftone screens of special fills to certain dot shapes. Possessing PostScript level 3 capabilities, CorelDRAW features an expanded collection of screen styles including CosineDot, Cross, various Diamond styles, various Double and InvertedDoubleDot styles, various Ellipse and InvertedEllipse and other styles, Euclidean, Grid, Rhomboid, Round, Square, and Star shapes. While any of these styles is selected, Frequency and Angle options are available in the PostScript Options dialog, enabling you to override default printing settings for your selected spot color inks. An easy visual indicator that you are using spot colors is the small circle tick inside the chosen color swatch in the Fountain Fill box.
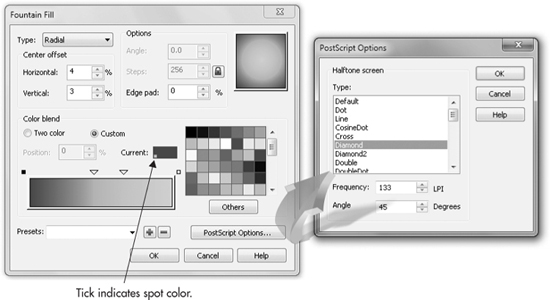
If you’re unfamiliar with spot colors, it’s the printing process used to add a color to packages, for example, that cannot be reproduced using standard press inks, such as that reflective silver logo on a box of cereal. See Chapter 27 for the lowdown on spot versus process colors and for a guide to commercial printing of your CorelDRAW work.
• Presets The Presets drop-down menu includes a variety of sample fountain fill types, colors, and positions. Use them as they are, or edit them to suit a specific need. To select any of these, choose a name from the drop-down list. While you’re browsing the alphabetical list, a preview of the highlighted preset is displayed in the fountain fill preview window in the upper-right corner of the dialog. A preset can contain any of the properties associated with a two-color or custom fountain fill color.
• Add/Delete Presets The two small buttons to the right of the Presets drop-down list can save you hours of custom fountain fill creation time. First, the button labeled with the minus (–) symbol deletes your current selection from the list of preset fountain fills after presenting a confirmation dialog, just to ensure that you don’t delete a factory preset by accident. The button labeled with a plus (+) symbol is for saving the current fountain fill as a preset.
To save your selected fountain fill settings, follow these steps.
Saving Your Own Fill as a Preset
1. With your custom fountain fill colors and options set in the Fountain Fill dialog, enter a name in the Presets box.
2. Click the + button. Your custom fountain fill is immediately saved alphabetically in the list of available presets.
3. Click OK to apply the saved preset and close the dialog.
4. To retrieve and apply your saved preset to fill a selected object, press F11 to open the Fountain Fill dialog, click Custom to view the Presets menu, choose your saved preset from the list, and click OK to close the dialog and apply the saved fountain fill.
Applying Pattern Fills
Pattern fills are rectangular-shaped tiles that repeat vertically and horizontally to fill a closed-path object completely. They come in three different varieties: Two Color, Full Color, and Bitmap, each with its own unique qualities, shown in Figure 15-5.
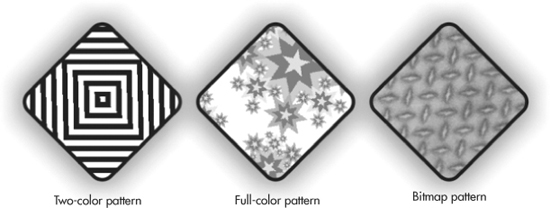
FIGURE 15-5 Pattern fills come in three types.
While a pattern fill is applied, the property bar includes a host of options that can be used to apply dramatic changes to the fill’s appearance, as shown here when the Two Color Pattern fill has been applied to an object, and the object is currently selected:
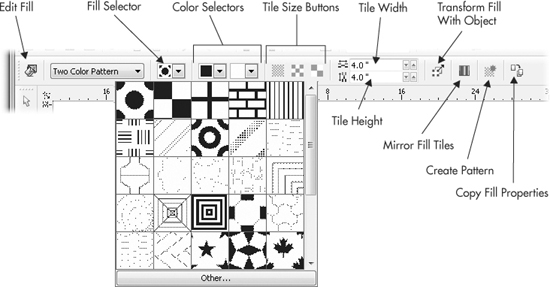
In addition to altering pattern properties, the property bar has features to control the appearance of your pattern in the following ways:
• Fill Selector Use this drop-down box to choose from existing pattern fill libraries.
• Front/Back Color Selectors When a two-color pattern is selected, these two selectors let you set colors other than black and white for a pattern.
• Tile Size Buttons Use these buttons to set your pattern to Small, Medium, or Large preset width and height sizes.
• Tile Width/Height The Width and Height sizes of your selected pattern can be set individually using these two options, each of which can be set between 0.1 and 15 inches.
• Transform Fill With Object When this option is active, transformations applied to your object will also be applied to your fill pattern. This is a useful feature when you need to scale an object larger and don’t want your pattern to “shrink”!
• Mirror Fill Tiles Using this option forces a transformed pattern tile back into a seamless pattern.
Two-color patterns are limited to exactly two colors, with no additional edge colors to create anti-aliasing. This means that the edges of the design can be harsh and somewhat jaggy if you export your work to a screen resolution of 96 dpi. However, if you export, for example, a TIFF copy of your work, the jagged edges you see onscreen will not appear in the exported bitmap image.
Full-color patterns are composed of vector shapes, but the pattern itself already has color applied and cannot be altered. Additionally, these full-color fills cannot be extracted as vector shapes from the pattern. Therefore, when making your own pattern, save a copy of your pattern to CDR file format for editing in the future, and forget about the Break Apart and Convert To Curves commands in an attempt to reduce a full-color pattern to its vector component shapes. Bitmap patterns are carefully edited bitmaps; some of the presets are taken from photos, while others are paintings, and all of them are relatively small in dimensions. The difference between a full-color and a bitmap fill is that the vector-based pattern tiles for the full-color fills can be resized without losing design detail, focus, or introducing noise, but enlarging bitmap pattern tiles carries the same caveat as enlarging any bitmap—the more you enlarge it, the better your chances are that the component pixels will eventually become visible. You can scale bitmaps down, but not up—computers are “smart,” but they can’t create extra visual data from nonexistent data.
Controlling Pattern Fills Interactively
You can edit the look of an applied pattern fill by adjusting the interactive markers, and using the various property bar options common to all pattern styles.
The interactive handles surrounding a pattern fill help you to set the tile size, offset, skew, and rotation of the pattern. To experience this firsthand, open Platonic.cdr and work with the uncompleted group of objects on the left of the page. Use the right side duplicate of the Platonic geometry as a reference.
Customizing a Pattern Fill
1. Select an object in the group at left, and then choose the Interactive fill tool (G).
2. Choose Two Color Pattern from the Fill Type selector. By default, a two-color dot-style pattern fill featuring Black as the Front color and White as the Back color is applied to your object featuring fill markers.
3. Insert the cursor in the top Edit Tiling field, and then type 1.2; then type 1.2 in the bottom Edit Tiling field. You’ve made the polka dot pattern a more pleasing size for one of the Platonic object faces. Clicking on the Small, Medium, and Large Tile buttons performs the same thing, but without precise size control. Dragging the Rotation/Size handle while holding CTRL to constrain the rotation angle also changes the size.
4. Drag the diamond-shaped center origin handle slightly in any direction. Notice that the center origin of the pattern changes.
5. Drag the white marker, governing the Back color, up and right to skew the pattern so it looks more like it’s on the face of the object, viewed in perspective.
6. Click the white Back color marker, and then click the Back color icon on the property bar—choose a light gray. Now the face of the Platonic object looks a little more properly shaded.
7. Repeat steps 3–6, varying the Front and Back colors to complete filling in other objects.
8. To quickly complete the assignment, while the Interactive fill tool is chosen, click a solid fill object, and then click the Copy Properties button on the property bar. Then click over a corresponding object in the completed design at right.
Figure 15-6 shows the marker handles around a two-color pattern fill.
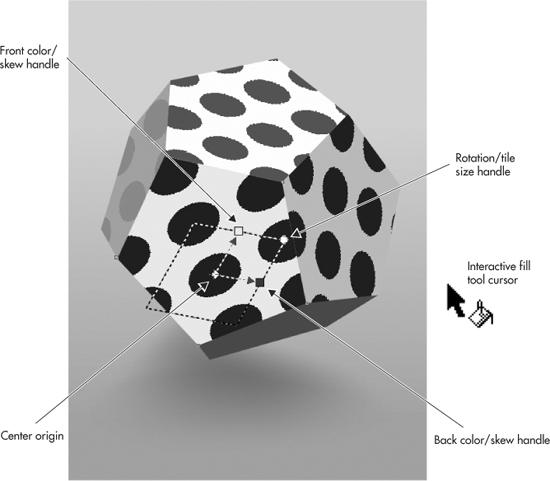
FIGURE 15-6 The interactive markers surrounding a two-color pattern fill are there for you to control the pattern’s colors, size, and skew.
Using Pattern Fill Dialog Options
The Pattern Fill dialog offers an alternative way to control pattern fills (see Figure 15-7). To open this dialog (which is nearly identical for two-color, full-color, and bitmap pattern fills), click the Edit Fill button in the property bar while a pattern fill type is in effect.
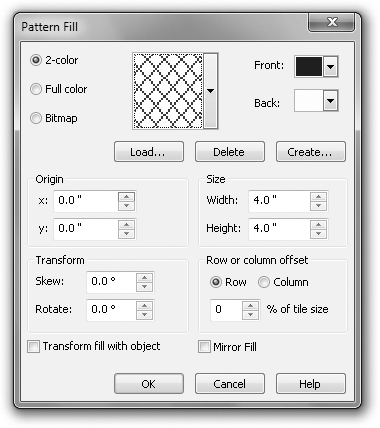
FIGURE 15-7 The Pattern Fill dialog provides an alternative method for setting pattern fill properties.
Here’s what each of the options in the Pattern Fill dialog controls:
• Origin The X and Y Origin options are used to offset the center of the pattern from 0 within a range between 30 and –30 inches. Positive X or Y values offset the origin right or upward, while negative values offset the origin downward or left. Using the interactive origin handle in the workspace performs the same thing.
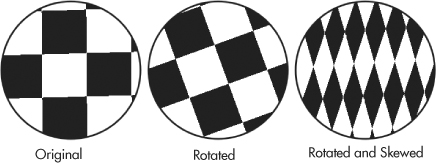
• Transform These options are Skew and Rotate, each of which is measured in degrees. Skew values range between 89 and –89 degrees, while Rotate values can be set between 360 and –360 degrees. These options work in combination with each other to apply vertical and/or horizontal distortion to the fill pattern. Rotation and Skew can be performed directly on an object onscreen; however, undoing a skew and rotation, and performing these distortions with precise values, is not easily done in the workspace.
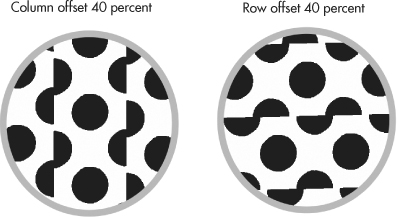
• Row and Column Offsets By default, pattern tiles join to appear seamless. However, you can intentionally ruin the pattern (or just create an “interesting” one) by offsetting the pattern seams through either of these two options. To apply an offset, choose either Row or Column as the offset option, and enter a value between 0 and 100 percent, as shown here:
Create Your Own Two-Color and Full-Color Patterns
Two-color patterns are harder to think up than they are to create, and the details are covered right after this section. Full-color (vector) patterns are created by sampling an area on the page. While the Interactive fill tool is active and the Fill Type selector in the property bar has Full Color Pattern selected, click the Create Pattern button. This opens a dialog for specifying the new pattern type and resolution. After you choose the type and resolution, crosshairs appear on your screen, and you then click-drag to define an area in your document to use for the new pattern.
The saved pattern is located in C:Usersyour user nameAppDataRoamingCorel CorelDRAW Graphics Suite X5Custom DataPatterns. To apply a custom pattern, you need to click the Edit tool on the property bar to display the Pattern Fill box, where you click Load.
Two-color patterns are created using a special editor box displayed by clicking the Edit Fill button on the property bar when the Interactive fill tool is active and the Fill Type selector is set to Two Color Pattern. Once the Pattern Fill box is displayed, click Create. As you can see in Figure 15-8, two-color patterns are created by choosing a bitmap size, a pen size, and then left-dragging and/or clicking to set the foreground pattern. Right-clicks and right-click-drags act like an eraser. Alternatively, you can click Load if you’ve created a bitmap image (a two-color one works best, so the Editor doesn’t brute-force a tonal image to black or white); the Editor accepts TIF, BMP, and other image file formats. Two-color patterns you create are immediately applied to a selected object, unlike full color patterns, which are saved to a PAT file on hard disk. If you want to later load a two-color pattern you’ve designed, click Load in the Pattern Fill dialog.
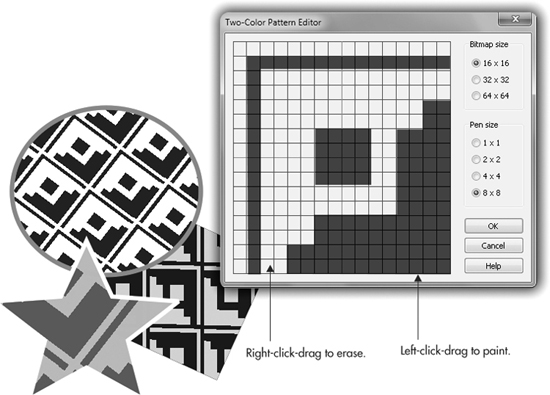
FIGURE 15-8 Create your own two-color pattern by clicking the Create button in the Pattern Fill dialog; then edit an existing preset pattern.
TIP
You can also create patterns by using the Tools | Create | Pattern Fill menu command.
Applying Texture Fills
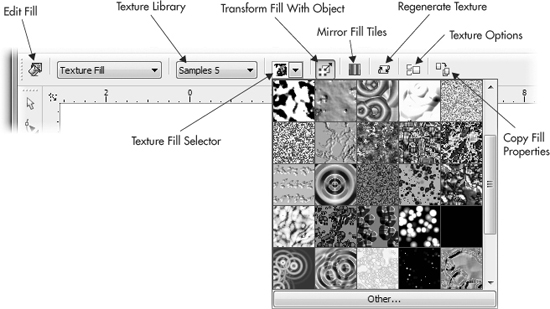
When the Interactive fill tool has been chosen and you then pick a texture fill, the property bar (shown next) displays texture options, including a Texture Library selector, a Texture Fill selector, and options for controlling the appearance of the texture.
The interactive handles surrounding a texture fill are the same as those for pattern fills; they’re there for you to set the size, offset, skew, and rotation of the texture. If you have experience manipulating pattern fills by click-dragging the control handles above the object, you’ll discover bitmap fills are exactly the same. However, because these are bitmap-based textures, you’ll need to take note of some transformation limitations, covered shortly.
As you’ll discover next, each texture is based on a range of variables specific to a style type. To view these core styles, you’ll need to open the Texture Fill dialog by clicking the Edit Fill button.
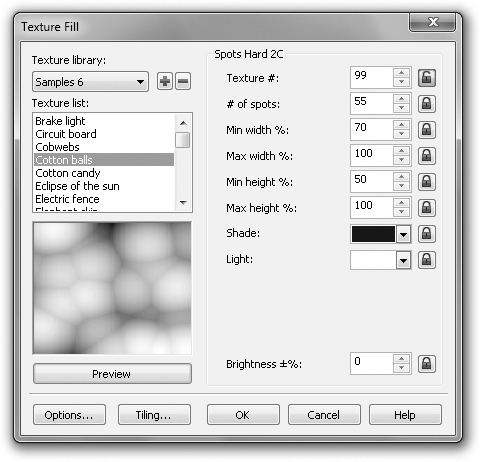
You’ll notice that the same options available in the property bar are in the dialog above—but also included when you click the Edit Fill button are the texture variables. There are settings for texture, color, frequency of properties of the textures, and so on. Don’t hesitate to drag a spin box value and then to click Preview; although several of the values might seem to have strange labels for the values, they’ll indeed modify the texture preset (changing the Texture # is a great place to begin experimenting). Also, it’s very hard to give a label to some of the properties of fractal math; they’re abstract attributes and fairly difficult to write in the first place! Start by choosing a type of texture from the Texture List, and then use different values in fields such as colors (another good starting place). Click Preview, and if you like what you see, save it as a Preset, click OK to apply the texture, and then use the control handles for the Interactive fill tool to adjust the fill as it appears in the selected shape.
What Is a Fractal?
Fractal geometry is based on mathematical equations, whose core is beyond the scope of this book. However, fractal geometry usually appears to have the following visual characteristics:
• Self-similarity Fractal designs branch with variations set by the mathematician writing the fractal math, but typically a fractal design repeats a basic structure within itself at smaller scales, branching from a main body in the design. This is why many fractals look like organic forms such as ferns, broccoli, and seashells—these designs in nature also obey fractal math.
• A recursive structure with irregularities As with self-similarity, fractals repeat, with variations, as they branch. If you’re familiar with Euclidean geometry, fractal math is too unpredictable when plotted to 2D space to be described in Euclidian geometric functions.
• Exist within a domain of 2D or 3D space Fractal math is used in several 3D programs to generate organic sculptures. KPT Frax4D, in fact, is a plug-in for PHOTO-PAINT and other bitmap programs that can generate fractal designs in 3D space. Fractals were once described by a mathematician using this analogy: if a square represents the number 2 and a cube represents the number 3, fractals live somewhere between these two integers.
Not all the texture fills use fractal math; some use procedures (a recipe of equations), but overall, they’re just fun to add to a design. And because they’re math based, they can be rendered to the size you need—this is part of what the Regenerate button on the property bar is for.
The textures are based on more than a hundred different styles ranging from bubbles and clouds through minerals, raindrops, ripples, rock, and vapor.
TIP
Many of the fractal patterns in the Samples libraries do not seamlessly tile all on their own. Fractal math can be coded as non-terminating (which creates an infinite branching and can be quite processor-intensive) and terminating, which means the math ends at a certain point, and you’ll see a tile edge in your design once in a while. To fix this: click the Mirror button on the property bar when the object is selected and when the Interactive fill tool is chosen. Alternatively, this option is available by clicking the Edit Fill button on the property bar, which displays the Texture Fill dialog, where there’s a Tiling button. Clicking this takes you to the Tiling box, where you can check Mirror Fill and set other options. The texture fill will then appear in your object as a seamless one, regardless of how you scale, rotate, and skew the pattern.
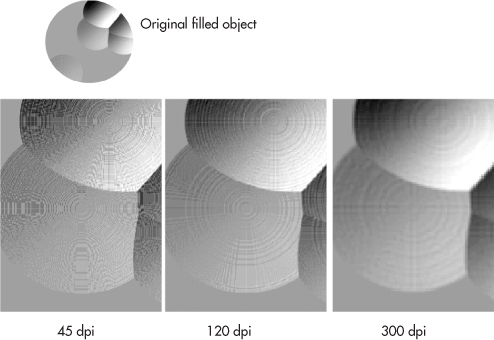
Setting Texture Fill Options
Besides being able to set the appearance of your texture fill interactively and to customize the fill using the value fields in the Texture Fill dialog, you’ll want to be able to set other options, too. For example, if your texture fill looks like it’s been pushed through a screen window, it means the resolution is too low, as measured in pixels per inch (called dots per inch [dpi] in the dialog). To increase the texture size and its resolution, click the Texture Options button in the property bar to open the Texture Options dialog.
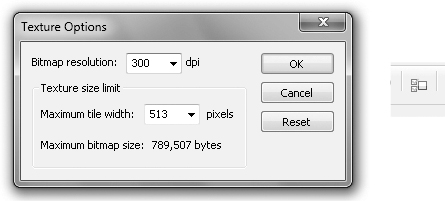
By default, texture fills are initially created at a resolution of 300 dpi and at a tile width of 2,049 pixels. Increasing both of these settings will reduce harsh areas and add definition to your texture, as shown here:
Calculating the Resolution of Texture Fills
If you’re the ambitious, professional sort, you can use a very non-nerdy equation to determine your maximum tile width setting. Calculate the value based on twice the final line screen multiplied by the longest object dimension in inches. Line screens are what PostScript laser printers and commercial printer image-setting devices use for reproduction. You’re good to go with 133 lines per inch (lpi; this value is half of 266 dpi, which is commonly used in high-quality art books); 1,200 dpi laser printers can use 85 lpi. Inkjet printers don’t arrange dots in a logical order (they sort of splatter ink on the page), but a ballpark estimate (if inkjets were to render lines of dots) would be about 180 lpi for inkjet printers manufactured as late as 2007. Or you can overestimate, be on the safe side, and use 300 dpi, which vendors often suggest because it’s an easy number to remember. Enter your calculated value in the Maximum Tile Width box, or choose the next highest preset value available.
Texture options affect the appearance of your texture fill in the following ways:
• Bitmap Resolution The Bitmap Resolution option sets the amount of detail in the bitmap image created. By default, the bitmap resolution setting is 300 dpi, but it can be reset to preset values ranging between 75 and 400 dpi, and to a maximum value of 9,999 dpi.
• Texture Size Limit This option should be set according to both the desired resolution of your texture and the size of your object. To avoid seeing seams between your texture’s tiles (which will ruin the effect), set the tile larger than the object it fills and ensure that the tile seams are hidden from view; use the Mirror button on the property bar if necessary.
NOTE
Increasing the Bitmap Resolution and Maximum Tile Width settings of your texture fill can dramatically increase your saved CDR file size and the time it takes for high-resolution textures to display on your monitor. For screen display, you can usually get an accurate view of a texture at 1:1 viewing resolution (100%) with a texture resolution of 96 dpi (pixels per inch, dots per inch). Coincidentally, this is also an ideal texture resolution for web graphics, because visitors to your website are also viewing your texture at 1:1 on their monitors.
Creating and Saving Texture Samples
Once you’ve gone to the effort of selecting or editing a texture fill to suit your needs, you may wish to save it for later retrieval. To save a texture, click the + button to the right of the Texture Library selector drop-down list. You’ll then be prompted in the Save Texture As dialog for the name of your texture (type any name you like), and for the name of the library in which you want the texture saved. Click a library name found in the drop-down list, click OK, click OK in the Texture Fill dialog, and your custom texture is ready to be applied to the selected object.
Applying PostScript Fills
PostScript fills are vector based and use PostScript page-descriptor language to create a variety of patterns from black-and-white to full color. Each PostScript fill included with CorelDRAW has individual variables that control the appearance of the pattern, much the same way as you can customize texture fills. PostScript pattern styles come in a variety of patterns, as shown in Figure 15-9, and also come as non-repeating fills.
While using the Interactive fill tool with PostScript Fill selected in the property bar Fill Type selector, very few options that relate to the individual fills are available on the property bar. You need to click the Edit Fill button on the property bar to get access to line widths, how large the pattern elements should be, and to color options, depending on the specific preset.
The image you see onscreen is an accurate representation of the actual pattern that will be printed; again, PostScript is a printing technology, but Corel Corporation has made the technology viewable in CorelDRAW and printable without the need for a PostScript printer.
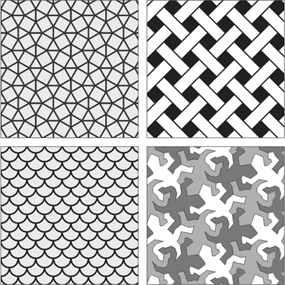
FIGURE 15-9 PostScript fills come in a variety of repeating and non-repeating patterns.
Note that PostScript fills will print exceptionally well to any PostScript device; that’s what the fills are intended for, but you don’t necessarily have to use PostScript. However, you must be using Enhanced View to see it (choose View | Enhanced).
To apply a PostScript fill, use these steps:
1. Create and then select the object to apply any PostScript texture fill, and then choose the Interactive fill tool (G).
2. Using property bar options, choose a PostScript fill texture from the selector by name.
3. To customize the fill, click the Edit Fill button in the property bar to open the PostScript Texture dialog, shown in Figure 15-10. To view your currently selected fill, check the Preview Fill option. Notice that each fill has its own set of Parameters that can be changed.
4. Make any changes to your fill, and click the Refresh button to view the results of your new settings.
5. Click OK to accept the fill, close the dialog, and apply the new fill to your object. Your object is now filled with a PostScript texture fill.
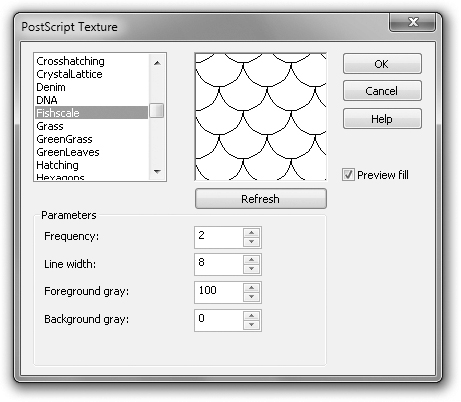
FIGURE 15-10 The PostScript Texture dialog lets you customize a PostScript fill.
PostScript fills can be very useful in schematic and roadmap illustrations, and if you use no background color when you customize many of the fills, the fills support transparency. So you can actually apply, for example, crosshatching, over a color-filled object to enhance the shading.
Applying Mesh Fills
Mesh fills can be used to create the effect of several blending-color fountain fills over a mesh of vertical and horizontal Bézier curves. Editing a mesh grid creates a sort of fill that doesn’t really look like a fountain fill but instead looks very much like a painting. Mesh fills make it easy to create, as you’ll see in the following figures, most of the visual complexity of a reflective sphere—using only one object and one fill. Add to the visual complexity the capability to set transparency levels to each patch of a mesh fill individually, and in no time you’ll be creating scenes that look like paintings, using a fraction of the number of individual objects you’d imagine. You’ll find the Mesh fill tool, shown at left, in the toolbox grouped with the Interactive fill tool; or press M for speedy selection.

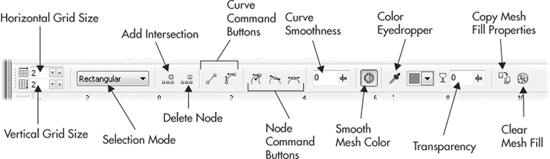
While the Mesh fill tool is selected, the property bar features a number of options, shown next, for controlling this truly unique fill type. Use these options to set the vertical and horizontal size in the mesh grid, to change node and path properties, and to set the smoothness of curves.
Applying a mesh grid to an object is a quick operation. Mesh fills are dynamic, so they can be edited and reedited at any time. Editing the shape and color of a mesh grid can be a little bit of a challenge your first time out, but to be able to smear and to almost paint on a fill will make the effort worthwhile to you and to your work. Node- and curve-editing actions to move fill areas are done exactly the same as for Bézier curves. For information on how to do this, see Chapter 11.
Mesh Fill Options
On the property bar, when the Mesh fill tool is used and an object is selected, you have control over the following attributes of your mesh-filled object:
• Resolution of the Patches By default, a new mesh fill is created on an object with two horizontal and two vertical sets of patches. These patches are linked at the edges by paths and at their vertices by nodes. You can use the numerical entry fields or the spin boxes with these fields to increase or decrease the number of columns and rows of patches. If you right-click a node or a path segment, you have the option to create a node or an intersection by choosing from the pop-up menu.
• Add Intersection/Delete Node When you’ve clicked a path segment and a marker appears, this is your opportunity to add an intersection, either by clicking the Add Intersection button, or by pressing + on the numerical keypad. When you add an intersection, you add a row or a column to the mesh fill, depending on whether you’ve added a point to a vertical or a horizontal mesh path segment. You must first select a node to then delete it, and doing so by clicking the Delete Node button or by pressing DELETE on your keyboard removes both the mesh node and its associated intersecting path segments—reducing the number of columns or rows of mesh patches. Deleting nodes can yield unanticipated results, so give some thought before you delete a node.
• Curve and Node Command Buttons By default, path segments that make up the mesh fill are curves, bound by nodes that have the smooth property at intersections and the cusp property along the edges of the object. To change a path segment to a line, you use the Convert To Line button; click Convert To Curve to create the opposite property. Nodes can be changed to cusp, smooth, and symmetrical properties by clicking the associated property bar button; the commands can also be found on the right-click pop-up menu when your cursor has selected a node.
• Curve Smoothness Suppose you’ve added far too many nodes to a path segment, and your mesh fill looks like a bad accident in one area. If you marquee-select the nodes that bind this path segment, the Curve Smoothness slider and numerical entry field act like the Node Reduction feature in CorelDRAW. You reduce the number of superfluous nodes (CorelDRAW decides on the meaning of “superfluous”—you have no control) by entering a value or using the slider.
• Selection Mode By default, you can select nodes in Rectangular mode, which means you marquee-drag a rectangular shape with your cursor to select nodes, and then change their properties such as color, position, and transparency. Your other selection choice is Freehand mode; your cursor behaves like a real-world lasso, and you are unconstrained by a selection shape for nodes. Additionally, you can SHIFT-click and select non-neighboring nodes to edit. When using Freehand mode, patches cannot be selected—selecting patches by clicking within them is only available in Rectangular selection mode.
• Transparency When selecting using Rectangular mode, transparency can be applied to a patch by clicking the patch once with the Mesh fill tool, and then using the numerical entry field or the slider to assign from 0 (no transparency) to 100 (completely transparent) to the patch. You can also set a transparency value to a mesh fill node by selecting it and then using the Transparency controls. Transparency on a mesh fill has no blending mode like the Transparency tool offers for entire objects—transparency is applied in Normal mode. However, once your mesh fill object is completed, you can use the Transparency tool on the toolbox to assign the object different types and modes of transparency as a single object.
• Smooth Mesh Color This is a toggle on/off button that can produce smoother color blends in your fill without changing the position or properties of the mesh nodes and curve path segments.
• Color Eyedropper When a patch or node is selected, you can choose a color anywhere on your Windows desktop by dragging the Color eyedropper over to any point. You can also sample from objects on your drawing page, but that might not be as much fun!
• Color Palette You have a mini color-palette flyout on the property bar with which you can select colors for selected nodes and patches. Click the flyout button to access the default color palette, or choose from other preinstalled CorelDRAW palettes. Clicking a color well on the (regular) Color Palette applies color, too.
• Copy and Delete Mesh Fill Properties These buttons are common to most all effects in CorelDRAW; use them to copy a mesh fill to a different object on the page, or to remove the mesh fill effect from an existing object.
When working with the mesh fill, you’ll get far more predictable results if you apply colors to the nodes instead of dropping colors onto patches. Also bear in mind that regardless of how you create a shape, the mesh fill makes the object “soft”—the control nodes that make the closed path of the object are also mesh fill nodes. So, unavoidably, if you want to move a node you’ve colored in at the edge of the object, you’re also moving the associated path segment. This is fun and creative stuff, actually, and if you need the fill to be soft with the object’s original shape intact, you can put your finished object inside a container by using the Effects | PowerClip feature.
NOTE
You cannot mesh fill a combined shape; an object made by subtracting a circle from a rectangle so it looks like an awkward doughnut will not take a mesh fill, although the property bar will offer you mesh fill options.
The following tutorial guides you through the creation of a mesh fill within a shape that’s been created for you, with the finished example on the right of the page in Shiny Sphere.cdr. The goal is to create a mesh fill that gives a simple circle object the appearance of being a dimensional, highly reflective sphere, complete with a soft cast shadow beneath it.
Take a look at Figure 15-11 before you begin these steps; it’s not only a comprehensive visual guide for the steps to follow, but also is a handy reference to accompany your independent mesh fill adventures.
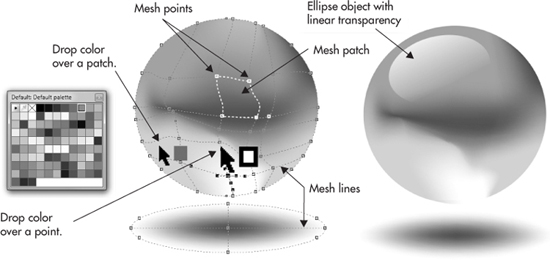
FIGURE 15-11 Mesh fills use control handles very similar in appearance and function to the paths you draw with the Pen tools and edit with the Shape tool.
Blending Colors Using the Mesh Fill
1. Open Shiny Sphere.cdr, select the top circle at left, and then choose the Mesh fill tool. A default mesh fill grid is applied to the object: 2 rows, 2 columns. Increase the resolution to 4 rows, 4 columns for starters.
2. In a lasso marquee–drag motion, select the horizontal nodes along the center of the sphere, and then click the black color well on the Color Palette.
3. Marquee-select all the nodes below the horizontal center nodes you selected in step 2, and then choose a rich brown from either the Color Palette or from the flyout palette on the property bar.
4. Select only the bottom center node, and then click a lighter brown.
5. Choose the Freehand selection mode from the property bar, then select the five top nodes that define the top edge of the circle, and then fill them with a purple-blue medium color. Select the first row, the five nodes below the top circular edge nodes, and fill them with a light blue.
6. Click the second node in this row, and fill it with a deep gold color to suggest a sunset on the horizon of the little desert painting you’ve created. Often, traditional airbrush illustrators have created photorealistic chrome spheres using the reflection of a desert as the primary visual content. You’ve done this; now it’s time to distort the desert scene to suggest the dimensionality of a 3D sphere.
7. Select the gold node and drag it down a little.
8. Select, one by one, the nodes that are colored black, and create a slight wavy effect.
9. Select the light brown node at bottom center, and move its control handle up a little.
10. Finesse the color nodes to suit your personal artistic taste. Then select the bottom oval, apply a white fill, and apply the default 2 by 2 Mesh fill grid.
11. Click the center node with the Mesh fill tool, and then click black on the Color Palette. You now have a feathered, soft drop shadow that would take two of three additional steps to get right if you’d used the Drop Shadow tool on the toolbox. The Drop Shadow tool is often, but not always, the right tool for creating a shadow effect.
12. With the Pick tool, drag the oval highlight object currently over the completed example at right; tap the right mouse button before releasing both buttons to drop a copy on top of your shiny sphere at left.
NOTE
After a mesh fill has been applied to an object, the object cannot be filled with any other fill type unless the mesh fill effect has first been cleared. To clear a mesh fill applied to a selected object, click the Clear Mesh button in the property bar.
Sampling and Applying Fill Colors
After you’ve experimented and come up with a lot of interesting and valuable fills you’ve applied to objects, a natural question to ask is: I’ve got this once-in-a-lifetime, truly excellent color (or texture), and I want to use the fill on other objects. How do I do this?
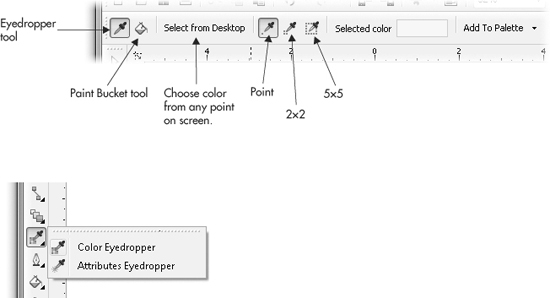
Version X5 has integrated the color-sampling process and improved it so that a single tool now can be used to sample a color and apply that color to a different object. Additionally, when an object fill has more than one color—such as fountain fills—you have the Attributes eyedropper at hand to sample and duplicate any fill to a new object or group of objects.
To use the Color eyedropper tool:
1. Make sure your view of the page includes both the object that is filled with the color you want to copy, and the target object. Zoom out or pan your view if necessary.
2. Choose the Color eyedropper tool from its group on the toolbox.
3. Click over the object with the color you want to sample. The cursor changes to a paint bucket, as does the function of the tool.
4. Click over the object you want to apply the sampled color to. Notice that after you click, the cursor remains in the paint bucket state. If you want to apply the sampled color to additional objects, you do it now. However, if you want to pick a different color sample—starting the process all over again—click the eyedropper icon on the property bar. The tool is now reset to sample, not apply, color. Applying samples is not limited to fills: click the paint bucket cursor over the outline of an object, and you apply the color to the object’s outline.
Additional options with the process of color sampling are on the property bar:
• Select From Desktop When you click this button, you can sample more than a CorelDRAW object color. You select any color on your screen. This means, for example, you can sample the color of the Zoom tool on the toolbox, any color on the Color Palette, and you can even click CorelDRAW’s minimize/restore button above the menu bar, move the CorelDRAW window a little, and sample from your Windows desktop.
• Selected Color This is not only a good visual reference as you work, but while the Color eyedropper tool is in use, you also can drag this color well on top of any object—selected or unselected—and the current selected color is applied to that object, or to the outline of the object if your aim is precise.
• Add To Palette If you want to keep using your sampled color long after you’re done with the Color eyedropper tool, click this button to add the sampled color to the Document palette, located in Window | Color Palettes | Document Palette.
• Sample Size Before clicking to sample, you have the option to sample a single point—one pixel on your monitor’s screen—or a 2×2 average area, or a 5×5 average color area. The use and importance of this feature is covered next.
The usefulness of sampling colors with a “big” eyedropper will become evident when you’ve imported a bitmap and want to approximate a color you see in the bitmap for a border or text in your composition. Figure 15-12 illustrates the use of a large, averaged color sample. The background of the ceramic moon is dreadful, and a harmonious color value sampled from the moon sculpture itself would be splendid. But the color at left was taken using a “point sample,” 1×1 pixel. Bitmap images have pixels that vary from neighboring pixel to pixel, especially with JPEGs that by their nature have noise—similar to film grain, random distribution of color pixels that don’t belong in image areas. So the 1×1 pixel Eyedropper tool sample is a dud, even after three tries. The 2×2 averaged sample (at center) did better, but at the right, when the same area in the circle is sampled using the 5×5 setting, a color has been sampled correctly for artistic purposes, and a nice average of a 25-pixel area yields a suitable color for the background on the moon.
Sampling Above and Beyond Uniform Fills
You will love to work with the more complex fills in CorelDRAW, and naturally, you’ll want to apply one you’ve deliberately created or even stumbled upon to other objects. Multi-color fills fit into a category called Styles, and to copy them, you need to use the Color eyedropper’s cousin tool, the Attributes eyedropper. To sample and apply fills such as fountains, texture fills, and all the others, choose the Attributes eyedropper from the toolbox, and then click the Properties button and choose Fill. You can use the Attributes eyedropper to copy just about anything an object displays, but for making a rectangle’s fill look like that fountain-filled circle next to it, for example, you only check Fill before clicking with the tool.
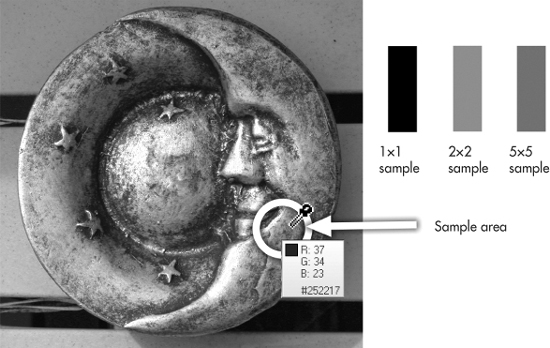
FIGURE 15-12 Increase your Color eyedropper sample size to get a general color instead of the exact underlying pixel color.
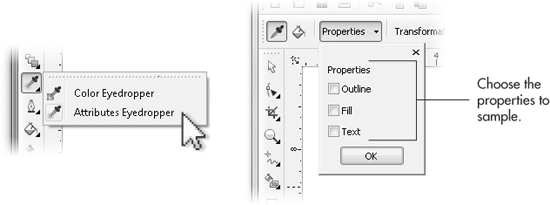
Alternatively, you can drag an object using the right mouse button, and drop it on top of an object to which you’d like to apply any style of fill. The pop-up menu appears when you release the right mouse button, and you then choose Copy Fill Here. The position of the source object does not move using this drag technique.
TIP
When a shape is selected, double-clicking the Fill box in the status bar opens a corresponding dialog where you can edit the current fill of the object and also add it to a Preset list for safekeeping for future needs. This saving option doesn’t apply to PostScript fills, which cannot be fundamentally edited in CorelDRAW.
If you’ve had your fill, this is okay…so have your objects. You’ve learned in this chapter how to tap into CorelDRAW fills, and hopefully you’ve also seen how important fills can be to your drawings. Fills can actually contribute to the visual robustness of a composition more than the shape of objects. Take a cardboard box, for example. The shape of the box isn’t that interesting and takes only a few seconds to draw. But the texture of a cardboard box is where the object gets its character and mood.
Outline properties and attributes are covered in the following chapter. You can do as much with customizing the thing that goes around an object as with the object itself.