Defining the Eyes, Mouth, and Nose
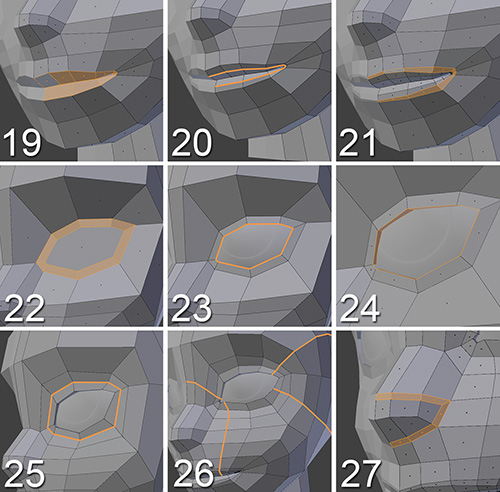
Little by little, Jim’s face is starting to take shape! The next steps, shown in Figure 7.10, add definition to the eyes, mouth, and nose.
19. Select the mouth’s loop, extrude it, and adjust the vertices to get the lips’ shapes, according to the reference images.
20. Using Ctrl + R, add a new loop to the lips to add a little more detail to that area. You can probably inflate the lips by just adjusting the Loop Cut and Slide Smooth options in the Operator panel. At this point, you can add a Subdivision Surface modifier to the mesh and enable it from time to time to make sure the geometry is behaving correctly when it’s smoothed.
21. Select the outer loop of the lips and press Ctrl + B to add a bevel to it. Then, slide the loops near the mouth’s corners to separate them a little more than the other loops. This will define the shape of the lips when you add a Subdivision Surface modifier. Separating the vertices near the mouth corners will make those areas smoother, while the central area of the lips will have more definition, as its loops are closer together.
22. Select the n-gon of the eye and press I to inset and create the base of the eyelids.
23. Unhide the eyes and adjust the eyelids’ geometry to the eyeball’s surface. Proportional Editing can help with this. Leave a space between the eyelids and the eyeball.
24. Select the inner loop of the eyelids and extrude it to fill in the space between the eyelid and the eyeball.
25. Select the outer loop of the eye and slide the vertex out to make some space for a new loop to help define the eyelids a little more.
26. In the eye area, add some more loops with Ctrl + R to define the section between the nose and the forehead; then, adjust the vertices to the reference images and make sure the vertices are smooth between the rest of the geometry.
27. Select the nose’s bottom and nostril faces. Inset them and turn the Boundary option off (you’ll find it in the Operator panel) so the nose’s front faces don’t inset in the center.
Tip
While you model, try to think ahead to plan how you’ll perform the next steps. If you have in mind what the final topology will look like, you can add loops and vertices to achieve that specific goal. Modeling blindly is also possible, but you’ll probably lose some time figuring it out, and sometimes you’ll have to delete certain parts and rebuild them to create a better topology.

