Adding Ears
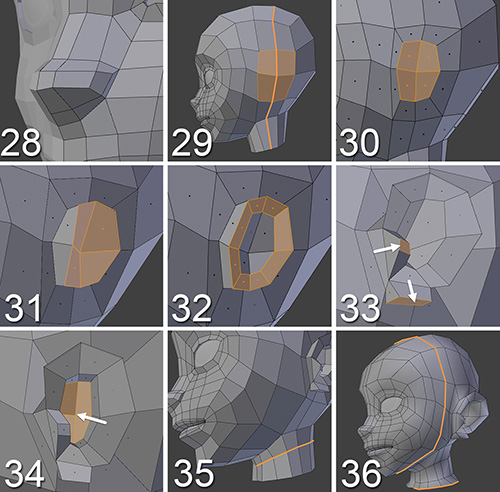
The face is almost done! Figure 7.11 shows additional steps that add more details to Jim’s face. At this stage, you’ll add the ears and define the neck and head a little more.
28. Move the nose vertices you just created to define the shape of the nose. Turn on the Subdivision Surface modifier to see how the model looks when subdivisions are enabled. You may want to play with the nose geometry; in this case, as the design presents a pretty stylized character, we’re not going to model the nostrils.
Note
While you are working on the model, it’s useful to enable the Subdivision Surface modifier from time to time to see if the geometry behaves correctly when subdivided. Also, this modifier provides several display modes (the four buttons located at the top of the modifier panel), and the last two are really helpful for this stage. One of them allows you to see the subdivided model in Edit mode, while you keep working
on the original mesh as if it were a cage for the subdivided model. The last button modifies the option previously described, letting you work directly on the subdivided model without displaying the original mesh cage (an option that, in some situations, can be more useful and intuitive).
29. Go to the side of the head and create a new loop from the neck to the top of the head. The highlighted faces are going to serve as a base from which to extrude the ear. Ears are quite tricky, but in this case, we’re making an anime design, so let’s create a simple ear, not very realistic but one that will fit the overall look of the character.
30. Inset the selection to create the base for the ear.
31. Extrude it and adjust the shape to resemble an ear.
32. Make an inset within the ear.
33. Extrude and shape the highlighted areas to define those parts of the ear.
34. Add a new extrusion to create the ear canal and arrange those vertices a little. Don’t worry if the geometry looks weird; just keep an eye on the subdivided mesh because when it’s smoothed it will look quite different.
Tip
In the images that accompany the modeling steps, you’re seeing the low-resolution mesh, so you can get a clear idea of how the polygons and vertices work; however, at this point in the process, you could have been working with the subdivided mesh from the beginning.
35. Cut a new loop in the neck to define the articulation between it and the base of the head.
36. Keep adding more and more loops in the areas where you think you’d like to have more detail. In the image for this step, two loops that were added to the mesh are highlighted: one is at the bottom of the neck so later on you won’t have an empty space under Jim’s jacket. Also, there is now a clean loop surrounding the whole face, which you can think of as a division you could use to extract a mask from the face.

