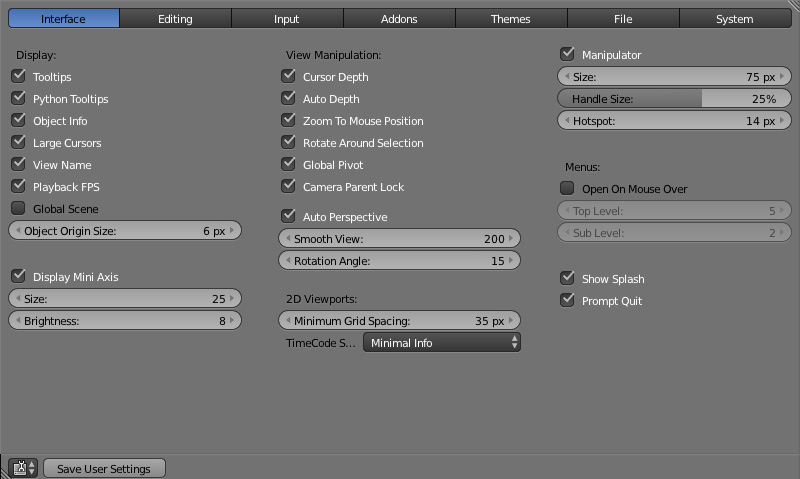
Blender User Preferences
In the File menu, or if you press Ctrl + Alt + U, you will find the Blender User Preferences, which will appear in a new window you can close once you’re done selecting your preferences (see Figure 2.11).
This window has different tabs across the top that you can use to customize your preferences in Blender. Let’s check out what you can do on each one of them:
![]() Interface: Here, you’ll find a lot of options to set the Blender Interface to your desired parameters so you feel more comfortable working with it.
Interface: Here, you’ll find a lot of options to set the Blender Interface to your desired parameters so you feel more comfortable working with it.
![]() Editing: On this tab, you’ll find some options for editing things like materials, animation curves, and grease pencil, and you’ll be able to adjust how objects are aligned when you create them or how duplicate objects should behave.
Editing: On this tab, you’ll find some options for editing things like materials, animation curves, and grease pencil, and you’ll be able to adjust how objects are aligned when you create them or how duplicate objects should behave.
![]() Input: You can edit keyboard shortcuts in this tab, as well as some other options that determine how you work with Blender using your mouse and keyboard.
Input: You can edit keyboard shortcuts in this tab, as well as some other options that determine how you work with Blender using your mouse and keyboard.
![]() Addons: On this tab, you can manage extensions that come with Blender, or download and install others to add some new functionality to Blender. A lot of these extensions are deactivated by default, but you can look for the ones you’re interested in and turn them on to use them while you work.
Addons: On this tab, you can manage extensions that come with Blender, or download and install others to add some new functionality to Blender. A lot of these extensions are deactivated by default, but you can look for the ones you’re interested in and turn them on to use them while you work.
![]() Themes: Here, you can create your own color schemes to make Blender more appealing to you or to fit your corporate color scheme if you want!
Themes: Here, you can create your own color schemes to make Blender more appealing to you or to fit your corporate color scheme if you want!
![]() File: This tab defines general file paths, what external software to link with Blender (like a default player for rendered animations), and how Blender saves files. You can also set up the Auto Save feature on this tab.
File: This tab defines general file paths, what external software to link with Blender (like a default player for rendered animations), and how Blender saves files. You can also set up the Auto Save feature on this tab.
![]() System: On this tab, you can set up performance options to improve how Blender works, depending on your computer, such as selecting your graphics card (useful when you want to work with GPU rendering with Cycles). Or, you can change your own preferences for things like the default lighting applied to objects in the solid view, as well as text size and font, or the method Blender will use when drawing 3D objects.
System: On this tab, you can set up performance options to improve how Blender works, depending on your computer, such as selecting your graphics card (useful when you want to work with GPU rendering with Cycles). Or, you can change your own preferences for things like the default lighting applied to objects in the solid view, as well as text size and font, or the method Blender will use when drawing 3D objects.
Tip
I highly recommend that you check out all these options. If you don’t know what they do, hover the cursor over them to get a brief pop-up description. Some of these preferences may make your life easier when using Blender, especially if you’re coming to it from other animation software.
Click Save User Preference at the bottom-left corner of the User Preferences window to confirm your selections and make your new preferences appear the next time you open Blender. Alternatively, keep in mind you can even save how your scene, workspace, and menus look when you open Blender: Just set everything up as you prefer (even replace that default cube with another interesting shape if you want), and press Ctrl + U to save your selections as the “startup” .blend file.
.blend Files
The Blender file format is .blend. However, if you have the Save Versions feature turned on (you can find this option in the Blender User Preferences on the File tab), Blender will automatically generate backup files *.blend1, *.blend2, *.blend3 (the asterisk represents the original filename) when you save. By default, Blender will save one backup file, but you can increase the amount of versions saved from the User Preferences. These backup files can be opened from within Blender just like the original file; they just have a different extension so you can easily distinguish between the original files and those automatically saved by Blender. Another option you can turn on in the same menu is the Auto Save Temporary Files: you can set a timer in intervals of minutes and Blender will save the file in the temporary folder when that interval passes. Usually, you only access Auto Save files when something goes wrong or you need to recover a file you’ve lost or didn’t save.
Also, keep in mind that if you use images as textures or use any kind of external files inside Blender, they won’t be inside the .blend file by default. However, you can pack them inside the .blend file; you’ll learn how to do this procedure in Chapter 9, Painting Textures.

