Chapter Three. Drawing with Brushes
The title of this chapter, “Drawing with Brushes,” is shorthand for applying brush strokes to paths. You’ll have more fun, be more productive, and be less frustrated if you take a moment to appreciate the difference.
For all practical purposes, drawing a path and applying a brush stroke are generally two distinct processes in digital design, particularly in Illustrator.
Remember that the heart of Illustrator is the ability to define vector paths, usually using the Pen or Pencil tool. The paths can have an almost infinite variety of fills, stroke properties, and other effects. Among these effects is an amazing variety of brushlike stroke attributes.
You can select a brush from Illustrator’s Brushes panel and “paint” with it using a mouse or a drawing tablet. The advantage is that you can draw a path and apply stroke attributes all at once. The disadvantage is that you have to manage both drawing and strokes simultaneously. You’ll learn how later in this chapter.
However, for most of the techniques in this chapter the assumption is that you have drawn your path and are now ready to apply brush stroke attributes to that path.
#25. Applying or Drawing with Brushes
As noted in the introduction to this chapter, there are two ways to use the Paintbrush tool. You can draw with the brushes, or you can apply them to existing strokes.
You can filter the Brushes panel to display selected types of brushes by selecting (or deselecting) a brush type from the Brushes panel menu.
Drawing with the Paintbrush tool is similar to drawing with the Pencil tool. The main difference is that drawing with the Paintbrush tool applies the selected brush stroke to a path as you draw (Figure 25a).
Figure 25a. Selecting the Paintbrush tool in the toolbox.

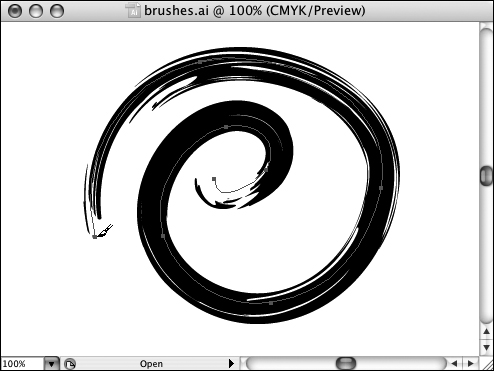
To draw a brush stroke in one step, select the Paintbrush tool. In the Brushes panel, choose a brush stroke. Then draw as you would with the Pencil tool (Figure 25b).
Figure 25b. Drawing a path with the Paintbrush tool and a brush selected.
Note
See #18, “Drawing with the Pencil Tool,” for advice on drawing with the Pencil tool.
You can apply a brush pattern to a stroke by selecting the stroke and clicking on a brush in the Brushes panel. This works for strokes that already have a brush applied; selecting a brush in the Brushes panel changes the applied stroke.
The Brushes panel has five icons on the bottom that allow you to access the brush libraries, remove a brush stroke, define options for the selected object, create a new brush, or delete the selected brush (Figure 25c).
Figure 25c. The Brushes panel.
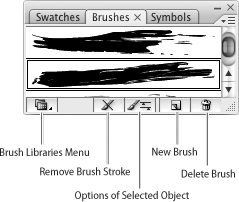
To remove a brush stroke from a selected path, click the Remove Brush Stroke icon at the bottom of the Brushes panel menu.
The Options of Selected Object button opens a different set of options for each type of brush. The New Brush icon allows you to define a custom brush. Both options will be explored in the remaining techniques in this chapter, which discuss the four types of brushes. The Delete Brush icon is not used to remove a brush from a stroke; it deletes the brush from the panel.
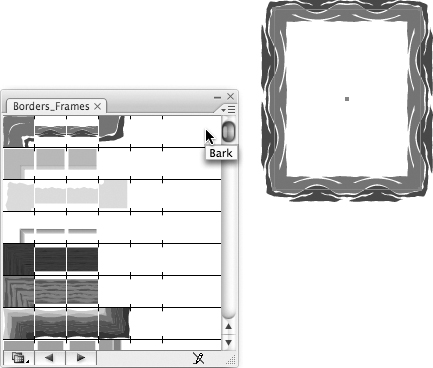
The Brush Libraries Menu icon, new to Illustrator CS3, provides quick access to five sets of brushes, along with additional brush libraries and the ability to save your current set of brushes (as part of your Illustrator document). For example, you can quickly access several border brushes using the various sets of border brushes libraries. These sets of border brushes appear as tabs in a new Brushes panel (Figure 25d).
Figure 25d. Applying a brush stroke from the Borders Frames library.
#26. Creating Calligraphic Brushes
Calligraphy is the art of drawing stylized type that looks like it was scribed with an ink pen or paintbrush. Calligraphic brush strokes can vary in size, angle, shape, and randomness (variety) in the brush stroke width.
Stroke shape can range from almost round to very flat, or anything in between. They are not completely round because a completely round calligraphic brush would simply apply a wider band around a stroke; the “ovalness” of the brush is what gives it a calligraphic quality.
There are several preset calligraphic brushes in the Brushes panel, but you can easily define your own customized brush by following these steps:
- Choose New Brush from the Brushes panel menu. The New Brush dialog opens. In the New Brush dialog, select New Calligraphic Brush and click OK (Figure 26a).
Figure 26a. Defining a new calligraphic brush stroke.
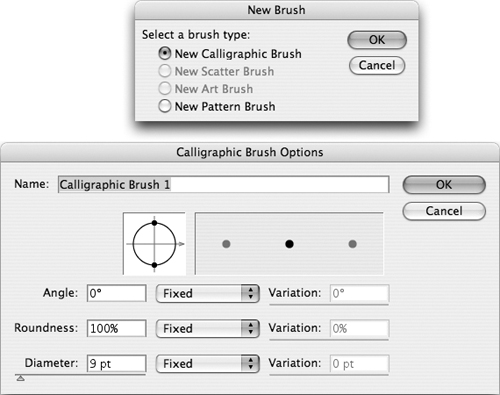
- In the Calligraphic Brush Options dialog, enter an easy-to-remember name in the Name box.
- Type a value in the Angle box to define the angle of the brush. You might start with a 45-degree angle and experiment from there.
- Enter a value of less than 100% in the Roundness box. Lower values produce flatter brushes. Choose Random from the Roundness list. Enter a value, in percent, in the Roundness Variation box. Higher values (up to 180%) produce more variation in roundness as you apply or draw the brush effect.
- Enter a value (usually in points) in the Diameter box to set the diameter of the brush. Higher values create thicker strokes.
- Click OK to save the new calligraphic brush pattern.
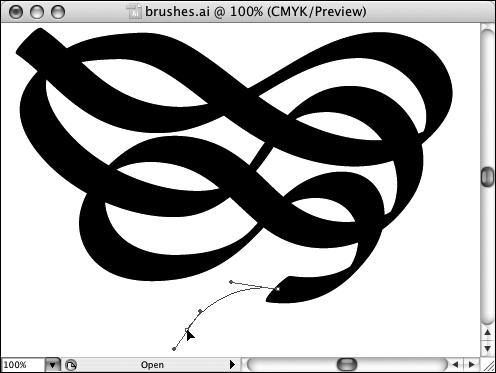
You can use the Pen or Pencil tools (or draw with shape tools) to create paths with a selected calligraphic brush effect. To do this, simply click on a calligraphic brush stroke in the Brushes panel and draw with the selected tool (Figure 26b).
Figure 26b. Using the Pen tool to draw with a selected calligraphic brush stroke.
#27. Creating Art Brushes
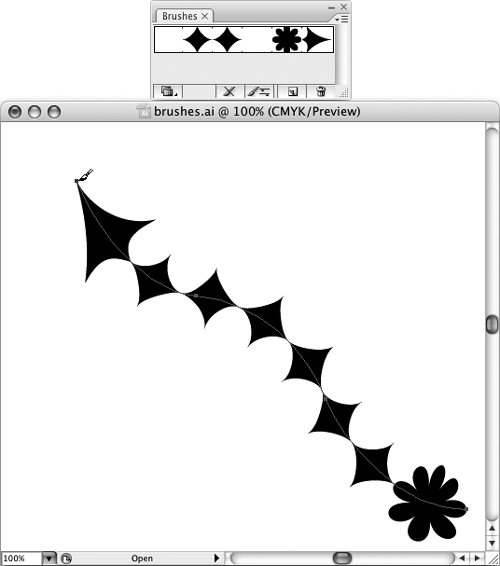
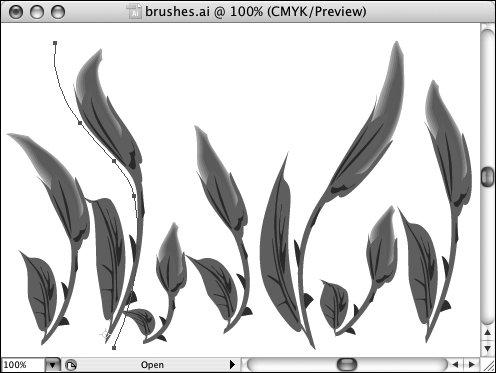
Art brushes stretch to the length of any path to which they are applied. Normally, you create your own art brush and then bend it, stretch it, or squeeze it onto any path. The same art brush can be applied to a long or short stroke (Figure 27a).
Figure 27a. A flower art brush applied to several strokes of different lengths.
One useful and easy technique is to use symbols as art brushes. Open a symbol library (Window > Symbol Libraries) and choose a library.
Tip
The symbols in the Nature Symbol Library will work well as art brushes.
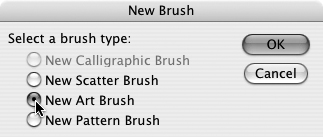
The Symbol library opens as a panel. Drag a symbol onto the artboard. Then drag the symbol object from the artboard onto the Brushes panel and release your mouse button. The New Brush dialog opens. Choose the New Art Brush option in the dialog and click OK. When you do, the Art Brush Options dialog appears.
You can experiment with the options for the new art brush in the Art Brush Options dialog, but normally you will not need to adjust the default options. After you click OK in the Art Brush Options dialog, you can apply the symbol to any path. As you do, the symbol will conform to the path to which it is applied.
Note
Symbols can be a powerful tool for automating illustration. Here, we are just using symbols as packaged artwork, but for a full exploration of symbols, see #91, “Creating Symbols and Applying Instances.”
To create a new art brush, follow these steps:
- Create some artwork.
- Drag the artwork onto the Brushes panel. The New Brush dialog appears. Choose the New Art Brush option and click OK (Figure 27b).
Figure 27b. Creating a new art brush from an arrow.
- The Art Brush Options dialog opens with the brush design selected in the preview window of the dialog. Enter a name in the Name area of the dialog.
- In the Direction area, select the up arrow to make the pattern appear in an intuitive, right-side-up manner as you draw a path up with a drawing tool (Figure 27c).
Figure 27c. Defining an art brush for an arrow that will point upward as you draw a line upward.
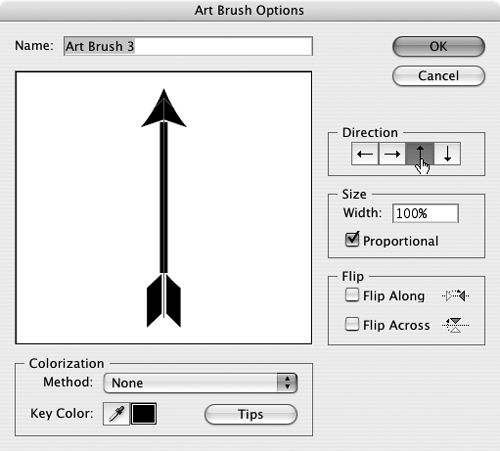
- Enter a Width value in the Size area to define how large the symbol will display relative to the stroke path. Normally, you’ll want to select the Proportional check box to keep the height-to-width ratio unchanged as you rescale the object to which the art brush is applied.
Note
The Flip Along and Flip Across check boxes in the Flip area allow you to reverse the symbol either horizontally or vertically.
- After you define the art brush options, click OK.
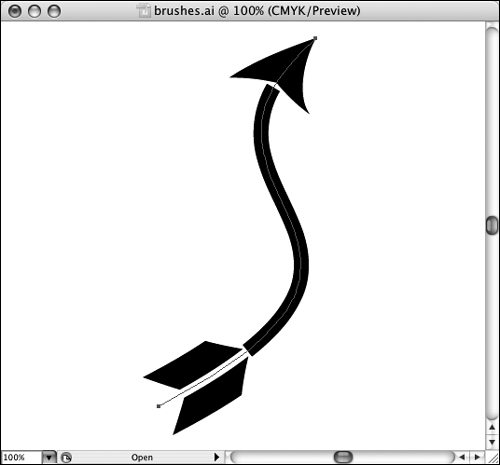
With an art brush defined, select any path and click on the brush in the Brushes panel to apply it to the selected path (Figure 27d).
Figure 27d. Applied art brush.
#28. Creating Scatter Brushes
Scatter brushes are intuitively named. They scatter a pattern along a path. Thinking of a leaf blower being pushed across a lawn gives you a sense of the chaos you can generate by using a scatter brush stroke to create a path of objects.
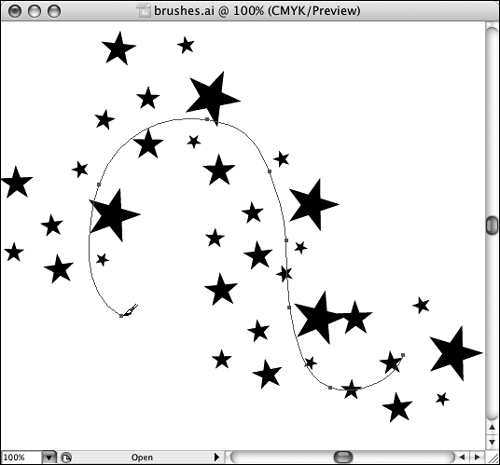
You might use a scatter brush, for instance, to populate a field of stars (Figure 28a).
Figure 28a. A star field being drawn using an art brush.
You can draw interactively with a scatter brush, or you can apply a scatter brush pattern to an existing path.
To define a scatter brush, start by creating artwork to use as a brush. Small patterns work well. With the artwork selected, follow these steps to create and use a scatter brush:
- Drag the artwork onto the Brushes panel. The New Brush dialog appears. Choose the New Scatter Brush option and click OK.
- The Scatter Brush Options dialog appears (Figure 28b). Enter a name for the brush in the Name area.
Figure 28b. Defining a scatter brush from a group of stars.
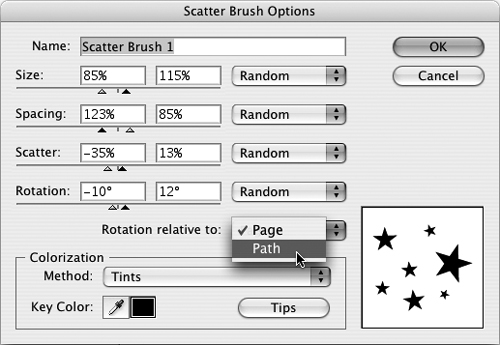
- Use the sliders and lists in the dialog to modify the pattern. Size defines the size of the pattern in relation to the size of the original drawing. Spacing controls the spacing between instances of the artwork. Use the Scatter slider to define how far apart the scatter brush art will scatter away from the path to which the brush is applied. Use the Rotation setting to define how much objects will rotate as the brush is applied to a curved path.
Note
The Rotation setting can be applied relative to either the path or the page.
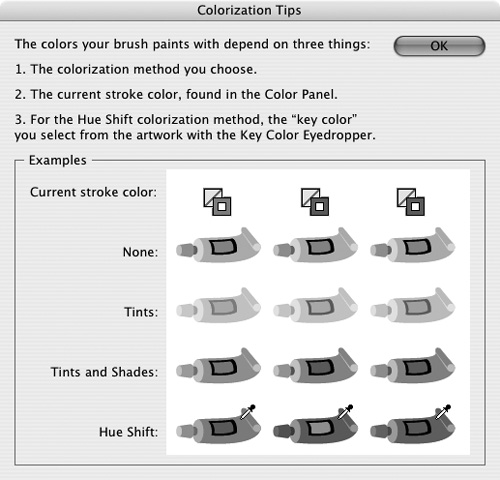
- Use the Colorization Method pop-up list in the Scatter Brush Options dialog to define how coloring is added (or not added) to the original stroke color. You’ll see a preview of each option if you click the Tips button (Figure 28c).
Figure 28c. Previewing tints for a scatter brush.
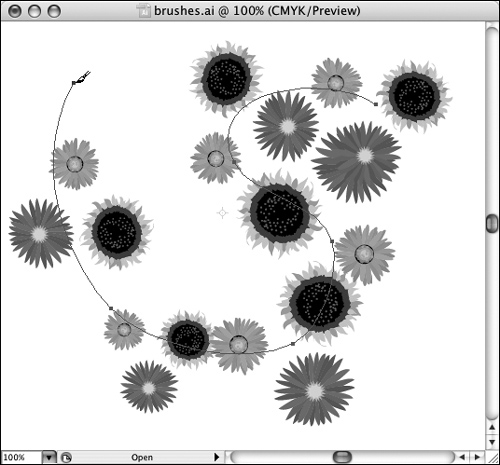
- After you define scatter brush options, click OK to generate the brush. Apply the brush by clicking on a selected path with the Selection tool, and then clicking on the art brush in the Brushes panel. Or select the art brush first, and then use the Paintbrush tool to draw interactively (Figure 28d).
Figure 28d. Drawing a path of flowers with an art brush using the Paintbrush tool.
#29. Working with Pattern Brushes
Pattern brushes are the most complicated to modify or create because they involve as many as five different object panels. You can use separate symbols for the start, finish, side (center), inside corner, and outside corner panels.
While you can use up to five different objects in a single pattern brush, you can also create an interesting pattern brush with three or even two elements.
Once you define the pattern brush, you can apply it to existing paths or draw interactively with the Paintbrush tool. Pattern brushes can be used to draw mazelike paths; to generate arrows with a start, beginning, and end object; or to create borders for illustrations (Figure 29a).
Figure 29a. Using a pattern brush to apply a border around an illustration. Here one pattern defines the sides of the brush stroke, and a second pattern defines the corners.

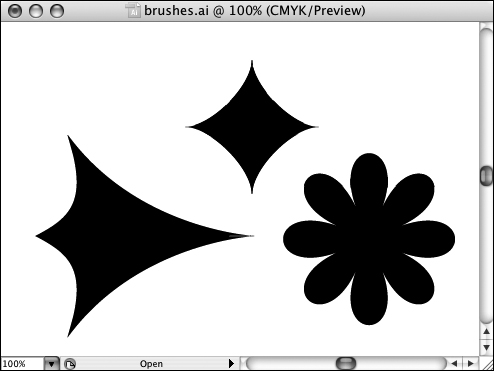
To create a pattern brush, start by defining up to five patterns that will be used as different elements of a path. You can, for example, create a brush by preparing a beginning pattern, a line segment pattern, and a line end pattern. That pattern brush can function as an arrow (Figure 29b).
Figure 29b. These three objects will become the start, middle, and end of a pattern brush.
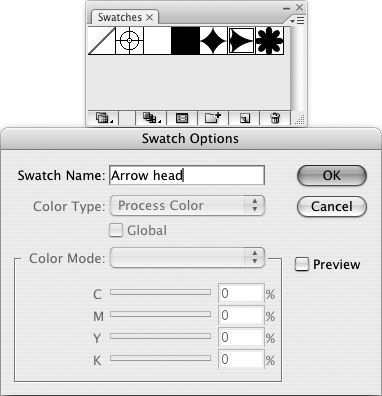
Once you have created your pattern brush elements, drag each object, one at a time, onto the Swatches panel and name them by double-clicking on the new swatch (Figure 29c).
Figure 29c. Creating swatches from artwork to use as pattern brush elements.
With your brush elements all in the Swatches panel, follow these steps to create a three-pattern pattern brush:
- From the Brushes panel menu, choose New Brush. Choose New Pattern Brush in the New Brush dialog and click OK to open the Pattern Brush Options dialog.
- Enter a name in the Name area.
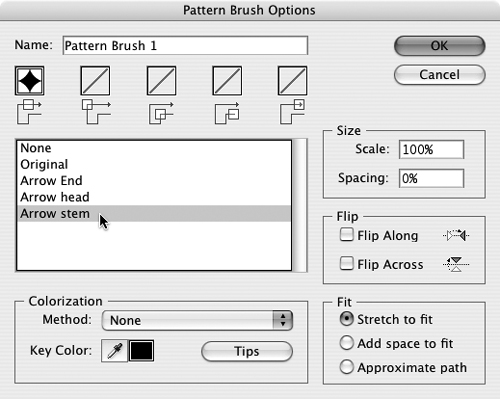
- Click the Side Tile icon (on the far left) in the set of five pattern swatches. Choose a swatch from the set that appears in the dialog to use as the pattern for normal line segments (Figure 29d).
Figure 29d. Defining a pattern to be used as the line segment element of a pattern brush.
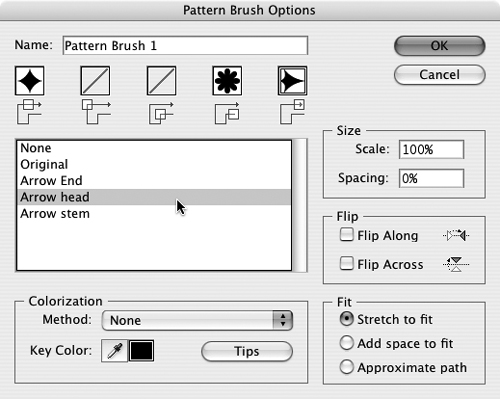
- Click the Start Tile icon (second from right) in the Pattern Brush Options dialog and select a swatch to use at the beginning of a path.
- Select the End Tile icon (on the far right) and choose a swatch (Figure 29e).
Figure 29e. Defining the end of a pattern brush.
- Normally, you’ll want to accept the default settings Size, Flip, Fit, and (no) Colorization. Click OK to define the pattern brush.
- As with other drawing tools, you can apply pattern brush strokes to selected paths by clicking on the brush in the Brushes panel. Or you can first select the pattern brush in the Brushes panel and then interactively draw strokes with the Paintbrush tool pattern (Figure 29f).
Figure 29f. Drawing a path with a pattern brush.