
As you discovered in Chapter 10, corrective filters enable you to eliminate image flaws and apply special effects that enhance the appearance of an image — generally without losing any details or changing the overall image content. These filters improve upon, rather than change, an image.
Destructive filters, on the other hand, are devoted solely to special effects. There are nearly twice as many destructive filters as corrective filters, perhaps because they simplify the creation of special effects, from simple artistic medium-mimicry to total distortion — things you could not easily do from scratch with any of Photoshop's tools or corrective commands and filters.
Now, some Photoshop veterans will tell you that destructive filters aren't useful or they aren't as important or effective as the corrective ones. That's an entirely subjective position, and one that isn't really worth defending or attacking. Suffice to say that many veteran designers love the destructive filters and would miss them terribly if they went away. Whether you're a veteran or a newbie, you'll probably find yourself loving some of the destructive filters and not seeing the need for or sense in others. That's why, as they say, "they make chocolate and vanilla" — there's something for everyone.
In this chapter, we make no attempt to cover each and every one of the destructive filters. First, for most of them, after you've mastered a few of the different controls that the filter dialog boxes offer, you don't need an explanation of the others. Second, you'd need a forklift to get this book from the shelf in your bookstore to the cashier (or you'd have to tip the mail carrier for lugging the book to your doorstep) if each one was covered.
Fear not: Even with the filters that have been skipped in this chapter, you're going to find yourself a master of destruction after reading the next 70-plus pages, and no filter's magic will elude you.
This list provides information about some of the more interesting special effects filters. Many of them may not seem immediately useful, but the more creative your work is, the more you'll find yourself making use of them:
Fragment: Found in the Pixelate group of filters, this filter repeats an image four times in a square formation and lowers the opacity of each to give the illusion of the image being shaken — as though the photo was taken during an earthquake. Earthquake photography is not the technical purpose for this filter — it may not have a specific purpose at all — but it can be used alone or with other filters for interesting results, especially if you use it on a duplicate layer with reduced opacity. There are no options for controlling its effects, and it can make your eyes hurt if you stare at the photo for too long.
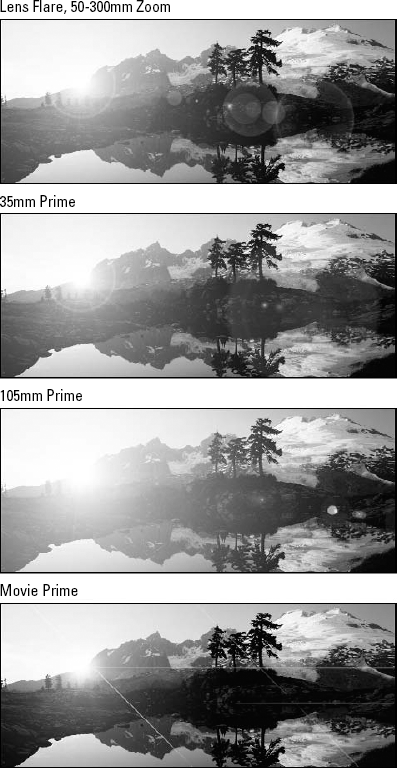
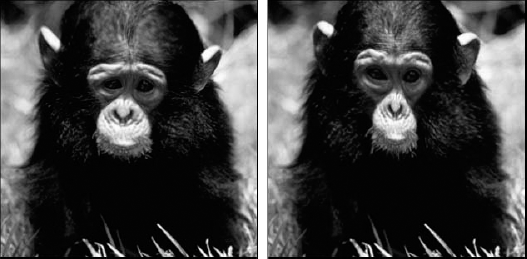
Lens Flare: Found in the Render submenu, this filter adds sparkles and halos to an image to suggest light bouncing off the camera lens. Even though many photographers work hard to avoid these sorts of reflections, lens flares can have artistic merit and this filter lets you add them after the fact. You can select from one of three Lens Type options, adjust the Brightness slider between 10 and 300 percent (though somewhere between 100 and 150 is bound to deliver the best results), and move the center of the reflection by clicking and dragging a point around inside the Flare Center box. In addition, you can Alt-click (Win) or Option-click (Mac) inside the preview to position the center point numerically. By way of example, Figure 11.1 shows an Alpine landscape, and Figure 11.2 demonstrates the four Lens Type settings. In each case, the Brightness value was set to 140 percent.
Tip
The Alt or Option key can be very helpful to you in the Lens Flare and many other filter dialog boxes: If you press and hold Alt or Option as you drag the slider, you can see the preview update on the fly.
If you want to add a flare to a grayscale image, first convert it to the RGB mode. Then apply the filter and convert the image back to grayscale. The Lens Flare filter is applicable only to RGB images and is dimmed in the menu if your image is in Grayscale mode.
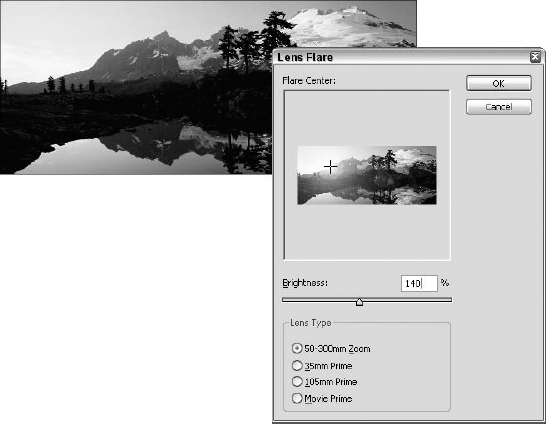
Figure 11.1. Starting with this crisp mountain pool, the next figure shows you what the Lens Flare filter can do.
Before you write off Lens Flare as something too detail-obscuring or something you'd never need, consider this: Prior to choosing the filter, create a new layer, fill it with black, and apply the Screen blend mode by pressing Shift+Alt+S (Shift+Option+S on the Mac) with a nonpainting tool selected. Now apply Lens Flare. You get the same effect as you would otherwise, but the effect floats above the background image, protecting your original image from harm. You can even move the lens flare around and vary the Opacity value, giving you more control over the final effect.
Tip
Want your lens flare to be an on-and-off affair? Turn your image layer into a Smart Object, using the Filter

Diffuse: Located in the Stylize submenu — as are the three filters that follow — Diffuse dithers the edges of color, much like the Dissolve brush mode dithers the edges of a soft brush. The results are hard to describe in terms of "makes it look like this" or "mimics that," but the results are pretty neat.
Solarize: This filter has no dialog box, so you can't control it. It serves mostly to distort your colors and may have a variety of creative purposes in the right situation — it's up to you. What it does is change all medium grays in the image to 50 percent gray, changes all blacks and whites to black, and remaps the other colors to shades in between. If you're familiar with the Curves command, the map for Solarize looks like a pyramid. What? You're not familiar with Curves? Go to Chapter 18.
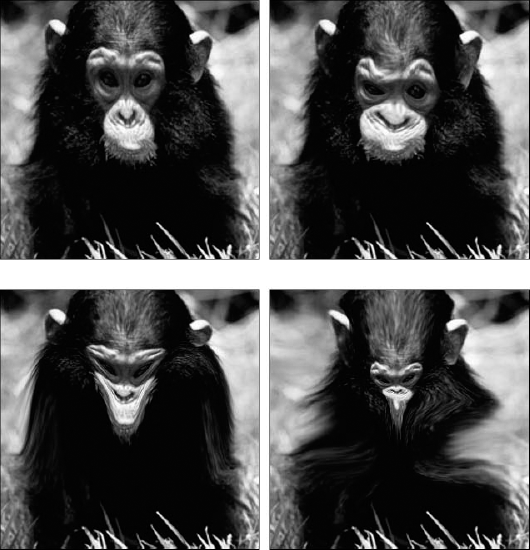
Tiles: This filter does its best to break an image up into a bunch of square, randomly spaced rectangular tiles. You specify how many tiles fit across the smaller of the image's width or height — a value of 10, for example, creates 100 tiles in a perfectly square image — and the maximum distance each tile can shift. You can fill the gaps between tiles with the foreground color, the background color, or an inverted or normal version of the original image. You can compare the Tiles filter to the Extrude filter (the next one discussed here) in Figure 11.3, where the original, untouched image appears on the far left, followed by two types of extrusions.
Extrude: A functional cousin of the Tiles filter, Extrude breaks an image into tiles and forces them toward the viewer in three-dimensional space. The Pyramid option is lots of fun, turning an image into a collection of spikes. When using the Blocks option, you can select a Solid Front Faces option that renders the image as a true 3-D mosaic. The Mask Incomplete Blocks option simply leaves the image untouched around the perimeter of the selection where the filter can't draw complete tiles.
Diffuse Glow: Filter
Custom: The first of two custom effects filters in Photoshop, found under the Filter
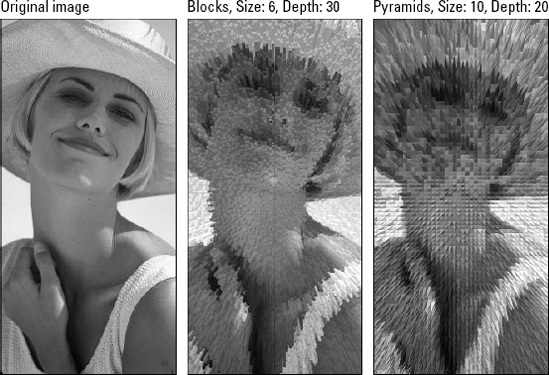
Figure 11.3. This figure shows two examples of the Extrude filter. Reminds you of one of those toys with the hundreds of little metal rods you can press parts of yourself into to create a relief, doesn't it? What the heck are those things called, anyway?

Figure 11.4. Type numbers into these little boxes, and watch your photo's light, color, and clarity change — for better or worse — depending on the numbers you type, where you type them, and what you were hoping for. Again, Chapter 12 helps you make sense of this — and it's worth the trip!
Displace: Located in the Distort submenu, Displace is Photoshop's second custom effects filter, and it's also covered in detail in Chapter 12. It permits you to distort and add texture to an image by moving the colors of certain pixels in a selection. You specify the direction and distance that the Displace filter moves colors by creating a second image called a displacement map, or dmap (pronounced dee-map) for short. The brightness values in the displacement map tell Photoshop which pixels to affect and how far to move the colors of those pixels.
Artistic filters: As a rule, the effects under the Filter
Brush Strokes filters: The Brush Strokes filters could really have been packed into the Artistic group, because most of them mimic artistic tools such as pens, spray paint, and other methods for using ink. Some of them defy categorization (Accented Edges comes to mind here), but you'll find ways to use them regardless of where Adobe decided to store them.
Sketch filters: Many of the Sketch filters replace the colors in your image with the current foreground and background colors, so be prepared to undo and then tinker with the Color settings before reapplying the filter for more pleasing results. If the foreground and background colors are black and white, the Sketch filter results in a grayscale image. Charcoal and Conté Crayon create artistic effects, Bas Relief and Note Paper add texture, and Photocopy and Stamp create extreme black-and-white results — not easy to imagine using every day, but... Figure 11.6 shows a group of Sketch filters (including Photocopy) in use.
Tip
To retrieve some of the original colors from your image after applying a Sketch filter, press Ctrl+Shift+F (

Texture filters: As a group, the commands in the Filter
Note
Adobe decided that 3D Transform and Texture Fill are somewhat dated and not terribly useful, so as of the release of Photoshop CS, they don't install automatically with the program. But if you want them, they're on the Photoshop CD/DVD, and you need to install them manually to access them.
Note
Learn more about patterns and textures and how filters can help you build them in Chapter 12.
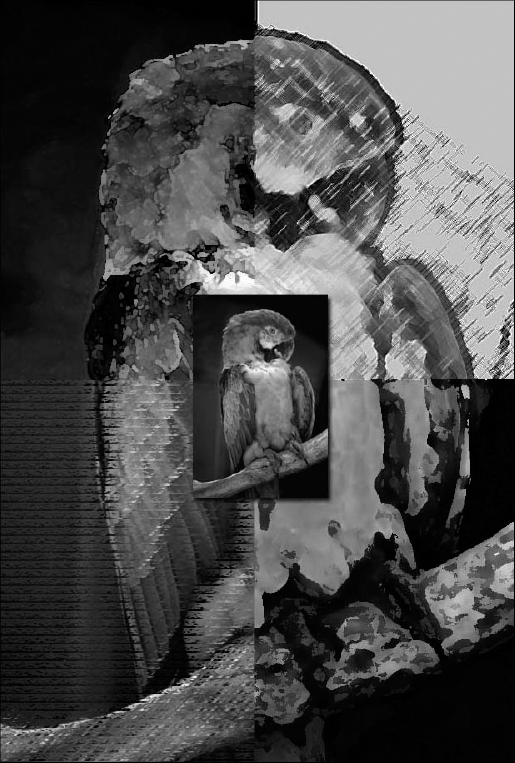
Figure 11.5. A photo goes from reality (inset) to Watercolor, Colored Pencil, Rough Pastels, and Fresco (clockwise from upper left). Try them yourself on an otherwise boring photo to mask blemishes, unwanted details, or just plain ugliness.

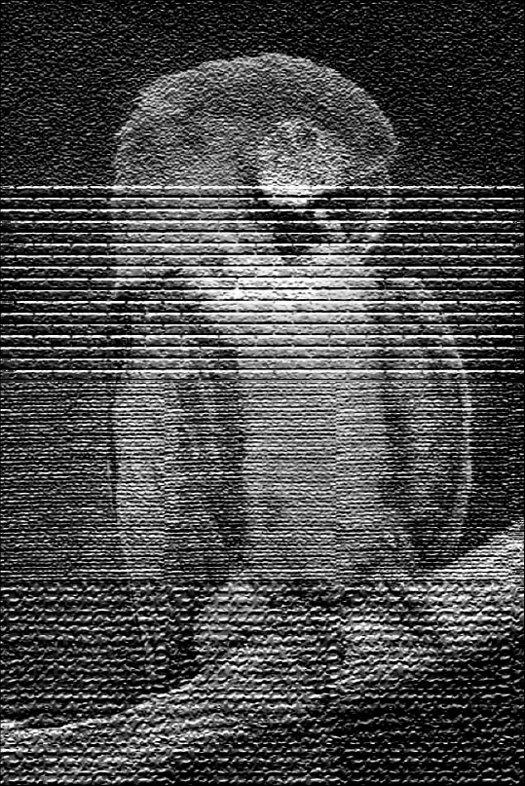
Figure 11.6. Clockwise from upper left, the parrot seen in Figure 11.5 has been Sketched with the Chalk & Charcoal, Bas Relief, Graphic Pen, and Photocopy filters.
Some filters don't belong in either the corrective or destructive camp. Take Filter
The NTSC Colors filter modifies the colors in your RGB or Lab image for transfer to videotape. Vivid reds and blues that might otherwise prove very unstable and bleed into their neighbors are curtailed, as are pure white and black. The problem with this function is that it's not an independent color space; it's a dialog box-less filter (meaning you can't control it) that changes your colors and is finished with them. If you edit the colors after choosing the command, you may very well reintroduce colors that are incompatible with NTSC devices and therefore warrant a second application of the filter. Conversion to NTSC — another light-based system — isn't as risky as conversion to CMYK pigments, but you may wish you could have better results than this filter gives you.
The Offset command moves an image a specified number of pixels. Why wasn't it covered in Chapter 8 with the other movement options? Because the command moves the image inside the selection outline while keeping the selection outline itself stationary. It's as if you had pasted the entire image into the selection outline and were now moving it around. The command is a favorite among fans of channel operations, a topic covered in Chapter 4. You can duplicate an image, offset the entire duplicate by a few pixels, and then mix the duplicate and original to create highlight or shadow effects.
Note
Among the filters omitted in this chapter is Filter
As for the other filters in the Filter
Why bring this up here, in a chapter on filters? Because RAM (and your other system resources) is a precious commodity when applying destructive filters. As mentioned in Chapter 2, scratch disk space typically enables you to edit larger images than your computer's RAM might permit. But all the filters in the Distort submenu and most of the commands in the Render submenu operate exclusively in memory. If they run out of physical RAM, they won't work.
Here's what Adobe states are the minimum requirements for Windows users. Next to some of these requirements are our suggestions (in italics) for more realistic performance expectations:
Processor: Intel Xeon, Xeon Dual, Centrino, or Pentium 4
System: Microsoft Windows XP with Service Pack 2 or higher, Vista
RAM: 320 MB (384MB recommended). 1 GB is a better choice, and certainly anything less than 512 MB will result in very slow performance.
Hard-disk: 650MB
Monitor: 1024×768 monitor resolution, 16-bit video card
Video RAM: 64MB
CD-ROM Drive: required
Activation/Updater: Internet or phone connection required for product activation
Browser: IE 6.0, Netscape 4.x, 6.1, 6.2 or 7.0, AOL 6.0 or 7.0, Opera 8.0+, Firefox 1.0.5+
Multimedia: QuickTime 7 required for multimedia features
If you're on a Mac, here are the system requirements — again, at minimum:
Processor: PowerPC G4 or G5, Intel-based Macs
System: Mac OS X v. 10.3.X latest, 10.4. latest, Leopard (10.4.X)
RAM: 320MB (384MB RAM recommended). In reality, anything less than 512 MB won't work, and new, Intel-based Macs ship with a 1 GB minimum RAM.
Hard-disk: Estimated 1.5GB
Monitor: 1024×768 monitor resolution, 16-bit video card
Video RAM: 64MB
CD-ROM Drive: required
Activation/Updater: Internet or phone connection required for product activation
Browser: IE 5.5+, Netscape 8.0+, AOL 5.0+, Safari 1.0+, Opera 8.0+, Firefox 1.0.5+
Multimedia: QuickTime 7 required for multimedia features
These requirements aren't intended to raise the hardware bar so high that only the wealthy can afford the computer that'll run Photoshop. It's just that the software's capabilities require more "juice" from the hardware, so only a computer with adequate resources can run it properly. If you're serious about your photos and all the things you can do with Photoshop, you probably already have a computer that can handle Photoshop's system requirements. If not, you'll reap lots of other technological benefits by upgrading your system — enhanced experience on the Internet, viewing video, and running lots of other programs that run faster and better with more horsepower under the hood.
Introduced to much applause in Photoshop CS, the Filter Gallery (shown in Figure 11.8) provides one-stop shopping for many of Photoshop's filters. To access the Filter Gallery, choose Filter
One of the really nice things about the Filter Gallery is the ability to see that large preview of the image within the Gallery itself. As with the Lens Blur filter dialog box discussed in Chapter 10, you can adjust the zoom level of the preview using the plus and minus icons or the pop-up menu under the right-pointing arrowhead next to the zoom percentage. Whenever there is more to the image than fits in the preview window, you can use your mouse (its cursor appears as the Hand tool) to pan up, down, left, or right and to view other parts of the preview in the window. Also similar to the Lens Blur filter is the progress bar that appears next to the zoom controls during particularly time-consuming renders.
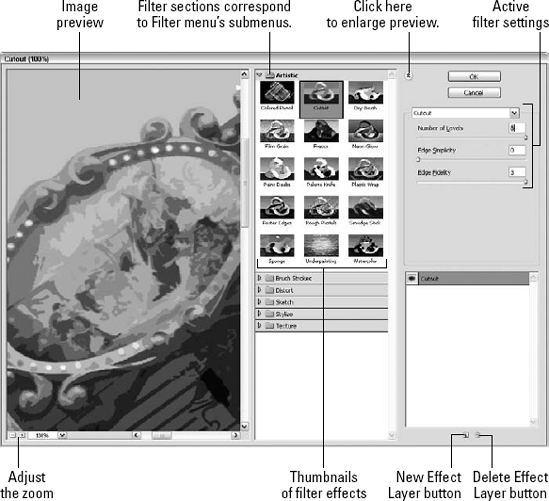
Figure 11.8. The Filter Gallery gives you access to a large preview of your image (without having to drag a filter dialog box aside to see your image window) and access to each filter's controls. Very handy.
The middle vertical section of the Filter Gallery dialog box is where you access the filters themselves. The filters are organized in an assortment of sections that correspond to their respective submenus in the Filter menu. Click the triangles to the left of the section names (or simply click a section name) to reveal the thumbnails, each altered to represent the effect of applying a particular filter. Click any of the thumbnails to apply the effect to your image, bring up a preview in the left side of the dialog box, and display the filter's settings on the right side of the dialog box.
Tip
Want to see all the Gallery's filters without having to navigate the sections? Click the down arrow next to the displayed filter name (above the active filter's settings on the right side of the dialog box) to see a list of all the Gallery's filters — regardless of section — displayed in one long list.
After you enable an effect, you can adjust its settings as you would any other filter. From here, you can more or less go wild — hop from section to section or filter to filter and play with the controls and watch the changes appear in the preview. Click the arrow icon to the left of the OK button to toggle the visibility of the filter area in the middle section of the dialog box and create more room for your image preview.
The real power of the Filter Gallery, however, is found in the bottom-right corner of the window (refer to Figure 11.8), where the applied filters are displayed in much the same manner as layers in the Layers palette. The filters also work in a similar fashion, if only because their stacking order plays a large role in determining how the final image looks. By default, you have only one layer of effects in the Filter Gallery, but adding more layers is as easy as clicking the New Layer Effect button (it's the little page) at the bottom of the dialog box and then selecting a different filter from the thumbnails. You also can press Alt (Option on the Mac) to apply another filter to your image and keep the filter/s you just applied in the Gallery in place. Figure 11.9 shows one of Krisha Martzall's images with three filters applied.
Additionally, you can stack the same filter on top of itself again and again, varying the settings to create some interesting effects. Click the eyeball icons next to the filter layers to toggle the visibility of any of the effects. Reordering the layers of filters in the Filter Gallery is as simple as clicking one and dragging it up or down the stack — just like restacking layers in the Layers palette. To remove any of the filters, simply highlight its layer and click the trash icon.
Note
With all these references to layers, if you're not clear on their use or how to manage them, check out Chapter 13.
Moving on, key filters are analyzed and demonstrated. Of course, as stated earlier, not all the filters in the whole Filters menu and submenus are discussed in detail, but most of them are and you'll find enough detail to enable you to use any filter successfully.
The Filter
Color Halftone: This highly practical filter allows you to suggest the effect of a halftone pattern. You can't preview in the filter's dialog box, so if you don't like your results, just Undo and reopen the dialog box to tweak the settings and reapply. When applied to a CMYK image, Photoshop simulates a commercially reproduced color separation. Otherwise, the filter merely affects those channels that it can. For example, when working inside an RGB image, the Channel 4 value is ignored, because RGB images have no fourth channel. When working on a grayscale image or mask, the Screen Angles value for Channel 1 is the only angle that matters.
Crystallize: This filter organizes an image into irregularly shaped nuggets. You specify the size of the nuggets by typing a value from 3 to 300 pixels in the Cell Size option.
Tip
If your image is set to a very high resolution or is quite large in terms of print size, you'll want to back the zoom off a bit (using the plus and minus buttons) to see the overall effect on the image before clicking OK. This applies to just about all the filters that offer a preview in their dialog box — you want to zoom in to adjust the specific settings and their per-pixel impact on the image, but zoom out to see how it's going to affect things overall.
Facet: Facet fuses areas of similarly colored pixels to create a sort of hand-painted effect. There is no dialog box for this one, so if you don't see a big change, just repeat the filter a few times (Ctrl+F or
Fragment: Another filter with no dialog box, this one shakes things up — literally. It creates the look of a photo taken by a camera sitting on a paint-shaker.
Mezzotint: This filter renders an image as a pattern of dots, lines, or strokes. See the section "Creating a mezzotint" for more information (it's coming right up after this section). You cannot adjust the zoom percentage for the Preview in the dialog box (or turn off the Preview), and your mouse has no panning ability in the dialog box. Just pick the Type of dots, lines, or strokes, and click OK to see what it does to your image.
Mosaic: The Mosaic filter blends pixels together into larger squares. You specify the height and width of the squares by typing a value in the Cell Size option box. Obviously, the smaller the cells are, the more recognizable your image details remain.
Pointillize: This filter is similar to Crystallize, except that it separates an image into disconnected nuggets set against the background color. As usual, you specify the size of the dots by changing the Cell Size value.
A mezzotint is a special halftone pattern that replaces dots with a random pattern of swirling lines and wormholes. Photoshop's Mezzotint filter is an attempt to emulate this effect. Although not entirely successful — true mezzotinting options can be properly implemented only as PostScript printing functions, not as filtering functions — they do lend themselves to some interesting interpretations.
The filter itself is straightforward. You choose Filter
Note
The Mezzotint line patterns are on par with the halftoning options offered when you select Mode
When applied to grayscale artwork, the Mezzotint filter always results in a black-and-white image. When applied to a color image, the filter automatically applies the selected effect independently to each of the color channels. Although all pixels in each channel are changed to either black or white, you can see a total of eight colors — black, red, green, blue, yellow, cyan, magenta, and white — in the RGB composite view.
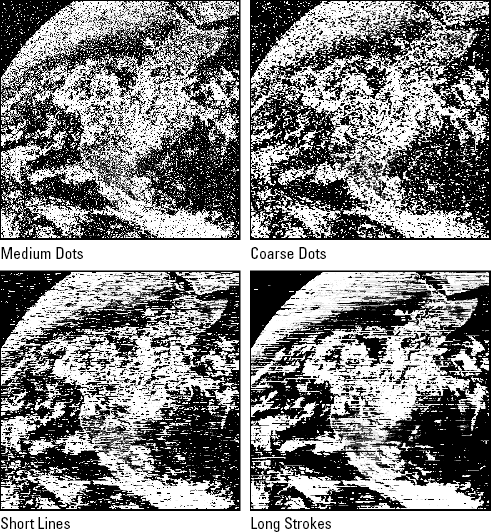
Figure 11.10. This figure shows the results of applying the Mezzotint filter as Fine Dots (upper left), Coarse Dots (upper right), Medium Lines (lower left), and Long Strokes (lower right). In each case, the filter changes all pixels in each channel to black and white.
If the Mezzotint filter affects each channel independently, it follows that the color mode in which you work dramatically affects the performance of the filter. For example, if you apply Mezzotint in the Lab mode, you again whittle the colors down to eight, but a very different eight — black, cyan, magenta, green, red, two muddy blues, and a muddy rose. If you're looking for bright happy colors, don't apply Mezzotint in the Lab mode.
In CMYK, the filter produces roughly the same eight colors that you get in RGB — white, cyan, magenta, yellow, violet-blue, red, deep green, and black. However, the distribution of the colors is much different. The image appears lighter and more colorful than its RGB counterpart. This happens because the filter has lots of black to work with in the RGB mode but very little — just that in the black channel — in the CMYK mode.
The Filter
The Emboss filter works by searching for high-contrast edges (just like the Sharpen Edges and High Pass filters), highlighting the edges with black or white pixels, and then coloring the low-contrast portions with medium gray. When you choose Filter
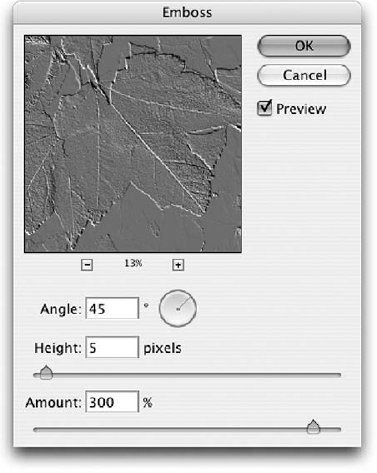
Figure 11.11. The Emboss dialog box lets you control the depth of the filtered image (Height and Amount) and the Angle from which the image is lit.
The dialog box offers three options:
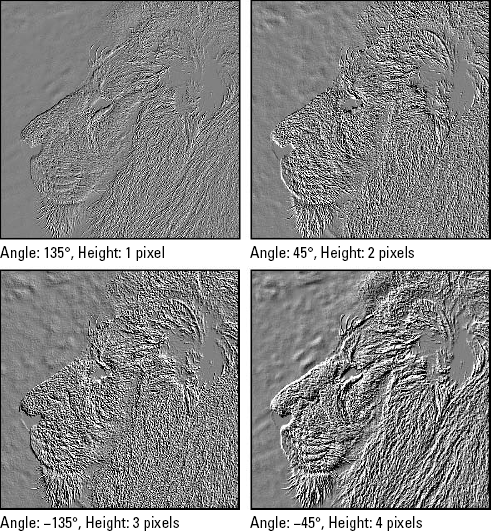
Angle: The value in this option box determines the angle at which Photoshop lights the image in relief. For example, if you type a value of 90 degrees, you light the relief from the bottom straight upward. The white pixels therefore appear on the bottom sides of the edges, and the black pixels appear on the top sides. Figure 11.12 shows four reliefs lit from different angles and with different Height settings.
Height: The Emboss filter accomplishes its highlighting effect by displacing one copy of an image relative to another. Using the Height option, you specify the distance between the copies, which can vary from 1 to 100 pixels. Lower values produce crisper effects, as demonstrated in Figure 11.12. Values above 4 work best if you also use a high Amount value. Together, the Height and Amount values determine the depth of the image in relief.
Tip
The Height value is analogous to the Radius value in the Unsharp Mask dialog box. You should therefore set the value according to the resolution of your image — 1 for 150 ppi, 2 for 300 ppi, and so on.
Amount: Type a value between 1 and 500 percent to determine the amount of black and white assigned to pixels along the edges. Values of 50 percent and lower produce almost entirely gray images. Higher values produce sharper edges, as if the relief were carved more deeply.
Tip
To create a color-relief effect, apply the Emboss filter and then select the Luminosity option in the Fade dialog box. This retains the colors from the original image while applying the lightness and darkness of the pixels from the filtered selection. The effect looks something like an inked lithographic plate, with steel grays and vivid colors mixing together.
Tip
If you're not sure how you might use the Emboss filter (other than to create the illusion of a carving), think of Emboss as an extension of the High Pass filter. When considered this way, it takes on new meaning. You can use it to edit selection outlines in the Quick Mask mode, just as you might use the High Pass filter. You also can use it to draw out detail in an image.
Photoshop provides three filters that trace around pixels in your image and accentuate the edges. All three filters live in the Filter
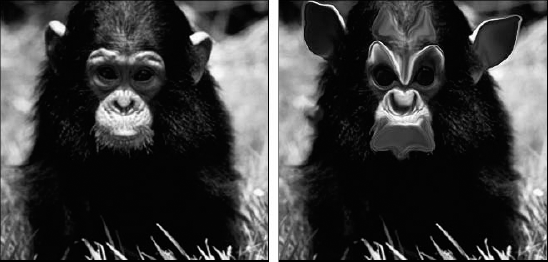
Find Edges: This filter detects edges similarly to High Pass. Low-contrast areas become white, medium-contrast edges become gray, and high-contrast edges become black, as in the upper-right example in Figure 11.13. Hard edges become thin lines; soft edges become fat ones. The result is a thick, organic outline that you can overlay on an image to give it a waxy appearance. The original, unfiltered image appears in the inset in the upper-left corner of the figure.
Glowing Edges: This Gallery Effects filter is a variation on Find Edges, with two important differences. Glowing Edges produces an inverted effect, changing low-contrast areas to black and edges to white, as shown in the upper-right and lower-left images in Figure 11.13. This filter also enables you to adjust the width, brightness, and smoothness of the traced edges by adjusting the Edge Width and Edge Brightness. The Smoothness setting reduces noise and heightens the intensity of the outline (the bottom-left example in Figure 11.13).
Tip
If you want black lines against a white background, change the image to Grayscale mode, and press Ctrl+I (
Trace Contour: Illustrated in Figure 11.13, this filter traces a series of single-pixel lines along the border between light and dark pixels. Choosing the filter displays a dialog box containing two settings: Level and an Edge setting with two options, Upper and Lower. The Level value indicates the lightness value above which pixels are considered to be light and below which they are dark. For example, if you type 128 (medium gray), Trace Contour draws a line at every spot where an area of color lighter than medium gray meets an area of color darker than medium gray. The Upper and Lower options tell the filter where to position the line — inside the lighter color's territory (Upper) or inside the space occupied by the darker color (Lower).
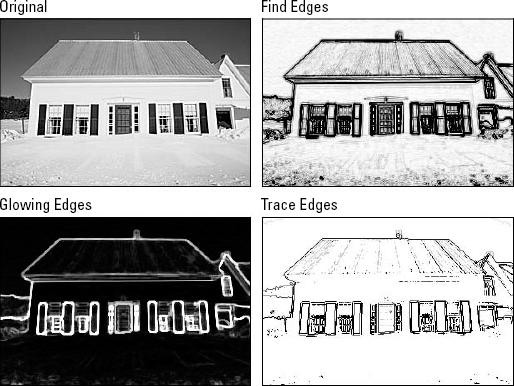
Like Mezzotint, Trace Contour applies itself to each color channel independently and renders each channel as a 1-bit image. A collection of black lines surrounds the areas of color in each channel. The RGB, Lab, or CMYK composite view shows these lines in the colors associated with the channels. When you work in RGB, a cyan line indicates a black line in the Red channel (no red plus full-intensity green and blue becomes cyan). A yellow line indicates a black line in the Blue channel, and so on. You get a single black line when working in the Grayscale mode.
The edge-tracing filters are especially fun to use in combination with Edit
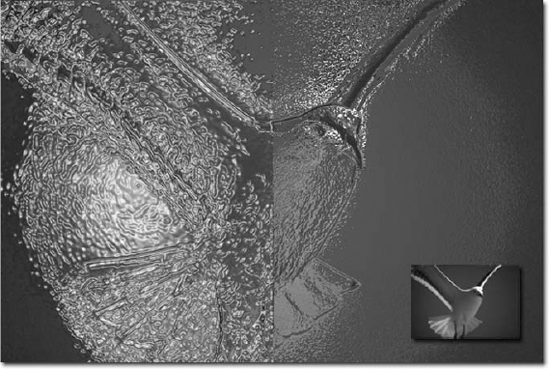
Figure 11.14. Chrome can be very cool (left), but you may want to tone down its effects a bit with the Fade command (right). Here, the fine detail of the bird is retained, while on the left, the full chrome effect is distracting from the subject. The inset shows the original image.
Tip
There's no end to the ways you can tweak one filter by combining it with another filter (or two) and various image adjustments. For example, while on the topic of metallic coatings and the gleaming highlights they promise, could there be another way to achieve that look without the problems that the Chrome filter can create? Absolutely — and the Find Edges filter can help. First, copy your image to a separate layer by pressing Ctrl+J (
For the most part, commands in the Distort submenu are related by the fact that they move colors in an image to achieve unusual stretching, swirling, and vibrating effects. They're rather like the transformation commands in the Edit menu in that they perform their magic by relocating and interpolating colors rather than by altering brightness and color values.
The distinction, of course, is that whereas the transformation commands let you scale and distort images by manipulating four control points, the Distort filters provide the equivalent of hundreds of control points, all of which you can use to affect different portions of an image. In some cases, you're projecting an image into a fun-house mirror; other times, it's a reflective pool. You can fan images, wiggle them, and change them in ways that have no correlation to real life, as illustrated in Figure 11.15.
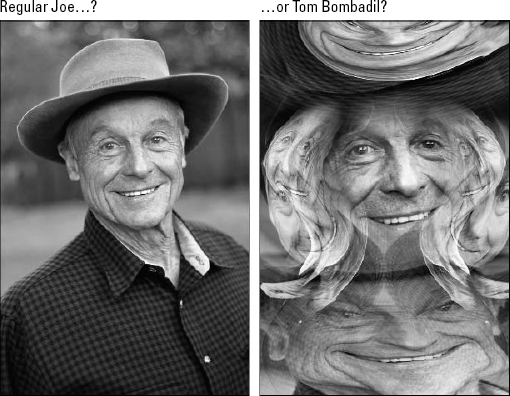
Figure 11.15. This is your Daddy (left); this is your Daddy on Distortion filters (right) — six of them, in fact. Liquify was also used for the effects at the bottom of the image.
Distortion filters are powerful tools. Although they are easy to apply, they are extremely difficult to use well. Here are some rules to keep in mind:
Practice makes perfect: Distortion filters are like complex vocabulary words. You don't want to use them without practicing a little first. Experiment with a distortion filter several times before trying to use it in a real project. You may even want to write down the steps you take so that you can remember how you created an effect.
Keep your eye on the clock: Distortion filters are enormous time-wasters. Unless you know exactly how you want to proceed, you may want to avoid using them when time is short. The last thing you need when you're working under the gun is to get trapped trying to pull off a weird effect.
Apply selectively: The effects of distortion filters are too severe to inflict all at once. You can achieve marvelous, subtle effects, however, by distorting feathered and layered selections. Although one would hardly call the image in Figure 11.15 subtle, no single effect was applied to the entire image.
Combine creatively: Don't expect a single distortion to achieve the desired effect. If one application isn't enough, apply the filter again. Experiment with combining different distortions.
Warning
Distortion filters interpolate between pixels to create their fantastic effects. This means the quality of your filtered images depends on the setting of the Image Interpolation option in the General Preferences dialog box. If a filter produces jagged effects, the Nearest Neighbor option is probably selected. Try selecting the Bicubic or Bilinear option instead.
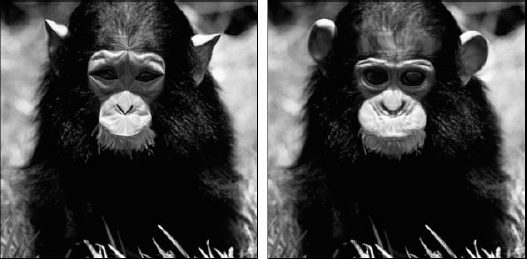
Just about everyone has stood in front of a fun-house mirror and watched his or her face and/or body be squeezed, stretched, and otherwise twisted into a variety of shapes. Where it gets really weird is where your facial features are shrunken, as though your face was shrinking from the center, and where your face seems to expand from the center — making for a big nose and a receding brow-bone and chin. It's probably fun to play in front of such a mirror for the same reason kids dress up like scary characters for Halloween — when something's temporary and unreal, even something scary can be fun. In Figure 11.16, you'll see a photo turned into a fun-house mirror reflection, using the Pinch and Spherize filters to scrunch, stretch, and wrap what started out as a perfectly normal-looking face.
Note
A positive Amount value in the Pinch dialog box produces an effect similar to a negative value in the Spherize dialog box. There is a slight difference between the spatial curvature of the 3-D calculations: Pinch pokes the image inward or outward using a rounded cone — we're talking bell-shaped, much like a Gaussian model. Spherize wraps the image on the outside or inside of a true sphere. As a result, the two filters yield subtly different results. Pinch produces a soft transition around the perimeter of a selection; Spherize produces an abrupt transition. If this doesn't quite make sense to you, just play with one, try out the same effect with the other, and see which you like better.
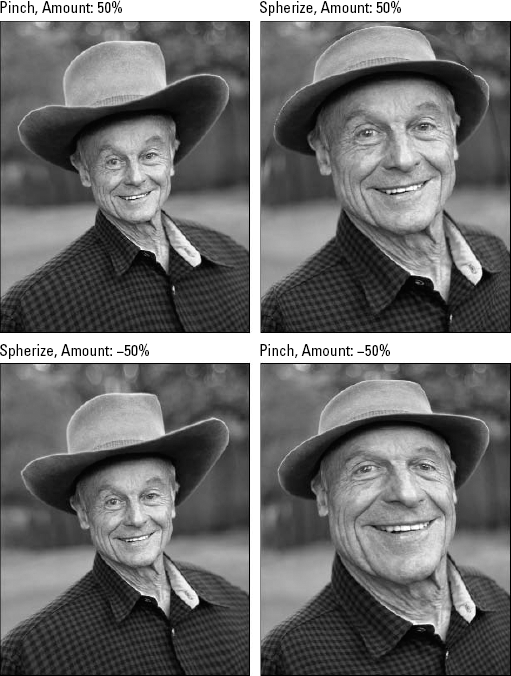
Figure 11.16. Using Pinch and Spherize, you can create some amusing results. Notice how negative values can make Pinch spherize, and Spherize pinch?
Another difference between the two filters is that Spherize provides the additional options of enabling you to wrap an image on the inside or outside of a horizontal or vertical cylinder, as shown in the last sample in Figure 11.16, where Vertical Only was used. To try out these effects, select the Horizontal Only or Vertical Only options from the Mode pop-up menu at the bottom of the Spherize dialog box.
Tip
Both filters can affect only elliptical regions. If a selection outline is not elliptical, Photoshop applies the filter to the largest ellipse that fits inside the selection. As a result, the filter may leave behind a noticeable elliptical boundary between the affected and unaffected portions of the selection. To avoid this effect, select the region you want to edit with the Elliptical Marquee tool and then feather the selection before filtering it. This softens the effect of the filter and provides a more gradual transition (even more so than Pinch already affords).
One of the more remarkable properties of the Pinch filter is that it lets you turn any image into a conical gradation. First, you may want to blur the image to eliminate any harsh edges between color transitions. Then apply the Pinch filter at full strength (100 percent). Reapply the filter several more times. Each time you press Ctrl+F (
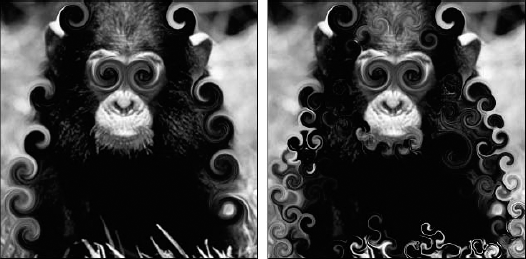
The Twirl filter rotates the center of a selection while leaving the sides fixed in place. The result is a spiral of colors that looks for all the world as if you poured the image into a blender set to a very slow speed.
When you choose Filter
Tip
The Twirl filter produces smoother effects when you use lower Angle values. Therefore, you're better off applying a 100-degree spiral 10 times rather than applying a 999-degree spiral once.
When you hear ZigZag filter, you may picture lightening bolts or other back-and-forth patterns. When it comes to a Photoshop filter, however, you know it won't be that simple. The ZigZag filter does arrange colors into zigzag patterns, but it does so in a radial fashion, meaning that the zigzags emanate from the center of the image like spokes in a wheel. The result is a series of concentric ripples, as shown in Figure 11.18 (see original image in the center inset). If you want parallel zigzags, check out the Ripple and Wave filters, described in the next section. (The ZigZag filter creates ripples and the Ripple filter creates zigzags — don't ask.)

When you choose Filter
Amount: Type an amount between negative 99 and positive 100 in whole-number increments to specify the depth of the ripples. If you type a negative value, the ripples descend below the surface. If you type a positive value, the ripples protrude upward.
Ridges: This option box controls the number of ripples in the selected area and accepts any value from 0 to 20.
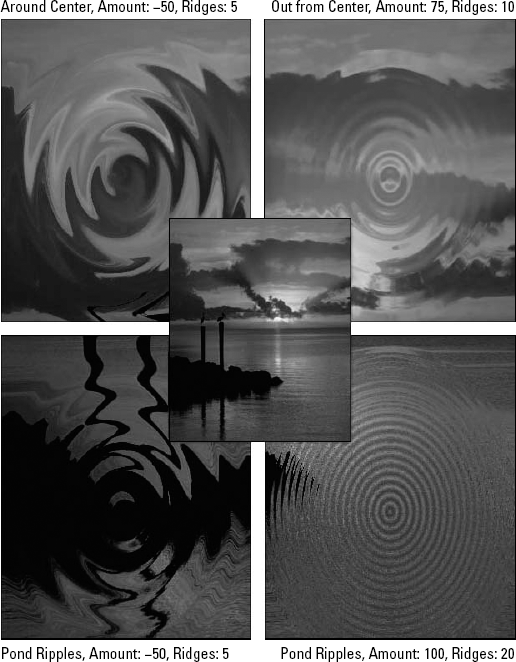
Figure 11.18. The ZigZag filter applied with Around Center, Amount −50, Ridges 5 (upper left), Out from Center, Amount 75, Ridges 10 (upper right), and Pond Ripples, Amount −50, Ridges 5 (lower left) Styles applied. The lower-right quadrant shows the Pond Ripples at the highest Amount (100) and Ridges (20) settings.
Style: The options in this pop-up menu determine how Photoshop moves pixels with respect to the center of the image or selection.
Around Center: Select this option to rotate pixels in alternating directions around the center without moving them outward. This is the only option that produces a true zigzag effect.
Out From Center: When you select this option, Photoshop moves pixels outward in rhythmic bursts according to the value in the Ridges option box.
Pond Ripples: This option is really a cross between the previous two. It moves pixels outward and rotates them around the center of the selection to create circular patterns.
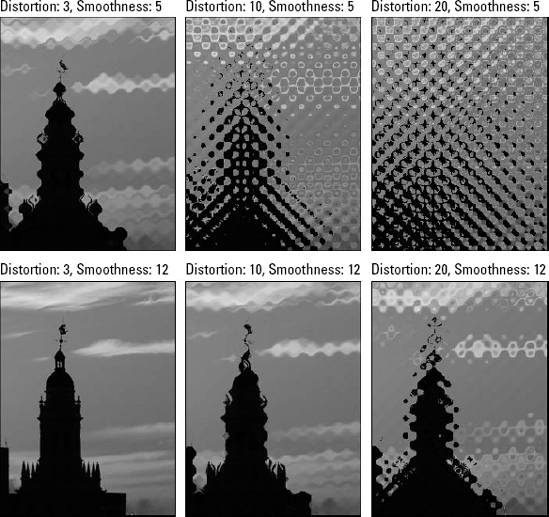
Photoshop provides four means to distort an image in parallel waves, as if the image were lying on the bottom of a shimmering or undulating pool. Of the four, the ripple filters — which include Ripple, Ocean Ripple, and Glass — are only moderately sophisticated, but they're also relatively easy to apply. The fourth filter, Wave, affords you greater control, but its options are among the most complex Photoshop has to offer.
To use the Ripple filter, choose Filter
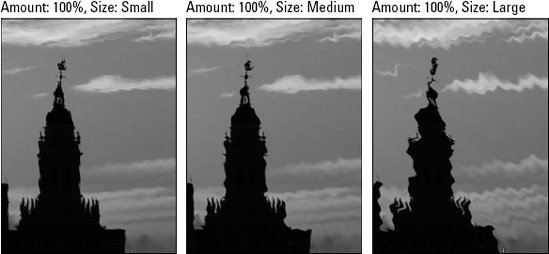
Amount: Type an amount between negative 998 and positive 999 in whole-number increments to specify the width of the ripples from side to side. Negative and positive values change the direction of the ripples, but visually speaking, they produce identical effects. The ripples are measured as a ratio of the Size value and the dimensions of the selection — all of which translates to, "Experiment and see what happens." You can count on getting ragged effects from any value over 300, as illustrated in Figure 11.19.
Size: Select one of the three options in the Size pop-up menu to change the length of the ripples. The Small option results in the shortest ripples and therefore the most ripples. Combining the Small option with a relatively high Amount value results in a textured-glass effect. The Large option results in the longest and fewest ripples. Figure 11.20 shows an example of each Size option.
Tip
You can create a blistered effect by overlaying a negative ripple onto a positive ripple. Try this: First, copy the selection. Then apply the Ripple filter with a positive Amount value — say, 300. Next, paste the copied selection and apply the Ripple filter at the opposite Amount value, in this case, −300. Press 5 to change the Opacity value to 50 percent. The result is a series of diametrically opposed ripples that cross each other to create teardrop blisters.

Both of these filters emulate the effect of looking at an image through textured glass. These two distorters so closely resemble each other that they would be better merged into one. The Ocean Ripple filter's two parameters, Ripple Size and Ripple Magnitude, are illustrated in Figure 11.21. Compare the examples horizontally to observe an increase in Ripple Size values from 5 to the maximum of 15; compare vertically to observe an increase in Ripple Magnitude from 5 to the maximum of 20. As you can see, you can vary the Ripple Size value with impunity. But raise the Ripple Magnitude value, and you're looking through sculpted glass.
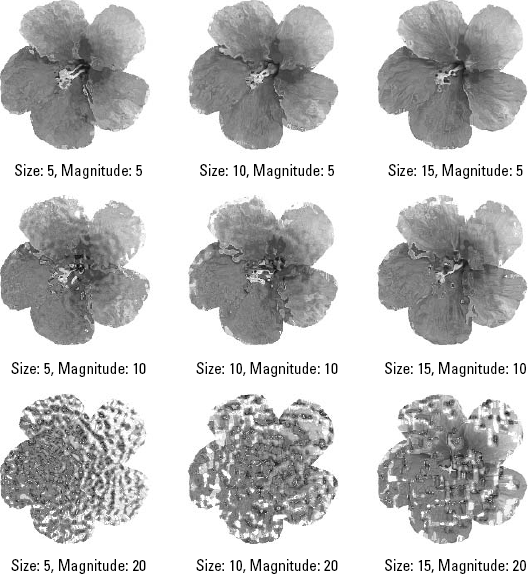
Figure 11.21. Raising the Ocean Ripple Size value spreads out the effect; raising the Ocean Ripple Magnitude adds more depth and contrast to the ripples.
The principal difference between Glass and Ocean Ripple is that Ocean Ripple uses one preset distortion texture, and Glass gives you four to choose from, plus it lets you load your own (similar to Texturizer). You can invert the texture — high becomes low, low becomes high — and also scale it to change its size relative to the layer you're distorting. Figure 11.22 uses the Tiny Lens texture throughout and demonstrates how different the effect can be depending on the Distortion and Smoothness settings. Compare the examples in the figure horizontally for proof that Distortion is perhaps the best-named parameter in all of Photoshop. Smoothness, on the other hand, is sort of like an "anti-Ripple Magnitude" setting. High Smoothness settings in Glass are analogous to low Ripple Magnitude settings in Ocean Ripple.
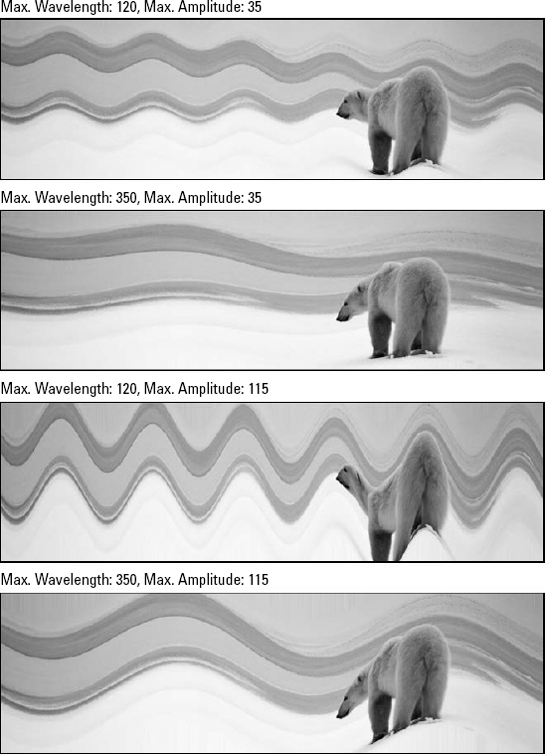
To go from baby ripples to serious water damage, choose Filter
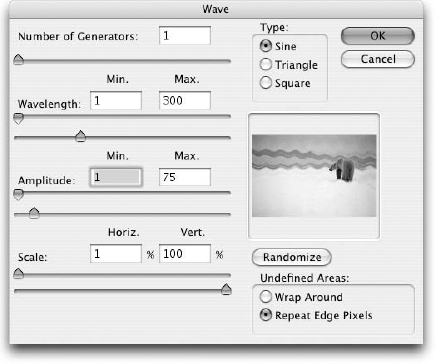
Figure 11.23. The Wave dialog box lets you decide how high the tide will rise as it undulates over your image.
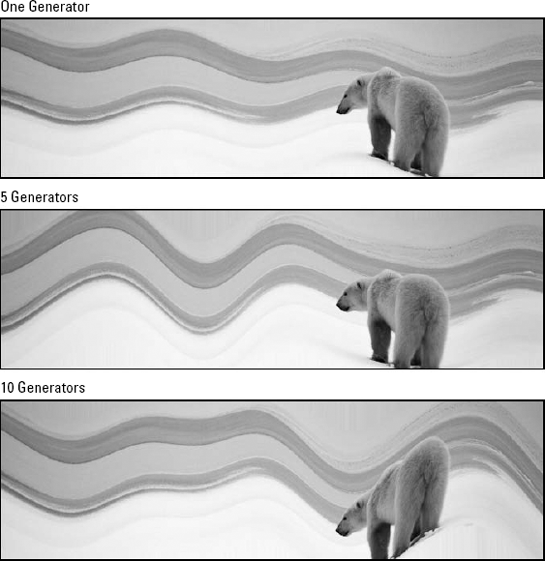
Number of Generators: Think of Generators as rocks tossed into still water. The more rocks you throw (one at a time), the more pools of outward-flowing concentric waves you get. If the rocks are close to each other, the waves intersect and flow through and bounce off one another. As shown in Figure 11.24, the more rocks you throw in, the more extreme and complex the results. If you type a very high value in this field, however, be prepared to wait a few years for the preview to update. If you can't wait, press Esc, which turns off the preview until the next time you type a value in the dialog box.
Wavelength and Amplitude: The Wave filter produces random results by varying the number and length of waves (Wavelength) as well as the height of the waves (Amplitude) between minimum and maximum values, which can range from 1 to 999. (The Wavelength and Amplitude options, therefore, correspond in theory to the Size and Amount options in the Ripple dialog box.) Figure 11.25 demonstrates an increase in Wavelength and Amplitude.
Scale: You can scale the effects of the Wave filter between 1 and 100 percent horizontally and vertically. Increasing Horizontal Scale makes the waves go back and forth as well as up and down.
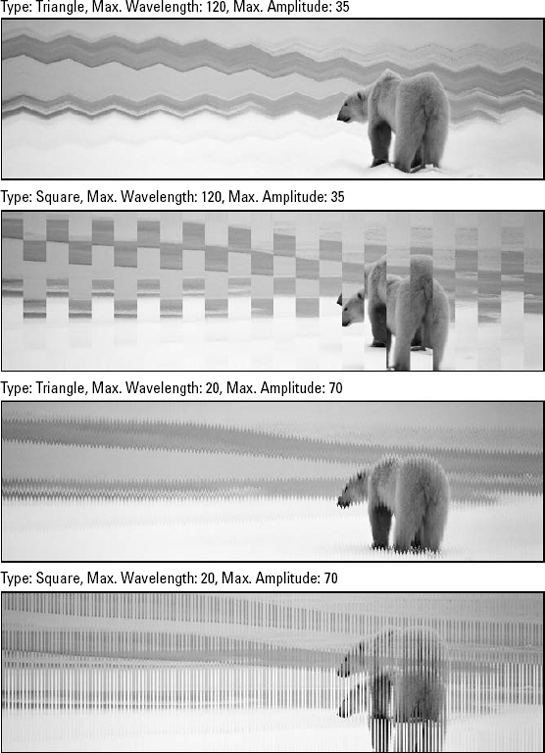
Type: You can select from three kinds of waves. The Sine option produces standard sine waves that rise and fall smoothly in curves, just like real waves. The Triangle option creates zigzags that rise and fall in straight lines, like the edge of a piece of fabric cut with pinking shears. The Square option has nothing to do with waves at all, but rather organizes an image into a series of rectangular groupings, reminiscent of Cubism. You might think of this option as an extension of the Mosaic filter. All examples in Figure 11.26 utilize a Number of Generators setting of 1 and demonstrate the Sine, Triangle, and Square settings.
Randomize: The Wave filter is random by nature. If you don't like the effect you see in the preview box, click Randomize (as illustrated in the bottom example in Figure 11.26) to stir things up a bit. You can keep clicking the button until you get an effect you like.
Undefined Areas: The Wave filter distorts a selection to the extent that gaps may appear around the edges. You can fill those gaps by repeating pixels along the edge of the selection, as in the figures, or by wrapping pixels from the left side of the selection onto the right side and pixels from the top edge of the selection onto the bottom.
The Distort command (Edit
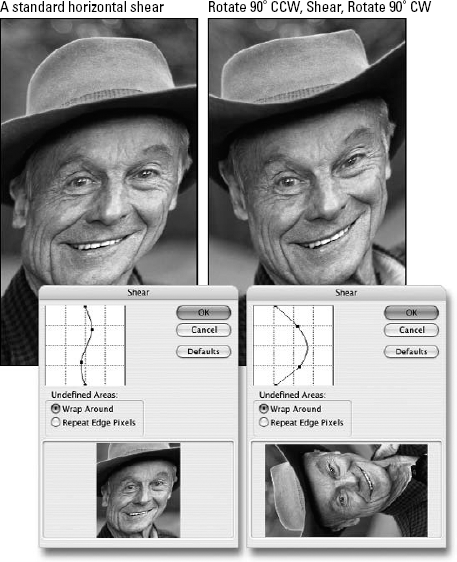
Shear distorts an image or a selection along a path. When you choose Filter
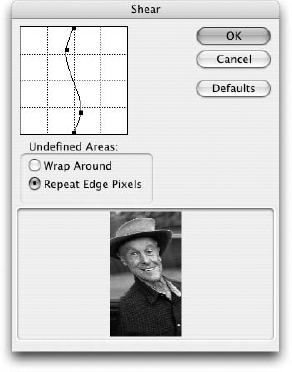
Figure 11.27. Click the grid line in the left corner of the Shear dialog box to add points to the line. Click and drag these points to distort the image along the curve.
You can add points to the grid line simply by clicking it. A point springs up every time you click an empty space in the line. Drag the point to change the curvature of the line, and distort the image along the new curve. To delete a point, click and drag it off the left or right side of the grid. To delete all added points and return the line to its original vertical orientation, click Defaults.
The Undefined Areas options work just as they do in the Wave dialog box (described in the preceding section). You can either fill the gaps on one side of the image with pixels shoved off the opposite side by selecting the Wrap Around option or repeat pixels along the edge of the selection by selecting the Repeat Edge Pixels option.
Tip
Although Shear was conceived to create horizontal distortions, you may find that you need to create a vertically based distortion instead. If you can't change the filter, why not change the image? Simply rotating the image on its side (Image
The Polar Coordinates filter is another one of those gems that lots of people shy away from because it doesn't make much sense at first glance. When you choose Filter

Figure 11.29. We've abused this guy in this chapter! Here he is in the Polar Coordinates dialog box, set to Rectangular to Polar.
When you convert the image to Polar Coordinates (by selecting the Rectangular to Polar option in the Polar Coordinates dialog box), you look down on it from an extreme aerial view. This means that the entire length of the image becomes a single dot in the exact center of the polar projection. If you select the Polar to Rectangular option, the Polar Coordinates filter produces the opposite effect — instead of the entire image becoming a dot in the center of the project, the image flows from a polar center outward, in a rectangular shape. Figure 11.30 gives you a little food for thought.
Tip
The Polar Coordinates filter is a great way to edit gradations. After drawing a linear gradation with the Gradient tool (as discussed in Chapter 6), try applying Filter

The Lens Correction filter opens a very large dialog box, shown in Figure 11.31. Your image appears in the Preview area, with a grid as an overlay. You can turn the Preview and the Grid off (hide them) using the check boxes just down and to the right of the preview — but you'd be better off keeping them on, at least while you're tinkering with the settings on the right side of the dialog box.
The tools on the left side of the dialog box allow you to use your mouse to adjust the Lens Correction settings — from top to bottom, the Remove Distortion tool, Straighten tool, Move Grid tool, Hand tool, and Zoom tool either correspond with a slider on the right or help you control the Preview area. For example, if you prefer a more hands-on approach to using this filter, use the Remove Distortion tool to drag on the Preview of the image instead of dragging the Remove Distortion slider. You can adjust the Angle setting by dragging to draw a line on the Preview with the Straighten tool.
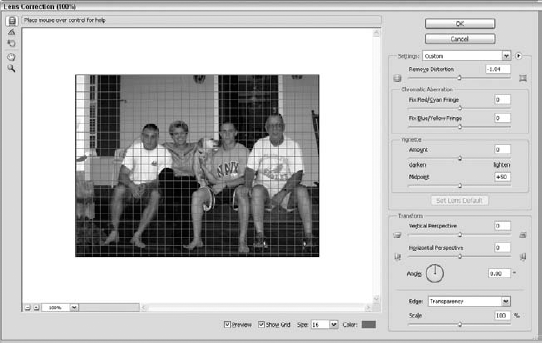
Figure 11.31. The Lens Correction filter dialog box allows you to correct lens relative flaws in your images or introduce them for dramatic effect.
Tip
If you can't see the grid (maybe it's the same color as the image — it's set to a medium gray by default), click the Color swatch and choose a color that stands out against your image.
Speaking of settings, your choices are as follows:
Remove Distortion: This adjusts the default lens distortion to create a concave lens (drag to the right) or a convex lens (drag to the left). This feature exists to fill two functions: remove that fish-eye lens look or introduce it. Figure 11.32 shows a classic example of this problem — a shot taken with a Web cam.
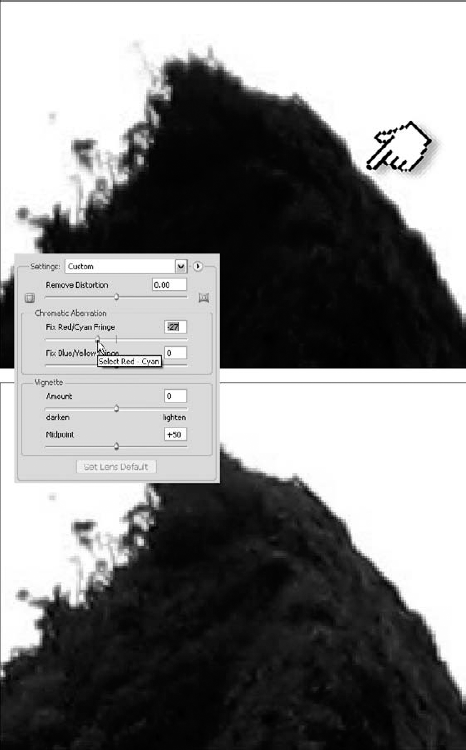
Chromatic Aberration: Chromatic aberration, or color fringing (shown in Figure 11.33), is the result of your lens focusing the various wavelengths of light onto different points on the camera's focal plane. This filter provides a Fix Red/Cyan Fringe and a Fix Blue/Yellow Fringe slider to correct for whichever type of color fringing your images is suffering from.
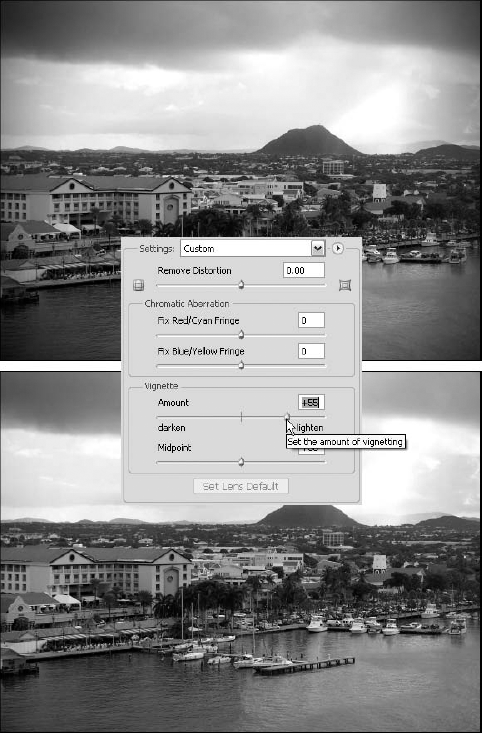
Vignette Amount: A vignette is typically a distinct darkening around the edges of an image. This was seen often in vintage portraits, creating a dark, cloudy frame around the main subject. This option allows you to darken or lighten the edges of the image by dragging the slider. If you leave the slider in the middle, no vignette effect is added by the filter. Of course, if your image already has an unwanted vignette effect, like that seen in Figure 11.34, you can counter it by dragging the slider toward the opposite of your problem — most likely toward Lighten to counteract a traditional vignette.
Vignette Midpoint: Drag this slider to change the center of the vignette effect's origin.
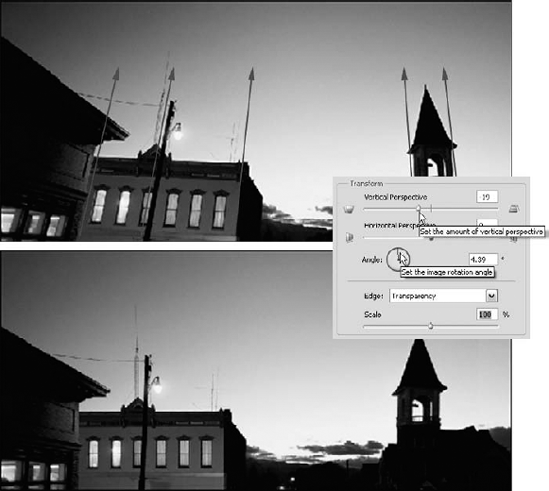
Transform Vertical Perspective: Drag this slider to tilt the image away from you at the top (drag to the right) or away from you at the bottom (drag to the left).
Transform Horizontal Perspective: Drag this slider to swing the image like a door — a door opening away from you to the left by dragging the slider to the right, or a door swinging away from you to the right by dragging the slider to the left.
Transform Angle: Rotate the image with this option, either by dragging within the circle, or by entering an angle of rotation into the box. Figure 11.35 shows an image in need of tinkering in both the Perspective and the Angle departments.
Transform Edge: Choose from Edge Extension, which (surprise) extends the ends of the image to the edges of the grid, Transparency (the default), which leaves the areas outside of the image yet within the grid transparent, and Background Color, which fills in around the image with the current background color. This option only becomes an issue when the lens has created space between the grid's edges and your image — through rotation, and perspective changes, or by dragging on the grid with your mouse to apply a lens effect to the image.
Transform Scale: This option simply sizes the image within the grid. Drag to the right to increase its size, or drag to the left to decrease it. If you're correcting a bulging image, increase the Scale to a level close to 100 plus the number shown in the Remove Distortion option — typically, this resolves any transparency or obvious expansion (if you have Edge Extension turned on for the Edge option).

The final essential distortion function isn't located under the Filter
Liquify is a distortion filter that also doubles as a powerful retouching tool. Consider the images in Figure 11.36. Thanks to the Liquify command, a calm and serene face was contorted into a mix of angered agitation — yet you could use it in subtler ways to widen eyes, soften lips, reduce a double chin, or raise cheekbones. Liquify could turn us all into supermodels.
Note
English teachers and ex-spelling-bee champions may notice the habitual misspelling of the word "liquefy" throughout this and the following pages. Rather than referring to the strictly accurate "Liquefy command," which would not match your screen, or the condescending "Liquify [sic] command," which gets old fast, we have just stuck with Adobe's inexplicable spelling.
To enter the world of Liquify, choose the Liquify command from the Filter menu or press the keyboard shortcut Ctrl+Shift+X (
The miniature toolbox on the left side of the window contains seven tools for distorting your image. You drag or click with the tools as explained in the next section. (You can even select tools from the keyboard, as indicated by keys in parentheses.) But before you begin, here are a few basic facts:
All tools respond to the Brush Size setting on the right side of the window. Press the right and left bracket keys ([ and ]) to raise and lower the brush size by 2 pixels. This is a bit of a departure from Photoshop's standard painting tools, where pressing [ or ] routinely changes the brush size by 10 pixels or more. To change the brush size in the Liquify window more rapidly, press and hold [ or ]. Throughout, your cursor reflects the approximate brush size. Note, however, that most distortions affect the pixels at the center of the cursor more quickly than those on the perimeter.
The Brush Density setting determines how much feathering the edges of your cursor have while you are creating your distortions. A smaller Brush Density setting means that effects are more localized to the center of the brush.
The Brush Pressure option controls the impact of the tools as you drag across your image; higher values produce more pronounced effects. If you work with a pressure-sensitive tablet, select the Stylus Pressure option to make Photoshop adjust the tool pressure based on the amount of pressure you put on the pen stylus.
Available when you use the reconstruct, Twirl clockwise, Pucker, Bloat, and Turbulence tools, the Brush Rate option controls the strength of these tools when you click on a particular area but keep the cursor still. The higher the Brush Rate setting, the faster distortions are applied to the area.
You can use the standard shortcuts Ctrl+plus to zoom in and Ctrl+minus to zoom out (
If you select a portion of your image before choosing Filter
By default, frozen regions are covered with a red translucent coating, just like masked areas in the Quick Mask mode. You can change the appearance of the overlay by selecting a new color from the Mask Color pop-up menu at the bottom of the Liquify window. If you don't want to see the coating at all, deselect the Show Mask option.
If your image contains layers, you see only the current layer against a transparent checkerboard background when you enter the Liquify window. To see other layers, select the Show Backdrop option in the bottom-right corner of the window. You can view all layers or select a specific layer from the nearby pop-up menu. The Opacity option controls how well you can see the other layers.
Use the Mode pop-up menu in the Show Backdrop settings to specify exactly how the layer you're currently distorting interacts with the other layers in the image. Regardless of what you see, Photoshop lets you edit only the active layer.
Select the Show Mesh option to display gridlines on top of the image. You can use the gridlines as a guide if you want to apply very precise distortions. You can even apply your distortions while viewing only the grid by deselecting the Show Image option. Set the grid size and color by selecting options from the Mesh Size and Mesh Color pop-up menus.
You can save a distortion for later use by clicking Save Mesh. To use the mesh on a Mac or PC, the file name needs to end with the .msh extension. Click Load Mesh to load a distortion stored on disk. Note that Photoshop is smart enough to scale the mesh to fit the current image, so a mesh specifically designed for one image may turn out to be useful for another.

Okay, so much for the basics. You're itching to start, so here's how the distortion tools along the left side of the Liquify window work:

Forward warp (W): Drag to shove the pixels under your cursor around the image. At first, it may feel like the Smudge tool. But instead of smearing pixels, you're incrementally moving points in the mesh that distort the image. The first example in Figure 11.38 shows a few large-scale changes made with a large brush and the default Pressure value. When used properly, the Forward Warp tool is the Liquify command's most practical tool. To create the second image, the Forward Warp tool was set to a smaller brush size. But the biggest difference was in the length of the strokes. Instead of dragging, say, 10 to 20 pixels at a time, the brush was dragged just 1 or 2 pixels. As you can see, making lots of little adjustments — in this case, somewhere in the neighborhood of 30 strokes — produces the best results.
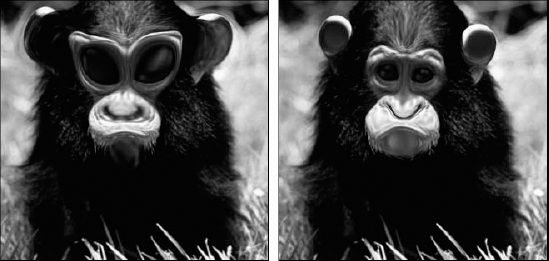
Figure 11.38. Making big strokes with the Forward Warp tool produces wacky results (left); short, careful drags give you more control (right). But you have to be patient. It took 6 strokes to make the big changes on left and about 30 to make the subtle changes on right — broadening the nose, expanding the lips, raising the chin, and lifting the eyelids and brows.

Twirl clockwise (C): Click or drag to spin pixels under your cursor in a clockwise direction, or to the right.
This tool's companion, the Twirl counterclockwise tool, no longer owns a slot in the Liquify toolbox. But you can still access the Twirl counterclockwise tool by pressing Alt (Option on the Mac) when you drag with the Twirl clockwise tool. You can press and release Alt in mid-drag to switch the Twirl direction on the fly. Figure 11.39 shows the Twirl tool used with Alt (Option on the Mac) to change the Twirl direction.

Pucker (S): Click and drag with this tool to move pixels toward the center of the brush cursor. The effect is similar to applying the Pinch filter with a positive Amount value. If you move your mouse down instead of dragging, Photoshop steadily increases the extent of the distortion until you release the mouse button.

Bloat (B): When you drag or move your mouse down with this tool, pixels underneath the cursor move outward. As is the case with the Pucker tool, the longer you hold down the mouse button, the more bloating you get.
Tip
Press Alt (Option on the Mac) to toggle between the Pucker and Bloat functions on the fly.
The Pucker and Bloat tools are particularly valuable for removing weight or adding bulk. For example, in the first image in Figure 11.40, the Pucker tool was used to contort the face and head shape.

Push Left (O): As you click and drag with this tool, pixels underneath the cursor move in a direction perpendicular to your drag. For example, if you drag down, pixels flow to the right. Drag straight up, and pixels move to the left. To reverse the direction of the pixels, press Alt (Option on the Mac).
At first, the Push Left tool may seem unwieldy, resulting in dramatic and sometimes unpredictable movements. But you can control it using two techniques. First, reduce the Brush Pressure value to 25 or lower. Figure 11.41 illustrates the difference between drags performed using Pressure settings of 50 and 20. Second, try using the Push Left tool in a straight line by clicking at one point and Shift-clicking at another, as you might with Photoshop's painting and editing tools. The result is a neat line, great for reducing flab along straight elements, such as arms and legs.

Mirror (M): Clicking and dragging with this tool creates a reflection, albeit one you might see in a fun-house mirror. As you drag, Photoshop copies pixels from the area perpendicular to the direction you move the cursor. So if you drag up, you clone pixels to the right of the cursor into the area underneath the cursor; drag down to clone pixels from left to right, as shown in Figure 11.42. Press Alt (Option on the Mac) to reflect from another direction on the fly.

Turbulence (T): The Turbulence tool is a variation on the Forward Warp tool that distorts pixels in random directions as you drag. When you select this tool, Photoshop grants you access to a third Tool Options value labeled Turbulent Jitter. If the Brush Size value controls how many pixels are affected at a time and Brush Pressure controls the strength of the stroke, Turbulent Jitter specifies just how much random variation is permitted. The minimum value of 1 causes the Turbulence tool to behave much like the Forward Warp tool; a maximum value of 100 mixes pixels in all directions.
Figure 11.43 illustrates a few examples. For purposes of demonstration, all four images were created using a very large Brush Size (ranging from 100 to 200, throughout all the samples) and the maximum Pressure value, 100. For each image in the top row, the brush was held in place for 15 seconds. The random variations built up from one moment to the next. Not surprisingly, a higher Turbulent Jitter value produced a more dramatic effect than a lower one.

After you drag with any of these tools, you can undo the effect by pressing Ctrl+Z (
As mentioned earlier, if you make a selection in your image before choosing Filter
To freeze a portion of your image from the Liquify window, you have two options:

Freeze Mask (F): Press F to select the Freeze Mask tool, and then click and drag over areas that you want to protect. You can adjust the brush size and pressure as you can when working with the distortion tools. But in this case, the Brush Pressure setting determines how deeply frozen the pixels become. At anything less than 100 percent, the pixels become partially distorted when you drag over them with a distortion tool. If you set the pressure to 50 percent, the distortion is applied with half the pressure used in unfrozen areas. Likewise, the Brush Density setting controls how deeply pixels become frozen toward the outside of the brush. To freeze the entire image, click Mask All in the Mask Options settings.

Thaw Mask (D): To thaw areas that you have frozen from the Liquify window, once again making them slaves to the distortion tools, paint over them with the Thaw Mask tool. The tool options affect this tool just as they do the Freeze Mask tool. To thaw the entire image, click None in the Mask Options settings.
Tip
Just as you can invert a selection outline or invert a mask in the Quick Mask mode, you can click Invert All to quickly freeze any unfrozen pixels and thaw any frozen ones.
Among the more complex features in the Liquify dialog box are the Mask Options settings, located below the Reconstruct Options. Above the None, Mask All, and Invert All buttons just mentioned, you're presented with five different buttons, each giving you a different option for interacting with the current mask. And each of those buttons has three options, when relevant; you can use information from the layer's current selection, transparency, or layer mask. From left to right, the options perform these functions:
Replace selection replaces the current mask, completely wiping out any freezing or thawing you've done and replacing it with a mask drawn from the layer's current selection, transparency, or layer mask.
Add to selection keeps all thawed areas in the current mask and also thaws other areas according to the layer's current selection, transparency, or layer mask.
Subtract from selection keeps all frozen areas in the current mask and also freezes other areas according to the layer's current selection, transparency, or layer mask.
Intersect with selection only allows an area to stay thawed if it is thawed both in the current mask and according to the layer's current selection, transparency, or layer mask.
Invert selection takes the current mask and inverts it, but only within the thawed areas according to the layer's current selection, transparency, or layer mask.
In the Reconstruct Options section of the Liquify window, you see a Mode pop-up menu plus two buttons, Reconstruct and Restore All. You can use these options not only to revert an image to the way it looked before you applied a distortion, but also to redo a distortion so that it affects the image differently.
The following list outlines reversion possibilities:
Undo: The Liquify window doesn't give you a History palette, but Ctrl+Alt+Z and Ctrl+Shift+Z still let you undo and redo sequences of operations (
Reset: To return everything to the way it was the very first time you opened the Liquify window, press the Alt key (Win) or the Option key (Mac), which changes the Cancel button in the dialog box to Reset. Click the Reset button, and not only do you restore your original image, you restore the Liquify window's default settings.
Tip
Believe it or not, you can undo Reset and other reversion techniques. I know; it's too cool. Just press Ctrl+Z (
Restore All: To revert the image without resetting all values to their defaults, click Restore All. This affects frozen and thawed areas alike.
Liquify also offers a handful of reconstruction techniques that are more controlled and more complex than the reversion options. By selecting an option from the Mode menu and then clicking Reconstruct or clicking and dragging with the Reconstruct tool (R), you can reconstruct a distortion so that it extends from a frozen area into neighboring unfrozen pixels. The Reconstruct button affects all unfrozen areas, but dragging with the tool alters only pixels under your cursor, subject to the Brush Size and Pressure values.
All the reconstruction modes calculate the change to the image based on the warp mesh (grid). To get a better feel for how each mode works, deselect the Show Image option, select the Show Mesh option, and then apply a simple distortion across a portion of the grid. Freeze part of the distorted region and then keep an eye on the grid lines at the intersections between frozen and unfrozen regions as you try out each of these modes:
Revert: The Revert mode restores unfrozen portions of the image to their original appearance, without regard to the borders between the frozen and unfrozen areas. Compare this to the Revert button, which restores frozen and unfrozen areas alike.
Rigid: This mode extends the distortion only as needed to maintain right angles in the mesh where frozen and unfrozen areas meet. The result is unfrozen areas that look very much like they did originally but smoothly blend into the frozen areas.
Stiff: Stiff interpolates the distortion so that the effect tapers away as you move farther from the boundary between the frozen and unfrozen areas.
Smooth and Loose: These two modes extend the distortion applied to the frozen areas into the unfrozen areas. The Smooth setting tries to create smooth transitions between frozen and unfrozen areas. Loose shares more of the distortion from the frozen area with the unfrozen area. You'll achieve the most dramatic results when frozen and unfrozen areas have been distorted differently.
Displace, Amplitwist, and Affine: The last three modes work exclusively with the reconstruct tool. Using these modes, you can apply one or more distortions that are in force at a specific reference point in the image. Click to set the reference point, and then drag through unfrozen areas to distort them. Use the Displace mode to move pixels to match the displacement of the reference point; select Amplitwist to match the displacement, rotation, and scaling at the reference point; and choose Affine to match all distortions at the reference point.
Although Liquify certainly gives you plenty of ways to reconstruct distortions, predicting the outcome of your drags with the Reconstruct tool can be nearly impossible. So be prepared to experiment. And if you don't get the results you want, remember that you can undo a reconstruction just as easily as you can any distortion.
The Vanishing Point filter, which really goes beyond what you expect from a filter, is used to manipulate image content to create the illusion of perspective. Of course, the Edit
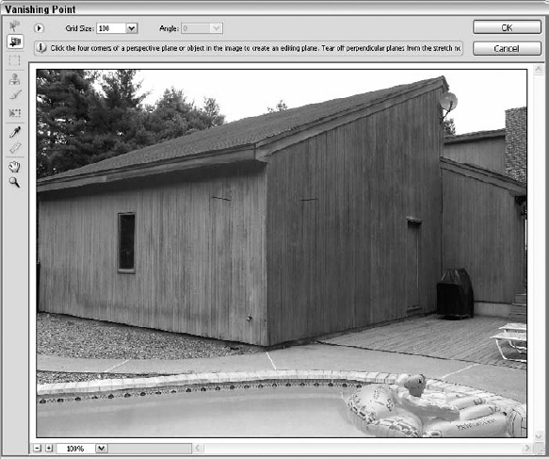
Figure 11.44. The Vanishing Point dialog box provides tools for creating and editing planes, cloning, stamping, sampling, panning, and zooming in on your image.
There are some new features of the Vanishing Point filter for Photoshop CS3:
You can bend selections across multiple surfaces. When you drag a selection across two connected surfaces, the selection bends, following the orientation of both surfaces. The Brush tools behave the same way with the brush tip itself able to bend across multiple surfaces. This, along with the Brush tool's ability (within Vanishing Point) to bend as it moves across surfaces with different orientations, gives you great editing capability, in perspective.
You can rotate selections and bend them. In the CS3 version of Vanishing Point, you could rotate selections, but now you can both rotate and bend them over more than one surface. You can wrap text around a building or packing box, or see a pattern fall down off the edge of a tablecloth (spread over the top and down the side of a table, for example).
Measurements can now be done in perspective. To serve the needs of architects, landscape and interior designers, and a host of other users who need to be able to measure in perspective, Vanishing Point now provides tools for this purpose. You can draw a measurement within an image and tell Photoshop how long the measured length should be. This then affects all other measurements and grid spacing for that image.
Photoshop supports DXF (CAD format), with export of geometry and measurements. Vanishing Point now takes 3-D sizes and positions on all surfaces and rebuilds them in DXF format. This enables you to take the measurement information from Vanishing Point-edited images and create CAD drawings. Press Ctrl+E (
Photoshop supports 3DS (3d Studio), with export of geometry and textures. This feature also will delight designers and architects, because it allows them to take what's edited in Vanishing Point and use it in a CAD, animation, or special effects application, with textures and other information gathered by the camera. Press Ctrl+Alt+E (
Tip
To access the Show Edges and Show Measurement commands, click the menu button (a small right-pointing triangle just to the left of the Grid Size field) and make your selections there. These options are on by default. You'll find menu commands for the aforementioned exporting options (to DXF and 3DS) here, too.
To use the Vanishing Point filter, read the discussion below to find out about the main tools and techniques.
When you start with the Vanishing Point tool, you want to begin with a duplicate layer that contains the portions of the image you want to use in creating the vanishing point and the content-in-perspective.
STEPS: Creating a vanishing point
Create a duplicate layer of an image.
Choose Filter
Click and drag to create a four-sided plane, as shown in Figure 11.45. If the resulting grid is yellow or red, you have not drawn a plane that follows a true perspective in your image.
Create a plane in the area of the image where you want to position content taken from the area within the first plane, as shown in Figure 11.46.
Now clone the content from one plane to the next by clicking the Clone Stamp tool (within the Vanishing Point window, of course) to take content from the first plane into the second.
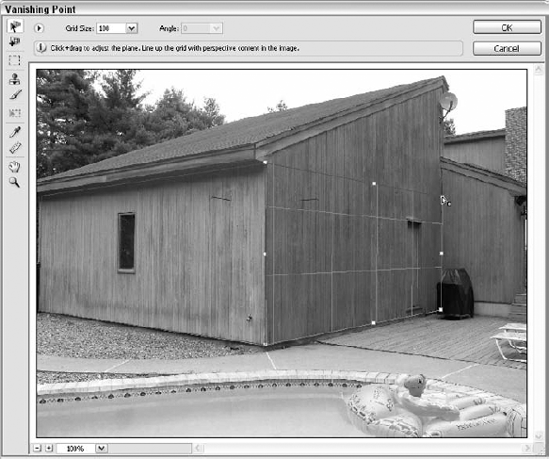
Figure 11.46. The second editing plane encompasses the side of the building and follows the intended vanishing point. Because the grid is blue (although it appears light gray in this black and white image), you know that the correct perspective is achieved.
Tip
If your grid is yellow or red, or if it's simply the wrong size, point to and drag the grid's side points to extend the edges of the grid to cover the area you wish to work in. If your resizing of the grid changes the perspective, the grid may change color, again indicating a problem with the perspective. Tinker with your grid until it's blue and the right size for your needs.

The cloning process is very much the same as it is when using the Clone Stamp tool in the Toolbox — use Alt (Option on the Mac) and click to set the source for the clone. You'll want to use the Heal option (it appears at the top of the dialog box as soon as you begin using the Clone tool). This ensures the colors and lighting in the cloned content match their new surroundings. You also can leave Aligned on so that you don't create any unwanted patterns if cloning a large area.
With the Clone tool active, drag your mouse over the target area to draw content from the source point. As shown in Figure 11.47, the window from the front of the garage is cloned to the right side of the building, and it appears in perfect perspective. You can save your modifications to the duplicate layer by clicking OK, which closes the Vanishing Point window and returns you to your image.
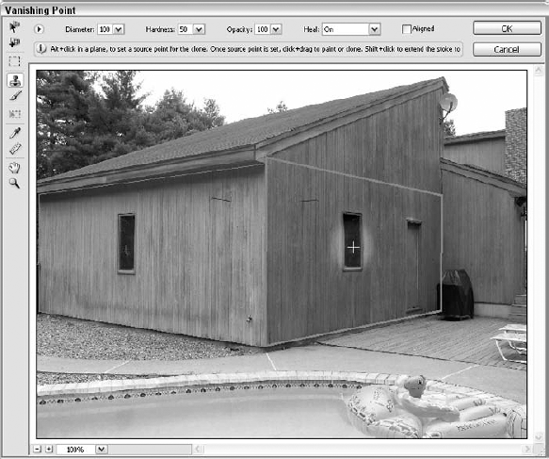
Figure 11.47. The green cross hair (gray here, over on the left) indicates the source point for the Clone Stamp. And with no need for a home construction how-to manual, a new window is placed on this building in just minutes.
Tip
The Vanishing Point filter takes lots of practice, and you'll find that using images with buildings, roads, and other solid structures with lots of vertical and horizontal sides is your best bet for honing your Vanishing Point skills. With its new tools for exporting to other programs, and the ability to bend and rotate selections over multiple surfaces, your options for using this tool to design product packaging, buildings, rooms, and other designs is virtually unlimited.
The five filters in the Render submenu produce lighting effects. You can use Clouds and Difference Clouds to create a layer of haze over an image. Lens Flare creates light flashes and reflections (as shown earlier in the chapter). Lighting Effects lights an image as if it were hanging on a gallery wall. You also have the Fibers filter, which you may want to check out but then ignore — its results are a bit strange.
The Clouds filter creates an abstract and random haze between the foreground and background colors. The Difference Clouds filter works exactly like layering the image, applying the Clouds filter, and selecting the Difference blend mode in the Layers palette.
Why would Difference Clouds make special provisions for a single blend mode? Because you can create cumulative effects. Try this: Select a sky blue as the foreground color, and then choose Filter
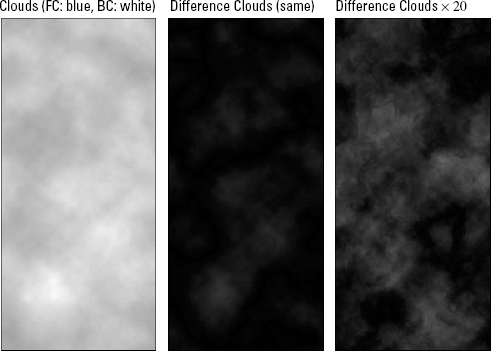
Figure 11.48. These are the effects of applying Clouds (left), followed by Difference Clouds (middle) and Difference Clouds repeated 20 times.
Tip
To strengthen the colors created by the Clouds filter, press Shift when choosing the command. This same technique works when using the Difference Clouds filter as well. In fact, there may be no reason not to press Shift while choosing one of these commands, unless you have some specific need for washed-out effects.
Also, if you want to make a repeating texture using Clouds and Difference Clouds, make sure your image size is a square with pixel dimensions based on a power of two — something like 128×128 or 256×256 works well. Your cloudy image is seamlessly tiled, making it a perfect backdrop when you need something to fill in a large area.
Tip
Tempted to use a Clouds filter-created image as your Web page background? Think again. First, background images are pretty passé for use on the Web, and second, even if a background image is appropriate in a table, frame, or layer (some smaller segment) of your Web pages, a background image that has any significant pattern or color diversity makes text hard to read and competes visually with any Web graphics placed on top of it.
Like the Clouds and Difference Clouds filters, the Fibers filter uses Perlin-based fractal noise to achieve a realistic randomness that, when stretched out in one direction, looks less like fluffy clouds and more like, well, fibers. This could be a problem for you if you don't want the fibers Photoshop gives you, because there is no way to vary the fibers greatly — you have two sliders (Variance and Strength) and one button (Randomize), and as you'll see, these don't do much more than change the appearance of the fibers — in the end, you still get fibers. If fibers are what you want, this is a great thing, but if you were hoping for a fibrous texture made from the content of your image, this is not what you're getting here. Programs such as Adobe's After Effects give you lots of options for tweaking and adjusting the noise this filter generates, but Photoshop's Fibers filter is rather limited in terms of its flexibility, and therefore its uses.
If you're still interested in using this filter — and you should be, if only to see for yourself how you might be able to use it — choose Filter
Tip
Sadly, there's no way to change the angle of the fibers generated by the Fibers filter to create a woven effect, but you can cheat your way around this. Apply the Fibers filter to a layer, duplicate it, and then rotate the top layer 90 degrees. Set the top layer to the Darken blend mode, and you should wind up with a somewhat realistic interwoven pattern.
The complex Lighting Effects filter enables you to shine lights on an image, color, position, and focus the lights, specify the reflectivity of the surface, and even create a surface map.
Note
The Lighting Effects filter is applicable exclusively to RGB images.
When you choose Filter

There's no way around it: This filter and its dialog box are complex. The easiest way to apply the filter is to choose one of the predefined lighting effects from the Style pop-up menu at the top of the right side of the dialog box, see how it looks in the preview area, and — if you like it — press Enter or Return to apply the effect.
If you want to create your own effects, you have to tinker with the settings a bit and risk some frustration. It can be worth it, though, for creating some striking lighting effects in your images. Here are the basic steps involved in creating a custom effect.

Figure 11.50. The Lighting Effects dialog box lets you light an image as if it were hanging in a gallery, lying on a floor, or perhaps resting too near a hot flame.
Click and drag from the light icon at the bottom of the dialog box into the preview area to create a new light source. Think of this area as the stage because it's as if the image is painted on the floor of a stage and the lights are hanging above it.
Select the kind of light you want from the Light Type pop-up menu. It's just below the Style pop-up menu. You can select from Directional, Omni, and Spotlight:
Directional works like the sun, producing a general, unfocused light that hits a target from an angle.
Omni casts light like a bare light bulb hanging in the middle of the room, shining in all directions from a center point.
Spotlight is a focused beam that is brightest at the source and tapers off gradually.
Specify the color of the light by clicking the top Color Swatch. You also can tinker with the Intensity slider to control the brightness of the light. If Spotlight is selected, the Focus slider becomes available. Click and drag the slider toward Narrow to create a bright laser of light; drag toward Wide to diffuse the light and spread it over a larger area.
Move the light source by clicking and dragging at the focus point (if you've chosen a color for your light, the focus point appears as a colored circle in the preview area). When Directional or Spotlight is selected, the focus point represents the spot at which the light is pointing. When Omni is active, the focus point is the actual bulb.
If Directional or Spotlight is active, you can change the angle of the light by clicking and dragging the hot spot. The hot spot represents the location in the image that's likely to receive the most light. When you use a Directional light, the hot spot appears as a black square at the end of a line joined to the focus point. The same holds true when you edit a Spotlight; the confusing thing is that there are four black squares altogether. The light source is joined to the focus point by a line; the three handles are not.
Tip
To make the light brighter, click and drag the hot spot closer to the focus point. Dragging the hot spot away from the focus point dims the light by increasing the distance that it has to travel. It's like having a flashlight in the living room when you're in the garage — the light gets dimmer as you move away from it.
With Omni or Spotlight in force, you can edit the elliptical footprint of the light. When Omni is in force, a circle surrounds the focus point. When editing a Spotlight, you see an ellipse. Either way, this shape represents the footprint of the light, which is the approximate area of the image affected by the light. You can change the size of the light by clicking and dragging the handles around the footprint. Enlarging the shape is like raising the light source. When the footprint is small, the light is close to the image so it's concentrated and very bright. When the footprint is large, the light is high above the image, so it's more generalized.
Tip
When editing the footprint of a Spotlight, Shift-drag a handle to adjust the width or height of the ellipse without affecting the angle. To change the angle without affecting the size, Ctrl-drag (
Introduce more lights as you see fit.
Tip
Duplicate a light in the stage by Alt-dragging (Option-dragging on the Mac) its focus point. To delete the active light, drag the focus point onto the Trash icon below the preview area.
Change the Properties and Texture Channel options as you see fit. This is explained in detail after the steps.
If you want to save your settings for future use, click Save. Photoshop invites you to name the setup, which then appears as an option in the Style pop-up menu. If you want to get rid of one of the presets, select it from the pop-up menu and click Delete.
Press Enter or Return to apply your settings to the image.
That's really about it; the only parts not yet discussed are the Properties and Texture Channel options. The Properties sliders control how light reflects off the surface of your image:
Gloss: Is the surface dull or shiny? Click and drag the slider toward Matte to make the surface flat and non-reflective like dull enamel paint. Drag the slider toward Shiny to make it glossy, as if you had slapped on a coat of lacquer.
Material: This option determines the color of the light that reflects off the image. According to the logic employed by this option, Plastic reflects the color of the light; Metallic reflects the color of the object itself.
Exposure: Your options here are Under and Over — referring to exposure. This option controls the brightness of all lights like a dimmer switch. You can control a single selected light using the Intensity slider, but the Exposure slider offers the added control of changing all lights in the stage (preview) area and the ambient light (described next) together.
Ambience: The last slider enables you to add ambient light, which is a general, diffused light that hits all surfaces evenly. First, select the color of the light by clicking the color swatch to the right. Then click and drag the slider to cast a subtle hue over the stage. Drag toward Positive to tint the image with the color in the swatch; drag toward Negative to tint the stage with the swatch's opposite. Keep the slider set to 0 — in the center — to cast no hue.
The Texture Channel options let you treat one channel in the image as a texture map, which is a grayscale surface in which white indicates peaks and black indicates valleys. (This is true as long as the White is High option is selected, that is; if you deselect that option, everything flips and black becomes the peak.) It's as if one channel has a surface to it. By selecting a channel from the pop-up menu, you create an embossed effect, much like that created with the Emboss filter except much better because you can light the surface from many angles at once and it's in color, too.
Choose a channel to serve as the embossed surface from the pop-up menu. Then change the Height slider to indicate more or less Flat terrain or huge Mountainous cliffs of surface texture.
Figure 11.51 shows a rather bland multi-layered image — a metallic faceplate layer in front of a textured background layer. To add a little depth, a texture channel can be created for the faceplate layer by first Ctrl-clicking (
Now for the fun part! With the selection still in place, run the Gaussian Blur filter on it five times in a row using Radius values of 18, 9, 6, 3, and 1, in that order. What you've just created is a Depth map — the white area is the highest, and the fading edges are progressively lower, all the way down to the black zone (the lowest), as seen in Figure 11.52.


Figure 11.52. After selecting the faceplate layer transparency and then hopping to a new alpha channel, we create this new Texture Map by applying the Gaussian Blur filter to the white fill inside the selection.
Figure 11.53 shows what happens when we apply the Lighting Effects filter to the faceplate layer and assign the texture map using the Texture Channel pop-up menu.
Figure 11.53. Now the faceplate has nicely lit beveled edges — better than those you'd get with the Bevel and Emboss layer styles, too. FYI: Sometimes the best texture map for an image is the image itself. We ran the same Lighting Effects filter on the background layer, using the Blue channel as the texture map.
In this chapter, you learned about Photoshop's special effects filters, including those available exclusively through the Filter Gallery. We discussed the plusses and minuses of Photoshop's many special effects filters and followed with more specific coverage of the Pixelate and Mezzotint filters, the Edge-Enhancement filters, and the Distort filters. This included the new Lens Correction filter and the always-exciting Liquify filter.
You also learned to create metallic effects with Bas Relief, Plastic Wrap, and Chrome, and how to use the Fade command to reduce the sometimes over-the-top results these and other filters can give you.
Coverage of enhanced features continued with a section on the Vanishing Point filter, which enables you to build and modify structures and shapes in your photos like never before, and we discussed the Clouds and Lighting Effects filters.