In This Chapter
In this chapter, I lead you through the entire sales process with SugarCRM. I show you how to create an initial opportunity, make changes to it while a sale makes its way through the sales pipeline, and view your opportunities in a variety of ways. And, if you're using SugarCRM Professional, I show you some of the advanced Opportunities functionality.
In SugarCRM, an opportunity is a potential sale to an Accounts record. Each opportunity must be associated with an Accounts record. All sales information for an Accounts record appears on the Opportunities subpanel of the Accounts record. When you create an opportunity, you associate it with a sales stage and forecasted close date so that you can see how close you are to closing the sale.
You can associate an opportunity with additional record types, typically Contacts and Leads records. You can associate an opportunity with only one account, but you can associate it with multiple leads and contacts. Opportunities records are often linked to Campaigns records so you can measure the success — or failure — of a campaign.
After creating an Opportunities record, you can go to the Opportunity List where you can see all your opportunities listed together. Additionally, you can view the opportunity from any record you've associated with the opportunity. If that weren't enough, there are a slew of sales dashlets ranging from a basic pipeline to a Campaign ROI (return on investment). Whew!
By automating the sales process with Sugar, you have a better chance of closing more sales. First, if you follow up on your activities, as I show you in Chapter 5, you have significantly fewer contacts falling through the cracks of your database. Secondly, you can adjust your predictions while the opportunity moves through the sales stages. Most importantly, you can filter the Opportunity List (Chapter 9), allowing you to focus on the deals that you think you have the best chance of closing.
Sugar gives you several methods of creating an opportunity, depending on which module you happen to be working in at the time. Opportunities records can be created with
The Create Opportunity link from the Shortcuts menu on the Home module or on the Opportunities module's Home page.
The Create Opportunity Quick Form on the Opportunities module's Home page.
The Create button in Opportunity subpanels within Accounts and Contacts records.
The Convert Lead button in the Leads Detail view; when you convert a lead, you also find an option to create an opportunity.
The Create Opportunity from Quote button in the Quotes Detail view (Professional version only).
For the purposes of this book, I use the first method, but feel free to experiment with the other methods to find the one that works best for you. Who knows? You might even find that you eventually generate opportunities using all the methods.
So why are you sitting around reading a book? It's time for you to go out there and make some money. Here's how you'll make your first million:
Click the Opportunities tab on the Module Tab bar.
The Opportunities module's Home page opens.
Create a new opportunity by choosing Create Opportunity from the Shortcuts menu.
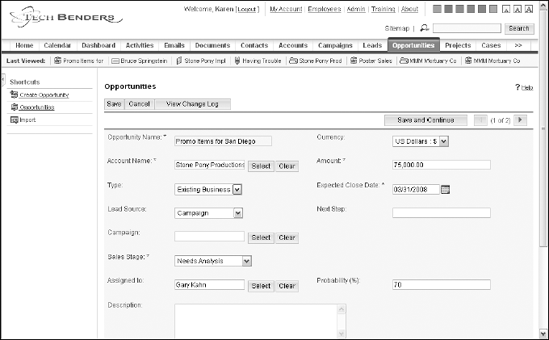
The Opportunities record opens, as shown in Figure 7-1.
Tip
If you've been following along from chapter to chapter, you might already be a few steps ahead of me. You are correct in assuming that you can simply use the Quick Form to create an Opportunities record quickly (albeit slightly abbreviated). And yes, you can scroll to the Opportunities subpanel of just about any record and click Create to create the new Opportunities record.
Fill in the pertinent information for the Opportunities record.
Knowledge is power, so the more information you enter about an opportunity the more power you will have to (hopefully) make the sale. You can supply a lot of information here. Although much of this information is optional, you'll find that the little bit of extra effort you spend now to enter data will result in huge benefits down the road.
Here's a rundown of the Opportunities record fields:
Opportunity Name (required): After you create the opportunity, you can track it down by searching for its name, so consider assigning a name that starts with the company name that you're doing business with or the Purchase Order number.
Account Name (required): Type the first several letters of the account related to the opportunity and Sugar will supply you with a list of possibilities. Alternatively, click the Select button, and click the account name.
Type: From the drop-down list, specify whether the opportunity is from an existing customer or a new customer.
Lead Source: Select the lead source, such as Trade Show or Cold Call, from the drop-down list.
Campaign: Enter the campaign name or click Select to choose one from the Campaigns list if the opportunity was the direct result of one of your marketing campaigns.
Assigned To: Enter the name of the user who is responsible for the opportunity, or click Select and choose the person from the User List. By default, a new opportunity is assigned to you.
Amount (required): Enter the estimated amount of the sale.
Expected Close Date (required): Indicate when you estimate the opportunity will close.
Next Step: Enter your next step in closing a sale.
Warning
Not happy with some of the choices in the drop-down lists, or not sure what information to add to a field? Chapter 15 shows you how to change the drop-down items in the various drop-down lists, or add a drop-down list to an existing field.
Sales Stage (required): If you're hearing a nagging voice in the back of your head, it's because I'm nagging you. An important concept in computing is Garbage In, Garbage Out (GIGO). You want to set the sales stage to know where this opportunity lies in your sales pipeline so the opportunity doesn't fall by the wayside.
Probability (%): In this field, you can assign a probability to each sales stage when you set up the sales process. Feel free to overwrite the probability percentage based on your hunch for each opportunity.
Description: Generally, a database consists of many fields with each containing a single piece of information. But sometimes, storing all your important information into a bunch of teeny-tiny fields isn't possible. That said, you can use the description to write The Great American Novel — or at least a few important tidbits of additional info — about your opportunity.
Click Save to save the Opportunity.
At this point, you're essentially done with creating the Opportunities record. Sit back and relax a moment while Sugar records the Opportunities record on the subpanel of any associated records.
The Opportunities subpanel provides you with the sales information on any given record. You can use the information contained on the Opportunities subpanel to create a 360-degree view of a record. For example, you might be trying to sell some white widgets to ABC Company. By taking a peek at the Opportunities subpanel, you can see when they placed their last order and even the dollar amount of their order. Figure 7-2 shows you an example of an Opportunities subpanel.

The Opportunities subpanel serves another important purpose. As your opportunity progresses, you'll find it's often necessary to modify the sales stage.
Warning
Sales information appears in the various dashlets, so updating your Opportunities records is vitally important.
The process of updating your sales information is quick and painless:
Go to the record of the account for whom you want to track the opportunities.
Because you must associate every Opportunities record with an account, you might start by going to the Accounts Detail view of the account in question. However, because it's possible to associate multiple Leads, Contacts, Campaigns, and Projects records, you'll find the Opportunities subpanel on those records as well.
Click the Edit link to the right of the opportunity you want to view.
The Opportunities record opens (refer to Figure 7-1).
Change the information as necessary.
The purpose of Sugar's Opportunities records is to allow you to track a potential sale from its inception to its outcome. You'll want to edit the Sales Stage field while the opportunity progresses through the sales pipeline. This allows you to view any of your opportunities to assess exactly where you stand.
Naturally, you'll also want to record that you won an opportunity; unfortunately, you might also find it necessary to record an opportunity as lost. And — win, lose, or draw — it's a good idea to change the Expected Close Date to the actual date that you closed the opportunity so that the information displays correctly on any date-driven sales dashlets.
Click Save when you finish editing the opportunity.
As usual, Sugar scurries around trying to make life easier for you. The dashlets will update automatically and the Opportunity List and sub-panel will reflect the updated information.
Additionally, you can add contacts to the Contact subpanel that are associated with the opportunity. The more accurately you cross-link information like this, the more effective Sugar becomes.
You poor reader, you! You work so hard in filling out the numerous Opportunities record fields. Knowing that you need a little break, SugarCRM rewards you with an abundance of ways to view your opportunity information.
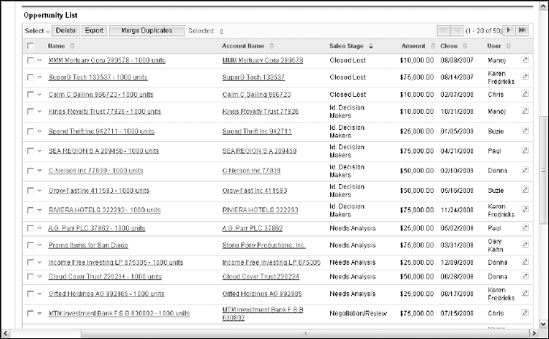
The Opportunity List provides you with a way to view all your opportunities for all your contacts. Chapter 9 shows you how to filter the Opportunity List to display only those opportunities that match your specifications. You can then print the Opportunity List by clicking the Print button at the top of the Opportunities Home page.
Getting to the Opportunity List is almost too easy: Just click the Opportunities module tab to open the Opportunities Home page. Scroll to the Opportunity List to see your opportunities (see Figure 7-3). Notice that the Opportunity List comes equipped with its very own toolbar containing buttons that allow you to Delete, Export, and Merge Duplicates.
In Sugar-speak, a dashlet is one of the charts and graphs located on the Dashboard Home page. You can monitor the opportunities that you have at each stage of the sales development cycle and display this information graphically by making use of Sugar's pre-defined sales dashlets. Whether you want to compare the progress of your sales people or measure the success of your lead sources, Sugar has a way of giving you the information, as you can see in Figure 7-4.
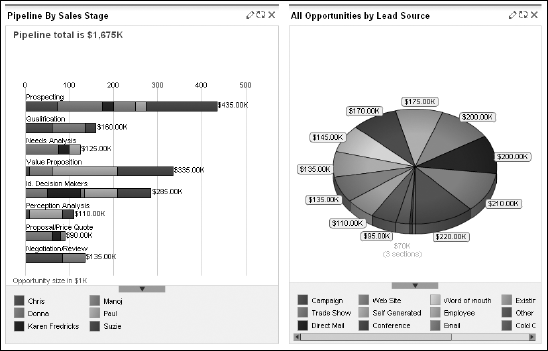
All you need to do to see all your opportunities translated through the wonder of modern technology into a graph is to click Dashboard on the Module Tab bar.
For added excitement, try performing one of these neat party tricks:
Hover your mouse over any section of a dashlet and a mouse over appears that gives you the details of the particular dashlet.
Click on any section of a dashlet and Sugar drills down to the underlying data.
Warning
Chapter 9 gives you more information on working with the Dashboard.
All record types include a Change Log and Opportunities records are no exception. And, because Opportunities records tend to be one of the most volatile of all record types, they're a great way of tracking an individual opportunity.
By now, you're an old hand at opening an Opportunities record using one of the following methods:
Click the opportunity from the Opportunity List that's located on the Opportunities Home page.
Click the opportunity from the Opportunities subpanel of any record Detail view associated with the opportunity.
Click the View Change Log button located at the top of the Opportunities Detail view and the Change Log will open in a new window, like the one shown in Figure 7-5.
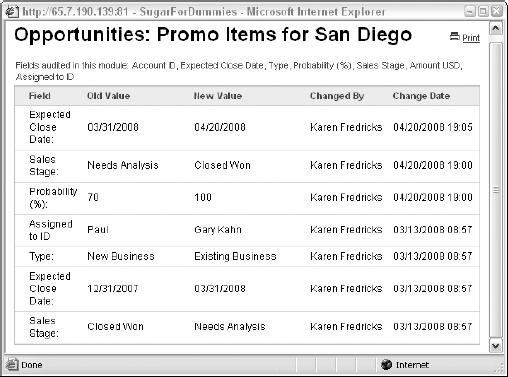
The Change Log shows you the important milestones for the opportunity, such as when it moved from one sales stage to another. It will also detail any changes that were made to key fields — such as Expected Close Date and Amount — and give you the name of the user who made the change. You can click the Print link to create a hardcopy of the Change Log.
So far, this chapter has focused on the Opportunities functionality found in the Community Edition of SugarCRM. The remainder of this chapter shows you some of the advanced Opportunities features that are a part of SugarCRM Professional. Specifically, you'll see how to add Products to Sugar, associate those products with an Opportunities record, and even create a quote using those products. If that isn't enough to get your juices flowing, the Professional Edition allows you to e-mail your quote as a PDF file and even pull up some nifty Opportunities reports to help you keep track of the entire operation.
If you're like most people, you'll find this part to be fun. Here's where you get to count the cash, bill for the beans, dream of the dollars . . . In any event, the Products module is where you get to add all of the products and/or services that you sell. Once added, you can add the product line items to a quote for your opportunity and sit back while Sugar crunches the numbers for you.
The Products module helps you to create and manage products for your company. You can either select an item from the product catalog, or create a new product that is not in the product catalog.
Sounds like a job for the Administrator!
If you happen to find yourself wearing the Database Administrator hat, you'll need to read this section — and possibly asks for a raise and/or a corner office. If you aren't a database administrator, feel free to skip this section unless you're wondering what the administrator does to deserve a raise or a corner office.
The database administrator is responsible for several very important product areas. You'll want to make sure that he's doing the job before you set your users loose on the Products module in SugarCRM Professional.
The administrator defines all the products, product types, categories, and manufacturer information within Sugar. If your organization doesn't maintain a product catalog or if users need to create a product that isn't in the catalog, you can create a freestanding product. However, freestanding products aren't added to the product catalog.
Warning
You can have more than one administrator for a Sugar database. If you have lots of users and only one administrator, you might consider letting another user share the fun — and responsibilities — of being an administrator.
You can enter into the land of Administrative Products by using either of the following methods:
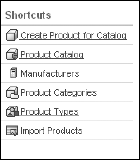
Click the Admin system link at the top of any Sugar page and then click Create Product from the Shortcuts menu shown in Figure 7-6.
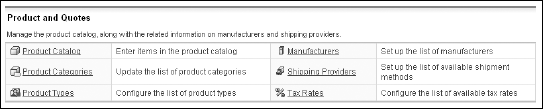
Click the Admin system link at the top of any Sugar page and scroll to the Products and Quotes subpanel (see Figure 7-7).
Manufacturing Manufacturers
For centuries, man has contemplated his navel and the age-old question of which comes first — the product, the catalog, or the manufacturer. Okay, maybe that discussion was about eggs and chickens, but I'm going to veer slightly from the order of the Shortcuts menu and start by adding some of the simpler Products elements:
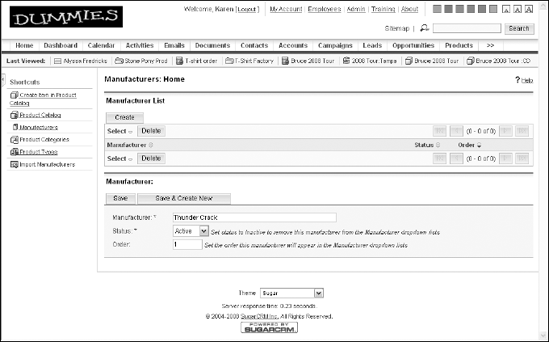
Click Create from the Manufacturers Home page.
The Manufacturers Home page expands to show you the new Manufacturers record. Figure 7-8 gives you a good idea of what all this looks like.
Enter the manufacturer information.
When I say I like to start simple, I mean just that. You have only three fields to fill in here:
Manufacturer: Enter the manufacturer's name.
Status: Select Active to add the name to the manufacturer's drop-down list.
Order: Enter a number to specify the order in which the manufacturer will display in the manufacturer's drop-down list.
To create the manufacturer, click Save; to create another manufacturer, click Save & Create New.
Typecasting your products
When you first start creating a product list in Sugar, it seems fairly simple: create a product or two and you're off and running. However, as you add more and more products, your list can become more and more disorganized. Adding product types is an easy way to control the chaos.
Here's all you need to do to add a product type:
Click the Create button in the Product Type List subpanel.
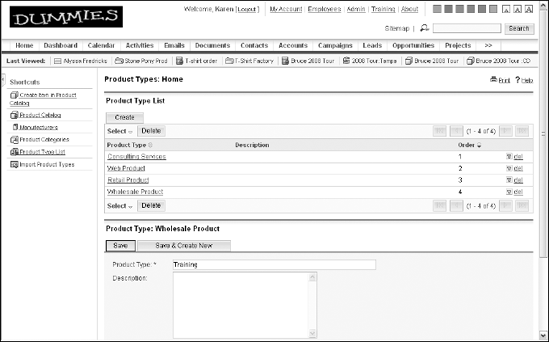
The Product Types Home page opens, as shown in Figure 7-9.
Tip
Not sure how to get there? The easiest way is to click Product Types in the Products and Quotes subpanel of the Administration Home page.
Enter information into the following fields:
Product Type: Enter a name for the new product type. You might want to divide your products into Retail and Wholesale, or include various types of services.
Description: Enter an optional description for the product type.
Order: Enter a number to specify the order in which the product type will appear in the Product Type drop-down list.
Click Save to save the Product Type, or click Save & Create New to create another product type.
Categorizing your products
It's good to walk before you run, look before you leap — and enter in the various product parameters before you delve too deeply into the exciting world of product management.
After you have the feel for adding product types and manufacturers, you're ready to start thinking about how your products will be categorized.
Click the Product Categories option in the Product and Quotes sub-panel on the Administration Home page.
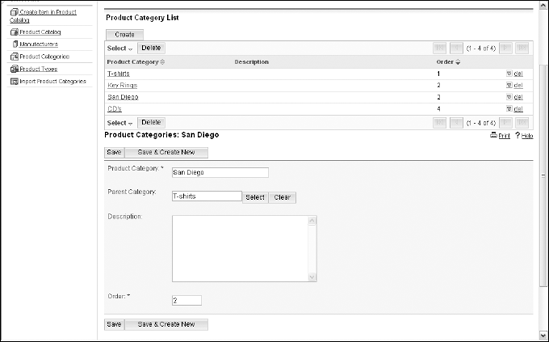
Just try saying that instruction five times fast! While you tie your tongue in circles, the Product Categories Home page opens (see Figure 7-10).
Click the Create button on the Product Categories Home page.
The Product Category subpanel displays fields to let you create a new product category.
Enter information for the following fields:
Product Category: Enter a name for the category. You can have parent categories and subcategories. And, if you really want, you can have subcategories of your subcategories. For example, you might sell red, white, and blue widgets. You could set up Widgets as the first category before setting up the additional categories of Red, White, and Blue.
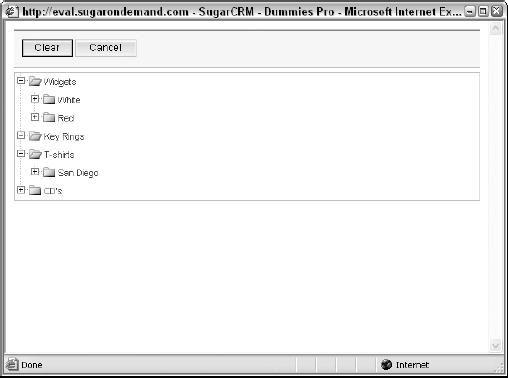
Parent Category: Here's where you can sculpt your product hierarchy. In the widget example above, you could indicate Widgets as the Parent category when setting up the Red, White, and Blue products by clicking Select to choose the parent from the Product categories. Figure 7-11 shows you a sample of the hierarchy that appears when you click Select.
Description: Enter a brief description of the category.
Order: Enter a number to specify the order in which this category will appear in the Product Category List. I'm not sure how why, but this is a required field — and conceivably all your product types can have the same order number.
Click Save to create the category or click Save & Create New to create another category.
Giving the taxman what he's owed
The only certainties in life are death and taxes — or so I'm told — and I'm fairly certain that if you sell products you're going to have to pay taxes on them somewhere down the line. Sugar takes the bitter edge off taxes by providing you with a handy dandy way of configuring the various tax jurisdictions you deal with.
Click Admin on the Home page, scroll down the Administration Home page to the Products and Quotes subpanel, and then click Tax Rates.
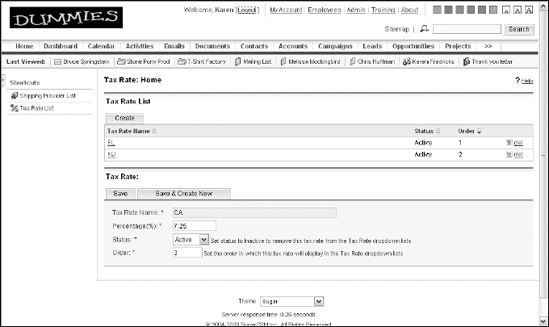
The Tax Rate Home page opens, as shown in Figure 7-12.
Click Create.
Fill in the required fields.
Actually, all the fields are required but don't worry — there's only four of them. Kind of ironic that something as complicated as taxes (at least according to the bill I receive every year from my accountant) is so easy to set up.
Tax Rate Name: Give the Tax Rate a catchy name; you might find that the name of the appropriate state works rather well.
Percentage: Add in the tax percentage.
Status: Choose Active from the drop-down list to display the rate in the appropriate areas of Sugar.
Order: Enter a number to specify the order in which the tax rate will display in the Tax Rate drop-down list.
Click Save to save the tax rate.
For additional fun and excitement, you might prefer to click Save & Create New if you want to save this tax rate and create a new one.
Sending your products via carrier pigeon
Sometimes it seems as though Sugar has thought of everything. Granted, it hasn't thought of a way to help me win an argument with my significant other, but it sure makes life easy when running a business.
Unless people are coming to you to pick up all their purchases in person, you'll probably need to have a method of delivering your products directly to their fat, little fists. Here's how you can set up the shipping methods:
Click Admin on the Home page to open the Administration Home page.
On the Administration Home page, scroll to the Product and Quotes subpanel and click Shipping Providers.
The Shipping Provider Home page opens.
Click Create.
The Shipping Provider Home page expands to include the Shipping Provider page, as shown in Figure 7-13.
Fill in the Shipping Provider fields, all of which are required.
Shipping Provider: Enter the name of the shipping provider.
Status: Choose Active from the drop-down list so that you can actually use the shipping method.
Order: Enter a number to specify the order in which the name will display in the Shipping Provider drop-down list.
Click Save to save your new shipping method for posterity.

Producing a Catalog
In Sugar, you don't actually create a catalog. Rather, any products that the administrator adds are automatically placed into the Catalog and grouped by product types. The Catalog List allows the administrator to keep track of how much inventory she has on hand as well as other important tidbits of information, including the cost and price of each item.
After you've done all the initial setup, you're ready to start entering your widgets, gadgets, and other products into the product catalog:
Click Admin on the Home page to open the Administration Home page.
Choose Create Product from the Shortcuts menu.
The Product Catalog page opens. If you prefer, you can also scroll down the Administration Home page to the Products and Quote subpanel, click Product Catalog, and then choose Create Product for Catalog from the Shortcuts menu, but I was always taught that the shortest distance between two points is a single click.
Enter the product information into the various fields.
You might start to see the method to my madness. Many of the areas that you had set up previously, such as Manufacturer and Category, will now be available to you. The thing to remember here is that you are actually creating a catalog of your products. By that, I mean that in addition to adding information about your product, you're adding information that will help you with reporting and tracking later.
There are lots of fields to enter here, but I want to share a few of the more important ones with you:
Product Name (required): Enter the name of the product.
Category: Click Select to choose the category to which the new item belongs.
Date Available: If this is a new product, you might want to indicate exactly when it's going to be available to your adoring fans.
Quantity in Stock: I don't know about you, but I'm pretty disappointed when I order something — only to learn that it's out of stock.
Tax Class: Choose the appropriate option from the drop-down list to specify whether the item is taxable.
Manufacturer: Choose the manufacturer of the item from the drop-down list.
Cost (required): Enter the cost price of the item. This price will not appear in quotes.
List Price (required): Enter the list price of the item.
Discount Price (required): Show the discounted price; if you don't offer discounts, just enter the List Price.
Click Save to save your product to the product catalog.
Creating a product using the Products module
Warning
Products set up using the Products module are not part of the product catalog. For that reason, it's probably a better idea to let the administrator deal with setting up products and let the users sell the products.
The Products Home page typically lists products that you create but not those from the product catalog. However, when you create a quote from the product catalog, the products in the quote are automatically added to your Products List.
One reason you may want to set up products from the Products module is that you can also associate a product with an Accounts record. This enables you to view and edit the product from the Accounts' Detail view. This functionality is helpful if you manufacture specific items for specific accounts.
Follow the bouncing ball to create a product from the Products module:
Click the Products module tab on the Home page.
The Products Home page opens.
Click Create Product on the Products Home page.
The Products page opens.
Enter information for the fields on the Products page.
If you've been following along at home, you might think that this form is slightly different from the form you see when you create a product from the product catalog. Smart reader! Although the fields are fairly similar, they are arranged a wee bit differently. And, if you really want to be lazy, only one field — Product Name — is required. Either you can feel sorry for the administrator who was required to add more fields, or you can roll up your sleeves and start entering information.
Warning
One of the problems with being lazy is that you might inadvertently enter default information into some of the non-required fields. For example, the Manufacturer and Product Type fields auto-populate with the first item that appears on their drop-down lists.
Warning
You might see Product fields that you just plain don't need. For example, the Support fields show when support starts and expires. You can opt to leave those fields blank — or flip over to Chapter 15 where you find out how to edit and/or delete those fields.
Click Save to create the product.
Adding a touch of product management
If you've hung in there during the entire Product section, you deserve a gold star on your forehead — and to make lots of money in the future. At last, your hard work is over and you can sit back and relax. First, however, you might want to tear yourself away from the golf course for a minute and review some of the neat things you can do with your products — besides sell them, of course!
As you might have guessed, you're able to see a list of your products from the Product List that you access by clicking Products on the Module Tab bar.
Warning
Not seeing all of your products? Items that the administrator added to the product catalog will not appear in the Product List until you use them in a quote.
You can manage your opportunities directly from the Product List in a number of ways:
Sort: Click any column title to sort the List view.
Delete: Select a product and then click Delete to delete it.
Edit: Click a product name in the list to view the details of the product. Once there, you can click Edit to edit the product details.
Duplicate: Click Duplicate in the Product Detail view. This is a great timesaver if you have a lot of similar products, such as pink, magenta, and chartreuse widgets; click Duplicate, stick in a new product name, and you're good to go.
Export: Select the products you want to export and then click Export to export a list of your products to Excel.
Wouldn't it be lovely if all your customers simply picked up the phone, placed an order, and ka-ching — the money was in the bank. Dream on! Many — if not all — of your customers are going to require, request, and/or demand that you send them a quote before they send you the money. If that's the case with your business, you'll want to use the Quotes module that comes with SugarCRM Professional.
The Quotes module lets you create, view, and manage quotes for your organization. When you create a quote, you can select a product from the product catalog, or you can manually enter information on products that aren't in the catalog. Quotes specify the quantity and the price per unit for the products and services that you sell to a customer. When you select from the catalog, the system automatically fills in information, such as the manufacturer's number and tax class.
Choose Create Quote from the Home page's Shortcuts menu.
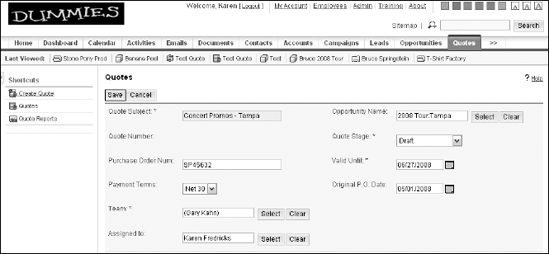
The Quotes page opens. The top half of a Quotes page is shown in Figure 7-14.
Enter information into the fields on the Quotes page.
Quote Subject (required): Give the quote a name that will make it easy to identify.
Quote Number: You can be lazy here because Sugar will assign a number automatically.
Purchase Order Num: Enter the P.O. number if you have one.
Payment Terms: Choose the customer's payment terms from the drop-down list.
Team (required): Enter the name of the team that is allowed to view the Opportunities record.
Assigned To: Add the name of the individual who is working on the Opportunities record.
Opportunity Name: Here's where you can associate an existing Opportunities record with a quote.
Quote Stage (required): Choose the current stage from the drop-down list.
Valid Until (required): Click the calendar icon and select an expiration date.
Original P.O. Date: Click the calendar icon and select the Purchase Order date.
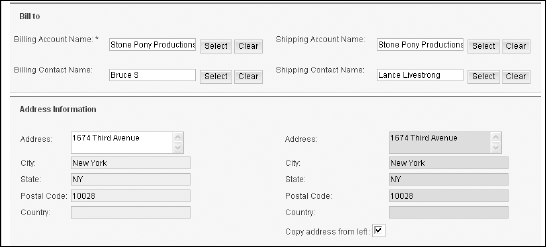
Add information to the Bill to and Address Information subpanels, as shown in Figure 7-15.
You must associate every quote with a Billing Account. Happily, any address information you have on record for the account will automatically fill in to the billing address information. Select the Copy Address From Left check box if the shipping address is the same as the billing address.
(Optional) Add the basic Line Items information.
You can cram a lot of information into the Line Items subpanel; follow along so you won't get lost. You start by filling in a few non-required fields:
Currency: Choose the currency used in the quote from the drop-down list.
Tax Rate: Choose the tax rate for the account from the drop-down list.
Shipping Provider: Choose a shipping provider from the drop-down list.
Warning
The administrator defines the currency, tax rate, and shipping provider information that display in the drop-down lists.
Grand Total: Check this box if you want Sugar to get out its abacus and add up all the products you include in the quote.
Line Numbers: Check this box if you want to number your products when you save the quote in PDF format.
Click the Add Group button
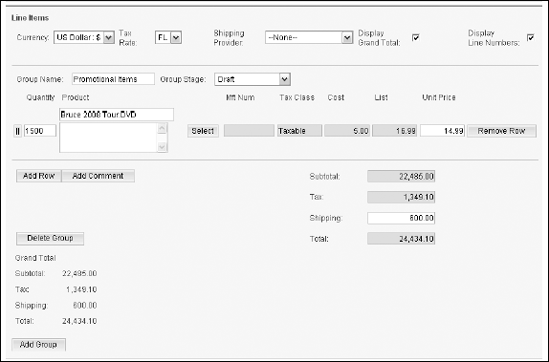
The Line Items subpanel expands, as shown in Figure 7-16.
Click the Add Row button.
This allows you to enter your first product within the group. Now the fun begins and some of your long hours of setup start to pay off — you add your products to the Quote. For each row, add the following product information:
Quantity: Enter the quantity that you're quoting.
Product: Enter the product name or click Select to select it from the product catalog.
Description: Add a description of the product if desired.
Sugar will automatically enter information for the remaining fields — Mft Num, Tax Class, Cost, List, and Unit Price — if you select an item from the catalog that contains this information. If not, feel free to add it manually.
Tip
The cost price doesn't display in the quote you e-mail customers.
Tip
You can't modify the pricing information of products you added directly from the product catalog. However, you can modify the pricing for items that you manually enter into Sugar.
Add additional Groups and/or rows.
Typically, you continue to add products to the group you create in Step 5. However, you might want to have more than one group on the quote to help distinguish between different types of products or services. For example, if you offer both products and services, you might have a Products group showing the products you're selling, and a Services group showing the services you'll render.
Click Save to create the new quote.
After you save the quote, the system displays the Quotes Detail view. You can also find the quote listed on the Quotes List.
Sugar treats a quote exactly like any other record. You can edit, duplicate, and delete a quote directly from the Quotes Detail view. You can also create Activities, History, Projects, and Contracts from the Quotes Detail view that are then associated to the Quote. If you're not sure how to perform these wondrous tasks, flip back to Chapter 4, which focuses on creating Contacts, Accounts, and Leads records.
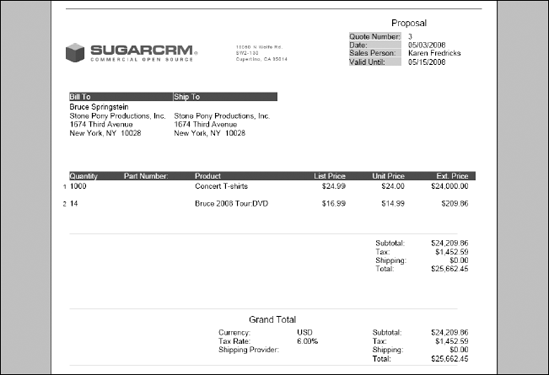
One cool thing you can do with a quote that you can't do with other records is to convert it to a PDF. You can then print the PDF or e-mail it directly to the customer. And of course, Sugar lets you do all this PDF (pretty darned fast!).
Click the Quotes module tab on Sugar's Home page.
As expected, the Quotes Home page opens.
Click the quote name to open it.
The Quotes Detail view springs open.
Click the Print as PDF button and then click Open in the dialog window that appears.
A PDF version of your quote opens in Adobe Reader (see Figure 7-17). Try to avoid jumping up and down in delight because your cubicle mates might look at you strangely. From here, you can save the PDF and attach it to an e-mail, or you can print it, squeeze it into an envelope, and send it on its way via US Snail Mail.
Tip
The only modification that you can make to the quote template is to add your logo to it. Chapter 16 shows you how.
Close Adobe Reader.
You'll end up right back where you started — in the Quotes Detail view.
Click the E-mail as PDF button.
The E-mail page opens with an e-mail message already addressed to the contact that is linked to the quote. And even better, the subject and body of the e-mail are filled in as well (which of course you can edit if necessary).
(Optional) Click the Options button on the e-mail icon bar and select a different e-mail template.
If you've read Chapter 12, you might have set up some e-mail templates. Feel free to choose one of them from the Templates drop-down list.
Click Send and your e-mail — with the attached quote in PDF form — will hurtle through cyberspace on its way to Mr. or Ms. Customer.