
Chapter 20. Testing Your User Interfaces
Introduction
Automatically testing user interfaces has always been difficult. Indeed, for many projects, it has often been placed in the “too-hard” basket. In this chapter, we will look at two tools that can help with your automatic Graphical User Interface (GUI) testing: Selenium and Fixtures for Easy Software Testing (FEST). Selenium is an innovative tool that uses a web browser to run tests against your web application. And FEST is an equally innovative product that lets you integrate Swing testing as part of your JUnit or TestNG tests.
Testing Your Web Application with Selenium
Introduction
With a bit of practice and good tools, it isn’t difficult to write good unit tests for a large part of most applications. Lightweight POJO-based frameworks such as Hibernate and Spring make it easier to design classes and components that can be unit-tested in isolation. Embedded Java databases such as Derby and HSQLDB, along with database testing frameworks such as DBUnit, make it a relatively simple task to test database access layers. EJB-based applications are an exception to this rule—you generally need to deploy your EJBs onto an application server before you can test them correctly, which makes unit testing unwieldy and difficult.
However, testing the user interface of a web application has
always been problematic. Some libraries, such as StrutsTestCase (see Chapter 13) and the
Spring MVC testing framework, make good use of mock objects
approach to simulate interaction with the server. These tools fit smoothly
into ordinary unit tests, and are excellent at testing (in MVC terminology)
the Controller code. However, although they do a fine job of this, their
limits lie in the fact that they only test the application code, and not the
HTML screens themselves.
Other tools use different approaches. Some, like HttpUnit, allow you to write tests to run against a running web server, and then inspect the returned HTML code. Cactus lets you test applications by running the tests on the server itself. JMeter lets you do functional web testing to some extent, again by building HTTP requests. Frank Cohen’s Test Maker is another interesting open source product in this field that lets you record web tests in Jython, edit them, and replay them as unit tests.
Selenium is a little different. Selenium is an open source testing tool, originally developed by ThoughtWorks and now hosted and maintained by OpenQA, which tests web applications by using them as a user would—via a browser. So, rather than building HTTP requests that a browser might send to the server and analyzing the results, Selenium drives a real browser, making it possible to test more sophisticated user interfaces. Selenium works on most platforms (Windows, Linux, and Mac OS X) and with most browsers (Firefox, Internet Explorer, Opera, Konqueror, Safari...), which makes Selenium a good choice when it comes to verifying cross-browser compatibility.
Using the Selenium IDE
Probably the easiest way to write Selenium test scripts is to use the Selenium IDE. The Selenium IDE is a Firefox plug-in, which you can download and install from the Selenium web site.[17] This tool allows you to create test scripts by using your web application just as a normal user would, through a browser.
Start up the IDE by selecting “Tools→Selenium IDE” in your Firefox menu bar. The Selenium IDE console will come up (see Figure 20-1). As soon as you open this Window, Selenium will automatically begin recording your every move. Now go to the site you want to test. If you haven’t got a test server, try Selenium out on your favorite Internet site—Selenium will work against any site you can access from your browser.
To build a test script, just run through your application as if you were a normal user. Typically, this will involve navigating through your application, entering values into forms and submitting them to the server, and so on. On the way, you can insert different types of controls to make sure the web application is returning what you expect. At any point, you can use the contextual menu to insert the equivalent of assertions—for example, select a block of text that should always figure on this page, and then select “VerifyTextPresent” in the contextual menu (see Figure 20-2).
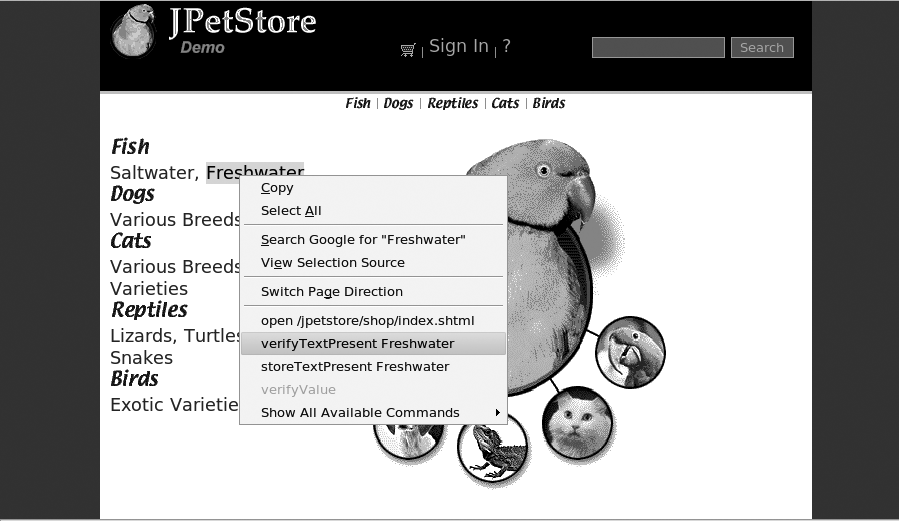
You can also check for other things on each page, such as the presence of a particular title (to check that you are on the right page, for example). The full range of options is available using the “Show All Available Commands” menu option.
Selenium is quite smart about how it identifies fields, and it will use unique field names or id values where possible. However, sometimes it will use less-than-optimal XPath expressions, which can be retouched by hand to make your script more robust. We will look at how to do this in Writing Selenium Test Scripts,” later in this section.
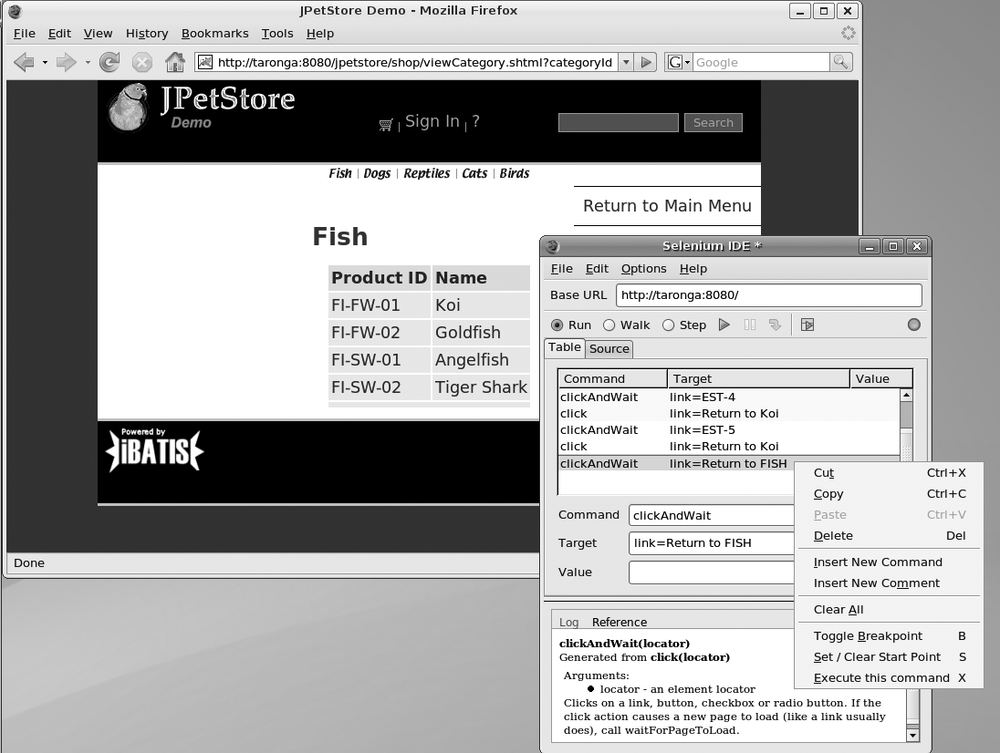
Selenium does more than simply record your actions: it is also a scripting tool in its own right—a surprisingly powerful one. Once you have recorded your script, you can rerun the script completely or step through the commands one-by-one. You can also save the Selenium test script for future use. You can insert breakpoints, delete commands, and insert new ones. A useful technique when you are tailoring your test scripts is to insert a breakpoint at the command you want to modify, and then to let Selenium “walk” though the script (using the “Walk” checkbox) until it gets to the breakpoint. Then you can step through your modified commands one-by-one to make sure they work as expected.
The Command drop-down list also gives you instant access to all available Selenium commands. And just to make things even easier, whenever you select a command, the corresponding documentation will be displayed at the bottom of the Selenium window.
It is important to know that the Selenium recording process is not flawless. Sometimes, you may need to retouch your script to get it to work systematically. A common example is the click command. The click command, as you would expect, tells Selenium to click on an HTML element somewhere on your web page. Quite often, this will result in a new page being loaded. However, if you expect a new page to be loaded, you need to tell Selenium to wait until it is loaded before proceeding to the next instruction. The easiest way to do this is to use clickAndWait instead of click. Sometimes Selenium assumes that a new page will be loaded and correctly records clickAndWait when it should. But sometimes it doesn’t. In those cases, you will need to go through your script and manually replace the click commands with clickAndWait.
Occasionally, the clickAndWait command does not wait long enough for the complete page to load. In this case, you may need to split the command into a click, followed by a separate waitForPageToLoad.
In addition, Selenium will, by design, record only the strict minimum of events that it thinks are necessary to reproduce the user actions. This can cause problems with more complex screens, especially ones that use Ajax-backed technologies. We will discuss the finer details of the Selenium scripting language in the next section.
Writing Selenium Test Scripts
The Selenium IDE is a great way to get started with Selenium testing—it is trivially easy to record and replay test scripts, and to study how Selenium records your interaction with a web site. However, Selenium also provides a powerful scripting language in its own right, known as “Selenese.” To get the most out of Selenium, you will need to understand how this scripting language works. In this section, we will look at how to understand, and write your own, fully fledged Selenium test scripts using this language.
An introduction to Selenese
A Selenium test script takes the form of an HTML table, made up of three columns. This makes it fairly easy to edit, either by hand or by using a visual HTML editor. However the easiest tool to use is probably the Selenium IDE itself. Using this tool, you can not only interactively run your test scripts but also delete commands and insert new ones, as well as have direct access to the documentation for each command.
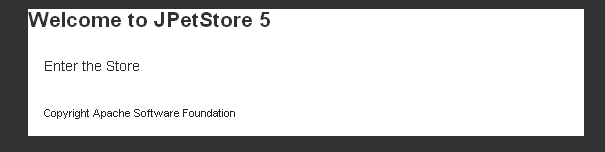
For convenience, throughout this chapter we will be running our tests against Clinton Begin’s JPetStore application, which you can obtain from the iBATIS web site.[*] This is an excellent lightweight version of Sun’s PetStore demo application, built using Struts and iBATIS. To start off, we will simply go to the application URL, and click on the “Enter the Store” link (see Figure 20-3). This will take us to the application home page (see Figure 20-4), where we will verify the presence of the text “Saltwater” on the page.
Each row of the table contains a command in the first cell. A command takes one or two arguments, which appear in the following cells. A simple Selenium test script to do this might look like the following:
<html>
<head>
  <meta http-equiv="Content-Type" content="text/html; charset=UTF-8">
  <title>Petstore Tests</title>
</head>
<body>
<table border="1" cellpadding="1" cellspacing="1">
  <thead>
  <tr>
    <td rowspan="1" colspan="3">JPetStore tests</td>
  </tr>
  </thead>
  <tbody>
    <tr>
      <td>open</td>
      <td>http://testserver:8080/jpetstore/</td>
      <td></td>
    </tr>
    <tr>
      <td>clickAndWait</td>
      <td>link=Enter the Store</td>
      <td></td>
    </tr>
    <tr>
      <td>verifyTextPresent</td>
      <td>Saltwater</td>
      <td></td>
    </tr>
  </tbody>
</table>
</body>
</html>
In a more readable form, this table would look like the one shown here:
| open | http://testserver:8080/jpetstore/ | |
| clickAndWait | link=Enter the Store | |
| verifyTextPresent | Saltwater |
The open command tells Selenium to open a particular URL in the browser. You can either use a full URL as shown here, or simply a relative path such as “/jpetstore/”. The full URL is useful when you need to develop and/or run your test script using the Selenium IDE from any machine. The relative path is more portable, but can only be used on the same machine as the web server, using the approach described later on.
The second action shown here is the very useful clickAndWait command. The basic command here is actually click; the AndWait suffix tells Selenium to wait until the new page has been loaded before proceeding. This suffix also works with any of the other Selenium commands (selectAndWait, typeAndWait, and so on), with the exception of open, where the AndWait suffix is implicit. You should use this suffix wherever the command is expected to result in a new page being loaded.
The final action illustrated here is verifyTextPresent, which, as its name indicates, simply checks for the presence of a particular block of text on the HTML page. Despite its rather basic nature, this sort of test turns out to be useful for functional testing. We will look at other, more sophisticated ways of checking results further on.
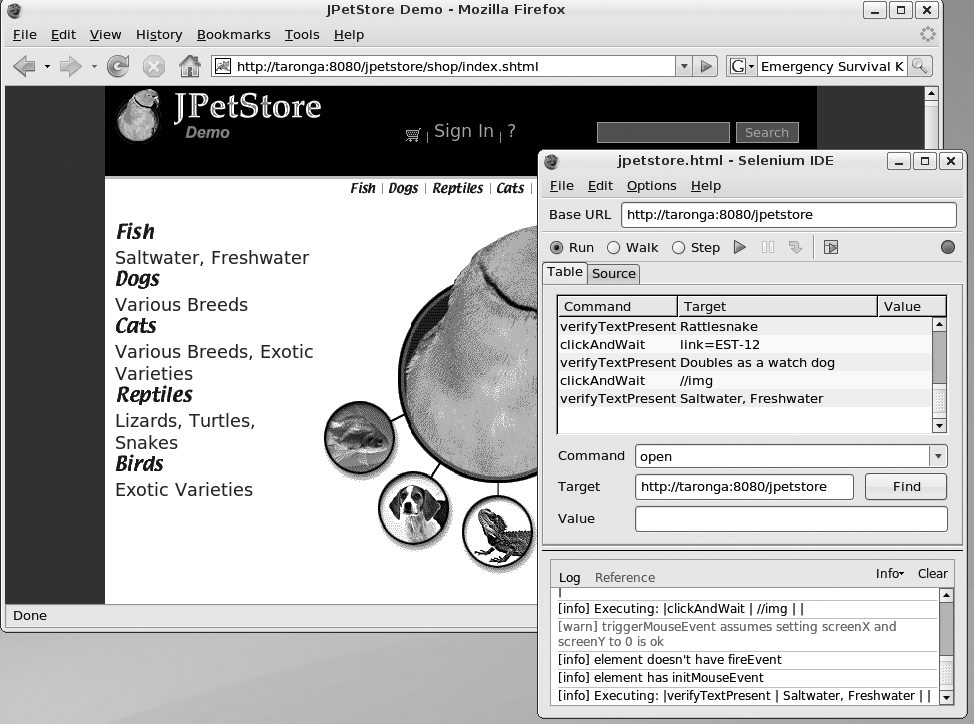
Selenium test scripts are designed to be run either through the Selenium IDE, or directly on the target web server. In Figure 20-4, you can see this script being executed on a remote server using the Selenium IDE.
Referring to objects on the web page
Much of the power of Selenium comes from its ability to interact with a web site using a conventional browser. You can tell Selenium to interact with a web page in a number of ways, such as by clicking on a button or a link, ticking a checkbox, selecting an entry in a drop-down list, or entering a value in a field. In all of these cases, it is vital to be able to identify exactly which HTML element Selenium will be manipulating.
Selenium provides a number of ways for you to identify objects on a screen using various sorts of element locators. Each sort of element locator uses a different strategy for finding target elements.
By far, the easiest way to identify an element is to simply refer to it by name or id. For example, in the JPetStore application, the “Update Cart” button is implemented as a “submit” button with the name attribute set to “update,” as shown here:
<input type="submit" name="update" value="Update Cart"/>
In this case, you can simply refer to the name of the HTML element directly in the second column:
| clickAndWait | update |
This is in fact a shorthand notation that will work for any HTML element identified using either the id or the name attribute. More precisely, this strategy will find any element with the specified id attribute, or, failing that, the first element with the specified name attribute. The equivalent full notation would use the identifier locator, as shown here:
| clickAndWait | identifier=update |
This approach is convenient, but there are cases in which you may need to be more precise. If necessary, you can use the id or name locator values explicitly:
| clickAndWait | name=update |
Another commonly used element locator is the link locator, which identifies an HTML link. For example, suppose that we want to click on the following link:
<a href="/jpetstore/shop/index.shtml">Return to Main Menu</a>
In this case, all we need to do is identify the anchor element using the link locator and the enclosed text, as shown here:
| click | link=Return to Main Menu |
More complex or well-hidden objects can be located using XPath or DOM expressions. For example, the following HTML code displays the central image in Figure 20-4.
    <div id="MainImageContent">
      <map name="estoremap">
        <area alt="Birds" coords="72,2,280,250" href="viewCategory.shtml
         ?categoryId=BIRDS".../>
        <area alt="Fish" coords="2,180,72,250" href="viewCategory.shtml
         ?categoryId=FISH".../>
        <area alt="Dogs" coords="60,250,130,320" href="viewCategory.shtml
         ?categoryId=DOGS".../>
        <area alt="Reptiles" coords="140,270,210,340" href="viewCategory.shtml
         ?categoryId=REPTILES".../>
        <area alt="Cats" coords="225,240,295,310" href="viewCategory.shtml
         ?categoryId=CATS".../>
        <area alt="Birds" coords="280,180,350,250" href="viewCategory.shtml
         ?categoryId=BIRDS".../>
      </map>
      <img height="355" src="../images/splash.gif" align="center"
       usemap="#estoremap" width="350"/>
    </div>
Suppose that we want to click on the “Fish” area link. We can identify this link using the following simple XPath expression:
//area[2] |
In Selenese, this becomes:
| click | xpath=//area[2] |
Selenium will recognize the form of an XPath expression so that the xpath locator is not strictly necessary. We can simplify the command to the following:
| click | //area[2] |
For more deeply nested elements, the XPath can get a bit more complicated. For example, the menu items on the home page (see Figure 20-4) are actually images. If you click on the small “Fish” menu item at the top of the screen, Selenium will record something like this:
| click | //div[4]/a[1]/img |
So, click on the image in the first anchor in the fourth div in the page. This is certainly precise but not particularly flexible. If the web designer modifies the page layout, this command could easily be broken. A better approach would be to use a more robust XPath expression that will find the image even if the structure of the page changes.
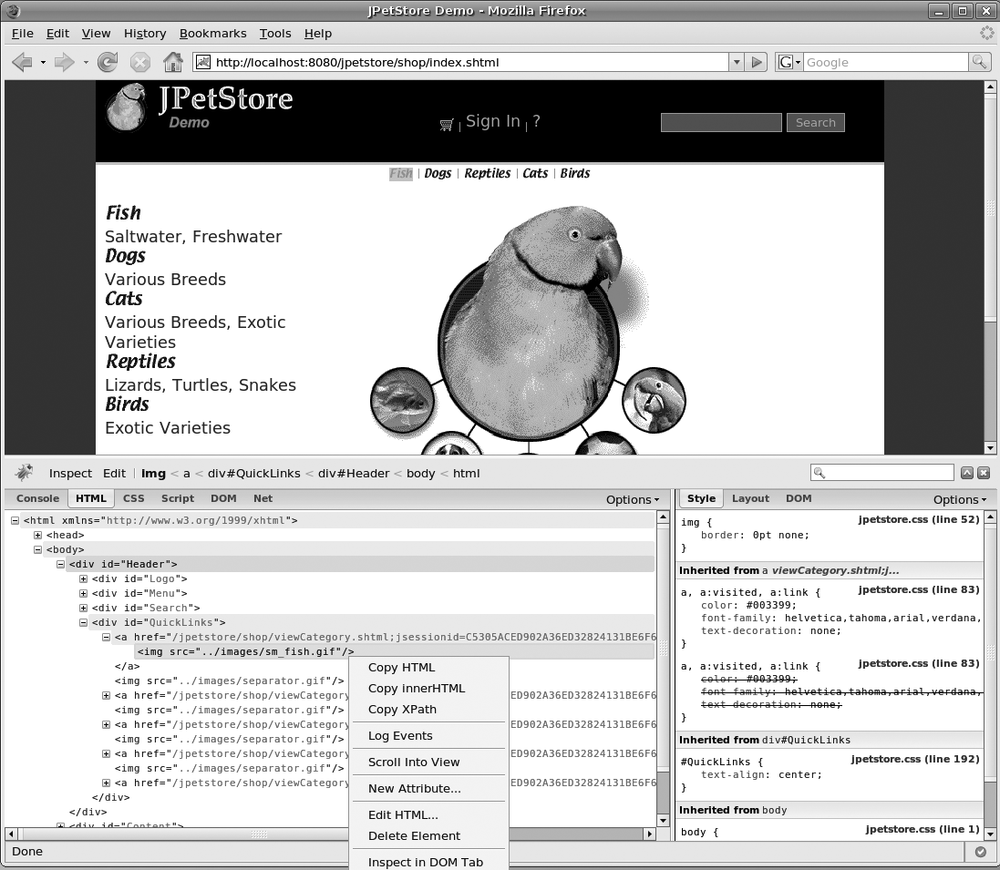
A useful tool for this sort of work is the excellent FireBug[*] plug-in for Firefox. This plug-in lets you inspect and interactively edit HTML, JavaScript, and CSS on your page (see Figure 20-5). If necessary, you can also copy the corresponding XPath into the clipboard.
In Figure 20-5, we can see the HTML code that implements the “Fish” menu option at the top of the screen:
<a href="/jpetstore/shop/viewCategory.shtml?categoryId=FISH">
  <img src="../images/sm_fish.gif"/>
</a>
The name of the image is unlikely to change very often. Assuming this, we can come up with an XPath expression that will find the first link containing this image:
//a/img[@src="../images/sm_fish.gif"]
So, in Selenese, our command becomes slightly longer, but much more robust:
| click | //a/img[@src=”../images/sm_fish.gif"] |
Using variables
Testing navigation and static text is all very well, but for serious functional testing, you need to verify dynamic data as well. Selenium allows you to store data you find on a web page in variables for later use. For example, you might want to check that a purchased item is correctly placed in the user’s shopping cart. Let’s see how this is done using the Selenium IDE.
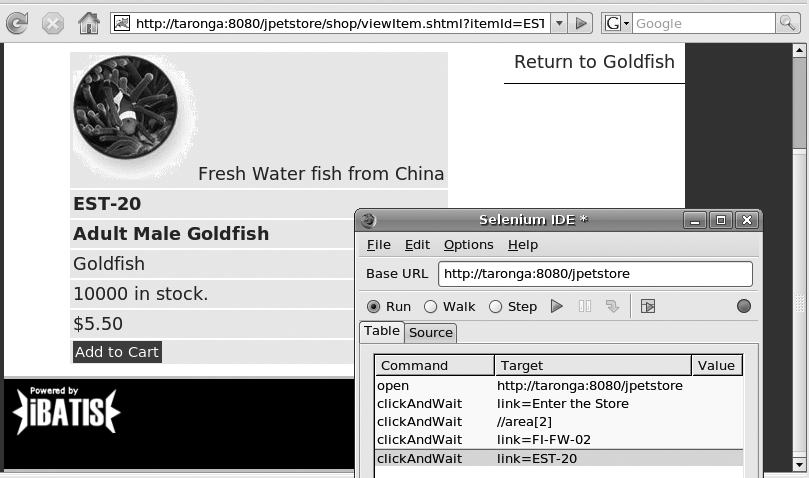
In the JPetstore application, users can add selected pets to their shopping carts using the “Add To Cart” button. Suppose that we need to check that the information going into the cart is correct. The first thing to do is to create a new Selenium test script and navigate to the details page of the pet you want to test. Alternatively, you can place a breakpoint in an existing test script at a details page, and step through the script to that point. In either case, you should end up displaying the details page of your favorite animal in the browser, along with a sequence of Selenium commands to get there (see Figure 20-6).
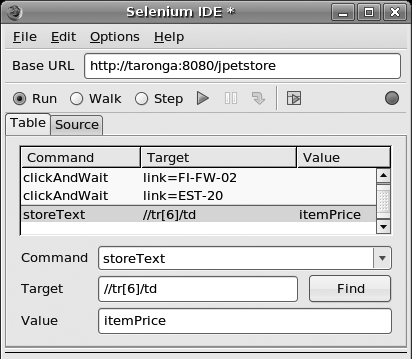
The next step is to locate and store the HTML elements that we need. In our case, we are going to make sure that, when we click on “Add to Cart,” a line is added containing the animal product code (“EST-20”), title (“Adult Male Goldfish”), and price ($5.50). You can store data in a variable by using the storeText command. Just place the cursor on the field you want to save, and select “StoreText...” in the contextual menu. (If you haven’t used it before, you may need to look for this command in the “Show All Available Commands” submenu.) Selenium IDE will prompt you for a variable name, and then add the appropriate storeText command into your script. If you do this for the price field, the actual Selenium command will look something like this:
| storeText | //tr[6]/td | itemPrice |
You are telling Selenium to record the value in the first cell of the sixth row of the first table it finds on the page. In SeleniumIDE, it looks very similar (see Figure 20-7).
This is not too hard so far. However, the trick here is to correctly identify the right HTML element. For example, if you do the same thing for the item title (“Adult Male Goldfish”), Selenium will record something along the following lines:
| storeText | //font | itemName |
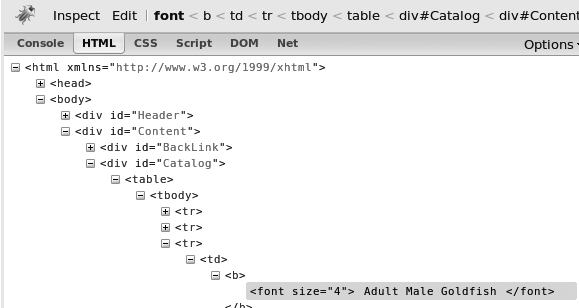
Selenium proposes to record the contents of the first <font> element it finds. This is accurate, but not particularly robust. If the web designer were to add a different <font> element before this one on the page, the test script would no longer work. So we may want to use an XPath expression with a little more context. Once again, the Firefox FireBug plug-in can come in handy here. Inspecting the item, we find that the title is actually the third line of a table (see Figure 20-8).
Knowing this, there are several ways we could make the XPath expression to this element more robust. For example, we could note that the title element is in the third row of the table nested in a <div> element. This <div> is uniquely identified by an id attribute value of “Catalog.” Using this, we can localize all the fields we need to record in a fairly precise manner:
| storeText | //div[@id="Catalog"]//tr[3]/td//font | itemName |
| storeText | //div[@id="Catalog"]//tr[2]/td | itemId |
| storeText | //div[@id="Catalog"]//tr[6]/td | itemPrice |
Now that we have stored our variables, we can click on the “Add To Cart” button and proceed to the Shopping Cart screen. Before doing so, you may need to reactivate the Selenium IDE recording mode (if the round red button on the right of the screen is solid red, recording has been stopped and you will need to click on this button to start recording again).
Once you’ve clicked on the “Add To Cart” button, Selenium should record a command along the following lines:
| clickAndWait | link=Add to Cart |
As we discussed above, Selenium IDE may record a click command rather than the more robust clickAndWait; in this case, just change it manually.
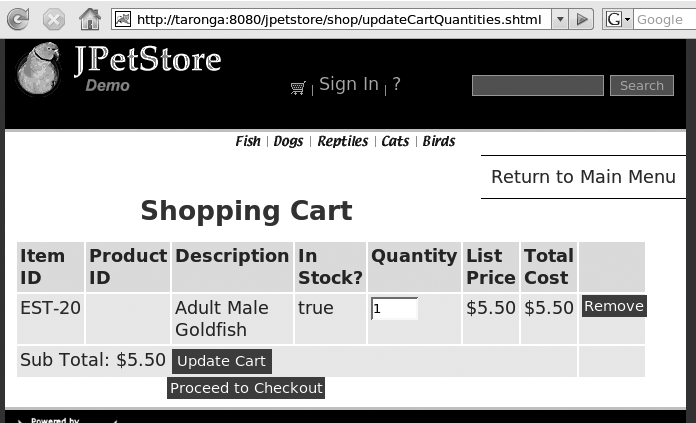
At this point, we should be on the Shopping Cart screen (see Figure 20-9). We can now check to make sure the displayed values are correct. Again, there are several ways of doing this. You can use the variables we have just created in any Selenium command, using the “${..}” notation. For example, we could opt to use the verifyTextPresent command to simply check for the presence of these values on the page, as shown here:
| verifyTextPresent | ${itemId} | |
| verifyTextPresent | ${itemTitle} | |
| verifyTextPresent | ${itemPrice} |
Or, we could opt for a more precise approach using XPath expressions, as shown here:
| verifyText | //div[@id="Cart"]//tr[2]/td[1] | ${itemId} |
| verifyText | //div[@id="Cart"]//tr[2]/td[3] | ${itemTitle} |
| verifyText | //div[@id="Cart"]//tr[2]/td[6] | ${itemPrice} |
Using assertions
Assertions are the bread-and-butter of any testing framework, and Selenium is no exception. Selenium comes with a rich set of assertions that allow you to verify the content of your web pages in great detail.
Selenium assertions come in three flavors: Asserts, Verifys, and WaitFors. So, to test text fields, you can choose from assertText, verifyText, and WaitForText. If a Verify command fails, the failure will be logged, but the test script will continue, whereas if an Assert fails, all bets are off and the test script will abort immediately. WaitFor assertions will monitor a particular element, waiting for it to take a particular value. This has obvious applications if you are writing a site using Ajax.
You can also negate any assertion using Not: assertNotText, verifyNotText, and so on.
We have already seen the verifyText and verifyTextPresent commands in action earlier on. These assertions can be used to check text values displayed within HTML elements on the screen.
Another common use of assertions is to verify the values of form fields displayed on the screen. You can use assertValue (or verifyValue or waitForValue) to check the contents of ordinary <input> fields. For other field types, you need to use different types of assertions. The following list describes the most important commands you will need when working with forms:
- assertSelectedValue
Check the value of the selected entry in a drop-down list.
- assertSelectedLabel
Check the label of the selected entry in a drop-down list.
- assertSelectedIndex
Check the index of the selected entry in a drop-down list.
- assertSelectedValues
Check the values of selected entries in a multiple-choice drop-down list.
- assertSelectedLabels
Check the labels of selected entries in a multiple-choice drop-down list.
- assertSelectedIndexs
Check the indexes of selected entries in a multiple-choice drop-down list.
- assertChecked
Check whether a checkbox field has been checked.
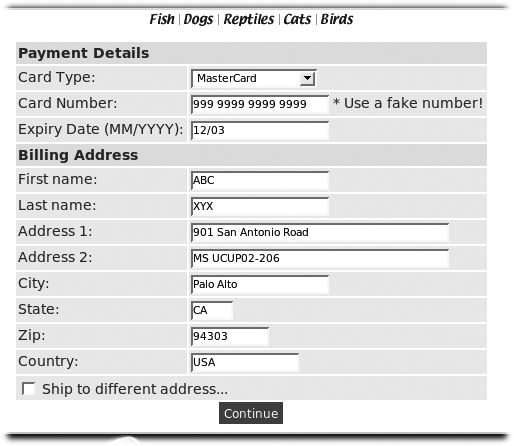
For example, Figure 20-10 illustrates the payment order form page of the JPetStore application. On this screen, we might need to check that the credit card type drop-down list is set to “MasterCard,” the credit card number is “999 9999 9999 9999,” and the shippingAddressRequired checkbox is checked. We could do this as follows:
| assertSelectedLabel | order.cardType | MasterCard |
| assertValue | order.creditCard | 999 9999 9999 9999 |
| assertChecked | shippingAddressRequired |
You can use assertions to check other aspects of the screen, as well. If your screen contains areas that are dynamically displayed or hidden using the CSS visibility property, you can check that this is working correctly with the assertVisible assertion:
| assertVisible | order.cardType |
In the same vein, you can check whether a field has been disabled using assertEditable:
| assertEditable | order.billToFirstName |
Or if your application uses JavaScript confirmation messages, you can test them using the assertConfirmation command, which lets you verify the text of the previously displayed JavaScript popup:
| assertConfirmation | Deleting record - are you sure? |
Running a Selenium Test Suite with Selenium Core
The Selenium IDE is not the only way to execute a Selenium test script.
Selenium Core is a web-based testing platform in which you can run your
Selenium test scripts on a central server. Because of JavaScript security
constraints, you need to install Selenium Core on the same web server as the
application to be tested. For a Java web server, this simply involves
extracting the Selenium Core package into the webapps directory.
You can download the Selenium Core from the Selenium web site.[*] Unpack the ZIP file into the webapp directory of your test server (in the following example, the tests are being executed on a Tomcat server). A typical installation process might go like this:
$ cd $TOMCAT_BASE/webapps
$ wget http://release.openqa.org/selenium-core/1.0-beta-1/selenium-core-1.0-beta-1.zip
$ unzip selenium-core-1.0-beta-1.zip
$ mv selenium-core-1.0-beta-1 selenium-core
Now, if you open your browser to the selenium-core context on your web server, you should see a page like that shown in Figure 20-11. This page lets you experiment with Selenium’s own test suites and, more important, provides you with access to the Selenium TestRunner, which is where all the interesting stuff happens.

It is good practice to create many smaller test scripts, rather than just one large one. This makes your test scripts easier to understand and to maintain, and makes selective testing easier. Typically, you would create a set of test scripts using the Selenium IDE, and then, once they are ready, place them on the Selenium Core server, where they can be used by the whole project team. Suppose that we have created a set of test scripts for the JPetStore application, as shown here:
$ cd ~/Documents/Selenium/jpetstore-*.html .
$ ls
jpetstore-cart.html     jpetstore-order.html     jpetstore-catalog.html
jpetstore-register.html
Also suppose that we want to deploy these scripts onto the Selenium Core
server. To do this, you first need to create a directory where the test
scripts will be stored. This can be anywhere, as long as it is within the
Selenium Core web context. Create a directory called
jpetstore-tests in the webapps/selenium-core directory, and place your test scripts
there. In a Unix environment, for example, this process might look something
like
this:
$ mkdir $TOMCAT_BASE/webapps/selenium-core/jpetstore-tests
$ cd $TOMCAT_BASE/webapps/selenium-core/jpetstore-tests
$ cp ~/Documents/Selenium/jpetstore-*.html .
$ ls
jpetstore-cart.html     jpetstore-order.html     jpetstore-catalog.html
jpetstore-register.html
Next, we need a Selenium Test Suite. Selenium Core is designed to help you centralise your functional testing in one place, to do this, it organizes Selenium test scripts into test suites, defined in simple HTML files. A Selenium Test Suite is simply a single-column table, where each row in the table contains a link to a different test script. A typical test suite might look like this:
<html>
<head>
<meta content="text/html; charset=ISO-8859-1" http-equiv="content-type">
<title>JPetStore Test Suite</title>
</head>
<body>
    <table id="suiteTable" cellpadding="1" cellspacing="1" border="1">
        <tbody>
            <tr><td><b>Test Suite </b> </td> </tr>
            <tr><td><a href="jpetstore-cart.html">Shopping Cart</a></td></tr>
            <tr><td><a href="jpetstore-catalog.html">Catalog</a></td></tr>
            <tr><td><a href="jpetstore-order.html">Orders</a></td></tr>
            <tr><td><a href="jpetstore-register.html">User Registration</a></td></tr>
        </tbody>
    </table>
</body>
Save this file under the name of TestSuite.html, in the same directory as your test scripts.
Now we can load up this test suite into Selenium Core and try it out. Open a browser to the Selenium Core web application and click on the “Selenium Test Runner” link. This will open the Selenium Test Runner home page, where you will have to provide a test suite file path. This can be a relative path or an absolute path, within the selenium-core web context. To use the test suite file created previously, for example, enter “../jpetstore-tests/TestSuite.html” and click on Go. Alternatively, you can use the test parameter in the URL to directly specify your test script, as shown here (in this example, “taronga” is the hostname of the test server):
http://taronga:8080/selenium-core/core/TestRunner.html?test=../jpetstore-tests/
TestSuite.html
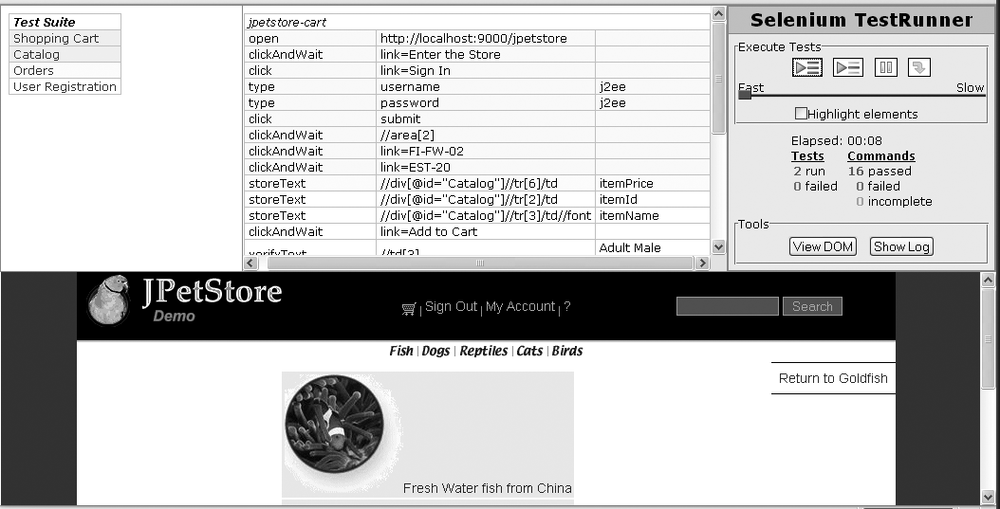
In both cases, Selenium will open your main workspace window, shown in Figure 20-12. From here, you can run any or all of your test scripts on the remote server. Clicking on the first of the green buttons in the “Execute Tests” zone will run through all of your test scripts, keeping track of how many test scripts, and how many commands have been executed, as well as any failures. As the test scripts are executed, the web site is displayed in the panel at the bottom of the screen, letting you visually keep track of what is happening.The second button does the same, but only for the currently displayed test script.
This can be a useful tool for testers to run automatic smoke or regression tests on a new release of the application.
Writing JUnit Tests with Selenium
Although the Selenium IDE is convenient, many developers prefer to write integration tests directly in Java. With Selenium, it is quite easy to do this. Selenium Remote Control (or RC) allows you to write integration tests to run against a Selenium server. Selenium RC provides APIs for several programming languages, including Java, C#, Python, and Ruby. These APIs are designed to call a remote application that you install on your test server. This application, called the Selenium Server, receives commands from remote test clients and executes them on the local server, in much the same way Selenium IDE does.
You can download the Selenium RC package, which contains the Selenium
Server from the Selenium RC web site.[*] Extract this package at a convenient place on your test server
(on my machine, it lives at /usr/local/selenium/selenium-remote-control). Then start up
the server as shown here:
$ cd /usr/local/selenium/selenium-remote-control/server/
$ java -jar selenium-server.jar
20/06/2007 20:23:10 org.mortbay.http.HttpServer doStart
INFO: Version Jetty/0.9.2-SNAPSHOT
20/06/2007 20:23:10 org.mortbay.util.Container start
INFO: Started HttpContext[/selenium-server/driver,/selenium-server/driver]
20/06/2007 20:23:10 org.mortbay.util.Container start
INFO: Started HttpContext[/selenium-server,/selenium-server]
20/06/2007 20:23:10 org.mortbay.util.Container start
INFO: Started HttpContext[/,/]
20/06/2007 20:23:10 org.mortbay.http.SocketListener start
INFO: Started SocketListener on 0.0.0.0:4444
20/06/2007 20:23:10 org.mortbay.util.Container start
INFO: Started org.mortbay.jetty.Server@1632c2d
Once the Selenium Server is installed and running on the test server, you
can start writing Selenium test cases. The Selenium RC API is very close to
the Selenese command language, so most of this example will look very
familiar. You will need the Selenium RC library, which is bundled in the
selenium-jar-client-driver.jar file.
You can download this library from the Selenium web site.[*]
If you are using Maven, you can use the OpenQA Maven repository, as shown here:
<project...>
  ...
  <repositories>
    <repository>
      <id>OpenQA</id>
      <name>OpenQA repository</name>
      <url>http://archiva.openqa.org/repository/releases</url>
    </repository>
    ...
  </repositories>
  ...
</project>
You also need to add some dependencies to your project:
<project...>
  ...
  <dependencies>
  ...
    <dependency>
      <dependency>
            <groupId>org.openqa.selenium.client-drivers</groupId>
            <artifactId>selenium-java-client-driver</artifactId>
            <version>1.0-beta-1</version>
       </dependency>
       <dependency>
            <groupId>org.openqa.selenium.server</groupId>
            <artifactId>selenium-server</artifactId>
            <version>1.0-beta-1</version>
        </dependency>
    ...
  </dependencies>
  ...
</project>
The Selenium RC API is easy to understand and to use, as the methods are
very close to the Selenium commands we saw earlier. A good way to start a
test case is to extend the SeleneseTestCase class. This is not obligatory, but it
provides some basic housekeeping tasks and useful functions that you would
otherwise have to write yourself. This class also provides your test cases
with a member variable called selenium.
You use this variable to invoke the Selenium commands.
The first thing you need to do is to correctly initialise your test
environment. You can do this in one of two ways. Providing the URL of your
test server and, if necessary, the target browser, as shown below, is the
simplest way to invoke the SeleneseTestCase
setup()
method:
    public void setUp() throws Exception {
        super.setUp("http://taronga:8080", "*firefox");
    }
Selenium supports a large number of browsers: Firefox, Internet Explorer, Opera, Konqueror, Safari, and so on. On Linux machines, you need to ensure that the corresponding executable (e.g., “firefox-bin” for Firefox) is on the system classpath, and that the application libraries are on the LD_LIBRARY_PATH. On Windows machines, standard browser installations seem to work well enough.
This will configure and start up the Selenium RC client for the specified address. The limitation of this approach is that it assumes you are running the tests directly on the test machine (which may be the case, say, for Continuous Integration testing), or that you are running the Selenium Server and web site to be tested locally (which is more typical if you are running integration or UI tests on your development machine). However, if you want to be able to run the tests on a separate test server from, say, a development machine, you need to create and start your own Selenium client object, as shown here:
    public void setUp() throws Exception {
        selenium = new DefaultSelenium("taronga",
                                       SeleniumServer.getDefaultPort(),
                                       "*firefox",
                                       "http://taronga:8080");
        selenium.start();
    }
Once you have set up the client object, things are fairly straightforward. Most of the commands are direct transcriptions of their Selenese equivalents:
    selenium.open("/jpetstore");
    ...
    selenium.click("link=Continue");
    ...
    selenium.select("order.cardType", "label=MasterCard");
Commands like “clickAndWait” need to be expanded into the base command (e.g., “click()”) and a “waitForPageToLoad()”), as shown here:
    selenium.click("link=Enter the Store");
    selenium.waitForPageToLoad("30000");
Using
methods such as getText(), getValue(),
getSelectedValue(), and so on, you can store
variables:
    String itemPrice = selenium.getText("//div[@id="Catalog"]//tr[6]/td");
    String creditCard = selenium.getValue("order.creditCard")
    String cardType = selenium.getSelectedValue("order.cardType")
For
your assertions, you can use both the ordinary JUnit assert instructions (assertEquals()...), as well as the
special Selenese verify commands
(verifyEquals(),...). The verify commands are implemented in the SeleneseTestCase
    verifyEquals("999 9999 9999 9999", selenium.getValue("order.creditCard"));
    assertEquals("MasterCard", selenium.getSelectedValue("order.cardType"));
The complete test class is listed here:
public class SeleniumTest extends SeleneseTestCase
{
public SeleniumTest() {
super();
}
public void setUp() throws Exception {
super.setUp("http://taronga:8080", "*firefox");
}
public void tearDown() throws Exception {
super.tearDown();
}
public void testSeleniumCart() throws Exception {
selenium.open("/jpetstore");
selenium.click("link=Enter the Store");
selenium.waitForPageToLoad("30000");
selenium.click("link=Sign In");
selenium.waitForPageToLoad("30000");
selenium.type("username", "j2ee");
selenium.type("password", "j2ee");
selenium.click("submit");
selenium.waitForPageToLoad("30000");
selenium.click("//area[2]");
selenium.waitForPageToLoad("30000");
selenium.click("link=FI-FW-02");
selenium.waitForPageToLoad("30000");
selenium.click("link=EST-20");
selenium.waitForPageToLoad("30000");
String itemPrice = selenium.getText("//div[@id="Catalog"]//tr[6]/td");
String itemId = selenium.getText("//div[@id="Catalog"]//tr[2]/td");
String itemName = selenium.getText("//div[@id="Catalog"]//tr[3]/td//font");
selenium.click("link=Add to Cart");
selenium.waitForPageToLoad("30000");
verifyEquals("Adult Male Goldfish", selenium.getText("//td[3]"));
verifyEquals("$5.50", selenium.getText("//td[6]"));
selenium.click("link=Proceed to Checkout");
selenium.waitForPageToLoad("30000");
selenium.click("link=Continue");
selenium.waitForPageToLoad("30000");
verifyEquals("999 9999 9999 9999", selenium.getValue("order.creditCard"));
selenium.select("order.cardType", "label=MasterCard");
assertEquals("MasterCard", selenium.getSelectedValue("order.cardType"));
assertEquals("1", selenium.getSelectedIndex("order.cardType"));
assertTrue(selenium.isVisible("order.cardType"));
assertTrue(selenium.isEditable("order.cardType"));
selenium.click("link=Sign Out");
}
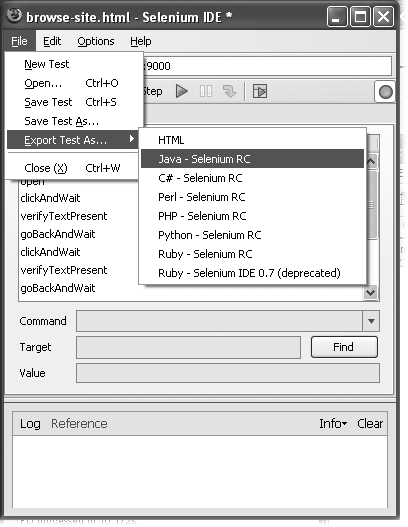
}Another way to get a head start by first creating your script using the Selenium IDE, and then exporting it into a Java file. To do this, select “File→Export Test As...Java - Selenium RC” (see Figure 20-13).
Once you have Selenium tests written in the form of Java unit tests, it is fairly easy to integrate them into the build lifecycle at an appropriate place.
Using Selenium with Ant
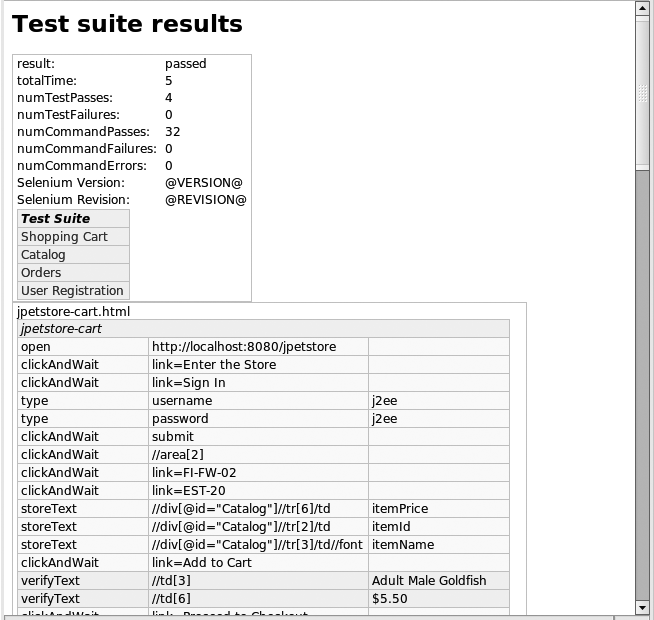
Ideally, Selenium tests should be closely integrated with the normal build environment. If you are using Ant, Selenium comes bundled with the <selenese> Ant task, a convenient tool that allows you to run Selenium test suites from within Ant. Here is an extract from an Ant build file showing how to run a Selenium test suite using the <selenese> Ant task. The task starts up its own Selenium Server instance and then runs the test scripts through this instance against a remote test server. The test results are generated in the form of an HTML report, like the one illustrated in Figure 20-14.
  <path id="selenium.classpath">
    <fileset dir="${maven.repo.local}">
        <include name="org/openqa/selenium/server/selenium-server/1.0-beta-1/selenium-server-
                       1.0-beta-1.jar"/>
        <include name="commons-logging/commons-logging/1.0.4/commons-logging-1.0.4.jar"/>
        <include name="org/openqa/selenium/core/selenium-core/1.0-beta-1/selenium-core-1.0-
                       beta-1.jar"/>
        <include name="jetty/org.mortbay.jetty/5.1.10/org.mortbay.jetty-5.1.10.jar"/>
        <include name="javax/servlet/servlet-api/2.4/servlet-api-2.4.jar"/>
        <include name="org/openqa/selenium/server/selenium-server-coreless/selenium-server-
                       coreless-1.0-beta-1/selenium-server-coreless-1.0-beta-1.jar"/>
    </fileset>
</path>
...
<taskdef resource="selenium-ant.properties">
    <classpath refid="selenium.classpath" />
</taskdef>
<target name="test-web">
    <selenese suite="src/test/resources/selenium/TestSuite.html"
              browser="*firefox"
              results="target/test-reports/selenium-results.html"
              timeoutInSeconds="500"
              startURL="http://localhost:8080/jpetstore/" />
</target>
This task is designed to be run against a locally running web server, so ideally you would probably add tasks to build and deploy your application to a local web server before running these tests. This sort of configuration fits nicely into a Continuous Integration environment—simply invoke this task at part of your Continuous Build process.
Using Selenium with Maven
Integrating Selenium with Maven can be more or less complicated, depending on your situation. If you are only using HTML Selenium test scripts, one way to run your Selenium tests from Maven is simply to use the <selenese> Ant task we looked at in the previous section. As before, these tests are designed to run against an external test server. You can do this as follows:
<project...>
    ...
    <build>
        <plugins>
            ...
            <plugin>
                <artifactId>maven-antrun-plugin</artifactId>
                <executions>
                    <execution>
                        <id>launch-selenium</id>
                        <phase>integration-test</phase>
                        <configuration>
                            <tasks>
                                <taskdef
                                    resource="selenium-ant.properties">
                                    <classpath
                                        refid="maven.plugin.classpath" />
                                </taskdef>
                                <selenese
                                    suite="src/test/resources/selenium/TestSuite.html"
                                    browser="*firefox" timeoutInSeconds="500"
                                    results="${project.build.directory}/selenium-firefoxresults.html"
                                    startURL="http://localhost:8080/jpetstore/" />

                                <selenese suite="src/test/resources/selenium/TestSuite.html"
                                      browser="*iexplore"
                                      timeoutInSeconds="500"
                                      results="${project.build.directory}/selenium-iexploreresults.html"
                                      startURL="http://localhost:8080/jpetstore/" />
                            </tasks>
                        </configuration>
                        <goals>
                            <goal>run</goal>
                        </goals>
                    </execution>
                </executions>
                <dependencies>
                    <dependency>
                        <groupId>ant</groupId>
                        <artifactId>ant-nodeps</artifactId>
                        <version>1.6.5</version>
                    </dependency>
                    <dependency>
                        <groupId>org.openqa.selenium.server</groupId>
                        <artifactId>selenium-server</artifactId>
                        <version>1.0-beta-1</version>
                    </dependency>
                </dependencies>
            </plugin>
        </plugins>
    </build>
    ...
</project>
In this example, we use the <selenese> Ant task to run the Selenium test scripts using Firefox and Internet Explorer.
The <selenese> task will start up an instance of the Selenium Server and run the specified Selenium test cases against this server. In the <phase> configuration element, we specify that these tasks are to be executed during the integration-test phase. To run these tests, use the mvn integration-test goal, as shown here:
$ mvn integration-test
[INFO] Scanning for projects...
...
Preparing Firefox profile...
Launching Firefox...
...*
Killing Firefox...
...
[INFO] ------------------------------------------------------------------------
[INFO] BUILD SUCCESSFUL
[INFO] ------------------------------------------------------------------------
[INFO] Total time: 1 minute
[INFO] Finished at: Thu Jun 21 16:05:45 NZST 2007
[INFO] Final Memory: 6M/13M
[INFO] ------------------------------------------------------------------------
Alternatively, you can use a more recent product, the selenium-maven-plugin, hosted at CodeHaus.[*] This plug-in allows you to execute Selenese test scripts directly from within Maven, without having to invoke the <selenese> Ant task. The configuration parameters are identical to those of the <selenese> Ant task. In the following example, we run the Selenium test suite using Firefox and Internet Explorer during the integration-test phase:
<project...>
  <build>
    ...
    <plugins>
      <plugin>
        <groupId>org.codehaus.mojo</groupId>
        <artifactId>selenium-maven-plugin</artifactId>
        <executions>
            <execution>
                <id>firefox-testscripts</id>
                <phase>integration-test</phase>
                <goals>
                    <goal>selenese</goal>
                </goals>
                <configuration>
                    <browser>*firefox</browser>
                    <startURL>http://localhost:8080</startURL>
                    <suite>src/test/resources/selenium/TestSuite.html</suite>
                    <results>${project.build.directory}/selenium-firefox-results.html
                    </results>
                </configuration>
            </execution>
            <execution>
                <id>iexplorer-testscripts</id>
                <phase>integration-test</phase>
                <goals>
                    <goal>selenese</goal>
                </goals>
                <configuration>
                    <browser>*iexplorer</browser>
                    <startURL>http://localhost:8080</startURL>
                    <suite>src/test/resources/selenium/TestSuite.html</suite>
                    <results>${project.build.directory}/selenium-iexplorer-results.html
                    </results>
                </configuration>
            </execution>
        </executions>
      </plugin>
    </plugins>
  </build>
</project>
Both of these approaches work fine for HTML Selenium scripts, but, as we have seen, you can also write Selenium test cases in Java. Integrating these tests into the Maven build process requires a little more work. Unlike in the previous example, we need to start the Selenium Server ourselves. For this, we are going to use the selenium-maven-plugin again, this time to start and stop a Selenium Server process in the background just before the integration-test phase starts. This is quite easy to configure. Simply add the following plug-in configuration to your POM file:
<project...>
  <build>
    ...
    <plugins>
      <plugin>
        <groupId>org.codehaus.mojo</groupId>
        <artifactId>selenium-maven-plugin</artifactId>
        <executions>
            <execution>
                <phase>pre-integration-test</phase>
                <goals>
                    <goal>start-server</goal>
                </goals>
                <configuration>
                    <background>true</background>
                </configuration>
            </execution>
        </executions>
      </plugin>
      ...
    </plugins>
  </build>
</project>
Now, if you run your integration tests, a local Selenium Server instance will start automatically:
$ mvn integration-test
[INFO] Scanning for projects...
[INFO] ----------------------------------------------------------------------------
[INFO] Building selenium-test-demo
[INFO]    task-segment: [integration-test]
[INFO] ----------------------------------------------------------------------------
...
[INFO] [selenium:start-server {execution: default}]
[INFO] Starting Selenium server...
[INFO] User extensions: P:projectsjava-power-toolssrcsample-codeselenium
selenium-test-demo	argetseleniumuser-extensions.js
[INFO] 15:02:46,407 INFO  [org.mortbay.http.HttpServer] Version Jetty/0.8.1
[INFO] 15:02:46,423 INFO  [org.mortbay.util.Container] Started HttpContext
[/selenium-server/driver,/selenium-server/driver]
[INFO] 15:02:46,423 INFO  [org.mortbay.util.Container] Started HttpContext
[/selenium-server,/selenium-server]
[INFO] 15:02:46,423 INFO  [org.mortbay.util.Container] Started HttpContext[/,/]
[INFO] 15:02:46,438 INFO  [org.mortbay.http.SocketListener] Started SocketListener
on 0.0.0.0:4444
[INFO] 15:02:46,438 INFO  [org.mortbay.util.Container] Started org.mortbay.
jetty.Server@106082
[INFO] 15:02:46,657 INFO  [org.mortbay.util.Credential] Checking Resource aliases
[INFO] Selenium server started
...
So far so good.
Next, let’s look into running some Selenium test cases written in Java. We need to ensure that these Selenium test cases will only be executed during the integration tests. To do this, we override the default configuration of the surefire plug-in, excluding the Selenium tests by default, but then including them during the integration-test phase. First of all, you need to define a convention identifying your Selenium unit tests. Here, they are all in a package called “selenium”:
      <plugin>
          <artifactId>maven-surefire-plugin</artifactId>
         <!-- Exclude Selenium tests from the usual unit tests -->
          <configuration>
              <excludes>
                  <exclude>**/selenium/*Test.java</exclude>
              </excludes>
          </configuration>
      <plugin>
Next, you need to add an <execution> element. This inverses the previous exclusion definition for this integration-test phase, ensuring that only the Selenium test cases will be executed during this phase:
      <plugin>
          <artifactId>maven-surefire-plugin</artifactId>
          ...
          <executions>
              <execution>
                  <id>surefire-integration-test</id>
                  <phase>integration-test</phase>
                  <goals>
                      <goal>test</goal>
                  </goals>
                  <configuration>
                      <excludes>
                          <exclude>none</exclude>
                      </excludes>
                      <includes>
                          <include>**/selenium/*Test.java</include>
                      </includes>
                  </configuration>
              </execution>
          </executions>
      </plugin>
The full configuration is shown here:
<project...>
  <build>
    ...
      <plugin>
          <artifactId>maven-surefire-plugin</artifactId>
         <!-- Exclude Selenium tests from the usual unit tests -->
          <configuration>
              <excludes>
                  <exclude>**/selenium/*Test.java</exclude>
              </excludes>
          </configuration>

          <!-- Include Selenium tests during integration tests-->
          <executions>
              <execution>
                  <id>surefire-integration-test</id>
                  <phase>integration-test</phase>
                  <goals>
                      <goal>test</goal>
                  </goals>
                  <configuration>
                      <excludes>
                          <exclude>none</exclude>
                      </excludes>
                      <includes>
                          <include>**/selenium/*Test.java</include>
                      </includes>
                  </configuration>
              </execution>
          </executions>
      </plugin>
      ...
    </plugins>
  </build>
</project>
Note that if you are executing both Selenium HTML test scripts and Selenium integration tests written in Java, you will need a little extra configuration. In fact, each <execution> element uses its own Selenium Server instance, and therefore needs to use a separate port. You can do this by setting the <port> configuration parameter to some value other than the default value of 4444, as shown here:
            <execution>
                <id>firefox-testscripts</id>
                <phase>integration-test</phase>
                <goals>
                    <goal>selenese</goal>
                </goals>
                <configuration>
                    <browser>*firefox</browser>
                    <startURL>http://localhost:8080</startURL>
                    <suite>src/test/resources/selenium/TestSuite.html</suite>
                    <results>${project.build.directory}/selenium-firefox-results.html
                    </results>
                    <port>5555</port>
                </configuration>
            </execution>
This way, your HTML and Java tests can run without getting in each other’s way.
Testing Swing GUIs with FEST
Contributed by: Alex Ruiz[*]
Introduction
Graphical User Interfaces (GUIs) have become a valuable way of interacting with computer programs. Testing GUIs is vital because it can improve the safety and fitness of the entire system. Any GUI, even the simplest one, is likely to enclose some level of complexity. Complexity in software needs to be tested because untested code is a potential source of bugs.
GUI testing is also important during application maintenance. During this stage, code might be refactored repeatedly to improve its design, and this code often includes great portions of the user interface. Having a solid test suite that covers the GUI code can give us assurance that we are not unintentionally introducing bugs.
This section introduces FEST, an open source library that facilitates functional GUI testing, and some practices that can simplify the creation and maintenance of thorough tests for Java Swing applications.
Testing GUIs Is Hard
Although essential, GUI testing can be difficult. Conventional unit testing, such as testing a class in isolation, normally is not appropriate for GUI testing: A GUI “unit” can be made up of more than one component, each of them enclosing more than one class. In many cases, functional testing is a more effective way to test GUIs.
The following factors are necessary to creating thorough functional GUI tests:
Being able to simulate user events
Having a reliable mechanism for finding GUI components
Being able to tolerate changes in a component’s position and/or layout
Introducing FEST
FEST (Fixtures for Easy Software Testing) is an open source library, licensed under Apache 2.0, which makes it easy to create and maintain large functional GUI tests. Although several open source projects have been devised for testing GUIs, FEST is distinguished by the following features:
An easy-to-use Java API that exploits the concept of fluent interfaces to simplify coding.
Assertion methods that detail the state of GUI components.
Support for both JUnit 4 and TestNG.
Screen shots of failing tests, which can be embedded in a HTML test report when using JUnit or TestNG. This configurable feature is useful when verifying that a test or group of tests failed because of an environment condition and not a programming error.
A Groovy-based domain-specific language that simplifies GUI testing even further. (This feature is still under development and is considered experimental.)
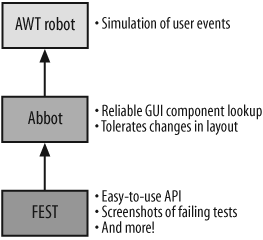
Although FEST does provide some unique features, it does not reinvent the wheel. Instead of creating yet another mechanism for component lookup and even-user simulation, FEST builds on top of Abbot, a mature, open source project for GUI testing (see Figure 20-15). Many GUI testing libraries, including FEST and Abbot, depend on the AWT Robot to generate native input events as though they were generated by a user, instead of just sending events to the AWT event queue.
Tests created with FEST are strong because they are not affected by changes in layout or component size. In addition, FEST provides features not available in other GUI testing libraries—its simple but powerful API being the most important one. FEST can be downloaded at http://code.google.com/p/fest.
Testing GUIs with FEST
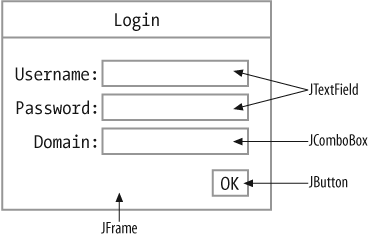
In the following sections, you will get to know FEST by walking through a testing example. Figure 20-16 is a sketch of the example GUI to be tested. It represents a login dialog where the user enters her username, password, and domain name to log in to the system.
The expected behavior of the dialog box is as follows:
The user enters her username and password, both required.
The user selects from the drop-down list the domain she wishes to connect to.
If any field is left blank, a pop-up dialog box notifies the user that the missing information is required.
In Example 20-1, we are not going to cover implementation details of our login window. Nowadays, we can create this type of GUI in a few minutes with the help of a high-quality GUI builder (commercial or free). Instead, we are going to jump straight to our first test using TestNG:
// Omitted imports and package declaration

 1  public class LoginWindowTest {
 2
 3    private FrameFixture login;
 4
 5    @BeforeMethod public void setUp() {
 6      login = new FrameFixture(new LoginWindow());
 7      login.show();
 8    }
 9
10    @Test public void shouldShowErrorIfUsernameIsMissing() {
11      login.textBox("username").deleteText();
12      login.textBox("password").enterText("secret");
13      login.comboBox("domain").selectItem("USERS");
14      login.button("ok").click();
15      login.optionPane().requireErrorMessage()
                          .requireMessage("Please enter your username");
16    }
17
18    @AfterMethod public void tearDown() {
19      login.cleanUp();
20    }
The test uses FEST to invoke the GUI being tested, simulate user events, and verify that the GUI works as expected. More specifically, the test does the following:
Uses a
org.fest.swing.fixture.FrameFixtureto manage and launch the window to test (lines 6 and 7)Ensures that the text field where the user enters his username is empty (Line 11)
Simulates a user entering the password “secret” in the appropriate text field (Line 12)
Simulates a user selecting a domain from the drop-down list (Line 13)
Simulates a user clicking the “OK” button
Verifies that a pop-up window (a
JOptionPane) is displayed showing an error message with the text “Please enter your username” (Line 15)
FEST performs component lookup using the component’s unique name. In Example 20-2, we need to identify the components in the logging window with the same names that we use in the test:
We perform component lookup using a unique name for these reasons:
Finding GUI components by type is trivial as long as the GUI being tested has only one component of that type. If it has more than one component of the specified type, we must do some extra work to identify the one we are looking for.
We cannot rely on a component’s displayed text as a way to identify it. Displayed text tends to change, especially if the application supports multiple languages.
Using a unique name for GUI components guarantees that we can always find them, regardless of any change in the GUI, as long as they haven’t been removed from the GUI.
It is also important to note
that is necessary to release resources used by FEST (such as the keyboard,
mouse, and opened windows) following the execution of each test (as shown in
Line 19). You can release used resources by calling the method cleanUp in org.fest.swing.fixture.FrameFixture, org.fest.swing.fixture.DialogFixture, or org.fest.swing.RobotFixture.
Following Windows with FEST
So far, we have created only one test. We’re not quite finished with the login window, however. The requirements specify that we still need to implement the following behavior:
An error message to be displayed if the user does not enter her password
An error message to be displayed if the user does not choose the domain she wishes to connect to
A successful login
The first two test cases are simple and involve testing a single window, similar to the test we just created. Testing a successful login is the “tricky” part. Authentication and authorization can take some time (depending on various factors such as network traffic) and we need to wait for the main window to appear to continue testing our application. With FEST it is pretty easy to test this case (see Example 20-3):
    // correct user credentials
    login.textBox("username").enterText("yvonne");
    login.textBox("password").enterText("welcome1");
    login.comboBox("domain").selectItem("USERS");
    login.button("ok").click();

    // we need to wait till login process is done
    // and the main window is shown.
    FrameFixture main = findFrame("main").using(login.robot);

    // we can continue testing the main window.
The findFrame method (statically
imported from org.fest.swing.fixture.util.WindowFinder) can look up a Frame
(having “main” as its name in our example) with a default timeout of five
seconds. In our case, if in five seconds the main window is not found, the
test will fail. We can also specify a custom value for the timeout. For
example, we can set the timeout to 10 seconds in 2 different ways, as shown
in Example 20-4.
This feature is not limited to frame lookups by name. We can also use
WindowFinder to look up frames and
dialogs by name or by type.
Verifying Test Failures
On some occasions, a functional GUI test will run perfectly from within the IDE but will break when executed in a batch with other tests (such as when you are using Ant). This is because functional GUI tests are vulnerable to certain environment-related events, and FEST is no exception. For instance, it occasionally happens that antivirus software runs a scheduled scan while a GUI is under test. If the antivirus software pops up a dialog in front of the GUI, the FEST robot will not be able to access the GUI and will time out eventually, so the test will fail. In this case, the failure is not related to a programming error; it is just a case of bad timing. Fortunately, in such cases you can verify the cause of failure easily by rerunning your test suite.
As previously mentioned, one of the features of FEST is its ability to
embed a screen shot of a failed test in its HTML test report. You then can
use this screen shot to verify the cause of a failed test and discover
whether it is program related or environmental. Configuring FEST to take
screen shots of failed tests is pretty simple. The first step is to “mark” a
GUI test with the annotation org.fest.swing.GUITest. We can place this annotation at
either the class or method level.
The following code listing in Example 20-5 shows a class “marked” as a GUI test. Every test method in this class will be considered a GUI test, even the ones in subclasses.
If you need more control, you can annotate only the methods that should be considered GUI tests. This is shown in the code listing in Example 20-6.
If you override a method marked as a GUI test, the overriding method also
will be considered a GUI test, even if it does not contain the org.fest.swing.GUITest
annotation.
The second and final step is to alert your testing framework to notify
FEST when a GUI test has failed. This way, FEST can take a screen shot of
the failed test and embed it in the test report. It is quite easy to
configure TestNG, thanks to its flexible architecture that supports
extensions. The only change necessary is the declaration of the TestNG listener org.fest.swing.testng.ScreenshotOnFailureListener, which is
provided by FEST. Example 20-7 shows configuration using TestNG and
Ant.
<target name="test" depends="compile">
<testng listeners="org.fest.swing.testng.ScreenshotOnFailureListener"
outputDir="${target.test.results.dir}">
<classfileset dir="${target.test.classes.dir}"
includes="**/*Test.class" />
<classpath location="${target.test.classes.dir}" />
<classpath location="${target.classes.dir}" />
<classpath refid="test.classpath" />
</testng>
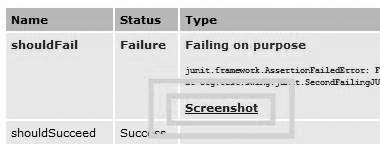
</target>Figure 20-17 shows an embedded screen shot of a TestNG test failure.
Configuring JUnit requires a little more work than TestNG. After
marking tests with the GUITest
annotation, we need to:
Add a definition of the Ant task
festreport.Use the formatter
org.fest.swing.junit.ScreenshotOnFailureResultFormatterinside the Junit Ant task.Use the Ant task
festreportinstead ofjunitreport, and specify in its classpath where the FEST jars file are.
It may look like a lot of work. The code listing in Example 20-8 shows that using FEST with Ant’s JUnit task requires only a couple of extra lines.
<target name="test" depends="compile">
  <taskdef resource="festjunittasks" classpathref="lib.classpath" />
  <junit forkmode="perBatch" printsummary="yes">
    <classpath refid="lib.classpath" />
    <classpath location="${target.test.classes.dir}" />
    <classpath location="${target.classes.dir}" />
    <formatter extension=".xml"
        classname="org.fest.swing.junit.ScreenshotOnFailureResultFormatter" />
    <batchtest fork="yes" todir="${target.junit.results.dir}">
      <fileset dir="${target.test.classes.dir}" includes="**/*Test*.class" />
    </batchtest>
  </junit>
  <festreport todir="${target.junit.report.dir}">
    <classpath refid="lib.classpath" />
    <fileset dir="${target.junit.results.dir}">
      <include name="TEST-*.xml" />
    </fileset>
    <report format="frames" todir="${target.junit.report.dir}/html" />
  </festreport>
</target>
Figure 20-18 shows an embedded screen shot of a JUnit test failure.
Every testing methodology has its weakness and functional testing, with its vulnerability to environmental factors, is no exception. Although FEST doesn’t overcome this weakness completely, it does let you account for it. Configuring FEST for failure notification makes it easy to determine whether a test has failed because of an environmental factor or because of a programming error.
Testing Legacy Applications
At this point, we have seen that FEST looks up GUI components by their name. We only need to be extra careful and provide a unique name to the components of the GUI we are creating. It is very likely that we already have a Swing application that we want to test, and unfortunately, its GUI components do not have any names at all. Instead of forcing us to go back and provide unique names to those components, FEST allows us to specify custom search criteria when them looking up.
Because we are not using unique names to identify GUI components, we need
to specify a custom search criteria in a org.fest.swing.GenericTypeMatcher to find those components.
GenericTypeMatcher in a abstract
class that uses Java generics to specify the type of GUI component we want
to match. Example 20-9 shows a matcher for a JButton:
We need to implement the method isMatching, which provides a non null instance of a JButton. From this point, it is up to us to specify if the given
component is the one we are looking for. In our example, we are looking for
a JButton with the text “OK.” If there
are no components matching our search criteria, FEST will throw a org.fest.swing.ComponentLookupException, and
our test will fail.
Tips for Writing Testable GUIs
Try the following suggestions for writing testable GUIs:
Separate model and view, moving as much code as possible away from the GUI.
Use a unique name for each GUI component to guarantee reliable component lookup.
Do not test default component behavior; for example, do not test that a button reacts to a mouse click—that is the job of the Sun Microsystems Swing team!
Conclusion
In spite of its importance, testing GUIs is difficult. FEST is an open source library that provides an easy-to-use API for GUI testing. FEST makes it easier to write and maintain robust GUI tests, which gives you more time to focus on what matters: specifying and verifying the behavior of your Swing GUIs.
FEST is a useful alternative to existing GUI-testing solutions. It’s easy to learn and use, and it provides some unique features that can make GUI development more productive and fun.
Future improvements will cover support for third-party GUI components, such as the ones provided by SwingLabs’ SwingX, and an easy-to-use Groovy and JRuby API for GUI tests.
[17] http://www.openqa.org/selenium-ide/download.action
[*] This section is based on material originally published in “Test-Driven GUI Development with TestNG and Abbot” by Alex Ruiz and Yvonne Wang Price, IEEE Software May/June 2007, and “Test-driven GUI development with FEST” by Alex Ruiz, JavaWorld.com, 07/17/07.