
Chapter 21. Detecting and Enforcing Coding Standards with Checkstyle[18]
Using Checkstyle to Enforce Coding Standards
Checkstyle is an open source tool that enforces coding conventions and best practice rules for Java code. Although it was originally designed to enforce coding standards, it now lets you verify coding best practices as well, in much the same way as PMD (Chapter 22) and FindBugs (Chapter 23). It works by analyzing Java source code and reporting any breach of standards. It can be integrated into your favorite IDE via a plug-in so that developers can immediately see and correct any breaches of the official standards. It can also be used to generate project-wide reports that summarize the breaches found.
Checkstyle comes “out-of-the-box” with the standard Sun conventions, including more than 120 rules and standards, dealing with issues that range from code formatting and naming conventions to Enterprise JavaBean (EJB) best practices and code complexity metrics. Checkstyle supports standards related to the following:
Javadoc comments
Naming conventions
File headers
Import statements
Whitespace
Modifiers
Blocks
Coding problems
Class design
J2EE (Java 2 Platform, Enterprise Edition)
And other miscellaneous issues
You can run Checkstyle from the command line, if you are so inclined. Download the Checkstyle distribution from the web site[*] and extract it in a convenient place. Then run the checkstyle-all-4.3.jar file as shown here:
$ java -jar checkstyle-all-4.3.jar -c sun_checks.xml -r src
This will analyze the code in the specified source directory and list any rule violations it finds. Here is an example, running the Sun Coding Standards provided with Checkstyle against one of the Java EE 5 sample applications provided by Sun:
$ java -jar checkstyle-all-4.3.jar -c sun_checks.xml -r javaee5/webservices/
hello-jaxws/src/
Starting audit...
/home/john/tools/checkstyle-4.3/javaee5/webservices/hello-jaxws/src/
endpoint/package.html:0:
Missing package documentation file.
/home/john/tools/checkstyle-4.3/javaee5/webservices/hello-jaxws/src/
client/package.html:0:
Missing package documentation file.
javaee5/webservices/hello-jaxws/src/endpoint/Hello.java:5:
Missing a Javadoc comment.
javaee5/webservices/hello-jaxws/src/endpoint/Hello.java:7:1:
'{' should be on the previous line.
javaee5/webservices/hello-jaxws/src/endpoint/Hello.java:8:5:
Method 'getHello' is not designed for extension - needs to
be abstract, final or empty.
javaee5/webservices/hello-jaxws/src/endpoint/Hello.java:8:5:
Missing a Javadoc comment.
javaee5/webservices/hello-jaxws/src/endpoint/Hello.java:8:28:
Parameter name should be final.
javaee5/webservices/hello-jaxws/src/endpoint/Hello.java:9:5:
'{' should be on the previous line.
javaee5/webservices/hello-jaxws/src/client/Client.java:13:
Missing a Javadoc comment.
javaee5/webservices/hello-jaxws/src/client/Client.java:14:1:
'{' should be on the previous line.
javaee5/webservices/hello-jaxws/src/client/Client.java:15:5:
Missing a Javadoc comment.
javaee5/webservices/hello-jaxws/src/client/Client.java:15:32:
'=' is not preceded with whitespace.
javaee5/webservices/hello-jaxws/src/client/Client.java:15:33:
'=' is not followed by whitespace.
javaee5/webservices/hello-jaxws/src/client/Client.java:16:25:
Variable 'service' must be private and have accessor methods.
javaee5/webservices/hello-jaxws/src/client/Client.java:17: L
ine has trailing spaces.
javaee5/webservices/hello-jaxws/src/client/Client.java:18:5:
 Missing a Javadoc comment.
javaee5/webservices/hello-jaxws/src/client/Client.java:18:29:
Parameter args should be final.
javaee5/webservices/hello-jaxws/src/client/Client.java:19:5:
'{' should be on the previous line.
javaee5/webservices/hello-jaxws/src/client/Client.java:23:
Line has trailing spaces.
javaee5/webservices/hello-jaxws/src/client/Client.java:24:5:
Method 'doHello' is not designed for extension - needs to be
abstract, final or empty.
javaee5/webservices/hello-jaxws/src/client/Client.java:24:5:
Missing a Javadoc comment.
javaee5/webservices/hello-jaxws/src/client/Client.java:25:5:
'{' should be on the previous line.
javaee5/webservices/hello-jaxws/src/client/Client.java:27:9:
'{' should be on the previous line.
javaee5/webservices/hello-jaxws/src/client/Client.java:31:9:
'}' should be on the same line.
javaee5/webservices/hello-jaxws/src/client/Client.java:32:14:
'catch' is not followed by whitespace.
javaee5/webservices/hello-jaxws/src/client/Client.java:33:9:
'{' should be on the previous line.
Audit done.
This does give some idea of the sort of tests Checkstyle does. However, for most users, this is actually about as useful as compiling from the command line: that is to say, in this day and age of IDEs and sophisticated build scripting, not very. We will see more useful ways of integrating Checkstyle in your daily work in the rest of this chapter, where we look at different ways you can use Checkstyle to improve your code quality and maintainability.
Using Checkstyle in Eclipse
Checkstyle can be used in a variety of ways, including from the command line or from within an Ant or Maven build script. However, from a developer’s perspective, the most efficient way to use it is from within the IDE, as corrections can be made immediately and with little effort. Plug-ins exist for most of the major Java IDEs, including Eclipse, IntelliJ, NetBeans, JBuilder, and even JEdit. In this section, we go through how this is done using Eclipse 3.2 and Checkstyle 4.2.
The Eclipse Checkstyle plug-in is found at http://eclipse-cs.sourceforge.net/. The first thing you will need to do is to install the plug-in. Just use the plug-in’s Remote Update site, which can be found at http://eclipse-cs.sourceforge.net/update (see Figure 21-1).

To install this plug-in, you follow the usual procedure for installing an Eclipse plug-in:
Open the Plug-in installation window by selecting the “Help→Software Updates→Find and Install” menu.
Select “Search for New Features.”
Create a new remote site entry for the Checkstyle update server via the “New Remote Site” button.
Enter a name for the remote site (say “Checkstyle Plug-in”) and the site URL (see Figure 21-1).
Step through the following installation screens.
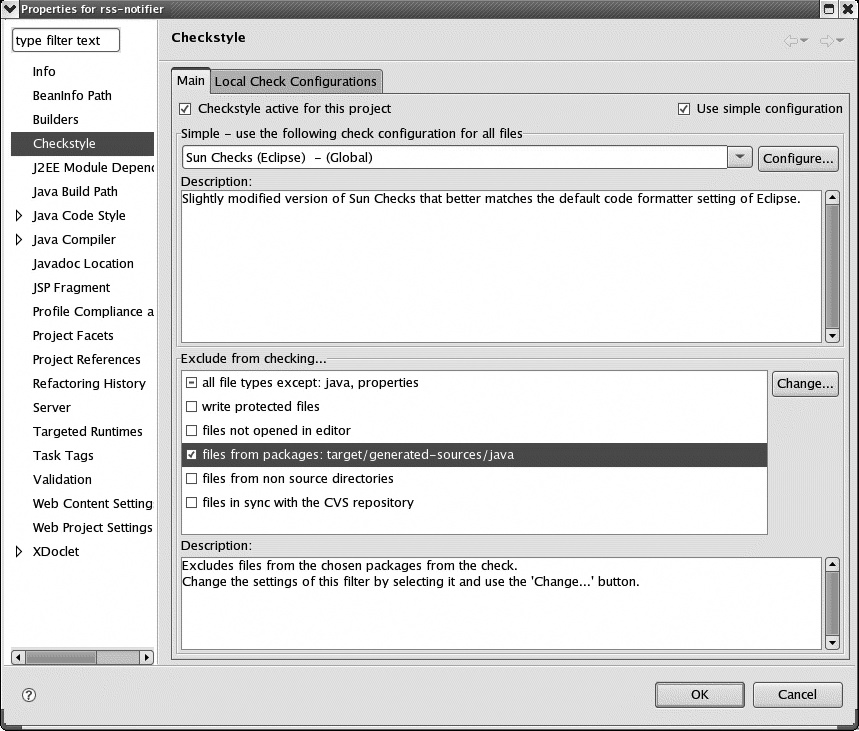
Once the plug-in is installed, you need to activate Checkstyle checks for your particular project. By default, Checkstyle will not be activated for your projects: you need to set this up yourself. Open the project properties window (Project→Properties), and select the Checkstyle properties entry (see Figure 21-2). Make sure that the “Checkstyle active for this project” checkbox is selected.
You can also specify the set of rules you want to use for this project. The Eclipse Checkstyle plug-in comes out-of-the-box with two sets of rules: the Sun Java Coding Standards and a slightly modified version of these rules, better adapted to the standard Eclipse formatting conventions. You can use one of these to get started, although you will probably want to tailor the rules to your own needs later on (see Customizing Checkstyle Rules in Eclipse).
A Checkstyle code audit can be time-consuming, especially if there are a lot of files to check. Too many errors can also make it harder to focus on the ones that really should be fixed. The “Exclude from checking...” option lets you filter out certain classes or packages that you don’t need (or want) to be checked, which can save time and processing power.
For example, in modern Java development, code generation tools are often used to save time and effort for the developers. Examples include generating Hibernate classes from Hibernate schemas, or generating classes for EJB or web services using annotations. In general, you have little control over the coding conventions used in the generated code (and, if the code works correctly, you probably don’t care).
Checkstyle lets you exclude this sort of code from its analysis. Your generated source code should be in a package of its own, preferably in a directory branch reserved for generated code (this is a common best practice that makes it easier to tidy up generated code when rebuilding the project). By convention, for example, Maven 2 places generated code in the target/generated-sources directory. Once you know where your generated source code is, just select the “files from packages” option in the “Exclude from checking...” list, and choose the packages you don’t want analyzed (see Figure 21-2).
When you’re happy with the configuration, press OK.
At this point, Checkstyle runs as a background task and audits the source code in your project. This may take some time, depending on the size of your project.
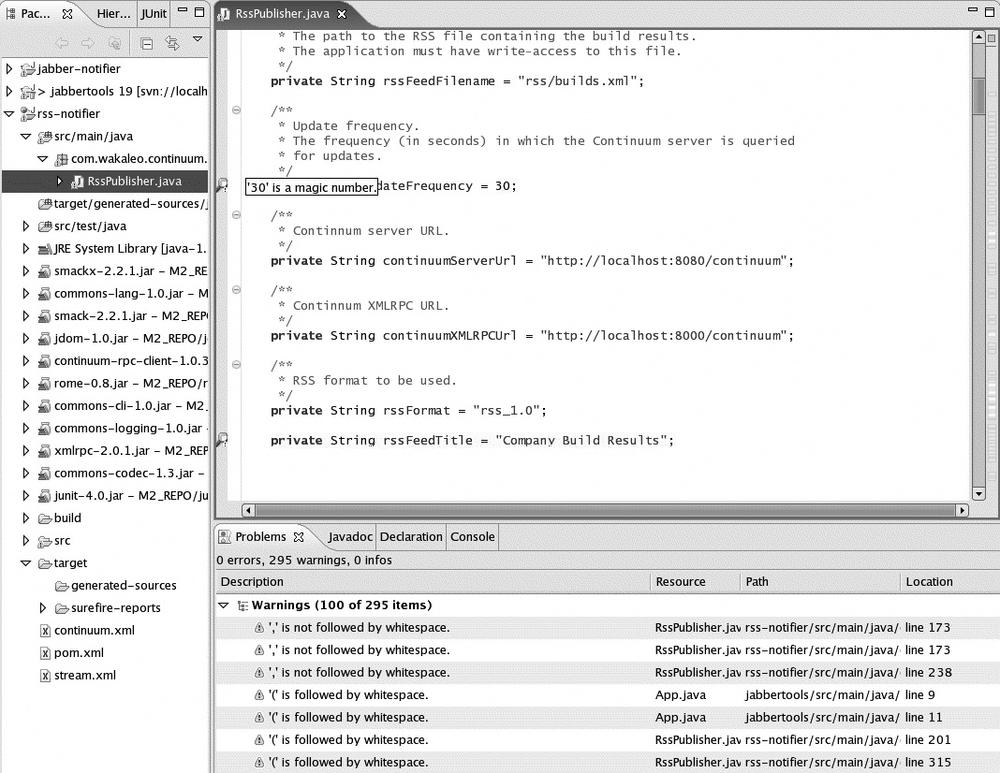
When Checkstyle finishes its audit, you will probably have a long list of standards violations, listed as warnings in the Problems view pane. Clicking on a problem in this list will automatically jump to the offending code segment.
The Checkstyle plug-in works in the same way as the Java compiler. Now, whenever you edit and save your Java classes in a Checkstyle-activated project, your code is automatically checked and any infringements are highlighted and explained (see Figure 21-3). They are rather hard to miss: the offending code is highlighted in yellow, with a corresponding marker in the margin for good measure.
In any project in which coding standards are to be enforced, developers need to work with an IDE correctly configured with Checkstyle. If properly encouraged, they will come to consider coding standard errors almost in the same way as syntax errors, correcting their code as they write it. And the project standards will be gradually and smoothly adopted by all team members. This is by far the most efficient way of enforcing coding standards.
By contrast, running Checkstyle on a large existing code base can be positively demoralizing, especially if no (or different) coding standards were previously enforced, as the number of errors can be overwhelming. This is an important factor when considering how to introduce coding standards into an organization. In Customizing Checkstyle Rules in Eclipse, we will look at how to customize Checkstyle coding standards to your team’s particular requirements.
Customizing Checkstyle Rules in Eclipse
The Sun coding standards—provided out-of-the-box via a configuration file—can be overwhelming at times. Checkstyle may well come up with hundreds of relatively minor rule violations (whitespace at the ends of lines, for example), especially if a lot of code has already been written without Checkstyle in place.
The more important standards may get lost in the mass of minor and relatively unimportant ones. This can result in two possible negative side effects:
Developers will become discouraged and ignore all rule violations, which tends to defeat the purpose of installing Checkstyle in the first place.
Developers will become overly zealous and pass hours removing spaces from the ends of lines. This will produce nice clean code, but will probably slow down developer productivity considerably.
To optimize the adoption of coding standards and the use of Checkstyle to enforce them, you often need to take a more flexible approach. The easiest way to do this is to create a custom set of coding standards that is specifically designed either for your company or for a single project.
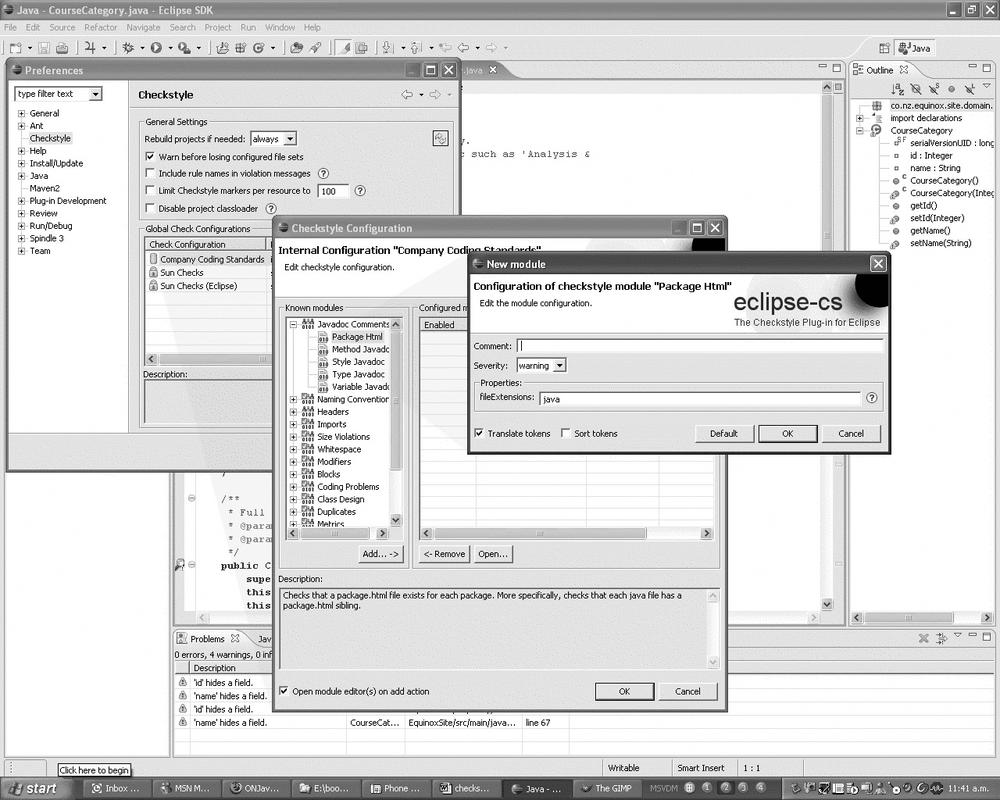
You can do this fairly easily from within Eclipse (see Figure 21-4). Go into the Preferences window, and select the Checkstyle preferences. You will see some built-in configuration files (the Sun coding standards and a slightly modified version of the Sun standards adapted to the default code formatting used by Eclipse).
To create a new Checkstyle configuration file, just click “New.” Several types of configuration files are available, including:
- Built-in configurations
For example, the Sun coding standards, which are delivered with the Checkstyle plug-in, and which cannot be altered.
- Internal configurations
Stored within the Eclipse metadata. These are useful for experimenting locally with new configurations, but they cannot (easily) be shared with other team members.
- External configurations
Imported from an external source. External configurations may be imported from an external file on a local disk (“External Configuration”) or from a web server (“Remote Configuration”), or be stored within the Eclipse project, under configuration management, for example, (“Project Relative Configuration”).
- Project Relative configurations
Particularly useful when the corresponding Checkstyle configuration file is also used in the build process by other tools such as Ant or Maven.
Another less labor-intensive approach is to copy an existing configuration, such as the standard Sun conventions, or the modification version of these checks adapted for Eclipse.
Configuring the Checkstyle configuration file using the plug-in is straightforward. When you click on the new configuration, you open a window displaying the available Checkstyle modules, along with those that have been activated for this configuration file (see Figure 21-4). To add a module to your configuration file, simply click on the module and configure it to your particular needs. Each module has its own specific configuration parameters. It is important to get buy-in from your development team for any coding standards initiative. A good approach is to go through the list of standards with your team, discussing each one, and then to configure your module according to your project needs and standards. This helps developers understand the impetus behind each rule, which encourages adoption.
When you are happy with the results, you need to publish the configuration file so that all team members can use it. Export the file using the “Export” button in the Checkstyle configuration screen, and save it somewhere on your hard disk. Once you have the Extensible Markup Language (XML) configuration file, you need to publish it somewhere. One option, for project-specific rules, is to store it under source configuration management. In this way, it can be easily accessed by any users who obtain the project from the source code repository. To use such a file in Eclipse, just create a new Checkstyle “Project Relative Configuration,” and choose the file you just created.
However, rules stored in this way are specific to each project, and you have to duplicate the rules for every new project. Another approach is to publish the configuration file on an internal web site or build server. This requires a little more work to set up and maintain, but the rules can be maintained centrally and shared across all projects. To use this type of configuration file, you need to create a new “External Configuration” (for a file on a shared directory) or “Remote Configuration” (for a file on a local web server).
Customizing Checkstyle Rules Using the XML Configuration Files
Under the hood, a Checkstyle configuration file is a standard XML file that defines a set of modules that are used to verify source code. Each module is specialized in one particular kind of coding standard or best practice.
The configuration file is basically an XML representation of a hierarchy of modules, starting from a special root module called the Checker module, which contains other modules. Some modules can also contain submodules. This is notably the case of the TreeWalker module, which parses a Java source file and then lets submodules verify different aspects of the parse tree. In fact, the majority of Checkstyle modules are sub-modules of the TreeWalker module.
A very simple Checkstyle configuration file might look like this:
<?xml version="1.0"?>
<!DOCTYPE module PUBLIC
    "-//Puppy Crawl//DTD Check Configuration 1.2//EN"
    "http://www.puppycrawl.com/dtds/configuration_1_2.dtd">

<module name="Checker">
    <module name="TreeWalker">
        <property name="tabWidth" value="4"/>
        <property name="charset" value="UTF-8"/>
        <module name="JavadocMethod"/>
        <module name="JavadocVariable"/>
            <property name="scope" value="protected"/>
        </module>
        <module name="AvoidStarImport"/>
    </module>
    <module name="PackageHtml"/>
</module>
As with all Checkstyle configuration files, this file starts with the special Checker root module. Next we add the TreeWalker module. This module parses individual Java source code files. We have added two properties to this module: tabWidth, which defines the number of spaces represented by a tab character when calculating line lengths, and charset, which (in this case) allows Checkstyle to handle UTF-8 source code files.
While we are in the process of parsing a Java source code file, we can also apply a number of other checks. These are represented by nested modules within the TreeWalker module. In fact, the majority of modules must be nested in the TreeWalker module, for the simple reason that most checks invovlve a particular Java class. In this case, we have added the following methods: JavadocMethod, which ensures that all methods have valid Javadoc comments; JavadocVariable, which ensures that all protected or public variables have Javadoc comments; and AvoidStarImport, which makes sure that import statements do not use the “*” notation.
Finally, the PackageHtml module checks, which ensures that all packages have a package.html file. The check is not included in the TreeWalker module as it does not apply to individual class files, but acts at a package level.
As seen here, module behavior can be customized using properties. Each module has a set of properties with default values. To override a property, you just add a property tag in the body of the module tag. For example, for the LineLength module the default maximum line length is 80 characters. If you want to check for lines longer than 70 characters instead, you would set the “max” property, as follows:
<module name="LineLength">
    <property name="max" value="70"/>
</module>
The severity property can be applied to any module and is used to determine the type of message that will be displayed. To deactivate a module, for example, set the severity to “ignore”:
<module name="LineLength">
    <property name="severity" value="ignore"/>
    <property name="max" value="70"/>
</module>
Most modules perform well using the default configuration. The JavadocType module checks class and interface Javadoc comments. To activate this module with the default values, you just declare the module in the configuration file (it must be nested inside the “TreeWalker” module):
<module name="JavadocType"/>
By default, the @author tag is not required. For your project or company, you may decide to make it mandatory. If so, you would also define the “authorFormat” property for this module as follows (in this case, any nonnull string will do). This property is an example of how Checkstyle uses regular expressions. Regular expressions are widely used in Checkstyle for checks involving formatting or naming conventions. These regular expressions use the popular Jakarta regexp[*] library. The following example, for example, uses the “S” regexp notation to indicate that a nonempty string is required (whitespaces are not acceptable):
<module name="JavadocType">
    <property name="authorFormat" value="S"/>
</module>
These regular expressions can be useful for expressing more complex constraints. Here is a stricter version of the package naming convention, where only lowercase letters and digits are authorized in package names:
<module name="PackageName">
    <property name="format" value="^[a-z]+(.[a-z][a-z0-9]*)*$"/>
</module>
There are many other modules that can be activated and configured. Check out the Checkstyle documentation for further details.
Customizing Checkstyle: Common Rules That You Can Do Without, and Some That You Could Use
The rules that Checkstyle provides out-of-the-box implement the Sun Coding Standards, but you may want to be a little more flexible, especially concerning arguably minor issues such as whitespaces. In Customizing Checkstyle Rules in Eclipse and Customizing Checkstyle Rules Using the XML Configuration Files, we discussed how you can create your own set of Checkstyle rules, adapted to your development practices. Here are a few pragmatic guidelines about which rules you may want to keep and which rules you may want to discard, based on the out-of-the-box Sun Checks:
- Javadoc comments
These rules are generally good to have, as they help to encourage better quality technical documentation. You can probably do without the Package Html rule, which checks for the presence of a package.html file in each package, a recommendation that is rarely followed with any consistency in the real world.
- Naming conventions
Naming conventions play an important role in code readability—I generally stick to the Sun conventions here.
- Headers
The rules about headers are not included in the default Checkstyle configurations, as they tend to be company-specific. Don’t bother with these unless you have some company-wide obligation to do so.
- Imports
The conventions around imports (no star (*) or redundant imports, imports in alphabetical order...) are beneficial for code readability, and are also supported by modern IDEs such as Eclipse and NetBeans with little extra effort. For example, in Eclipse, the “Source→Organize Imports” menu will automatically fix any import-related issues. I usually keep the default configuration here.
- Size violations
These limits on class and method size are designed to keep code short and simple, as recommended by many Java best practices and Agile methodologies. They are good to have.
- Whitespace
The Checkstyle whitespace rules contain an abundance of rules about where white space is (or isn’t) required. Although many correspond to standard Java coding practices and make for more readable code, some are a little too pedantic for real-world use.
One of the worst culprits is the Tab Character rule, which checks for the presence of tabs in the source code. There are good reasons to avoid tabs in source code, especially if the code needs to be read online. The problem is that many IDEs use tabs by default in their code templates and in generated code blocks. Keep this rule if you can, but make sure your IDEs are configured correctly.
The “Whitespace Around” rule works poorly if you use generics. Using the standard configuration, for example, the following expression will generate errors
List<Integer> list = new ArrayList<Integer>();
To avoid this, open up the details of this rule and disable the “Start of generic type arguments” and “End of the generic type arguments” entries.
- Modifiers
The Modifier Order rule makes sure modifiers are placed in the order recommended by Sun. For example, methods are public static, not static public. This is primarily a readability issue—having consistently ordered modifiers makes the code easier and smoother to read.
The Redundant Modifier rule enforces the Sun recommendation of not having abstract or public modifiers in interfaces. Interestingly, when you create an interface from a class in Eclipse, it does just that: by default, the generated interface has public abstract methods. If you include this rule, make sure you remember to uncheck these options if you create interfaces using Eclipse’s “Refactoring→Extract Interface” function.
- Blocks
Blocks are an important part of code conventions: I usually leave these rules as-is.
- Coding problems
The coding problems are designed to avoid common coding errors by enforcing basic best practices. Most of these rules are sensible and reflect good programming practices.
One rule that can cause problems is the Hidden Field rule, which detects parameters with the same name as member variables. In most cases, this is a sensible rule, since it can cause considerable ambiguity in the code. However, there are situations where it is not appropriate. IDEs like Eclipse and NetBeans provide convenient functionalities for generating getters and setters, such as the one shown here:
public void setName(String name) {
    this.name = name;
}
Although this code is fine, Checkstyle will indicate a Hidden Field error here. To get around this, just open the configuration for this rule and check the “ignoreSetter” option.
There are a couple of additional rules that can be useful:
The Multiple String Literals rule can be useful to detect duplicated string values that should be refactored into constants.
The String Literal Equality rule detects cases in which strings are compared using “==” or “!=.”
- Class design
The DesignForExtension rule is a fairly obscure rule designed to limit the ability of subclasses to damage the behavior of a class by overriding its methods. This is a nice idea in theory, but it requires a lot of extra coding for little real benefit in most cases. I usually drop this rule.
- Metrics
Metrics are not included in the standard rule set. Most metrics are not particularly easy to understand unless you are familiar with the theory of code metrics. However, there is one that’s worth a look, even if you’re not a specialist in code metrics: the CyclomaticComplexity rule.
The CyclomaticComplexity rule measures McCabe cyclomatic complexity, which is actually useful and fairly easy to understand. This metric measures the complexity of a method by counting the number of distinct paths through it. Each decision point (ifs, loops, case statements, and so on) adds a new path, and thus extra complexity. Overly complex methods with endless conditions and branches are harder to read and maintain, harder to test, and are prone to bugs. For Java code, most writers consider a cyclomatic complexity value of 1–4 to indicate low complexity, 5–7 to indicate moderate complexity, and 8–10 to indicate high complexity. A value over 10 indicates an excessively complex method that should probably be reviewed and refactored.
In Checkstyle, you can configure the maximum allowable complexity. By default, any method with a cyclomatic complexity of over 10 will be detected. In the following example, we lower the threshold to 7:
<module name="CyclomaticComplexity"> <property name="max" value="7"/> </module>- Miscellaneous
The default rules come with a rule called Generic Illegal Regexp, which is configured to detect trailing spaces at the end of lines in your code. You probably don’t care about this, so this rule can be safely removed.
The New Line At End Of File rule integrates poorly with many IDEs such as Eclipse, as the new line character in question varies depending on the operating system and/or the IDE configuration. I usually drop this one for the sake of simplicity.
There are many other rules that are not activated by default in the Sun configuration, such as Metrics, EJB-specific rules, and code duplication detection. These should be added only on an as-needed basis, and when everyone in the team fully understands the rule. At the end of the day, don’t forget that coding standards are designed to improve readability, reliability, and maintainability, and they should not add an excessive overhead to development efforts. If a rule does not fit in with your environment, don’t use it.
Defining Rules for Source Code Headers with Checkstyle
Many companies and projects use a standard file header convention. Checkstyle offers many ways to enforce this. For simple cases, you can write a header template, where some lines are fixed and others may be modified by the developer. Suppose that your company standards impose a boxed-style comment with a copyright line at the bottom, as shown here:
 ////////////////////////////////////////////////////////////////////
// My Project Title
// A description of this file goes here.
//
// Copyright (C) 2006 My Company
////////////////////////////////////////////////////////////////////
One easy way to do this is to define a header template called java.header, which would contain the above text, and then indicate which lines may be modified:
<module name="Header">
    <property name="headerFile"
    value="java.header"/>
    <property name="ignoreLines" value="2, 3, 4"/>
</module>
Suppose that all you need to do is to put a copyright line at the top of each file:
// Copyright (C) 2006 MyCompany
// All rights reserved
At first sight, this looks like a static block of text. However, the year needs to change each year. To do this, you can define an inline regular expression using the RegexpHeader module, as shown here:
<module name="RegexpHeader">
    <property name="header"
    value="^// Copyright (C) dddd My Company$
^// All rights reserved$"/>
</module>
You can also define the header as a more complicated regular expression in an external file. Suppose your company or project standards require a file header containing dynamic elements coming from the source configuration system, as in the following example:
////////////////////////////////////////////////////////////////////
// My Project Title
// File: $Id$
// A short description goes here
//
// Last modified $Date$ by $Author $
// Copyright (C) 2006 My Company
////////////////////////////////////////////////////////////////////
This can be configured using the RegexpHeader module and an external file template (called “java.header” in this example):
<module name="RegexpHeader">
    <property name="headerFile" value="java.header"/>
</module>
The java.header file in this case would look like this:
^////////////////////////////////////////////////////////////////////
^// My Project Title
^// File: $Id.*$$
Suppressing Checkstyle Tests
There will be times when you come across a genuine reason for violating a coding standard for a particular section of code. For example, the following code extracts the list of students in each percentile:
for (int i = 1; i < 100; i++) {
    List<Student> students = extractCentile(i, examResults);
    …
}
In this context, the use of the value 100, for example, is clear, and there is little added value in replacing it by a constant called ONE_HUNDRED. Checkstyle lets you get around this problem in several ways. The easiest way to deal with particular cases like this is to use the SuppressionCommentFilter module. This module lets you deactivate Checkstyle for a section of code:
// CHECKSTYLE:OFF – 100 is not a "magic number" in this case
for (int i = 1; i < 100; i++) {
// CHECKSTYLE:ON
    List<Student> students = extractCentile(i, examResults);
    …
}
Another way to do this is to use the SuppressionFilter associated with an XML configuration file, where detailed suppressions can be specified. This approach is useful for deactivating rules for large blocks of code or across several classes:
<module name="SuppressionFilter">
    <property name="file" value="docs/suppressions.xml"/>
</module>
The code above calls a suppressions.xml file, a file that you need to write where you can deactivate particular checks for particular classes, or even for certain lines in a particular class. In the following example, all Javadoc checks are deactivated for the first 50 lines of the Catalog class, and the MagicNumberCheck is deactivated for all unit test classes:
<!DOCTYPE suppressions PUBLIC
    "-//Puppy Crawl//DTD Suppressions 1.0//EN"
    "http://www.puppycrawl.com/dtds/suppressions_1_0.dtd">
<suppressions>
    <suppress checks="Javadoc*" files="Catalog.java" lines="1-50"/>
    <suppress checks="MagicNumberCheck" files="*Test.java"/>
</suppressions>
This approach does require extra maintenance work to keep the suppression.xml file up-to-date. Developers also may be tempted to use wildcards a little excessively, which can reduce the efficiency of Checkstyle audits. In practice, this method should be used sparingly and only after other options have been considered and eliminated.
Using Checkstyle with Ant
Integrating Checkstyle into your standard build process is an important step in the road to improved code quality. We will look at how to integrate Checkstyle into a build process using Ant.
Checkstyle comes out-of-the-box with an Ant task that does just this. If you haven’t already done so, download the Checkstyle installation file and unzip it into some convenient directory. Here, we have installed it into the “${user.home}/tools” directory:
$ cd ~/tools
$ unzip checkstyle-4.3.zip
The next thing you need to do is to add a task definition for the Checkstyle task. Something along the following lines should do:
    <property name="checkstyle.home" location="${user.home}/tools/checkstyle-4.3" />
    <taskdef resource="checkstyletask.properties"
    classpath="${checkstyle.home}/checkstyle-all-4.3.jar"/>
Then, to run Checkstyle against your source code, just invoke the task as follows:
<checkstyle config="${checkstyle.home}/sun_checks.xml">
  <fileset dir="src" includes="**/*.java"/>
  <formatter type="plain"/>
  <formatter type="xml"/>
</checkstyle>
The only problem with this is that the results are not particularly readable. If the error messages are for human consumption, you should pass the generated XML through a stylesheet (several are provided with the Checkstyle distribution) to generate the results in a more readable HTML form:
    <target name="checkstyle">
        <checkstyle config="${checkstyle.home}/sun_checks.xml"
         failOnViolation="false">
            <fileset dir="src" includes="**/*.java"/>
            <formatter type="plain"/>
            <formatter type="xml" tofile="checkstyle-report.xml"/>
        </checkstyle>
        <xslt in="checkstyle-report.xml"
                  style="${checkstyle.home}/contrib/checkstyle-noframes.xsl"
                  out="reports/checkstyle-report.html"/>
    </target>
Don’t forget the failOnViolation attribute. If this is not set to “false,” the Checkstyle check will stop the build if it finds any violations, and never get to the report generation task.
Now you can run the task:
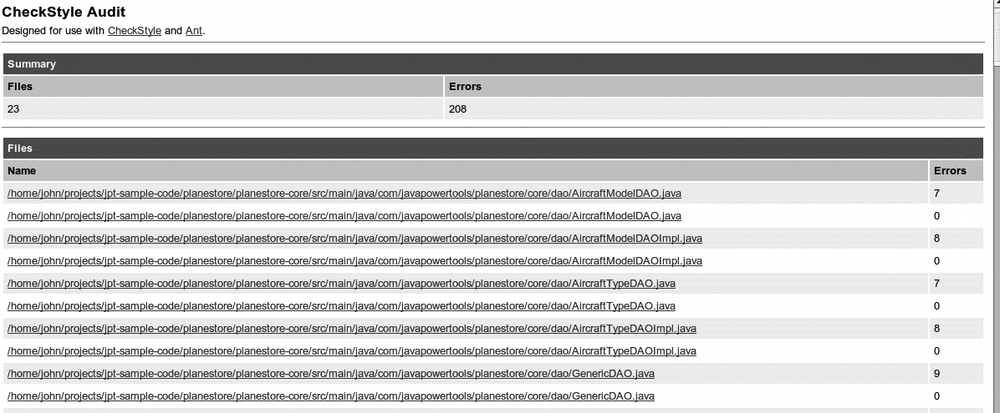
$ ant checkstyle

Buildfile: build.xml

checkstyle:
[checkstyle] Running Checkstyle 4.3 on 5 files
[checkstyle] /home/john/projects/.../taxcalculator/package.html:0:
Missing package documentation file.
...
[style] Processing
/home/john/projects/java-power-tools/src/code-listings/ch05/tax-calculator
/checkstyle-report.xml to
/home/john/projects/java-power-tools/src/code-listings/ch05/tax-calculator/reports/
checkstyle-report.html
[style] Loading stylesheet
/home/john/tools/checkstyle-4.3/contrib/checkstyle-noframes.xsl

BUILD SUCCESSFUL
This would produce an HTML report similar to the one shown in Figure 21-5.
Using Checkstyle with Maven
Checkstyle integrates extremely well with Maven, which comes with a Checkstyle report plug-in (see Figure 21-6). The Maven Checkstyle report contains summaries and more detailed information about the different detected issues in the code, with data presented using a convenient drill-down approach.
You set up the basic configuration in the <reporting> section of your pom.xml file, as shown here:
<reporting>
    <plugins>
        <plugin>
            <artifactId>maven-checkstyle-plugin</artifactId>
            <configuration>
                <configLocation>src/main/config/company_checks.xml</configLocation>
            </configuration>
        </plugin>
    </plugins>
</reporting>
The optional <configuration> tag lets you specify your own customized set of rules (in Customizing Checkstyle Rules in Eclipse and Customizing Checkstyle Rules Using the XML Configuration Files). By default, the standard Sun Java Coding Conventions will be used.
If you use a suppressions file (in Suppressing Checkstyle Tests), you can also specify this file in the suppressionsLocation configuration entry, as shown here:
<reporting>
    <plugins>
        <plugin>
            <artifactId>maven-checkstyle-plugin</artifactId>
            <configuration>
                <configLocation>src/main/config/company_checks.xml</configLocation>
                <suppressionsLocation>suppressions.xml</suppressionsLocation>
            </configuration>
        </plugin>
    </plugins>
</reporting>
In the same way, you can use headerLocation to specify a header template (Defining Rules for Source Code Headers with Checkstyle).
You run the Checkstyle report by generating the maven site using the “mvn site” command (see Chapter 2), or directly from the command line, as shown here:
$ mvn checkstyle:checkstyle
A typical report is illustrated in Figure 21-6.
The Maven Checkstyle report is flexible and takes a large number of configuration options that you can use to fine-tune the layout and content of the report. For example, by default the Checkstyle report begins with a list of all the rules used. You can remove this by setting the enableRulesSummary configuration entry to false. If you want the build to stop if there are any Checkstyle errors, set the failsOnError configuration entry to true.
If you include the JXR report as well, the generated Checkstyle report will contain hyperlinks to the HTML version of the Java source code. You can include this file by adding the maven-jxr-plugin report plug-in, as shown here:
<reporting>
    <plugins>
         ...
         <plugin>
             <groupId>org.apache.maven.plugins</groupId>
             <artifactId>maven-jxr-plugin</artifactId>
         </plugin>
    </plugins>
</reporting> 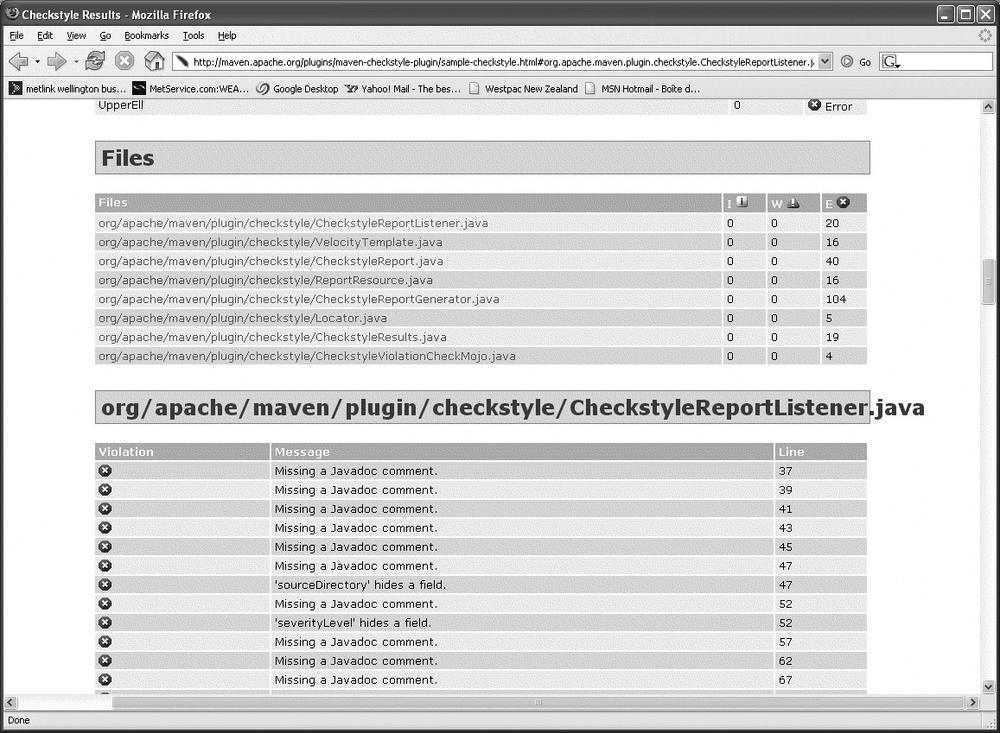
[18] Some of the material in this chapter appeared in it’s first incarnation on www.devx.com on the 29th of March 2006, in the article “Maintain Better Coding Standards with Ease Using Checkstyle”