
Chapter 27. Bugzilla
An Introduction to Bugzilla
Bugzilla[*] is probably the most well-known of the open source issue tracking solutions, and is used by many high-profile open source projects such as Mozilla, Apache, and Eclipse. It is a mature, high-performance, feature-rich open source issue management solution well adapted for use in very large projects. It has been adopted by a large number of organizations and projects, both in the open source world and for commercial products. On the downside, it has a fairly well-earned reputation of being hard to install and to maintain, and its default user interface—with its fast, lightweight, no-frills screens—is possibly one of the ugliest and most unfriendly around. In this chapter, we will look at how to install, use, and customize Bugzilla.
Installing Bugzilla
Bugzilla has an arguably justifiable reputation for being fairly hard to install.
Bugzilla is typically installed in a Unix or Linux environment, although the more recent versions work fine on Windows as well. Bugzilla runs on Perl, and uses either MySQL or PostgreSQL as a backing database. You also need a web server: Apache is the typical choice. Installation is done from the command line and basically involves installing all the necessary Perl modules, setting up the database, and scheduling external Perl scripts to collect data for bug graphs and to send notifications. Notifications are done by email, so you also need a mail server. The installation process is long and involved, often full of surprises, and only the bravest and most intrepid will come through a full Bugzilla installation unscathed. Here, I will go through the main steps, and try to point out some of the more common pitfalls.
This section concentrates on how to install Bugzilla into a Unix environment. On a Windows machine, the procedure is a little different; you can find a good tutorial on the Bugzilla web site.[24]
System Prerequisites
Bugzilla uses Perl as its scripting language, so you will need to have Perl installed on your machine. Most Unix/Linux distributions come with a recent version of Perl installed; if you have a doubt, run perl --version from the command line:
$ perl --version

This is perl, v5.8.8 built for i486-linux-gnu-thread-multi

Copyright 1987-2006, Larry Wall

Perl may be copied only under the terms of either the Artistic License or the
GNU General Public License, which may be found in the Perl 5 source kit.

Complete documentation for Perl, including FAQ lists, should be found on
this system using "man perl" or "perldoc perl".  If you have access to the
Internet, point your browser at http://www.perl.org/, the Perl Home Page.
If for some reason you don’t have Perl on your machine (for example, if you happen to be running under Windows), you will need to download and install one of the binary distributions from the Perl web site.[25]
There are many distributions available. One of the most popular for Windows is ActivePerl,[26] from ActiveState.
You will also need a database: either MySQL (4.1.2 or higher) or PostgreSQL (8 or higher). These are the only databases currently supported by Bugzilla. Luckily, both are fairly easy to install on all platforms.
Finally, you will need a web server. In theory, any old web server capable of running CGIs will do, but by far the most common configuration is to install it with Apache.
Installing the Bugzilla Application
That was the easy bit. Now it is time to install Bugzilla itself. Download and uncompress the latest Bugzilla installation package from the Bugzilla site, as shown in the following example:
# wget http://ftp.mozilla.org/pub/mozilla.org/webtools/bugzilla-3.0.tar.gz
# tar vxfz bugzilla-3.0.tar.gz
# mv bugzilla-3.0 /usr/local/apache2/htdocs/bugzilla
This last line places Bugzilla in the typical Apache web directory. On this machine, Apache 2 was installed to the /usr/local/apache2 directory, so we put Bugzilla in the htdocs subdirectory, which is the web site root directory. Obviously, this will vary depending on your installation; /var/www/html is another common option.
The unpacked Bugzilla directory must be accessible by the user that Apache runs under on your machine. This can be a pitfall if you run the installation scripts as root, and forget to change the permissions on the Bugzilla directory, for example. By default, Apache runs using the “nobody” user, but this is not considered to be a very secure practice. On many systems, the Apache server is run in a dedicated user account. This is configured in the Apache configuration (httpd.conf) file in the User directive:
# User/Group: The name (or #number) of the user/group to run httpd as.
# ...
User apache
Now go to this directory. The rest of the installation takes place there.
Installing the Perl Modules
One of the core parts of the Bugzilla installation process involves
installing a long list of Perl modules that Bugzilla requires (and a few
optional ones that Bugzilla would like to have). The main tool at your
disposition for this task is the checksetup.pl script. This script analyzes your system and
lists any Perl modules (and there will be) that are not present on your
system, and that, therefore, you need to install. The first thing to do is
to run this script as follows to determine exactly which modules you need to
install. The script will provide OS-specific instructions on how to go about
installing the missing
modules:
# ./checksetup.pl --check-modules
* This is Bugzilla 3.0rc1 on perl 5.8.8
* Running on Linux 2.6.17-11-generic #2 SMP Thu Feb 1 19:52:28 UTC 2007

Checking perl modules...
Checking for       AppConfig (v1.52)    not found
Checking for             CGI (v2.93)   ok: found v3.20
Checking for    Data::Dumper (any)     ok: found v2.121_08
Checking for    Date::Format (v2.21)    not found
...
Checking available perl DBD modules...
Checking for          DBD-Pg (v1.45)    not found
Checking for       DBD-mysql (v2.9003) not found
...
***********************************************************************
COMMANDS TO INSTALL:

       DBD-mysql: /usr/bin/perl  -MCPAN -e 'install DBD::mysql'
       DBD-Pg: /usr/bin/perl  -MCPAN -e 'install DBD::Pg'
       ...
Depending on the state of your system, there can be quite a few modules to install. Each module can be installed using the appropriate (OS- and distribution-specific) Perl command. The Perl installation scripts will download, compile, and install any components you need for a each library. For example, on a Unix machine you would use the perl -MCPAN command to install the Perl PostgreSQL libraries:
# perl -MCPAN -e 'install DBD::Pg'
You need to do this for each of the missing modules. It is certainly long and tedious, but, in my experience, it is still the safest way to get things done. One simple but useful shortcut is to copy the commands listed by the checksetup script into a text file and massage them into a usable script, which you need to run only once.
Installing the Bugzilla Application
Once all of the Perl modules are installed, you can install Bugzilla
itself. Again, you will be using the checksetup.pl
script, but this time with no options, as shown
here:
# ./checksetup.pl
This will generate a configuration file called localconfig, which you will need to tailor to your environment. There are several key properties in this configuration file that you may need to change:
- $db_driver
By default, this is set to MySQL. If you are using PostgreSQL, change this value to “Pg.”
- $db_name
The name of the database Bugzilla will be using (you need to set this up yourself).
- $db_user
The database username.
- $db_pass
The database user password.
Next you need to set up an empty database and a corresponding user account in the database of your choice. The details of this will obviously depend on the database you are using. Here is how you might do it if you are using MySQL, for example:
mysql> GRANT ALL PRIVILEGES ON bugs.* TO bugs@localhost IDENTIFIED BY 'secret';
mysql> FLUSH PRIVILEGES;
When you are done, run checkstyle.pl
again. It will detect your changes and populate the database with Bugzilla
tables:
# ./checksetup.pl
...
Checking for       DBD-mysql (v2.9003) ok: found v4.003
Checking for           MySQL (v4.1.2)  ok: found v5.0.24a-Debian_9-log

Removing existing compiled templates ...
Precompiling templates...
Fixing file permissions...

Now that you have installed Bugzilla, you should visit the
'Parameters' page (linked in the footer of the Administrator
account) to ensure it is set up as you wish - this includes
setting the 'urlbase' option to the correct url.
At some point, the script will prompt you for an email address and password for your administrator account, as shown here:
Looks like we don't have an administrator set up yet.
Either this is your first time using Bugzilla, or your
administrator's privileges might have accidentally been deleted.

Enter the e-mail address of the administrator:
At the risk of stating the obvious, enter this address carefully; if you get it wrong or forget it, recovering or modifying it can be quite tricky.
Configuring the Web Server
Last, but not least, you need to set up the web server to process the Bugzilla pages correctly. In Apache, this simply involves activating CGI script handling for your Bugzilla directory. For the installation described above, we just need to add the following Directory directive to the Apache httpd.conf file (found in the /usr/local/apache2/conf directory on my installation, although this file is often to be found in other places, such as /etc/httpd/conf):
<Directory /usr/local/apache2/htdocs/bugzilla>
AddHandler cgi-script .cgi
Options +Indexes +ExecCGI
DirectoryIndex index.cgi
AllowOverride Limit
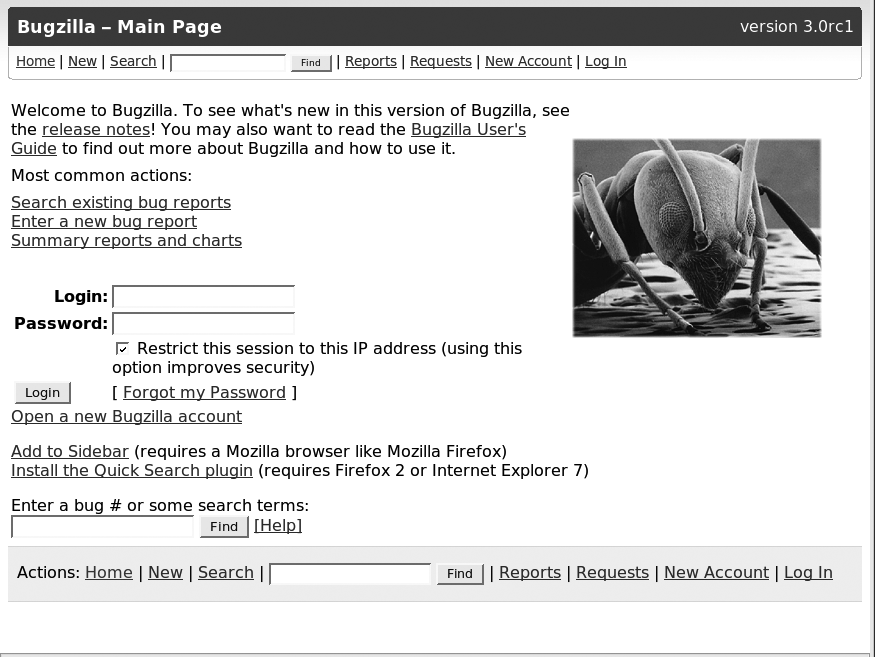
</Directory>Now restart your web server, open your favorite browser, and go to the Bugzilla directory that you have just installed (http://localhost/bugzilla, if you have been following the examples given here). This should display the default Bugzilla main page, as shown in Figure 27-1.
Setting Up Your Bugzilla Environment
Once you get Bugzilla running, you will need to tailor it to your environment. Bugzilla asks you to define a few basic parameters the first time that you log in using your administration account (remember, the one we said not to forget at the start of the installation?). You need to set up things like the email address of the person responsible for maintaining the installation, the base URL of your Bugzilla installation, and whether some or all of the site should be protected by encrypted SSL access.
Managing User Accounts
When it comes to user accounts, Bugzilla is very much based on an open source school of thought. By default, anyone can search and view bugs without needing to log in. You need to log in if you want to create or update bugs. Users can create their own accounts by clicking on the “New Account” link at the bottom of every screen. This is, in fact, the best and most convenient way to create new user accounts because users can manage their own email addresses and password details without having to bother the administrator. All a user needs to provide is a valid email address. New users created this way can freely search, create, and update bugs.This approach is fine for many projects, especially open source ones.
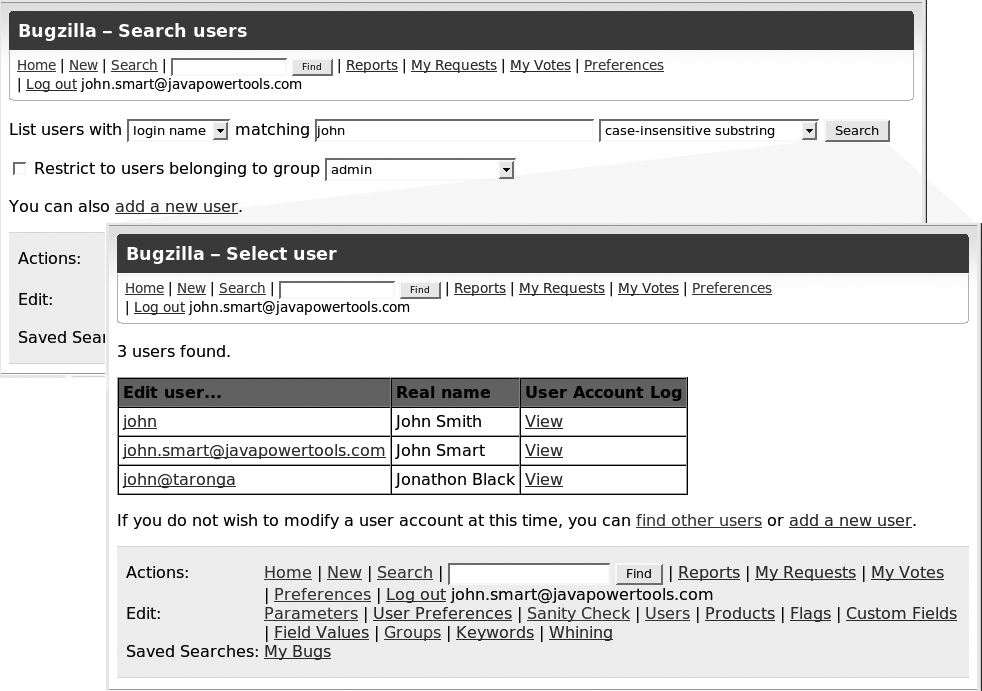
Bugzilla provides a useful web interface for creating and administrating user accounts. Administrators can manage user accounts in the “Users” screen (see Figure 27-2). This screen lets you search and list existing user accounts, modify user account details, and create new user accounts. Creating user accounts from the administration screens is usually only done for testing purposes, as users are not automatically notified when their account is created.
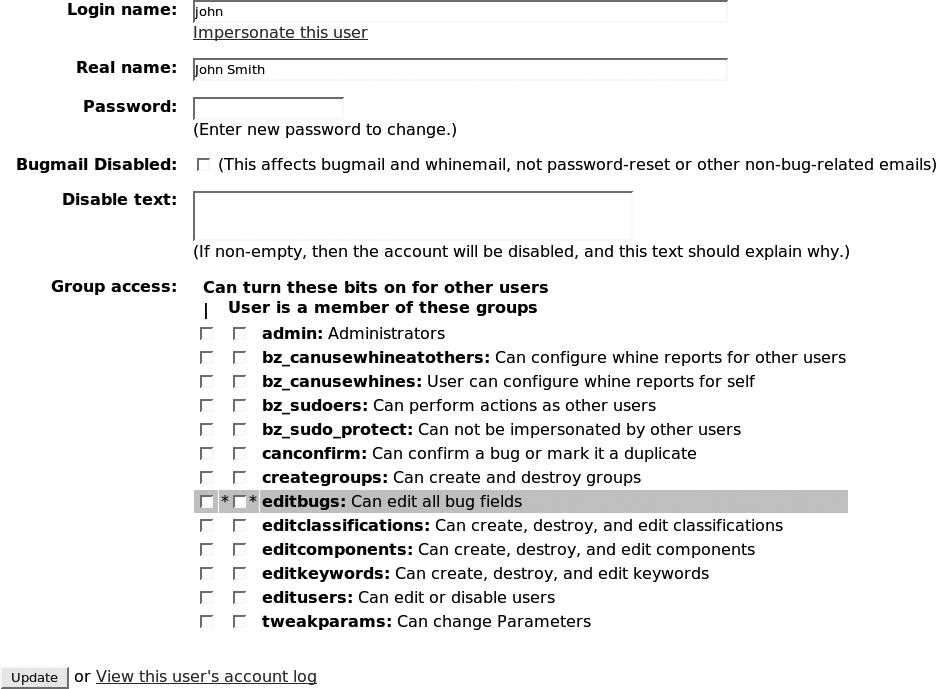
Default users can search, create, and update bugs, but they are not authorized to do very much else. Other functionalities, such as managing products and components, configuring periodic email notifications (known in Bugzilla terms as “whining”), and, indeed, managing users and user groups, are reserved for authorized users only. You can do this in the “Edit user” screen (see Figure 27-3). This screen lets you modify the user’s login details and also authorize the user to access these other functionalities.
Bugzilla is fundamentally designed to be an open, public-facing issue management system, and any user can try to create his or her own account. By default, Bugzilla requires (and is happy with) a full, correctly formed email address (so it won’t accept “jill” or “joe@myserver,” for example). If your project requires more security, you can restrict access by modifying the emailregexp, in the “User Authentication” section of the “Parameters” screen. This field is a regular expression that user account email addresses must match. If you leave this field blank, Bugzilla will accept any email address (although it is likely to crash if the address isn’t a real one). For example, you may want to limit user accounts to email addresses within your organization:
^[w.+-=][email protected]$
In this case, only email addresses with the domain “mycompany.com” will be accepted.
Alternatively, you could allow only local usernames:
^[^@]+
In this case, you would also need to set the emailsuffix parameter to something like “@mycompany.com” so that Bugzilla can work out where to send notification emails.
If you need to restrict access to authentified users only, you can also activate the requirelogin parameter. If this is set to “true,” users will be asked to log in before they can access Bugzilla at all.
Restricting Access Using User Groups
Bugs in Bugzilla are, by default, visible to any user. However, you can use groups to limit the visibility of certain bugs and products to certain users. For example, you may want to limit access to bugs in a particular project to members of the project team only. In this section, we will go through how to do this in Bugzilla using user groups.
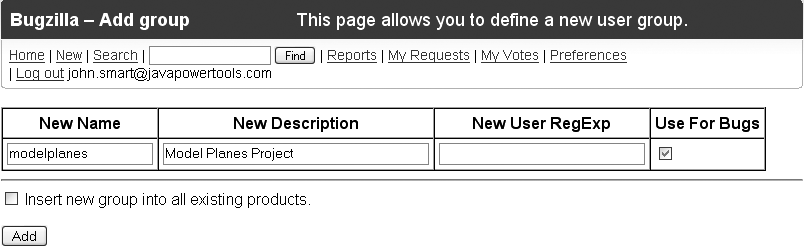
The first thing you need to do is set up a new group. You do this in the “Groups” page (see Figure 27-4). This group will appear in the group lists alongside the special System groups such as admin and editbugs.
Once you have added a group for your project, you need to place the team members in this group. Unfortunately, you have to do this individually for each user in the user details page (see Figure 27-3).
When you have assigned all of your team members to the new group, you can restrict access to a product in the “Edit Group Controls” page, which you can access by clicking the “Edit Group Access Controls” link in the product details page (see Figure 27-5). This screen contains a list of all the user-defined groups. Each column lets you restrict a different functionality to members of certain groups. The first two (Entry and CanEdit) restrict access to bugs for this project, whereas the final three (editcomponents, canconfirm, and editbugs) widen access, letting in users who otherwise wouldn’t be able to view or edit the project bugs.
- Entry
If you check the “Entry” column for a particular group, only members of this group will be able to enter bugs against this product.
- CanEdit
Checking “CanEdit” will mean that only team members will be able to modify bugs for this project—other users will have read-only access.
- editcomponents
If you check this option, users who belong to a group with editcomponents privileges will be able to edit the product components, milestones, and versions, even if they don’t belong to the project group.
- canconfirm
If you check this option, users who belong to a group with canconfirm privileges will be able to confirm UNCONFIRMED bugs, even if they don’t belong to the project group.
- editbugs
If you activate this option, user who belong to a group with editbugs privileges (that is to say, pretty much any authenticated user) can modify bugs for this product.
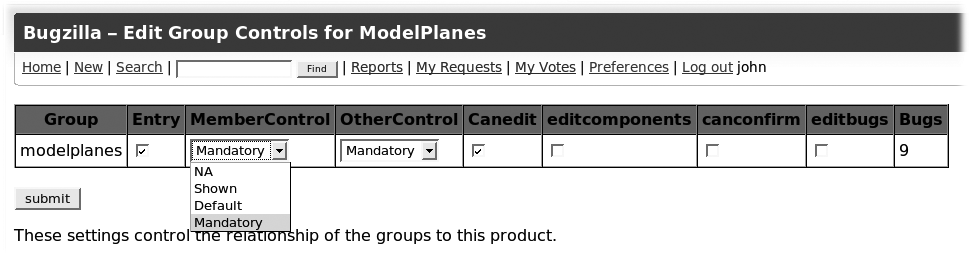
The two other fields, MemberControl and OtherControl, determine whether or not bugs entered for this product are automatically placed in this group for members of this group (project team members) and for the rest of the world. If NA is chosen, bugs entered for this product by this type of user (team members for “MemberControl” and everyone else for “Other Control”) are not placed in this group; therefore, there are no restrictions placed on them. Shown and Default are similar: the user is given the possibility to place the new bug in the restricted group (see Figure 27-6). With Shown, the option is not checked by default, whereas with Default, the option is checked by default. When Mandatory is chosen, bugs created for this project are automatically placed in this group.
The most intuitive option is to put both values to “Mandatory.”

Note that the reporter, the assignee, and anyone copied (cc) on the bug will always be able to access the bug, no matter what group he or she belongs to.
Configuring a Product
It is fairly easy to set up a new project in Bugzilla. The main goal of a software development project is to create (or modify) a software application of some kind. In Bugzilla, a software application is known as a product. You manage products in the Bugzilla “Products” screen, which you can access via a link in any screen footer when logged in as an administrator (see Figure 27-7).
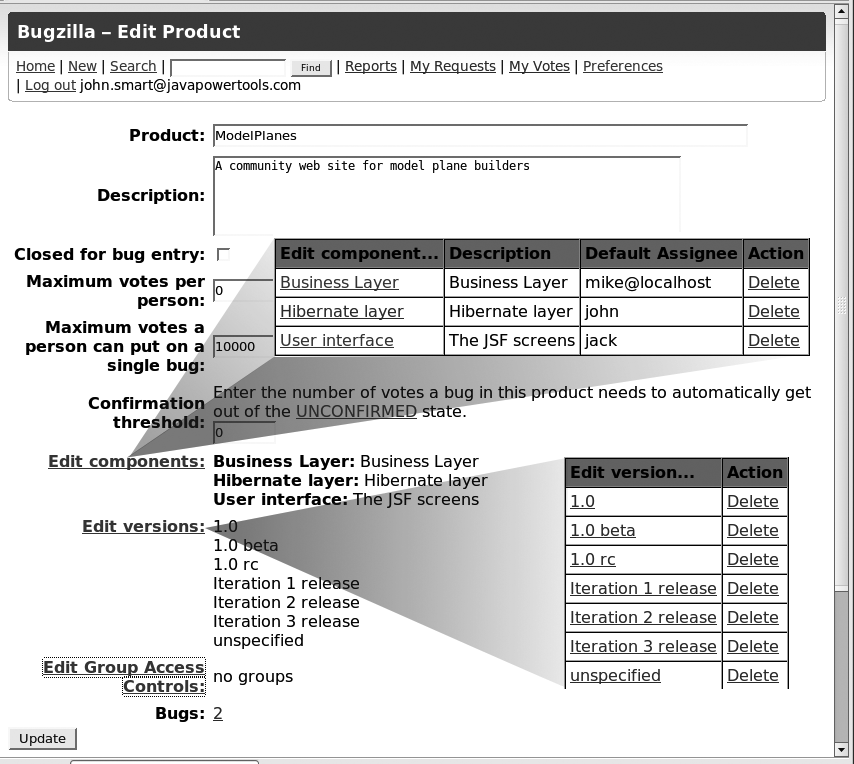
In Bugzilla, products are made up of components. You can define the components of a product by clicking on the “Edit components” link on the product details page. This will display a list of components for this product, letting you modify or delete existing components, or create new ones.
A product cannot exist by itself; you need to give it at least one component. While you’re at it, however, you might as well add several. You use components to decompose your project into smaller chunks. Exactly how you do this will depend on your project and on your organization; Bugzilla doesn’t really care. Typically, a component will be small enough to be the responsibility of a single developer, or have a readily identifiable development leader who coordinates work on the component. In Bugzilla, each component is the responsibility of a particular person, defined in the “Default Assignee” field. A component should be meaningful enough to an end user (or at least a QA person) to be able to log bugs against it with some degree of reliability. You can also use the “Default CC List” to define a list of users who will always be notified when bugs logged against this component are modified.
Some examples of what a component might be in your project are:
A subproject within the main development project
A software module
A particular feature or functionality
The implementation of a particular use case or user story
In a similar way, you can also define versions for your product using the “Edit versions” link. A version is a released product in which bugs are found, so you usually create new version entries in Bugzilla as they are released for testing. During testing, when a bug is found, you specify the version being tested when the bug was found.
Finally, once the project has finished, you may want to prevent users from logging any new bugs against this project. You can do this by checking the “Closed for bug entry” field. Users will still be able to search and consult bugs, but they won’t be able to create new ones for this project.
Tracking Progress with Milestones
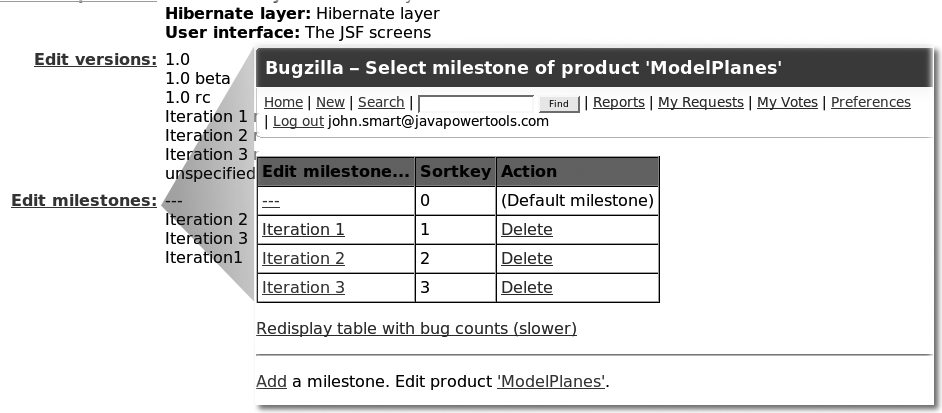
Milestones are an excellent tool for project tracking and prioritization. If you are using an iterative or agile development approach, you can set up a milestone for each iteration. Bugs can then be associated with a particular milestone, making it easier for the development team to know where to focus its development efforts, and making it easier for the testing team to know what it is meant to be testing.
Bugzilla has optional support for milestones. They are not available by default: you need to activate them by setting the “usetargetmilestone” option (in the “Bug Fields” section of the “Parameters” screen) to “On.” When you do this, you can create milestones for a particular project (see Figure 27-8), define the target milestone for a particular bug, and view the list of bug corrections planned for a given milestone.
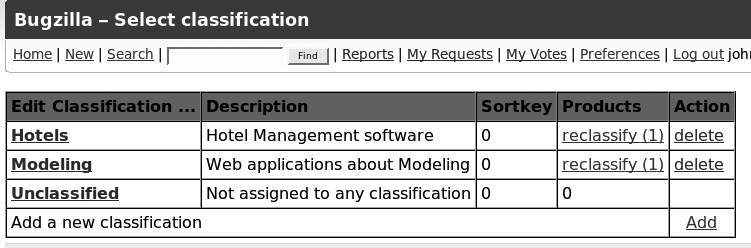
Managing Groups of Products with Classifications
Sometimes, it is useful to be able to associate several different but related products. You may want to regroup several distinct products that belong to the same program of work, a suite of software applications, or products that are related in some other way. Classifications let you group related products. By default, classifications are deactivated. To enable them, you need to activate the “useclassification” option (which is in the “Bug Fields” section of the “Parameters” screen). Once you have activated classifications, an administrator will be able to manage them using the “Classifications” link in any screen footer (see Figure 27-9).
Setting up a classification simply involves giving it a name and associating some projects with it. Once you have at least two classifications set up with some projects in them, Bugzilla will ask you to choose a classification when you enter a bug (see Figure 27-10). You will also be able to use the classification field as a search criteria in the Advanced Search screen.

Searching for Bugs
Bugzilla is designed to be a robust, high-performance issue tracking system, capable of handling databases with hundreds of thousands of bugs. In a database with that many bugs, you obviously need some good search functionality to find the ones you are looking for.
Bugzilla provides several ways to search the database, each appropriate in different situations. The simplest way to look for a bug is to use the search field in the page header. This provides a quick-and-easy full-text search across the entire database. You can also enter a numerical bug id, in which case Bugzilla will take you directly to the bug details.
You can do more elaborate searches in the Search screen (accessible using the “Search” link in the header of any page). From this screen, you can choose between two types of searches. Probably the most useful is the “Find a Specific Bug” tab. This tab provides a simple, full-text search (see Figure 27-11), possibly filtering by status or for a particular product.
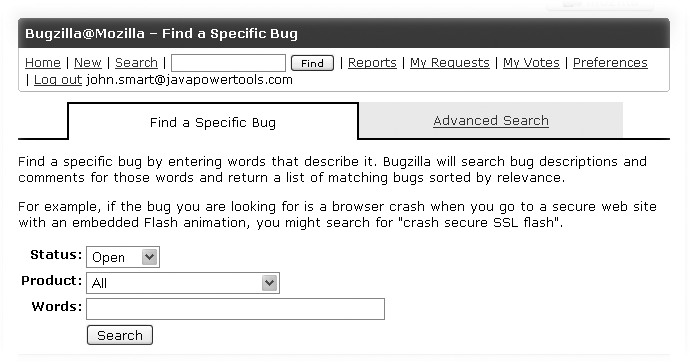
The “Advanced Search” tab is a much more complicated beast that lets you search on virtually any field in the database.
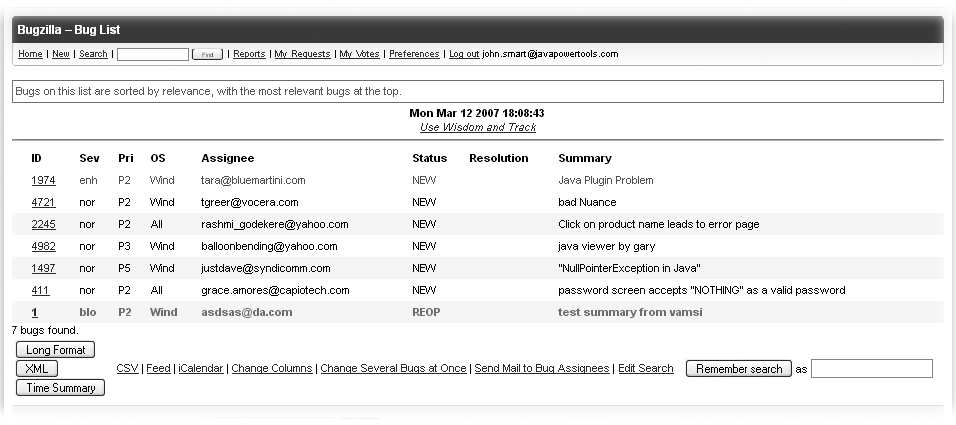
Search results are displayed as a table (see Figure 27-12). Note that Bugzilla doesn’t know about paging results, so if your query returns 4,000 bugs, you will get 4,000 entries on the one screen.
The results screen has a few nice additional features to it. The “Long Format” button displays a list of detailed information for each bug, including all the principal fields, the description, and any comments. This is especially useful for preparing those bug review meetings. You can also subscribe to a query in the form of an RSS feed, which is useful if you want to keep tabs on a certain category’s issues (such as issues for the product you are working on) without having to continually open Bugzilla and run the search.
Another useful feature is the “iCalendar” button. It lets you download the list of bugs in iCalendar format so that you can import them as tasks in your agenda.
Finally, you can use the “Remember Search” button to give some meaningful name to your search and save it for later use. The saved search will appear in your page footer in the “My Searches” section.
Creating a New Bug
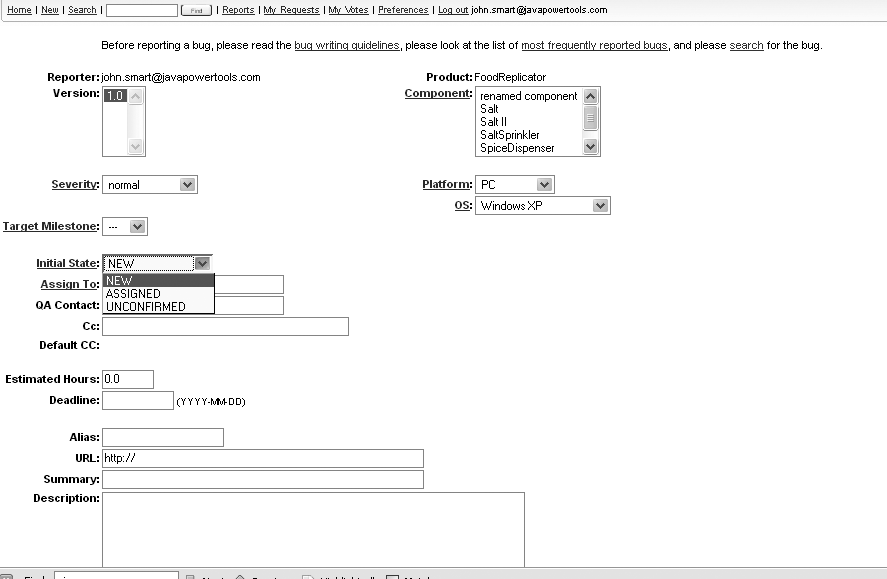
Although the interface is rudimentary and lacks many of the niceties of more recent Web sites, entering a new issue in Bugzilla is relatively straightforward. After selecting the buggy product, you arrive at the bug details screen (see Figure 27-13). Out of the numerous fields that you’ll see, only the Summary and Component fields are actually mandatory. You will usually also provide other details, such as a version number (the version of the product in which the bug was found), severity of bug, platform, a target milestone, and so on. You can assign a bug directly to a developer if you know who you are working with, or just wait for it to be picked up by some willing soul. If you can’t remember the definitions of the various severity levels or how to use a particular field, convenient hyperlinks near each field let you display the appropriate help pages. You can also use attachments to add screen shots or the like.
The Lifecycle of a Bugzilla Bug
Bugzilla supports a fairly complete, albeit hardcoded, workflow model, illustrated in Figure 27-14.
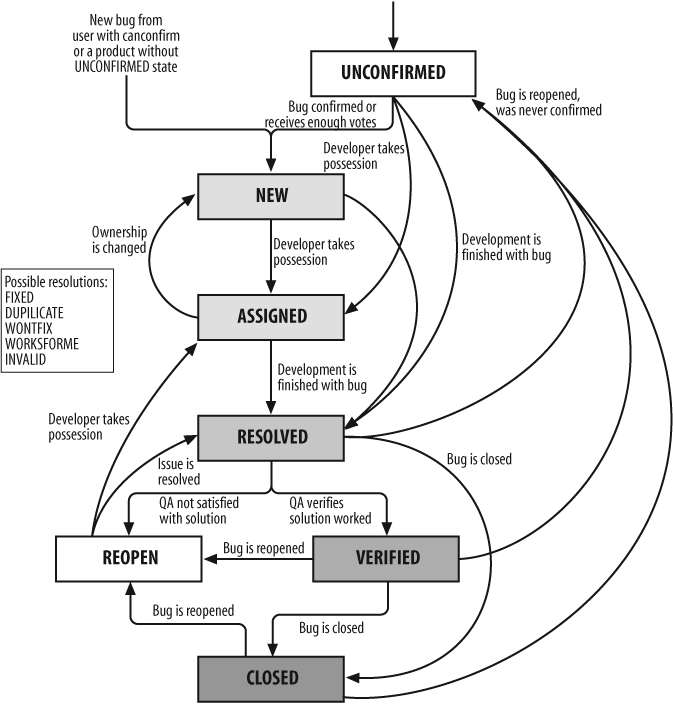
Bugs begin life when a tester or user enters them in Bugzilla. Newly created bugs can be NEW, ASSIGNED, or UNCONFIRMED.
In simple terms, an UNCONFIRMED bug is one that needs to be reproduced by QA before it can be set to NEW and assigned to a developer. The UNCONFIRMED initial status is not available by default. If you want to allow UNCONFIRMED bugs, you need to activate the “usevotes” option in the “Bug Fields” section of the “Parameters” screen. Then you need to edit the product (see Configuring a Product) to make sure that the “Number of votes a bug in this product needs to automatically get out of the UNCONFIRMED state” is greater than zero, and also that the Maximum votes per person is greater than zero. When this is done, you will be able to create new bugs in the UNCONFIRMED status.
A bug can go from UNCONFIRMED to NEW either by having people vote for it, or when it is manually confirmed by a QA person (or any member of the canconfirm group). The QA person may assign the bug to a developer using the “Assigned To” field. Note that, even when a bug is “assigned to” a developer, it can still be in the NEW state. It will remain in this state until the developer reviews the issue and accepts it (in which case its state will go to ASSIGNED), or reassigns it to another developer. In fact, the ASSIGNED state actually means that a developer has accepted the bug and is actively (at least, in theory!) working on the problem.
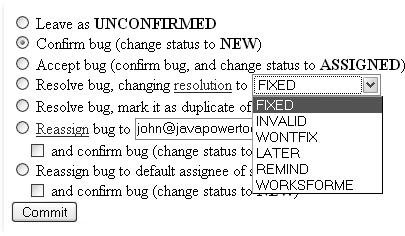
Once the developer has finished working on an issue, he places it in the RESOLVED state. When he resolves a bug, he has to specify how it was resolved (see Figure 27-15). A bug can be resolved in several ways:
- FIXED
The bug was fixed and the correction submitted for testing by QA
- INVALID
The developer does not think this issue is really a bug
- WONTFIX
There is a bug, but it won’t be fixed
- LATER
This bug will be fixed in a future version
- REMIND
This bug might be fixed for this version if there is time
- WORKSFORME
The developer was unable to reproduce this machine
The LATER and REMIND resolution status values are of dubious value; it is usually better to leave these issues open and reassign them to a future milestone.
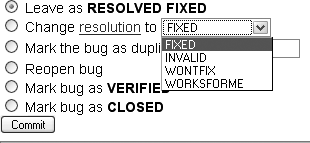
A RESOLVED bug needs to be verified by QA before the correction can be confirmed and released. QA staff typically review any allegedly FIXED bugs for the current milestone in order to make sure that the fixes work (see Figure 27-16). A bug is considered to be VERIFIED once the tester has confirmed that the fix works. When the version containing this fix is released, the bug can be CLOSED.
Although this workflow model cannot be customized in Bugzilla, it usually proves sufficient for most organizations.
Scheduling Notifications (Whining)
Bugzilla allows you to schedule notifications to be generated and sent to users on a regular basis. This process is known as whining. Whining basically involves scheduling predefined queries to be run at regular intervals or at specific times (for example, every Sunday). You can schedule any query you want; for example, you might want to send out the list of open bugs for a particular project to the project team every Sunday to remind them to prepare for the weekly status meeting.
The first thing to do is to build and run the query in the Search screen. Then save the query results using the “Remember Search” button. Once you have saved your query, go to the “Whining” configuration page (see Figure 27-17). Here, you simply specify when the notifications should be generated and sent out, what query should be used, and to whom they should be send. You can send notifications to individuals and to groups; both can be useful in some circumstances.
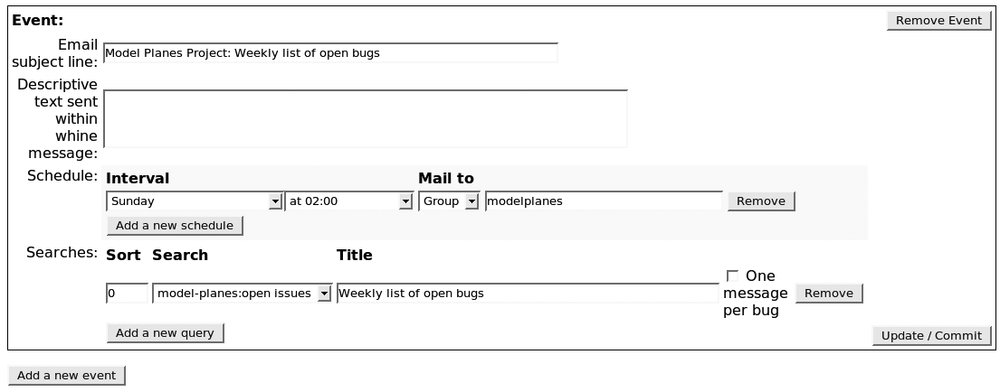
On the configuration side of things, the whining mechanism will only work if you run a PERL script called whine.pl at regular intervals (for example, every 15 minutes). You need to set this up outside of Bugzilla, for example, using cron.
Customizing Fields in Bugzilla
When you install an issue tracking system, there is often much debate about how to classify issues, particularly in terms of defining the various levels of priority and severity. Bugzilla lets you customize certain key fields such as Priority and Severity, as well as the environment-related fields such as “OS” and Hardware, via the “Field Values” link in the page footer. You can rename the existing values, add new ones, or delete unnecessary values (if they are not currently being used by any bugs).
It is important to note that if you do change these values, the corresponding contextual help screens will still refer to the default Bugzilla values. If you want to change these as well (which you probably should), you need to update the fields.html.tmpl file, which you will find somewhere under the template directory (the default English version of this page can be found at template/en/default/pages/fields.html.tmpl). Another alternative is to provide definitions of the terms in the label itself, such as “Critical: The software crashes, hangs, or causes you to loose data.”
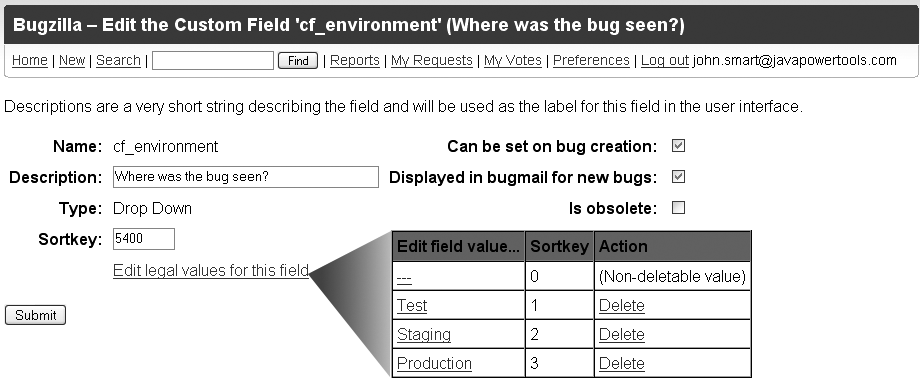
Although Bugzilla already has more than enough fields for many users, there may be times when you would like to have just one extra bit of information. For example, you may want to know on what test platform the error occurred, or you may need to know some other detail about how or where the application was deployed. Catering to this need, Bugzilla allows you to define custom fields via the (you guessed it!) “Custom Fields” link in the page footer. Custom fields are easy to create: you just need to provide an internal field name (which must start with “cf_”), a description (which will be used as the field label in the bug details page), and some other details such as whether the field should be visible when you create a new bug, and whether the field should be used in notification emails. Custom fields can currently be either plain text fields or drop-down lists.
When you create a custom field using a drop-down list, you can’t set up the values immediately. You need to create the custom field, then edit the legal values for this field (see Figure 27-18).
Once a custom field has been created, you can’t delete it; you can just declare it to be “Obsolete,” in which case, it will no longer be displayed on new or existing bugs.
Conclusion
Bugzilla is a tried-and-true solution that will support very large projects and user bases. Its workflow features are more than sufficient for most organizations. On the downside, Bugzilla is particularly complicated to install and maintain, and the user interface won’t win any prizes for design or usability. Its reporting features will do the job, although they are not particularly user-friendly.