
Chapter 28. Trac—Lightweight Project Management
An Introduction to Trac
Trac[27] is a lightweight, open source issue tracking and project management tool that builds on Subversion (Chapter 4) by adding flexible web-based issue tracking, wiki, and reporting functionalities. Its second-to-none integration with Subversion makes it an excellent choice for development teams who use Subversion. It imposes no particular methodology, and so allows a great deal of flexibility in the way it is used. Although it does not provide as wide a range of features as products like Bugzilla, Trac is steadily gaining popularity in the Subversion community. Indeed, many commercial Subversion hosting companies now offer Trac as part of their package deals.
Trac provides a number of interesting features that make it a tool particularly well suited to small teams using lightweight, agile development processes. These include:
A lightweight issue-tracking system, where issues can be entered and assigned to team members with a minimum of formality and effort
An excellent web interface to your Subversion source code repository, allowing you to browse your source code and revisions, and keep tabs, via both the web site and RSS feeds, on what changes are happening in the repository
A wiki-based project management tool, in which you can manage project milestones and iterations, assign tasks, and share documentation and ideas
But one of the nicest things about Trac is the way all of these features are integrated together. Using a wiki-style syntax, you can include references to Trac issues, tasks, or wiki pages in your Subversion commit messages, or refer to Subversion changesets from within Trac. These references are rendered as HTML links on the project web site. And a project timeline gives you an overall view of all activity on your project, making it easy to keep track of changes made to issues, tasks, and within the source code repository.
In this chapter, we will discuss how to install and use Trac in your projects.
Installing Trac
Installing Trac is not a difficult task in itself, but the various dependencies can make things a little complicated, especially on a Windows machine. In addition, the Trac installation process tends to vary a great deal in its finer details from one system to another. In this chapter, we will cover the general steps and also a few tips to get you started. For more details, the best and most up-to-date reference remains the Trac web site itself (see http://trac.edgewall.org/).[*]
One thing that you should know from the start is that, at the time of this writing, Trac did not support network access to a Subversion repository. So, you need to either install Trac on the same machine as your Subversion repository, or mirror the Subversion repository to your Trac server.
Trac is written in Python,[28] so you will need to have Python installed on your machine. Python is bundled with many Linux distributions these days, and Windows installers and installation packages for other OSs are readily available on the Python web site. However, if you want to use the mod_python module for Trac (see Installing Trac on an Apache Server), you may need to recompile Python yourself from the source code.
You will also need to install the Subversion Python Bindings. To do this on Windows, you can download and run the installer from the Subversion site, using version numbers corresponding to your local installation (e.g., svn-win32-1.4.5_py2.5.exe for Subversion 1.4.5 and Python 2.5). On a Linux box, this may well involve (re)building Subversion from the source code yourself with the correct configuration options. On Linux, another common error is to forget to update the library paths to include the newly compiled libraries (this usually involves defining or updating the LD_LIBRARY_PATH variable).
Trac also needs a relational database: you can use either SQLite,[29] PostgreSQL,[‖] or MySQL,[§] all of which work well on both Windows and Linux machines.
By default, Trac will use an embedded SQLite database written in C, which is easy to configure and quite sufficient for most projects. If you want to use this option, however, you still need to install SQLite onto your machine. There are precompiled packages (RPM or DEB) available for many Unix distributions, and this is generally the easiest option. Alternatively, you can build it from the source code, as shown here (you will need the TCL development libraries for this to work):
# wget http://www.sqlite.org/sqlite-3.5.1.tar.gz
# tar xvfz sqlite-3.5.1.tar.gz
# cd sqlite-3.5.1
# ./configure
# make install
If you use SQLite on Windows, you will also need to install PySQLLite,[*] the Python SQLLite API. Be sure to install a 1.x version (e.g., 1.1.7) rather than a 2.x version, as the latter will not work.
PostgreSQL is more appropriate for very large Trac projects, such as open source projects with public access. If you use a PostgreSQL database, you will need to install PostgreSQL, set up a user account, and install the appropriate scripts. This is well documented on the Trac web site.
In versions earlier than 0.11, Trac relies on an HTML templating language called Clearsilver.[†] If this is not already installed on your machine (which it probably isn’t), you will need to install it as well. Binary installation packages exist for Windows, but for some *nix boxes, you might need to build it yourself from the source code. The basic process is shown here, although the exact details and requirements tend to vary from one system to another. Download the source code bundle from the Clearsilver web site, and extract it. You need to use the --with-python option when configuring the project, in which you provide the location of the python executable on your machine (usually something like /usr/bin/python). You should also specify the --disable-ruby and --disable-csharp options. Finally, you build the library using the standard make install:
# wget http://www.clearsilver.net/downloads/clearsilver-0.10.4.tar.gz
# tar xvfz clearsilver-0.10.4.tar.gz
# cd clearsilver-0.10.4
# ./configure --enable-gettext --disable-ruby --disable-csharp
# make
# make install
As of version 0.11, Trac no longer requires ClearSilver, which simplifies the installation process somewhat, and means you can skip the previous step.
Once you have all the dependencies, you can install Trac itself. The Windows binaries come with a graphical installer. Just run this executable to install Trac in a Windows environment.
Many Linux distributions have bundled binary packages. Otherwise, you have to run the installation script manually, as described here; once you’re sure that you have everything you need, just unpack the downloaded package and run (as root) the setup.py python script as follows:
# tar xvfz trac-0.10.4.tar.gz
# cd trac-0.10.4
# python ./setup.py install
This should compile and install the Trac scripts and administration tools onto your machine.
The Trac web site[*] contains a useful rundown of the specificities involved when installing Trac in different environments.
Before starting Trac up for the first time, you need to set up a project environment. We discuss this in the next section.
Setting Up a Trac Project
In Trac, all project administration tasks are done at the command line using the trac-admin tool. Each Trac project has its own directory. To set up a new project, we use the initenv command, as shown here:
$ mkdir /data/trac
$ trac-admin /data/trac/myproject initenv
Creating a new Trac environment at /data/trac/myproject

Trac will first ask a few questions about your environment
in order to initalize and prepare the project database.

 Please enter the name of your project.
 This name will be used in page titles and descriptions.

Project Name [My Project]>
...
Note that the trac-admin utility will
create the project directory (myproject), but
not the parent directories (/data/trac),
which you must have created beforehand.
On a Windows machine, you need to invoke python explicitly, as shown here:
C:Python23Scripts>mkdir D:	rac
C:Python23Scripts>python trac-admin D:	racmyproject initenv
In both cases, this will run an interactive script prompting you for the configuration details Trac needs to set up your project, such as:
- The name of the project
This will be displayed at prominent places on your Trac web site, so make it meaningful.
- The database connection
By default, Trac will use an embedded SQLite database, which is sufficient for small projects. You can also configure Trac to use a PostgreSQL database. If you want to use PostgreSQL, create a database called “trac,” and use a database connection string of the following form:
postgres://<user>:<password>@localhost/trac
- The Subversion repository
Trac needs the local path of your Subversion repository (not a Subversion-type URL), and also needs write-access to set up its own access.
You can run Trac without a Subversion repository, in which it can work as an issue-tracking tool and project wiki, but without the integration with the source control management tool. To do this, simply do not provide a repository path
Once the script has finished asking questions, it will proceed to build the Trac database in the directory you provided. If all goes well, you should get something like this:
...
Creating and Initializing Project

 Installing default wiki pages
 /usr/share/trac/wiki-default/TracModPython => TracModPython
 /usr/share/trac/wiki-default/TracRss => TracRss
 ...

---------------------------------------------------------------------
Project environment for 'My Project' created.

You may now configure the environment by editing the file:

  /data/trac/myproject/conf/trac.ini

If you'd like to take this new project environment for a test drive,
try running the Trac standalone web server `tracd`:

  tracd --port 8000 /data/trac/myproject

Then point your browser to http://localhost:8000/myproject.
There you can also browse the documentation for your installed
version of Trac, including information on further setup (such as
deploying Trac to a real web server).

The latest documentation can also always be found on the project
web site:

  http://trac.edgewall.org/

Congratulations!
Running Trac on the Standalone Server
Trac comes with a small, very fast embedded web server called tracd. This configuration is easy to install and configure and can be quite sufficient for many enterprise projects.
To start the tracd server, run the tracd command as shown here:
$ tracd --port 8000 /data/trac/myproject
Your project will be available on http://localhost:8000/myproject.
For a Windows installation, the instruction is slightly different (because of the way Python works under Windows), and you need to explicitly invoke the python executable, as shown here:
C:Python23Scripts>python tracd --port 8000 D: racmyproject
If you have several trac environments on the same server, just list them as follows:
$ tracd --port 8000 /data/trac/project1 /data/trac/project2
Your projects will be available on separate URLs: http://localhost:8000/myproject1 and http://localhost:8000/myproject2.
However, this alone will not provide a very satisfying solution. Using this configuration, users will not be able to log on to the site. We need to set up user authentication.
Subversion can be configured to work with an Apache server, and to use an Apache-style basic or digest authentication file (see Setting Up a WebDAV/DeltaV Enabled Subversion Server). If your Subversion server is set up to use such a file, you can tell Trac to use it, too. This has the obvious advantage of sharing user accounts directly between Subversion and Trac.
To do this, you use the --basic-auth or --auth options when starting tracd from the command line. You need to specify an auth command-line option for each of your Trac projects. The auth option takes the following form:
--auth project-name,/path/to/svn-digest-auth-file, realm-name
The realm name is the name specified in the AuthName parameter in your Apache configuration file (see Setting Up a WebDAV/DeltaV Enabled Subversion Server). Here is a complete example:
python tracd -p 8000
   --auth project1,/data/svn/svn-digest-auth-file,"Subversion repository"
   --auth project2,/data/svn/svn-digest-auth-file,"Subversion repository"
   /data/trac/project1 /data/trac/project2
Setting Up Tracd As a Windows Service
It is quite easy to set up tracd as a Windows service using the techniques described in Installing Subversion As a Windows Service. Use InstSrv and Srvany to install a new service:
D:	rac>InstSrv tracd "C:Program FilesWindows Resource KitsToolssrvany.exe"

The service was successfuly added!

Make sure that you go into the Control Panel and use
the Services applet to change the Account Name and
Password that this newly installed service will use
for its Security Context.
Next, you need to update the registry as shown for the Subversion service (see Installing Subversion As a Windows Service). Open the Windows Registry and open the HKEY_LOCAL_MACHINESystemCurrentControlSetServices racd entry (see Figure 28-1). Add a key called Parameters, and add two String values. The Application value should point to your python executable (typically something like “C:Python23python”). The AppParameters should contain the full path to the tracd script (for example,“C:Python23scripts racd”), followed by all the appropriate command-line options (see Running Trac on the Standalone Server).

Once this is done, the service should be up and running. You can test by starting and stopping the script from the command line as follows:
D:	rac>net start tracd
The tracd service is starting.
The tracd service was started successfully.


D:	rac>net stop tracd

The tracd service was stopped successfully.
Installing Trac on an Apache Server
Trac is bundled with its own standalone server, which is fast and easy to install, but not as flexible as a full-blown web server such as Apache. You can also install Trac on an Apache server using either FastCGI or mod_python (CGI is also an option but not a recommended one).
There are several ways to do this. Here, we will install Trac onto an Apache server using the mod_python module.
This section refers to Apache 2.0 and mod_python 3.2.8. Both can be downloaded from the Apache web site. The key aspect here is to correctly install the mod_python module, although installation details may vary from version to version and between platforms. Check out the mod_python web site[*] for details regarding how to install mod_python on your platform.
In all cases, you will need to load the mod_python module in the Apache configuration file. This usually
takes the form of a line like the following one in your httpd.conf file:
LoadModule python_module modules/mod_python.so
The Apache configuration is quite similar to the Subversion equivalent (see Setting Up a WebDAV/DeltaV Enabled Subversion Server). You can provide simple public access to your site for anonymous users by using the mod_python plug-in as follows:
<Location /trac/myproject1>
   SetHandler mod_python
   PythonHandler trac.web.modpython_frontend
   PythonOption TracEnv "D:/trac/myproject1"
   PythonOption TracUriRoot "/trac/myproject1"
</Location>
With this configuration, you could access your Trac site using a URL like http://localhost/trac/myproject1.
You can set up authentication to use the same Apache basic or digest authentication that you use for your Subversion installation: simply use the same authentication type (AuthType), realm name (AuthName), and authentication file (AuthUserFile or AuthDigestFile). Just associate the authentication file with the “/login” URL for your project, as follows:
<LocationMatch "/trac/myproject1/login">
   AuthType Digest
   AuthName "Subversion repository"
   AuthDigestDomain /trac/myproject1
   AuthDigestFile "/data/svn/svn-digest-auth-file"
   Require valid-user
</LocationMatch>
You can also configure several trac projects together by using the TracEnvParentDir field:
<Location /trac>
   SetHandler mod_python
   PythonHandler trac.web.modpython_frontend
   PythonOption TracEnvParentDir "/data/trac"
   PythonOption TracUriRoot "/trac"
</Location>
And if you want all your projects to share the same authentication file, you can configure this using a regular expression, as follows:
<LocationMatch "/trac/[^/]+/login">
   AuthType Digest
   AuthName "Subversion repository"
   AuthDigestDomain /trac/myproject1
   AuthDigestFile "/data/svn/svn-digest-auth-file"
   Require valid-user
</LocationMatch>
Administrating the Trac Site
By default, normal Trac users can do everything they need to do in their daily development activity. However, to perform more advanced tasks, such as creating milestones or reports or adding new ticket types, you need to use an account with extra rights.
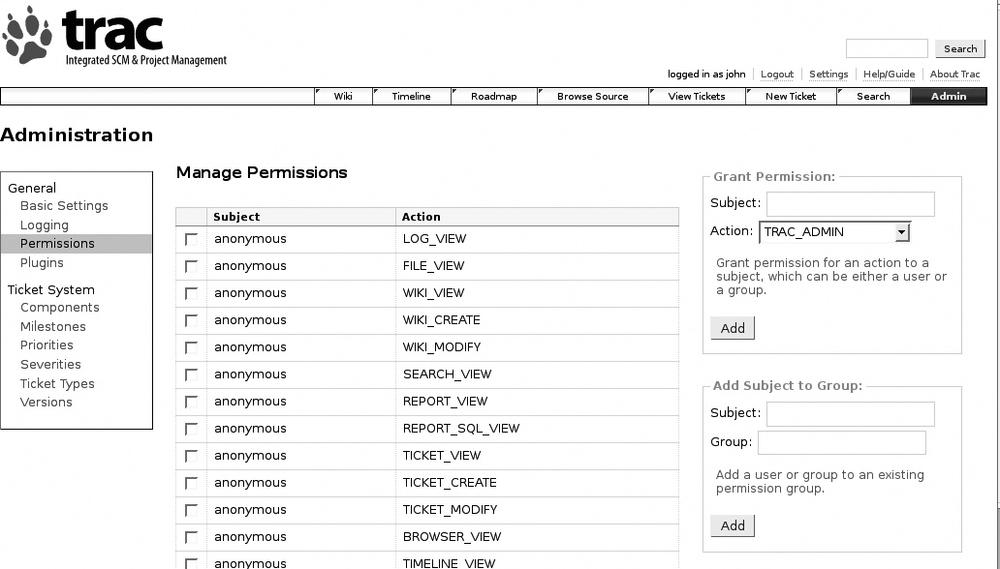
In the standard installation of Trac, you manage user rights from the command line, using the trac-admin script. To list the current access rights, use the permission list command as follows:
$ trac-admin /data/trac/myproject permission list

User       Action
--------------------------
anonymous  BROWSER_VIEW
anonymous  CHANGESET_VIEW
anonymous  FILE_VIEW
anonymous  LOG_VIEW
anonymous  MILESTONE_VIEW
anonymous  REPORT_SQL_VIEW
anonymous  REPORT_VIEW
anonymous  ROADMAP_VIEW
anonymous  SEARCH_VIEW
anonymous  TICKET_CREATE
anonymous  TICKET_MODIFY
anonymous  TICKET_VIEW
anonymous  TIMELINE_VIEW
anonymous  WIKI_CREATE
anonymous  WIKI_MODIFY
anonymous  WIKI_VIEW

Available actions:
 BROWSER_VIEW, CHANGESET_VIEW, CONFIG_VIEW, FILE_VIEW, LOG_VIEW,
 MILESTONE_ADMIN, MILESTONE_CREATE, MILESTONE_DELETE, MILESTONE_MODIFY,
 MILESTONE_VIEW, REPORT_ADMIN, REPORT_CREATE, REPORT_DELETE, REPORT_MODIFY,
 REPORT_SQL_VIEW, REPORT_VIEW, ROADMAP_ADMIN, ROADMAP_VIEW, SEARCH_VIEW,
 TICKET_ADMIN, TICKET_APPEND, TICKET_CHGPROP, TICKET_CREATE, TICKET_MODIFY,
 TICKET_VIEW, TIMELINE_VIEW, TRAC_ADMIN, WIKI_ADMIN, WIKI_CREATE,
 WIKI_DELETE, WIKI_MODIFY, WIKI_VIEW
It is always useful to have an administrator account. Indeed, you need to create one to be able to do any serious customization work.
$ trac-admin /data/trac/myproject permission add mike TRAC_ADMIN
Mike is now administrator, and he can make any modifications that he wants to the site.
Trac also allows more fine-grained permissions, both for users and for user groups. For example, the following command lets Jill create new reports, a function that is not available for normal users:
$ trac-admin /data/trac/myproject permission add jill REPORT_CREATE
Another useful administration tool is the web administration console (see Figure 28-2). This module is integrated out-of-the-box into Trac 0.11, but for previous versions, you will need to download and install it yourself.
Here is how to install it manually. Trac plug-ins need the EasyInstall python utility package.[*]
Download the python ez_setup.py file from this web site and install it as follows:
# python ez_setup.py
When this is done, download the latest packaged plug-in from the Trac web site,[†]remove the zip extension, and place the resulting .egg file in your project’s plug-ins directory.
Alternatively, you can install the latest cut from the Subversion repository by doing something along the following lines:
$ svn export http://svn.edgewall.com/repos/trac/sandbox/webadmin/
$ cd webadmin
$ sudo python setup.py install
Next, you need to activate this component in your trac.ini file. Add the following lines at the end of this
file:
[components]
webadmin.* = enabled
Trac should now load the plug-in and you should see (if you have TRAC_ADMIN priviledges, of course) the new “Admin” tab.
Managing User Accounts
In the default Trac installation, managing user accounts is a little cumbersome. Although the web administration console (see Administrating the Trac Site) does make it easier to manage user rights from the web interface, there is no way to create or delete users directly from the Web. You need to directly manipulate the Apache htpasswd or htdigest file from the command line.
However, there is a better way. Matthew Good has written a third-party plug-in for Trac called AccountManager, which makes managing user accounts a great deal simpler. This plug-in provides several nice features in this domain, such as:
Viewing, creating, and deleting users stored in the Apache passwd or digest file
Letting users register to create their own accounts
Using HTML form-based login rather than HTTP authentication
Letting existing users change their passwords or even delete their accounts
Sending an email to users who have forgotten their passwords
In this section, we will go through how to install and use this plug-in. First of all, you need to install the plug-in. Before starting, you should install the web administration plug-in (see Administrating the Trac Site) if this is not already done. The exact installation instructions can be found on the plug-in web site.[*] Installation is straightforward, and it uses the easy_install python script. For Trac 0.10, you do something like this:
$ easy_install http://trac-hacks.org/svn/accountmanagerplug-in/0.10
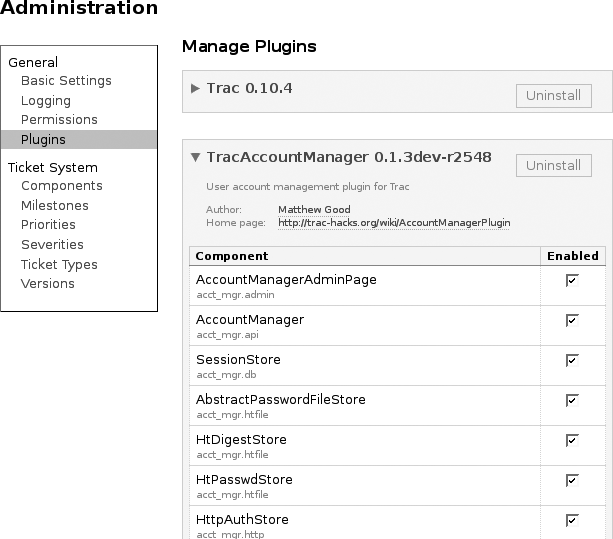
Once you have installed the plug-in, go to the “Manage plug-ins” section on the Admin page. There should be a new entry for the AccountManager plug-in (see Figure 28-3), where you can activate the various modules that come with the plug-in.
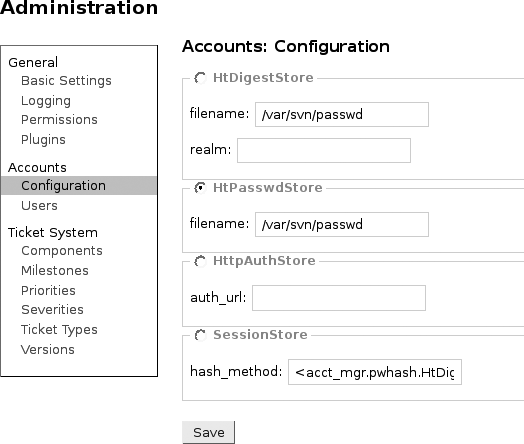
The most common authentification setup in Trac is to use the same user logins and passwords that are used for the Subversion repository. If you are using Apache for your Subversion and Trac authentication, you will have either an HTDigest file or an HTPasswd file containing your users and encrypted passwords. You just need to tell the AccountManger plug-in which type of authentication you are using, and which file is being used, which you do in the Configuration screen (see Figure 28-4). The file and realm that you specify here need to correspond to the ones defined in your Apache configuration file for your normal Subversion authentication (see Setting Up a WebDAV/DeltaV Enabled Subversion Server).
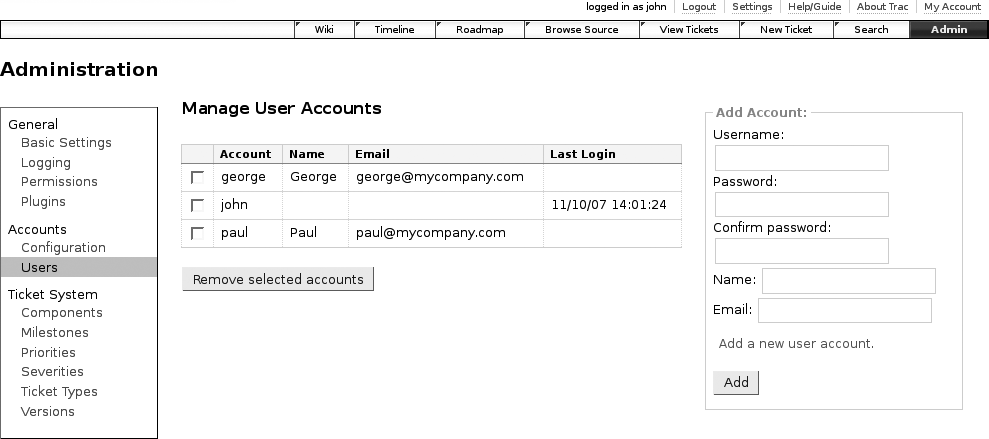
Once this is done, go to the “Users” screen (see Figure 28-5). This screen allows you to view the existing users, to delete a user, or to add a new one. Changes will be made automatically in the underlying authentication file, so any new users will also have access to the Subversion repository as well.
In addition, users will now have access to a “My Account” link, where they can change their passwords or even delete their own accounts.
You can also set up the user login module to use an HTML form rather than the HTTP authentication. Note that if you are using Mylyn (see Chapter 25), the HTML authentification may confuse the Mylyn Trac integration, which, at the time of this writing, only understands the conventional HTTP authentication.
To activate HTML authentication, you need to remove (or comment out) any Apache authentication configurations related to the Trac login. They usually look like this:
<LocationMatch "/trac/login">
   AuthType Digest
   AuthName "Enterprise Subversion repository"
   AuthDigestDomain /trac
   AuthDigestFile "/var/svn/svn-digest-auth-file"
   Require valid-user
</LocationMatch>
You also need to disable the LoginModule in Trac either in the “Plugins” screen, under the Trac plug-ins entry, or directly in the trac.ini file, as shown here:
[components]
trac.web.auth.LoginModule = disabled
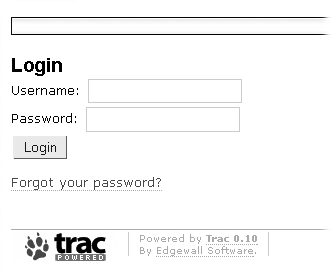
Now, users will be able to login using an ordinary HTML login form (see Figure 28-6). There is also the commonly seen “Forget your password?” link, which allows users to recover their lost passwords via email.
Finally, if you activate the RegistrationModule, users will even be able to create their own accounts, via a “Register” link that appears at the top of the screen.
Tailoring the Trac Web Site: Using the Wiki Function
Trac is, first and foremost, a wiki-based application. Any page can be modified at will by any team member with the appropriate rights, and new pages can be created easily to describe specific aspects of your particular project.
Trac’s online help describes the Trac wiki syntax in some detail. Most of the formatting language is very close to what you find on other wiki sites, and, in particular, that of the MoinMoin wiki engine. If you’ve never used a wiki before, here are some of the more useful markup codes:
- Headings
Headings and subheadings can be written using “=” and “==,” as shown here:
= A heading =
...
== A sub-heading ==
...
- Lists
You can use “*” for unordered lists, as shown here:
 * Cats
   * Burmese
   * Siamese
 * Dogs
   * Bloodhound
   * Poodle
Trac expects you to respect some fairly strict formatting rules for lists: the first element must be indented by precisely one space and subsequent levels by exactly two spaces per level.
- Formatting
Basic text formatting such as bold and italic can be done using single quotes, as shown here:
 * '''bold'''
 * ''italic''
Preformatted text can be displayed using {{{...}}}:
{{{
    public void foo(int bar) {
       ...
    }
}}}
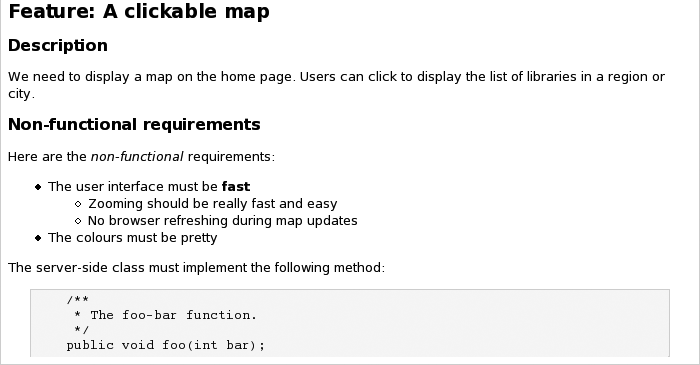
For example, consider the following text:
= Feature: A clickable map =
== Description ==
We need to display a map on the home page. Users can click to display the list of
libraries in a region or city.
== Non-functional requirements ==
Here are the ''non-functional'' requirements:
 * The user interface must be '''fast'''
   * Zooming should be really fast and easy
   * No browser refreshing during map updates
 * The colours must be pretty

The server-side class must implement the following method:
{{{
    /**
     * The foo-bar function.
     */
    public void foo(int bar);
}}}
This text is rendered in Figure 28-7.
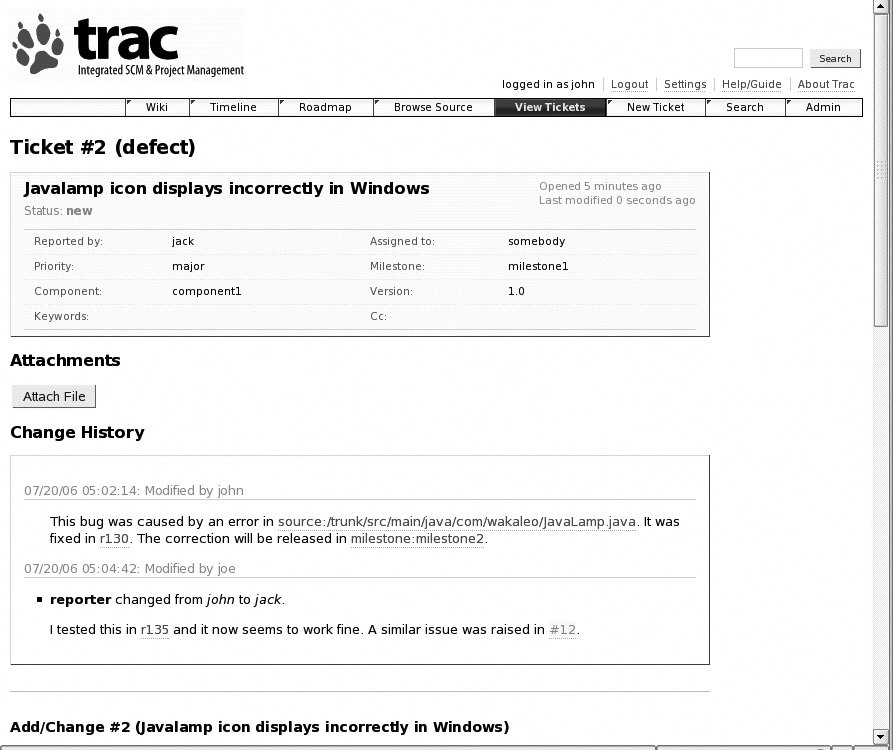
However, one of the most useful (and original) aspects of the Trac wiki is its ability to integrate with other Trac objects. Tickets, changesets, milestones, other wiki pages, and more can all be references using the special TracLink syntax. These hyperlinks can also be used both in commit messages and in object descriptions. Typical uses include listing corrected bugs when committing source code to the repository, referring to source code when describing work done to fix a bug, referring to a target milestone in a feature description, and so on. See Figure 28-8 for an example of a Trac ticket using the wiki formatting. Detailed documentation about available TracLink types is available in the Trac online documentation. Some of the more useful types are described here:
- Trac tickets
Trac issue tickets can be referenced using either the “ticket” link type (ticket:123) or the # shorthand form (#123), as shown here:
This revision corrects the issues #123, #125 and #245
- Source code files
Trac provides many ways to set up links to your source code. At the simplest level, files in the source code repository can be referred to using the “source:” link type, followed by the full file path:
This bug was caused by an error in source:/trunk/src/main/java/com/wakaleo
/JavaLamp.java
You can also refer to a particular line within the file, using the “#L...” notation:
This bug was caused by an error in line 50:
see source:/trunk/src/main/java/com/wakaleo/JavaLamp.java#L50
Or to a particular version of the file, using the “@...” notation:
This bug was caused by an error in a previous version (version 10) of the file:
see source:/trunk/src/main/java/com/wakaleo/JavaLamp.java@10
It is even possible to combine these two notations to refer to a line number in a specific version:
This bug was caused by an error in a previous version (version 10) of the file
at line 50:
see source:/trunk/src/main/java/com/wakaleo/JavaLamp.java@10#L50
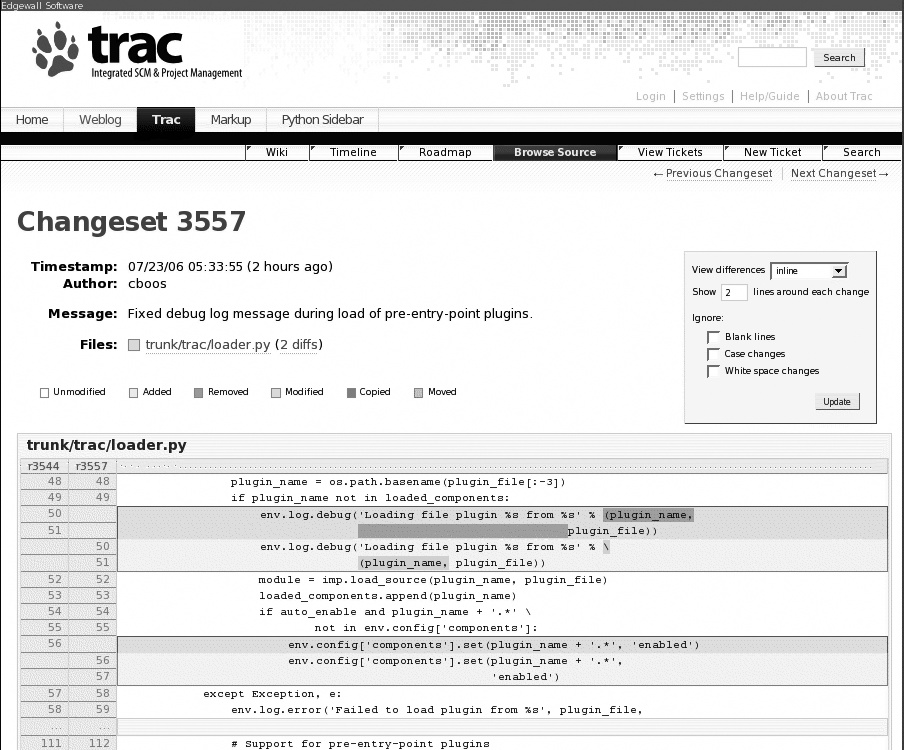
- Changesets and logs
A changeset refers to a specific version of the code base committed by an individual developer. In Subversion, changesets are atomic (all the changes come from one developer, in one coherent unit), and, if correctly documented, can be very useful in understanding the changes done to the code base. When you click on a link to a changeset, you can conveniently visualize the set of modified files and the reason behind these modifications. Changsets can be referred to using the “changeset” type (changeset:10), or by the shortcut notations r10 or [10]. An example is shown here:
The corrections for this bug were delivered in changeset:186
You can refer directly to the log messages for a set of changesets using the “log” notation (e.g., log:@1:5), or by using a shorthand form r1:5:
These changes are explained in r10:10
- Milestones
You can refer to a milestone using the “milestone” link type:
This feature was originally planned for milestone:milestone1,
but was finally rescheduled to milestone:milestone2
- Reports
You can refer to reports using the “report:” notation, or curly braces for short:
You will find all your tickets listed in this report:7
- Diffs
It is sometimes useful to point out and document the differences between two files. For example, you might want to explain why you made certain changes, or explain why some particular changes where the cause of a bug. You can refer to the differences between versions of a paricular file:
To fix this bug, I had to change the class as shown
here: diff:/trunk/src/main/java/com/wakaleo/JavaLamp.java@10:11
Or display all the changes made to a particular set of files:
We did a lot of changes on the Java classes: diff:/trunk/src/main/java@10:11
- Other wiki pages
Following a widely used convention, other wiki pages are identified using the “wiki” link type, or, more frequently, simply by writing a page name that respects CamelCase, the widely adopted naming convention for wiki pages. CamelCase involves writing the name of a page as a sequence of capitalized words joined together without spaces (JustLikeThis). To create a new wiki page, just include a term respecting this convention, as shown here:
Users are keen on this feature because it will help with CustomerBilling
A new page is not created immediately, the term will be displayed with a question mark (“CustomerBilling?”). When you click on the term, Trac lets you create a new page and edit it as you would any other page.
Trac’s linking capabilities are one of its most useful features. You can find more details about how to put them to good use on the Trac web site.[*]
Using the Trac Ticket Management System
Tickets are the bread-and-butter of the Trac issue management system. Tickets can be used to keep track of bugs and change requests, features, tasks, and just about anything else. The Trac ticket database is simple, flexible, and easy to customize. Trac is designed to be as lightweight and unobtrusive as possible. There are few constraints and virtually no mandatory fields, so users can put as little or as much information as they wish. (Of course, this may be a good thing or a bad thing depending on your particular environment.)
As a project management tool, Trac is more suited to the more lightweight, agile methodologies. It makes no claim to be a web equivalent of full-blown project management tools such as Microsoft Project. There is no support for defining dependencies between tasks or for producing Gantt chart reports, for example, although support for dependencies between tasks (defining tasks and subtasks) is planned for release 1.0 of the product. Of course, you can always use the wiki links (see Tailoring the Trac Web Site: Using the Wiki Function) to list any dependencies in the ticket description. Another useful planning feature is to associate tasks, features, or bugs with milestones or versions (see Managing Progress with Trac Roadmaps and Timelines).
In the rest of this section, we will look at how the Trac tickets can be used to improve your software development project.
Creating a New Ticket
Creating a new ticket in Trac is straightforward. You can create Trac tickets quickly and easily in the “New Ticket” screen (see Figure 28-9). Although there are no mandatory fields, you should enter at least the summary field (this is what is displayed in the reports), a type, and a description. You can use the usual wiki formatting in the description field, so a devoted developer can refer to the source code where the problem was fixed and the changeset in which this correction was delivered, for example.
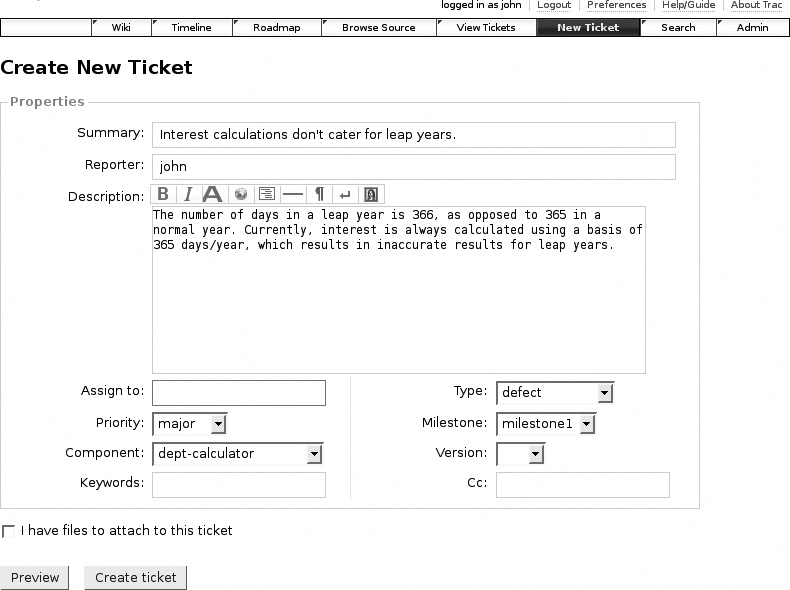
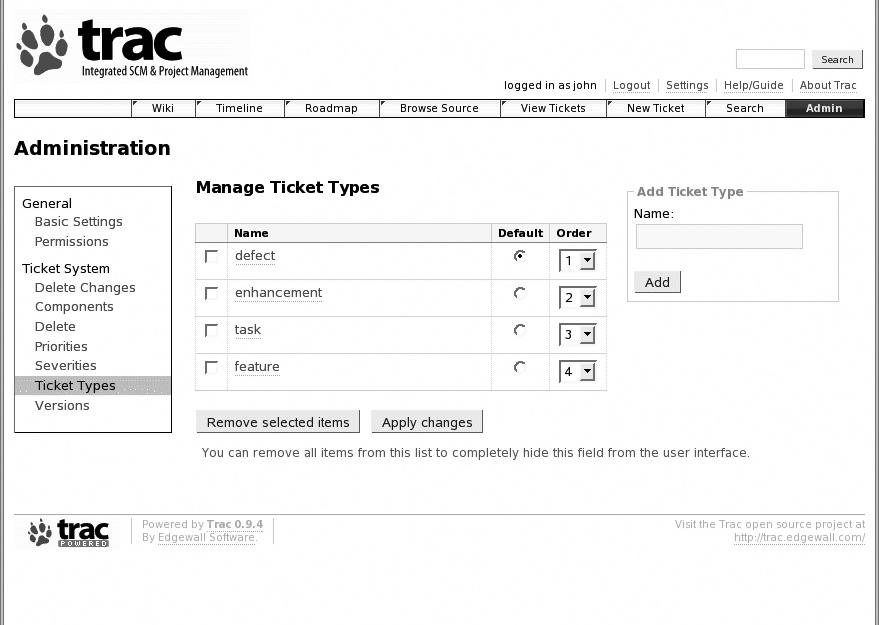
The Ticket Type field lets you specify what sort of issue it is: a bug, an enhancement, a task, and so on. Ticket types are fairly arbitrary, and can be used to extend the ticket management system to far beyond simple issue tracking. Modifying the type of a ticket has no effect on any of the other fields: its main use is to identify different types of tickets and as a filter in reports and queries.
Priority and Severity are common fields in issue tracking systems. Severity refers to the impact a bug has on an application (in other words, how much damage it can do). Priority, by contrast, refers to the order in which bugs should be fixed.
By default, Trac displays only the Priority field, which, judging by the proposed values (blocker, critical, major, minor, trivial), is designed to reflect both priority and severity. Trac does support a “Severity” field, but you need to go to the “Administration” screen and specify a list of possible values before it will be displayed. Both these fields are fully customizable, so it is easy to tailor them to your own processes and preferences.
Milestones and Versions are useful for QA and project management tasks. The Version field lets you specify the version in which an issue was found, and the Milestone field lets you identify the target release in which this correction should be included.
The Component field can be used to associate tickets with different modules or subsystems of the project.
You assign a ticket to a particular person in the team, whose responsibility it is to see that this issue is addressed. This person is called The Owner. You can also provide a list of other people who may be interested in this issue in the CC field. By default, this field is a text field—you can enter any user name or email address you want. If you have a well-defined team, you can change this to a list (see Customizing Trac Ticket Fields).
The content of most of these fields can be customized in the Admin page (see Customizing Trac Ticket Fields).
The Lifecycle of a Trac Ticket
The lifecycle of a typical Trac ticket goes along the following lines. Joe is testing the company’s new product when he comes across a bug. He creates a new ticket and assigns it to Sally, the project manager. Sally will be notified by email about the new bug. Sally sees the new bug on the Trac web site home page, and opens it. Here she has a choice (see Figure 28-10): basically, she can choose to accept the ticket herself or to reassign it to someone else. There is a third option; if the issue has already been resolved, or if it only takes a few minutes to fix, she can declare the issue to be resolved.
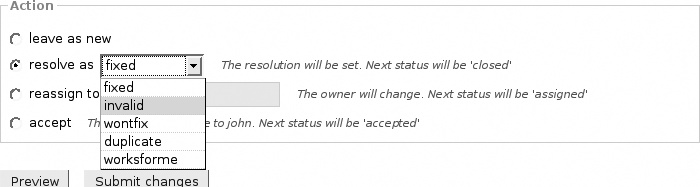
Normally, Sally would probably assign the ticket to another developer. In this case, the ticket would become “assigned.” However, it turns out that this issue is in her domain, so she accepts the ticket and does the correction herself. The ticket now passes into the “accepted” state.
As a rule, when a developer commits code into the Subversion repository, he or she should include a descriptive message including, if applicable, references to the tickets that have been addressed by this commit. In this case, Sally commits the corrections as follows:
$ svn commit
  -m "Corrected the Catalog file loader. This fixes the bug raised in #123."
...
Transmitting file data.
Committed revision 172.
Now, when a Trac user displays this changeset (in the Timeline or Browse Source pages, for example), Trac will display the comment with a hyperlink to Ticket #123.
She also needs to update the ticket status in Trac. She adds some details on what she did and why in the Comments field. All added comments (in fact, all modifications of any sort) are recorded for posterity and can be consulted later on the Ticket page.
To close the ticket, Sally has to indicate why she considers the issue to be resolved. This is the same list we saw in Figure 28-10, and it includes values such as fixed (hopefully; the most frequently used), invalid (“it’s a feature, not a bug”), wontfix (“it is a bug, but I don’t want to fix it”), duplicate, and the oft-misused worksforme. In this case, Sally sets the value to fixed, and the issue is closed.
This workflow is a good, general-purpose one. However, there may be times when you want to tailor it to suit your own particular needs. In Trac 0.11 (in development at the time of this writing), you can customize this workflow to some extent.
Updating Trac Issues from Subversion
One nice trick is to get Subversion to update the relevant Trac
tickets whenever someone commits changes to the repository. By using a
postcommit hook (see Customizing Subversion with Hook Scripts), you can configure
Subversion to update any Trac tickets referenced in the commit message. A sample
script can be found on the Trac web site.[*] Just download this script and store it on your server in a
convenient place (say, /usr/share/trac/contrib/trac-post-commit-hook, or directly in the
Subversion hooks directory). Make sure that
the script matches your version of Trac, as the scripts don’t tend to be
compatible between versions.
Subversion hook scripts are stored in the hooks directory of your Subversion repository. For example, if
your repository is stored in the /var/svn/repos directory, the hooks directory will be at /var/svn/repos/hooks:
# cd /var/svn/repos/hooks
# ls
post-commit       post-revprop-change.tmpl  pre-lock.tmpl            start-commit.tmpl
post-commit.tmpl  post-unlock.tmpl          pre-revprop-change.tmpl
post-lock.tmpl    pre-commit.tmpl           pre-unlock.tmpl
This directory contains mostly templates showing how to write Subversion
hooks. The real hook scripts are the ones without the “.tmpl” suffix. In our
case, we need a script called post-commit,
which will call the script we just downloaded. You will find more detailed
instructions in the trac-post-commit-hook
script, but a typical implementation looks something like this (for Trac
0.10.4):
#!/bin/sh

# POST-COMMIT HOOK

REPOS="$1"
REV="$2"
LOG=`/usr/bin/svnlook log -r $REV $REPOS`
AUTHOR=`/usr/bin/svnlook author -r $REV $REPOS`
TRAC_ENV='/var/trac/myproject/'
TRAC_URL='http://buildserver/trac/myproject/'

/usr/local/bin/python /usr/local/src/trac/contrib/trac-post-commit-hook
  -p "$TRAC_ENV"
  -r "$REV"
  -u "$AUTHOR"
  -m "$LOG"
  -s "$TRAC_URL"
Make sure both these scripts are executable, or Subversion will not be able to trigger them correctly. Subversion hooks are run with no environment variables initialized, so you may also need to define environment variables such as LD_LIBRARY_PATH or PYTHON_EGG_CACHE to get the Python scripts to work properly.
Once this is in place, whenever a developer commits a change, a new comment will be appended to the corresponding Trac tickets. The script works by recognizing certain key words associated with ticket numbers. When these keywords are detected, the commit message will be integrated into the corresponding track issues. In addition, certain key words can make Trac modify the state of the issue. The keywords take several variations (for example, “closes,” “close,” or “closed” all work). The main ones are shown here:
- closes, fixes
Closes the Trac issue, for example, “Close #1,” or “This correction fixes #2 and # 3”
- addresses, re, references, refs, see
Leave the Trac issue in its current state, and just add the message to the issue, for example, “Addresses #1” or “see #1 and #2”
You can also prevent developers from committing code without a message that contains a reference to at least one Trac issue. You do this by setting up a precommit hook. A sample script for this can also be found on the Trac web site.[*]
This feature combines well with Mylyn and Eclipse changesets (see Using the Eclipse Change Sets), allowing a very smooth integration between you IDE, the source code repository, and the issue management system. You work on a task or issue in Trac, and commit your changes from within Eclipse. Mylyn will automatically prepare a comment quoting the issue number.
Customizing Trac Ticket Fields
Trac lets you customize the ticket screen to some extent. All of the predefined lists can be customized in the Admin screens (see Figure 28-11). If you don’t need a field, remove all its values and it won’t be displayed on the “Ticket” screen.
By default, the “Assigned to” field is a text field. In many cases, it is more convenient to display a list of known Trac users. To do this, open the Trac configuration file, which you can find in <projectenv>/conf/trac.ini, and set the restrict_owner variable in the ticket group to true:
[ticket]
restrict_owner = true
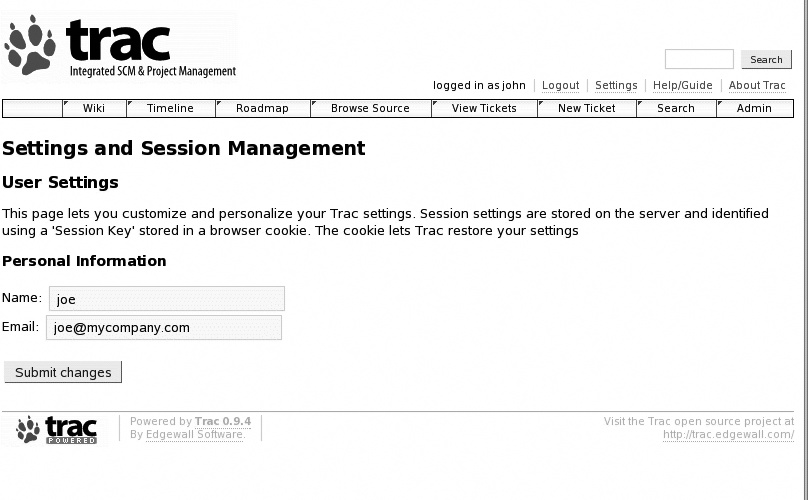
This is actually only part of the picture. You also need user names to fill this list. At the time of this writing, Trac has no centralized interface where user accounts are managed. Users have to set up their own user accounts and email details in the “Settings” screens (see Setting Up Email Notifications). Users who do this will automatically appear in the user list.
You can also add additional fields to the “Ticket” screens, although not via the web interface. If you want to add extra fields, you need to configure them in the Trac configuration file. You configure custom ticket fields in the [ticket-custom] block. Suppose that you want to add a simple text field for developers to record the time spent fixing a bug. This could be done as follows:[†]
[ticket-custom]
correctiontime = text
correctiontime.label = Time taken to correct
Now suppose that you need a list of operating systems:
[ticket-custom]
correctiontime = text
correctiontime.label = Time taken to correct

os = select
os.label = Operating System
os.options = All|Windows|Mac|Linux|Other
os.value = 1
Custom tickets can be of any of the HTML input types: text, checkbox, select, radio, or textarea.
Setting Up Email Notifications
To be efficient, users should be informed of any new or modified tickets as soon as possible. Trac notifies users by email. You can set this up in the Trac configuration file (<projectenv>/conf/trac.ini), in the [notifications] section. By default, email notification is deactivated. To activate it, set smtp_enabled to true, and provide sensible values for the other fields (which are mostly self-evident). The always_notify_owner, always_notify_reporter, and always_notify_updater fields let you specify who should be systematically informed of any changes made to a ticket:
[notification]
smtp_enabled = true
smtp_server = mail.mycompany.com
smtp_from = [email protected]
smtp_replyto = [email protected]
smtp_always_cc = [email protected], [email protected]
always_notify_owner = true
always_notify_reported = true
always_notify_updater = true
This leaves just one minor detail: to send notifications to your users, Trac needs to know their email addresses. One approach is to use email addresses as usernames. This works, but it’s not particularly elegant. In fact, there is an easier way.
The Settings page (see Figure 28-12) lets you associate an email address with your username. That way, you can have nice short usernames and still get your email notifications.
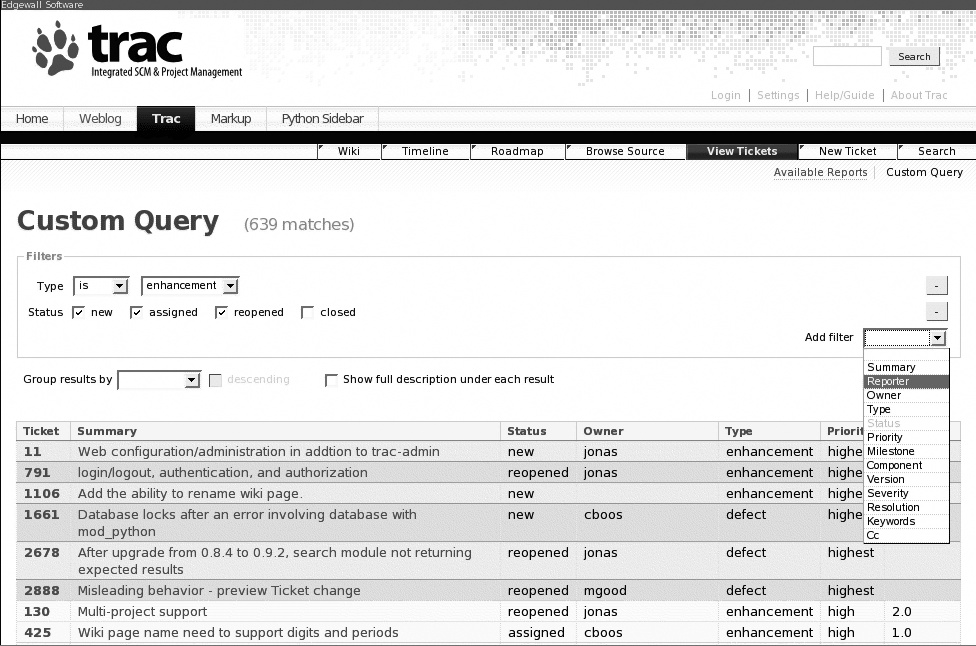
Reporting Using Trac Queries and Reports
For a long time, Trac users built reporting functions by using direct SQL queries on the Trac database. You can see an example in Figure 28-13. Although this approach is still in use, and currently offers the richest feature set, it is progressively being phased out in favor of a more intuitive query language, which can be configured via the web interface and also used directly within wiki pages (see Customizing a Wiki Page with Python).
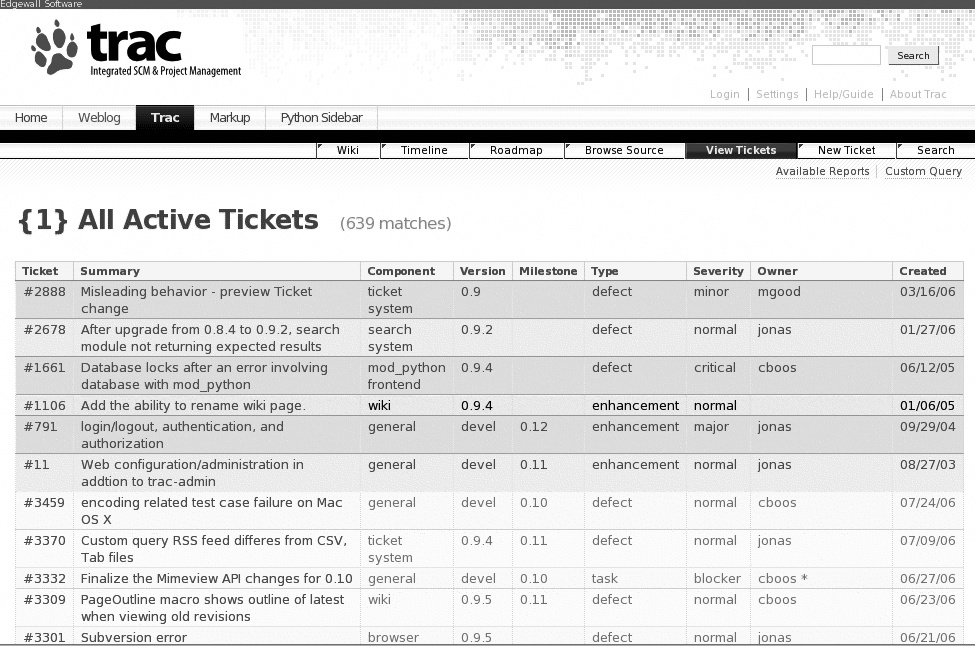
You configure Trac reports and queries in the “View Tickets” screen. Trac comes with a number of useful predefined reports such as “Active Tickets,” “My Tickets,” and “All Tickets by Milestone.” If you need to define your own, you have to write your own custom SQL query. The following query, for example, lists all new, assigned, or reopened tickets for milestone1:
SELECT id AS ticket, status, severity, priority, owner, time as created, summary
FROM ticket
  WHERE status IN ('new', 'assigned', 'reopened') and milestone = 'milestone1'
  ORDER BY priority, time
This rather low-level approach is destined to be replaced by a more user-friendly one in which you dynamically build your query using a series of filters and group-by criteria (see Figure 28-13).
This promising feature is not yet fully functional. At the time of this writing, you can’t actually store queries, and not all of the features available in the SQL reports have been implemented. However, you can insert them into any wiki page using the TicketQuery macro (see Customizing a Wiki Page with Python). To do this in the current version, you need to write your query using the special Trac query language.
Trac uses a simple query language in “query” links and in TicketQuery macro expressions, both of which can be placed directly in any wiki page. This language is simply a set of filter expressions separated by ampersands (&). Alternative values are separated by the pipe (|) character. For example, the following expression displays the list of all open (new, assigned, or reopened) tickets:
[query:status=new|assigned|reopened]
You can add a user-readable label by placing it after the query, as shown here:
[query:status=new|assigned|reopened Active tickets]
Filters can be combined using the “&” character. For example, the following query lists all open blocking or critical tickets:
[query:status=new|assigned|reopened&severity=blocker|critical Open Important Tickets]
Several other Boolean operators are supported. The “~=” operator indicates that the field contains one of a set of values. For example, the following query lists all tickets about cats and/or about dogs:
[query:summary~=cats|dogs Tickets about cats and dogs]
The “^=” operator indicates that the field starts with a given value, and the “$=” operator indicates that the field ends with a given value. For example, the following expression lists all the tickets of which the summary starts with the word “Test”:
[query:summary^=Test Tickets with a summary starting with "Test"]
Managing Progress with Trac Roadmaps and Timelines
Trac provides convenient ways to plan, monitor, and publish information about project progress. In this section, we will look at how to plan, track and publish project progress using the “Milestone” screen, and how to keep tabs on detailed project activity using the “Timeline” screen.
Trac Milestones
The “Roadmap” screen (see Figure 28-15) gives an overview of current and future project milestones, including a description of each milestone and an indication of the progress made (based on the percentage of closed tickets associated with each milestone). Milestone descriptions use the Trac wiki formatting (see Tailoring the Trac Web Site: Using the Wiki Function), so they can contain references to other Trac objects such as tickets or changesets.
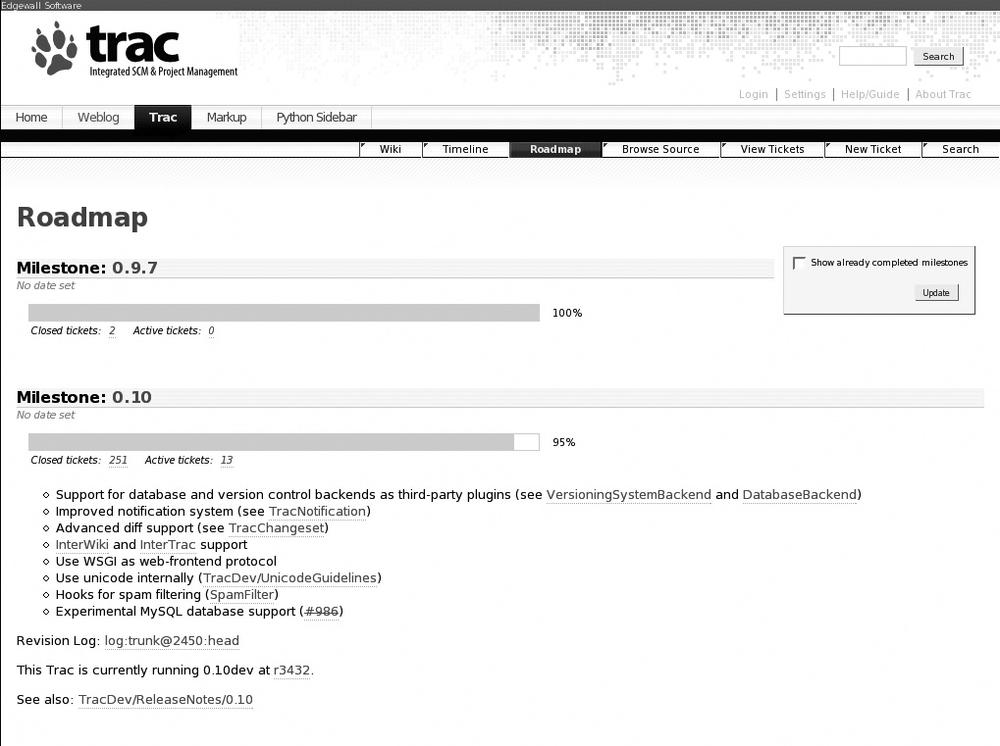
To get the most out of this functionality, you need to integrate Trac into your daily project management. As part of the project planning activity, you create development tasks and associate them with different milestones. If an iterative approach is used, milestones may correspond to iterations, and tasks may be used to keep track of features or user stories.
From a project management point of view, the “Roadmap” view of project progress has a lot going for it:
It gives a high-level overview of project progress useful for keeping management people happy.
It requires very little extra overhead in terms of reporting or project management: progress is measured on the basis of the proportion of open tickets for a given milestone.
The metrics used to measure progress are objective and Boolean: a ticket is closed or open, it is never 90 percent done.
It can accurately reflect situations in which work may be progressing in parallel in several areas, toward different milestones.
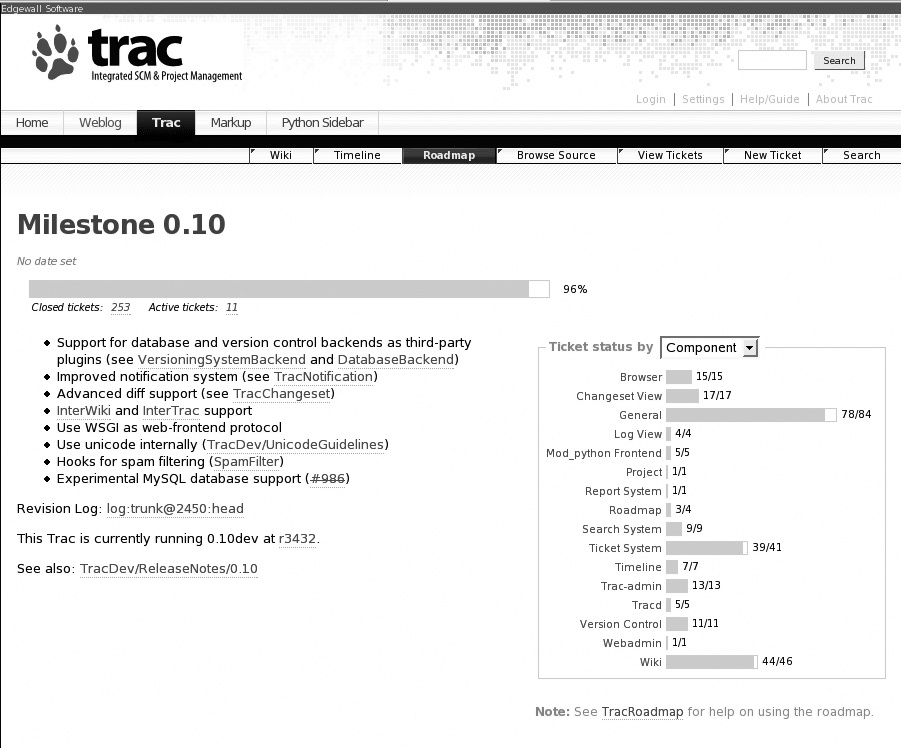
If you need to know more about progress on a particular milestone, you can always click on the milestone to open a more detailed view (see Figure 28-16). In addition to the progress indicators visible in the “Roadmap” view, the “Milestone” view shows a graph of ticket status grouped by type, owner, component, severity, priority, and so on. Clicking on any of the graph lines will drill down further to the detailed list of all the corresponding tickets.
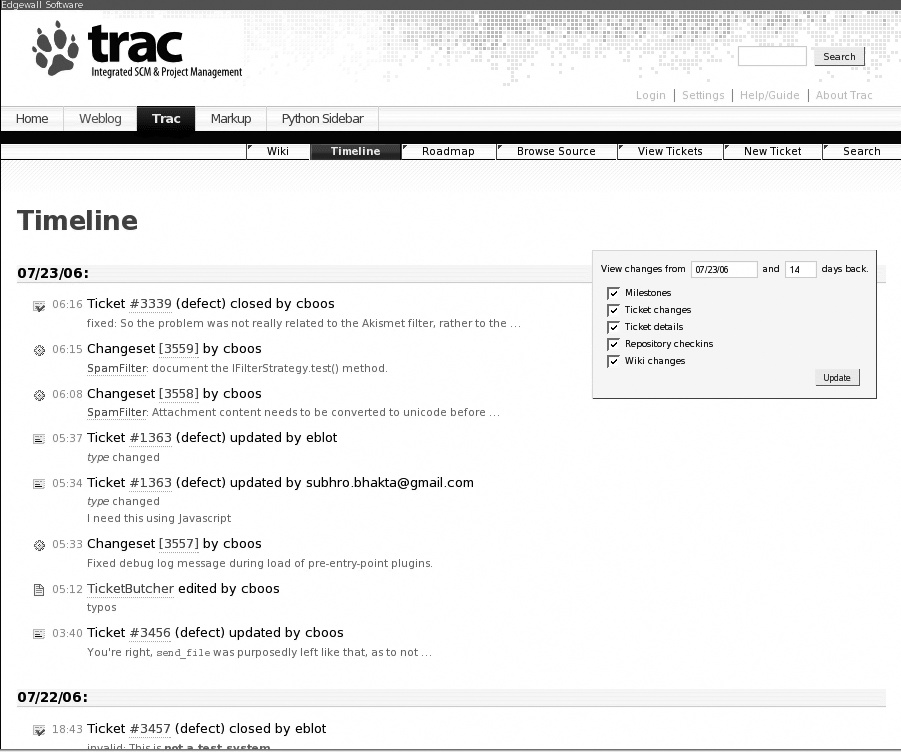
Browsing the Source Code Repository
Trac provides full web access to the underlying Subversion repository (see Figure 28-18).
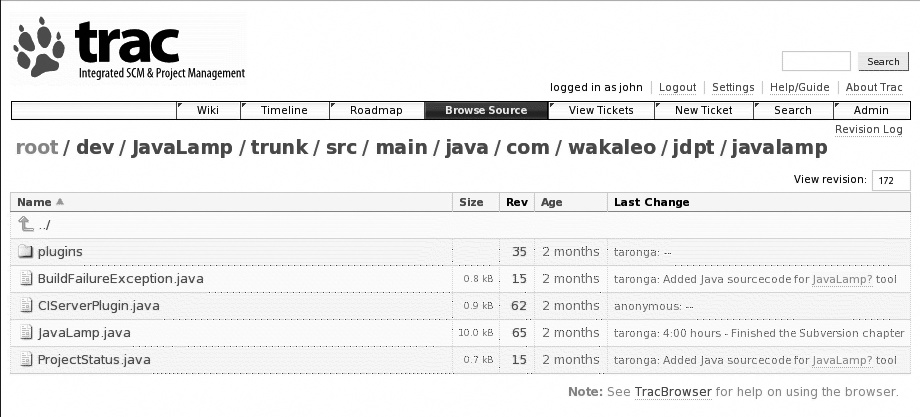
All directories and files are listed with their latest revision number. You can click on any revision number to display the corresponding change log. From here, you can view the changes between two revisions or the changes that were done in a particular file (see Figure 28-19).
You can also browse a previous version of the source code, using the “View Revision” field.
Using RSS and ICalendar
For users who don’t consult the Trac web site several times a day, or who simply wish to be able to keep track of project progress without having to open a new web page, Trac provides RSS support for several types of project data. The “Timelines” screen provides an RSS feed concerning all project events, whereas each individual Report and Query can provide an RSS field listing the current tickets matching certain criteria.
Subscribing to an RSS feed can be done in a number of ways. Pages with an RSS feed available have the usual orange “XML RSS feed” icon at the bottom of the screen, which you can usually click on to subscribe. Not all browsers support this function, however. Recent versions of Firefox also provide support for Live Bookmarks; when you display a page with RSS support, an orange icon appears in the URL. You can click on this icon to subscribe (see Figure 28-20).
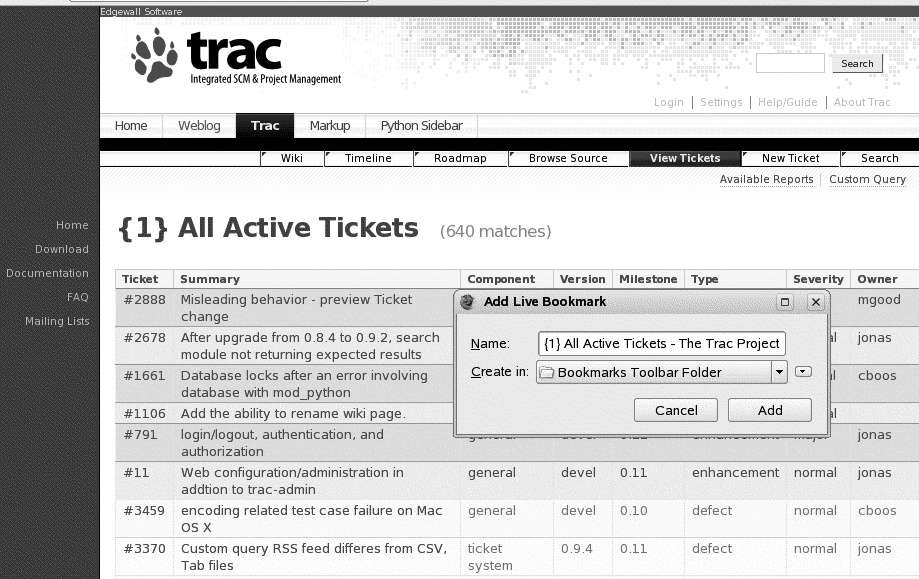
Once you’ve subscribed to the RSS feed, you can now keep tabs on the latest project activity or the status of tickets, just as you would any other RSS feed. In Figure 28-21, for example, you can see ticket status being displayed in Firefox using the Live Bookmark feature. There are, of course, many other tools and techniques to display RSS feeds: any tool that suits your work habits will do the job.

Trac also lets you download tasks from the Roadmap page in the standard iCalendar format. iCalendar is a standard data-exchange format designed to exchange meetings and tasks. It is supported by a number of products, including Lotus Notes, KOrganiser, Evolution, and Microsoft Outlook. From the RoadMap page, you can download data in iCalendar format and import the corresponding tasks into your calendar application. However, if your calendar tool lets you, it is more convenient to subscribe to the Trac site as a remote iCalendar calendar. This way tasks that are assigned to you are automatically updated in your local calendar.
Customizing a Wiki Page with Python
The Trac pages are extensible and easy to configure. In addition to modifying the text and layout of your wiki pages, you can also insert dynamic contents using macros.
Macros are enclosed in two square brackets and can take parameters provided between parentheses. Trac comes with a dozen or so standard macros, letting you do a few simple tasks. We’ll look at some of the more interesting ones.
The Image macro inserts the image of your choice into the page. Images can come from a variety of places, including files attached directly to the current wiki page, as shown here:
[[Image(screenshot.gif)]]
Files can also come from other wiki pages or objects, or even from the repository, as shown here, from a ticket:
[[Image(ticket:16:screenshot.jpg)]]
[[Image(source:/dev/JavaLamp/trunk/src/main/resources/images/green-lavalamp.gif)]]
The RecentChanges macro lists pages which have been recently modified. This can be handy on the home page, for example, in a “What’s new” zone. You can specify the prefix of the pages you want to display and/or the maximum number of results. For example, the following macro lists the five most recently modified pages whose names begin with “Wiki”:
[[RecentChanges(Wiki,5)]]
Finally, the TicketQuery macro lets you display the result of queries on the ticket database (see Reporting Using Trac Queries and Reports):
== Curren Open Tickets ==
[[TicketQuery(status=assigned)]]
Conclusion
Trac is, as the writers maintain, a lightweight issue tracking system with excellent Subversion integration. On the downside, it is not as feature-rich as many other issue-tracking solutions, and its reporting capabilities in the current version are somewhat limited. Nevertheless, for small, agile teams using Subversion, Trac is an excellent choice.
[*] If you are installing Trac on an Ubuntu machine, in particular, the Trac web site contains a tutorial that may be able to save you a lot of time and effort. See http://trac.edgewall.org/wiki/TracOnUbuntu.
[*] http://trac.edgewall.org/browser/trunk/contrib/trac-post-commit-hook for the latest cutting-edge version, or http://trac.edgewall.org/browser/branches/0.10-stable/contrib/trac-post-commit-hook for Trac 0.10.x.
[†] A more thorough way of tracking time spent would be to install the Timing and Estimating plug-in (see http://trac.edgewall.org/wiki/TimeTracking).