
Chapter 30. Automatically Generating Technical Documentation
Introduction
Good-quality, reliable, and up-to-date technical documentation on a project is generally regarded as a Good Thing. Technical documentation is a great aid for the developers who are assigned to maintaining the product, once the original development team has been dispersed. Technical documentation can also help new developers come up to speed when they join a project.
However, good technical documentation comes at a cost—the more documentation you have, the more effort you need to put into maintaining this documentation. And the effort that goes into maintaining technical documentation is, of course, effort that could be spent on writing code. In this chapter, we look at three tools that you can use to reduce the time you spend on maintaining your technical documentation, without compromising too much on the quality: SchemaSpy, for database models, and Doxygen and UmlGraph for source code documentation.
Visualizing a Database Structure with SchemaSpy
Introduction
Relational databases play a key role in a majority of today’s software applications, and database schemas are without doubt one of the most widely recognized and understood models in the IT field. Although they are relatively low-level, and lack some of the abstraction of an object-oriented class model, they can still be an extremely valuable asset when it comes to trying to understand the architecture of an application, both during the development phase and also during product maintenance once the application is in production.
However, the main problem with database schemas, like all other design models and documents, is keeping them up-to-date. As a rule, the chances of a design document being kept up to date are inversely proportional to the effort required to maintain them. That is to say, if human intervention is required to maintain a document, it will soon become out of date in all but the most rigorous of projects.
SchemaSpy can be a valuable asset in maintaining and publishing these models. Like Javadoc for Java source code, SchemaSpy provides an accurate, up-to-date view of the database structure, generated automatically from the actual database. As an automated tool, SchemaSpy incurs very little cost to set up and virtually no cost to maintain—the diagrams are automatically updated as the database schema evolves. This alone is a valuable time-saver for both development and maintenance teams.
An Overview of SchemaSpy
Based on material contributed by: Masoud Kalali
SchemaSpy[31] is a free, open source Java tool written by John Currier that can generate a rich interactive HTML view of your database, showing detailed information about the tables, views and relations that make up the database. SchemaSpy works by analyzing the metadata from a JDBC connection, and producing a set of detailed HTML reports describing the database. The HTML reports are richly annotated with hyperlinks letting you navigate between parents and children by simply clicking on the appropriate foreign key field. Primary keys, foreign keys, and indexes are visible at a glance.
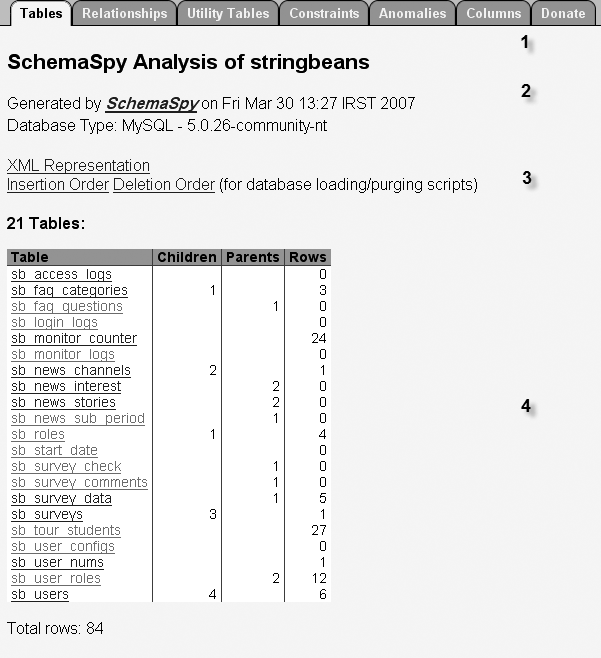
Figure 30-1 shows a view of a typical SchemaSpy report. Information is categorized under a number of intuitively-titled tabs, such as “Tables,” “Relationships,” “Utility Tables,” and so on. Hyperlinks make it easy to drill down to see details about particular tables.
SchemaSpy displays a wealth of useful information about your database, including:
A list of all tables and views in the database, displayed appropriately enough in the Tables tab. This view also shows the number of rows in each table, as well as the number of parents and children for each table (see [4] in Figure 30-1).
A graphical view of the relationships between tables in the database (see Figure 30-2). This view provides a powerful and succinct overview of the database structure, much appreciated by developers. This diagram is generated using Graphviz, and is enriched with HTML map and area tags that allow the user to click directly on a table in order to display the details for that table.
Detailed information about any constraints present in the database (in the Constraints tab).
A list of utility tables. Utility tables are tables that have no relation to any other tables. Utilities tables are typically used to store information such as counters. Any other tables appearing in this list should be considered suspect, and should be checked for possible missing foreign keys.
Anomalies that are present in your database. This is another nice feature, where SchemaSpy checks your database for simple structural errors. SchemaSpy can detect several types of anomalies, such as columns that are flagged as both “nullable” and “must be unique,” single column tables, tables without indexes, foreign keys that appear to be missing, and so on.
A list of all the columns present in the database with detailed information such as related columns, constraints, and comments. This can act as a handy data dictionary, especially if the columns have been commented in the SQL creation script.
As shown in (3) in Figure 30-1, SchemaSpy can also be used to generate an XML representation of your database, as well as the correct drop and create sequences for database tables. Drop and create sequences let you avoid those unresolved constraints during creation and dependency problems when you create or drop tables from the database.
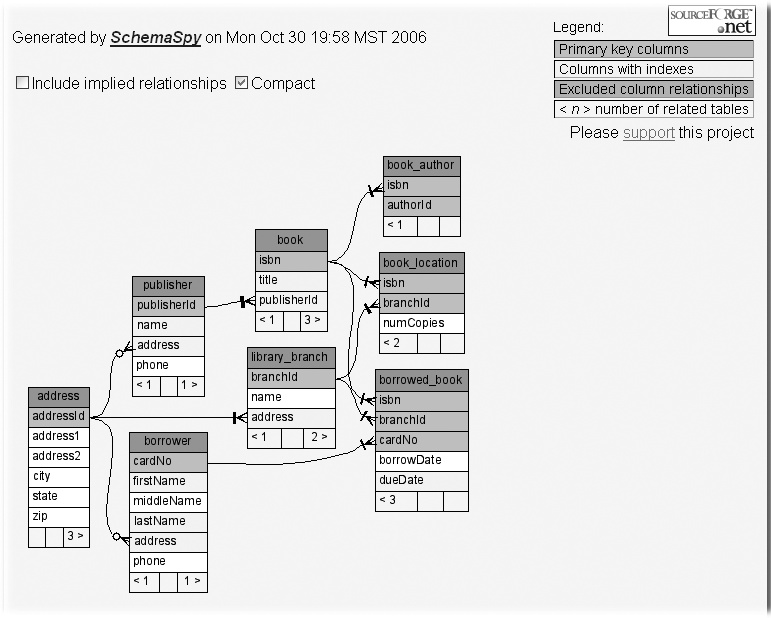
The graphical view illustrated in Figure 30-2 is a great way of getting a global picture of your database structure. If you are interested in a particular table, it is easy to drill down into a table for more details. If you click on a table, either in the tables list or from one of the graphs, SchemaSpy will display detailed information about that table (see Figure 30-3). This view contains information such as:
Column details—name, type, constraints, default value, related columns with table name, and so on
Index-related information: index name, type, column(s) name
A diagram showing relations with other tables
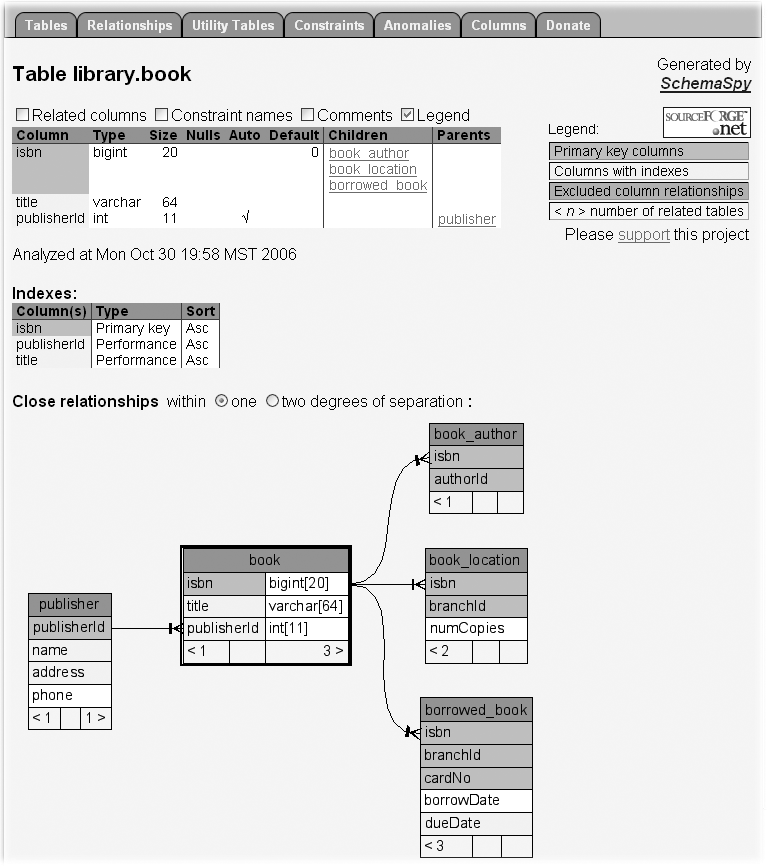
Once again, you can click on any of these tables to drill down to a more detailed view about that specific table. Each table also displays some numbers in the bottom left and right corners. These numbers represent, respectively, how many parent tables a given table is associated with (left corner), and how many children it has (right corner).
Installing SchemaSpy
Now that we have a better idea of what SchemaSpy does, let’s see how to install it. SchemaSpy is bundled as a simple JAR file that you can download SchemaSpy from the project web site.[*]
SchemaSpy relies on the Graphviz library to generate the graphical views of the database structure. Graphviz is a collection of tools for manipulating and generating graphs, based on the dot language. Graphviz is not a Java tool but, rather, a native executable that SchemaSpy invokes from the command line. Therefore SchemaSpy expects to find the Graphviz dot application on your PATH. You can download the Graphviz package from the Graphviz web site.[32] There are installation packages for Windows and for most flavors of UNIX and Linux. Alternatively, you can download the source code and compile and install the library following a fairly standard Unix installation procedure, which is, again, well documented on the Graphviz web site.
Using SchemaSpy
Based on material contributed by: Masoud Kalali
By default, SchemaSpy comes as a no-frills, command-line tool. You run it simply by executing the Jar file, using a set of command-line options to specify the connection details for your database. A typical execution from the command line looks something like this:
$ java -jar schemaSpy_3.1.1.jar
        -t mysql
        -u root
        -o db-schema-report
        -host localhost
        -db bookstore
        -s bookstore
        -cp mysql-connector-java-5.0.5.jar
Using database properties:
    [/usr/local/tools/schemaSpy/schemaSpy_3.1.1.jar]/net/sourceforge/schemaspy
    /dbTypes/mysql.properties
Connected to MySQL - 5.0.24a-Debian_9ubuntu2-log

Gathering schema details.......................................................(0sec)
Writing/graphing summary........(12sec)
Writing/graphing results.......................................................(0sec)
Wrote relationship details of 55 tables/views to directory 'db-schema-report'
in 13 seconds.
Start with db-schema-report/index.html
You need to provide the JDBC driver yourself, either on the Java classpath or using the -cp option. The other options are described briefly here:
- -t databaseType
This parameter lets you specify the database type you are working with. SchemaSpy provides built-in support for most of the major databases, including Oracle (“ora,” which is the default value, or “orathin” for the 100% Java type-4 JDBC driver.), mysql, pgsql, db2, and mssql (Microsoft SQL Server). Database configurations are stored in properties files, which can be found in the
schemaSpy.jarfile, under thenet/sourceforge/schemaspy/dbTypesdirectory. If your database is not supported, you can copy and adapt one of these properties files, and provide the path to your own customized properties file instead.- -db dbName
The name of database that SchemaSpy will analyze.
- -u user
A valid database user with at least read access to the target database.
- -p password
The password for this user.
- -o outputDirectory
The generated HTML report will be placed in this directory.
Using SchemaSpy from the command line is a bit unwieldy. In the next two sections, we’ll look at how to automate the process with Ant and Maven.
Using SchemaSpy in Ant
A tool like SchemaSpy really begins to excel when you can integrate it into your build process. At the time of writing, SchemaSpy did not come packaged with an Ant task, but it is possible to execute the SchemaSpy JAR file from within Ant using the <java> tag. SchemaSpy comes packaged as an executable JAR file, so you need to invoke the <java> tag using the jar attribute to specify the SchemaSpy JAR file. You also need to provide the JDBC driver using the -cp command line option. You provide the command-line options simply by using the <arg> parameter. Note that SchemaSpy does accept command-line options using a “property=value” syntax, which saves some space and reduces the number of <arg> lines.
This technique is illustrated here:
    <!-- SchemaSpy property values -->
        <property name="schemaspy.report.dir" value="${build.dir}/schemaspy"/>
        <property name="schemaspy.jdbc.driver" value="${lib}/mysql-connector-
         java-5.0.5.jar"/>
        <property name="schemaspy.database" value="mydatabase" />
        <property name="schemaspy.driverClassName" value="com.mysql
        .jdbc.Driver" />
        <property name="schemaspy.database.host" value="localhost" />
        <property name="schemaspy.username" value="scott" />
        <property name="schemaspy.password" value="tiger" />

        // ...

        <target name="schemaspy">
            <echo>Generating database schemas in ${schemaspy.report.dir}</echo>
            <java jar="${lib}/schemaSpy_3.1.1.jar"
                output="${schemaspy.report.dir}/schemaspy-out.log"
                error="${schemaspy.report.dir}/schemaspy-error.log"
                fork="true">
                 <arg line="-t=mysql"/>
                 <arg line="-db=${schemaspy.database}"/>
                 <arg line="-u=${schemaspy.username}"/>
                 <arg line="-p=${schemaspy.password}"/>
                 <arg line="-cp=${schemaspy.jdbc.driver}"/>
                 <arg line="-host=${schemaspy.database.host}"/>
                 <arg line="-o=${schemaspy.report.dir}"/>
            </java>
        </target>
This
will generate the SchemaSpy web pages into the target/schemaspy directory.
Using SchemaSpy in Maven
If you are using Maven on your project, there are obvious advantages to incorporating SchemaSpy reports in the automatically generated Maven site. At the time of writing, however, there is no Maven 2 plug-in for SchemaSpy.
Integrating SchemaSpy with Maven is not a simple task. For one thing, SchemaSpy is bundled as an executable tool, not as an API, so you won’t find it in any Maven repositories. You need to download and install it yourself (along with Graphvis), and make it available to Maven. In its simplest form, you can get Maven to generate the SchemaSpy reports during Maven site generation by incorporating a slightly adapted version of the Ant script listed above directly within your POM file:
</project>
  ...
  <build>
    <!-- SchemaSpy -->
    <plugin>
      <artifactId>maven-antrun-plugin</artifactId>
      <executions>
        <execution>
          <phase>site</phase>
          <configuration>
            <tasks>
              <echo>
                Generating database schemas in ${schemaspy.report.dir}
              </echo>
              <java
                jar="${schemaspy.home}/schemaSpy_${schemaspy.version}.jar"
                output="${schemaspy.report.dir}/schemaspy-out.log"
                error="${schemaspy.report.dir}/schemaspy-error.log"
                fork="true">
                <arg line="-t=mysql" />
                <arg line="-db=${schemaspy.database}" />
                <arg line="-u=${schemaspy.username}" />
                <arg line="-p=${schemaspy.password}" />
                <arg line="-cp=${schemaspy.jdbc.driver}" />
                <arg line="-host=${schemaspy.database.host}" />
                <arg line="-o=${schemaspy.report.dir}" />
              </java>
            </tasks>
          </configuration>
          <goals>
            <goal>run</goal>
          </goals>
        </execution>
      </executions>
    </plugin>
  </plugins>
  </build>
  <dependencies>
    ...
    <dependency>
      <groupId>mysql</groupId>
      <artifactId>mysql-connector-java</artifactId>
      <version>5.0.5</version>
    </dependency>
    ...
  </dependencies>
  ...
  <properties>
    <schemaspy.home>${user.home}/.schemaspy</schemaspy.home>
    <schemaspy.version>3.1.1</schemaspy.version>
    <schemaspy.report.dir>${project.build.directory}/site/schemaspy</schemaspy.
     report.dir>
    <schemaspy.jdbc.driver>
      ${settings.localRepository}/mysql/mysql-connector-java/5.0.5/mysql-connector-
      java-5.0.5.jar
    </schemaspy.jdbc.driver>
    <schemaspy.database>planestore_test</schemaspy.database>
    <schemaspy.driverClassName>com.mysql.jdbc.Driver</schemaspy.driverClassName>
    <schemaspy.username>scott</schemaspy.username>
    <schemaspy.password>tiger</schemaspy.password>
    <schemaspy.database.host>localhost</schemaspy.database.host>
  </properties>
</project>
We have placed the property values in a <properties> block at the end of the POM file. In a
real-world application, these properties would probably find themselves
placed in profiles (see Defining Build Profiles” in Declarative Builds and the Maven Project Object Model) and/or in the local user’s settings.xml file (see Configuring Maven to Your Environment).
This will generate the SchemaSpy reports in a subdirectory of the site directory called schemaspy.
We need to pass a reference to the JDBC library we are using to SchemaSpy via the -cp command-line parameter. Because this JDBC library will certainly be listed in the project dependencies, one of the simpler approaches is to use the ${settings.localRepository} property to refer to the copy of this library in our local repository.
Now we can generate the SchemaSpy report whenever the Maven site is built, we need to display it. Because SchemaSpy does not have a report plug-in, it is not easy to integrate a link to the SchemaSpy pages into the standard Maven report list. The simplest approach is to add a manual link to the page at an appropriate place on your site. (Chapter 29 discussed how to customize your Maven site in more detail.)
Generating Source Code Documentation with Doxygen
Introduction
Doxygen[*] is a tool for generating technical documentation from your Java source code written by Dimitri van Heesch. Doxygen is similar to the standard Javadoc tool: both tools analyze Java source code to produce interactive HTML documentation. However, Doxygen goes further than Javadoc: as well as documenting the classes, it also can generate a variety of diagrams, such as class diagrams, collaboration diagrams, and dependency graphs. Doxygen is not limited to Java source code. It also can document C, C++, and C# projects. It also can produce technical documentation in other formats, such as PDF, RTF, or LaTeX.
Another advantage of Doxygen is that it is much less obtrusive than Javadoc, making it easier to document your classes without having to think about formatting issues. For example, Doxygen will automatically recognize references to other classes (no need for @link commands), and uses a simple wiki-style notation for formatting, eliminating the need to add HTML code within your comments. This smooths the documentation process and makes for higher-quality, more relevent technical documentation.
The Doxygen Reports
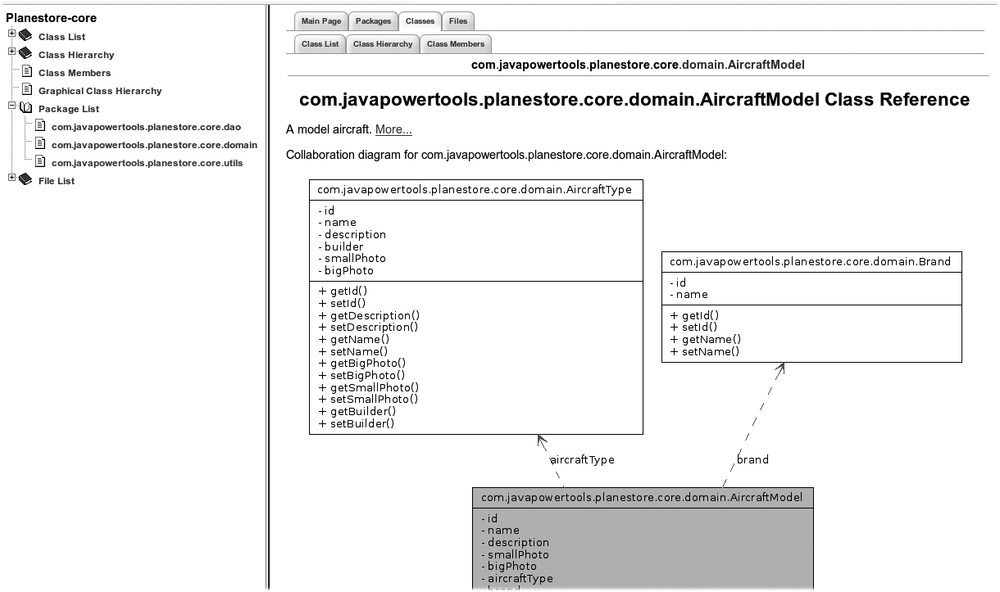
Doxygen generates a rich set of browsable HTML documentation (see Figure 30-4). By way of comparison, Doxygen-generated documentation is similar to but more extensive than documentation generated by Javadoc. In addition to the lists of classes, packages, and files that you would expect, Doxygen can generate UML class diagrams and collaboration diagrams which can provide a better understanding of how the classes work together. Collaboration diagrams are based on structural relations (inheritance and member variables), but they do not include class usage within individual methods.
The reports also include annotated and cross-referenced source code in HTML form.
Installing Doxygen
Doxygen is not a Java API: it is a command-line utility that you need to download and install on your machine. There are precompiled binary installations for many Linux platforms such as Red Hat, SuSE, and the Debian family. Otherwise, you will need to download, compile, and install the tool. This fairly straightforward procedure is described here. First, download and unpack the Doxygen source code:
$ tar xvfz doxygen-1.5.2.src.tar.gz
Next, configure and compile the source code:
$ ./configure
$ make
Finally, to install, just run the standard “make install”:
# make install
If you run into any trouble, the Doxygen web site[*] has some useful tips for particular installation issues with certain platforms.
On Windows, you can use the packaged Windows installer to install Doxygen very easily.
Like SchemaSpy (see Visualizing a Database Structure with SchemaSpy), Doxygen uses Graphviz to generate its graphs. So you will need to download and install this tool as well to get the best our of Doxygen. This is fairly straightforward and is explained in Installing SchemaSpy,” in Visualizing a Database Structure with SchemaSpy.
Configuring Doxygen
Before you can run Doxygen, you need to set up a configuration file, which tells Doxygen what files to analyze and how to format the generated documentation. This configuration file is a simple text file with a Makefile-like format, containing a set of configuration options. You can generate a sample configuration file using the -g option, as shown here:
$ doxygen -g
A simple configuration file, suitable for a Java project, is illustrated here:
PROJECT_NAME           = Planestore-core
PROJECT_NUMBER         = 0.1
OUTPUT_DIRECTORY       = P:/projects/planestore-core/planestore-core/target/doxygen
JAVADOC_AUTOBRIEF      = YES
TAB_SIZE               = 4
OPTIMIZE_OUTPUT_JAVA   = YES
INPUT                  = P:/projects/planestore-core/planestore-core/src
RECURSIVE              = YES
HAVE_DOT               = YES
UML_LOOK               = YES
CLASS_GRAPH            = YES
COLLABORATION_GRAPH    = YES
GROUP_GRAPHS           = YES
GRAPHICAL_HIERARCHY    = YES
DIRECTORY_GRAPH        = YES
SHOW_DIRECTORIES       = YES
SOURCE_BROWSER         = YES
STRIP_CODE_COMMENTS    = NO
GENERATE_LATEX         = NO
GENERATE_TREEVIEW      = YES
This file is a not-quite-minimal configuration you would need for a Java project. As well as the strict minimum, there are a few useful extras added in along the way. You need the HAVE_DOT option to indicate that Graphviz dot tool is installed and available: in this case, Doxygen can generate a full range of graphs and diagrams, including class diagrams, collaboration diagrams and call graphs. The UML_LOOK option will instruct Doxygen to produce proper UML-style diagrams. The GENERATE_TREEVIEW option produces a JavaScript tree structure, which is displayed in a side panel (see Figure 30-4). The SOURCE_BROWSER option lets you generate a cross-referenced, browsable, HTML view of your application source code.
All the available configuration options are described in detail in the Doxygen documentation.[*] I will discuss some of the more useful ones later in the chapter.
Rather than configuring this file by hand, you can also use the Doxygen graphical frontend tool, if it has been installed on your machine. (It comes bundled with the Windows installer, but for *NIX installations, you may need to configure and build Doxygen from the source code using the --with-doxywizard option.)
The graphical frontend (doxywizard) is useful for learning how to use Doxygen (see Figure 30-5), and is also a good way to obtain an initial Doxygen configuration file, which you may want to tailor afterward. The wizard mode (shown in Figure 30-5) lets you configure Doxygen quickly and intuitively, using just the most important configuration options, and sensible default values.
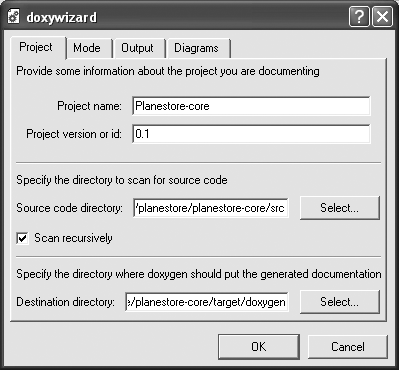
For a Java project, make sure that you tick the “Scan recursively” option on the Project page, and “Optimize for Java output” on the Mode page. It is also handy to include cross-referenced source code in the generated web site (this option is on the Mode page).
You should also configure the graphs and diagrams you would like to be generated. You do this on the Diagrams tab. By default, only simple class diagrams are generated. However, for the more sophisticated (and useful) diagrams, you need to use the Graphviz command-line tools. Just select the “Use dot tool from the Graphviz package” option, and choose the diagrams you want to produce.
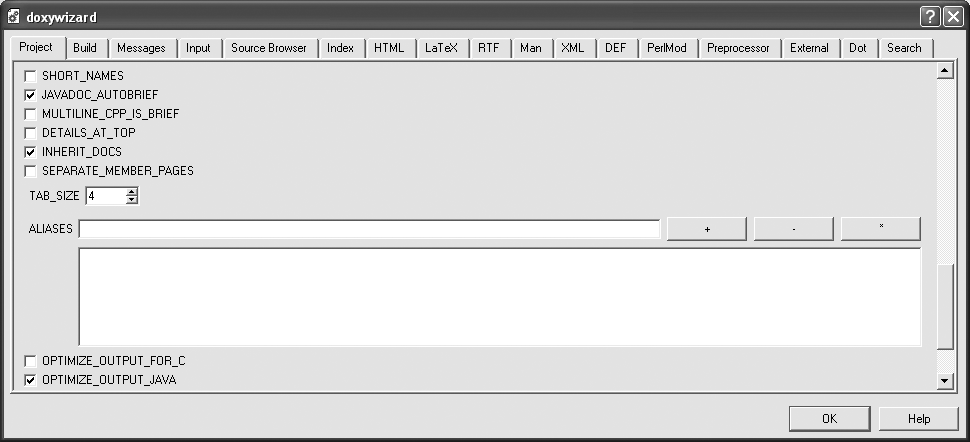
The expert mode (see Figure 30-6) provides access to all the nitty-gritty details, and refers to configuration variables by their internal names, rather than the more readable labels used in the wizard mode. However, there are some useful options for Java projects which are not set by default, and which are only accessible from the Expert mode (or directly from the configuration file, of course). For example, the JAVADOC_AUTOBRIEF option, which I discuss below, is not set by default. By default, the TAB_SIZE option is set to the rather strange value of 6, rather than the more common values of 4 or possibly 8. And, if you want the more familiar UML-style class diagrams, you need to select the UML_LOOK option on the Dot tab.
When you are happy with your configuration file, save it into your project home directory.
Running Doxygen from the Command Line
Running Doxygen from the command line is easy. By default,
Doxygen will look for a configuration file called Doxyfile in the current directory. If your configuration file
is called Doxyfile, all you need to do is
to run the Doxygen
command:
$ doxygen
Searching for include files...
Searching for example files...
Searching for images...
Searching for dot files...
Searching for files to exclude
Searching for files to process...
Searching for files in directory P:/projects/planestore-core/planestore-core/src
...
Generating namespace member index...
Generating graph info page...
Generating file index...
Generating example index...
Generating file member index...
Generating page index...
Alternatively, you can provide the configuration file explicitly:
$ doxygen src/config/doxyfile.conf
This will analyze your project’s source code and generate a web site in the designated output directory. Depending on the size of your project, this may take some time.
Using Doxygen with Ant
It is a straightforward task to use Doxygen with Ant. Karthik Kumar maintains an Ant plugin for Doxygen, which you can download from the project web site.[*] As you would expect, Doxygen and Graphviz need to be installed for this task to work.
Download and extract the binary distribution into an appropriate place on your local machine. Alternatively, you can use a bootstrap script along the following lines for more portability:
<project name="DOxygen Bootstrap script" default="bootstrap" basedir="." >

  <!-- Define the environment-specific "doxygen.ant.home" and "doxygen.ant.version"
       variables in this file if required.
    -->
  <property file="${user.home}/ant-global.properties"/>
  <!-- This default value is used if no properties file is present -->
  <property name="doxygen.ant.home" value="${user.home}/.doxygen-ant"/>
  <property name="doxygen.ant.version" value="1.4"/>

  <echo>Installing the DOxygen Ant task into ${doxygen.ant.home}</echo>
  <property name="sourceforge.mirror"
            value="http://optusnet.dl.sourceforge.net/sourceforge/ant-doxygen" />

  <available file="${doxygen.ant.home}/ant_doxygen-bin-${doxygen.ant.version}.tgz"
             property="doxygen.ant.installed"/>

  <echo>Bootstrap DOxygen</echo>
  <target name="bootstrap" unless="doxygen.ant.installed">
    <echo>Installing DOxygen task</echo>
    <mkdir dir="${doxygen.ant.home}" />
    <get src="${sourceforge.mirror}/ant_doxygen-bin-${doxygen.ant.version}.tgz"
         dest="${doxygen.ant.home}/ant_doxygen-bin-${doxygen.ant.version}.tgz"
         usetimestamp="true"/>

    <gunzip src="${doxygen.ant.home}/ant_doxygen-bin-${doxygen.ant.version}.tgz"
            dest="${doxygen.ant.home}/ant_doxygen-bin-${doxygen.ant.version}.tar"/>
    <untar src="${doxygen.ant.home}/ant_doxygen-bin-${doxygen.ant.version}.tar"
           dest="${doxygen.ant.home}/ant_doxygen-bin-${doxygen.ant.version}"/>

    <move todir="${doxygen.ant.home}">
        <fileset dir="${doxygen.ant.home}/ant_doxygen-bin-${doxygen.ant.version}">
          <include name="**/*"/>
        </fileset>
    </move>
    <delete dir="${doxygen.ant.home}/ant_doxygen-bin-${doxygen.ant.version}"/>
  </target>

</project>
Running Doxygen is now a simple matter: just declare the doxygen task using the JAR file we just downloaded, and invoke the task using the configFilename attribute to specify the configuration file:
    <!-- This default value is used if no properties file is present -->
    <property name="doxygen.ant.home" value="${user.home}/.doxygen-ant"/>
    <property name="doxygen.ant.version" value="1.4"/>
    ...
    <!-- Doxygen -->
    <ant antfile="bootstrap-doxygen.xml"  />
    <taskdef name="doxygen" classname="org.doxygen.tools.DoxygenTask"
             classpath="${doxygen.ant.home}/lib/ant_doxygen.jar" />

    <target name="doxygen">
        <doxygen configFilename="src/config/doxyfile.conf" />
    </target>
You can also explicitly specify configuration values, which allows more flexibility in the build parameters, as shown here:
    <target name="doxygen">
        <mkdir dir="build/doxygen" />
        <doxygen>
            <property name="PROJECT_NAME" value="Planestore-core" />
            <property name="PROJECT_NUMBER" value="0.1" />
            <property name="OUTPUT_DIRECTORY" value="target/doxygen" />
            <property name="JAVADOC_AUTOBRIEF" value="YES" />
            <property name="TAB_SIZE" value="4" />
            <property name="OPTIMIZE_OUTPUT_JAVA" value="YES" />
            <property name="INPUT" value="src" />
            <property name="RECURSIVE" value="YES" />
            <property name="HAVE_DOT" value="YES" />
            <property name="UML_LOOK" value="YES" />
            <property name="CLASS_GRAPH" value="YES" />
            <property name="COLLABORATION_GRAPH" value="YES" />
            <property name="GROUP_GRAPHS" value="YES" />
            <property name="GRAPHICAL_HIERARCHY" value="YES" />
            <property name="DIRECTORY_GRAPH" value="YES" />
            <property name="SHOW_DIRECTORIES" value="YES" />
            <property name="SOURCE_BROWSER" value="YES" />
            <property name="STRIP_CODE_COMMENTS" value="NO" />
            <property name="GENERATE_LATEX" value="NO" />
            <property name="GENERATE_TREEVIEW" value="YES" />
        </doxygen>
    </target>
How to Make Your Java Classes Doxygen-Friendly
Doxygen (and Javadoc, for that matter) will try their best to document your source code in a readable way, but there is always a limit to what a machine can do. Automatically-generated technical documentation of any quality requires a bit of effort when it comes to documenting your code. (Of course, writing well-documented code is a recommended best practice for any programming language, and not just where automatic documentation is to be used.) In this section, we look at a few tips for creating decent documentation when using Doxygen.
Using the brief descriptions
If you set the JAVADOC_AUTOBRIEF option to true, Doxygen will use the first sentence of a Javadoc comment as the brief description. The brief description is used in summary tables to give a—well—brief description of a class or method. There are other ways to do this, but this is by far the easiest and the most Java-friendly.
Lists
You can include lists in your documentation in a number of ways. If you are using both Javadoc and Doxygen, you should probably use standard HTML lists. However, if you are only using Doxygen, you can use the more convenient wiki-style lists such as the one shown here:
  /**
   * This class handles three types of widget orders:
   *   - Orders received online
   *   - Orders received by phone:
   *       - By voice
   *       - By SMS
   *   - Orders received by carrier pigeon.
   */
This would generate something along the following lines:
This class handles three types of widget orders:
Orders received online
Orders received by phone:
By Voice
By SMS
Orders received by carrier pigeon.
Links and references
Doxygen handles cross-references between classes particularly well. This means that, when you write your comments, you can add references to other classes with very little effort. Any qualified or unqualified class name that appears in your Javadoc comments will be automatically detected and rendered as a HTML link to the details page for the corresponding class. And you can refer to methods or variables using the “#” notation. Both techniques are shown here:
/**
 * A generic DAO interface.
 * All DAO interfaces derive from this one, and all DAO implementation classes
 * implement this interface.
 * A typical example is AircraftModelDAO and AircraftModelDAOImpl.
 * In particular, refer to the AircraftModelDAOImpl#findAll implementation for a
 * good example of how to implement this method.
 */
In the generated site, the class names and method name will be rendered as HTML links to the corresponding page. Similarly, any email addresses or URLs included in your documentation will be correctly rendered as HTML links.
You should note that Doxygen does not recognize the Javadoc-style @link or @see notations.
Documenting packages
Documenting packages is a much-neglected art. A little high-level documentation about your key packages can go a long way in making your application architecture easier to understand and more consistent. Take the time to sit down and write a few architectural notes for your key packages—what does this package do? How does it fit in to the overall application? How should the classes in this package be used? What patterns should be used when writing a new class in this package?
In Javadoc, you can use the “package.html” to do this. Unfortunately, at the time of writing, Doxygen didn’t know much about this file, so if you want package-level documentation in your Doxygen reports, you need to do something a little more proprietary. In Doxygen, you can use the “package” or “@package” notation, placed within a Java class, to document a package. The simplest approach is to place this block in one of the principal classes of a package, as shown here:
package com.javapowertools.planestore.core.dao;
/**
 * @package com.javapowertools.planestore.core.dao
 * Each DAO class provide basic database-related functions for a particular domain
 * object. Each DAO is written as an interface and an implementing class.
 * Implementation classes are derived from the GenericDAOImpl class, and
 * interfaces from the GenericDAO interface. The interface is used by other
 * classes in the application - the implementation class is referenced in the
 * Spring configuration file...
 *
 */

...

/**
 * A generic DAO interface.
 * All DAO interfaces should derive from this one...
 *
 * @param AnyType the domain object this DAO handles.
 * @param KeyType the type of the primary key of this domain object.
 */
public interface GenericDAO<AnyType, KeyType> {
  ...
}
Documenting the home page
You can customize the (by default empty) home page using the “homepage” (or “@homepage“) tag. You can also use the @section, @subsection, and @subsubsection tags to structure your text:
package com.javapowertools.planestore.core.domain;
/**
 * @mainpage The Planestore Core API package
 *
 * @section intro_sec Introduction
 *
 * This web site contains the technical documentation for the Planestore-Core API.
 * This page contains a high-level introduction to the application architecture.
 * etc...
 */
...
This block can be placed anywhere, but preferably you should place it in one of the main classes of your application, although, admittedly, this can be hard to find with a web application.
Embedding UML Diagrams in Your Javadoc with UmlGraph
Source-generated UML diagrams are an excellent way to communicate details of your application architecture and domain model. UML can provides a clear and (usually) readable representation of the state of your code. It can also highlight architectural flaws such as redundant dependencies or overly complex classes.
You can use generated diagrams both to learn about an API and also to verify that an application has been correctly implemented. For example, it is much easier to review and explain a domain model implementation using interactive UML diagrams than by just reading the source code. Typically, a modeling tool might be used to design a clean domain model. Round-trip UML tools are not particularly widespread, however, and in most organisation, most application coding ends up being done directly in the IDE. Generating UML diagrams directly from source code can let you make sure that the implemented classes correspond to the target model.
Diomidis D. Spinellis[*] has written, and maintains, another interesting tool in this domain, called UmlGraph.[33] This quite brilliant tool lets you insert detailed UML class diagrams seamlessly into your Javadoc. It does not go as far as Doxygen in the documentation that it generates—indeed, this tool is exclusively devoted to generating UML diagrams from your code. However, it does this very well.
Like Doxygen, UmlGraph relies on the Graphvis tool, so this needs to be installed on your system before you can use UmlGraph.
The most convenient way to use UmlGraph is via the UmlGraph doclet. This enables you to integrate UML class diagrams seamlessly in to your Javadoc (see Figure 30-7).
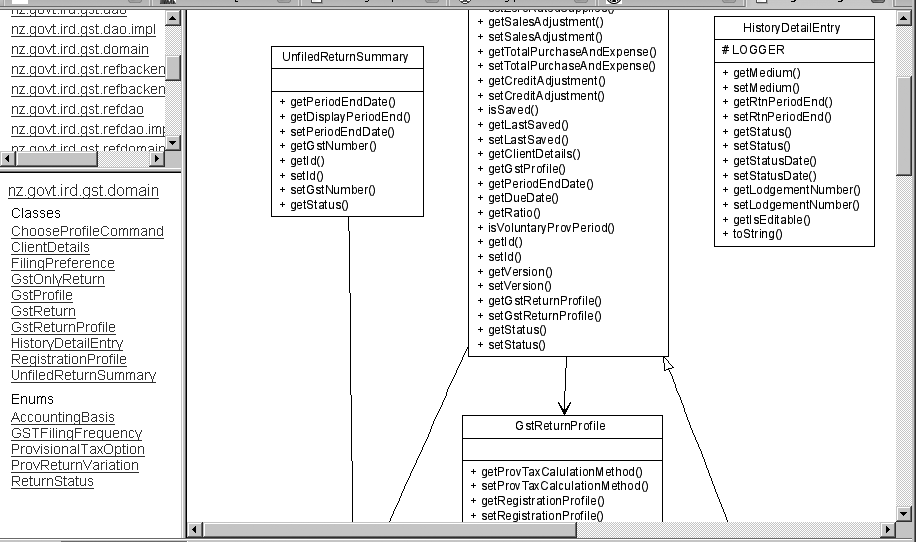
These graphs are interactive, so you can click on a class to go to the Javadoc page (and corresponding UML class diagram) of that class. This provides a clear, intuitive way of navigating though the application architecture.
UmlGraph is a command-line tool, but, in a real-world project, this is not necessarily the most convenient way to generate your graphs. It is far easier to integrate UmlGraph into your build process. To this end, UmlGraph also comes in the much more useful form of a Javadoc doclet, making it easy to integrate into your javadoc generation. This approach works perfectly with Ant and Maven.
UmlGraph is a flexible tool, with a large number of configuration options that you can use to fine-tune the layout of your diagrams. Some of the more interesting options are discussed here:
- inferrel
This option tells UmlGraph to derive relationships between classes from the fields of each class. For example, if a
Clientclass has a member variable of typeAccount, UmlGraph will draw a relationship between these two classes in the class diagram. This option is deactivated by default.- inferdep
Similar to inferrel, the inferdep option tells UmlGraph to draw any dependencies it can find within the class, based on method and parameter types. This is useful to give a real idea of what classes a particular class uses.
- hide
The hide option can be used to mask out certain classes from your diagrams. For example, you may not want the JDK classes to appear in your class diagrams.
- collpackages
This tells UmlGraph what classes it should consider to be collections. This is mainly used to depict cardinality in relationships.
- attributes
Show class attributes.
- operations
Show class operations.
- enumerations
Show enumerations as separate objects.
- enumconstants
List the constant values for enum types.
- link
You can use this parameter to provide the address of external Javadoc for classes that your application uses. This way, a user will be able to navigate directly to the external Javadoc. This is useful for the Java API itself, and key libraries such as Spring and Hibernate.
Using UmlGraph in Ant
UmlGraph integrates smoothly into Ant, using the UmlGraphDoc doclet wrapper. Simply embed a <doclet> tag in your <javadoc> task, as shown below. You can use the <param> tag to specify command-line options. The following configuration will produce a set of fairly complete and detailed UML diagrams embedded into your Javadoc:
<target name="javadoc" depends="compile,init" description="Generate JavaDocs.">

     <javadoc sourcepath="${src.dir}" destdir="${reports.javadoc}" access="private"
      classpathref="compile.classpath">
            <doclet name="org.umlgraph.doclet.UmlGraphDoc" path="lib/UmlGraph.jar">
                    <param name="-inferrel"/>
                    <param name="-inferdep"/>
                    <param name="-quiet"/>
                    <param name="-hide" value="java.*"/>
                    <param name="-collpackages" value="java.util.*"/>
                    <param name="-qualify"/>
                    <param name="-postfixpackage"/>
                    <param name="-nodefontsize" value="9"/>
                    <param name="-nodefontpackagesize" value="7"/>
                    <param name="-attributes"/>
                    <param name="-operations"/>
                    <param name="-enumerations"/>
                    <param name="-enumconstants"/>
                    <param name="-visibility"/>
                    <param name="-link" value="http://java.sun.com/j2se/1.5/docs
                     /api/"/>
                    <param name="-link" value="//static.springframework.org/spring/
                     docs/2.0.x/api/"/>
                    <param name="-link" value="http://www.hibernate.org/hib_docs/
                     v3/api"/>
            </doclet>
    </javadoc>
</target>
Using UmlGraph in Maven
To integrate UmlGraph into Maven, you will need to configure the
maven-javadoc-plugin in the
<reporting> section of
your POM file. You use the <additionalparam> tag to list the numerous UmlGraph
options that you need to fine-tune your diagrams:
<project...>
    ...
    <reporting>
        <plugins>
            <!-- UML-enabled javadoc -->
            <plugin>
                <artifactId>maven-javadoc-plugin</artifactId>
                <configuration>
                    <source>1.5</source>
                    <doclet>
                        gr.spinellis.umlgraph.doclet.UmlGraphDoc
                    </doclet>
                    <docletArtifact>
                        <groupId>gr.spinellis</groupId>
                        <artifactId>UmlGraph</artifactId>
                        <version>4.4</version>
                    </docletArtifact>
                    <additionalparam>
                        -inferrel -inferdep -quiet -hide java.*
                        -collpackages java.util.* -qualify
                        -postfixpackage -nodefontsize 9
                        -nodefontpackagesize 7 -attributes -operations
                        -enumerations -enumconstants -visibility
                        -link "http://java.sun.com/j2se/1.5/docs/api/"
                        -link "http://static.springframework.org/spring/docs/2.0.x/api/"
                        -link "http://www.hibernate.org/hib_docs/v3/api/"
                    </additionalparam>
                </configuration>
            </plugin>
        </plugins>
    </reporting>
    ...
</project>
Conclusion
Good technical documentation is a valuable asset for any project. Now, really good technical documentation can only be produced by a combination of human-written text and automatically generated documentation. Some high-profile open source projects such as Hibernate[*] and the Spring framework[†]can be said to have high-quality documentation, combining well-crafted human-written documentation alongside automatically generated API documentation. It would be a mistake to think that the latter can replace the former.
However, for typical enterprise projects, budgetary constraints may not allow for such high-quality documentation, nor is it absolutely essential for all types of projects to have this level of technical documentation. Tools such as SchemaSpy, Doxygen, and UmlGraph—although not producing truly great documentation—can certainly go a long way to producing adequate documentation. Combined with good-quality and strategically placed comments, they can still provide valuable insight into the architecture and inner workings of an application, at a relatively small cost.