Chapter 17. Customizing Project
In this chapter, you will learn how to: | |
✓ | Copy a customized element, such as a table, from one project plan to another by using the Organizer. |
✓ | Record and play back a macro. |
✓ | Edit a macro in the Visual Basic Editor. |
✓ | Create a custom toolbar. |
Tip
Do you need only a quick refresher on the topics in this chapter? See the Quick Reference entries in Customizing Project.
This chapter describes some of the ways that you can customize Microsoft Office Project 2007 to fit your own preferences. Project has some customization features, such as the Organizer and global template, that are unique to Project. In addition, Project has customization features, such as recording Visual Basic for Applications (VBA) macros, that are similar to what you might be familiar with from other Microsoft Office applications.
Important
Some of the actions you perform in this chapter can affect your overall settings in Project regardless of the specific project plan you are using. To keep your Project environment unaffected or at the “factory settings” throughout this chapter, we include steps to undo some actions.
Important
Before you can use the practice files provided for this chapter, you need to install them from the book’s companion CD to their default locations. See "Using the Book’s CD" for more information.
Sharing Custom Views and Other Elements Between Project Plans
The Organizer is the feature you use to share customized elements, such as views, among project plans. The complete list of elements that you can copy between project plans with the Organizer is indicated by the names of the tabs in the Organizer dialog box, which you will see shortly.
One Project feature that you can work with through the Organizer is the global template, named Global.mpt. The global template is installed as part of Project and provides the default views, tables, and other elements in Project. The list of elements provided by the global template includes the following:
Calendars
Filters
Forms
Groups
Maps (import/export)
Reports
Tables
Menus and toolbars
Modules (VBA macros)
Views
Tip
This tip describes enterprise project management (EPM) functionality. Project Standard always uses the global template. Project Professional, when used with Project Server, has a different configuration. When Project Professional is connected to Project Server, it uses the global template but is supplemented with details from the enterprise global template as well. For more information about Project Server, see Part 4.
Initially, the specific definitions of all views, tables, and similar elements are contained in the global template. For example, the fact that the default usage table contains one set of fields and not others is determined by the global template. The very first time you display a view, table, or similar element in a project plan, it is automatically copied from the global template to that project plan. Thereafter, the element resides in the project plan. Any subsequent customization of that element in the project plan (for example, changing the fields displayed in a table) applies to only that one project plan and does not affect the global template. The exception to this is macros, toolbars, and import/export maps. By default, Project stores these elements in the global template rather than in the active project plan.
You could use Project extensively and never need to touch the global template. However, when you do work with the global template, you do so through the Organizer. Some results that you can accomplish relating to the global template include:
Create a customized element, such as a custom view, and make it available in all project plans you work with by copying the custom view into the global template.
Replace a customized element, such as a view or table, in a project plan by copying the original, unmodified element from the global template to the project plan in which you’ve customized the same element.
Copy one customized element, such as a custom view, from one project plan to another.
The settings in the global template apply to all project plans you work with in Project. Because we don’t want to alter the global template you use, in this exercise we’ll focus on copying customized elements between two project plans. Keep in mind, though, that the general process of using the Organizer shown here is the same whether you are working with the global template and a project plan or two project plans. In fact, any custom element that you copy into the global template becomes available in all of the project plans you use.
Important
In the Organizer, when you attempt to copy a view, table, or other element from a project plan to the global template, Project alerts you as to whether you will overwrite that same element in the global template. If you choose to overwrite it, that customized element (such as a customized view) will be available in all new project plans and any other project plans that do not already contain that element. If you choose to rename the customized element, it becomes available in all project plans but does not affect the existing elements already stored in the global template. It’s generally a good idea to give your customized elements unique names, such as Custom Gantt Chart, so that you can keep the original element intact.
In this exercise, you will copy a custom table from one project plan to another.
Important
If you are running Project Professional, you may need to make a one-time adjustment to use the My Computer account and to work offline. This ensures that the practice files you work with in this chapter do not affect your Project Server data. For more information, see "Starting Project Professional" in Important.
Note
OPEN Parnell Aerospace Promo 17a and Wingtip Toys Commercial 17b from the DocumentsMicrosoft PressProject 2007 SBSChapter 17 Customizing folder. You can also access the practice files for this book by clicking Start, All Programs, Microsoft Press, Project 2007 Step by Step and then selecting the chapter folder of the file you want to open.
On the File menu, click Save As.
The Save As dialog box appears.
In the File name box, type Wingtip Toys Commercial 17, and then click Save.
Repeat steps 1 and 2 to save Parnell Aerospace Promo 17a as Parnell Aerospace Promo 17.
On the Window menu, click Wingtip Toys Commercial 17.
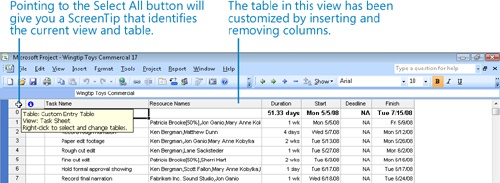
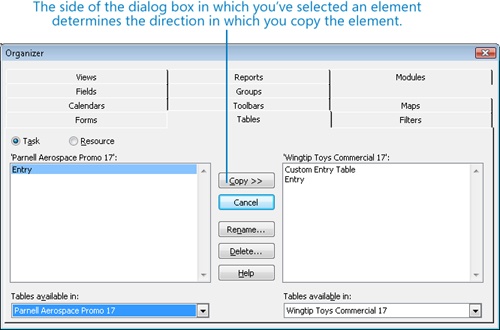
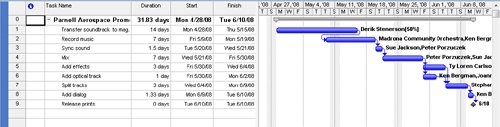
The Wingtip Toys Commercial 17 project plan contains a custom table named Custom Entry Table, which is currently displayed in the Task Sheet view. The Custom Entry Table was previously added to this project plan for you.
You’d like to copy this custom table to the Parnell Aerospace Promo 17 project plan.
On the Tools menu, click Organizer.
The Organizer dialog box appears.
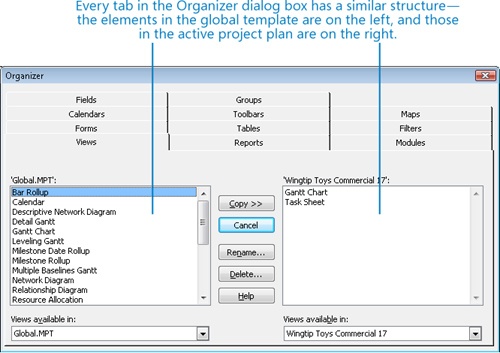
Click several of the tabs in the dialog box to get an overview of the available options, and then click the Tables tab.
As you can see, every tab of the Organizer dialog box has a similar structure: elements from the global template appear on the left side of the dialog box, and the same types of elements from the active project plan appear on the right.
You might notice that the list of tables in the Wingtip plan is not the complete list of tables that you can display. The list you see for the Wingtip plan in the Organizer includes only the tables that have actually been displayed already in the Wingtip plan. If you were to display another table, such as the Schedule table, Project would copy that table definition from the global template into the Wingtip plan.
Selecting an element on the left side of the dialog box and then clicking the Copy button will copy that element to the project plan listed on the right. Conversely, selecting an element on the right side of the dialog box and then clicking the Copy button will copy that element to the file listed on the left.
On the Tables available in drop-down list on the left side of the Organizer dialog box, select Parnell Aerospace Promo 17.
This project plan appears in the list because it is open in Project.
As you can see, the Parnell plan (on the left) does not have the Custom Entry Table and the Wingtip plan (on the right) does.
In the list of tables on the right side of the dialog box, click Custom Entry Table.
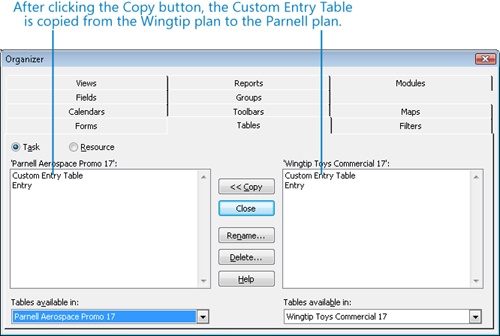
Click Copy.
Project copies the Custom Entry Table from the Wingtip plan to the Parnell plan.
Click Close to close the Organizer dialog box.
To conclude this exercise, you will display the newly copied custom table.
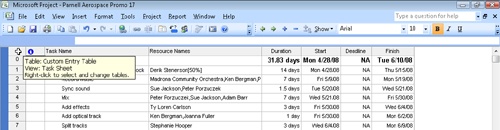
On the Window menu, click Parnell Aerospace Promo 17.
Project switches to the Parnell plan, which is the plan to which you just copied the custom table.
On the View menu, click More Views.
The More Views dialog box appears.
On the Views list, click Task Sheet, and then click Apply.
On the View menu, point to Table: Entry, and then click Custom Entry Table.
Project displays the custom table in the Parnell plan.
Important
In this exercise, you copied a table between project plans. When copying an entire view, however, keep in mind that most views are comprised of tables, filters, and groups. When copying custom views between plans, you might also need to copy a custom table, filter, or group that is part of the custom view. For a refresher about the elements of a view, see Chapter 1.
Recording Macros
Many activities you perform in Project can be repetitive. To save time, you can record a macro that captures keystrokes and mouse actions for later playback. The macro is recorded in Microsoft Visual Basic for Applications (VBA), the built-in macro programming language of the Microsoft Office System. You can do sophisticated things with VBA, but you can record and play back simple macros without ever directly seeing or working with VBA code.
The macros you create are stored in the global template by default, so they are available to you whenever Project is running. (In fact, macros, toolbars, and import/export maps are unique in that, when you create or customize them, Project will store them in the global template rather than the active project plan by default.) The project plan for which you originally created the macro need not be open to run the macro in other project plans. If you want, you can use the Organizer to copy the macro from the global template to another project plan to give it to a friend, for example.
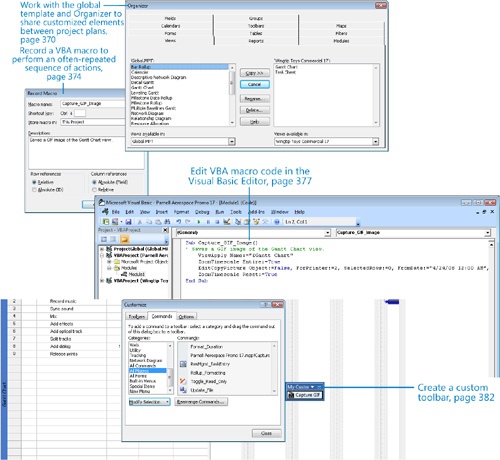
Creating a graphic image snapshot of a view is a great way to share project details with others. However, it’s likely the details you initially capture will become obsolete quickly as the project plan is updated. Capturing updated snapshots is a repetitive task that is ideal for automation through a macro. In this exercise, you record and run a macro in the Parnell Aerospace Promo 17 project plan that creates a GIF image snapshot and saves it locally. From there, you could attach the GIF image to an e-mail message, publish it to a Web site, insert it into a document, or share it in other ways.
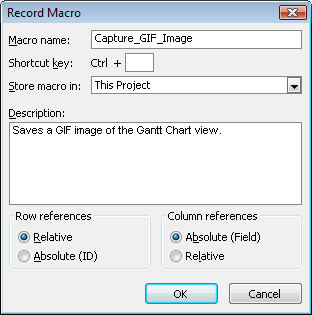
On the Tools menu, point to Macro, and then click Record New Macro.
The Record Macro dialog box appears.
In the Macro name box, type Capture_GIF_Image
Tip
Macro names must begin with a letter and cannot contain spaces. To improve the readability of your macro names, you can use an underscore (_) in place of a space. For example, rather than naming a macro CaptureGIFImage, you can name it Capture_GIF_Image.
For this macro, we will not use a shortcut key. When recording other macros, note that you cannot use a
 combination already reserved by Project, so
combinations like
combination already reserved by Project, so
combinations like  (the keyboard shortcut for Find) and
 (Go To) are unavailable. When you click OK
to close the dialog box, Project alerts you whether you need to
choose a different key combination.
(Go To) are unavailable. When you click OK
to close the dialog box, Project alerts you whether you need to
choose a different key combination.In the Store macro in box, click This Project to store the macro in the active project plan.
When a macro is stored in a project plan, the macro can be used by any project plan when the project plan that contains the macro is open. The default option, Global File, refers to the global template. When a macro is stored in the global template, the macro can be used by any project at any time because the global template is open whenever Project is running. In this exercise, since we don’t want to customize your global template, you’ll store the macro in the active project plan.
In the Description box, select the current text, and replace it by typing Saves a GIF image of the Gantt Chart view.
The description is useful to help identify the actions the macro will perform.
Click OK.
Project begins recording the new macro. Project does not literally record and play back every mouse movement and passing second, but records only the results of the keystrokes and mouse actions you make. Do not feel rushed to complete the recording of the macro.
On the View menu, click Gantt Chart.
Even though the project plan is already showing the Gantt Chart view, including this step in the macro thereby records the action so that, if the project plan were initially in a different view, the macro would switch to the Gantt Chart view.
On the View menu, click Zoom.
In the Zoom dialog box, select Entire Project, and then click OK.
Project adjusts the timescale to display the entire project.
On the Report menu, click Copy Picture.
The Copy Picture dialog box appears.
Under Render image, click To GIF image file, and then click Browse.
In the Browse dialog box, navigate to the Chapter 17 Customizing folder, and then click OK.
Click OK to close the Copy Picture dialog box.
Project saves the GIF image.
On the View menu, click Zoom, click Reset, and then click OK.
Now you are ready to stop recording.
On the Tools menu, point to Macro, and then click Stop Recorder.
Next, you will run the macro to see it play back.
On the Tools menu, point to Macro, and then click Macros.
The Macros dialog box appears.
In the Macro name box, click Parnell Aerospace Promo 17.mpp!Capture_GIF_Image, and then click the Run button.
The macro begins running, but pauses as soon as Project generates a confirmation message to replace the existing GIF image file (the one you just created while recording the macro).
Click Overwrite to overwrite the previously created GIF image file.
The macro resaves the GIF image. Next, you’ll see the results of the macro’s actions.
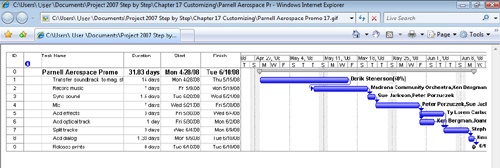
In Windows Explorer, navigate to the Chapter 17 Customizing folder, and double-click the Parnell Aerospace Promo 17 GIF image file to open it in your image editor or viewer application.
The GIF image appears in your image application. In the following figure, we are displaying the GIF image in Internet Explorer.
Close your image viewing application, and then switch back to the Parnell Aerospace Promo 17 project plan in Project.
This macro would be very useful if the Parnell project manager needed to recapture the project plan snapshot frequently. For example, the project manager could recapture it at regular intervals during the planning stage—when the details are being developed—and then again during the execution stage—when the effects of actual progress change the remaining scheduled work.
Editing Macros
As handy as the Capture_GIF_Image macro is to use, it can be improved. Remember that when you ran it in the previous exercise, you had to confirm that Project should overwrite the existing GIF image. Because the intent of the macro is to capture the most current information, you would always want to overwrite the older information. You can change the macro code directly to accomplish this. The macro code resides in a VBA module, and you work with the code in the Visual Basic Environment.
Tip
The VBA language and Visual Basic Environment are standard in many of the programs in the Microsoft Office System (including Project). Although the specific details of each program differ, the general way in which you use VBA in each is the same. VBA automation is a powerful tool you can master, and that knowledge can be used in many Microsoft programs.
In this exercise, you work in the Visual Basic Editor to fine-tune and enhance the macro you recorded in the previous exercise and then run it.
On the Tools menu, point to Macro, and then click Macros.
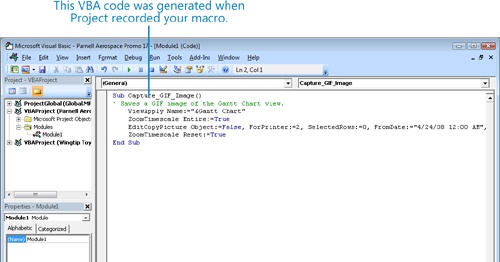
Under Macro name, click Parnell Aerospace Promo 17.mpp! Capture_GIF_Image, and then click the Edit button.
Project loads the module that contains the macro in the Visual Basic Editor.
A full explanation of the VBA language is beyond the scope of this book, but we can walk you through some steps to change the behavior of the previously recorded macro. You might also recognize some of the actions that you recorded earlier by the names used in the VBA code.
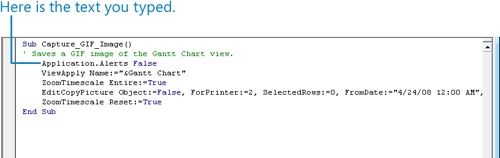
Click at the beginning of the line, ViewApply Name:="&Gantt Chart”, and press
 .
.Click in the new line you just created, press
 , and type Application.Alerts
False
, and type Application.Alerts
FalseThis line of code will suppress the prompt you received when running the macro and accept the default option of replacing the existing GIF image file with the same name.
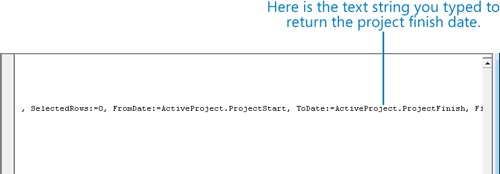
In the line that begins with EditCopyPicture, select the date and time “4/24/08 12:00 AM” (including the quotation marks) that follows FromDate:=, and type ActiveProject.ProjectStart
Note that the specific date you see might not be 4/24/08.
This VBA code describes the project start date of the active project.
This causes the macro to get the current start date of the active project for the GIF image that the macro creates.
In the same line, select the date and time “6/15/08 12:00 AM” (including the quotation marks) that follows ToDate:=, and type ActiveProject.ProjectFinish
Again, note that the specific date you see might not be 6/15/08.
This causes the macro to get the current finish date of the active project for the GIF image that the macro creates. Now, if the project plan’s start or finish date changes, the date range for the GIF image will change as well.
Next, you’ll add new macro capabilities while in the VBA Editor.
Click at the beginning of the line EditCopyPicture, and press
.Click in the new line you just created, press
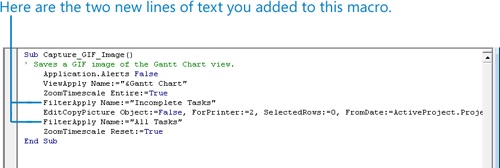
, and type FilterApply
Name:="Incomplete Tasks”This line of code will apply the Incomplete Tasks filter to the current view.
Click at the beginning of the line ZoomTimescale Reset:=True, and press
.Click in the new line you just created, press
, and type FilterApply
Name:="All Tasks”This line of code will remove the Incomplete Tasks filter to the current view.
On the File menu in the Visual Basic Editor, click Close and Return to Microsoft Project.
The Visual Basic Editor closes, and you return to the Parnell plan.
You could run the updated macro now, but first you’ll make some changes to the project plan.
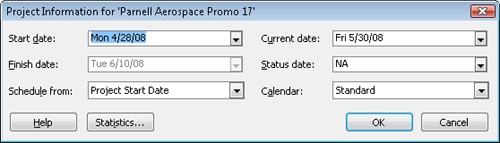
On the Project menu, click Project Information.
The Project Information dialog box appears.
Note the current start and finish dates: 4/28/08 and 6/10/08.
In the Start date box, type or select 5/5/08, and then click OK to close the Project Information dialog box.
Project reschedules the start (and all subsequent dates) of the project plan. Before you rerun the macro, however, you’ll make one more change to the plan. You’ll record some progress on tasks.
Click the name of task 1, Transfer soundtrack to mag. stock.
On the Tools menu, point to Tracking, and then click Update Tasks.
The Update Tasks dialog box appears.
In the Actual dur field, type 20d, and then click OK.
Next, you’ll record partial progress on task 2.
Click the name of task 2, Record music.
On the Tools menu, point to Tracking, and then click Update Tasks.
The Update Tasks dialog box appears.
In the Actual dur field, type 5d, and then click OK.
Now you are ready to rerun the macro.
On the Tools menu, point to Macro, and then select Macros.
The Macros dialog box appears.
In the Macro name box, click Parnell Aerospace Promo 17.mpp! Capture_GIF_Image, and then click Run.
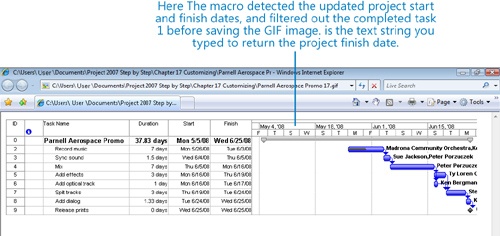
The macro runs, and this time you are not prompted to overwrite the previously saved files. To verify that the macro ran correctly, you’ll view the updated GIF image in your image application.
In Windows Explorer, navigate to the Chapter 17 Customizing folder, and double-click the Parnell Aerospace Promo 17 GIF image file to open it in your image application.
The GIF image appears in your image application.
The updated screenshot includes the updated project start and finish dates, and displays only incomplete tasks (note that task 1, which is now completed, does not appear). Now you can run the macro as frequently as needed to capture the most up-to-date information.
Close your image viewing application, and then switch back to the Parnell Aerospace Promo 17 project plan in Project.


Here are some additional tips for working with VBA macros in Project.
VBA is a rich and well-documented programming language. If you would like to take a closer look at VBA in Project, on the Tools menu, click Macro, and then click Visual Basic Editor. In the Microsoft Visual Basic window, on the Help menu, click Microsoft Visual Basic Help.
While working in a module, you can get help on specific items such as objects, properties, and methods. Click a word, and then press the F1 key.
To close the Microsoft Visual Basic window and return to Project, on the File menu, click Close and Return to Microsoft Project.
Customizing a Toolbar
As with other Office applications, you have several choices concerning how to work with Project. Some of the many customization settings include the following:
Setting up Project to save the active file or all open files automatically at the time interval you specify. (On the Tools menu, click Options, and on the Save tab of the Options dialog box, select Save Every and enter the time interval you want.)
Creating customized toolbars that include buttons for any commands you want. (You will do this in the following exercise.)
In this exercise, you create a custom toolbar and assign the macro you recorded earlier to a button on the custom toolbar.
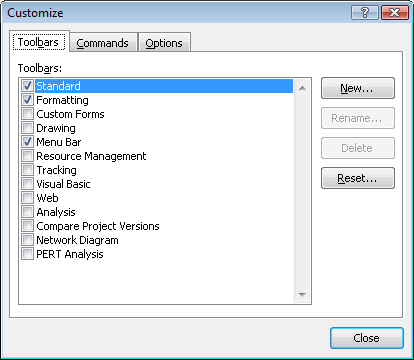
On the Tools menu, point to Customize, and then click Toolbars.
The Customize dialog box appears.
Click the Toolbars tab.
A check mark indicates the toolbars that are currently displayed; what you see on your screen might differ.
Tip
Toolbars are either docked or floating. When docked, a toolbar appears at one edge of the Project window. This is typically the top edge, but you can dock a toolbar at any edge of the window. When a toolbar is floating, it contains a title bar displaying the toolbar’s name. To move a docked toolbar, point to the far left edge and drag the toolbar either into the Project window to make it float or to another edge of the window to redock it.
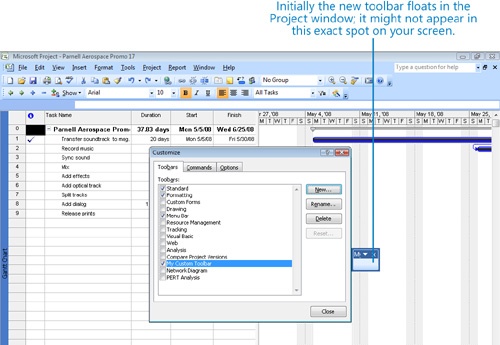
The New Toolbar dialog box appears.
In the Toolbar Name box, type My Custom Toolbar, and then click OK.
The new toolbar appears in the list of toolbars and is displayed by default. (Initially, it’s a floating, empty toolbar.)
Next, you’ll add a command to the toolbar that runs the previously recorded macro.
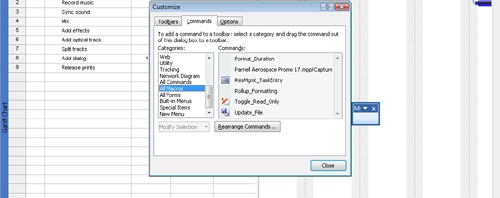
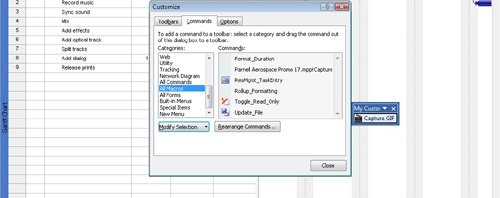
Click the Commands tab.
On the Categories list, you can see several categories of commands. Many of these, such as File and Edit, correspond to menu names.
On the Categories list, click All Macros.
The commands in the All Macros category appear in the Commands list on the right.
Most of the commands listed for the All Macros category relate to macros included with Project; what you see on your screen might differ. However, you should see the Parnell Aerospace Promo 17.mpp!Capture_GIF_Image macro listed because it is stored in the active project plan.
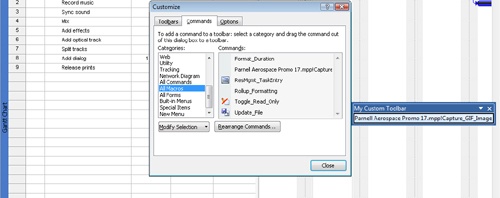
Drag the Parnell Aerospace Promo 17.mpp!Capture_GIF_Image macro from the Customize dialog box onto the My Custom Toolbar.
The My Custom Toolbar widens to show the full title of the macro. If necessary, drag the toolbar so you can see all of the title.
Next, you’ll change the text that appears on the button and add a graphic image.
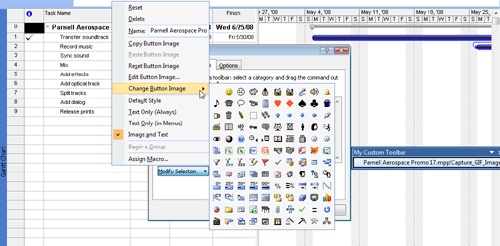
In the Customize dialog box, click Modify Selection, and then click Image and Text.
This setting makes room on the button for an image as well as a text label.
Click Modify Selection, and then point to Change Button Image.
A submenu of button images appears.
Click the first item on the last row, which is the clapperboard figure.
Project adds the button image to the button. Next, you will change the text label of the button.
Click Modify Selection, and then position your mouse pointer in the Name box and select the full name of the macro.
With the name of the macro selected, type Capture GIF, and then press
.Project changes the text label on the button.
Click Close to close the Customize dialog box.
The custom toolbar remains floating in your Project window. Next, you’ll try it out.
On My Custom Toolbar, click the Capture GIF button.
The Capture_GIF_Image macro runs. If you want, view the updated results in your image application, and then switch back to Project.
Custom toolbars and any other customizations made to built-in toolbars apply to all project plans you view in Project. This is because toolbar settings must reside in the global template. To conclude this exercise, you’ll delete My Custom Toolbar from your global template so it doesn’t affect your overall Project environment.
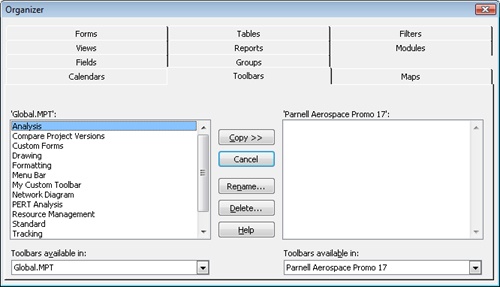
On the Tools menu, click Organizer.
The Organizer dialog box appears.
Click the Toolbars tab.
In the Global.MPT box, click My Custom Toolbar, and then click Delete.
Project prompts you to confirm that you want to delete the toolbar; click Yes.
Click Close to close the Organizer dialog box.
Key Points
In Project, you share elements that you customize, such as tables or filters, between project plans and the global template via the Organizer.
Project, like many other programs in the Microsoft Office System, uses the Visual Basic for Applications (VBA) macro programming language. Among other things, macros enable you to automate repetitive tasks.
If you want to work directly with VBA code, you do so in the Visual Basic Editor, which is included in Project as well as other Office applications.
You can substantially customize the toolbars in Project to include the commands and features that interest you the most.