Chapter 7. Fine-Tuning Task Details
In this chapter, you will learn how to: | |
✓ | Adjust task links to have more control over how tasks are related. |
✓ | Apply a constraint to a task. |
✓ | Identify the tasks on the critical path. |
✓ | Split a task to record an interruption in work. |
✓ | Create a task calendar and apply it to tasks. |
✓ | Change a task type to control how Project schedules tasks. |
✓ | Record deadlines for tasks. |
✓ | Enter a fixed cost and specify how it should accrue. |
✓ | Set up a recurring task in the project schedule. |
Tip
Do you need only a quick refresher on the topics in this chapter? See the Quick Reference entries in Fine-Tuning Task Details.
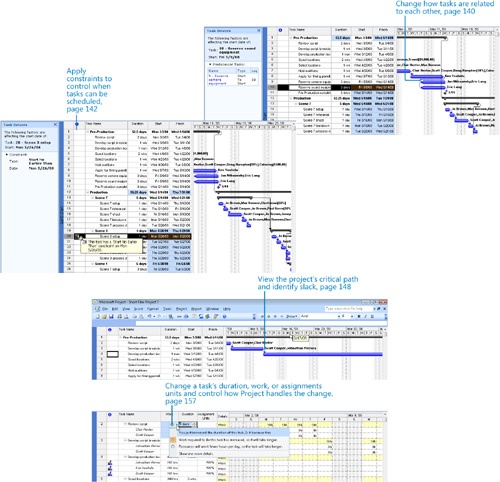
In this chapter, you examine and use a variety of advanced features in Microsoft Office Project 2007. These features focus on fine-tuning task details prior to saving a baseline as well as commencing work on the project with the goal of developing the most accurate schedule representation of the tasks you anticipate for the plan.
Important
Before you can use the practice files provided for this chapter, you need to install them from the book’s companion CD to their default locations. See "Using the Book’s CD" for more information.
Adjusting Task Relationships
You might recall from Chapter 2, that there are four types of task dependencies, or relationships:
Finish-to-start (FS): The finish date of the predecessor task determines the start date of the successor task.
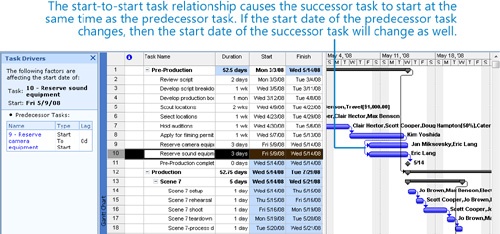
Start-to-start (SS): The start date of the predecessor task determines the start date of the successor task.
Finish-to-finish (FF): The finish date of the predecessor task determines the finish date of the successor task.
Start-to-finish (SF): The start date of the predecessor task determines the finish date of the successor task.
When you enter tasks in Project and link them by clicking the Link Tasks button on the Standard toolbar, the tasks are given a finish-to-start (FS) relationship. This should be fine for most tasks, but you will most likely change some task relationships as you fine-tune a project plan. The following are some examples of tasks that require relationships other than finish-to-start:
You can start setting up the lighting for a film scene as soon as you start setting up the props (start-to-start relationship). This reduces the overall time required to complete the two tasks, as they are completed in parallel.
Planning the filming sequence can begin before the script is complete, but it cannot be finished until the script is complete. You want the two tasks to finish at approximately the same time (finish-to-finish relationship).
Task relationships should reflect the sequence in which work should be performed. After you have established the correct task relationships, you can fine-tune your schedule by entering overlap (called lead time) or delay (called lag time) between the finish or start dates of predecessor and successor tasks.
Assuming that two tasks have a finish-to-start relationship:
Lead time causes the successor task to begin before its predecessor task concludes.
Lag time causes the successor task to begin some time after its predecessor task concludes.
The following is an illustration of how lead and lag time affect task relationships. Assume that you initially planned the following three tasks using finish-to-start relationships.
Before task 6 can begin, you need to allow an extra day for the paint applied in task 5 to dry. You do not want to add a day to the duration of task 5 because no real work will occur on that day. Instead, you enter a one-day lag between tasks 5 and 6.
However, task 7 can start as soon as task 6 is halfway completed. To make this happen, enter a 50% lead time between tasks 6 and 7.
You can enter lead and lag time as units of time, such as two days, or as a percentage of the duration of the predecessor task, such as 50%. Lag time is entered in positive units and lead time in negative units (for example, -2d or -50%). You can apply lead or lag time to any type of task relationship: finish-to-start, start-to-start, and so on.
Tip
Places in which you can enter lead or lag time include the Task Information dialog box (Project menu), the Predecessors column in the Entry table, and the Task Dependency dialog box (viewable by double-clicking a link line between Gantt bars).
In this exercise, you enter lead time and change task relationships between predecessor and successor tasks.
Important
If you are running Project Professional, you may need to make a one-time adjustment to use the Computer account and to work offline. This ensures that the practice files you work with in this chapter do not affect your Project Server data. For more information, see "Starting Project Professional“.
Note
OPEN Short Film Project 7a from the DocumentsMicrosoft PressProject 2007 SBSChapter 7 Advanced Tasks folder. You can also access the practice files for this book by clicking Start, All Programs, Microsoft Press, Project 2007 Step by Step, and then selecting the chapter folder of the file you want to open.
On the File menu, click Save As.
The Save As dialog box appears.
In the File name box, type Short Film Project 7, and then click Save.
On the Project menu, click Task Drivers.
The Task Drivers pane appears. This pane succinctly reveals all of the scheduling factors that affect the selected task, such as predecessor task relationships, resource calendars, and/or task calendars.
Select the name of task 9, Reserve camera equipment.
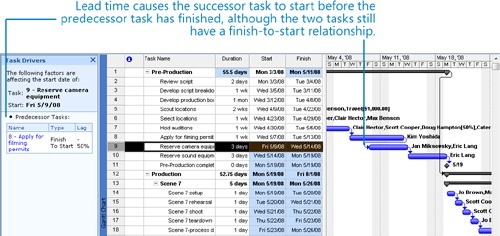
In the Task Drivers pane, you can view the scheduling factors affecting this task.
For task 9, you can see that its predecessor is task 8, Apply for filming permits. You can see in the pane that the two tasks have a finish-to-start relationship with zero lag time. Next, you’ll adjust the lag value on the task relationship. Because you cannot edit this value directly in the pane, you’ll display the Task Information dialog box.
Click the Predecessors tab.
In the Lag field for predecessor task 8, type –50%.
Entering lag time as a negative value produces lead time.
Click OK to close the Task Information dialog box.
To observe the effect of adjusting lag on the Gantt bars, on the Standard toolbar, click the Scroll To Task button.
Task 9 is now scheduled to start at 50% of the duration of task 8. Should the duration of task 8 change, Project will reschedule the start of task 9 so that it maintains a 50% lead time.
Next, you will change the task relationship between two tasks.
Double-click the name of task 10, Reserve sound equipment.
The Task Information dialog box appears. The Predecessors tab should be visible. Note also that the Task Drivers pane in the background updates to display the scheduling details for task 10, the currently selected task.
On the Predecessors tab, click in the Type column for predecessor task 9. Select Start-to-Start (SS), and click OK.
Project changes the task relationship between tasks 9 and 10 to start-to-start.
Important
Assigning tasks’ start-to-start relationships and entering lead times where appropriate are both excellent techniques to shorten overall project duration. However, Project cannot automatically make such schedule adjustments for you. As project manager, you must analyze the sequences and relationships of your tasks and make those adjustments where necessary.
Setting Task Constraints
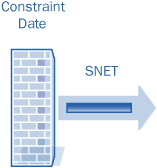
Every task you enter into Project has some type of constraint applied to it. A constraint controls the start or finish date of a task and the degree to which that task can be rescheduled. There are three categories of constraints:
Flexible constraints. Project can change the start and finish dates of a task. For example, the task Select locations to film can start as soon as possible. This type of flexible constraint is called As Soon As Possible, or ASAP for short, and is the default constraint type in Project. No constraint date is associated with flexible constraints.
Inflexible constraints. A task must begin or end on a certain date. For example, a task, such as Set up lighting, must end on June 14, 2008. Inflexible constraints are sometimes called hard constraints.
Semi-flexible constraints. A task has a start or finish date boundary. However, within that boundary, Project has the scheduling flexibility to change the start and finish dates of a task. For example, a task such as Install props must finish no later than June 13, 2008. However, the task could finish before this date. Semi-flexible constraints are sometimes called soft or moderate constraints.
In total, there are eight types of task constraints.
This constraint category | Includes these: constraint types | And means |
Flexible | As Soon As Possible (ASAP) | Project will schedule a task to occur as soon as it can occur. This is the default constraint type applied to all new tasks when scheduling from the project start date. There is no constraint date for an ASAP constraint. |
As Late As Possible (ALAP) | Project will schedule a task to occur as late as it can occur. This is the default constraint type applied to all new tasks when scheduling from the project finish date. There is no constraint date for an ALAP constraint. | |
Semi-flexible | Start No Earlier Than (SNET) | Project will schedule a task to start on or after the constraint date you specify. Use this constraint type to ensure that a task will not start before a specific date. |
Start No Later Than (SNLT) | Project will schedule a task to start on or before the constraint date you specify. Use this constraint type to ensure that a task will not start after a specific date. | |
Finish No Earlier Than (FNET) | Project will schedule a task to finish on or after the constraint date you specify. Use this constraint type to ensure that a task will not finish before a specific date. | |
Finish No Later Than (FNLT) | Project will schedule a task to finish on or before the constraint date you specify. Use this constraint type to ensure that a task will not finish after a specific date. | |
Inflexible | Must Start On (MSO) | Project will schedule a task to start on the constraint date you specify. Use this constraint type to ensure that a task will start on an exact date. |
Must Finish On (MFO) | Project will schedule a task to finish on the constraint date you specify. Use this constraint type to ensure that a task will finish on an exact date. |
Important
Beginning Project users are often tempted to enter start or finish dates for tasks. However, doing so applies semi-flexible constraints, such as Start No Earlier Than or Finish No Earlier Than. This essentially prevents users from taking full advantage of the Project scheduling engine. Although this is one of the most common scheduling problems that people create when using Project, it is usually avoidable.
These three constraint categories have very different effects on the scheduling of tasks:
Flexible constraints, such as As Soon As Possible, allow tasks to be scheduled without any limitations other than their predecessor and successor relationships. No fixed start or end dates are imposed by these constraint types. Use these constraint types whenever possible.
Semi-flexible constraints, such as Start No Earlier Than or Start No Later Than, limit the rescheduling of a task within the date boundary that you specify.
Inflexible constraints, such as Must Start On, completely prevent the rescheduling of a task. Use these constraint types only when absolutely necessary.
The type of constraint that you apply to the tasks in your projects depends on what you need from Project. You should use inflexible constraints only if the start or finish date of a task is fixed by factors beyond the control of the project team. Examples of such tasks include handoffs to clients and the end of a funding period. For tasks without such limitations, you should use flexible constraints. Flexible constraints provide the most discretion in adjusting start and finish dates, and they allow Project to adjust dates if your project plan changes. For example, if you have used ASAP constraints and the duration of a predecessor task changes from four days to two days, Project adjusts or “pulls in” the start and finish dates of all successor tasks. However, if a successor task had an inflexible constraint applied, Project could not adjust its start or finish dates.
In this exercise, you apply a Start No Earlier Than constraint to a task.
Select the name of task 20, Scene 3 setup.
This scene must be shot at a location that is not available to the film crew until May 26, 2008.
On the Standard toolbar, click Task Information.
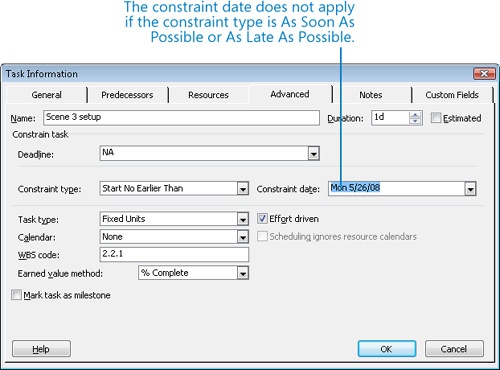
In the Task Information dialog box, click the Advanced tab.
In the Constraint Type box, select Start No Earlier Than.
In the Constraint Date box, type or select 5/26/08.
Click OK.
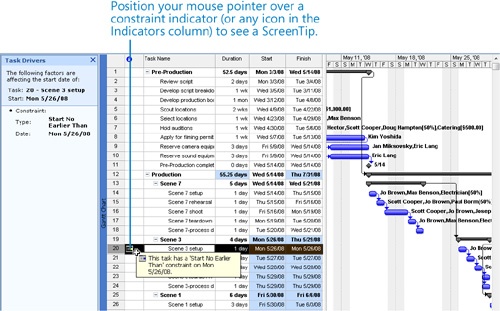
Project applies a Start No Earlier Than (SNET) constraint to the task, and a constraint icon appears in the Indicators column. You can point to the icon to see the constraint details in a ScreenTip. You can also see the constraint details in the Task Drivers pane.
Task 20 is rescheduled to start on May 26 instead of May 21. All tasks that depend on task 20 are also rescheduled. One way to view this rescheduling is by the light blue change highlighting that Project applies to the Start and Finish dates of the successor tasks of task 20. Because the duration of the Production phase was also changed by applying the constraint to task 20, the Duration and Finish fields for the Production summary task (task 12) are also highlighted. Change highlighting remains visible until you perform another editing action or save the file, and it is an effective visual way to see the broader consequences of your specific actions in your schedule.
Click the Close button (the “X” button in the upper right corner) on the Task Drivers pane.
Here are a few other things to keep in mind when applying constraints to tasks:
Entering a Finish date for a task (for example, in the Finish column) applies a Finish No Earlier Than (FNET) constraint to the task.
Entering a Start date for a task (for example, in the Start column) or dragging a Gantt bar directly on the Gantt chart applies a Start No Earlier Than (SNET) constraint to the task.
In many cases, entering a deadline date is a preferable alternative to entering a semi-flexible or inflexible constraint. You will work with deadline dates later in this chapter.
Unless you specify a time, Project schedules a constraint date’s start or finish time using the Default Start Time or Default End Time values on the Calendar tab (Tools menu, Options command). In this project, the default start time is 8 A.M. If you want a constrained task to be scheduled to start at a different time, enter that time along with the start date. For example, if you want to schedule a task to start at 10 A.M. on May 26, enter 5/26/08 10AM in the Start field.
To remove a constraint, first select the task or tasks and, on the Project menu, click Task Information. In the Task Information dialog box, click the Advanced tab. In the Constraint Type box, select As Soon As Possible or (if scheduling from the project finish date) As Late As Possible.
If you must apply semi-flexible or inflexible constraints to tasks in addition to task relationships, you might create what is called negative slack. For example, assume that you have a successor task that has a finish-to-start relationship with its predecessor task. If you entered a Must Start On constraint on the successor task earlier than the finish date of the predecessor task, this would result in negative slack and a scheduling conflict. By default, the constraint date applied to the successor task will override the relationship. However, if you prefer, you can set Project to honor relationships over constraints. On the Tools menu, click Options, and in the Options dialog box, click the Schedule tab. Clear the Tasks Will Always Honor Their Constraint Dates check box. This setting applies only to the current project file.
If you must schedule a project from a finish date rather than a start date, some constraint behaviors change. For example, the As Late As Possible (ALAP) rather than the As Soon As Possible (ASAP) constraint type becomes the default for new tasks. You should pay close attention to constraints when scheduling from a finish date to make sure they create the effect you intend.
Viewing the Project’s Critical Path
A critical path is the series of tasks that will push out the project’s end date if the tasks are delayed. The word critical has nothing to do with how important these tasks are to the overall project. It refers only to how their scheduling will affect the project’s finish date; however, the project finish date is of great importance in most projects. If you want to shorten the duration of a project to bring in the finish date, you must begin by shortening (also referred to as “crashing”) the critical path.
Over the life of a project, the project’s critical path is likely to change from time to time as tasks are completed ahead of or behind schedule. Schedule changes, such as assigning resources to tasks, can also alter the critical path. After a task on the critical path is completed, it is no longer critical because it cannot affect the project finish date. In Chapter 15, you will work with a variety of techniques to shorten a project’s overall duration.
A key to understanding the critical path is to understand slack, also known as float. There are two types of slack: free and total. Free slack is the amount of time a task can be delayed before it delays another task. Total slack is the amount of time a task can be delayed before it delays the completion of the project.
A task is on the critical path if its total slack is less than a certain amount—by default, if it is zero. In contrast, noncritical tasks have slack, meaning they can start or finish earlier or later within their slack time without affecting the completion date of a project.
In this exercise, you view the project’s critical path. One way to see the critical path is to switch to the Detail Gantt view.
On the View menu, click More Views.
In the More Views dialog box, select Detail Gantt, and then click the Apply button.
The project appears in the Detail Gantt view.
On the Edit menu, click Go To.
In the ID box, type 12, and then click OK.
Project displays task 12, the Production summary task.
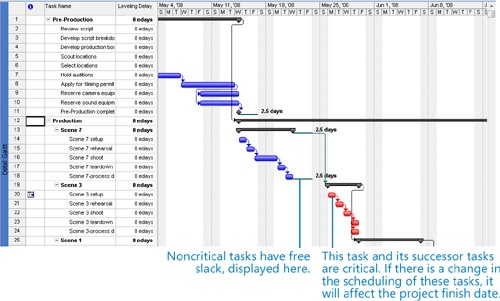
The Scene 3 tasks and later tasks are critical tasks. In the Detail Gantt view, Project distinguishes between critical and noncritical tasks. Critical task bars are red, but noncritical task bars are blue. In this view, you can also see tasks with free slack.
Notice the Gantt bar of task 18, Scene 7–process dailies. The blue bar represents the duration of the task. The thin teal line and the number next to it represent free slack for this task. As you can see, this particular task has some slack and is therefore a noncritical task. (Remember that the term critical in this sense has nothing to do with the task’s importance, but only with how much or little total slack is associated with the task—and, ultimately, what effect the task has on the project’s finish date.) The slack on task 18 was caused by the Start No Earlier Than constraint applied to task 20. Without that constraint being applied, all tasks in the project would have been critical.
On the View menu, click Gantt Chart.
Working with the critical path is the most important way to manage a project’s overall duration. In later exercises, you will make adjustments that might extend the project’s duration. Checking the project’s critical path and, when necessary, shortening the overall project duration are important project management skills.
Tip
“Critical path” is a frequently misused phrase on many projects. Just listen for references to critical path work on your current projects to determine how frequently the phrase is used correctly. Remember that critical has nothing to do with the relative importance of a task, but only with its effect on the project finish date.
Here are a few other things to keep in mind when working with the critical path:
By default, Project defines a task as critical if it has zero slack. However, you can change the amount of slack required for a task to be considered critical. You might do this, for example, if you wanted to more easily identify tasks that were within one or two days of affecting the project’s finish date. On the Tools menu, click Options, and in the Options dialog box, click the Calculation tab. In the Tasks Are Critical If Slack Is Less Than Or Equal To box, enter the number of days you want.
Project constantly recalculates the critical path even if you never display it.
You see free slack represented in the chart portion of the Detail Gantt view, and you can also see the values of free and total slack in the Schedule table. You can apply the Schedule table to any Gantt Chart or Task Sheet view.
Interrupting Work on a Task
When initially planning project tasks, you might know that work on a certain task will be interrupted. You can split the task to indicate times when the work will be interrupted and when it can resume. The following are some reasons why you might want to split a task:
You anticipate an interruption in a task. For example, a resource might be assigned to a week-long task, but needs to attend an event on Wednesday that is unrelated to the task.
A task is unexpectedly interrupted. After a task is under way, a resource might have to stop work on the task because another task has taken priority. After the second task is completed, the resource can resume work on the first task.
In this exercise, you split a task to account for a planned interruption of work on that task.
On the Edit menu, click Go To.
In the ID box, type 4, and then click OK.
Project displays task 4, Develop production boards.
You know that work on this task will be interrupted for two days starting March 17.
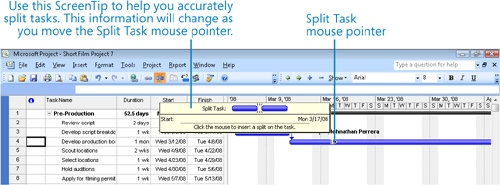
On the Standard toolbar, click the Split Task button.
A ScreenTip appears, and the mouse pointer changes.
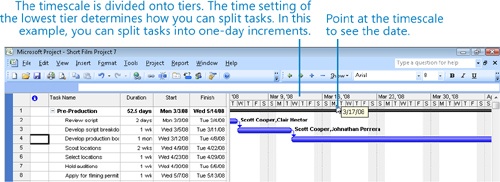
Move the mouse pointer over the Gantt bar of task 4.
This ScreenTip is essential for accurately splitting a task, because it contains the date at which you would start the second segment of the task if you dragged the mouse pointer from its current location on the Gantt bar. As you move the mouse pointer along the Gantt bar, you will see the start date in the ScreenTip change.
Move (but don’t click) the mouse pointer over the Gantt bar of task 4 until the start date of Monday, 3/17/08, appears in the ScreenTip.
Click and drag the mouse pointer to the right until the start date of Wednesday, 3/19/08, appears in the ScreenTip, and then release the mouse button.
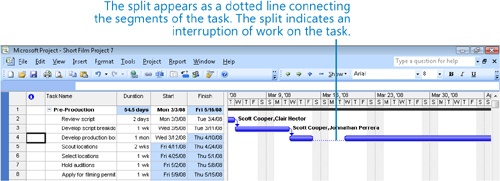
Project inserts a task split, represented in the Gantt chart as a dotted line, between the two segments of the task.
Tip
Splitting tasks with the mouse might take a little practice. In step 6, if you didn’t split task 4 so that the second segment starts on 3/19/08, just point to it again. When the mouse pointer changes to a four-headed arrow, drag the segment to the correct start date.
Here are a few other things to keep in mind when splitting tasks:
Adjusting the bottom tier of the timescale is important for splitting tasks: the calibration of the bottom tier determines the smallest time increment into which you can split a task. With the bottom tier set at the Days level, you must split a task by at least one day. If you want to split a task at the Hourly level, you must adjust the bottom tier further (through the Timescale command on the Format menu).
You can drag a segment of a split task either left or right to reschedule the split.
The time of the task split, represented by the dotted line, is not counted in the duration of the task. No work occurs during the split.
If the duration of a split task changes, the last segment of the task is increased or decreased.
If a split task is rescheduled (for example, if its start date changes), the entire task is rescheduled, splits and all. The task keeps the same pattern of segments and splits.
Resource leveling or manually contouring assignments over time can cause tasks to split. You will level resources in Chapter 8, and contour assignments in Chapter 9.
To rejoin two segments of a split task, drag one segment of the task until it touches the other segment.
If you do not want to display splits as a dotted line, you can remove them. On the Format menu, click Layout, and in the Layout dialog box, clear the Show Bar Splits check box.
Adjusting Working Time for Individual Tasks
You might want specific tasks to occur at times that are outside of the working time of the project calendar (or for assigned resources, the resource calendar). To accomplish this, you apply a task calendar to these tasks. As with the project calendar, you specify which base calendar to use as a task calendar. The following are some examples of when you might need a task calendar:
You are using the Standard base calendar as your project calendar, and you have a task that must run overnight.
You have a task that must occur on a specific weekday.
You have a task that must occur over the weekend.
Unlike resources and resource calendars, Project does not create task calendars as you create tasks. When you need a custom task calendar, you assign one of the base calendars provided with Project (or, more likely, a new base calendar you have created) to the task. For example, if you assign the 24 Hours base calendar to a task, Project will schedule that task according to a 24-hour workday rather than the working time specified in the project calendar.
For tasks that have both a task calendar and resource assignments, Project schedules work during the working times that are common between the task calendar and resource calendar(s). If there is no common working time, Project alerts you when you apply the task calendar or assign a resource to the task.
Tip
When you assign a base calendar to a task, you can choose to ignore resource calendars for all resources assigned to the task. Doing so causes Project to schedule the resources to work on the task according to the task calendar and not their own resource calendars (for example, to work 24 hours per day). If this would result in resources working in what would otherwise be their nonworking time, you might want to first discuss this with the affected resources.
In the film project, one of the scenes must be filmed at night. However, the project calendar does not include working time late enough to cover the filming of this scene. Because this task is really an exception to the normal working time of the project, you do not want to change the project calendar. In this exercise, you create a new base calendar and apply it to the appropriate task.
On the Tools menu, click Change Working Time.
In the Change Working Time dialog box, click the Create New Calendar button.
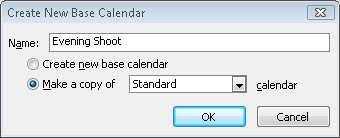
The Create New Base Calendar dialog box appears.
In the Name box, type Evening Shoot.
Make sure that the Make a copy of option is selected and that Standard is selected in the drop-down menu.
Click OK.
Tip
The benefit of basing the new calendar on the Standard calendar is that all of the working day exceptions from the Standard calendar, such as Independence Day, will also appear in the new calendar.
Note that Evening Shoot now appears in the For calendar box.
In the Change Working Time dialog box, click the Work Weeks tab.
Next you’ll enter the working time details for this new calendar.
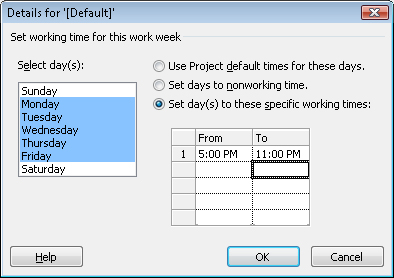
Make sure that the Name value [Default] in Row 1 is selected, and then click the Details button.
In the Select Day(s) box, select Monday through Friday.
You want to set this calendar’s working time to 5:00 PM and 11:00 PM, Monday through Friday.
Click Set day(s) to these specific working times:.
Select the number 2 row heading in the Working Times box, and press
 .
.In the From field for the first row, type 5:00 PM, and then press the
 key.
key.Click OK to close the Details dialog box, and then click OK again to close the Change Working Time dialog box.
Now that you’ve created the Evening Shoot calendar, you’re ready to apply it to a task that must be filmed in the evening.
Select the name of task 34, Scene 2 shoot.
On the Standard toolbar, click Task Information.
The Task Information dialog box appears.
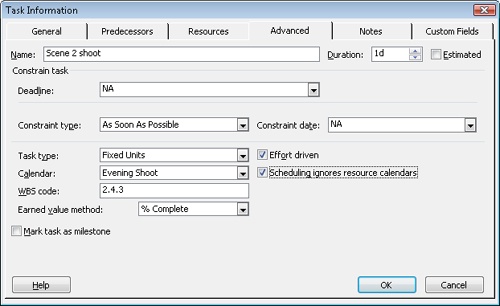
Click the Advanced tab if it is not already selected.
In the Calendar box, select Evening Shoot from the list.
Click the Scheduling ignores resource calendars check box.
Click OK to close the dialog box.
Project applies the Evening Shoot calendar to task 34. A calendar icon appears in the Indicators column, reminding you that this task has a task calendar applied to it.
Point to the calendar icon.
A screentip appears, showing the calendar details.
Because you chose to ignore resource calendars in the previous step, the resources assigned to these tasks will be scheduled at times that would otherwise be non-working times for them (specifically, 5:00 P.M. through 11:00 P.M.).
Changing Task Types
You might recall from Chapter 4, that Project uses the following formula, called the scheduling formula, to calculate a task’s work value:
Work = Duration × Units
where Units refers to the resource assignment units, normally expressed as a percentage. Remember also that a task has work when it has at least one work (people or equipment) resource assigned to it. Each value in the scheduling formula corresponds to a task type. A task type determines which of the three scheduling formula values remains fixed if the other two values change.
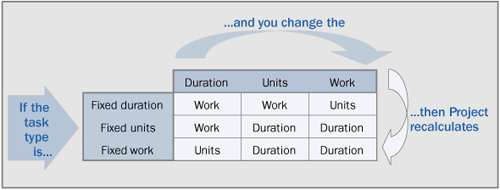
The default task type is fixed units: when you change a task’s duration, Project recalculates work. Likewise, if you change a task’s work, Project recalculates the duration. In either case, the units value is unchanged. The two other task types are fixed duration and fixed work.
For a fixed-duration task, you can change the task’s units or work value, and Project will recalculate the other value. For a fixed-work task, you can change the task’s units or duration value, and Project will recalculate the other value. Note that you cannot turn off effort-driven scheduling for a fixed-work task.
Which is the right task type to apply to each of your tasks? It depends on how you want Project to schedule that task. The following table summarizes the effects of changing any value for any task type. You read it like a multiplication table.
To view the task type of the selected task, on the Standard toolbar, click the Task Information button. Then in the Task Information dialog box, click the Advanced tab. You can also view the task type in the Task Form. (When in the Gantt Chart view, you can display the Task Form by clicking the Split command on the Window menu.) You can change a task type at any time. Note that characterizing a task type as fixed does not mean that its duration, units, or work values are unchangeable. You can change any value for any task type.
In this exercise, you change scheduling formula values (work, duration, and units) and task types.
On the View menu, click Task Usage.
The Task Usage view appears.
On the Edit menu, click Go To.
In the ID box, type 2, and then click OK.
Project displays task 2, Review script, and its assignments.
The Task Usage view groups the assigned resources below each task and shows you, among other things, each task’s and assignment’s duration and work—two of the three variables of the scheduling formula.
Drag the vertical divider bar to the right so that the Start column is visible.
Next, you’ll add a column to the Task Usage view so you can see the assignment units—the third variable of the scheduling formula. You don’t need to modify this view every time you want to use it, but for our purposes here, this is a good way to illustrate the effect of changing task types on the three variables of the scheduling formula.
Click the Start column heading, and then on the Insert menu, click Column.
The Column Definition dialog box appears.
In the Field Name box, select Assignment Units, and then click OK.
Project inserts the Assignment Units column to the left of the Start column.
You can see that task 2 has a total work value of 32 hours (that is, 16 hours each for two resources), resource units of 100% each, and a duration of two days. Next, you will change the task’s duration to observe the effects on the other values.
After a discussion among all of the resources who will review the script, all agree that the task’s duration should double but that the work required to complete the task should remain the same.
In the Duration field for task 2, type 4d, and press
 .
.Project changes the duration of task 2 to four days and increases the work per resource to 32 hours each. Note the change highlighting applied to the Work and Duration values. You wanted the duration to double (it did) but the work to remain the same (it didn’t), so you will use the Smart Tag to adjust the results of the new task duration.
Point at the Duration field and then click the Smart Tag Actions button.
Review the options on the list that appears.
Because task 2’s task type is fixed units (the default task type), the Smart Tag’s default selection is to increase work as the duration increases. However, you’d like to keep the work value the same and decrease assignment units for the task’s new duration.
On the Smart Tag Actions list, click Resources will work fewer hours per day so that the task will take longer.
The assignment units value of each resource decreases to 50%, and the total work on the task remains unchanged at 32 hours (that is, 16 hours per each assigned resource).
Next, you will change a task type using the Task Information dialog box.
On the Edit menu, click Go To.
In the ID box, type 67, and then click OK.
Project displays task 67, Hold formal approval showing.
On the Standard toolbar, click Task Information.
Click the Advanced tab if it is not already selected.
The selected task describes the formal screening of the film for the financial backers of the project. As you can see in the Task Type box, this task currently has a fixed-units task type.
The task is scheduled for a full day, although a few of the assigned resources will work for the equivalent of half a day. To reflect this (and properly manage resource costs for the task), you will make this a fixed-duration task and adjust the assignment unit values for some of the assigned resources.
In the Task Type box, select Fixed Duration.
Click the Resources tab.
In the Units column, set the units values for Mark Hassall and Scott Cooper to 50% each.
Click OK to close the Task Information dialog box.
The change highlighting shows you the updated work values of the two resources on the task in the Task Usage view. Note that the duration value remains unchanged.
On the View menu, click Gantt Chart.
Important
A summary task always has a fixed-duration task type, and you cannot change it. Because a summary task is based on the earliest start date and the latest finish date of its subtasks, its duration is calculated based on its subtasks and is not directly editable. If you want to confirm this, double-click Summary Task 1, Pre-Production (or a different summary task) and view the Advanced tab in the Task Information dialog box.
Entering Deadline Dates
One common mistake made by new Project users is to place semi-flexible or inflexible constraints on too many tasks in their projects. Such constraints severely limit your scheduling flexibility.
Yet, if you know that a specific task must be completed by a certain date, why not enter a Must Finish On constraint? This is the reason why not: Assume that you have a five-day task that you want to see completed by October 17, and today is October 6. If you enter a Must Finish On constraint on the task and set it to October 17, Project will move it out so that it will, indeed, end on October 17.
Even if the task could be completed earlier, Project will not reschedule it to start earlier. In fact, by applying that constraint, you have increased the risk for this task. If the task is delayed for even one day for any reason (a required resource is sick, for example), the task will miss its planned finish date.
A better approach to scheduling this task is to use the default As Soon As Possible (ASAP) constraint and enter a deadline of October 17. A deadline is a date value you enter for a task that indicates the latest date by which you want the task to be completed, but the deadline date itself does not constrain the task.
Now the task has the greatest scheduling flexibility. It might be completed well before its deadline depending on resource availability, predecessor tasks, and whatever other scheduling issues apply.
Entering a deadline date causes Project to display a deadline indicator on the chart portion of the Gantt Chart view. If the task’s finish date moves past its deadline, Project displays a missed deadline indicator in the Indicator field for that task.
In this exercise, you enter deadline dates for some tasks.
On the Edit menu, click Go To.
In the ID box, type 11 and click OK.
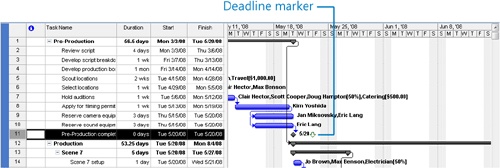
Project displays task 11. This task is a milestone marking the scheduled finish date of the pre-production phase of the project. You want to make sure that the pre-production tasks conclude by May 22, 2008, so you will enter a deadline date for this milestone.
On the Standard toolbar, click Task Information.
Click the Advanced tab.
In the Deadline box, type or select 5/22/08, and then click OK.
Project inserts a deadline indicator in the chart portion of the Gantt Chart view.
You can now see at a glance how close the pre-production phase has come to meeting or missing its deadline. If the scheduled completion of the pre-production phase moves past May 22, Project will display a missed deadline indicator in the Indicators column.
With one exception, entering a deadline date has no effect on the scheduling of a summary or subtask. However, a deadline date will cause Project to alert you if the scheduled completion of a task exceeds its deadline date.
The one situation in which the deadline date can affect the scheduling of a task involves slack. When a task is given a deadline date, its slack does not extend beyond the deadline date.
Entering Fixed Costs
Projects that budget or track financial costs can deal with several different sources of costs. These include costs associated with resources, as well as costs associated directly with a specific task.
For many projects, financial costs are derived mainly from costs associated with work resources, such as people and equipment, or with material resources. To handle costs of similar types for which you want to track aggregate sums (travel and catering are two examples used in the short film project), Project 2007 has introduced cost resources (introduced in Chapter 3.).
However, you may occasionally want to associate a cost with a task that is not tied to resources or work and is not something you want to aggregate across the project. Project calls this a fixed cost, and it is applied per task. A fixed cost is a specific monetary amount budgeted for a task. It remains the same regardless of any resources assigned to the task. The following are common examples of fixed costs in projects:
A setup fee, charged in addition to a per-day rental fee, for a piece of equipment.
A permit to film in a public location.
If you assign resources with cost rates, assign cost resources, or add fixed costs to a task, Project adds it all together to determine the task’s total cost. If you do not enter resource cost information into a project plan (perhaps because you do not know how much your work resources will be paid), you can still gain some control over the project’s total cost by entering fixed costs per task.
As with resources, you can specify when fixed costs should accrue:
Start. The entire fixed cost is scheduled for the start of the task. When you track progress, the entire fixed cost of the task is incurred as soon as the task starts.
End. The entire fixed cost is scheduled for the end of the task. When you track progress, the entire fixed cost of the task is incurred only after the task is completed.
Prorated. The fixed cost is distributed evenly over the duration of the task. When you track progress, the project incurs the cost of the task at the rate at which the task is completed. For example, if a task has a $100 fixed cost and is 75% complete, the project has incurred $75 against that task.
When you plan a project, the accrual method you choose for fixed costs determines how these costs are scheduled over time. This can be important in anticipating budget and cash-flow needs. By default, Project assigns the prorated accrual method for fixed costs, but you can change that to match your organization’s cost accounting practices.
For the film project, you know from past experience that the filming permits will cost $500, payable when you apply for the permits. In this exercise, you assign a fixed cost to a task and specify its accrual method.
On the View menu, click More Views.
In the More Views dialog box, click Task Sheet, and then click Apply.
The Task Sheet view appears.
On the View menu, point to Table: Entry, and click Cost.
The Cost table appears, replacing the Entry table.
In the Fixed Cost field for task 8, Apply for filming permits, type 500, and press
 .
.
Project will now schedule a $500 cost against the task Apply for filming permits at the task’s start date, and the project will incur this cost when the task starts. This cost is independent of the task’s duration and of the costs of resources assigned to it. In fact, the task’s total cost of $1,156 (visible in the Total Cost column) includes both the $500 fixed cost and the cost of the resources assigned to the task.
Setting Up a Recurring Task
Many projects require repetitive tasks, such as attending project status meetings, creating and publishing status reports, or running quality-control inspections. Although it is easy to overlook the scheduling of such events, you should account for them in your project plan. After all, status meetings and similar events that indirectly support the project require time from resources, and such events take time away from your resources’ other assignments.
To help account for such events in your project plan, create a recurring task. As the name suggests, a recurring task is repeated at a specified frequency such as daily, weekly, monthly, or yearly. When you create a recurring task, Project creates a series of tasks with Start No Earlier Than constraints, no task relationships, and effort-driven scheduling turned off.
In this exercise, you create a recurring task that will represent a weekly meeting associated with this project.
On the View menu, click Gantt Chart.
The Gantt Chart view appears.
Select the name of task 12, Production.
You want the recurring tasks to be inserted into the project as the last items in the pre-production phase, directly above task 12, the Production task.
On the Insert menu, click Recurring Task.
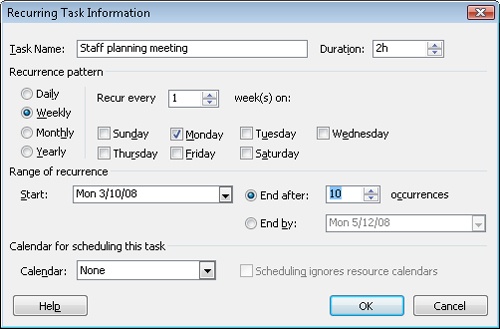
The Recurring Task Information dialog box appears.
In the Task Name box, type Staff planning meeting
In the Duration box, type 2h
Under Recurrence pattern, make sure Weekly is selected, and then select the Monday check box.
Next, you will specify the date of its first occurrence. By default, it is the project start date. However, you want the weekly status meetings to begin one week later.
In the Start box, type or select 3/10/08.
Next, you will specify the number of recurrences. You do this by entering either an exact number of recurrences or a date by which the task should end.
Select End after, and type or select 10 occurrences.
Click OK to create the recurring task.
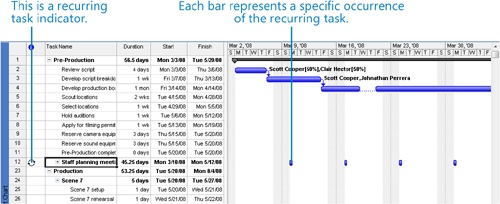
Project inserts the recurring tasks, nested within the pre-production phase. Initially, the recurring task is collapsed. A recurring task icon appears in the Indicators column.
To view the first occurrences of the recurring meeting’s Gantt bars, on the Standard toolbar, click Scroll To Task.
Note that the Gantt bar for the recurring task does not look like the other Gantt bars in the Gantt chart. A Gantt bar for a recurring task shows only the occurrences or roll-ups of the individual occurrences of the task. For example, contrast the summary Gantt bar for the recurring task with that of task 1, Pre-Production.
Next, you will assign resources to the recurring task.
Verify that task 12, Staff planning meeting, is selected, and then, on the Standard toolbar, click Assign Resources.
In the Assign Resources dialog box, click Clair Hector. Then hold down the
 key while clicking Johnathan Perrera and Scott Cooper.
Click the Assign button, and then click Close.
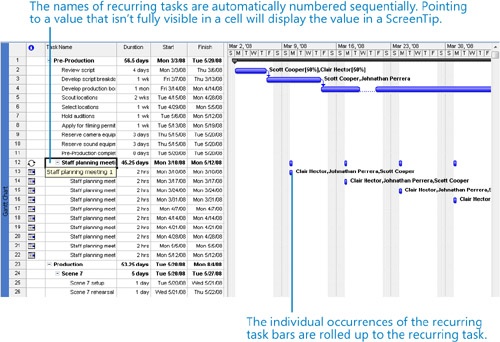
The Assign Resources dialog box closes, and Project assigns the selected resources to the recurring task. Next, you will view the individual occurrences of the recurring task.
Click the plus sign next to the recurring task’s title, Staff planning meeting.
Each occurrence of the recurring task is sequentially numbered (if you wish to verify this, widen the Task Name column, or point to the task’s name and note the content of the ScreenTip), and the resource assignments appear for the individual occurrences.
Click the minus sign next to the recurring task’s title, Staff planning meeting, to hide the individual occurrences.
Here are a few other things to keep in mind when creating recurring tasks:
By default, Project schedules a recurring task to start at the Default Start Time value entered on the Calendar tab (on the Tools menu, click Options); in this project, that value is 8 A.M. If you want to schedule a recurring task to start at a different time, enter that time along with the start date in the Start box of the Recurring Task Information dialog box. For example, if you want the recurring staff meeting to be scheduled for 10 A.M. starting on October 6, you would enter 10/6/08 10AM in the Start box.
As with a summary task, the duration of a recurring task spans the earliest start to latest finish date of the individual occurrences of the recurring task.
When you schedule a recurring task to end on a specific date, Project suggests the current project end date. If you use this date, be sure to manually change it if the project end date changes later.
Project alerts you if you create a recurring task that would occur during nonworking time, such as a holiday. You can then choose not to create that occurrence or to schedule it for the next working day.
You should always assign resources to recurring tasks with the Assign Resources dialog box. Entering resource names in the Resource Name field of the recurring task assigns the resources to the recurring task and not to the individual occurrences.
Key Points
By using a combination of task relationships plus lead and lag time, you can more accurately model how work should be done.
When entering lead time between a predecessor and successor task, entering a percentage lead time value offers more flexibility because Project recalculates the lead time value whenever the duration of the predecessor task changes.
The constraint options in Project enable you to fully take advantage of the scheduling engine in Project or to effectively turn it off. Think through the effects of semi-flexible and inflexible constraints on your schedules, and use them sparingly.
You can often set a deadline date for a task instead of applying a hard constraint, such as Must Finish On.
You can record any fixed cost value you wish per task, and it is not associated with resource costs.
The critical path indicates the series of tasks that determine the project’s finish date. Project constantly recalculates the critical path, which may change as the details of your project plan change.
You can interrupt work on a task by splitting it.
For tasks that must be completed outside of the project’s normal working time (as specified by the project calendar), you can create a new base calendar and apply it to the task.
Project supports three different task types; fixed units is the default. A task’s type determines how Project reschedules a task when you change work, duration, or assignment unit values.
Set up a recurring task for activities, such as status meetings, that occur on a regular frequency.
