In addition to typical HTML pages, you can also create other pages—including ASP.NET, ASP, PHP, and XML—where you can take advantage of other features and technologies that HTML page don’t provide.
Expression Web supports ASP.NET 2.0 and provides controls you can use directly from the Toolbox. The Toolbox in Expression Web provides seven categories of ASP.NET controls: Standard, Data, Validation, Navigation, Login, WebParts, and AJAX Extensions. You can insert ASP.NET controls into an ASP.NET page and configure them in the same way you insert form controls. To use ASP.NET controls, you need to install ASP.NET 2.0 on your Web server and .NET Framework 2.0, 3.0, or 3.5 on your computer, which you can download from www.microsoft.com.
PHP is a server-side scripting language and interpreter used to create dynamic Web pages. A PHP script is embedded in an HTML Web page, and interpreted on the server before being sent to the user who requested the page. The user receives the interpreted PHP code as pure HTML code. PHP runs reliably on almost any platform currently available, including Windows, Linux and Mac servers and clients; it can perform a variety of tasks using module controls, but its strength lies in its compatibility with many types of databases, including MySQL and other SQL or ODBC databases.
XML (eXtensible Markup Language) is designed specifically for Web pages. XML is a complementary format to HTML, which is ideal for producing extensive, highly-structured data from an application in a consistent manner. XML describes the content of a Web page, while HTML tags describe how the page looks. HTML tags assign certain characteristics to the text they surround.
ASP.NET is the latest dynamic Web site technology from Microsoft. With ASP.NET 2.0, you can display data from a database on a Web page, allow users to create accounts and log in to your Web site, add validation to forms, and add dynamic Web site navigation. ASP.NET is a server technology, so in order to use it, you need to install it on a Web server; check with your administrator or ISP about installing ASP.NET 2.0. You also need to install .NET Framework 2.0, 3.0 or 3.5 (recommended) on your computer, which you can download at www.microsoft.com. You can use the New dialog box to create several different types of ASP.NET pages, including configuration files for .NET 2.0 or 3.5 web application settings.
 Click the Web Site tab for the site in which you want a new page.
 Click the New button arrow on the Common toolbar, and then click Page.
 In the left pane, click ASP.NET.
 Click the type of ASP.NET page you want.
 Click OK.
An untitled Web page appears.
 Click the Save button on the Common toolbar, type a name for the page, and then click Save.
Did You Know?
You can test your ASP.NET pages without a Web server. If you don’t have access to a Web server during development, Expression Web provides a MS Expression Development Server so you can test your ASP.NET pages.
See Also
See “Changing Web Site Settings” on page 350 for information on using the MS Expression Development Server.
Expression Web supports ASP.NET 2.0 and provides controls you can use directly from the Toolbox. You can insert ASP.NET controls into an ASP.NET page and configure them in the same way you insert form controls. To use ASP.NET controls, you need to install ASP.NET 2.0 on your Web server and .NET Framework 2.0, 3.0, or 3.5 on your computer, which you can download from www.microsoft.com. The Toolbox in Expression Web provides seven categories of ASP.NET controls: Standard, Data, Validation, Navigation, Login, WebParts, and AJAX Extensions.
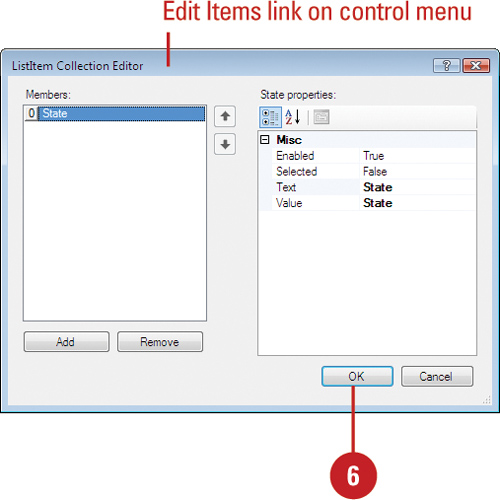
Standard. This category provides common controls—Button, CheckBox, DropDownList, and ListBox—as well as uncommon ones—Calendar, AdRotator, and Wizard (to collect data).
Data. This category provides controls to create a data-driven Web site for retrieving and displaying data. You can create data connections using the Data Source Library panel. You can connect to data in a database, an XML file, or even a sitemap file.
Validation. This category provides controls for configuring form field data validation on an ASP.NET Web form.
Navigation. This category provides controls—Menu, SiteMapPath, and TreeView—for navigating in a Web site.
Login. This category provides controls for creating a membership login with username and password for an ASP.NET Web site.
WebParts. This category provides controls that allow users of the site to customize the appearance and layout of pages. After you insert the WebPartZone control, you can add other individual WebPart controls, which work similar to HTML form pages.
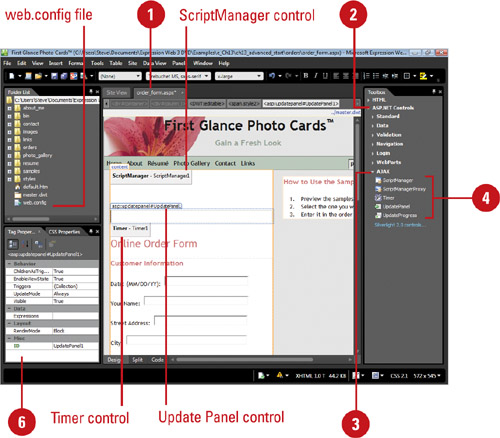
AJAX Extensions. This category provides controls for user interface elements—Timer, UpdatePanel, UpdateProgress, ScriptManager, and ScriptManagerProxy.

You can insert ASP.NET controls into a page by using the ASP.NET Controls submenu on the Insert menu or dragging a control from the Toolbox. The ASP.NET Controls submenu provides easy access to commonly used standard controls, while the Toolbox provides access to all the available controls broken down by category, which includes Standard, Data, Validation, Navigation, Login, WebParts, or AJAX Extensions. After you insert an ASP.NET control, you may be prompted with a control menu requesting information or providing options specific to the control. Before you can work with ASP.NET controls, you need to install .NET Framework 2.0, 3.0, or 3.5 (recommended) at www.microsoft.com.
- Open and display the ASP page you want to use.
- Expand the ASP.NET Controls category in the Toolbox panel.
- Expand the category (Standard, Data, Validation, Navigation, Login, WebParts, or AJAX Extensions) in the Toolbox panel with the control you want to insert.
- Drag control icon to your Web page in Design view where you want to insert it.
Trouble?
If the controls are missing in the Toolbox, you need to install .NET Framework 2.0, 3.0, or 3.5 (recommended), which is available at www.microsoft.com.
- If a control menu appears, click a link to execute the command, or an option to enable it. Link commands and options vary depending on the control.
- If prompted, specify the options you want, and then click OK.
 To change control properties, open the Tag Properties panel, and then specify individual properties.
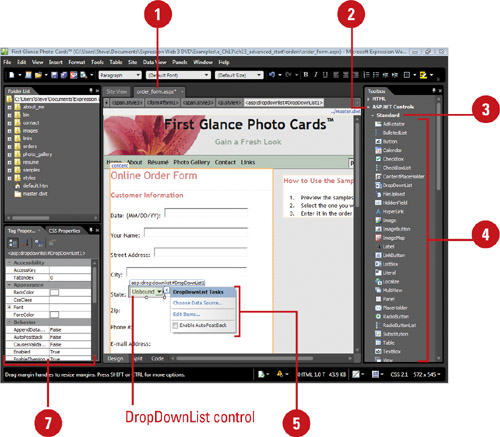
- Open and display the ASP page you want to use in Design view.
- Click to place the insertion point where you want the control.
- Click the Insert menu, point to ASP.NET Controls, and then select the code script you want:
Button. Inserts a button to perform a command.
Checkbox. Inserts a check box for users to turn on or off.
Checkbox List. Inserts a check box as a parent control.
Dropdown List. Inserts a drop-down list box to select an item from a list.
Image Button. Inserts a button with an image to perform a command.
Label. Inserts a text label.
Listbox. Inserts a list box to select one or more items.
Radio Button. Inserts an option button to select one or more items.
Radio Button List. Inserts a radio button as a parent control.
Textbox. Inserts a text box for users to type information.
- If a control menu appears, click a link to execute the command, or an option to enable it. Link commands and options vary depending on the control.
- If prompted, specify the options you want, and then click OK.
- To change control properties, open the Tag Properties panel, and then specify individual properties.???

ASP.NET AJAX controls provide more response to user actions through partial-page updates (for faster page refreshes and avoid page flicker) and status information without writing scripts. You can insert a ASP.NET AJAX controls into a page by dragging a control from the Toolbox. After you insert an ASP.NET AJAX control, you may be prompted to add a web.config file and turn turn on a visual aid to view a non-visual control. Before you can work with ASP.NET controls, you need to install .NET Framework 3.5 or ASP.NET AJAX 1.0 at www.microsoft.com.
- Open and display the ASP page you want to use.
- Expand the ASP.NET Controls category in the Toolbox panel.
- Expand the AJAX Extensions category in the Toolbox panel.
- Drag control icon to your Web page in Design view where you want to insert it.
Script Manager. Manages a client script for AJAX.
Script Manager Proxy. Allows content pages and user controls (nested or child elements) to add script and service references to pages, when the ScriptManager is defined in a parent element.
Timer. Performs postbacks at defined intervals.
Update Panel. Performs a partial-page update.
Update Progress. Provides status information on updates.
- If prompted to add or update a web.config file, click Yes, or if prompted to turn on a visual aid to view a non-visual control, click Yes.

- To change control properties, open the Tag Properties panel, and then specify individual properties.
If you don’t find the controls you need from the ones provided by .NET Framework, you can use custom ASP.NET controls created by other developers or create your own custom controls by using visual design tool, such as Microsoft Visual Studio. You can view a list of custom ASP.NET controls on the Microsoft ASP.NET Web site at www.asp.net.com under Control Gallery in the Community area. When you place the custom ASP.NET control in the BIN folder of your Web site and reference the custom control, you can take advantage of the added functionality. You can preview custom controls and access the Common Tasks smart tag menu in Design view, edit properties, and use IntelliSense and syntax checking in Code view. The custom controls are not available in the Toolbox or on the Insert menu. Before you can work with ASP.NET controls, you need to install .NET Framework 3.5 at www.microsoft.com.
- Add the custom control assembly file (.dll) to the bin folder—create one if necessary—in the root folder of your Web site or install the custom control into the Global Assembly Cache (GAC) on both your computer and Web server.
- Reference the custom control in an ASP.NET page or web.config file.
ASP.NET Page. Display page in Code or Split view, and then add the reference code provided in the illustration.
web.config file. Open or create a Web site web.config file, and then add the reference code provided in the illustration.
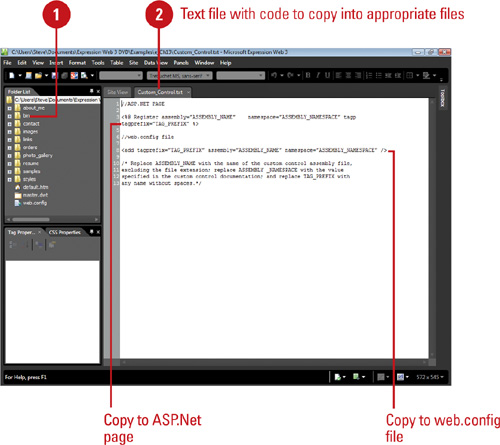
- To add a custom ASP.NET control to a page, open and display the page in Code or Split view, place the insertion point in the body, and then type the following code or use the IntelliSense menu:
<TAG_PREFIX:CLASS_NAME
runat=server" />Replace TAG_PREFIX with the one used in the reference, and replace the CLASS_NAME with the one for the custom control.
PHP is short for PHP (Personal Homepage): Hypertext Preprocessor. PHP is a server-side, HTML embedded scripting language and interpreter used to create dynamic Web pages. A PHP script is embedded in an HTML Web page, and interpreted on the server before being sent to the user who requested the page. The user receives the interpreted PHP code as pure HTML code. PHP is a collection of modules that can be added on the server as needed to perform a large variety of specific tasks. One of the modules controls database access. Using PHP with MySQL database has become common enough that the MySQL interface is now part of core PHP instead of a plug-in module. PHP can also access most any SQL or ODBC database.
Three things make PHP popular. (1) It’s easy to implement, learn, and use. (2) It’s free. (3) It runs on almost any Web server on almost any platform currently available, including Windows, Linux and Mac servers. PHP is open source, and may be downloaded from www.php.net, and then installed and configured on your Web server.
PHP code is similar to the syntax for C, Perl, and Java, so if you are familiar with any of these scripting language, you have ahead start with PHP. PHP scripts have the extension .php. A PHP script begins with ‘<?php’ and ends with ‘?>’ with PHP code statements in between. When set within a page of HTML, the start and end indicators tell the computer where to differentiate between HTML and PHP. A semicolon at the end of a PHP statement signifies the completion of the line of code. As with HTML, whitespace is ignored between PHP statements. You can also press tab to indent your code and the PHP interpreter will ignore those spaces as well.
A variable is a means of storing a value, such as text string “Hello!” or the integer value 10, and reusing it throughout your code. In PHP you define a variable with the following form:
$variable_name = Value;
If you forget that dollar sign at the beginning, it will not work. Variable names are case-sensitive, so use the exact same capitalization when using a variable. There are a few rules that you need to follow when choosing a name for your PHP variables. (1) PHP variables must start with a letter or underscore “_”. (2) PHP variables may only be comprised of alpha-numeric characters and underscores. a-z, A-Z, 0-9, or _ . (3) Variables with more than one word should be separated with underscores (for example, $my_variable) or capitalization (for example, $myVariable).
Comments in PHP are similar to comments that are used in HTML. A single line comment starts with “//” and all text to the right is ignored, while a multiple line comment begins with “/*” and ends with “*/”.
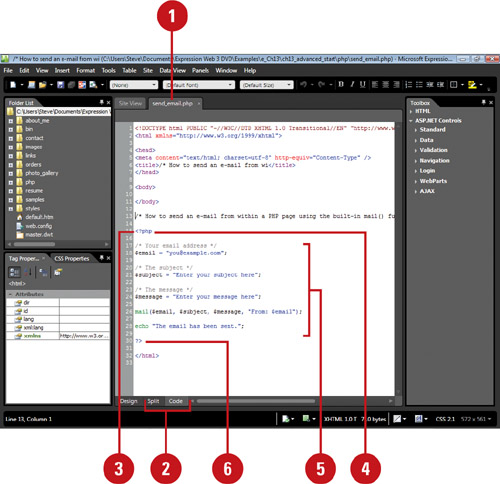
The example sends an email from within a PHP page using the built in mail() function:
<?php
// Your email address
$email = "[email protected]";
// The subject
$subject = 'Enter your subject here";
// The message
$message = Enter your message here";
mail ($email, $subject, $message, "From: $email");
// Display text
echo "The email has been sent.";
?>
With Expression Web, you can create a PHP page in the same you create an HTML page. A PHP page with a script uses the extension .php. The PHP script is embedded in an HTML Web page, and interpreted on the server before being sent to the user who requested the page. The PHP script is enclosed/embedded within special PHP tags (<?php and ?>), which allows the author to jump between HTML and PHP. PHP runs reliably on almost any platform currently available, including Windows, Linux and Mac servers and clients; it can perform a variety of tasks using module controls, but its strength lies in its compatibility with many types of databases, including MySQL and other SQL or ODBC databases.
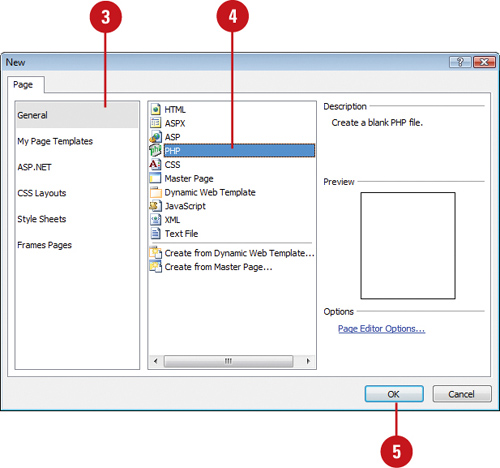
- Click the Web Site tab for the site in which you want a new page.
- Click the New button arrow on the Common toolbar, and then click Page.
- In the left pane, click General.
- Click PHP.
- Click OK.
An untitled Web page appears.
- Click the Save button on the Common toolbar, type a name for the page, and then click Save.
When you have PHP inserted into your HTML and want a Web browser to interpret it correctly, then you must save the file with a .php extension, instead of the standard .html extension, and place the .php file on a PHP enabled (installed and configured) Web server.???
A PHP script begins with ‘<?php’ and ends with ‘?>’. The script that is interpreted on the server into HTML, before being sent to the client. The client will receive a pure HTML page. When set within a page of HTML, these indicators tell the computer where to differentiate between HTML and PHP. The semicolon signifies the end of a PHP statement. As with HTML, whitespace is ignored between PHP statements. You can also press tab to indent your code and the PHP interpreter will ignore those spaces as well. Comments in PHP are similar to comments that are used in HTML. To do a single line comment type “//” and all text to the right will be ignored by PHP interpreter, while the multiple line PHP comment begins with “/*” and ends with “*/”. You can use IntelliSense to help you enter PHP code correctly.
- Open and display the Web page you want to use.
- Click the Code or Split button.
- Click to place the insertion point where you want.
- Type <?php, and then press Enter.
- Type the PHP code statements you want followed by the Enter key. Be sure to end a PHP statement with a semicolon.
- When you’re done entering PHP code statements, press Enter, type ?>, and then press Enter.
See Also
See “Getting Start with PHP” on page 322 for information on using PHP code.
See “Setting Code Formatting Options” on page 374 for information on changing the color of PHP code.
- Click the Code or Split button, and then click to place the insertion point between the PHP script block start and end tags (<? and ?>).
- Click the Edit menu, point to IntelliSense, and then click List Members to insert a function, or type $_ to insert a PHP variable.
- Type part of the item name or move down the IntelliSense shortcut menu list, and then press either Tab or Enter for the selected item or double-click the item to insert it in the code.

- To display a tooltip with PHP function parameters, press Shift+ Ctrl+Spacebar.
- Click the Tools menu, and then click Page Editor Options.
- Click the IntelliSense tab.
- Select the PHP global variable completion check box to have IntelliSense complete global variables.
- Select the PHP parameter information check box to have IntelliSense provide parameter information.
- Select the check boxes next to the PHP function categories you want to use with IntelliSense.
- Click OK.

A PHP script begins with ‘<?php’ and ends with ‘?>’. Instead of manually typing the beginning and ending code before you type a PHP statement, you can quickly insert commonly used PHP code snippets that includes them into your page. You can insert a PHP code snippet by using the PHP submenu on the Insert menu. When you insert a code snippet, the code appears all on one line. The code line starts with <?php followed by the PHP code statement, and then ends with ?> all separated by spaces. If you want, you can separate the three parts into individual lines of code.
- Open and display the Web page you want to use.
- Click the Code or Split button.
- Click to place the insertion point where you want.
- Click the Insert menu, point to PHP, and then select the code script you want:
Form Variable. Use to collect information from a form when using the HTTP post method.
<?php $_POST[]; ?>
URL Variable. Use to collect information from a form when using the HTTP get method.
<?php $_GET[]; ?>
Session Variable. Use to save information about a user’s session time at your site.
<?php $_SESSION[]; ?>
Cookie Variable. Use to retrieve a cookie value from a user’s computer. A cookie is a file that is embedded in the user’s computer by the server in order to identify it.
<?php $_COOKIE[]; ?>
Include. Use to insert a file and doesn’t require a successful script. In the dialog box, select a file, and then click Open.
<?php include(); ?>
<?php include_once(); ?>Require. Use to insert a file and does require a successful script. In the dialog box, select a file, and then click Open.
<?php require(); ?>
<?php require_once(); ?>Code Block. Use to insert the beginning <?php and ending ?> PHP code.
<?php ?>
Echo. Use to display HTML in your browser.
<?php echo ?>
Comment. Use to insert a multiple-line comment.
/* */
If. Use to check whether a condition is true.
<?php if ?>
Else. Use as an option when an if statement is false.???
<?php else ?>
- If desired, you can separate the three parts into individual lines of code.


XML is short for Extensible Markup Language. XML is designed specifically for Web pages. XML is a complementary yet stricter format to HTML. XML is ideal for producing extensive, highly-structured data from an application in a consistent manner. The difference between XML and HTML is subtle but profound: XML describes the content of a Web page, while HTML tags describe how the page looks. HTML tags assign certain characteristics to the text they surround. XML is ideal for data-intensive Web environments and, unlike HTML, supports customized tags for specific data. After you create an XML page with the customized, you can use the XML file in HTML and ASP.NET pages to create Data Views that integrate XML data.
- Click the Web Site tab for the site in which you want a new page.
- Click the New button arrow on the Common toolbar, and then click Page.
- In the left pane, click General.
- Click XML.
- Click OK.

An untitled Web page appears.
- Click the Save button on the Common toolbar, type a name for the page, and then click Save.
Did You Know?
You can change the XML encoding. Open the Web site with the XML page you want to change, right-click the XML page in the editor, and then click Encoding. To reload the file, click a different encoding, and then click Reload. To save the file, click the encoding you want, click Save As, and then save the file.
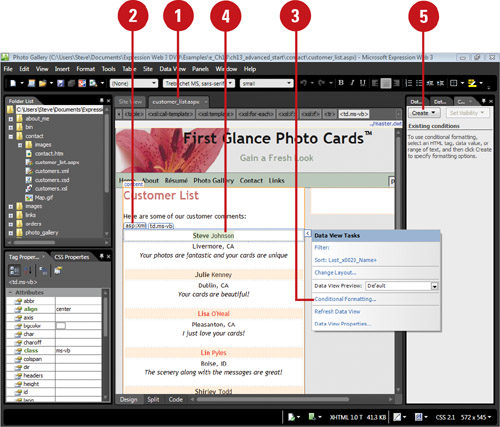
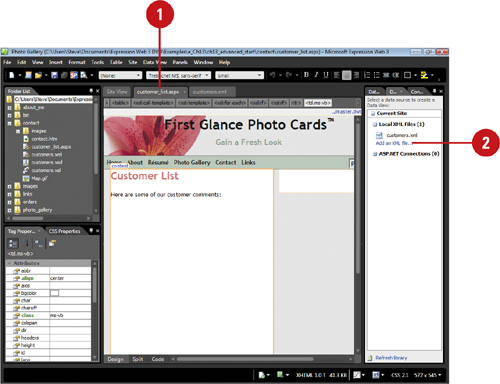
A Data View retrieves data from a data source with XML and displays the data using XSLT (eXtensible Stylesheet Language Transformation) formatting. You can create Data Views to integrate XML data in HTML and ASP.NET pages by simply dragging an XML file onto your page. However, the code generated in HTML and ASP.NET is different. When you create a Data View in HTML, Expression Web adds an IFRAME element to your page and creates a JavaScript file to run the IFRAME element and an XSLT file to provide formatting. In ASP.NET, Expression Web adds an ASP XML control to your page, sets control properties, and creates an XSLT file. A Data View is a live, customizable view of an XML data source that you can sort, filter, or group.
- Open and display the HTML or ASP.NET page where you want to create a Data View in Design view.
- To create a Data View with all XML data, drag the XML file onto your Web page from the Folder List panel or the Data Source Source Library panel.
- To create a Data View with selected XML data, do the following:
Click the Data View menu, and then click Insert Data View.
In the Data Source Library panel, select the XML data file, and then click Show Data.
In the Data Source Details panel, select the fields you want to insert in the Data View.
Click Insert Selected Fields as, and then click Single Item View or Multiple Item View to insert the data.
The data appears in a basic table layout, but you can change it later.
- Place the insertion pointer in the table cells to edit the data; use the Delete submenu on the Table menu to remove elements.

- Click the Save button on the Common toolbar, and then click OK to save the embedded file.

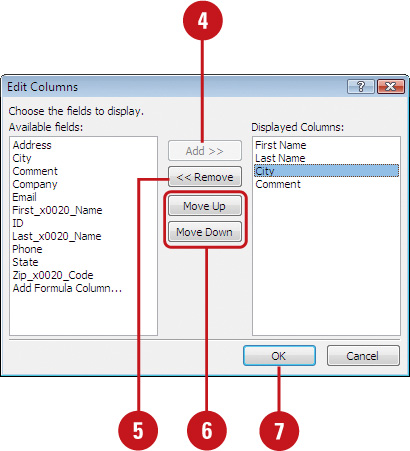
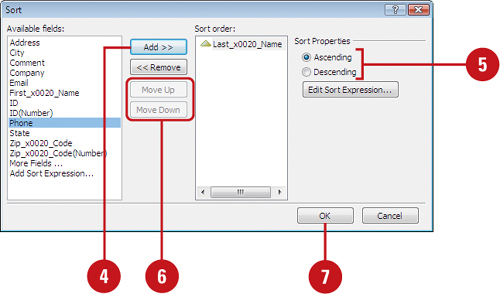
In a Data View, you can add, remove, or arrange columns, which displays data fields. After you display and position columns in Data View, you can sort and filter the data to display the information you want in the most effective way that works for you. A sort arranges all the data in a Data View by a field. You can sort by one or more fields in ascending (A to B or 1, 2, 3) or descending order (Z to A or 3, 2, 1). A filter displays data in a Data View by a field based on rules. A filter is built upon one or more expression rules, known as clauses, that get applied to the data. If the data meets the expression clauses, the data appears in Data View.
- Open and display the HTML or ASP.NET page with a Data View.
- In Design view, select the Data View you want to change.
- Click the Data View menu or Data View Tasks arrow, and then click Edit Columns.

- To add a column, click the field you want to include, and then click Add.
- To remove a column, click the field you want to delete, and then click Remove.
- To arrange columns, click the field you want to move, and then click Move Up or Move Down.
- Click OK.
- Open and display the HTML or ASP.NET page with a Data View.
- In Design view, select the Data View you want to change.
- Click the Data View menu or Data View Tasks arrow, and then click Sort.

- Click the field you want to sort on, and then click Add.
- Click the Ascending or Descending option.
- To sort on multiple fields, add more fields to the Sort Order list, and then click Move Up or Move Down to change the sort order.
- Click OK.
- Open and display the HTML or ASP.NET page with the Data View.
- In Design view, select the Data View you want to change.
- Click the Data View menu or Data View Tasks arrow, and then click Filter.

- Click Click here to add a new clause.
- Click the Field Name, Comparison, and Value boxes, and then specify the values or operator you want.
- To add to a clause, click the And/Or box, click And or Or, and then repeat Steps 4 and 5.
- To delete a clause, click the clause column arrow, and then press Delete.
 Click OK.
When you create a Data View, the data appears in a basic table layout. You can use formatting tools to manually change different aspects of the layout or apply one of the built-in layouts in Expression Web. If you use a built-in layout that displays fewer fields than your original Data View, those fields are removed from your Data View. In addition, any previous layout formatting is removed. If you want to manually format a Data View, you can change font formatting and color using tools on the toolbar, and apply styles and conditional formatting. When you change a data element in one field, the same data element change is applied to all the fields. As you format a Data View, Expression Web creates and modifies an external XSLT file.
- Open and display the HTML or ASP.NET page with a Data View.
- In Design view, select the Data View you want to change.
- Click the Data View menu or Data View Tasks arrow, and then click Change Layout.
- Select the layout style you want.
- Click OK.

- Click Yes or No to remove any previous custom formatting.
- In Data View, edit or delete the data, and drag fields to add (from the Data Source Details panel) or move them.

Did You Know?
You can manually format elements in Data View. In Design view, select the data in the Data View you want to format, and then click buttons on the Formatting toolbar to change font style, size, and color, and align text. You can also use the Apply Style panel to apply formatting styles to data. When you change a data element in one field, the same data element change is applied to all the fields.
- Open and display the HTML or ASP.NET page with a Data View.
- In Design view, select the Data View you want to format.
- Click the Data View menu or Data View Tasks arrow, and then click Conditional Formatting.
- In Data View, select any cell, except for the header cell, such as the HTML tag, data value, or range of text.
- Click Create, and then click Apply Formatting.
- Click anywhere in the first row to add a new clause.
- Click the Field Name, Comparison, and Value (and More Fields) arrows, and then specify the field, value, or comparison operator you want for the rules to apply the formatting.
- Click OK.

 Specify the formatting to apply when the conditions are met.
 Click OK.
When you create and work with an XML file, you need to make sure the XML code are written and formed correctly. The standards for XML tags and related attributes are stricter than those for HTML, so it’s important that you check the file; otherwise, the file will not display correctly. For example, so much as a single missing tag or mis-formatted attributes makes the entire file unreadable.
- Open the Web site with XML page you want to check.
- Right-click the XML page in the editor, and then click Verify well-formed XML.
If an error appears, the XML Validation dialog box appears, displaying a description of the error, and the line number of the error.
- To display the error, click Go To Error.

- Make the changes to fix the error.

- Click the Save button on the Common toolbar to save the file; if prompted, click Yes to confirm the save.

See Also
See “Creating an XML Page” on page 334 for information on creating an XML page.
An RSS (Really Simple Syndication) feed provides a way for Internet content publishers to make news, blogs, and other content available to subscribers in an standardized XML format. You can integrate RSS feeds in your Web pages. An RSS feed is an XML file that gets updated with new information. To add a local RSS feed to a Web page, add the XML file to the Data Source Library panel, and then add the data from the XML file to your Web page, which creates a Data View.
- Open the Web site and Web page you want to add a RSS feed.
- If the XML file isn’t in your Web site, do the following:
Click the Panels menu, and then click Data Source Library.
Under Local XML Files, click the Add an XML file link.
Browse to and select the XML file, and then click OK.
- Use either of the following to add the XML data to a page:
All Data. Drag the XML file from the Data Source Library panel into the RSS Web page in Design view.
Selected Data. Place the cursor where you want to place the selected data in Design view, click the XML file, and then click Show Data. In the Data Source Details panel, Ctrl+click to select the fields you want in the RSS Web page. Click Insert Selected Fields as and then click Single Item View to insert the RSS feed as a new Data View in the page.

See Also
See “Creating a Data View” on page 329 for information on using XML files to create a RSS feed in a Data View.
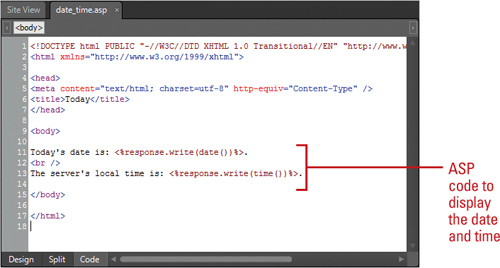
ASP (Active Server Pages) is a technology that allows you to make dynamic and interactive Web pages. ASP uses server-side scripting to dynamically create Web pages that are not effected by the type of browser a person uses to view the page. The default scripting language used for writing ASP is VBScript, although you can also use JScript (Microsoft’s version of JavaScript). All the ASP code is run on the Web server and no ASP is passed to the browser. ASP runs on a Web server that uses Microsoft’s Internet Information Services (IIS) (recommended) or Personal Web Server (PWS), which comes free with Windows. ASP pages use the .asp extension. You can create an ASP Web page (New!) in Expression Web for compatibility purposes. ASP has been superseded by ASP.NET.
- Click the Web Site tab for the site in which you want a new page.
- Click the New button arrow on the Common toolbar, and then click Page.
- In the left pane, click General.
- Click ASP.
- Click OK.

An untitled Web page appears.
- Click the Save button on the Common toolbar, type a name for the page, and then click Save.