
Chapter 2. Using FileMaker Pro
In this chapter
FileMaker Extra: Becoming a FileMaker Pro Power User
Getting Started
It’s time to roll up your sleeves and actually put FileMaker Pro to use. Most of this book deals with being a FileMaker developer—someone focused on the programming side of creating and managing FileMaker solutions. However, development makes up only a small percentage of the overall time a given database is used. Much of the time a FileMaker solution will simply be in use and its users will care nothing for scripting, calculations, or the vagaries of user interface design. They will simply be involved in working with a developer’s creation and will not need to know anything of the programming side of FileMaker.
Becoming facile in working with FileMaker databases will prove quite helpful in allowing you to quickly access the information you want and to understand the underpinnings of any database, regardless of user interface.
This chapter introduces you to how to make the most of FileMaker databases that have already been built. All FileMaker databases—often called solutions, systems, or applications—have certain common elements, and becoming adept at using FileMaker Pro solutions will not only help you manipulate and analyze data better, but also assist you in extending what you can accomplish with that data. We’ll cover some broad concepts at first, move into the nuts and bolts of working with databases, and finally wrap things up with some techniques to help you become a FileMaker Pro power user.
Although the concepts and functions described can be fairly basic (how to open a database, for example), this chapter covers a fair number of advanced topics as well. This chapter is a good place to start if you’re unfamiliar with FileMaker Pro or if you still don’t quite feel comfortable using a FileMaker Pro database. Throughout the rest of this book, the concepts and functions introduced in this chapter will be treated in greater detail as you see how to develop them for others to use.
When it comes to getting started with FileMaker, you need to know a few basics. The first two, activation and registration, happen after you install the software from FileMaker and before you begin to use it. If you are using software that has already been installed, activated, and registered on your computer, you will be able to skip these steps.
A third aspect of FileMaker, automated software updates, might present you with its own window after you launch FileMaker and before you can get to work. Whereas activation and registration have to be done only once, software updates occur whenever updates are available, but you can control the frequency with which FileMaker checks for them.
The Quick Start screen is what you normally see when FileMaker starts. From there, you can open or create databases and get help. After you look at these aspects of FileMaker, it will be time to move on to actually working with databases and their components.
Registration
Registration is a different process from the activation process. Although activation is tied to the computer, registration is tied to the owner. You can choose to register your copy of FileMaker, and doing so personalizes the startup screen; it also provides FileMaker with personal information, including your address, which can be used to notify you of new products, updates, and the like. During the registration process, you can indicate to FileMaker what sorts of communications—if any—you would like to receive about FileMaker products. FileMaker can also use the information from the registration process to find out more about the people who use FileMaker and the purposes to which they intend to put the product.
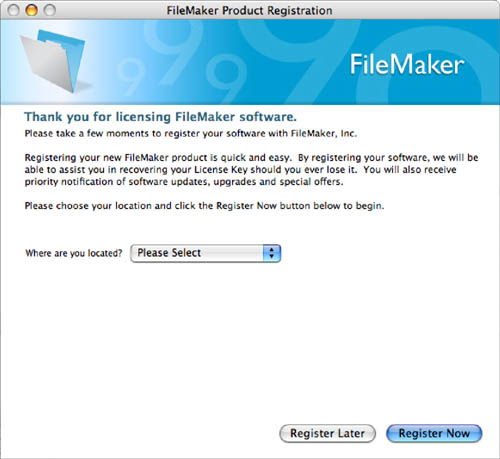
Registration is required for the use of free trial software. You might also be prompted to register your software during the installation process with a screen such as the one shown in Figure 2.1.
Figure 2.1. You will be prompted to register as part of the installation process.
If you choose not to register at this time, you can always choose to register later by choosing Register Now from the Help menu. Unlike activation, registration is optional, so you do not ever have to register.
More and more software is sold as a download, which means that fewer and fewer cartons, manuals, and CDs need to be produced and stored. This provides savings to users and vendors, as well as using fewer raw materials and providing less trash when products are discarded in favor of new ones. In this environment, registration is increasingly important to prove your ownership of a product. If you have a credit card receipt, you might be able to track through the process of the purchase to prove that you did, indeed, purchase a product, but if you have registered the product, the process is immensely easier. Some people are hesitant to register because they are afraid of receiving too much unsolicited commercial email, but FileMaker, like all responsible companies, respects your wishes in this regard. Just make certain to check the communication options you prefer in the registration process.
Activation
Starting in FileMaker Pro 9, selected FileMaker products, including FileMaker Pro and FileMaker Pro Advanced, will use activation technology. Activation is normally done over the Internet in a few moments the first time you run FileMaker. It is designed to ensure that your copy of FileMaker is genuine, to help protect FileMaker from illegal distribution of its software, and to enable updating of the software as necessary over an Internet connection.
![]() Software piracy is a major problem, with estimates as high as 35% of business software worldwide being illegally copied. For more information on this problem, see http://www.filemaker.com/company/legal/notice/software_piracy.
Software piracy is a major problem, with estimates as high as 35% of business software worldwide being illegally copied. For more information on this problem, see http://www.filemaker.com/company/legal/notice/software_piracy.
Activation is an increasingly common way for software developers to achieve these goals. In FileMaker’s implementation, activation involves absolutely no personal information: Your license key and computer identification are transmitted to secure servers at FileMaker. Anyone using the computer you identified can use the activated version of FileMaker installed on that computer.
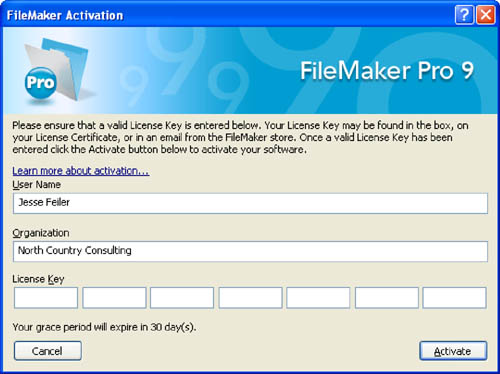
If your copy of FileMaker has not yet been activated on your computer, the first time you launch the application, you will see a dialog very much like the window shown in Figure 2.2.
Figure 2.2. Activate your copy of FileMaker Pro.
There are two versions of this window. The one shown when you first launch an unactivated copy of FileMaker does not contain the prompt of the number of days remaining. In addition to an Activate button, it has an Activate Later button and a Quit button. You open this window, which you actually see more often, from the Activate command in the Help menu.
You can choose to activate the software now, to do so later, or to quit from FileMaker. You have 30 days to activate the software after you install it except for free trial software, which you must activate before its first use. You can click the Learn More link to go to more information about activation on the FileMaker website if you have an Internet connection.
Most activation is done over the Internet using the connection you use for browsing the Web, sending and receiving email, and the like. If you do not have an Internet connection or choose not to use it, you can activate your software by calling FileMaker Customer Assistance or your Volume Licensing Representative (if you purchased other than a single-user license such as a shrink-wrapped box or an individually downloaded application from the FileMaker website). In this section, you can assume that every reference to online activation includes this parenthetical remark: (or by calling FileMaker Customer Assistance).
The license key for your software includes a code that indicates the type of license you purchased. The End User License Agreement for users who purchase FileMaker in a shrink-wrapped carton or as a download allows installation on a primary and secondary computer. For most people, this is a computer at home as well as a laptop or a computer at work and another one at home (or a work computer and a laptop). Thus, FileMaker activation supports two activations for such a single-user license key.
For most people, activation is a simple process that is done once the first time you run FileMaker. The data FileMaker stores is an identifier of your computer and your license key (as a result, if you forget your license key, you can get it by calling FileMaker Customer Assistance). If you modify your computer with additional memory, upgrades to the operating system, or a new processor main logic board (“motherboard”), the activation system recognizes these as normal environmental changes and your activation continues in effect for your modified computer.
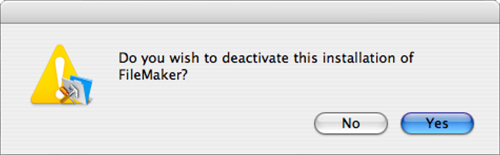
The only time you need to give activation a second thought is if you need to transfer it to another computer. Doing so is very simple. After you have activated your copy of FileMaker, you can choose Deactivate from the Help menu. Doing so opens the dialog shown in Figure 2.3.
Figure 2.3. Confirm that you want to deactivate FileMaker Pro.
After you deactivate a copy of FileMaker Pro, you can reactivate it on that computer or another. Most of the time, you will be moving it to another computer. Simply install FileMaker again from the installation disk or download, and then activate it with the original license key (if you have forgotten it, call FileMaker Customer Support). Your activation will successfully transfer to the new computer. If you are selling your old computer, giving it to a friend, or donating it to a worthy cause, you need not uninstall FileMaker Pro: It cannot be used because it is now deactivated. The new owner of the computer can purchase a license key and activate that copy of FileMaker Pro. The only point to remember is to deactivate FileMaker before you dispose of your computer so that activation can be used on your new computer.
Sometimes, you need to transfer your FileMaker license to another user. This would be the case if you want to transfer the FileMaker software and its activation code to another user—something you would do if you were selling the computer and its installed applications to another person. To do so, you must contact FileMaker at http://www.filemaker.com/company/legal/policy/single-user.html. Remember that the only information that FileMaker collects as part of the activation process is the license key and the identifier of the computer on which the software is installed. As a result, the activation is tied to the computer, not the computer’s owner because that information is not collected as part of activation.
![]() For more information on FileMaker activation, see http://www.filemaker.com/activation.
For more information on FileMaker activation, see http://www.filemaker.com/activation.
Software Updates
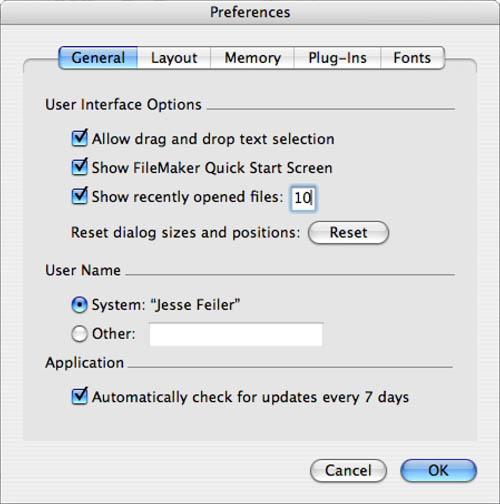
Starting with FileMaker Pro 9, you can be prompted to download updates to FileMaker software. This accounts for another screen that you might see when you first launch FileMaker Pro. The choice of downloading the update is up to you—as is the choice of whether to perform this automatic check as shown in Figure 2.4. Choices in this dialog are part of your preferences, which you can get to on Mac OS X from the Preferences command in the FileMaker application menu. On Windows, the Preferences command is at the bottom of the Edit menu. This is one of the few interface differences between the two operating systems in FileMaker Pro.
Figure 2.4. You can control checking for software updates.
Many people automatically check for software updates right after the installation of a new application. For any product, some minor revisions are often released shortly after the main release of the product, and it makes sense to start your adventures with a new version of the software with the latest code.
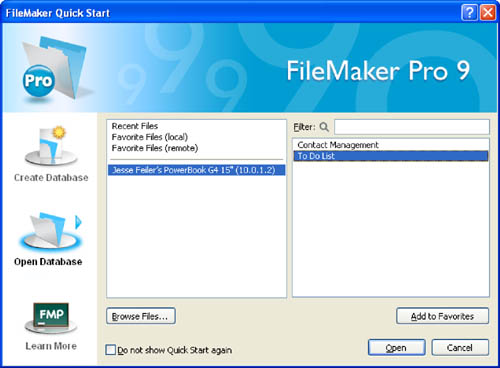
Using the Quick Start Screen
When you launch FileMaker Pro, you see the Quick Start screen—generally the first screen after activation, registration, and software updates (if any) are disposed of. The Quick Start screen is new in FileMaker Pro 9; it provides a simpler interface to a variety of FileMaker Pro tools, as shown in Figure 2.5.
Figure 2.5. The Quick Start Screen is your gateway to FileMaker Pro.
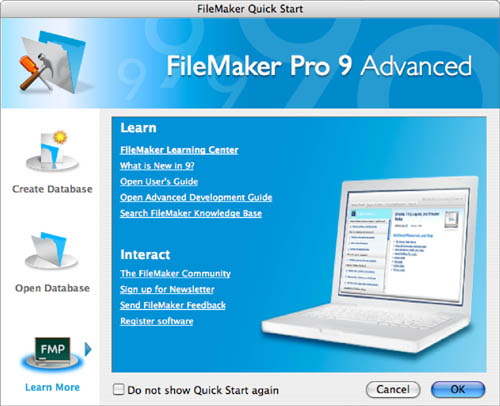
At the left, three icons let you choose from tools to create a database, open a database, or get assistance. The default view for the first launch of FileMaker Pro is the Learn More view shown in Figure 2.5. Thereafter, the Quick Start screen opens to whichever view you last selected.
As you can see from the check box at the bottom left of the Quick Start screen, you can choose not to have this screen shown at startup. If you choose that option, you can always reopen this screen by choosing New Database from the File menu. Doing so reopens the Quick Start screen to the Create Database tab discussed in the following section.
If you choose Create Database from the icons at the left, the view changes to that shown in Figure 2.6.
Figure 2.6. Create a database from scratch or use a Starter Solution.
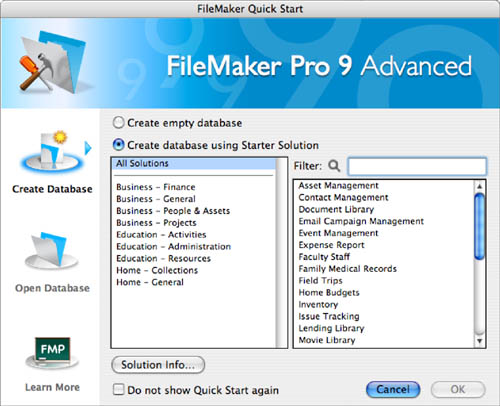
You can create a database from scratch or use one of the Starter Solutions—the radio buttons at the top of the screen let you choose. The Starter Solutions are a set of FileMaker Pro databases that you can use as is or with modifications for your own customized solutions. FileMaker categorizes the Starter Solutions into a variety of areas (some are in more than one area). The Filter field at the right lets you type in text to use in matching the Starter Solution names.
If you want to learn more about any Starter Solution, select it and click Solution Info in the lower left of the screen. That will open the window shown in Figure 2.7.
Figure 2.7. You can get information about each Starter Solution.
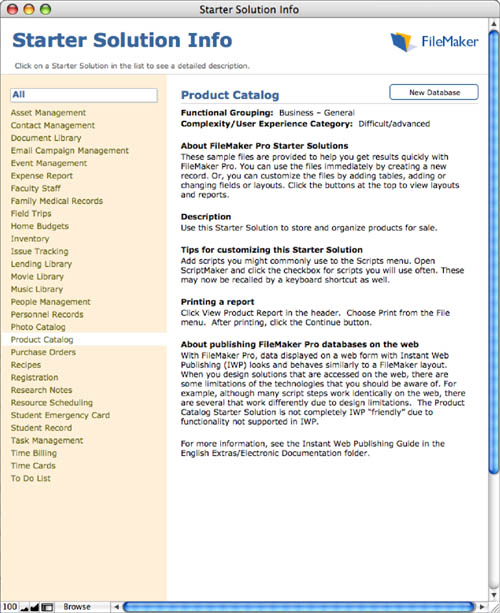
As you can see in Figure 2.7, the information about a Starter Solution includes not just what it provides, but suggestions as to how you can modify it.
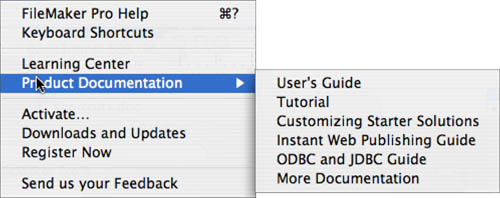
All the Starter Solutions use a common user interface described in a brief document that you can access from the Product Documentation tab in the Help menu. This interface is a consistent one from solution to solution, making it easy for people to use the various solutions. You can use these interface guidelines for building your own solutions (and, of course, it is not a good idea to modify a Starter Solution so that the interface is inconsistent with other solutions). In this book, the Starter Solutions are frequently used as examples not only because their interfaces are consistent and proven over years of use, but also because you have them installed as part of FileMaker Pro.
It is worth noting, however, that although the interfaces of the Starter Solutions are consistent, some variations exist in the ways the underlying databases are structured. This allows you to see multiple ways of solving data storage issues allowing the Starter Solutions to serve as tutorials as well as usable solutions.
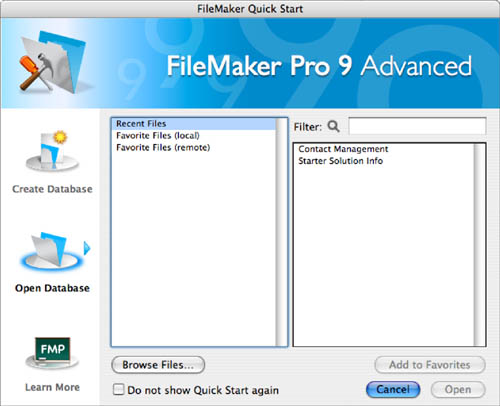
The Open Database view, shown in Figure 2.8, lets you open files and servers that you have recently used. You can use the Browse button at the lower right to open your standard Open File dialog.
Figure 2.8. The Open Database tab lets you select files or servers to open.
Getting Help
The Help functions have been substantially expanded in FileMaker Pro 9. Help begins with the Help menu, shown in Figure 2.9.
Figure 2.9. FileMaker Pro’s Help menu is just the beginning of built-in assistance. It provides you with a variety of assistance, ranging from simple keyboard commands all the way to developing your own solutions.
The Learning Center command takes you to the FileMaker website where additional information is provided.
In addition to the Help menu, you will find Learn More links on many of the FileMaker dialogs. They will be discussed at the appropriate points of this book.
Understanding FileMaker Databases
FileMaker databases have evolved over the years. Today they consist of several components, not all of which might be present in every database you use:
- A database contains one or more tables that actually contain the data. The next section describes tables in more detail.
- A database can contain references to tables in other FileMaker database files or in other databases accessed via ODBC.
- A database can contain layouts that provide the user interface with which to access tables either in this database file or in other locations.
- There might be scripts that contain commands created to automate various processes. Scripts are often connected to layout elements, such as buttons, but they can be invoked automatically when a database is opened or closed.
- The database includes security features in the form of user identifiers and passwords as well as descriptions of what privileges each set of users has to access the database and its components.
- A variety of other, smaller, components that support these major features are also part of the database.
With the exception of tables in other files or databases referenced from a database, all the database elements are stored in a single file that can be moved from place to place.
![]() If you have references to other files, you might break these links if you move the database file. For more information, see Chapter 7, “Working with Relationships,” p. 217.
If you have references to other files, you might break these links if you move the database file. For more information, see Chapter 7, “Working with Relationships,” p. 217.
Understanding Tables
Before FileMaker 7, no serious distinction was made between database files and tables—this was one way in which FileMaker differed from other relational databases. Beginning with FileMaker 7, FileMaker could handle multiple tables within a single database file. The number of tables that a single database file can contain is essentially limitless.
A table is a collection of data—the records and fields described in the following section. Data in a given table is all in a single logical format. Many of the Starter Solutions have a single table in their database; the To Do List database, for example, contains a To Do List table. Similarly, Contact Management contains a Contact Management table.
A large part of the power of a relational database such as FileMaker Pro is its capability to relate data in one table to another. In this book, you will see how to add to Starter Solutions so that, for example, you can integrate Contact Management and the To Do List, so that the names and addresses in Contact Management can be associated with To Do items.
Tables need not be in the same database file to be related to one another, but it makes sense to combine tables that are closely related in a single database file. For example, if you have a complex Contact Management database, you might have tables for names, for addresses, and for phone numbers, with all of those tables being related to one another to combine the data for a single contact. In FileMaker Pro, every layout is based on a single table, although it can use data from other tables as well.
![]() To dig deeper into working with multiple tables and understanding relational data models, see Chapter 6, “Working with Multiple Tables,” p. 195, and Chapter 5, “Relational Database Design,” p. 163.
To dig deeper into working with multiple tables and understanding relational data models, see Chapter 6, “Working with Multiple Tables,” p. 195, and Chapter 5, “Relational Database Design,” p. 163.
Understanding Records and Fields
A table stores information about many items with similar data characteristics: many to do items, many contact items, and so forth. Each of these items is called a record (sometimes data record), or, in relational database parlance, a row. Each record or row has data elements which are called fields, or, in relational database parlance, columns. Fields for a contact record can include a name, an address, and the like; for a to do item, fields might contain a due date and the name of the task to be done.
Particularly if you use the row/column terminology, it is easy to think that you are talking about a spreadsheet, but a database is much more powerful than a spreadsheet. Much of that power comes from two major aspects of a database.
- You can describe the database so that the data it contains must adhere to strict rules. Numbers must be numbers, if you choose to enforce such a rule, and values must be within a specific range of values if you choose another type of rule.
- Furthermore, you can set up rules to relate data within the database so that, for example, the person charged with carrying out a to do item must be someone who is already entered into the contacts database. You will see how to create such relationships shortly.
The combination of these two aspects of databases—along with many more—make them more powerful than spreadsheets.
FileMaker Pro Navigation
One of the first things you’ll want to do when you open a database in FileMaker Pro is navigate the various screens, called layouts, which a developer designed as the interface for the database. Using these layouts, you can view records, enter data into fields, see reports, run scripts, and more.
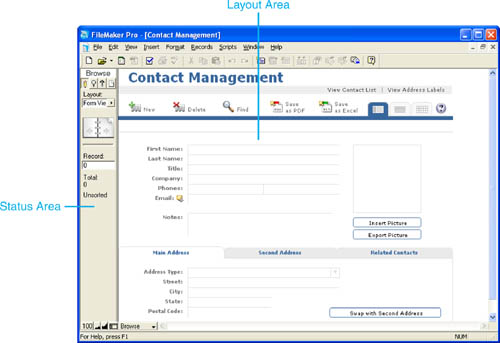
In addition to the menus common to all software applications, there are two important work areas to distinguish from one another in a FileMaker Pro database: the Status Area on the left and the Layout area on the right (see Figure 2.10).
Figure 2.10. These are the primary areas of all FileMaker Pro databases; in some cases, however, a developer might have hidden the Status Area.
Note that the menus and menu items you see in your FileMaker database might well be quite different from those you see in the screenshots in this book or in other FileMaker solutions. FileMaker Pro 9 Advanced includes a feature to customize menus, and the developer who created the file you are working with might have changed its menu set from the standard.
Layouts
Most FileMaker Pro databases open to a data-entry layout. Generally you have access to fields, commonly designated by a field border or embossing of some kind (depending on the aesthetic design or dementia of the database’s developer), or you might come across a layout used for reporting purposes only.
The Status Area
The Status Area serves as a primary control center for FileMaker Pro. In Browse mode—the state in which all data entry and general use occurs—the Status Area displays a book icon and other elements for navigating a database solution.
FileMaker Pro has four modes that we’ll explain later in this chapter. For now, note that the Status Area changes appearance and function depending on which mode you’re using. In Find mode, it allows access to search functions and special search wildcard characters. In Layout mode, the Status Area contains most of the tools used for defining the look and feel of your database. Figure 2.11 details the various elements of the Status Area as it appears in Browse mode.
Figure 2.11. Note the various functions of the Status Area in Browse mode. To jump to a specific record, type a number into the record number field and press Enter.
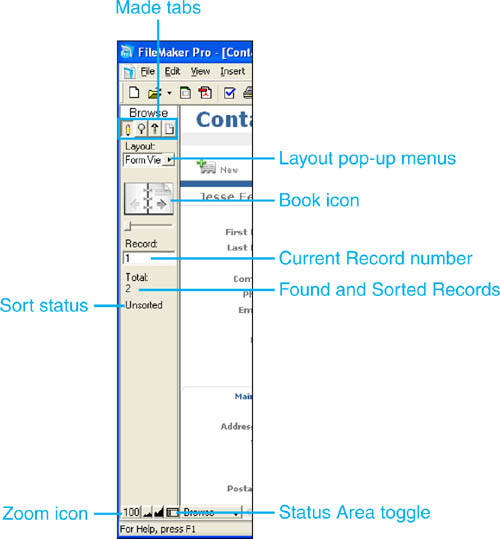
The elements of the Status Area include the following (more details about these interface elements follow later in this chapter):
- Mode tabs— These four buttons, from left to right, let you select the mode for the window: Browse, Find, Layout, and Preview.
- Layout pop-up menu— Not to be confused with the Layout menu in Layout mode, this enables you to navigate from layout to layout in your database. Developers can control whether a layout appears in this list.
- Book icon— The book icon enables you to page through each record in your database. You stay on the same layout, but you see the information for each record in your database as you click through your records. The slider below enables you to jump ahead and back by multiple records.
- Current record number— Not to be confused with a record identifier, key, or ID, this number indicates which record in your current set you’re viewing, relative to the others you’re currently working with. FileMaker Pro allows you to establish found sets—groups of records with which you’re currently working—and this number shows where your current record lies relative to the found set. In one situation, a given record might be record number 1; in another, say after sorting your database differently, it might be number 20. FileMaker stores unique record identifiers, and you can create your own unique record identifiers. These are separate from the current record number shown here.
- Found and Total records— These numbers show how many records are in your found set compared to the total in your entire database. Found sets are discussed in more detail later in the chapter.
- Sort status— FileMaker Pro allows you to sort your records based on some criterion. Depending on how your found set has been sorted, the Status Area shows Sorted, Semi-sorted, or Unsorted. A semi-sorted state would occur if you were to sort the records in your database and then create new records.
- Zoom icons— These icons allow you to zoom in and out on a given layout.
- Status Area toggle— This allows you to show and hide the Status Area.
- Mode pop-up menu— This pop-up menu functions in the same way as the mode tabs at the top of the Status Area.
Compared to a web browser, you’ll notice something missing from FileMaker Pro: Back and Forward buttons. It’s important that you not confuse the book icon with such buttons. The book icon enables you to page back and forward through your data as opposed to paging through your navigation history.
FileMaker Pro Modes
You’ll interact with your FileMaker Pro databases via one of four modes. At times, developers choose to tailor a layout for use with a specific mode, but more often than not, you can use layouts effectively with all four modes. To switch between modes, use the View menu. To familiarize you with the four modes, here’s a simple description of each:
- Browse mode— Browse mode is FileMaker Pro’s primary mode, where all data entry occurs, and generally is the principal mode you’ll use in a given solution.
- Find mode— Here you create and then perform find requests to search for specific sets of records.
- Preview mode— When preparing to print from FileMaker Pro, you can opt to switch to Preview mode to see what a given layout will look like after it is printed. Developers can also build Preview mode steps into their reporting functions so that you can review a document before sending it to a printer. Preview mode is also necessary to view some summary-type reports.
- Layout mode— It is in Layout mode that a great deal of development occurs. Here developers can manipulate all the elements of a given layout, including controlling all the things that appear on that layout.
You can change modes in four other ways: You can use the pop-up menu at the lower left of your screen (in the lower border of the window). You can use the mode tabs at the top of the Status Area. You can use various functions and/or buttons that a developer might have programmed to switch modes. And you can use keyboard shortcuts or the commands in the View menu.
Views
In addition to the modes of FileMaker Pro, there are three views as well. A view is a particular way of displaying record data on the screen. To change among them, use the View menu as well. As you will see later, layouts can have headers and footers; the view refers to the layout shown between the header and footer. These are the three views:
- Form view— Allows you to see and manipulate only one record at a time (see Figure 2.12).
- List view— Here you can display multiple records. At any given moment, you are working with only one specific record while still being able to view the rest (see Figure 2.13). A black bar at the left of the Layout area shows you which record is active. In Figure 2.13, the first record is active. List views frequently consist of a single line so that you can see more of them in a single window, but, as shown here, you can use more space for images, links to web pages, and the like.
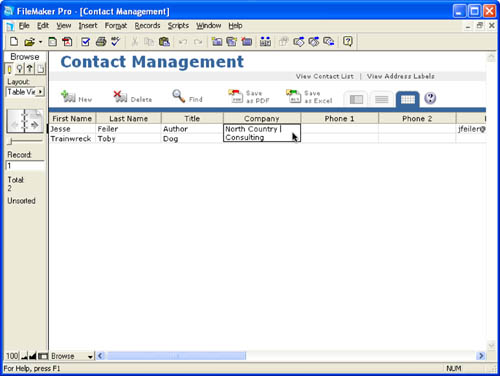
- Table view— Table view simply displays the raw data for a given record (depending on what fields have been placed on a layout). It looks quite similar to a spreadsheet application (see Figure 2.14). This is extremely handy for reviewing large groups of data quickly, but it offers few user interface controls. Still, as shown in Figure 2.14, it does have built-in features such as automatic expansion of fields when they are selected. In most cases (it is the developer’s option), you can move, resize, and sort the columns by clicking the column headers.
Figure 2.12. Form view is usually where you perform most data entry.
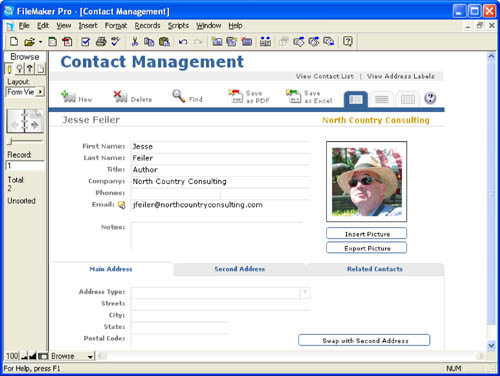
Figure 2.13. List view lets you work with more than one record at a time.
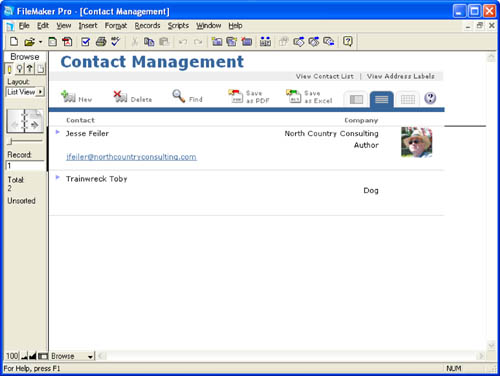
Figure 2.14. In Table view, you can automatically resize, move, and sort with column headers.
Buttons
Notice that we’ve largely been talking about fields on layouts. Most FileMaker Pro solutions also include buttons. Figure 2.12 shows a few examples.
Buttons can come in all shapes and sizes in FileMaker Pro. Text can be a button, a field can be a button, and even just a mysterious blank area in the middle of a layout can be a button (although that is a very poor interface).
In Figure 2.12, most of the top of the layout consists of buttons. Many of these are standard in the Starter Solutions as well as in solutions built by others. They reflect many common FileMaker tasks.
For example, you will notice buttons to add a new record, delete a record, or to go into Find mode. Other buttons let you save the data currently displayed as PDF or an Excel spreadsheet. A trio of buttons let you switch among Browse, List, and Table views (compare those three icons in Figure 2.12, 2.13, and 2.14).
In Figure 2.12, text at the top of the layout is also turned into buttons: The View Contact List and View Address Labels text items are “hot.” Good interface design suggests that something differentiates between hot text and text that is not hot or that is available for data entry. In the Starter Solutions, for example, the gray bar across the top of the layout is home to hot text. Where text buttons are used elsewhere on the layout (such as Insert Picture, Export Picture, or Swap with Second Address), a standard button outline indicates that they are buttons.
In general, it is a good idea to avoid decoration in layouts—interface elements that do not immediately suggest that they are useful. For example, the small envelope and arrow icon next to Email send email to the associated address. They are not decoration, and, because the layout contains no irrelevant decoration, the user can reasonably assume that envelope and icon mean something.
Buttons trigger actions, often by launching scripts that developers write; these actions are usually specific to a given FileMaker database. Buttons can perform dozens of actions, such as creating a new record, deleting a record, navigating to another layout, performing a calculation, performing a find request, controlling windows, and even spell-checking and emitting a simple beep. The possibilities are nearly endless.
You’ll have to become familiar with the specifics of a given FileMaker Pro solution to come to understand what its buttons do. A good interface suggests what items are hot; furthermore, information the developer can provide, such as tooltips for each button, should assist you. If all of this fails, the person who built the system should have those details, or should have provided some form of training or documentation.
Tab Control Objects
Another element you’ll work with on layouts is the Tab Control object introduced in FileMaker 8. With it, developers can create multiple panes of information on a single layout, as shown at the bottom of Figure 2.12, where a tab control lets you alternate between viewing the main address, the secondary address, and related contacts. Users can flip from pane to pane, as they need. Each tab pane displays information from the same record: Think of it as extending the amount of screen real estate you can view at any given time.
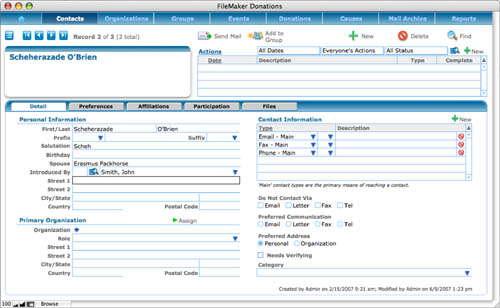
FileMaker layouts can be quite complex, but the differences among them are always controlled by the fact that what you are doing is ultimately a set of variations on the same theme. For example, Figure 2.15, taken from the Donations application that you can buy from FileMaker, shows a Form view of the database. There are tabs across the top of the layout, and another set of tabs across the middle, providing multiple views of the data. A variety of other buttons (arrows, downward-pointing disclosure triangles, icons to delete records, and more) is available on the layout, but the interface design is still similar and the use of similar icons helps provide a comfort level for users.
Figure 2.15. The Donations application has a Form view that is similar to the one in Contact Management.
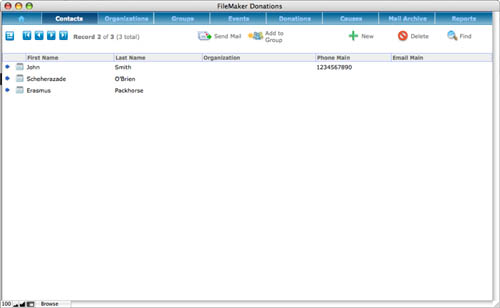
In Figure 2.16, you can see a list view from Donations. It, too, has common features with the Contact Management database. Perhaps the most significant navigation tools are the arrows to the left of the entries in the List views: They take you to the corresponding Form view. In place of the three icons in Contact management that let you switch among Form, List and Table views, Donations provides a single icon at the upper left that lets you switch from Form to List view or vice versa: The icon and functionality switch depending on which view you are looking at. In this book, you will see how to implement all these interface elements.
Figure 2.16. The Donations List view provides similar functionality to that of Contact Management.
Working in FileMaker Pro
This section walks you through working in some typical FileMaker Pro situations and addresses many of the common tasks you must be able to perform.
![]() Over the last few revisions of FileMaker Pro, functionality has been added that lets you create databases in FileMaker but access them through other applications. With web publishing, you can use a browser to access FileMaker data. You can use ODBC import and export to share data with SQL-compliant applications, and you can even import and export Excel spreadsheets. This section focuses on working with FileMaker data using FileMaker Pro itself. For more information on using other tools to access the data, see Part IV, “Data Integration and Publishing,” p. 601.
Over the last few revisions of FileMaker Pro, functionality has been added that lets you create databases in FileMaker but access them through other applications. With web publishing, you can use a browser to access FileMaker data. You can use ODBC import and export to share data with SQL-compliant applications, and you can even import and export Excel spreadsheets. This section focuses on working with FileMaker data using FileMaker Pro itself. For more information on using other tools to access the data, see Part IV, “Data Integration and Publishing,” p. 601.
Opening a Database
The first step, obviously, is opening a database. FileMaker Pro databases can live in various places. They can sit on your own computer, just as any other document might; they can be hosted by another computer; or they can be served by FileMaker Server. On any of those computers, they can be housed on shared volumes or external devices (although there are constraints for the FileMaker Server database locations).
Local Files
Opening a local file is a simple matter of double-clicking its icon in either your Windows environment or the Mac OS X Finder. You can also use FileMaker Pro’s File, Open command or the Quick Start screen as described previously.
You can use the Open command to navigate to any database file to which you have access, whether it is on your own computer, or somewhere else on your network, or on the Internet, if you can get to it from the Open File dialog shown in Figure 2.17.
Figure 2.17. Use the Open command to open a FileMaker Pro database.
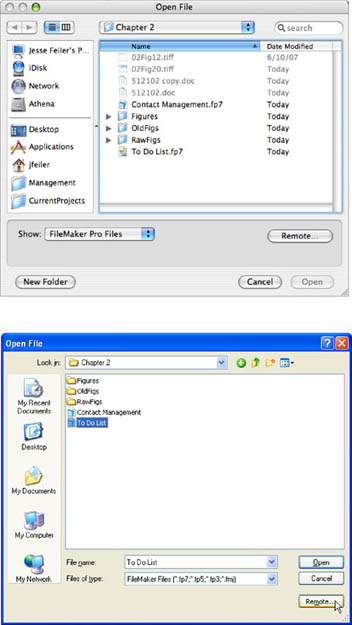
You will note that in addition to the Open button, there is also a Remote button; it will be discussed in the next section.
Remote Files
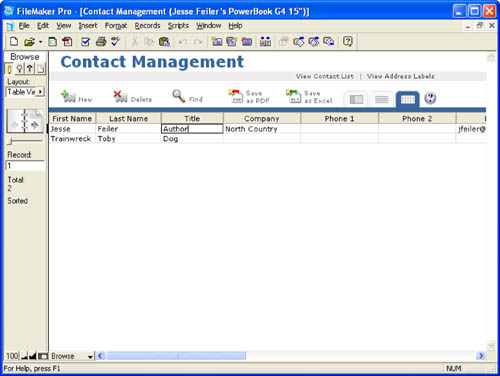
Working with remote files requires connecting to a server. That server could be a database hosted on FileMaker Server (the software that allows you to host a FileMaker database for use across a LAN or WAN by up to 250 users), or a FileMaker database file that is set to multiuser and running in FileMaker on another person’s workstation. After you connect to a remote database, everything works just as it would with a local connection (although over a busy network, there might be a slight lag in response). The only distinction that you will note is that the title of the window shows not only the name of the database but also—in parentheses—the name of the server on which it is hosted. Compare the title of the window shown in Figure 2.18 (opened remotely) with the same database shown in Figure 2.14.
Figure 2.18. A FileMaker Pro database opened remotely shows the name of the host in its title.
A remote connection is one that lets you connect to a copy of FileMaker Pro from your own copy of FileMaker Pro. If you use the standard Open dialog as described in the previous section, you open a database with your own copy of FileMaker Pro, whether the database is on your computer or on the network. When you use the Open Remote dialog by clicking the Remote button in the lower right of the Open dialog shown in Figure 2.17 or a remote favorite from the Quick Start screen, the database to which you connect has already been opened by a copy of FileMaker Pro or FileMaker Server. And, actually, it is to that copy of FileMaker Pro that you are connecting, and through that copy of FileMaker Pro or FileMaker Server to the database.
Only one copy of FileMaker Pro or FileMaker Server can attach to the actual database file at a given time; all other users (if any) attach to that copy of FileMaker. The same applies to users of FileMaker databases connecting through ODBC or the Web: They are connecting to the copy of FileMaker Pro or FileMaker Server that has the database open. (Sharing databases with FileMaker Pro is possible on a small scale, but performance significantly improves with dedicated hardware resources and FileMaker Server.)
Although the most common scenario involves sharing databases across a network or the Internet, other configurations are possible. You can use Open Remote to open a database on your own computer as long as another copy of FileMaker Pro on your own computer (perhaps FileMaker Pro Advanced) has opened it. In that case, both the server and the client are the same computer, but there is no question which is the server (the version of FileMaker Pro that opened the database with the Open command) and which is the client (the version of FileMaker Pro that opened the database with the Open Remote command).
While discussing these matters, it is worthwhile to point out that server is sometimes used to designate one or more computers on a network that provide shared resources such as common disks. The term server might also refer to one or more computers that provide shared services such as email, web hosting, and the like on a network. In the FileMaker context, server refers to a computer running either FileMaker Server or a version of FileMaker Pro or FileMaker Pro Advanced and configured to share databases. It can be located on a server (hardware) that runs server software (network administration, email, and the Web), but it might be any computer on the network. In fact, there are often significant advantages in a high-volume environment to using a dedicated computer to serve FileMaker databases so that no other demands are made on that computer’s disk and processing resources.
![]() For more information on FileMaker Server, see Chapter 29, “FileMaker Server and Server Advanced,” p. 785.
For more information on FileMaker Server, see Chapter 29, “FileMaker Server and Server Advanced,” p. 785.
To open a remote database, click the Remote button in the Open File dialog, or choose Open Remote from the File menu. As shown in Figure 2.19, you can choose from those hosts available to you locally (those on your network, within your domain in corporate environments, or accessible on the Internet), or you can navigate to a particular server via a Lightweight Directory Access Protocol (LDAP) server. You can also view servers and databases that you have previously marked as favorites. Finally, you can type in the address of a file in the box at the bottom. Make certain in this case to use the prefix fmnet.
Figure 2.19. Use the Open Remote File dialog to open a database on a LAN, in a corporate domain, or (with a proper IP address) across the Internet.
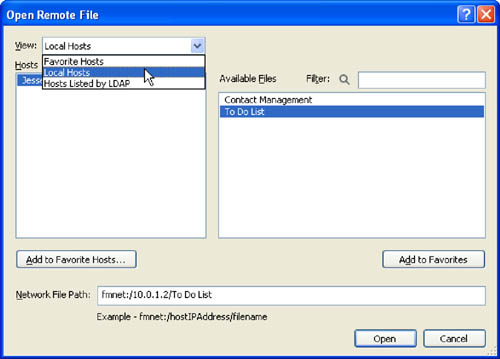
When you choose Local Hosts, you will first see a list of all the FileMaker servers running on your local network. It might take some time for FileMaker Pro to locate all of these servers, so be patient. After you click a hostname (either a local host, an LDAP host, or a Favorites host), FileMaker Pro interrogates that host for the list of databases to display in the list at the right of the dialog. This, too, might take some time. As you navigate through hosts and to an individual database, the fmnet address at the bottom of the dialog fills in automatically.
If you add a database or a FileMaker host to the favorites, it shows up not only in the Favorites of this dialog, but also in the favorites for the Quick Start screen. When you select a host or database, you can click Add to Favorites to open the dialog shown in Figure 2.20. It is a good idea to rely on favorites—particularly for remote databases where the network file path might be a lengthy string of numbers and/or words that are easier to select from a Favorites list than to retype.
Figure 2.20. Use Favorites to organize your databases and hosts.
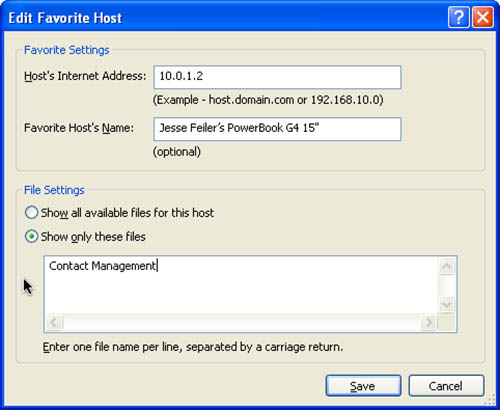
Figure 2.21 shows the Quick Start screen’s Open Database view with recent and favorite hosts and files. Note that you can use Recent Files to select a recently opened database and add it to Favorites with the button at the lower right of the dialog.
Figure 2.21. The Quick Start screen helps you create and open favorites, whether remote or local.
If you are browsing files on a remote FileMaker server, you will see all the opened FileMaker databases that the developer has specified should show up in the Open Remote dialog. You will not see closed databases or those marked not to be listed in this dialog.
If you want to open a database not shown in the list, you can quickly create the appropriate fmnet address. Select, with a single click, a database shown in the list and simply erase the name of that database from the end of the address and type in the name of the database that you want to open.
 If you run into what might appear to be a corrupted file, see “File Corruption and File Recovery” in the “Troubleshooting” section at the end of this chapter. If you are prompted for a user ID or password that you do not have or have forgotten, either contact your database administrator (if such a person exists and is not yourself), or see Chapter 12, “Implementing Security,” for more information on setting up security, resetting passwords, and creating new users.
Working with Records
Creating and deleting records in FileMaker Pro is simple. Under the Records menu, choose New Record, Delete Record, or Duplicate Record. Notice also that there’s a Delete All Records option. For now, let’s explore how to take care of simple data entry. Many solutions (including the Starter Solutions) provide buttons—usually at the top of the layout—to create and delete records; some might also provide a duplicate record button.
If you are in the midst of entering data in a record and want to undo the entry, use the Revert Record command under the Records menu. A record is saved—or committed—automatically when you click outside a field for the first time (or in another field), change modes, change layouts, or press the Enter key. FileMaker Pro uses the term commit to indicate when a record is posted, or saved, to your database. Using the Revert Record command before committing a record allows you to roll back all the changes you’ve made, returning that record to its last committed state.
The flow of processing in FileMaker Pro differs from that of a web interface. In a web-based application, including FileMaker’s Instant Web Publishing and Custom Web Publishing, all data is shown on the screen and is sent when you click a Submit button—that is the moment when data is committed. When working directly with FileMaker, you might be committing (or submitting) data many times as you work on the record. In practice, this is usually not a serious issue, just a reflection of the differences in how two technologies handle the issue of data updates.
Keep in mind that even though there’s an Undo command in the Edit menu, it doesn’t work at the record level. After a record is committed (saved to the database), it and its changes are a part of your database. However, until you click out of the field, you can undo and redo changes to your heart’s content. Also remember that after you delete a record, it’s gone forever.
You never need to save a FileMaker Pro database. As users commit records, those records are automatically stored in the database file. If you want to save a copy of your database or create a duplicate for backup purposes, the Save As option under the File menu will serve.
If Revert Record doesn’t seem to do anything, see “Reverting Records” in the “Troubleshooting” section at the end of this chapter.
If you have trouble with data you believe to be lost, see “Data Loss” in the “Troubleshooting” section at the end of this chapter.
Working with Fields
If you are used to other productivity applications or have ever filled out a form on the Web, you should find data entry quite familiar in FileMaker. Fields generally look like embossed or bordered areas with labels off to one side or the other, underneath, or above the field. Keep in mind that developers control the look and feel of their systems, so it’s entirely possible that someone could build a database with no labels, fields that are the same color as their background, and white text on a white background. When a field is being actively edited, its border is highlighted (generally darker), and the other fields on a given layout are shown with less prominent highlights, indicating that you’re in the midst of editing a record (see Figure 2.22). Fields can also be enlarged to allow editing, as shown previously in Figure 2.14, which you can compare to Figure 2.18 where a different field is being entered; it is not enlarged because all its data fits in the basic field. Editing fields is as easy as clicking into them, typing some text, and clicking out again.
Figure 2.22. A downward-pointing arrow might indicate a drop-down field.
Although FileMaker has offered spell-checking capabilities for years, FileMaker 8 introduced a visual cue for misspelled words that appears while users are entering data. When a field is active—where the cursor is in the field itself—FileMaker underlines in red any words it concludes are misspelled. If you right-click (or Control-click on a Mac with a one-button mouse) the word, you can choose from among possible other spellings or save a word to your local dictionary file.
Moving from field to field can be managed on your keyboard if you simply press the Tab key. Some solutions also support the Return and Enter keys. You can, depending on how the developer of a database has set things, tab from button to button or tab panel to tab panel. To execute an action associated with an active button or tab, press the Enter key or spacebar on your keyboard.
![]() For discussion on how to control object behavior from a development perspective, see “Working with Fields,” p. 152.
For discussion on how to control object behavior from a development perspective, see “Working with Fields,” p. 152.
You’ll work with a few different formats of fields in FileMaker Pro:
- Edit box— This allows standard keyboard entry and sometimes includes a scrollbar.
- Drop-down list— When first clicking into a field, you are presented with a list of options from which you can select or, alternatively, you can type directly into the field.
- Pop-up menu— A pop-up menu is similar to a drop-down list, except that a pop-up menu does not allow typing directly into the field and thus allows values from only the menu in question.
- Check box set— Check boxes allow multiple values per field.
- Radio button set— These are similar to check boxes, with the exception that they are mutually exclusive. A user can select only one value at a time.
- Pop-up calendar— Some date fields might open to show a calendar that you can page through from month to month. To input a date into your date field, click on a specific day.
Shift-clicking allows a user to select multiple values in certain input types, such as pop-up menus and radio buttons. Selecting multiple values in a pop-up menu or in radio button sets is generally a bad idea. You will end up with unpredictable results because you’re making an exception to a formatting choice meant to allow for only one value in a given field.
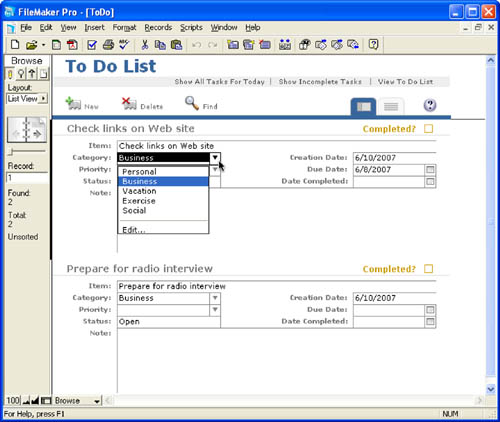
As the FileMaker Pro interface has evolved, new interface elements have been introduced. Many of the traditional interface elements immediately reveal their functionality: Radio buttons, for example, are instantly recognizable. Some newer features now allow developers to provide hints of functionality that the interface provides. Often this is done by using a light gray for some of the interface elements. Figure 2.22, for example, shows a drop-down menu. Even when the drop-down menu is not selected, the small downward-pointing arrow at the right of the field is visible. For the purpose of this book, the arrow is shown darker than it would be in most interfaces; it is usually quite subtle. And do remember that this is the developer’s option: There might be no indication of the field’s capabilities until you click in it and activate the drop-down menu.
A date field can contain a pop-up calendar as shown in Figure 2.23. As is the case with the drop-down menu shown in Figure 2.22, the little calendar icon at the right of the date field might be shown in light gray even when the field is not active.
Figure 2.23. Pop-up calendars can ease entry of dates.

Data in Formatted Fields
You might find it helpful to understand how multiple-value data is stored in fields: Remember that check boxes, radio buttons, drop-down lists, and pop-up menus are all nothing more than data-entry assistants. The actual data stored is a collection of values delimited by line returns. This means that you can accomplish the same result, from a data perspective, by simply entering a return-delimited list of values into your fields. This is an important thing for you to remember when performing find requests, which we’ll cover later in this chapter.
![]() To understand more about how multiple values in a field can lead to relational data structure problems, see Chapter 5, “Relational Database Design,” p. 163.
To understand more about how multiple values in a field can lead to relational data structure problems, see Chapter 5, “Relational Database Design,” p. 163.
Modifying Value Lists
Often, you might need to add new values to a value list—the list that is used to create drop-down lists and pop-up menus, check boxes, and radio button items. Developers have the option of including an Edit option at the bottom of a drop-down list or pop-up menu. Selecting Edit brings up a dialog that you can use to change or add to a list as needed (see Figure 2.24).
Figure 2.24. Editing value lists is a simple way to finetune a database to your specific needs without having to dig into programming.
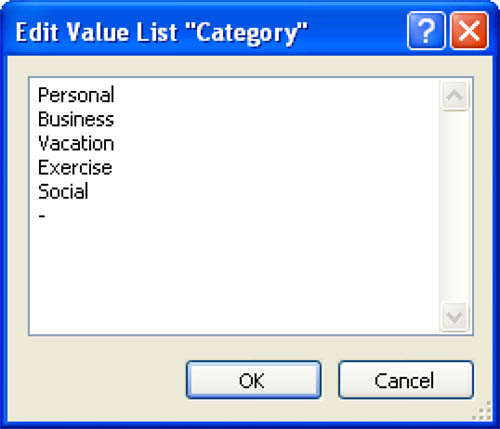
To edit the items in a value list, simply type text into the Edit Value List dialog, followed by a carriage return. A hyphen adds a separator to the list.
Keep in mind that just because you replaced an old menu item with a new category—for example, “autos” became “cars”—doesn’t mean that you changed the actual values stored in your database’s records. Remember that field formatting is nothing more than a data-entry assistant. By changing the assistant menu, you have not changed any data stored in your database.
Using the “Other” Value in Value Lists
Radio button sets and check boxes work a bit differently than drop-down lists and pop-up menus. Developers do not have the choice to add an edit function to these formats; rather, they can include an Other option. This allows users to enter virtually any custom text they want, from a single value to hundreds of lines of text. Regardless of the value, the check box or radio button option visibly displayed is Other; however, the data stored and included in the field’s index includes whatever your other data is. In contrast to adding values to a value list and changing the options available on all records, the Other function simply enables you to enter custom text into a specific record’s field.
As you can guess, developers often disable this feature. Data can get buried behind another entry and can be difficult to account for. Just remember that all you’re doing is using field formatting to help in entering consistent data. These fields are no different from standard fields that accept text data.
Field Types
In addition to enabling you to control how data is entered into a field, FileMaker Pro databases use specific field types for different types of information. Field types are independent from the field formatting discussed in the preceding section. For example, it’s entirely possible to format a calculation field as a check box. Calculation fields are different from standard fields; they do not accept data entry and instead present the results of a formula. Although you as a user might expect to be able to click on a check box, if you do so, FileMaker Pro prompts you and explains that calculation fields are not modifiable.
It’s incumbent on the developer to sensibly identify, for a given system’s users, which fields expect what sort of data. Often field labels make this clear. For example, you can often expect a Price field to be a number, and an Invoice Date field will no doubt be a date type. You can also use cues (such as the icon for a pop-up calendar) to distinguish fields.
FileMaker Pro is adept at converting data from one type of field to another. If you have a calculation that requires a number, FileMaker Pro happily takes the contents of a text field and converts it to a number. Often this is exactly what you want, although the default conversion of “ten” to a number will not give you the result you might expect.
Despite the built-in conversions, you will get the best performance out of FileMaker Pro if you use the strictest representation of data. If data is a number, use a number field. Dates should be date fields, not free-format text fields.
The following list describes the field types available in FileMaker:
- Text— The most common data type, text fields allow a user to enter approximately 2GB of information, including carriage returns. Sorting by a text field is alphabetical.
- Number— Number fields store up to 800 digits, 400 on either side of the decimal, and sort as typical numbers.
- Date— Dates are managed in FileMaker by the Gregorian calendar, 1/1/0001 through 12/31/4000. It’s a good practice, but not required, to use four-digit years when doing data entry. Sorting is by year, month, and day, with the sequence of elements determined by the system settings in effect on your computer at the time the database file was created. This matters only if you commonly deal with date sequences that vary (year/month/day, day/month/year, and so forth). If that is the case, consider using separate fields for month, day, and year to avoid ambiguity.
- Time— Time in FileMaker is stored in hours, minutes, and seconds, like so: HH:MM:SS. Sorting is based on a typical 24-hour clock.
- Timestamp— A timestamp is a tool generally used by database developers to identify exactly when a record was created or modified. It combines a date with a time and looks like “6/28/1998 2:00 AM.” For the user, you might occasionally want to use a timestamp when performing a find.
- Container— Container fields hold just about any binary information, be it an image, a movie, a PDF document, a Word document, or a file archive. You cannot use these fields for sorting purposes. Container fields are capable of holding files of up to 4GB in size, making it possible to use FileMaker Pro for managing all sorts of digital assets.
Data entry for container fields is slightly different from other types: You need to either paste a file or image into the field or use the Insert menu. - Calculation— A calculation field stores the result of a formula, which might be based on other fields or related information in your system. The resultant data is assigned a type so that one can return a date, time, and so on. It’s even possible for a calculation field to return container (binary) data.
Calculations can also format data: From FileMaker Pro’s standpoint, there is no difference between a calculation that adds two fields and one that rounds a number to two decimal places and then turns the result red. You will find out more about this in the chapters about layouts and about sharing FileMaker Pro databases.
The data in calculation fields is not modifiable by an end user; you can, however, access calculation fields for performing finds, sorts, and so on.
- Summary— Summary fields are similar to calculations, but they return information from your found set, or current group, of records. A summary field performing a
Totaloperation, for example, totals a field across your current set of records. Other functions include averaging, totals, maximum, minimum, and so on.
Layouts have front-to-back ordering of elements. Mouseclicks are handled by the front-most object underneath the mouse. If you place a field that is not editable on top of a field that is editable, you can often provide very intuitive and sophisticated interfaces without troubling the user.
For example, if you place an editable phone number field on a layout, you can create a calculation field of exactly the same size and shape on top of it and specify that the calculation field is not editable. Clicking the calculation field does nothing; the mouse click passes through to the next object that accepts mouse clicks at that spot—the editable phone number field. The user can enter an unformatted phone number; then, when another field is selected, the calculation is performed, adding punctuation to the phone number, and it appears that the phone number field itself has been formatted. Actually, the raw phone number field is simply obscured by the formatted phone number created by the calculation.
Saving and Retrieving Information in Container Fields
Container fields work differently than other fields. You cannot type data into them; rather, you have to insert whatever file or media you want to store or display in them.
Note that a container field can do more than just store documents. For many image types, it can display the image within FileMaker; for many sound types, it can play the sound within FileMaker; and for QuickTime movies, it can allow users to play the files. Whether you store something as a document or as a media type that FileMaker can play depends on how you save the information to the container field. There are three general ways to store a file or media in a container field:
- Paste— You can place an image or a document on your clipboard and simply paste it into a container field. FileMaker makes its best guess as to what kind of information is on your clipboard and either stores a document or displays an image, a sound, or a QuickTime movie.
- Insert— Using the Insert menu, you can choose from among Picture, QuickTime (movie), Sound, and File. If you choose from the first three, FileMaker displays the media in question. If you choose File, FileMaker loads a document.
- Import— Under the File menu is the Import Records menu item from which you can further choose to import a file or a folder. If you choose to import from a folder, you can point FileMaker to a directory of images or files and load them into a container field. You can also import container data directly from other FileMaker files.
On Windows, you can also insert an object into a container field. If you choose this option, you will embed some OLE (object linking and embedding) file content in your FileMaker database. The result is that you can provide interoperability between FileMaker and other applications: You can edit, say, a Word document directly from within FileMaker. Although this is convenient in some circumstances, we have found OLE support to be inconsistent and unstable. It is also not cross-platform compatible. We generally do not recommend using the Insert -> Object command unless under special circumstances in which a developer can ensure that all users can consistently make use of the functionality.
In both the case of inserting a single media file and the case of importing many, you have the choice of inserting only a reference to the file or of inserting the document itself. In the case that you insert a document itself, that document is physically stored in FileMaker and is accessible by all users. They can select the container field in question and choose Export Field Contents from either the Edit menu or the contextual menu available from the field itself.
If you choose instead to store only a reference to the file, the file is stored physically elsewhere; for example, on a shared hard disk. To have access to the file, users must have access to the same shared directory on which the actual file sits. In this case, you are performing the same sort of task as saving a shortcut or an alias to the file: It remains on whatever storage device you found it.
The benefit of leaving documents on an external storage device and storing only references within FileMaker is that these documents require far less space within FileMaker for storage. Perhaps even more important, documents stored by reference are double-clickable: When you double-click a referenced document in a FileMaker Pro layout, it opens in the appropriate application, be it Excel, Aperture, or whatever.
Global Storage
Field data in your database generally pertains to a specific, individual record. The baseball team field for your San Francisco record holds the data “The Giants,” whereas for Chicago, it’s “The Cubs.” In some cases, however, a developer opts to define a field as globally stored. Developers often use a shorthand, globals, to describe these sorts of fields. The value in that field is constant throughout the database, regardless of which record is currently under inspection. Some common examples might be fiscal year start and end dates, your company name, report headers, or a fixed commission rate. As a user, you might not always be able to tell which fields in your database are defined to store global values and which are record specific.
An important thing to keep in mind about global fields is that their behavior varies depending on how you’re hosting a database. If you’re using a database on your own local machine, with sharing set to single user, all global data is preserved from session to session. In other words, the next time you open the database, your global details remain from the last time you worked with the system.
If you’re working with a database hosted on a server, all global information is session specific. It might contain default values, but if you change some data in a global field, other users of the system do not see that change, nor is it preserved for the next time you use the database. If a developer has added global storage to a field in your system, it is quite likely that there are routines to manage what information it holds when necessary.
Before the introduction of script parameters and script variables, it was impossible to create certain types of scripts without the use of global variables. As a result, older FileMaker Pro databases use global variables more often than modern ones.
Data Validation
Data integrity is one of the primary concerns of any database developer or of the team using a given system. If duplicate records appear where they should not, or misspellings and typos plague your database, or worse yet the wrong data is entered into the wrong fields, your system will soon become unreliable. For example, if you run a monthly income report, but in a few of your transaction records someone has entered a date value where in fact a transaction amount belongs, your monthly totals will be incorrect.
FileMaker Pro—or any application, for that matter—cannot read users’ minds and fully safeguard against bad data, but developers do have a wide range of tools for validating information as it is entered. If your organization can come up with a business rule for validation, a developer can apply that rule to a given field or fields. Consider the following examples:
- Transaction amounts can be only positive numbers, can have only two decimal places, and cannot exceed 100,000.
- Employee hire dates may be only equal to or later than 1/1/2001.
- Data in a given field must match established values in a status value list containing the values
open,closed, andon hold. The field will not accept any other status descriptions. - Company names in the database must be unique.
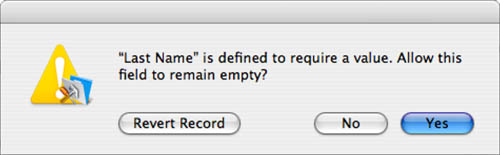
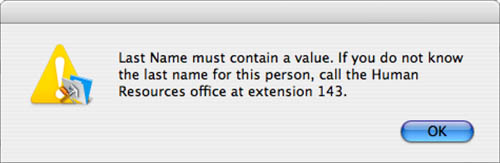
Understanding that these rules are in place will help you understand the underpinnings of your database application. When a validation check occurs, the system might prompt you with an appropriate message (see Figure 2.25).
Figure 2.25. This is an example of a default validation message. If you choose Revert Record, whatever data you’ve entered into the field reverts to the state it had before you started editing.
In addition to the default dialog shown in Figure 2.25, developers can create their own custom text, as shown in Figure 2.26.
Figure 2.26. This is an example of a customized validation message.
If you choose Yes rather than Revert Record, your data is accepted as is and overrides the validation requirement. In some cases you might not have the option of posting an override. Figure 2.25 does allow overriding of data, whereas Figure 2.26 does not. Note that overriding data is independent of whether you use a custom validation message.
To explore additional thoughts on addressing data problems, refer to “Data Integrity” in the “Troubleshooting” section at the end of this chapter.
Never, ever, under any circumstances, no matter what happens, use data to describe data conditions. Values of 0, 99, and -1 are values. You can use validation rules to prevent the storage of invalid data, and having done so, you can rely on the fact that the data is data. If you need to store imperfect data, consider using pairs of fields: as-entered data (which may be invalid) and validated data (which is always valid if it exists). FileMaker Pro correctly handles missing data (empty fields); anything other than valid data or missing data belongs elsewhere in the database.
Millions of dollars were spent at the end of the twentieth century tracking down what came to be known as the Y2K problem, much of which arose from the fact that programmers decades earlier assumed that it was safe to use 00 to indicate missing data for a year. The fact that 00 in the peculiar arithmetic of two-digit years was the result of 99 + 1 did not occur to many people until it was necessary to review every line of code in critical applications to see whether this had happened.
Working with Related Data
By now you’ve probably read the word relational a few times already in this book. Get used to it. One of FileMaker’s core strengths is how it allows you to view and work with related information from a different but connected contextual set of records from other tables.
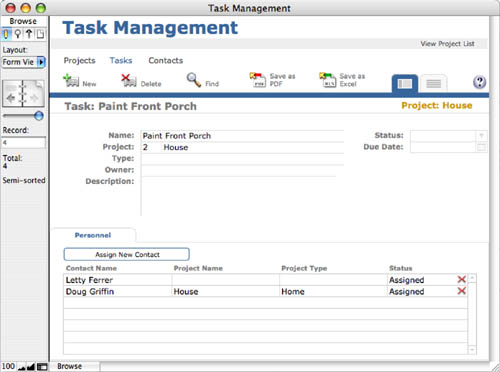
The Task Management Starter Solution has several related tables for contacts, projects, and tasks. A project can consist of one or more tasks; a task can be assigned to one or more contacts. And because these relationships have been set up in the database, it is easy for the FileMaker Pro layouts to display them and allow them to be edited.
Figure 2.27 shows the tasks table in the database. At the bottom of the layout is a portal that shown the contacts assigned to that task. A portal lets developers display related information to users.
Figure 2.27. The Form View - Tasks layout contains a portal of related contacts.
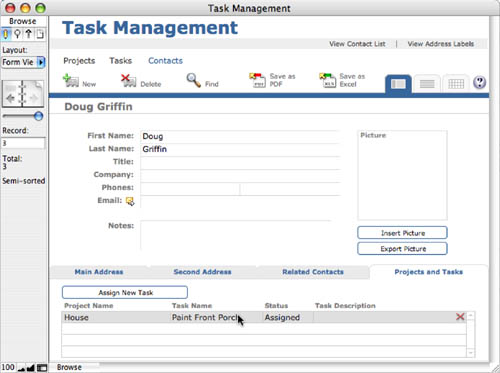
Because relationships are bidirectional, the Form View - Contacts layout can use the same relationship to display tasks for a given contact in another portal, as shown at the bottom of Figure 2.28.
Figure 2.28. The Form View - Contacts layout contains a portal of related tasks.
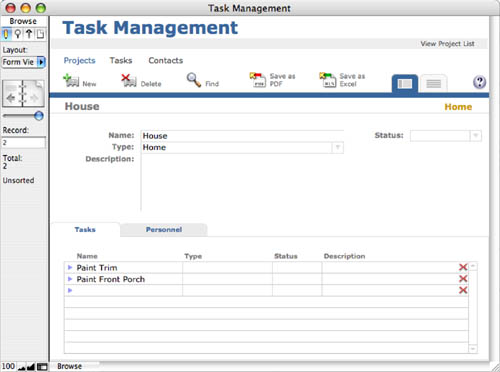
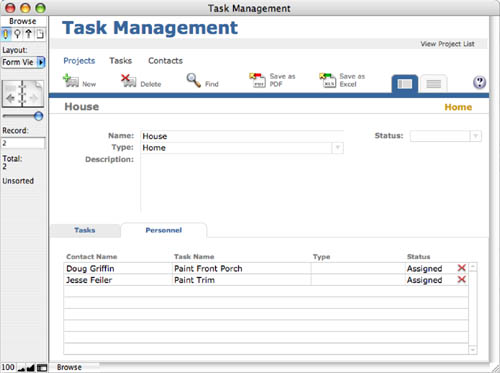
The Form View - Projects layout also contains a portal showing the tasks that are part of that project (see Figure 2.29).
Figure 2.29. The Form View - Project layout has a tab that shows a portal of related tasks.
It is part of a tab view at the bottom of the layout; the Personnel tab shows a portal of the contacts for the project’s tasks as shown in Figure 2.30. Compare the four figures to see how the data can be displayed in various ways after the relationships are established in the database.
Figure 2.30. The Form View - Project layout has a tab that shows a portal of related contacts.
Understanding the Mechanics of a Portal
A portal is simply a view into another table and includes rows of specific related records. Developers determine the rules by which records appear in portals, and at times the records displayed can dynamically change or a portal might display other records in the same table you’re currently viewing.
![]() To explore the depths of advanced portal development techniques, see Chapter 17, “Advanced Portal Techniques,” p. 495.
To explore the depths of advanced portal development techniques, see Chapter 17, “Advanced Portal Techniques,” p. 495.
Most portals have a scrollbar on the right. They feel a bit like List views and act much the same way. To browse through your related records, simply scroll up and down through the list. Data entry works the same way it does in other areas of FileMaker: Simply click into a field and enter whatever data is appropriate.
At times developers include buttons in portals. When they place a button within a portal, the button in question appears on each portal row, and each row’s button will act on that row’s data or record. Common buttons are a delete button (often a red circle with a slash through it at the right of the portal row) to delete that portal row and a disclosure button (often a triangle at the left of the row) at the left of a portal row. Figure 2.29 shows both of these interface elements.
Creating and Deleting Portal Rows
To create a new portal row—which then creates a new child record—scroll to the first empty row of a portal. If there are blank fields there (as at the bottom of the portal in Figure 2.29), click any of the blank fields there. Child records is a term often used to describe related, hierarchically dependent records—for example, Company and Employee. Employees records are considered children of Company.
Your developer might have turned off the ability to add or delete portal rows, in which case there should be an alternative means of adding related records. Likewise, your developer might have disabled the ability to create new records using the first available row. In addition, as you will see in the discussion of related records in Chapter 7, “Working with Relationships,” not all relationships are simple. In the case of complex relationships (nonequijoins, to be specific), FileMaker Pro cannot allow this method of adding rows to portals because the relationship would be ambiguous. For several of these reasons, portals increasingly allow the creation of new portal rows with a button outside the portal.
If a developer allows for it, you can delete a portal row by following these steps:
- Click outside the fields of a given portal on the row background. (You might have to mouse around a bit.) You should see the row become highlighted.
- Press the Backspace or Delete button on your keyboard. You can also use the Records menu. You are prompted as to whether you want to delete that one related record. Click Delete or Cancel to close the dialog box.
It’s important to remember that the developer of a given file must have turned on this portal behavior. It is increasingly considered good practice to explicitly provide a delete row icon in a portal row, rather than asking users to understand the mechanics of deleting portal rows.
Portal Sorting
Sorting records is covered later in the chapter. For now, simply note that a developer determines by what means a portal sorts and that there is no way for you as a user to change a portal’s sort order unless the developer creates a specific mechanism allowing for that option. A developer can build a dynamically sortable, command-driven portal in various ways, but this is not default behavior in FileMaker Pro.
![]() To learn how to build sorting portals, see “Dynamic Portal Sorting,” p. 511.
To learn how to build sorting portals, see “Dynamic Portal Sorting,” p. 511.
Finding Data with FileMaker
Up to this point, we’ve discussed working with a single record and the fields on a given form layout, but at all times FileMaker holds a found set of records—anywhere from none to all the records in the table that is the basis of the current layout. Refer to the Status Area on the left of your screen again. Notice the Found and Total numbers. It’s also possible that your found set contains only one record, or even none; however, generally speaking, you are likely to have many records in your found set.
This is an important point to remember. Even though you might be able to see the contents of only one record’s fields (more than likely in Form view), you can still work with either all the records in your table or a subset of such. Think of it as working with a deck of cards. There are 52 total cards in your deck, some of which are in your hand, and one of which is frontmost (visible). Your current record would be akin to that front card and your found set like those cards in your hand. In FileMaker, many functions apply to a found set. A good example is sorting: You are ordering only those records in your found set.
Many FileMaker Pro databases offer layouts tailored to be viewed either in Form view, where one record encompasses the information on the screen, or in List view, where layouts resemble spreadsheets or tables and display multiple records at once. Figures 2.12 and 2.15 show records in Form view; Figures 2.13 and 2.16 show the same records in List view. Notice in List view that small disclosure triangles are available to take you back to the individual records as shown in Form view (this is a common interface convention). From the Form view, an icon representing a list takes you to the List view of the found set.
Working with groups of records is important mainly for comprehension and processing of your information. Data entry occurs on one individual record at a time, unless you’re importing or performing some other function that applies across multiple records. It’s in the reporting and analyzing stage that working with multiple records becomes necessary.
One of the first ways to work with a group of records is simply to scan the list visually. Summary fields might lie at the bottom of a List view and can total numeric data based on a current found set, or perform other summary operations such as counting or averaging.
For a quick example of how this might work, imagine a sales database. If you were to find or search for all records in January, your summary fields could total January’s sales. If you were to find again for the year 2003, your totals would be annual. The value of the summary field varies depending on your found set. If you perform different find requests, the information on your screen can deliver different results, specific to a given group of records.
Summary fields are quite powerful, but they require processor time. If you have a large found set of thousands of records, waiting for a summary field to evaluate can take some time. You can press the Esc key (or ![]() -. on Mac OS X) to cancel the summary, or simply avoid scrolling or viewing that portion of a layout. Summary fields evaluate only when they are visible on the screen.
-. on Mac OS X) to cancel the summary, or simply avoid scrolling or viewing that portion of a layout. Summary fields evaluate only when they are visible on the screen.
One last important note about found sets: They can be composed of records from only one table. You cannot, for example, display records from an automobile table and a manufacturer table in the same List view or Table view although they can be shown as related fields to the main table’s records.
Using Find Mode to Perform a Find Request
To change your found set in FileMaker, you must perform a find request or search. This usually entails getting into Find mode, and entering some set of search criteria into the field by which you want to search. FileMaker takes you back into Browse mode after your search is complete.
To perform find requests in FileMaker, you have to use one of three options to change to Find mode: the tabs at the top of the Status Area, the menu on the bottom left of your application window, or the View menu. Developers might also opt to put various Find buttons into their systems.
After you’re in Find mode, FileMaker waits for you to enter data for your find request. A find request is a single entry in Find mode that encapsulates the criteria by which you want to perform a search. It behaves and looks much like a record. You enter data into fields just as you would in Browse mode, but instead of saving records, these requests serve as instructions for finding your actual data. You can add a new request, create multiple requests, and delete requests. The requests disappear after the search is actually performed, although it’s possible to use the Modify Last Find command (![]() -R) [Ctrl+R] to review (and if necessary modify) the most recently executed set of search requests.
-R) [Ctrl+R] to review (and if necessary modify) the most recently executed set of search requests.
A Find button appears in the Status Area in Find mode. FileMaker Pro enables you to search for any number of criteria throughout your database. Enter whatever fraction of characters or data you want on the same layouts you’ve used in Browse mode, and then click the Find button. Any records that match your request are returned as your found set, replacing the set you had before performing the find.
To find a specific set of records, enter Find mode (choose View, Find mode) and type a criterion by which to search. You can type this into any field in the layout that accepts input in Find mode; as shown in Figure 2.31, you can even type it into a field in a portal. If you do that, you will find the records in the base table of the layout where the related records in the portal contain the find criterion. You can use words or parts of words for your find queries.
Figure 2.31. FileMaker matches the find criterion “porch” against the data in the database after you click Find to find all projects with a related task containing the word “porch.”
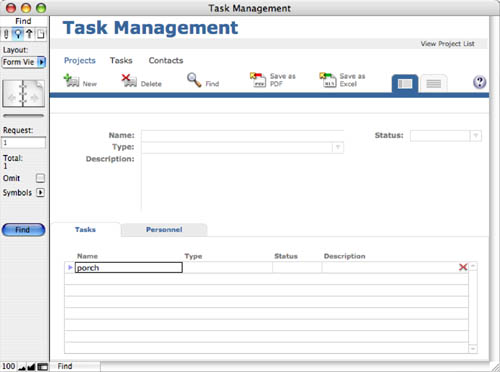
Figure 2.32 shows the results of the find.
Figure 2.32. One record has been found out of a total of two in the table.
If you perform another find, the records matching your new request replace your found set.
You can perform a complex find by entering data into more than one field. FileMaker Pro finds all the records with both of those find criteria. In database parlance, this is called an and query. Figure 2.33 shows a request with two criteria: garden is entered in to the project Name field, and porch is entered into the task Name field in the portal. This query finds all the records in which the project name contains garden and the related task names contain porch.
Figure 2.33. A find request with multiple fields specified retrieves data in which all the criteria are met—an and query.
Search Symbols
In addition to text that you type in, you can use symbols to construct queries. Figure 2.34 shows the Symbol menu in Find mode.
Figure 2.34. Special symbols enable you to search for a wide range of match criteria.
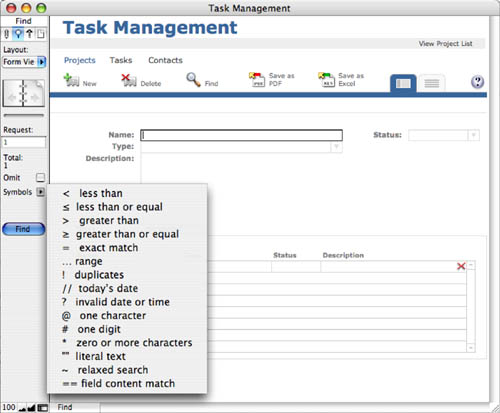
The less than, less than or equal, greater than, greater than or equal, and exact match symbols should be obvious. An entry of >3 finds all records with a value 4 and above. An entry of <=100 finds all records with values of 100 or lower (including zero and negative numbers).
You need not use the symbol menu at all: A < and = typed from your keyboard work just as well as inserting the symbol from the pop-up menu in the Status Area.
The ellipsis (...) for ranges is a commonly used search symbol. The search criterion 1/1/2003...12/31/2006 returns all records for the span of four years. (Two or three periods from your keyboard work just as well.)
Use * and # for wildcards. The # symbol is for one digit exactly. An entry of 5# finds all whole numbers from 50 to 59. The # alone finds just numbers 1–9. A 1#1 criterion finds 101, 121, 131, and so on, but not 211 or 1211.
The ~ for relaxed search looks intriguing, doesn’t it? Some fuzzy logic, perhaps? No such luck. It’s used to search for common base characters in two-byte Asian phonetic alphabets. It doesn’t do anything for any other languages.
Shortcuts for Fast Finding
The right-click (Control-click for Macs using a one-button mouse) contextual menu for a field in FileMaker will show three “fast match” commands: Find Matching Records, Constrain Found Set, and Extend Found set. Here FileMaker performs a find request on the data in the field in question. If, say, you right-click a field containing the term porch and choose Find Matching Records, your found set changes to show all porch records. Likewise, you can constrain and extend your found set based on the value in the field. We’ll cover these concepts in the next section.
FileMaker 8 also introduced some shorthand date searching capabilities: You can type 2005 in a date field and FileMaker correctly interprets that to be a “*/*/2005” search that results in all the records for a given year. Likewise, you can enter 1 through 12 and FileMaker assumes that you’re searching for records within that month for a given year.
Finally, you can search for the names of the days in a date or timestamp to pull up records specific to days of the week.
Multiple Find Requests
FileMaker Pro also enables you to perform complex searches involving multiple find requests. To find both the porch and the garage records, a user would simply enter Find mode, type porch into the appropriate field, and then create a new record/request. Just as you can create new records in Browse mode, you can create and delete requests in Find mode. This process is identical to creating a new record in Browse mode. In the second record, a user would enter garage in the same field.
A user can flip between requests, using the book icon in the Status Area, and can delete requests as necessary. As soon as the user is satisfied with a series of requests, clicking Find on the left performs the find and returns the user to Browse mode with a new found set.
Multiple find requests can also include requests meant to be omitted. You do this by clicking Omit in the Status Area for that request that you want to omit. Thus, you could find all painting tasks for the house—or by omitting house from painting tasks, you could find those that refer to the garage, garden shed, and other nonhouse areas. Whereas typing find criteria into multiple fields in a single request produces an and query (all the criteria must be true), using multiple requests creates an or query—all the criteria in the first request must be true or the criteria in the second request must be true, and so forth.
Figure 2.35 shows two find requests. One looks for projects whose name contains garden, and the other looks for tasks whose name contains porch. Because they are separate requests, they find all records where the project name contains garden or the task name contains porch. In general, or queries return as much or more data than and queries because they are less restrictive.
Figure 2.35. A pair of find requests produces an or query.
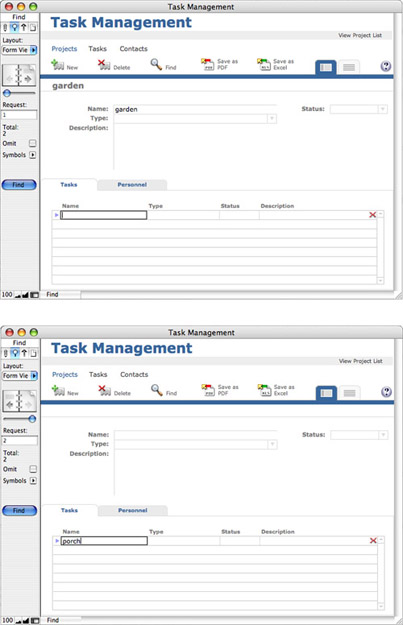
Constrain and Extend Requests
Performing find requests is all well and good, and as you can imagine, they can become quite complex. Instead of developing complex find requests, you can work through the complexity in stages. Rather than clicking the Find button in the Status Area, choose Requests, Constrain Found Set. FileMaker Pro performs this new find request on only the existing found set rather than on the entire database.
Using Requests, Extend Found Set works in a similar fashion by retaining the existing records and simply adding more to them. This way of working helps you simplify complex queries. It also is a powerful way for you to explore and analyze the data in your database.
If you are analyzing data in a database with FileMaker Pro, it is important to be able to categorize the data properly. For example, imagine that, in a school enrollment database, you find 15 students enrolled in 19th Century History and 25 students enrolled in Physics—two facts you could determine with simple find requests. It might be more useful to know that of 15 students enrolled in 19th Century History, 12 are also enrolled in Physics—something you could determine by constraining the 19th Century History found set.
Modify Last Find
Modify Last Find is a great feature for find requests. In Browse mode, choose Records, Modify Last Find. You are placed in Find mode with the last set of find requests you performed. This is handy if you want to continue to play with a particularly complex set of find requests, or are simply performing a series of similar requests.
Finding on Multiple Layouts
FileMaker’s find functionality is flexible. While you are in Find mode, it is entirely possible to change layouts. As long as all the layouts on which you enter your requests are associated with the same source table, your find performs just as though you had a layout with all the fields on it you needed. Finding is not layout specific.
Finding is, however, always table specific. Some more advanced FileMaker Pro solutions comprise multiple tables. Although it is possible to search across related information in FileMaker Pro, your find results will always display a found set of records from a single table. In the examples shown here, searching on the value of the task name in the portal is only searching on the related records for the Projects table, which is the base of the layout.
![]() To learn more about working with multiple tables, see Chapter 6, “Working with Multiple Tables,” p. 195.
To learn more about working with multiple tables, see Chapter 6, “Working with Multiple Tables,” p. 195.
Each layout in your database is associated with a given table. When you perform a find, FileMaker returns your set of records on the layout, from which you can choose Requests, Perform Find, Constrain Found Set, or Extend Found Set.
Omitting and Showing All Records
After performing a find, you can opt to omit individual records from the resultant found set. Choose Records, Omit Record to omit a single record or Omit Multiple to omit a specified number of records. To restore your found set to the full set of records in your current table, choose Records, Show All Records.
Sorting
When you’re working with multiple records, an obvious requirement is the capability to sort them so that they are arranged in a logical order.
Before you go further, a word of caution is in order. Sorting is perhaps the most overused feature in databases such as FileMaker Pro. Sorting is expensive in terms of computer resources, and, particularly in the case of shared databases, can slow down performance for everyone. Many people think nothing of sorting a large database so that the records are in alphabetical order (last name first, first name last, or whatever). They then scroll through the list view to find the record they want, and proceed to edit the record using a form layout.
In almost every case, it is much, much faster to eschew the sort and simply use a find request to find the record you wanted. It takes fewer computer resources, and you do not have to spend your time scrolling through the alphabetized list. Sorting is essential for printed reports, but for routine data manipulation, finding is often what you should be doing.
If you do need to sort data, it can be very useful to precede the sort with a find. Find the general set of records in which you are interested, and then sort it. Doing so substantially lessens the demands on the computer.
FileMaker doesn’t store its records in a sorted order—it stores them in the order in which they were created. When you first open an unsorted table, the records follow that order. There aren’t any real mysteries here; for a view of the Sort Records dialog, see Figure 2.36. By default, the Sort Records dialog shows only those fields available on your current layout, but you can use the menu in the upper left of the dialog to choose from among all the fields in your database (including those related to the records in your found set).
Figure 2.36. You can control how a field is sorted: ascending by type (alpha or numeric generally), descending, or in custom order by value list.
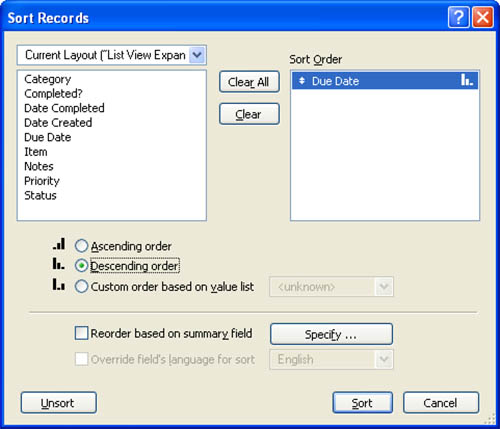
To sort the records from a table in your database, move fields from the left side of the dialog into the right. There you can choose to have a field sort ascending, descending, or based on the order in which values appear in a specific value list. Choosing Descending, for example, sorts a number field from largest to smallest.
If you move multiple fields into the dialog, FileMaker sorts all records by the first field. In cases in which records contain the same values in the first field, FileMaker then uses the second field as an additional criterion.
Sorting by value list enables you to set up your own order in which things should appear. For example, if you have a workflow process that flows from Pending to Approved to Complete, you can have your records sort in that order rather than alphabetically.
By adding multiple fields to your sort criteria, you are specifying secondary sorts: First sort by last name, and then by first name, for example.
![]() Sorting by summary field is a bit tricky. See “Summarized Reports,” p. 329.
Sorting by summary field is a bit tricky. See “Summarized Reports,” p. 329.
Printing
Printing is fairly straightforward in FileMaker. Choose File, Print. In the subsequent dialog that appears, you have the choice to print your found set, just the current record, or a blank record showing field names.
If you’d like to see what something will look like before wasting paper on something you don’t want, use Preview mode via the mode tabs at the top of the Status Area, or the View menu. Choose the layout from which you want to print, and change to Preview mode.
After you’re there, you can see where page margins will fall, and the Book icon enables you to step through the pages you will send to the printer. Keep in mind that Preview mode shows you what will be sent to the printer if you choose to print current records.
Presenting Data with Summary and Subsummary Reports
One prevalent type of report is a summary or subsummary report. A subsummary report enables you to group records that share some bit of common data.
Let’s start with a nonsummarized report. For example, a standard List view report might look like the one shown in Figure 2.37. This report uses data from the Inventory Starter Solution.
Figure 2.37. Notice that this report is formatted for paper: It is black and white, vertically oriented, and ready for printing.
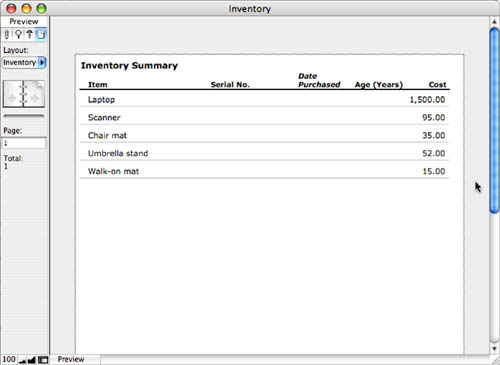
You should design reports for the most restrictive printer on which they will be produced, which means adjusted paper sizes, color, and the like so that they will always look correct.
In Figure 2.38, you see the report that the Inventory Start Solution actually provides. It contains subsummary parts that organize the data by category. In addition, a final summary part is used to total all the costs. Totals can be provided for subsummary parts as well if the report designer specifies.
Figure 2.38. A summarized report can be more comprehensible.
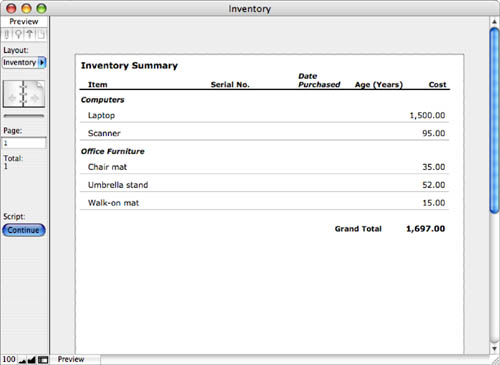
It’s possible for a developer to create quite complex reports. Often, reports are paired with scripts that provide the sorting necessary for the reports; scripts can also perform find requests to retrieve a subset of the database data to be displayed. Other times, reports are designed to be processed against whatever found set the user has created.
It can be useful to develop summarized reports very early on in your database design process. Although you might want a totally interactive database, many people are used to seeing information on paper. Also, as you design a report that is sorted and contains subsummaries, the structure of the report sometimes makes omissions of categories and data fields obvious.
Importing and Exporting Data
Having to manually type every bit of data into a database can be an excruciating experience. Fortunately, FileMaker has excellent capabilities for importing data from a wide variety of sources. Later chapters cover integration with other systems. For now, keep in mind that there are options other than spending all day at the keyboard.
Importing data moves data from one environment to another in a batch mode, and that is what this section summarizes. FileMaker Pro now also provides a number of ways to share data in real time. Beginning with FileMaker Pro 9, you can use ODBC to access external SQL data sources in real time. You can also add SQL tables to your database graph, and you can even add supplemental fields to the external tables—your FileMaker database stores the supplemental fields.
![]() To explore how to bring data, including a directory of images, into your FileMaker Pro solution, see Chapter 22, “Importing Data into FileMaker Pro,” p. 627.
To explore how to bring data, including a directory of images, into your FileMaker Pro solution, see Chapter 22, “Importing Data into FileMaker Pro,” p. 627.
![]() To learn about ODBC connectivity and exporting, see Chapter 23, “Exporting Data from FileMaker,” p. 649
To learn about ODBC connectivity and exporting, see Chapter 23, “Exporting Data from FileMaker,” p. 649
Saving PDF and Excel Documents
Often you will want to prepare a report in FileMaker and create an electronic document you can then share with your colleagues. From the File menu, you can now save directly to PDF or Excel without having to use any third-party software.
Notice that you can automatically attach your documents to an email, or even use FileMaker to compose an email message from data within your database. This function depends on your having an email client installed on your computer.
![]() For more information on saving PDF documents and sending email from FileMaker, see “Delivering Reports,” p. 342.
For more information on saving PDF documents and sending email from FileMaker, see “Delivering Reports,” p. 342.
Using the Web Viewer
No overview of FileMaker’s features would be complete without a discussion of the Web Viewer. First introduced in FileMaker Pro 8.5, the Web Viewer provides a way to display data from the Web on a FileMaker Pro layout. As long as an Internet connection exists, the data can be live, and the user can interact with it much as with a browser.
The Web Viewer does not replace a browser, but it does provide a very significant set of features to users of FileMaker Pro. Because the address used to set up the Web Viewer is a calculation, you can display a Web Viewer that presents a map of a customer location from your database. You can display a client web page containing contact information so that you do not have to continually update your Contact Management database with new telephone extensions and mail stops.
![]() For more information on the Web Viewer, see Chapter 13, “Using the Web Viewer,” p. 401.
For more information on the Web Viewer, see Chapter 13, “Using the Web Viewer,” p. 401.
Troubleshooting
Most of the trouble you’ll run into as a user will be with issues specific to your own database solutions. The best advice we can offer both developers and users is to work together! When you run into problems, knowing your developer will be a great first step.
Data Loss
I’ve noticed that I’m suddenly missing some data. What happened? What can I do?
One of the most critical aspects of your database is what gives it its name: your data. A wide range of possible problems can affect your data, but the most dangerous is accidentally deleting a record...or worse yet, discovering that you had the wrong found set when performing a Delete All Records command. FileMaker doesn’t have an undo function, so if you delete a record, it’s gone forever. Be sure that you haven’t simply altered your found set to exclude the records you’re looking for. Go to Records, Show All Records to recall all the data in your table.
Back up your data. We can’t stress this point enough. FileMaker Server 9 deployment best practices and backup routines are easy to learn. If you’re not using FileMaker Server, you can make timestamped copies of your files and store them on CD or on another computer. By far the best backup strategy is to use an automated procedure. That way, no one has to remember to do anything. It always seems to be the case that the only time you do not back up your data is the one time your hard disk fails.
Also, make certain that you have practiced recovering data (backing it up and then restoring it to disk). It is common for someone to note a data loss and proceed to take all sorts of steps to recover the data (inadvertently destroying data in the process). And then, at the end of the day, it turns out that there was no data loss—all the day’s data was entered with an incorrect date.
Data Integrity
How do I ensure that the data I have in my database is “good” data?
Making sure that good data is entered into your database is vital. If you properly put people’s names in the first name and last name fields of a contact database, but your office assistant decides to enter nicknames and other random tidbits, your data will be compromised.
In addition, duplicate data is a problem that plagues all databases everywhere. If you’ve already created a record for, say, Uryas Forge, you won’t want to create a second record for him. What happens if his phone number changes? You’ll change one record, but not the other.
Dealing with bad data is a challenge and almost always requires the power of the human brain. Become adept at running find requests. Use the ! mark to find duplicates and use * characters for wildcard characters.
You can also work with your developer to put validation in place, or even build an approval process by which new data is added to your system in phases, with raw data in one set of fields, and confirmed data in another. Alternatively, you can add a single check box field to each record that indicates whether the data has been reviewed.
Reverting Records
What does Revert Record do?
As you enter data into fields, that information is not saved (committed) until you exit the record in question. You do so by clicking outside any fields or by changing modes, changing layouts, and so on. Before the record is committed, you can choose Records, Revert Record. This command undoes all the data you’ve entered while working with active fields. If you’ve tabbed from field to field, it reverts all those not yet saved. If you have created a new record, it even reverts the entire new record if you’ve not yet committed it.
File Corruption and File Recovery
What do I do if a file won’t open or says it needs to be recovered?
In the rare case that a file is corrupted, you can attempt to recover it by using the File, Recover command. By recovering a file, FileMaker attempts to create a new copy of your database and rebuild its information, structure, and indices. This is necessary only in drastic circumstances.
Be careful: If a file fails this consistency check but is then successfully recovered, a prudent user would still import data into an empty copy of the database backed up before the corruption was evidenced. It is best not to use the recovered files if you can do this, but if you do not have a backup copy of the database from which you can delete all the data, you have no choice. The fastest way to delete all data is to use File, Save a Copy As to make a copy of the backup file and use the pop-up menu on the Save dialog to select Clone (No Data) for the file type.
FileMaker Extra: Becoming a FileMaker Pro Power User
Manipulating data can illuminate a wide range of information and can allow business users to draw conclusions they might not have been able to perceive anecdotally. For example, in our consulting firm, we were able to analyze our time entry data and calculate the average amount of time we need for testing. This helped greatly for future estimating.
Becoming adept at using FileMaker Pro enables you to understand what information you can pull from the system, but, most important, it enables you to know what to ask for. In working with a developer, you can guide that person’s priorities (or your own) based on a solid understanding of the platform.
Technique 1: Using Your Keyboard for More Speed
This one’s obvious. Entering (![]() -F) [Ctrl+F] brings you into Find mode. Tabbing takes you from field to field. The (Return) [Enter] key executes default values in dialog boxes, performs finds, and so on. (
-F) [Ctrl+F] brings you into Find mode. Tabbing takes you from field to field. The (Return) [Enter] key executes default values in dialog boxes, performs finds, and so on. (![]() -up arrow) [Ctrl+up arrow] and (
-up arrow) [Ctrl+up arrow] and (![]() -down arrow) [Ctrl+down arrow] page through your data. You’ll become much faster with FileMaker Pro if you take the time to learn your key commands. FileMaker’s online help details all the key commands available.
-down arrow) [Ctrl+down arrow] page through your data. You’ll become much faster with FileMaker Pro if you take the time to learn your key commands. FileMaker’s online help details all the key commands available.
Technique 2: Working with Table View
User interfaces have their purpose and more often than not greatly assist data entry and working with a given solution. But if you just need to look at the raw data in your system, you can opt to change to Table view from any layout in FileMaker Pro, assuming that your developer hasn’t disabled the option. This gives you a bird’s-eye view of your information. Don’t forget that clicking a column header sorts for that column. A second click re-sorts descending.
Technique 3: Replacing Data
You’ll often run across cases in which you need to globally replace some data with other data. For example, perhaps you’ve changed a value list of vehicle types to read “auto, bike, boat, plane,” rather than “bike, boat, car, plane.” If you leave things alone after changing the value list, you’ll have both “car” and “auto” data in your system. Enforcing the consistent use of terms is important in maintaining your data integrity. To quickly take care of migrating from an old value to a new one, follow these steps:
- Choose Records, Show All Records—otherwise your change is applied to only your current found set.
- Place your cursor into the field in question.
In the case of a pop-up menu, you’re out of luck. FileMaker Pro doesn’t recognize a cursor in a pop-up menu. You need to do a little development (covered in Chapter 3, “Defining and Working with Fields and Tables”), copy the field to an open spot on your layout, and change its formatting to a pop-up list. Then don’t forget to delete the layout field when you’re finished.
- Choose Edit, Find/Replace to open the Find/Replace dialog box (see Figure 2.39).
Figure 2.39. Find/Replace can step through your records, or be applied across the entire database. Be careful: You cannot undo these functions!
- Type your old and new values.
- Choose All from the Direction drop-down menu so that your entire database will be covered.
- Depending on your preferences, choose Current Field or apply your change to entire records. We recommend just the selected field because that’s much safer than accidentally changing all instances of a text string.
- Click Replace All.
It’s important to note that this is a function that you cannot undo! Be sure that you know what you’re doing with your data.
Technique 4: Inserting Specific Information
The Insert menu is an often-ignored source of handy time-saving commands. From a single menu choice or keyboard command, you can insert the current time, the current date, or your username into an active field.
In addition to that, Insert, From Index allows you to select from all the values in a given field from all records in a database. If you can’t quite remember the spelling of a given item, or you simply want to be perfectly consistent, this is a great way to see the data in your system and make a compatible selection. This works only if the field in question allows indexing.
![]() To learn about field indexing, see “Storage and Indexing,” p. 110.
To learn about field indexing, see “Storage and Indexing,” p. 110.
Finally, there’s a handy way to pull data from another record in your database. If three or four fields need to contain identical data to another record in your database, visit the source record first, and then via a List view or Table view, jump to the destination record by clicking on the appropriate row. Click into the specific fields you want and choose Insert, From Last Visited Record.
Technique 5: Getting to Know Your Entire Database
This item isn’t so much a technique as it is just common sense: One of the best ways to make the most of a FileMaker database is to learn how it works. Review all the layouts in your system, take a look at the fields you see, and explore other files (if there are others) in the solution. Be sure to discuss with your developer how the information fits together.
Technique 6: Using Multitiered Sorts
Sorting can be a fairly powerful way to derive meaning and see patterns in data. To make the most of the Sort Records dialog, don’t forget that you can provide multiple sort criteria. For example, in a contacts database, you could sort by Last Name, First Name, City, descending by Age, and finally by Pet Name.
You can also sort by the custom order of a value list. If you have, say, a status field managed by a value list of “open, pending, closed,” you can sort by that order.
Technique 7: Using Multiple Windows
FileMaker provides you with a Window menu. If you’d like to work with multiple layouts at once, choose Window, New Window, and then navigate to the second layout in question by using either the Layout pop-up menu in the Status Area or the buttons provided by a developer.
Multiple windows are also useful when you open two windows looking at the same List view layout: It’s possible for you to have two separate found sets. Imagine finding all the invitees of an event in one window and all the people who you’ve not yet invited in the other.
Technique 8: Applying Text Styling and Tabs
You can apply a wide range of formatting options to text within FileMaker Pro fields: bold, italic, font choice, color choice, and so on (see Figure 2.40). FileMaker Pro preserves this information, and you can copy and paste formatted text with other applications.
Figure 2.40. You have a wide range of control over text appearance in FileMaker Pro.
There is another neat trick in FileMaker Pro: In any field, you can establish an internal tab placement and apply tabs by using (![]() -Tab) [Ctrl+Tab]. Choose View, Text Ruler. When you click into a field, a horizontal ruler appears above it, into which you can click to establish tabs. Double-click a tab to set its properties: left, center, right, align to character, and whether to use a fill character.
-Tab) [Ctrl+Tab]. Choose View, Text Ruler. When you click into a field, a horizontal ruler appears above it, into which you can click to establish tabs. Double-click a tab to set its properties: left, center, right, align to character, and whether to use a fill character.