Chapter 15
Keeping Your House Safe
In This Chapter
![]() Verifying data
Verifying data
![]() Backing up and restoring a database
Backing up and restoring a database
![]() Turning on security
Turning on security
![]() Tracking actions in the database
Tracking actions in the database
![]() Using Station Administrator to resolve problems
Using Station Administrator to resolve problems
After you get information into your database, you should implement some safeguards to ensure that you haven’t wasted your time. In this chapter, you learn how to
- Verify that your database contains valid data
- Back up (and restore, knock on wood) your database
- Use security in Timeslips to ensure that only those who should be looking at your data can look at your data
- Use the Timeslips Audit Trail feature to track who has done what in your database
- Use the Station Administrator tool to diagnose and resolve configuration issues
Most of the tools described in this chapter are used by those who administer the Timeslips environment.
Making Sure Your Data Is Valid
As you work in Timeslips on a day-to-day basis, errors can creep into your Timeslips database. These errors might not be apparent immediately, but eventually they can corrupt your data to the point that the database becomes unusable. To avoid this situation, you should plan to periodically verify the validity of your database using the Data Verification feature. In many cases, if the Data Verification tool finds corruption, it can repair that corruption.
 If the Data Verification feature can’t solve your database corruption problems, you can restore your data from a backup. Or you can contact a Timeslips certified consultant or Sage Timeslips Technical Support person, who might be able to help you correct the corruption. If all else fails, you can send your database to Sage Timeslips Technical Support and, for a not-insignificant fee, they will repair your database.
Typically, you run Data Verification once to simply examine the database for errors. If Data Verification finds no errors, you’re done. If the tool finds errors, you rerun the tool using different settings. The Data Verification process can take considerable time, depending on how much data you store in the Timeslips database. Plan to run Data Verification during an off-peak usage period, perhaps at the end of the workday.
To run the Data Verification tool, follow these steps:
- Choose File⇒Data Verification.
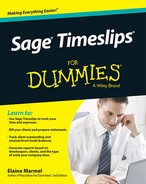
Timeslips displays the Data Verification dialog box shown in Figure 15-1.
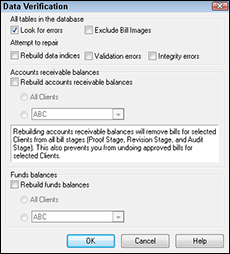
Figure 15-1: Confirm that your Timeslips database is healthy.
- Select only the Look for Errors check box.
- Click OK.
A message appears, explaining how data repair works and asking if you want to start repairing data. The message is a bit misleading because Timeslips won’t repair any errors it finds during the process of looking for errors.
- Click Yes.
Timeslips prompts you to make a backup of your database. Because the Data Verification tool won’t make any changes, you can skip the backup this time.
- Click No.
The Data Verification tool begins to run, and you see a progress bar. When the tool completes its analysis, the Data Verification Results window shown in Figure 15-2 appears.
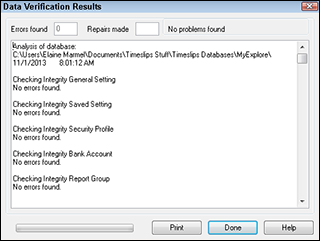
Figure 15-2: A typical Data Verification Results window.
At the top of the Data Verification Results window, Timeslips reports the number of errors that were found. You can scroll down in the window to review the tests that the Data Verification tool made and their results. This report can be useful to Timeslips–certified consultants or Timeslips Technical Support personnel if you need to contact them for help repairing the database.
If the Data Verification tool reports errors in your database, repeat the preceding steps, making the following changes:
- In Step 2, select Look for Errors and Rebuild Data Indices.
- In Step 5, click Yes and make a backup of your database. For details on the process of making a backup, see the next section.
The Data Verification tool will attempt to repair any data index problems in your database. If the Data Verification tool still reports errors in your database, repeat the previous steps but, in Step 2, select Look for Errors and Rebuild Data Indices.
If the Data Verification tool continues to report errors, rerun the tool, this time selecting Look for Errors, Rebuild Data Indices, and Validation Errors.
If your database errors pertain to accounts receivable balances or funds balances, you can use the settings at the bottom of the Data Verification dialog box to rebuild those balances for one or all clients.
Although the Data Verification tool will attempt to repair as many errors as it can, it cannot repair all errors. If your database is badly corrupted, the Data Verification Results report will recommend that you restore your database from a backup. Read on.
Backing Up and Restoring a Database
Your Timeslips database is probably the most valuable asset your company owns. After all, it stores all the time you’ve spent working and all the bills you’ve generated, both paid and unpaid. Without your Timeslips database, you might find yourself in the unenviable position of not knowing how much your clients owe you and how much to bill your clients for work you’ve performed.
You know that popular little saying, "Stuff happens.” (That’s not exactly how it goes, but you know what I mean.) Well, it’s true. Computers fail, data gets deleted or corrupted, and disasters such as fire or theft can occur.
 Although you can always get another computer and reload Timeslips, no amount of money can help you recover all the work that you’ve put into Timeslips. That’s why backing up your Timeslips database regularly is important. Your backup is your insurance policy against disasters — and the cheapest insurance policy you’ll ever own. Without backups, you run the risk of losing weeks, months, or even years of work. Do you really want to take that kind of risk?
Because the Timeslips database is actually a collection of database files, you should use the Timeslips Backup tool to make your backup. The Timeslips Backup tool ensures that you back up all the files you might ever need to recover from a disaster.
Please don’t say that your network administrator backs up your server every day. And please don’t tell me that you back up to the cloud. My answer: You still should make your own backup using the Timeslips Backup tool. My years of experience are talking here.
Why am I pushing using the Timeslips tools to back up? Because I can then guarantee that you’ll know how to restore your Timeslips database in case of an emergency. If you don’t have a backup made using Timeslips tools, you need to ensure that you know how to restore your database using some other tools. (Backups that you don’t know how to restore are hardly useful.) I think you’ll find the Timeslips tools very easy to use.
The question I’m asked most often is, “How often do I need to back up?” And my answer is always, “How much data are you willing to re-enter into Timeslips?” If you use Timeslips daily, I think you should back up daily. That way, if a disaster occurs on Day 2, you can restore the backup from Day 1 and re-enter only Day 2’s work. Plan to back up at the end of each day, before you leave work. Even large Timeslips databases typically take no more than 20 minutes to back up, and smaller databases take considerably less time — just a few minutes. While your backup runs, you can clean up your desk and get ready to go home.
Backing up
You should keep more than just yesterday’s backup. I recommend that you keep 10 backups—one for each of the last 10 days. Why? Refer to the Data Verification section in this chapter; sometimes, errors creep into your database without your knowledge. If your database becomes corrupted and you have only one backup, chances are good that you’ve backed up the corruption, and that backup won’t be worth much. However, if you keep several backups, you give yourself the chance of having to re-create only a few days of work instead of losing everything. And keeping 10 backups is easy to do, as you see in a moment.
You should save your backups to a hard drive other than the one that stores the original database. You can, for example, use an external hard drive or flash drives. Both mediums are reliable, inexpensive, fast, and portable. I prefer an external hard drive because I can fit all my backups on it and know exactly where to find the latest backup.
When you create your backup, Timeslips suggests that you name the backup file Timeslips Backup. That’s insufficient. You should add today’s date to the beginning of the filename so that your backup files have names such as 10-31-13 Timeslips Backup and 11-01-13 Timeslips Backup. Using this naming convention, you can easily identify the most recent backup file, which is the one you’ll want to try first if you need to recover from a disaster.
Backing up a corrupted database won’t help you in the event of a disaster. For that reason, you should verify your Timeslips database’s integrity before you back it up. See the preceding section, “Making Sure Your Data Is Valid” for details.
To back up your Timeslips database using the built-in tools supplied in Timeslips, follow these steps:
- Plug in your external hard drive or flash drive.
- If you work in a network environment, in Timeslips, place the database in exclusive mode by choosing Special⇒Exclusive Mode.
- Choose File⇒Backup.
Timeslips displays the Back Up Current Database dialog box, which lists the folder location of the current database, the date you last made a backup, the question, Do You Want to Make a Backup?, and the Include Subfolders Found in Your Database Folder check box.
- Select the Include Subfolders Found in Your Database Folder check box.
- Click Yes.
Timeslips displays the Name the Backup File window shown in Figure 15-3.

Figure 15-3: Assign a name to the backup file.
- Navigate to the location (external hard drive or flash drive) where you want to store your backup.
As you can see in Figure 15-3, I store my backups in a folder called Timeslips Backups on my LaCie external hard drive.
- In the File Name field, type the name you want to assign to the backup file.
I add today’s date to the default name that Timeslips supplies, which is Timeslips Backup.
 Timeslips automatically assigns a file type of .BKU (for backup) to all Timeslips backup files. In that way, you can easily distinguish Timeslips backup files from all your other files.
 - Click the Save button.
A progress bar appears as Timeslips backs up your database. When Timeslips finishes backing up, a message appears, indicating that the backup was successful.
- Click OK.
And that’s it — you’ve made a backup. Don’t forget to choose Special⇒Exclusive Mode to give others access to the database.
Restoring a backup
So, the moment arrives when disaster strikes. You knew it would; it’s Murphy’s Law — anything that can go wrong, will go wrong.
But you’re prepared. You have your Timeslips backups that you can use to recover from disaster. Picture me patting you on the back for making those backups. If I were there, I’d be cheering!
To restore a backup, follow these steps:
- Plug in the external hard drive or the flash drive where you store your backups.
- If you work in a network environment, in Timeslips, choose Special⇒Exclusive Mode.
- Choose File⇒Restore to display the Restore a Backup dialog box shown in Figure15-4.
By default, in the Select a Backup File to Restore box at the top of the dialog box, Timeslips displays the location and filename of the last backup you made. If necessary, click the Browse button (the three dots) beside the filename to locate and select the backup that you want to restore.
Figure 15-4: The Restore a Backup dialog box.
- Choose either the Current Database option or the Choose a New Location option.
If you choose the Current Database option, Timeslips restores the backup to the same folder where the original database was stored. If the original database became unusable, you have nothing to lose by overwriting it. If the original database was not unusable, you can make a copy of it before overwriting it by selecting the Back Up the Current Database First option and the Include Subfolders of the Current Database in the Backup option.
If you choose the Choose a New Location option, you can restore the backup to a new folder of your choice.
- Click OK.
Timeslips restores the backup you selected in Step 4. If you opt to restore to the original location and back up the original database before restoring, Timeslips first makes a copy of the original database.
When Timeslips finishes restoring, a message appears, telling you that Timeslips successfully restored the backup.
- Click OK to open the newly restored database.
If your Timeslips database was connected to an accounting program using TAL, you see a message that warns you to take care that you transfer only new transactions to your accounting program because the backup you restored might have contained transactions already stored in your accounting program. Click OK to dismiss the message and open the newly restored database.
Don’t forget to choose Special⇒Exclusive Mode again to give other workstations access to the database.
Now, admit it — wasn’t that easy?
Securing Your Data from Prying Eyes
Using the Timeslips Security feature, you can assign passwords to your Timeslips data so that only those who know the password can open the database. Further, you can establish exactly what any particular timekeeper can (and cannot) do while working in Timeslips.
Setting up security is a three-part process:
- Establish a supervisor password that the Timeslips database administrator — and no one else — knows. Anyone who knows the supervisor password can make changes to the security you establish for your Timeslips database.
- Create security profiles that describe the types of actions a timekeeper can take if assigned to the profile.
- Assign each of your timekeepers to a security profile.
You can and should assign multiple timekeepers to the same security profile. Setting up these profiles saves you time because, typically, you want to permit many timekeepers to perform the same actions and only a few timekeepers to perform different actions. You might find that you need only 3 or 4 profiles for 19 or more timekeepers.
Turning on security
You turn on the Timeslips Security feature when you set up global security options and establish a supervisor password. Follow these steps:
- Choose Setup⇒Security⇒Global.
Timeslips displays the Global Security dialog box (see Figure 15-5).
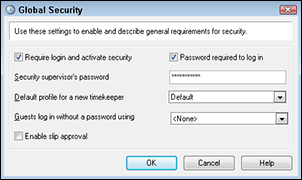
Figure 15-5: Turning on security.
- Supply the password that the administrator of Timeslips security should use.
Nobody but the security administrator and the company’s owner should know this password. It is not case-sensitive; Timeslips stores the password in all uppercase letters, even if you type it using uppercase and lowercase letters.
- Select the Require Login and Activate Security check box and the Password Required to Log In check box.
If you want to allow someone without a password to log into your database, you can create a timekeeper named Guest, set up a profile for it, and then permit it to log in by selecting it in the Guests Log in Without a Password Using drop-down list. Be aware that third-party programs that connect to Timeslips are subject to security, and some might try to use the Guest login, so set up the guest’s profile carefully.
- If your company uses the Slip Approval feature described in Chapter17, select the Enable Slip Approval check box.
- Click OK to save the settings.
Timeslips displays a message telling you to write down the password you assigned and keep it in a safe place.
- Click OK.
Another message appears, prompting you to log in.
- Click Yes, and Timeslips displays the Database Login dialog box shown in Figure 15-6.
This dialog box appears each time any user opens the database.
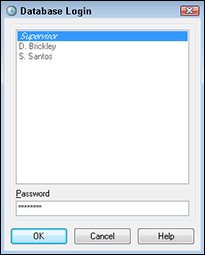
Figure 15-6: When security is enabled, the Database Login dialog box appears each time anyone opens the database.
- For now, select Supervisor, type the supervisor password in the Password text box, and click OK.
After you finish setting up security, timekeepers will select their own names from the list and type their own passwords.
Creating profiles
You create security profiles to store a collection of rights you want to assign to timekeepers.
Because timekeepers can share profiles, I suggest that you make a list of your timekeepers and group them based on what they do in Timeslips. Your grouping should show that you need to set up just a few profiles.
Follow these steps to create a security profile:
- Choose Setup⇒Security⇒Profiles.
Timeslips prompts you for the supervisor password.
- Type the supervisor password and click OK.
Timeslips displays the Security Profile List window. The window contains one profile — the Default profile, which provides complete access to all Timeslips functions. Typically, you reserve the Default profile for the Timeslips database administrator who uses the supervisor password to log into Timeslips.
- Click the New button to display the Security Profile dialog box shown in Figure 15-7.
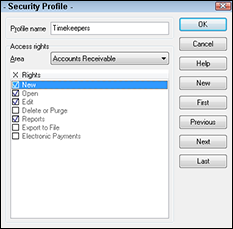
Figure 15-7: Create a new security profile.
- At the top of the dialog box, assign a name to the profile.
- Open the Area drop-down list and select an area in Timeslips for which you want to remove permissions.
By default, Timeslips assigns permission to all areas of Timeslips when you create a new profile; you remove check marks from the Rights list to limit permission to that area.
- Deselect any permissions you don’t want available in the profile.
- Repeat Steps 5 and 6 for each area in Timeslips.
- Click OK to save the profile.
- Repeat Steps 3–8 to create additional profiles.
- Click Done to save all your profiles.
Timeslips displays a message explaining that security settings have changed and asks if you want to log in again to enable the new settings.
- Click No because you need to finish setting up security as the supervisor.
Assigning timekeepers to profiles
After you’ve established profiles, you need to assign each of your timekeepers to one of the profiles and establish passwords for each timekeeper.
To assign timekeepers to profiles, follow these steps:
- Choose Setup⇒Security⇒Timekeeper Rights.
Timeslips prompts you for the supervisor password.
- Type the supervisor password and click OK.
Timeslips displays the Timekeeper Security window, which lists all timekeepers set up in your database.
- Click a timekeeper and then click Open.
Timeslips displays the Timekeeper Security Setting dialog box shown in Figure 15-8.
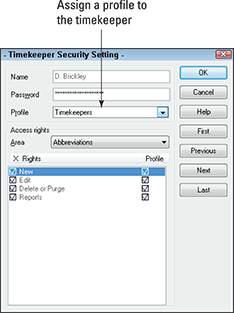
Figure 15-8: Assign a password and a profile to the selected timekeeper.
- In the Password text box, at the top of dialog box, type a password for the timekeeper.
The timekeeper uses this password to log into your Timeslips database.
To make your life easier, you can initially establish the same password for each timekeeper. When you notify your timekeepers of the password, also tell them to change the password by logging in with the initial password and then choosing Special⇒Change Password. - Open the Profile drop-down list and select the profile you want to assign to the selected timekeeper.
- Click OK.
- Repeat Steps 3–6 for each timekeeper defined in your database.
- Click Done.
Timeslips displays a message explaining that security settings may have changed for the current user and asking if you want to log in to see the effects of the changes.
- Click Yes.
Timeslips displays the Database Login dialog box shown previously in Figure 15-6.
- Select yourself, type your password, and click OK.
Let your Timeslips users know that they can choose Special⇒Logout and Lock to log out of the database without exiting Timeslips. By using this command, your Timeslips users can walk away from their desks knowing that the Timeslips database is secure.
If, at any time, you decide you no longer need security, choose Setup⇒Security⇒Global to display the Global Options dialog box (refer to Figure 15-5). Deselect the Require Login and Activate Security option and the Password Required to Log In option. Also delete the supervisor’s password. Then click OK.
Using the Audit Trail to Track Actions
If you enable Timeslips security and require that each timekeeper use a password to log into the database, you also can use the Audit Trail feature to track who takes actions in your Timeslips database, what actions are taken, and when they happen. After you enable audit trail tracking, you can control how much data the feature tracks and you can print the Audit Trail report to review the actions taken in your database.
Your Timeslips database administrator should limit access to the audit trail feature. If everyone has access to the audit trail feature, anyone can turn it on and off at will, which defeats the purpose of using the feature.
To set up the Audit Trails feature to track information in your database, follow these steps:
- Choose Setup⇒Security⇒Audit Trails.
The Audit Trails Setup dialog box shown in Figure 15-9 appears.
If you don’t see the Audit Trails command, choose Setup⇒Features Enabled and make sure that a check mark appears next to the Audit Trails option.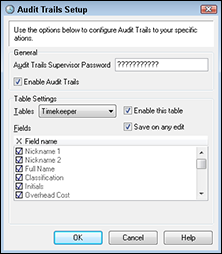
Figure 15-9: Set up the Audit Trails feature.
- In the Audit Trails Supervisor Password text box, supply a password that controls the Audit Trails feature.
For security, you should make this password different from the security supervisor password, but make sure that your company’s owner and the security supervisor know this password. It is not case-sensitive; Timeslips stores the password in all uppercase letters, even if you type it using uppercase and lowercase letters.
- Select the Enable Audit Trails option.
- Use the Table Settings section to select the data you want to track.
A table is a collection of records in a database, and you can enable the Audit Trails feature for specific tables in your Timeslips database. By default, the feature tracks all changes in all database tables.
To track only certain data in the database, open the Tables drop-down list and select the table. Then
- Decide whether to track changes to the table by selecting or deselecting the Enable This Table check box.
- Decide whether to save tracked changes for the entire table by selecting or deselecting the Save on Any Edit check box.
- If you deselect the Save on Any Edit check box, you can select specific fields in the table to track by selecting or deselecting fields in the Field Name list for the table.
- Click OK.
Timeslips displays a message identifying the Audit Trails feature password.
- Click OK.
Timeslips prompts you to add initial audit trail data for records in the database that already existed when you enabled audit trails.
- Click Yes.
Timeslips updates audit trail data.
To view audit trail information, choose Special⇒Audit Trails to display the Audit Trails window shown in Figure 15-10.
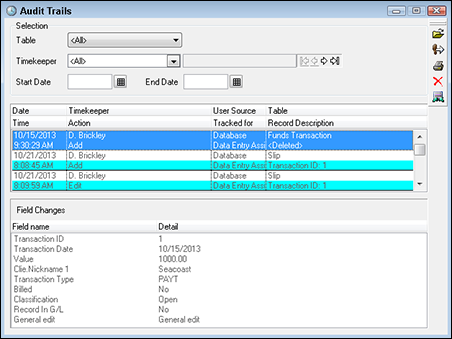
Figure 15-10: Audit trail information appears in this window.
Use the options at the top of the window to limit the audit trail data shown in the middle of the window, and click an entry in the middle of the window to see the audit trail data for that entry in the bottom of the window. You can print the information by clicking the Print (printer) button on the vertical toolbar. You can print the report also by choosing Reports⇒Other.
To display audit trail information for a specific record, open the Audit Trails window by choosing Special⇒Audit Trails. Then click a record and choose Special⇒Audit Trail on This Record. Using this approach can be helpful, for example, if you want to view the audit trail associated with a particular timekeeper, client, or task.
The Audit Trail feature can generate a lot of data. Periodically, consider purging audit trail data by clicking the Purge (X) button on the vertical toolbar in the Audit Trails window. Timeslips displays the Purge Audit Trails dialog box, where you can select audit trail records to purge. You also can print a report of the audit trail data that you purge.
Before you purge data, consider backing up. The backup will contain both the data you purge as well as the data you don’t purge; in that way, you will have the purged data in case you discover that you need it later.
Using Station Administrator
Station Administrator is a tool for Timeslips database administrators to help resolve some issues that might arise. The Station Administrator window lists all workstations currently accessing the Timeslips database and displays the location of the current Timeslips database. To use Station Administrator, close Timeslips and then, from the Timeslips group on the All Programs menu, choose Station Administrator. The window shown in Figure 15-11 appears.
The Timeslips database administrator can use Station Administrator to solve a number of problems. For example, if you see the BDE settings are too low error message when you open your Timeslips database, you can choose Options⇒Diagnose This Computer to solve the problem. Station Administrator displays the Diagnose This Computer dialog box, which contains four Fix buttons. If any of them are available, click them to fix the associated problem.
You might also see a message indicating that you should close all programs that use the Borland database. Make sure you close TimeCapture and close WordPerfect, if you use it.
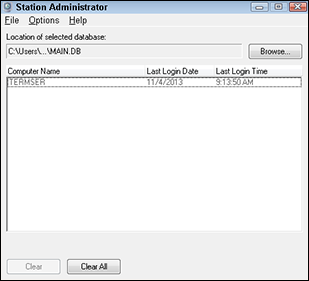
Figure 15-11: Station Admin-istrator.
The list of all workstations accessing the current database should refresh as workstations open and close the database. However, if you need to reboot a particular workstation while that workstation has Timeslips open, the list might not update properly. You can click the workstation in the Station Administrator window and then click the Clear button.
By choosing Options⇒Licenses In Use, you can identify the number of Timeslips licenses you own.
If you see the Another program is accessing your Sage Timeslips database error message, you can choose Options⇒Change Install Path to select the correct Timeslips configuration file.
For Timeslips to operate properly in a network, each workstation should use the same configuration file. If you follow the network installation instructions found at www.dummies.com/extras/sagetimeslips, your Timeslips installation shouldn’t experience this problem.
You also can choose Options⇒Change Timeout Settings to automatically log out workstations logged in-to the Timeslips database when these workstations have been inactive for a period of time you specify. This feature is particularly useful if you back up Timeslips in the middle of the night and one Timeslips user accidentally left Timeslips running at the end of the day.
You can control who uses Station Administrator by setting up security for it. Choose Options⇒Settings. Then supply an administrator password and click OK. Only those who know the administrator password will be able to use Station Administrator.