
Chapter 17
Features for Power Users
In This Chapter
![]() Using budgets and categories
Using budgets and categories
![]() Setting up taxes
Setting up taxes
![]() Updating rates and slips
Updating rates and slips
![]() Using the My Lists feature
Using the My Lists feature
![]() Taking advantage of the Slip Approval feature
Taking advantage of the Slip Approval feature
![]() Splitting bills between clients
Splitting bills between clients
![]() Allocating fees to timekeepers
Allocating fees to timekeepers
Timeslips is a feature-rich program, and no one uses all its features. In this chapter, I present some features that tend to be overlooked. None are required to use Timeslips, but some might interest you, especially if you want to use Timeslips beyond its basic time-tracking and -billing features.
Using Budgets
You can use the Budgets feature to compare estimates you provide for hours, fees, and costs to their actual values. The Budgets feature can help you learn to accurately estimate the amount of time you’ll spend on a particular project; with that information, you can improve your bids for similar future projects.
 You can set up a budget for your firm, a client, a timekeeper, a task, or an expense. For this example, I set up a client budget.
To set up a budget, choose Names⇒Budgets. In the Budget Setup window that appears, select the client for whom you want to set up a budget. And, if you use the References feature and want to set up the budget for a particular reference, select that reference.
Then click the New (plus sign) button on the vertical toolbar display the Budget Entry window shown in Figure 17-1.
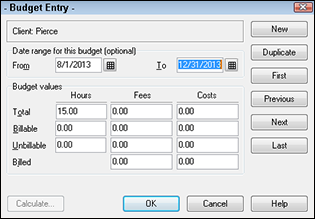
Figure 17-1: Setting up a budget for a client.
Optionally, provide a date range for the budget. In the budget values section, provide estimates for total, billable, and unbillable hours, fees, and costs. You don’t need to provide estimates for all these fields; you can estimate as few or as many as you’d like. In Figure 17-1, I estimate only hours.
Click OK, and Timeslips redisplays the Budget Setup window (see Figure 17-2) and saves the budget.
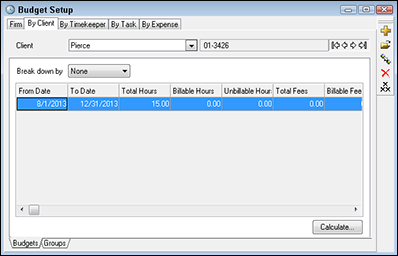
Figure 17-2: The Budget Setup window.
After you’ve entered some time for the client, redisplay the Budget Setup window and click the Calculate button in the lower-right corner. Timeslips displays the Budget Calculation window, which enables you to compare budgeted amounts to actual amounts (see Figure 17-3).
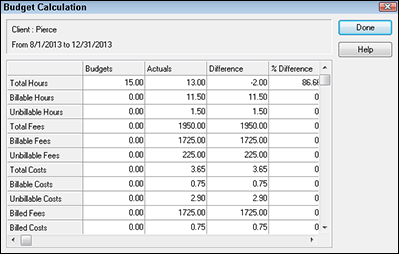
Figure 17-3: Compare budgeted amounts to actual amounts.
You also can print budget reports by choosing Reports and then clicking the Client, Timekeeper, Task, or Activity tab and selecting a budget report. To print a budget report for a firm budget, use the Other tab in the Report List window.
Using Categories
You can use activity categories to group charges on a bill. For example, suppose you’ve set up individual tasks for Design Development, Measured Drawings, and Schematic Design and you’ve created several slips using each task. You could create a category called Design and use it to group all slips using each of the tasks on the client’s bill.
Or suppose you use replacement slips. (For details on replacement slips, visit www.dummies.com/extras/sagetimeslips.) You could use categories to set up replacement slips for groups of tasks or expenses.
When you select the interim or progress billing by activity billing arrangement, categories you establish appear when you view WIP (work in progress) and determine new time charges. See Chapter 11 for more information on the progress and interim billing arrangements.
If you set your bill layout to summarize charges by time or expense slips, Timeslips groups charges associated with categories and prints them by category on the bill.
You can sort and filter information by category on many reports. The Category Listing report, on the System tab of the Report List window, prints the names of all categories defined in your database.
To set up the categories you want to use, choose Setup⇒Categories to display the Categories dialog box shown in Figure 17-4. Click the New button, type a name for the category, and click OK.
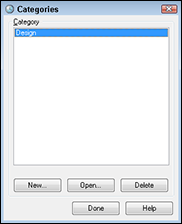
Figure 17-4: Set up categories.
To use the category, choose Names⇒Task Info or Names⇒Expense Info to display the Task Information window or the Expense Information window, respectively. Then double-click a task or expense and, on the General tab of the window, select a category for the task or expense using the Category field, which appears just below the Name field.
Setting Up Taxes
If your state, county, or city government requires that you charge tax to your clients for the work you perform, you can use the Timeslips Taxes feature. To use the Taxes feature, you first set up taxes and then you assign them to clients.
When you set up taxes, you define three components:
- Jurisdictions identify the government or location that charges a tax. Timeslips predefines jurisdictions for each U.S. state.
- Tax Rate Rules define the details of the tax that a jurisdiction charges, including the tax percentages, whether the tax applies to tasks, to expenses, or to both, and how taxes appear on bills.
- Tax Profiles group one or more tax rate rules, such as state and county taxes. You assign a profile to each client and to tasks and expenses, as appropriate.
To set up the feature, follow these steps:
- Choose Setup⇒Taxes.
- On the Jurisdictions tab, define additional jurisdictions you need:
- Click the New button and, in the Tax Jurisdictions dialog box that appears, use the Type drop-down list to specify whether the jurisdiction you’re adding is a federal, state, city, county, or other type of jurisdiction.
- Fill in the two text boxes that describe the jurisdiction.
For example, when you create a county jurisdiction, you identify the county name and the county’s state.
- Click the Tax Rate Rules tab, select the state for which you need to define tax rate rules, and click the Open button.
For this example, I select Florida.
- In the Tax Rate Rules dialog box that appears (see Figure17-5), do the following:
- Supply the tax rate for the jurisdiction as a percentage.
That is, type 5%, for example, not .05.
- Use the Type of Charges drop-down list to specify whether the tax applies to time charges, expense charges, or both.
- Use the Additional Rules section to set additional options for the tax.
- Use the Formatting on the Bill section to specify whether and how to identify slips on bills for which you charge taxes.
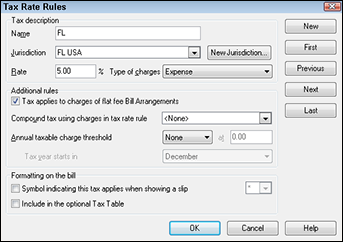
Figure 17-5: Define the details for a jurisdiction.
- Supply the tax rate for the jurisdiction as a percentage.
- Repeat Steps 2–4 for other jurisdictions for which you charge tax.
If Timeslips prompts you to select tasks or expenses to which the tax applies, you can right-click and choose all to avoid having to individually select tasks or expenses.
- Click the Tax Profiles tab, and open the jurisdiction for which you want to create a profile.
In this example, I open the Florida tax profile (see Figure 17-6).
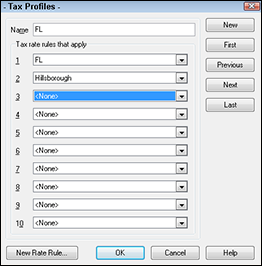
Figure 17-6: Assign multiple tax rate rules to a profile.
- Use the drop-down lists to select tax rate rules to a profile.
- Assign the appropriate tax profile to each client on the Arrangement 2 tab of the Client Information window.
- Assign the appropriate tax rule to each task and expense using the Billing tab of the Task Information window and the Expense Information window.
 Be aware that you assign a tax profile to clients, but assign tax rate rules to tasks or expenses. So, to correctly calculate taxes in the example, I assign the FL tax profile to my clients, but I assign both the FL tax rate rule and the Hillsborough tax rate rule to expenses.
Updating Rates
As described in Chapter 3, you assign billing rates to timekeepers, clients, tasks, and expenses, and you use billing rates when you create slips. In addition, you typically set up rate selection rules for each client. Timeslips uses these rules to automatically assign rates to time slips based on the names selected.
If you change a billing rate or rate selection rule, you can use the Update Rates Wizard to update rates on selected slips and avoid editing each slip manually. For example, many companies increase rates at the beginning of each new year and want to apply new rates to unbilled slips. You select the slips by setting a date that Timeslips compares to the slip’s date; Timeslips updates slips with dates later than the date you select. Alternatively, you can select slips using selection filters.
If you change a rate selection rule or a rate for a timekeeper, client, or task that is assigned to a slip, Sage Timeslips will open the Update Rates Wizard automatically.
To use the Update Rates Wizard, follow these steps:
- Back up your database.
By backing up, you can restore the backup in case you make a mistake. See Chapter 15 for details on backing up.
- Change the rate of a timekeeper, client, or task, or change the Rate Selection Rule for a client on the Rates tab of Client Information and click the Save (disc) button on the vertical toolbar.
Timeslips starts the Update Rates Wizard. For this example, I changed a timekeeper rate.
- Click Next on the first screen of the wizard.
Timeslips displays the rates currently assigned to the timekeeper, client, or task and selects the one(s) that you changed that are also assigned to existing slips (see Figure 17-7).
Note: If you change or assign a rate that isn’t used on an existing slip, Timeslips doesn’t select that rate.
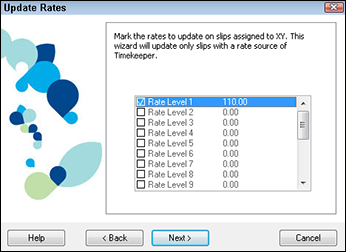
Figure 17-7: Timeslips identifies the rates it will update.
- Confirm the rate(s) you want to change and click Next.
Note: If you change a rate selection rule, Timeslips skips Step 4.
- Select the earliest date for the slips you want to update or click Filters and set a filter to select slips to update (see Figure 17-8).
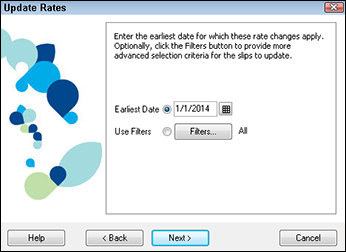
Figure 17-8: Set a date for slips to update.
- Click Next.
Timeslips displays a summary of the changes you want the Update Rates Wizard to make.
- Click Finish to make the changes.
Timeslips displays the number of slips it changed and the number of slips it skipped.
Updating Slips
You can use the Slip Export (Mass Update) Wizard to change selected fields on multiple slips using one slip as a guide.
Essentially, you set up a single existing slip to use the fields you want, and then you export selected fields to other slips. For example, suppose that a timekeeper leaves your company. You can change the timekeeper on that employee’s existing slips to some other timekeeper without editing individual slips. Follow these steps:
- Back up your database.
You can restore the backup in case you make a mistake. See Chapter 15 for details on backing up.
- Choose Slips⇒Time and Expense Slips.
The Time and Expense Slip List window appears.
- Highlight a slip you need to change and click the Open (folder) button (fourth from the top) on the vertical toolbar.
Timeslips opens the Slip Entry window.
- Change the field(s) on the slip as needed and then save the slip.
For my example, change the timekeeper.
- Click the Export button (second from the bottom) on the vertical toolbar.
Timeslips starts the Slip Export (Mass Update) Wizard.
- Click Next.
- Select the fields that you want to export from the slip (see Figure 17-9), and then click Next.
Sage Timeslips won’t export references unless the destination slips use the same client as the source slip. To export references, you must also export the client name.
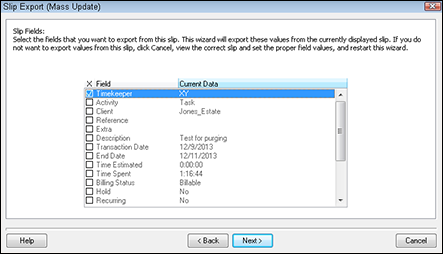
Figure 17-9: Select fields on the current slip to export.
- Set selection filters to specify the slips to which Timeslips should export the fields you chose in Step 7, and then click Next.
To change the timekeeper, double-click the Timekeeper Selection filter and choose the old timekeeper (which is the currently assigned timekeeper that you want to replace with the timekeeper you selected in Step 4).
Timeslips displays a summary of the settings it will use to export slip fields.
- Click Finish.
The Back Up Current Database dialog box opens, prompting you to make a backup.
- If you didn't make a backup in Step 1, make a backup now.
You’re making changes that you can’t undo, so you should have a backup. After Timeslips backs up, it exports the data.
When Timeslips finishes exporting the data, a dialog box appears, identifying the number of slips that the wizard updated.
- Click OK to redisplay the Slip Entry window.
Filtering Names with My Lists
Suppose that your organization’s Timeslips database contains lots of client, task, and expense nicknames. Further suppose that each timekeeper tends to use only a subset of all the client, task, or expense nicknames when entering data. You can use the My Lists feature to create a customized, shortened list of nicknames for each timekeeper. That way, the timekeeper has fewer names to sift through while creating slips so data entry will be easier.
The customized My List of nicknames doesn’t limit the timekeeper in any way. Any timekeeper can toggle between viewing all nicknames in the database or viewing only the nicknames on his or her customized list.
Setting up My Lists
Use the My Lists feature to specify which nicknames to display based on the timekeeper logged into the database. You start by setting up lists for timekeepers.
To set up a customized My List for any timekeeper, follow these steps:
- Choose Names⇒Timekeeper Info.
The Timekeeper Information List window appears.
- Double-click the timekeeper for whom you wish to set up a customized My List.
- Click the My List Setup tab.
You can set up customized lists of clients and of activities.
 Sage Timeslips uses the term activities to collectively refer to tasks and expenses.
 - Click the Client Selection button to open the My Client List Selection dialog box (see Figure 17-10).
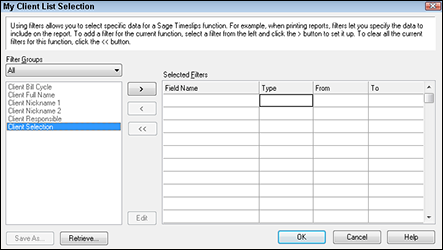
Figure 17-10: Choose a filter to select clients for a customized My List of clients.
- Double-click a filter to add it and select clients based on it.
For example, you can double-click the Client Selection filter and select the nicknames of the clients you want to add to the list (see Figure 17-11).
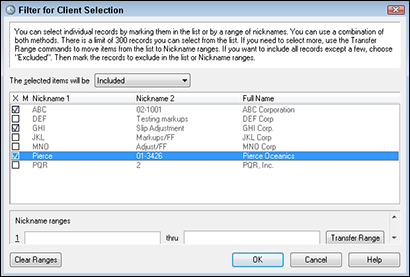
Figure 17-11: Select clients to add to the customized client My List.
- Click OK to save the filter selections, and click OK again to save the setup for the customized client My List.
- (Optional) Repeat Steps 4–6 to set up a customized activity My List for the timekeeper.
- Click Save to save the timekeeper’s settings.
Using My Lists
Suppose that a timekeeper for whom you set up a customized My Lists logs into the Timeslips database. That timekeeper views the established customized lists in the Client List window, the Task List window, and the Expense List window (see Figure 17-12).
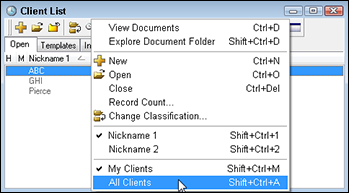
Figure 17-12: The Client List window shows only the names on the customized client My List.
The timekeeper can right-click anywhere in the window and, in the menu that appears, click All Clients to display the complete list of clients.
Similarly, that timekeeper can opt to view just the names on the customized My Lists while creating a slip. Toggle between viewing all names or only those on the customized My Lists by right-clicking the Client, Task, or Expense field.
Taking Advantage of the Slip Approval Feature
Some companies want more control over the slips included on bills. The Slip Approval feature can you help designate employees to approve slips to appear on bills. This feature helps you monitor the information that new timekeepers enter on slips and keep a closer eye on slips entered by mobile users.
When you use this feature, you assign authority to some timekeepers to approve slips — I call these timekeepers approvers— and you identify other timekeepers as ones whose slips require approval.
After you enable the Slip Approval feature, Timeslips assigns one of three statuses to each slip. You see each slip’s status in both the Slip Entry window and the Time and Expense Slip List window:
- Pending: Timeslips assigns this status to slips as you enter them, indicating that the slips are awaiting approval. Pending slips don’t appear on bills.
- Rejected: An approver assigns this status to a slip if the approver wants details on the slip changed. Rejected slips don’t appear on bills. Instead, the timekeeper must edit and resubmit the slip.
- Approved: An approver changes the slip’s status to approved when the slip requires no changes and can appear on a bill.
Only approved slips appear on bills.
Setting up the Slip Approval feature
Setting up the Slip Approval feature is a three-part process:
- Enable the feature.
- Assign the right to approve slips to selected timekeepers.
- Identify the timekeepers whose slips require approval.
To perform the first two parts of the process, you enable security for your Timeslips database. For details on setting up security in general, see Chapter 15.
To enable the Slip Approval feature, choose Setup⇒Security⇒Global. In the Global Security dialog box that appears, select the Enable Slip Approval check box and click OK.
Next, if you have only one or two approvers, you can edit their timekeeper rights in the Timeslips security feature to give them the right to approve slips by following these steps:
If you need to assign approver rights to many timekeepers, set up a separate security profile that assigns those rights and then assign that profile to the appropriate timekeepers.
- Choose Setup⇒Security⇒Timekeeper Rights.
Timeslips displays the Timekeeper Security window.
- Enter the Supervisor password and then click OK.
- Select the timekeeper to whom you want to assign approval rights, and then click the Open button.
Timeslips displays the timekeeper’s security profile in the Timekeeper Security Setting dialog box (see Figure 17-13).
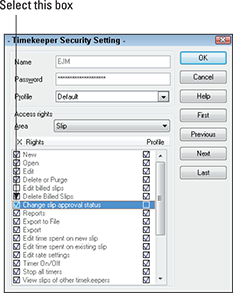
Figure 17-13: Assign slip approval rights to the selected timekeeper.
- Open the Area list and choose Slip.
- Select the Change Slip Approval Status check box.
Click the check box to the left of the option, not the one in the Profile column. If you click the check box in the Profile column, you add the right to approve slips to the profile (in Figure 17-13, that’s the Default profile) and all timekeepers who use that profile will then have slip approval rights.
- Click OK.
To perform the last part of the process of enabling slip approval, use the Timekeeper Information window:
- Choose Names⇒Timekeeper Info.
Timeslips displays the Timekeeper Information List window.
- Double-click a timekeeper whose slips need to be approved.
- Select the Slips Require Approval to Be Billed check box (see Figure17-14).
- Click the Save (disc) button on the vertical toolbar.

Figure 17-14: Designating that a timekeeper’s slips need to be approved before they can be billed.
Managing slips using the Slip Approval feature
With the Slip Approval feature enabled, Timeslips automatically sets the Slip Approval status for all new slips for all timekeepers to pending. The status appears in the upper-right corner of the Slip Entry window. But when you print bills, Timeslips ignores the Slip Approval status on the slips of timekeepers who don’t require approval; those slips automatically appear on the bill.
To address the slips that require approval, an approver must review the slips and determine whether they can be accepted or must be rejected because they require changes. An approver can use the Slip Entry window, the Time and Expense Slip List window, or the Billing Assistant to review and change the approval status of slips.
Figure 17-15 shows the Time and Expense Slip List window, with the cursor pointing at a slip approval status button. Each approval status has its own color: pending is yellow, approved is green, and rejected is red. The approver simply clicks the button to change the status; each click rotates through the three possible choices.
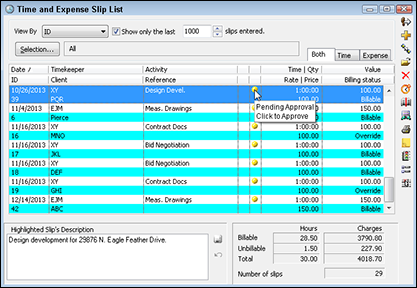
Figure 17-15: Click a slip approval status button to change its status.
Approvers can make changes to a slip and then approve it, or they can reject the slip. If an approver rejects a slip, the approver can use a slip note (see Figure 17-16) to explain why he or she rejected the slip.

Figure 17-16: A slip note.
Depending on how you set your preferences, Timeslips can automatically display a slip note window if an approver rejects a slip. Choose Setup⇒Preferences and then click Options on the left. Select or deselect the Open Slip Notes Dialog When Rejecting Slips option.
Anyone who can view the slip can also view the slip note; simply point at the Slip Note button in the Slip Entry window or the Time and Expense Slip List window. In addition, anyone can use slip notes at any time; simply click the Slip Notes button at the top of the Slip Entry window or on the vertical toolbar in the Time and Expense Slip List window (fourth button from the bottom). You also can use a slip note to carry on a running conversation between multiple timekeepers about a slip; just open the slip note and type.
Slip approval statuses appear on pre-bill worksheets. You can opt to print slip notes on the pre-bill worksheet by setting the report’s options.
Timekeepers can find their rejected slips most easily by using the Time and Expense Slip window. The timekeeper should edit the slip to make the requested changes. At that point, Timeslips changes the status of the slip to pending and an approver should once again review the slip.
If an approver edits a rejected slip, Sage Timeslips doesn’t change the approval status. Instead, the approver must take action to change the slip’s approval status.
Splitting Bills between Clients
You can use the Split Billing feature to allocate charges from one client, called the primary client, to one or more additional clients, called secondary clients. The Split Billing feature is useful whenever you need to bill two or more clients for related charges. For example, an insurance company might pay for a portion of a client’s bill.
You enter charges that you want to split between two or more clients by assigning the slips to the client you designate as the primary client. Timeslips then uses that split billing rules that you establish to determine how much to bill the primary client and how much to bill the secondary client when you generate a bill for either client.
If you perform work for a secondary client outside the split billing arrangement, select the secondary client on slips tracking that work. Timeslips then bills those slips to the secondary client without involving the primary client.
To set up split billing rules, follow these steps:
- Choose Bills⇒Split Billing Rules.
Timeslips displays the Split Billing Rule List window. The top portion of the window contains rules for primary clients, and the bottom portion contains rules for secondary clients.
- Click the New button beside the Primary Client Rules section.
Timeslips displays the Split Billing Primary Client Rule Entry dialog box shown in Figure 17-17.
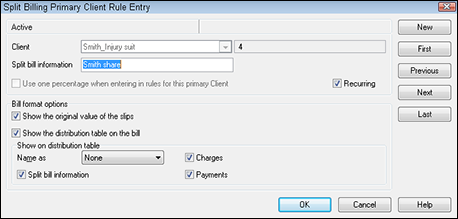
Figure 17-17: Set up a rule for a primary client.
- Make the following settings:
- Use the Client list to select the primary client, the one for whom you will record slips.
- (Optional) In the Split Bill Information text box, enter a description that will appear on the bill; the description can be up to 30 characters.
- Select the Recurring check box if you want the split billing arrangement to apply to each bill you approve for the client.
- Use the options in the Bill Format section to determine the appearance of split billing information on the bill.
You can opt to show the original values of slips on the bill and display a distribution table on the bill that recaps the percentage split of the bill’s charges. If you display the table, you can opt to display the primary client’s Nickname 1, Nickname 2, or Full Name. (In Figure 17-17, I opted not to display any name information.) You also can opt to include, in the distribution table, the information you provide in the Split Bill Information text box as well as charges and payments.
To display a distribution table on a bill, you must include on the distribution table either a name or the text from the Split Billing Information text box. - Click OK to redisplay the Split Billing Rule List window.
- Click the New button beside the Secondary Client Rules section.
Timeslips displays the Split Billing Secondary Client Rule Entry dialog box shown in Figure 17-18.
The primary distinction between the Split Billing Primary Client Rule Entry dialog box and the Split Billing Secondary Client Rule Entry dialog box is the appearance of the Percent of Fees and Percent of Costs text boxes.
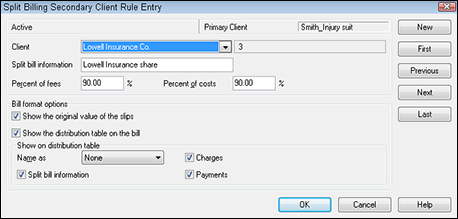
Figure 17-18: Set up a rule for a secondary client.
- In the Percent of Fees text box, type the percentage of fees for which the secondary client is responsible.
- Repeat Step 6 for the Percent of Costs text box.
- Complete the rest of the Split Billing Secondary Client Rule Entry dialog box.
The settings for the primary and secondary clients don’t have to match.
- Click OK to save the rule.
- Repeat Steps 5–9 for any additional secondary clients.
Note: Percentages for all primary and related secondary clients should not exceed 100 percent.
When you print a bill for a client who uses a split billing arrangement, Timeslips must also print bills for all other clients associated with the split billing rule. Timeslips splits the slips entered for the client according to the split billing rules, and the split charges appear on both clients’ bills. When you approve these bills, Sage Timeslips modifies the original slips for the primary client and creates new slips for the secondary client to reflect the split charges.
Figure 17-19 shows a sample bill for one of the clients involved in the split-billing arrangement described in the dialog boxes shown previously in Figure 17-17 and Figure 17-18. Note that the text from the Split Billing Information text box appears in the Split Billing Distribution table. In addition, Timeslips doesn’t show, by default, a subtotal for time charges, but I added that subtotal to the bill layout. See Chapter 8 for details on working with bill layouts.
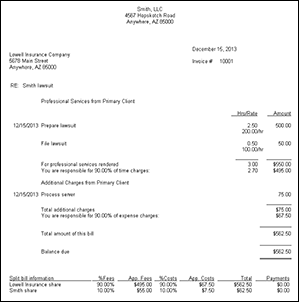
Figure 17-19: A bill to a secondary client of a split billing arrangement.
For the following special situations, search for split billing in the Online User’s Guide:
- If you hold bills for any party to a split billing arrangement
- If you undo bills for clients who are part of a split billing arrangement
- If a secondary client refuses to pay and you need to reassign charges from the secondary client back to the primary client
Allocating Fees to Timekeepers
You can use the Fee Allocation feature to pay your employees based on the income they bring into your business. You can think of this feature as a way to calculate commissions due to your employees. For each client, you can allocate income payments you receive in one of two ways:
- Based on the timekeeper assigned to the client’s slips.
- By assigning an allocation percentage to as many as three timekeepers assigned to the client. Each timekeeper receives the assigned percentage even if that timekeeper’s nickname doesn’t appear on any slips.
If you use the first method and opt to pay commissions based on the timekeepers assigned to slips, you can use the Timekeeper Collections and Timekeeper Collections by Period report. These reports, available in the Timekeeper page of the Report List window (choose Reports⇒Timekeeper), list payments applied to invoices and prorate the payments to each timekeeper whose slips appeared on invoices.
To see information on either the Timekeeper Collections report or the Timekeeper Collections by Period report, you need to apply a payment to an invoice.
If you opt to use the second method and allocate percentages of fees collected to up to three timekeepers, you need to do a bit of setup work.
First, set up custom fields to track fee allocation information. You’ll need up to three fields: one for the primary recipient, one for a secondary recipient, and one for a tertiary recipient. Follow these steps:
- Choose Setup⇒Custom Fields.
The Custom Fields dialog box appears.
- On the Client tab, create new a custom field for the primary timekeeper.
Select Timekeeper as the type of custom field and enter a name, such as Primary TK. At the bottom of the dialog box, select Originating Attorney. Note: The Fee Allocation feature was originally designed for law firms, but it works for any type of firm.
- Click OK to accept the new name.
- Repeat Steps 2 and 3 to create a secondary timekeeper and a tertiary timekeeper.
When you set up the secondary timekeeper, select Responsible Attorney at the bottom of the dialog box; when you set up the tertiary timekeeper, select Other Attorney at the bottom of the dialog box.
- Click OK to close the Custom Fields dialog box.
Next, assign values to these custom fields in the Client Information window. Choose Names⇒Client Info to display the Client List window. Then double-click a client and click the Custom tab (see Figure 17-20).
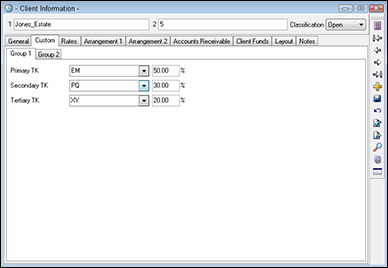
Figure 17-20: Assigning fee allocation percentages to custom fields.
Although the percentages shown in Figure 17-20 total 100 percent, you can assign percentages that exceed 100 percent.
You’re now ready to review how Timeslips allocates fees on an invoice. Generate a bill that includes time charges and approve it. You can then review the allocation of fees in the Accounts Receivable Entry window. Open the invoice transaction that Timeslips generates when you approve a bill and click the Fee Allocation tab (see Figure 17-21).
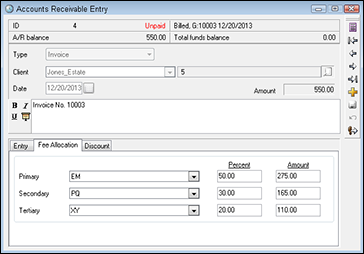
Figure 17-21: Review the allocation Timeslips established based on the fee allocation custom field percentages.
You can edit any of the fee allocation fields, changing the percentages or perhaps selecting different timekeepers.
After you record a payment, you can view the allocation of the payment using the Fee Allocations report on the Timekeeper tab of the Report List window (choose Reports⇒Timekeeper). For the report shown in Figure 17-22, I recorded a payment of $100 against an invoice totaling $550.
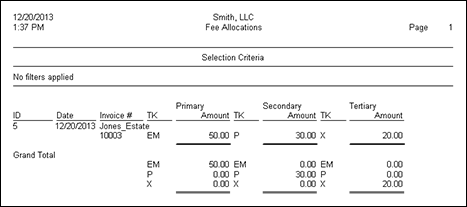
Figure 17-22: The Fee Allocations report after you record a client payment.
You might want to use security options in Timeslips to control how users can review and change fee allocation information to ensure that no one makes unauthorized changes.