Chapter B
Linking to Microsoft Outlook
In This Chapter
![]() Linking Timeslips and Outlook
Linking Timeslips and Outlook
![]() Synchronizing client and contact information
Synchronizing client and contact information
![]() Creating Outlook records while working in Timeslips
Creating Outlook records while working in Timeslips
![]() Creating slips while working in Outlook
Creating slips while working in Outlook
If you use both Timeslips and Microsoft Outlook, consider linking the two products by using the Timeslips Outlook Link feature. Doing so can make your life easier. By linking the two products, you can
- Synchronize Timeslips client names (and contact information) with Outlook contacts. That way, if you change a name you linked, the Outlook Link feature updates the name in both products and eliminates duplicate entry and all its potential errors.
- Create e-mail messages, tasks, meetings, or appointment records in Outlook while working in Timeslips.
- Create slips in Timeslips while working in Outlook.
Taking advantage of these features can help you work more efficiently and ensure that you accurately track all your billable time.
 To take advantage of Outlook Link, you must be using Outlook 2000 or later and both Timeslips and Outlook must be installed on the same workstation. If multiple Timeslips users will be synchronizing Sage Timeslips clients with Outlook contacts, your Outlook administrator should place the Outlook data file in a shared folder and provide edit rights to that folder to all Outlook users who will synchronize names.
 In Chapter 15, you can read about features of Timeslips security profiles. You can use the Other area of a Timeslips security profile to prevent unauthorized users from synchronizing names.
Establishing the Link between Sage Timeslips and Outlook
To link Timeslips with Outlook, you identify the shared folder where your Outlook data file resides, and you match Timeslips client fields with Outlook contact fields. Follow these steps:
- Choose Setup⇒Outlook Link⇒Settings.
Timeslips displays the Synchronize tab of the Outlook Link Settings dialog box (see Figure B-1).

Figure B-1: Set up synchronization between Timeslips and Outlook.
- Click in the Contact Folder Path field, and then click the Browse button to display the Select Folder dialog box (see FigureB-2).
If the Select Folder dialog box doesn’t appear, click the Enable Outlook Link button in the lower-left corner of the dialog box.
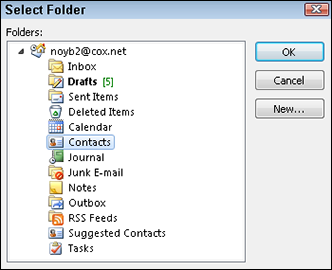
Figure B-2: Choose the Contacts folder.
- In the Select Folder dialog box, choose Contacts.
- Choose options in the Synchronization Rules group to control synchronization behavior.
If you select the Synchronize Clients When Opening the Sage Timeslips Database option, synchronization happens automatically each time you open the linked Timeslips database. To control when synchronization happens, don’t select this option.
- Click the Linked Fields tab.
Timeslips displays the links it establishes by default between Timeslips client name fields and Outlook contact fields (see Figure B-3).
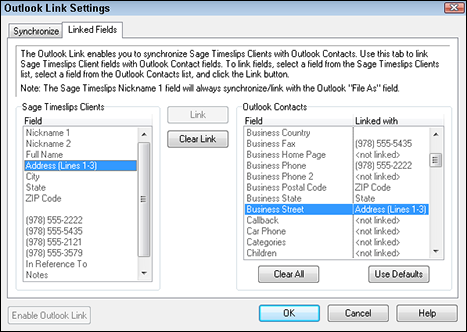
Figure B-3: The default links that Outlook Link creates between Timeslips client information and Outlook contact information.
- Review the links Timeslips establishes to ensure that they are correct.
You can review the links by using the list on the right, which identifies the Outlook Contact field linked to a Timeslips client name field. If you prefer, click a field in the Sage Timeslips Clients column on the left side of the dialog box and look at the field that Timeslips selects in the Outlook Contacts column on the right.
- Click OK to save your settings.
Synchronizing Sage Timeslips Names and Outlook Contacts
If you select the Synchronize Clients When Opening the Sage Timeslips Database option in the Outlook Link Settings dialog box (refer to Figure B-3), synchronization happens automatically each time you open the linked Timeslips database. Further, each time you save a new client, Timeslips offers to add the new client to your Outlook Contact folder.
If you opted not to synchronize each time you open your Timeslips database, you can follow these steps to synchronize Timeslips client data and Outlook contact data:
- Choose Setup⇒Outlook Link⇒Linked Data.
A message appears, explaining that no synchronization will occur unless data has changed in either database.
- Click OK.
Timeslips displays the Data Linked with Outlook dialog box shown in Figure B-4.
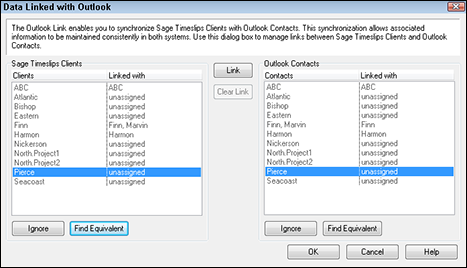
Figure B-4: Establish links between Timeslips clients and Outlook contacts.
- In the Sage Timeslips Clients list on the left, click an unassigned client.
If you prefer, you can click a name in the Outlook Contacts list on the right.
- Click the Find Equivalent button below the list.
Timeslips highlights a client in the Outlook Contacts list on the right.
- Click the Link button between the two lists.
Timeslips links the Timeslips client name with the Outlook Contact name.
- Repeat Steps 3–5 for each client you want to link.
- Click OK.
Timeslips assigns the links you establish.
If you make changes to a linked name in either program in the future, Timeslips updates the name in both programs.
Suppose that you opt not to add the client to your Outlook Contact folder and later decide that you want to synchronize that client between Timeslips and Outlook. Or suppose that you add a contact to Outlook who doesn’t exist in Timeslips and you want to link the name. In either case, choose Names⇒Synchronize Names with Outlook to display the Outlook Synchronization dialog box shown in Figure B-5.

Figure B-5: Add names from Outlook to Timeslips.
The missing name appears above the Link To list, and Outlook Link attempts to find names in Timeslips that might match the Outlook name. If you want to add the Outlook name to Timeslips, click the Add button (or the Add All button). To make Outlook Link ignore the name and stop trying to synchronize it with Timeslips data, click the Ignore (or Ignore All) button.
If an Outlook contact name is longer than the size you’ve established for the Timeslips Nickname 1 field, the Outlook Link prompts you to shorten it.
Note: The synchronization process ignores Outlook distribution lists.
Using Sage Timeslips to Create Outlook Data
One of the advantages of linking Timeslips and Outlook centers on Outlook Link’s capability to create Outlook entries for you from Timeslips.
When creating records in Outlook, Outlook Link relies on the e-mail addresses you establish for clients and timekeepers in Timeslips:
- You enter e-mail addresses for clients on the General tab of the Client Information dialog box. Outlook Link uses the e-mail address from the Email Address field and ignores any e-mail addresses you set up in the CC Email Addresses field.
- You enter e-mail addresses for timekeepers on the General tab of the Timekeeper Information dialog box. Outlook Link uses the first e-mail address you set up for the timekeeper logged into the Timeslips database to create Outlook records.
To create an Outlook record from Timeslips, open the Special menu, point at Outlook, and choose the appropriate type of Outlook record you want to create (see Figure B-6).
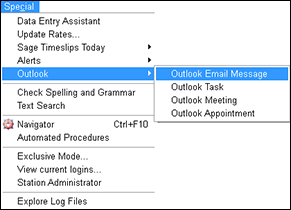
Figure B-6: While working in Timeslips, create an Outlook record.
For example, if you need to set up a task in Outlook, choose Special⇒Outlook⇒Outlook Task. The Outlook Task window appears; fill it in as you ordinarily would and save it.
Earlier, in the “Establishing the Link between Sage Timeslips and Outlook” section, you read about setting up the link between Timeslips and Outlook. If you select the Auto-Populate Outlook Fields with Sage Timeslips Data option in the Outlook Link Settings dialog box (refer to Figure B-1), Timeslips can automatically populate fields in Outlook records with Timeslips information. For example, if you open a linked client’s Client Information window and choose Special⇒Outlook⇒Outlook Email Message, the Outlook e-mail message window appears with the client’s e-mail address filled in.
Using Outlook to Create Time and Expense Slips
In addition to creating Outlook records from Timeslips, Outlook Link gives you the capability of creating slips as you work in Outlook. To be able to create slips from Outlook e-mail messages, you must disable the Timeslips feature called Create Slips from Email Messages. In Timeslips, choose Setup⇒Features Enabled. In the Features Enabled dialog box, click Slips on the left and deselect the Create Slips from Email Messages option. Then click OK. If the steps that follow don’t work for you, see the “Troubleshooting: creating Slips from Outlook e-mail messages” sidebar.
You can use Outlook Link with Outlook 2003, Outlook 2007, Outlook 2010, and Outlook 2013. In the examples in this appendix, I use Outlook 2010.
Creating slips from e-mail messages works best if you set your Outlook options so that you don’t send messages immediately upon clicking the Send button in the message. In Outlook 2010, choose File⇒Options and then click Advanced on the left. In the Send and Receive section, deselect the Send Immediately When Connected check box. Then click the Send/Receive button to display the Send/Receive Groups dialog box. Use the Schedule an Automatic Send/Receive Every options to set a time delay before sending messages.
Suppose, for example, that you need to send an e-mail to a Timeslips client. Follow these steps:
- Create the e-mail message as you usually would.
Assign an addressee, a subject, and a message.
- Click Send in the message.
- Switch to your Outbox and click the message.
- On the Outlook Ribbon, click the Add-Ins tab.
- Click the Timeslips button, and choose Create Slip (see Figure B-7).
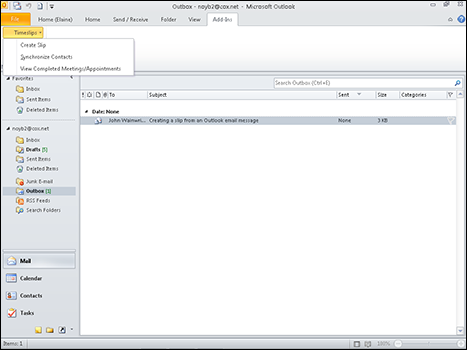
Figure B-7: Use the Add-Ins tab in Outlook to start the process of creating a slip.
When you click the Create Slip button, Outlook Link displays a dialog box similar to the one shown in Figure B-8. You need to complete the slip by supplying a task — one of three required fields to save a slip. Outlook Link fills in the other two required fields: the client from the recipient e-mail address on the message and the timekeeper from the sender on the e-mail message. You also can fill in any other slip information you want, including changing the slip description.
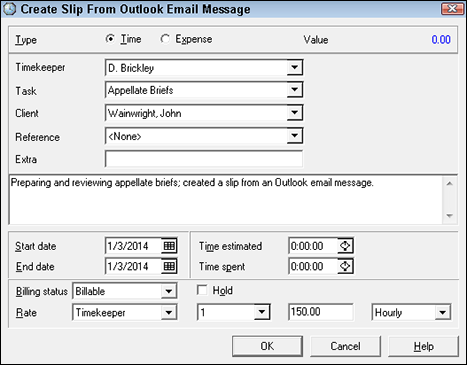
Figure B-8: Creating a slip from Outlook for an e-mail message.
The process for creating a slip from a task, a meeting, or an appointment is the same; click the record in Outlook, click the Add-Ins tab, click the Timeslips button, and choose Create Slip.