
Chapter 12
Playing Music
In this chapter we show you how to turn your iPhone into a terrific music player. Since the iPhone comes from Apple—which popularized the now famous iPod electronic music player—you'd expect it to have some great capabilities, and it does. We'll show you how to play and organize the music you buy from iTunes or sync from your computer, how to view playlists in a variety of ways, and how to quickly find songs. You'll learn how to use the Genius feature to have the iPhone locate and group similar songs in your library—sort of like a radio station that plays only music you like.
TIP: Learn how to buy music and use Ping (social networking for music lovers) right on your iPhone in Chapter 22: “iTunes on YourDevice.”
And you'll see how to stream music using an app called Pandora. With Pandora, you can select from a number of Internet radio stations, or create your own by typing in your favorite artist's name, and it's all free.
Your iPhone as a Music Player
Your iPhone is probably one of the best music players on the market today. The touch screen makes it easy to interact with and manage your music, playlists, cover art, and the organization of your music library. You can even connect your iPhone to your home or car stereo via Bluetooth, so you can listen to beautiful stereo sound from your iPhone!
TIP: Check out Chapter 5: “AirPlay and Bluetooth” to learn how to hook up your iPhone to your Bluetooth stereo speakers or car stereo.
Whether you use the built-in Music app or an Internet radio app like Pandora, you'll find you have unprecedented control over your music on the iPhone.
The Music App
Most music is handled through the Music app—the icon is on the Home screen,usually in the bottom dock of icons, the last one on the right.
NOTE: For all you readers familiar with the iPhone before iOS 5, yes, the music playing app was called the iPod app. Now is is simply the Music app.
Touch the Music icon and, as Figure 12–1 shows, you'll see fivesoft keys across the bottom:
- Playlists lets you see synced playlists from your computer, as well as playlists created on the iPhone.
- Artists lets you see an alphabetical list of artists (searchable like your Address Book).
- Songs lets you see an alphabetical list of songs (also searchable).
- Albums lets you browse your music by album titles.
- More lets you see audiobooks, compilations, composers, genres, iTunes U, and podcasts.

Figure 12–1. Music app with soft keys at bottom
Editing the Soft Keys
One very cool feature on the iPhone is that you can edit the soft keys at the bottom of the Music app and really customize it to fit your needs and tastes. To do so, first touch the More button.
Then touch the Edit button at the top left of the screen.
The screen changes to show the various icons that can be dragged down to the bottom dock.
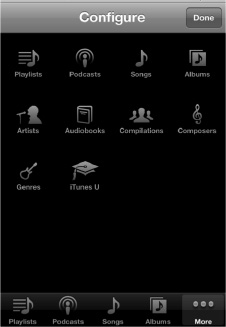
Figure 12–2. Change the soft keys in the Music app.
Let's say you want to replace the Albums icon with the one for Audiobooks. Just touch and hold the Audiobooks icon and drag it to where the Albums icon is on the bottom dock. When you get there, release the icon and the Audiobooks icon will now reside where the Album icon used to be. You can do this with any of the icons on this Configure screen. When you are finished, touchthe Done buttonat the top right of the screen.
TIP: You can also reorder the icons across the bottom by dragging and dropping them back and forth along the soft key row.
Playlists View
NOTE: A playlist is a list of songs you create and can include any genre, artist, year of recording, or collection of songs that interest you.
Many people group together music of a particular genre, like classical or rock. Others may create playlists with fast beat music and call it workout or running music. You can use playlists to organize your music just about any way you want.
You can create playlists in iTunes on your computer and then sync to your iPhone (see the iTunes Guide), or you can create a playlist right on your iPhone as we describe in the next section.
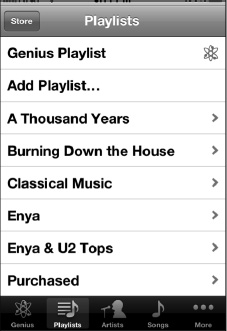
Once you've synced a playlist to your iPhone or created one on your iPhone, it shows up on the left-hand side of the Music screen, under Library.
If you have several playlists listed along the left side, just touch the name of the one you want to listen to.
NOTE: You can edit the contents of some of your playlists on your iPhone. However, you can't edit Genius playlists on the iPhone itself.
Creating Playlists on the iPhone
The iPhone lets you create unique playlists that can be edited and synced with your computer. Let's say you want to add a new selection of music to your iPhone playlist. Just create the playlist as we show below and add songs. You can change the playlist whenever you want, removing old songs and adding new ones—it couldn't be easier!
To create a new playlist on the iPhone, touch the Add Playlist tab under Genius Playlist.

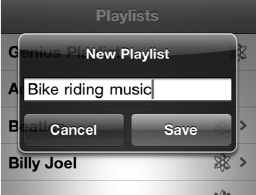
Give your playlist a unique name (we'll call this one “Bike-riding music”), then touch save.
Now you'll see the songs screen. Touch the name of any song you want to add to the new playlist.
You know a song is selected and will be added to the playlist when it turns gray.
NOTE: Don't get frustrated trying to remove or deselect a song you tapped by mistake. You can't remove or deselect songs on this screen; you have to click Done, then remove them on the next screen, as we describe.
Select Done at the top right and the playlist contents will be displayed.
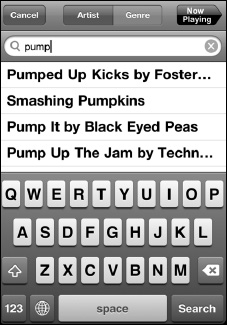
Searching for Music
Almost every view from your Music app (Playlists, Artists, songs, etc.) has a search window at the top of the screen.
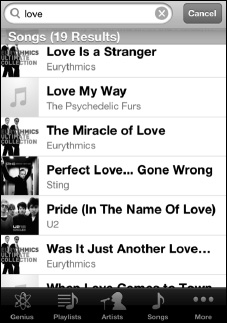
If you don't see the search window, tap the time at the top to instantly make it visible.
Tap once in the search window and type a few letters of the name of an artist, album, playlist, or song to instantly see a list of all matching items. This is the best way to quickly find something to listen to or watch on your iPhone.
Changing the View in the Music app
The Music app is very flexible when it comes to ways of displaying and categorizing your music. Sometimes, you might want to look at your songs listed by the artist. At other times, you might prefer seeing a particular album or song. The iPhone lets you easily change the view to help manage and play just the music you want at a given moment.
In your Music app, you have the following views:
- Artists View - shows you a listing of all your music arranged by artist.
- Songs View - shows all your music listed by name of each song.
- Albums View - shows all music arranged by album name.
- Genres View - shows all music arranged by type or genre.
- Composers View - shows music arranged by composer name.
- Audiobooks - shows all your audiobooks.
- Compilations - shows all compilations.
- ITunes U - shows all iTunes U content.
- Podcasts - shows all your podcasts.
Viewing Songs in an Album
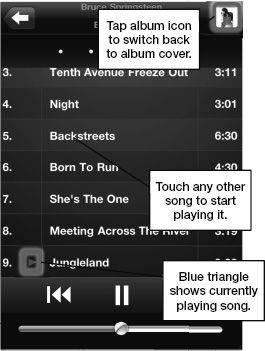
When you're in Albums view, just touch an album cover or name and the screen will slide, showing you the songs on that album (see Figure 12–3).
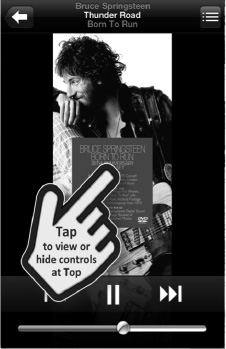
TIP: When you start playing an album, the album cover may expand to fill the screen. Tap the screen once to bring up (or hide) the controls at the top and bottom. You can use these controls to manage the song and screen as we describe below.
To see the songs on an album that is playing, tap the List button and the album cover and the cover will turn over, revealing all the songs on that album. The song that is playing will have a small blue arrow next to it.

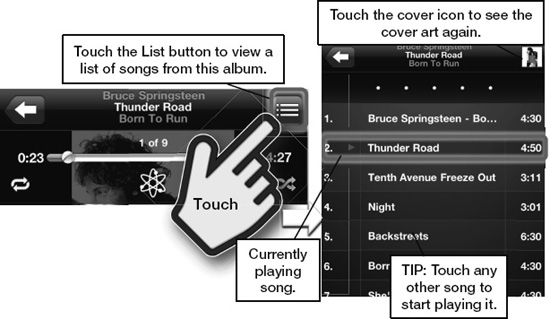
Figure 12–3. Touch the List button to see the songs on a particular album.
Tap the title bar above the list of songs to return to the album cover view.
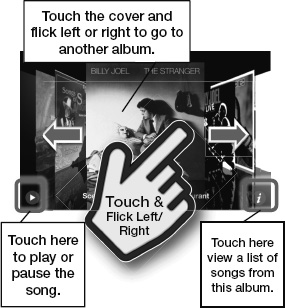
Navigating with Cover Flow
Cover Flow is a proprietary and very cool way of looking at your music by album covers. If you're playing a song in the Music music app and turn your iPhone horizontal—into landscape mode— your iPhone will automatically change to Cover Flow
Viewing Songs in Cover Flow
Just touch an album cover and the cover will flip, showing you all the songs on that album.
To see the song that is playing now (in CoverFlow view), tap the album cover and it will turn over, revealing the songs on that album (Figure 12–4). The song that is currently playing will have a small blue arrow next to it.
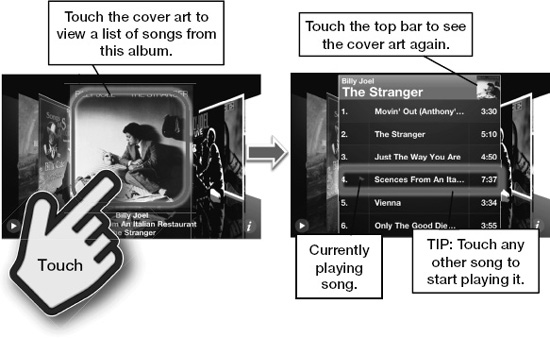
Figure 12–4. You can look at an album's contents using Cover Flow.
Tap the title bar (above the list of songs) and the album cover will be displayed once more. You can then keep swiping through your music until you find what you are searching for.
NOTE: You can also touch the small “i” in the lower right corner and the album cover will flip, showing you the songs, just as if you touched the cover.
Playing Your Music
Now that you know how to find your music, it's time to play it!Find a song or browse to a playlist using any of the methods mentioned above. Simply tap the song name and it will begin to play.
This screen shows a picture of the album that the song I chose comes from, with the name of the song at the top.
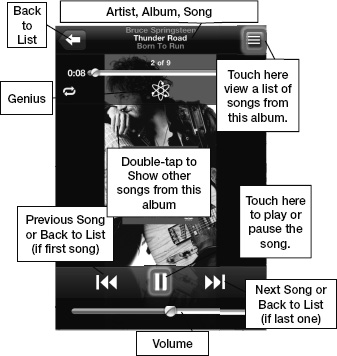
Along the bottom of the screen you'll find the Volume slider bar, and the Previous Song, Play/Pause, and Next Song buttons.
To see other songs on the album, just double-tap the album cover and the screen will flip, showing all of the other songs.
You can also touch the List button in the upper right corner to view a list of songs on the albym.
Pausing and Playing
Tap the pause symbol (if your song is playing) or the play arrow (if the music is paused) to stop or resume your song.
To Play the Previous or Next Song
If you are in a playlist, touching the Next Song arrow (to the right of the Play/Pause button) advances you to the next song in the list. If you are searching through your music by album, touching Next moves you to the next song on the album.Touching the Previous Song button does the reverse.
NOTE: if you're at the beginning of a song, Previous takes you to the precedingsong. If the song is already playing, Previous goes to the beginning of the current song (and a second tap would take you to the previous song).
Adjusting the Volume
There are two ways to adjust the volume on your iPhone: using the external Volume buttons or using the Volume Slider control on the screen.
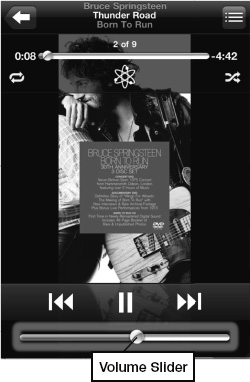
The external Volume buttons are on the upper left side of the device. Press the Volume Up key (the top button) or the Volume Down key to raise or lower the volume. You'll see the VolumeSlider control move as you adjust the volume. You can also just touch and hold the VolumeSlider key to adjust the volume.
TIP: To quickly mute the sound, press and hold the Volume Down key and the volume eventually reduces to
Double-Click the Home Button for Media Controls
You can play your music while you are doing other things on your iPhone, like reading and responding to e-mail, browsing the Web, or playing a game. With the iPhone's new multitasking function, a quick double-tap to the Home button on the bottom,followed by a swipe to the right, will bring up the “now playing”mediacontrols in the multitasking window. The controls allow you to skip to the previous song, pause or play the current song, skip to the next song, or go directly to the app playing the song.
NOTE: The widgets show whatever app last played audio or video, so if Pandora was last, you'll see that instead of Music, and the widgets will control Pandora instead, same with Videos, YouTube, etc.
TIP: If you hold down the PreviousSong control, the song will rewind; if you hold down the NextSong control, it will fast forward.
Repeating, Shuffling, Moving around in a Song
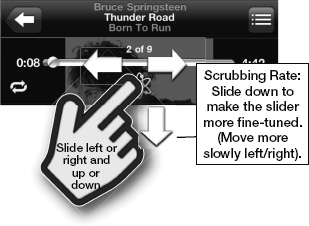
In play mode, you can activate additional controls by tapping the screen anywhere on the album cover. You'll then see an additional slider (the scrubber bar) at the top, along with the symbols for Repeat, shuffle, and Genius.
Moving to Another Part of a Song
Slide the scrubber bar to the right and you'll see the elapsed time of the song (displayed to the far right) change accordingly. If you are looking for a specific section of the song, drag the slider, then let go and listen to see if you're in the right place.
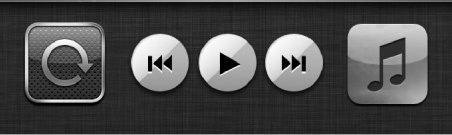
Repeat One Song or All Songs
To repeat the song you're listening to, touch the Repeat symbol at the left of the top controls twice until you see it turn blue and display a 1.

To repeat all songs in the playlist, song list, or album, touch the Repeat icon until it turns blue (and does not display a 1).
![]()
To turn off the Repeat feature, press the icon until it turns white again.

Shuffle
If you are listening to a playlist or album or any other category or list of music, you might decide you don't want to listen to the songs in order. You can touch the shuffle symbol so the music will play in random order. You know shuffle is turned on when the icon is blue, and off when it is white.
![]()
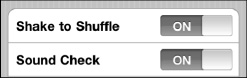
Shake to Shuffle
The shake to Shuffle feature was introduced in the last iPhone. So, to turn on shuffle mode, all you have to do to change songs is simply give your iPhone a shake, then shake it again. Every time you shake your iPhone, you'll skip to the next randomly selected song in the list.
![]()
TIP: If you plan on dancing while holding your iPhone, turn off shake to Shuffle!
You can turn on shake to Shuffle in your settings menu.
- Tap the settings icon.
- Scroll down and touch the Music icon.
- Move the shake to Shuffle switch to ON or OFF.
Now Playing
Sometimes you're having so much fun exploring your options for playlists or albums that you get deeply buried in a menu—then find yourself just wanting to get back to the song you're listening to. Fortunately, this is always very easy to do—you can just touch the Now Playing icon at the top right of most of the music screens.

Viewing Other Songs on the Album
You may decide you want to listen to another song from the same album rather than going to the next song in the playlist or genre list.
In the upper-right corner of the Now Playing screen, you'll see a small button with three lines on it.

Tap that button and the view switches to a small image of the album cover. The screen now displays all the songs on that album.
Touch another song on the list and that song will begin to play.
NOTE: if you were in the middle of a playlist or a GeniusPlaylist and you jump to another song from an album, you won't be taken back to that playlist. To return to that playlist, you'll need to either go back to your playlist library or tap Genius to make a new GeniusPlaylist.
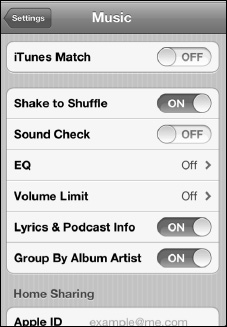
Adjusting Music Settings
There are several settings you can adjust to tweak music-playing on your iPhone. You'll find these in the settings menu. Just tap the settings icon on your Homes creen.
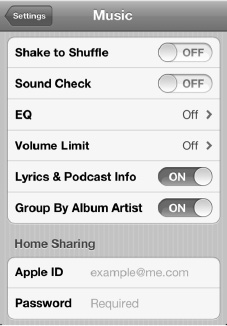
In the middle of the settings screen, touch the Music tab to go to the settings screenfor Music. You'll find six settings you can adjust on this screen: shake to Shuffle, sound Check, EQ, VolumeLimit, Lyrics & Podcast Info and Groupe By Album Artist.
You'll also find the login area for Home Sharing, which lets you stream music from iTunes on your Windows or Mac PC.
Using Sound Check (Auto Volume Adjust)
Because songs are recorded at different volumes, sometimes during playback a particular song may sound quite loud compared to another. sound Check can eliminate this. If sound Check is set to ON, all your songs will play at roughly the same volume.
EQ (Sound Equalizer Setting)
Sound equalization is very personal and subjective. Some people like to hear more bass in their music, some like more treble, and some like more of an exaggerated mid-range. Whatever your music tastes, there is an EQ setting for you.
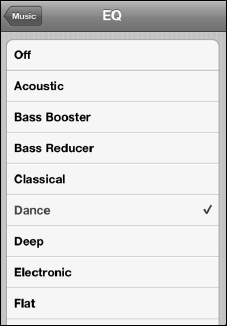
NOTE: Using the EQ setting can diminish battery capacity somewhat.
Just touch the EQ tab and then select either the type of music you most often listen to or a specific option to boost treble or bass. Experiment, have fun, and find the setting that's perfect for you.
Volume Limit (Safely Listen to Music at a Reasonable Level)
This is a great way for parents to control the volume on their kids' iPhones. It is also a good way to make sure you don't listen too loudly through headphones so you don't damage your ears. You just move the slider to a volume limit and then lock that limit.
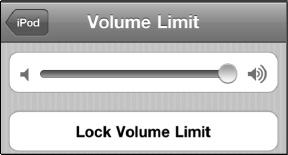
To lock the volume limit, touch the Lock Volume Limit button and enter a 4-digit passcode.You will be prompted to enter your passcode once more and the volume limit will then be locked.
Using Home Sharing
If you're like us, you probably have far more music on your big computer hard drive than you can fit on your iPhone. With iPhone and Home Sharing, that's not a problem.

As long as you're on the same Wi-Fi network as your computer, you can stream anything from your desktop iTunes library straight to your iPhone.
To enable Home Sharing, make sure your computer Is logged into Home Sharing with your iTunes email address and password, then log into Home Sharing on your iPhone with the same account.
Once you're logged in, you'll be able to choose between your local (iPhone) and remote (desktop iTunes) libraries. Here's how:
- Launch the Music app
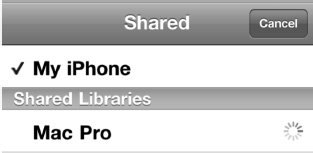
- Tap the More tab at the bottom right
- Tap the shared tab at the bottom of the list. (If you don't see a shared tab, double check to make sure both your iPhone and computer are both logged into Home Sharing using the same iTunes account)
- Choose the name of your desktop machine from the shared list, in this example that's MacPro. (You can share more than one iTunes library so you may have several to choose from.)
Your iPhone library will disappear and you'll see your desktop iTunes library instead. It will look exactly the same as your iPhone library, only the content will be different.
To switch back to your iPhone library, just repeat the same process but choose iPhone from the shared list instead.
Showing Media Controls When Your iPhone is Locked
You may want to get to your media controls even if your iPhone is locked. Here's how: Just double-click the Home button and the controls for adjusting the audio show up on the top of the locked screen. There's no reason to unlock the screen and then go to the Music program to find the controls.
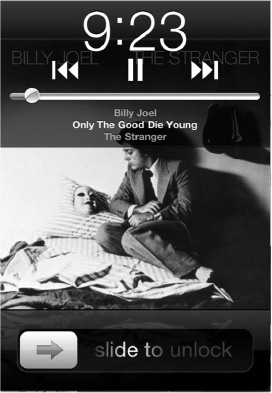
In the image to the right, notice that the screen is still locked—yet the music controls are now visible along the top. You can pause, skip, go to a previous song, or adjust the volume without actually unlocking the iPhone.
NOTE: You'll only see these controls if there is audio playing.
Listening to Free Internet Radio (Pandora)
While your iPhone gives you unprecedented control over your personal music library, there may be times when you want to just “mix it up” and listen to some other music.
TIP: A basic Pandora account is free and can save you considerable money compared with buying lots of new songs from iTunes.
Pandora grew out of the Music Genome Project. This was a huge undertaking. A large team of musical analysts looked at just about every song ever recorded and then developed a complex algorithm of attributes to associate with each song.
NOTE: There are an ever-increasing amount of “internet radio” or subscription music style apps now available including the popular slacker Personal Radio, spotify, Rdio, Last.fm, and others. Please also note that Pandora is a US-only application and Slacker available is only in the US and Canada. Spot fly is available in the US and Europe, and many others vary by region as well. Hopefully, more options will begin to pop up for international users.
Getting Started with Pandora
With Pandora you can design your own unique radio stations built around artists you like. Best of all, it is completely free!
Start by downloading the Pandora app from the App Store. Just go to the App Store and search for Pandora.

Now just touch the Pandora icon to start.

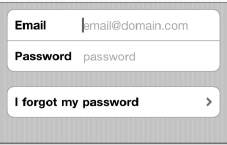
The first time you start Pandora, you'll be asked to either create an account or to sign in if you already have an account. Just fill in the appropriate information—an email address and a password are required—and you can start designing your own music listening experience.
Pandora is also available for your Windows or Mac computer and for most smartphone platforms. If you already have a Pandora account, all you have to do is sign in.
TIP: Remember that you can move apps into folders. As you can see in Figure 12–7, we've put three Music apps, including Pandora, into one folder named Music. See more about using folders in Chapter 6: “Icons and Folders.”

Figure 12–7. Put like Music apps, such as Pandora, into one folder for easy retrieval.
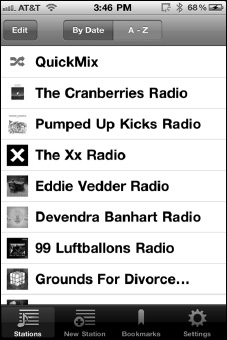
Pandora's Main Screen
Your stations are listed down the screen with the QuickMix at the top. Tap any station and it will begin to play. Usually, the first song will be from the actual artist chosen and the next songs will be from similar artists.
Once you select a station, the music begins to play. You'll see the current song displayed, along with album art—very much like when you play a song using the Music app.
You'll also see a small Now Playing icon in the upper right corner—very much like the Now Playing icon in the Music app.
Touch the Detail view ![]() icon in the upper right corner, just like the one you find in the Music app, and you'll see a nice bio of the artist, which changes with each new song.(See Figure 12–8).
icon in the upper right corner, just like the one you find in the Music app, and you'll see a nice bio of the artist, which changes with each new song.(See Figure 12–8).
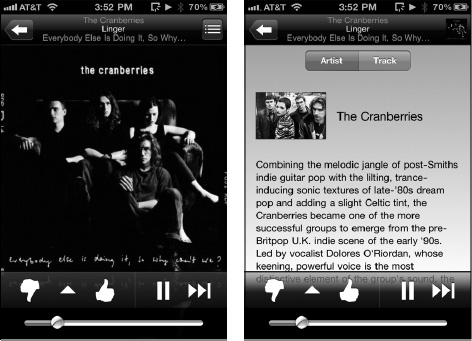
Figure 12–8. Pandora's Album cover view and the Detail view.
Thumbs Up or Thumbs Down in Pandora
If you like a particular song, touch the thumbs-up icon and you'll hear more from that artist.

Conversely, if you don't like an artist on this station, touch the thumbs-down icon and you won't hear that artist again.
If you like, you can pause a song and come back later, or skip to the next selection in your station.
NOTE: with a free Pandora account, you are limited in the number of skips per hour you can make. Also, you'll occasionally hear advertising. To get rid of these annoyances, you can upgrade to a paid “Pandora One” account as we show you below.
Pandora's Menu
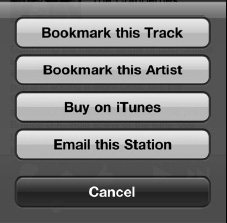
Between the two thumbs is a Menu button which looks like a triangle  . Touch this and you can bookmark the artist or song, go to iTunes to buy music from this artist, or email the station to someone in your Contacts.
Creating a New Station in Pandora
Creating a new station couldn't be easier.
If you are listening to a station, press the back arrow in the upper left corner to return to the Pandora main screen. Then tap the New Station button along the bottom row. Type in the name of an artist, song, or composer.
When you find what you are looking for, touch the selection and Pandora will immediately start to build a station around your choice.
You can also touch Genre and build a station around a particular genre of music.
You'll then see the new station listed with your other stations.
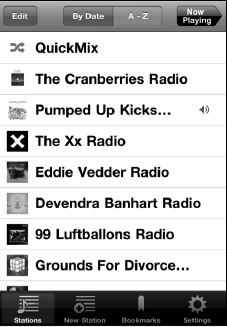
You can build up to 100 stations in Pandora.
TIP: You can organize your stations by pressing the By Date or ABC buttons at the top of the screen.
Adjusting Pandora's Settings—Your Account, Upgrading, and More
You can sign out of your Pandora account, adjust the audio quality, and even upgrade to Pandora One (which removes advertising) by tapping the settings icon in the lower right corner of the screen. (See Figure 12–9.)

Figure 12–9. Setting options in Pandora
To sign out, tap the sign Out button.
To adjust the sound quality, move the switch under Cell Network Audio Quality either ON or OFF. When you are on a cellular network, setting this off is probably better, otherwise you may hear more skips and pauses in the playback.
When you are on a strong Wi-Fi connection, you can set this to ON for better quality. See our Chapter 4: “Connect to the Network”chapter to learn more about the various connections.
To save your battery life, you should set the Auto-Lock to ON, which is the default. If you want the force the screen to stay lit, then switch this to OFF.
To remove all advertising, tap the Upgrade to Pandora One button. A web browser window will open and you'll be take to Pandora's web site to enter your credit card information. As of publishing time, the annual account cost is $36.00, but that may be different by the time you read this book.