
C H A P T E R 11
SharePoint and Windows Phone 7 Development
The introduction of the Windows Phone 7 mobile platform is a significant step forward from the more business-focused Windows Mobile 6.5 platform. Windows Phone 7 is a consumer-focused, marketplace-driven environment where the specifications, design, and capabilities are tightly controlled by Microsoft. Microsoft's goal for Windows Phone 7 is to enable developers to create applications using tools common to the rest of the .NET platform like Visual Studio 2010, Silverlight, and XNA.
This chapter will explore how to create Windows Phone 7 applications that can access SharePoint list data and web services. You'll learn how to create a SharePoint Web application that can be accessed with a Windows Phone and then you'll explore how to authenticate your application. Finally, you'll explore the various SharePoint web services available and look at techniques for working with SharePoint data.
![]() Note The information and coding practices presented in this chapter are based on the “NoDo” version of Windows Phone 7 OS (7.0.7390661.0). The code has been compiled and verified on the beta version code name “Mango.” Microsoft is dedicated to continuous improvement of the platform so it is likely that the specific code samples may require minor changes in subsequent versions. The concepts and practices will remain valid for SharePoint 2010.
Note The information and coding practices presented in this chapter are based on the “NoDo” version of Windows Phone 7 OS (7.0.7390661.0). The code has been compiled and verified on the beta version code name “Mango.” Microsoft is dedicated to continuous improvement of the platform so it is likely that the specific code samples may require minor changes in subsequent versions. The concepts and practices will remain valid for SharePoint 2010.
This chapter will cover the following:
- An introduction to Windows Phone 7
- Setting up the development environment
- SharePoint and Windows Phone 7 security
- SharePoint data access concepts
- Code examples for accessing SharePoint from Windows Phone 7
Introduction
The demand for mobile applications has grown year after year. Mobile applications provide a broad range of functionality from games to sophisticated remote sensing and augmented reality applications. This chapter covers the uses of Windows Phone apps to access business information in a SharePoint farm. The goals of business applications range widely depending on the needs of the business. Recent statistics show that over 60% of smart phone purchases are being made by individuals in order to access corporate information. As the number of mobile devices grows, so too will the demand for mobile applications to facilitate the access to corporate information. The benefit of the portability of mobile devices is that they are readily available, connected, and don't have to “boot up”. This means that the user can gain immediate access and respond to requests in a timely manner, rather than waiting “until they get back to work.” Even in the absence of a connection, it is possible to craft applications that store data locally on mobile devices. This provides a better model for network bandwidth consumption as the network is only required if the cached information becomes stale or needs to be updated for other reasons. Lastly, rather than providing extensive access to a corporate portal, and requiring the user to browse for their information, a mobile app can be crafted to pull only the data required by the user (for example, assigned tasks), thereby decreasing the network bandwidth required to service the user's request.
Windows Phone 7 is Microsoft's latest mobile operating system. The minimum development environment required for creating applications for Windows Phone 7 is Visual Studio Express with the Windows Phone Developer Tools. Professional developers who want to create robust applications, test the applications, and work in a team environment like that provided by Microsoft Team Foundation Server will want to use Microsoft Visual Studio 2010 (Professional, Premium, or Ultimate) and install the Windows Phone Developer Tools. While Visual Studio can be used to develop the application user interface in XAML, Microsoft Expression Blend is the best tool to design and edit the user interface of a Windows Phone 7 application. It is worth noting that although this chapter will focus on Silverlight, you can also choose to create applications using the XNA Framework.
One of the most significant changes to the mobile offering from Microsoft is the Windows Phone 7 Marketplace. The Marketplace is a single location for all phone-related content for prospective try-ers and buyers. The Marketplace offers a robust search and shopping interface for developers to sell their apps and buyers to find the apps they seek. The platform offers a Trial API that enables developers to offer free trials of apps that can be unlocked upon purchase to reveal their full functionality.
Although developers can deploy applications (and games) directly to their personal registered phones, the general public will only be able to install your published application from the Windows Phone Marketplace. In order for developers to publish their applications to the marketplace, the application has to be submitted for approval. The application is submitted along with all of the required data that accompanies the application, such as the title, description, and screen shots. The application is then tested and validated against the criteria for the marketplace by Microsoft. Finally, the application is signed and made available for download.
Windows Phone and SharePoint
The goal of this chapter is to prepare you with real world examples that demonstrate how to connect to and consume information stored in SharePoint with custom mobile applications that you write with Visual Studio 2010. You can use a Windows Phone browser to access SharePoint sites. It's important to note that Windows Phone is delivered with a native application that can perform some of these functions. Called the “Office Hub” (Figure 11-1), this application can connect to SharePoint and navigate sites and libraries and open Microsoft Office Documents like Word and PowerPoint.
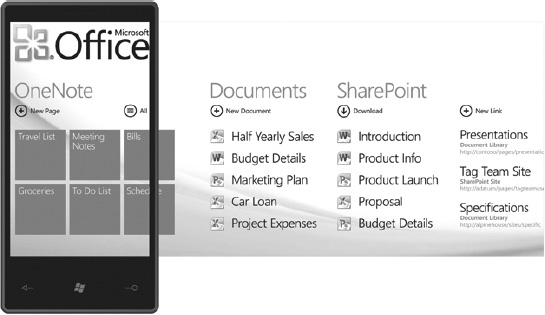
Figure 11-1. The Windows Phone 7 Office Hub
When you decide to create a custom application you have to decide how you are going to securely access the information. Windows Phone does not currently support NTLM authentication in custom applications, so alternate authentication approaches may be required on the SharePoint server to provide secure access to your application. In this chapter we will use Forms Based Authentication in our samples. The next step is to determine what data you want to get from SharePoint. If you are accessing lists and libraries you may choose to use ODATA or REST. The current version of the SharePoint Silverlight Client Object Model assembly is not compatible with Windows Phone Development. For SharePoint content that can't be accessed through those means you may need to use one of the many SharePoint web services. At the extreme end of the spectrum where you are consolidating information from many sources or accessing resources and data provided by Azure, you may choose to write custom services to run in parallel with your SharePoint environment and connect to those services with your phone.
This is an exciting time to be a developer. With the introduction of Windows Phone 7, .NET developers have the tools and resources available to create, test, deploy, and sell stunning applications using the same familiar tools that you have been using for years. You don't need to learn a new language, you just need to learn how the platform works in order to start building applications in Silverlight or the XNA Framework. We have a lot to teach you in this chapter: you will learn to access lists and then dive into connecting to SharePoint Web Services. We hope this will help get you started building applications that can improve your business. The first step in building Windows Phone 7 and SharePoint 2010 applications is to set up a development environment.
Development Environment
To develop Windows Phone 7 applications for SharePoint you will need a development environment that includes Windows 7, the Windows Phone Developer Tools, and access to a SharePoint 2010 server instance. The Windows Phone Developer Tools add support to Visual Studio 2010 to create Windows Phone Applications (see Figure 11-2). The current version of Windows Phone Developer Tools is only supported in a Windows 7 environment. If you normally develop SharePoint applications on a Windows Server 2008 machine you will need to have access to a Windows 7 machine to use the Windows Phone 7 Developer tools. You can't add the Windows Phone Developer Tools to a server operating system.
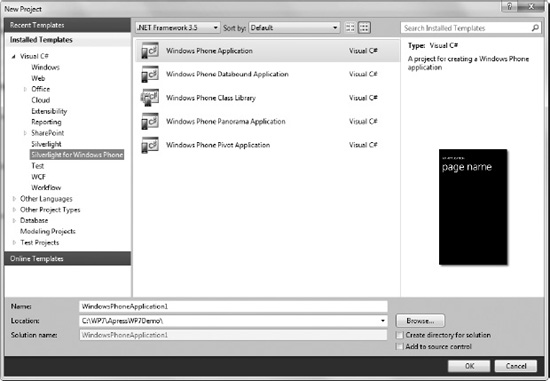
Figure 11-2. Windows Phone 7 projects in Visual Studio 2010
Developing on Windows 7 with SharePoint
The simplest way to start developing Windows Phone 7 applications using SharePoint 2010 is to setup a 64-bit Windows 7 development environment that includes both SharePoint 2010 and Windows Phone Developer Tools. SharePoint 2010 can be installed onto the 64-bit version of Windows 7 in a development-only scenario.
A development environment can be created from a clean Windows 7 x64 client machine. Windows 7 can be either installed as the main operating system on “bare metal” or it can be installed using boot to VHD. Either method is supported.
With a clean and fully service-packed Windows 7 machine, the next step is to install SharePoint 2010. SharePoint Foundation or SharePoint Server (any version) can be installed on 64-bit Windows 7 as a development machine. SharePoint 2010 running on a Windows 7 client is not supported in a production environment. Installing SharePoint 2010 on a Windows 7 client is outside the scope of this chapter. Refer to “Setting Up the Development Environment for SharePoint 2010 on Windows Vista, Windows 7, and Windows Server 2008” currently located at http://msdn.microsoft.com/en-us/library/ee554869(office.14).aspx for installation guidelines. You can also review the SharePoint 2010 and Windows Phone 7 Training Course available from Microsoft. This training course includes a lab to set up a Windows 7 development environment with SharePoint 2010 and the Windows Phone development tools (http://msdn.microsoft.com/en-us/SharePointAndWindowsPhone7TrainingCourse). After SharePoint 2010 has been installed and configured on the Windows 7 client, install Visual Studio 2010. Any version of Visual Studio 2010 should work for these examples.
Next, download and install the Windows Phone 7 Developer Tools. The current version of the developer tools are located in the App Hub, a center focused around Xbox 360 and Windows Phone 7 development. The App Hub is currently located at http://create.msdn.com, as shown in Figure 11-3.
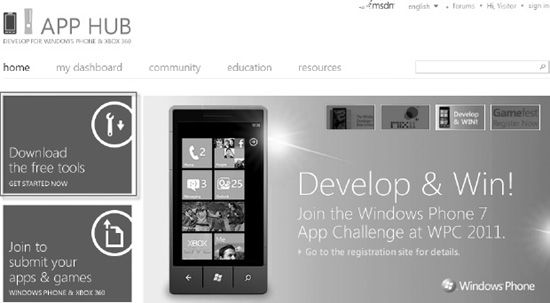
Figure 11-3. Developer tools located in the App Hub
The Windows Phone 7 Developer Tools include an update and a fix. First, download and install the January 2011 update located at: http://download.microsoft.com/download/1/7/7/177D6AF8-17FA-40E7-AB53-00B7CED31729/vm_web.exe. Then, the single fix required should be downloaded and installed. The fix is located at http://download.microsoft.com/download/6/D/6/6D66958D-891B-4C0E-BC32-2DFC41917B11/WindowsPhoneDeveloperResources_en-US_Patch1.msp.
There are many tools and toolkits available for Windows Phone 7 development. The code in this chapter does not require any other tools or toolkits. You should look at the Windows Phone 7 developer landscape and find tools that will help you be more efficient with your Windows Phone 7 application development.
Developing on Microsoft Hyper-V
Many developers are creating virtual environments with Microsoft Windows Server 2008 R2 Hyper-V. If you are considering Hyper-V and want to test the waters with SharePoint Development, you can save yourself a lot of time by downloading the 2010 Information Worker Demonstration and Evaluation Virtual Machine from Microsoft (http://go.microsoft.com/?linkid=9728417). Once you download the virtual machine, install the server into an existing Hyper-V environment and test the networking configuration.
The Windows Phone 7 emulator is a virtual environment and it's not compatible with Windows Server 2008 R2 running the Hyper-V role. There is a trick to getting around this problem, though. Don't install the tools on the server (or any 64-bit server); instead, create a new virtual machine using Windows 7 32-bit. It's important to use the 32-bit version of the Windows 7 for this installation. Once you have installed and updated Windows 7, you can proceed by installing Visual Studio 2010 and the Windows Phone 7 Tools as usual. The advantage to this configuration is that your Windows Phone 7 emulator will use the local test network for all connections and have no issues connecting to the SharePoint Farm.
Regardless of the development environment you create, you will need to understand the available authentication options to access SharePoint 2010 data or services from your phone application. The next section briefly reviews the authentication options.
Security
Security is a broad topic covering authentication, authorization, cross site access, and even the sandbox that prevents applications from accessing other application data. In this section, we will briefly discuss authentication. Windows Phone 7 is a new development platform. Accessing remote data as a known user can be challenging in the first version of Windows Phone 7. Authentication strategies can also decide your choice for SharePoint remote API access. Not all of the SharePoint remote APIs support the authentication methods supported by the platform.
Windows Authentication
Developers and end users alike love Windows authentication. The ability to pass user credentials seamlessly in the background provides a great user experience. In fact, .NET developers, including SharePoint developers, love the simplicity of authentication where the client and the server can pass credentials using Windows authentication. Many SharePoint Web applications, particularly intranets, use Windows authentication.
While Windows authentication is what you expect as a SharePoint developer, it is not what you get as a Windows Phone developer. The current version of Windows Phone 7 at the time of this writing doesn't support Windows Authentication. This means that a Windows Phone 7 application can't authenticate to any SharePoint Web application that is using Classic mode authentication (NTLM or Basic). Unified Access Gateway can provide some relief in this area by acting as a gatekeeper who can request users' credentials via a form and subsequently creating and presenting a Windows user to SharePoint.
Forms Based Authentication
Forms Based Authentication (FBA) is a common authentication scenario. SharePoint 2010 web applications can be set to Claims mode, which allows users and applications to authenticate using FBA. Currently FBA is one of the most common means to access secured data from a SharePoint server using a mobile client. Windows Phone 7 can easily use most SharePoint 2010 remote APIs using FBA authentication.
SharePoint 2010 provides the authentication web service that can be used to authenticate a user using the user's account and password. The authentication web service returns a FEDAUTH cookie in the response header when a user's credentials are successfully validated. The FEDAUTH cookie is used by SharePoint on subsequent calls to verify the user has been authenticated. An interesting point about the cookie: it is an HTTPOnly cookie and can't be viewed or worked with using code in the Windows Phone 7 framework. Effectively, it is a cookie that you need but can't easily access.
![]() Note The beta Windows Phone 7 “Mango” version will allow access to HTTP-only cookies.
Note The beta Windows Phone 7 “Mango” version will allow access to HTTP-only cookies.
Fortunately there is a way to work around the limitation of the HTTPOnly FEDAUTH cookie. This involves retrieving the container that includes the HTTPOnly FEDAUTH cookie and attaching the container to subsequent calls to SharePoint. The container for the cookie is a CookieContainer.
After the initial call to the Authentication Web service, the CookieContainer containing the HTTPOnly FEDAUTH cookie is stored for later use. In each subsequent call to SharePoint (for example, to query a list), the CookieContainer is attached to the web request, and the user can query the list (assuming the user has permissions to the specific list). This pattern works great for most SharePoint remote APIs. For example, a web service proxy created by Visual Studio exposes the CookieContainer attached to the web request. It is simple to attach your CookieContainer to the web request via the FEDAUTH cookie. This authentication pattern will work as long as you can attach the CookieContainer to the request. Listing 11-1 shows an example of attaching a CookieContainer to the CookieContainer property of a web service proxy object created by Visual Studio.
Listing 11-1. Attaching a CookieContainer to a Web Service Proxy Object
 ListsSoapClient svc = new ListsSoapClient();

 svc.CookieContainer = App.Cookies;

 svc.GetListItemsCompleted += new

                         EventHandler<GetListItemsCompletedEventArgs>

                                       (svc_GetListItemsCompleted);

 svc.GetListItemsAsync("MyLinks", string.Empty, null,

                                          viewFields, null, null, null);
Not every web request exposes a CookieContainer property. Two common examples where you will not be able to attach a CookieContainer is when using a WebClient object or a Visual Studio proxy generated for a Rest API. Neither of these examples exposes a CookieContainer property when working with the phone framework. This simply means that you should replace the WebClient object with an HttpWebRequest object and manually create REST calls using an HttpWebRequest object and an XML payload. This creates more code and injects more possible errors but does allow you to use FBA in these scenarios.
Anonymous Access
We have covered the two common authentication scenarios—NTLM and FBA. Now we must discuss anonymous access. SharePoint can support anonymous access to a SharePoint site and list data. Anonymous access must be enabled and configured on the SharePoint Web application and site collection. It is not hard to think of many scenarios where a phone application accessing anonymous data would make sense. For example, consider an application retrieving events or consuming images from a public-facing SharePoint site where the events or images are available to the general public.
Unfortunately, there is little in the way of support for anonymous access to SharePoint using a mobile device. Currently, there are no SharePoint APIs supported on the current Windows Phone 7 platform that can access SharePoint anonymously—with the exception of RSS feeds. If an RSS feed does not fit the data integration requirements (for example, you need to read and write list data), then you must consider a custom application. SharePoint provides RSS feeds out of the box. A creative developer could use an RSS feed to access list data. The “Data Access” section later in this chapter discusses the use of RSS feeds and custom applications
Unified Access Gateway
Microsoft Forefront Unified Access Gateway (UAG) is a product that provides remote client endpoints to access enterprise applications like SharePoint 2010. UAG “publishes” applications via a web portal, enabling users access to corporate applications through a secure endpoint that can validate the security of the client and network connection. If you are planning to use UAG to publish your SharePoint site for mobile applications, you have to consider how UAG performs authentication and request redirection.
![]() Note Installing and configuring UAG is beyond the scope of this chapter. You can refer to the whitepaper “Building Windows Phone 7 applications with SharePoint 2010 Products and Unified Access Gateway” (
Note Installing and configuring UAG is beyond the scope of this chapter. You can refer to the whitepaper “Building Windows Phone 7 applications with SharePoint 2010 Products and Unified Access Gateway” (http://go.microsoft.com/fwlink/?LinkId=216118) This paper describes how to set up networking and install and configure a UAG server to publish a SharePoint web site for Windows Phone 7 development.
When a SharePoint site is published through UAG, requests for SharePoint resources that don't contain an authorization header are redirected based on the endpoint configuration in UAG. This redirection can cause issues when your application is expecting a specific response from SharePoint and must be accounted for in your code. In general, your application should prompt for, encrypt, and store user's credentials prior to making any requests that require authorization. With UAG, the web request should be made over HTTPS and passed, as in Listing 11-2. The important points in this technique are the construction of the authorization header as a Base64 encoded string and the use of the User Agent string “Microsoft Office Mobile”. Construction of the request in this way will notify UAG who the user is and prevent default mobile redirection from interfering with your application. For example, in Listing 11-2 a request to the SharePoint User Profile Web service “ups” is modified by setting the Request Authorization header to work with UAG.
Listing 11-2. Passing Authorization Header to UAG
using (OperationContextScope scope = new

       OperationContextScope(ups.InnerChannel))

{

  //Create the Request Message Property

  HttpRequestMessageProperty request = new HttpRequestMessageProperty();

  //Set the Authorization Header

  request.Headers[System.Net.HttpRequestHeader.Authorization] =  "Basic " +

    Convert.ToBase64String(Encoding.UTF8.GetBytes(AppSettings.Username +

    ":" + AppSettings.Password)) + System.Environment.NewLine;


  //Set the User Agent header

  request.Headers[System.Net.HttpRequestHeader.UserAgent] =

    "Microsoft Office Mobile";
  //Add the headers to the request

  OperationContext.Current.OutgoingMessageProperties.Add(

    HttpRequestMessageProperty.Name, request);


  //Call the method

  ups.GetUserColleaguesAsync(account);

}
Now that you have an understanding that authentication in the current phone framework is limited to FBA and Anonymous access unless UAG is included in the solution, you should now consider the various data access methods. The next section will provide a basic understanding of the avaiable data access methods that can be used by a Windows Phone 7 application to work with SharePoint 2010 data and services.
Data Access
SharePoint 2010 provides many APIs to query SharePoint data. Most of the SharePoint remote APIs such as web services and Rest APIs can be used from a Windows Phone 7 application to integrate with SharePoint data and services. It is not just the remote API that you need to consider when selecting a method to access SharePoint data but the authentication scenario that will be used with the data access. Not all data access methods are available or easy to use with all authentication scenarios. As discussed in the previous section, none of the data access options work with Windows authentication because the current phone platform doesn't support Windows authentication.
Web Services
Web services are one of the most common methods you will use with the Windows Phone 7 platform to work with SharePoint data. Web services have the most coverage of SharePoint data and services available to the phone platform and can be used with the most authentication scenarios, including FBA. Web services cover data access from lists and libraries with the Lists.asmx web service to working with key services including the User Profile Service using the UserProfileService web service. Table 11-1 lists the web services available in SharePoint 2010.
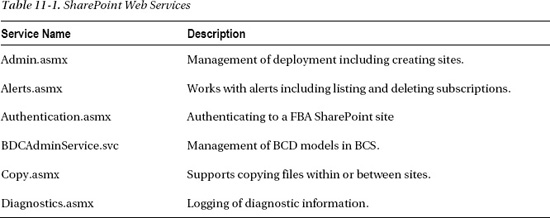
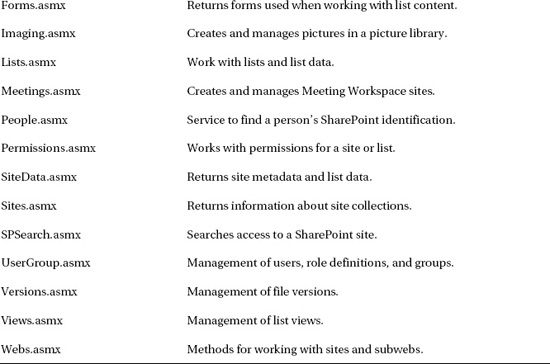
Table 11-1 does not include every service available in SharePoint but those listed are the most common web services. The SharePoint web services cover most, but not all, of the SharePoint API.
Calling a SharePoint Web Service from the phone platform is similar to calling the same service from a Silverlight client. All communication is asynchronous. Visual Studio will create asynchronous method calls in the proxy classes to call the service methods. Listing 11-3 shows an example of retrieving items from a list using the Lists.asmx web service. Notice in Listing 11-3 that we attach the CookieContainer to the proxy object. This allows for FBA authentication.
Listing 11-3. Retrieving List Items from a List Using the Lists.asmxWeb Service
public void LoadMyLinks()

{

  XElement viewFields = new XElement("ViewFields",

                           new XElement("FieldRef",

                               new XAttribute("Name", "ows_URL")));


  ListsSoapClient svc = new ListsSoapClient();

  svc.CookieContainer = App.Cookies;

  svc.GetListItemsCompleted += new

                          EventHandler<GetListItemsCompletedEventArgs>

            (svc_GetListItemsCompleted);
  svc.GetListItemsAsync("MyLinks", string.Empty, null,

                                  viewFields, null, null, null);

}


void svc_GetListItemsCompleted(object sender, GetListItemsCompletedEventArgs e)

{


   IEnumerable<XElement> rows = e.Result.Descendants

                               (XName.Get("row", "#RowsetSchema"));

   var myLinks = from element in rows

                 select new Link(

                                 (int)element.Attribute("ows_ID"),
                                     (string)element.Attribute("ows_URL")

                                      );


}
Client Side Object Model (CSOM)
CSOM is rapidly becoming popular with SharePoint developers as a remote API of choice. CSOM provides coverage of the core server functionality when compared to other remote APIs and it is packaged into three different implementations (.NET, JavaScript and Silverlight). Unfortunately, the current version of SharePoint Client Site Object Model is not supported on the Windows 7 Phone platform.
REST/ODATA
That leads us to REST and ODATA. When used with a service proxy created by Visual Studio, REST data access is simple. SharePoint 2010 provides REST-based data access using the ListData.svc service. This is a Windows Communication Foundation service. REST is an HTTP-based protocol where data access is accomplished using standard HTTP with an XML payload.
The SharePoint REST interface exposes list data from a URL address as XML making it easy to consume for read operations. To view all lists in a site you simply call the ListData.svc directly. For example, to display all the lists in the DemoFBA site, use the following URL:
http://demofba/_vti_bin/Listdata.svc.
To display a single list in the site, the list title is added to the URL, like so:
http://demofba/_vti_bin/Listdata.svc/contacts.
The ListData service can do inserts, updates, and deletes, as well as reads. To perform these operations, a complex XML payload must be sent with the correct HTTP verb. This XML can be generated by hand or through code. Code generation is generally left to the DataSvcUtil application to generate the proxy classes. When used with UAG the proxy classes can easily manage the inserts, updates, and deletes. When used with FBA, the proxy can't be used as it doesn't expose the CookieContainer property. The only other option is to create the HttpWebRequest object and the XML payload manually. Manually creating the code and XML payload for inserts, updates, and deletes is not a simple task. For this current version of the phone platform you might consider avoiding REST-based access when using inserts, updates, and deletes unless your solution includes UAG. Generating a query using the URL syntax and an HTTPWebRequest object is simple enough to do without a proxy object but inserts, updates, and deletes are complex.
RSS
The last out-of-the-box SharePoint remote API we will discuss is RSS feeds. RSS is the one data access method that everyone seems to forget about. One thinks of RSS feeds as being consumed by end-user RSS feed readers, forgetting that RSS is structured data that can be parsed and processed. SharePoint RSS feeds are the only out-of-the-box method for accessing data anonymously.
RSS is probably not the best solution for working with SharePoint data when presented with other remote API options. First, RSS feeds are read-only. You can't insert, update, or delete items using an RSS feed. Next, there are no proxy objects that can be created to simplify development. The .NET Framework does have a Syndication library that can be used to parse ATOM and RSS feeds but it doesn't equal a rich proxy object created by Visual Studio when working with a web service. The Syndication library doesn't produce strongly typed objects like a service proxy object. The final reason why RSS is not the best solution for data access is that outside of the common fields in RSS (title and link), any other list fields you make available in the feed are formatted HTML and not XML, which is difficult to parse at best. Even though RSS feeds look like they should be avoided when accessing data from SharePoint, RSS feeds could fill a need when anonymous access is required.
Custom SharePoint Applications
We covered all the major Remote APIs for SharePoint. The last data access method to consider is a custom SharePoint application. A custom SharePoint application has the least amount of limitations but potentially requires the most amount of work. Custom SharePoint applications also require a server-side component. A mobile solution that requires a server-side component means that a user can't simply add the application from the marketplace to their phone. Before the application can work, the server-side solution must be installed and configured. There is no support in the marketplace to download or install a server-side component of a phone application. The server-side component must be obtained outside of the Marketplace.
In some scenarios, a custom SharePoint application does make sense or is the only solution that solves the authentication and data needs. Consider a scenario for a corporation that creates a phone application to retrieve data from a list located on a public-facing SharePoint site. The list allows for anonymous access to the data. The only out-of-the-box method to anonymously access this data from a phone application is the list's RSS feed. Unfortunately, the RSS feed is difficult to parse when it contains columns other than common RSS feed elements such as title and author. Additional columns are formatted not as XML but as HTML.
Accessing your SharePoint Data
Now you should have a basic understanding of all the main points to start creating a Windows Phone 7 and SharePoint 2010 application. In this section, you will put it all together and create two Windows Phone 7 and SharePoint 2010 applications.
The first application will demonstrate how to access SharePoint list data—one of the most common integrations between a Windows Phone 7 application and SharePoint 2010. This application will demonstrate how to work with a SharePoint links list.
The second application will demonstrate how to access non-list data using the User Profile Service. This application will demonstrate how to view the current user's profile and colleagues in a Windows Phone 7 application. Working with users profiles are another common integration point for Windows Phone 7 and SharePoint. Note that these examples use FBA security and assume that you have created a SharePoint Web application that uses FBA.
Working with List Data
Accessing list data is one of the most common tasks a SharePoint developer will do. Lists are the main data source for almost any SharePoint implementation. As a developer, you can create Windows Phone 7 applications that read and write data to a list. Beyond reading and writing to a list, your application can also create and delete lists as well as change list schemas.
In this section, you will learn how to read and write data to an existing SharePoint list. In order to access data in a SharePoint list, you will need to learn how to authenticate to SharePoint using the Authentication Web Service and query a list using the Lists.asmx Web Service. You will also learn how to use Lists.asmx Web Service to add data to a SharePoint list.
This example creates a Windows Phone 7 application that reads and writes links from an existing SharePoint links list. The patterns presented in this application can be used for any SharePoint list template. This example demonstrates how to use the Authentication.asmx Web service to authenticate to SharePoint and how to use theLists.asmx Web service to read and write list data in a Windows Phone 7.
The steps are as follows:
- Create a
Linkmodel class. This class will contain the data retrieved from the SharePoint links list. - Add a service reference to the Lists Web Service. The service reference will create a proxy class that contains all the necessary code for working with the methods and objects defined by the Lists Web Service.
- Create a ViewModel for the links and populate a collection of links. The ViewModel contains the collection of Link model objects that will be bound to the user interface controls.
- Create a ViewModel to add new links to the SharePoint list. This ViewModel is bound to the user interface that will add a new link to the SharePoint list.
- Databind a list to the collection of links. This will display the links retrieved from the SharePoint list.
![]() Note In order to complete this demo you will need to have access to a FBA-enabled SharePoint web application. You will also need to have access to a SharePoint links list located in a site in the web application.
Note In order to complete this demo you will need to have access to a FBA-enabled SharePoint web application. You will also need to have access to a SharePoint links list located in a site in the web application.
Open the Apress.SharePoint.WP7.MyLinks Solution
The full source code for the MyLinks application is included with the book's source code. The application is too large to expect you to type each line of code to recreate it. This example covers the main SharePoint and Windows Phone 7 interaction points.
- Locate the Apress.SharePoint.WP7.MyLinks solution from the start folder.
- Open the Apress.SharePoint.WP7.MyLinks solution.
Modify the Application Constants
The Constants.cs file contains a list of values used in this application. You will need to provide the correct values for your environment.
- In Visual Studio, expand the Utilities folder in the project. Open the
Constants.csfile. - Modify the AUTHENTICATION_SERVICE_URL value to include the site that contains the links list.
- Example:
public const string AUTHENTICATION_SERVICE_URL = “http://fbaDemo/_vti_bin/authentication.asmx”; - Modify the MYLINKS_LIST_TITLE value to include the title of the links list that will contain your links.
Complete the Link Class
The Link model is a model class that contains the basic properties and methods for a link object. This is a representation of the SharePoint link in the link list.
- In Visual Studio, right click the Models folder and open the
Link.csfile. - Copy the code in Listing 11-4 into the Link class definition.
Listing 11-4. The Link Model Class
private int id;

public int Id

{

  get

  { return id; }

  set

  {

    id = value;

    NotifyPropertyChanged("Id");

  }

}
private string hyperLink;

public string HyperLink

{

  get { return hyperLink; }

  set

  {

    hyperLink = value;

    NotifyPropertyChanged("HyperLink");

  }

}


private string title;

public string Title

{

  get { return title; }

  set

  {

    title = value;

    NotifyPropertyChanged("Title");

  }

}


public Link() { }


public Link(int id, string SPLinkValue)

{

  Id = id;

  string[] split = SPLinkValue.Split(','),

  HyperLink = split[0];

  Title = split[1];

}


public static string BuildSPLink(string title, string url)

{

  return string.Format("{0}, {1}", url, title);

}
This model is a data container for the application. Each link retrieved from a SharePoint list will result in one instance of the link model class. The link model class implements the INotifyPropertyChanged interface. The INotifyPropertyChanged interface works with the user interface data binding. It, along with the calls to the NotifiedPropertyChanged method, notifies any bound objects of a change to the data, allowing the data bound object to rebind and display the new data. This call also implements a simple static method BuildSPLInk that will create the correct format for the link before saving to the SharePoint list.
Add a service reference For the Lists.Asmx Web Service
In this example you will use SharePoint's Lists.asmx Web Service to retrieve the list data. You will also configure the service to enable CookieContainers. CookieContainers are used to attach the authentication cookie for FBA.
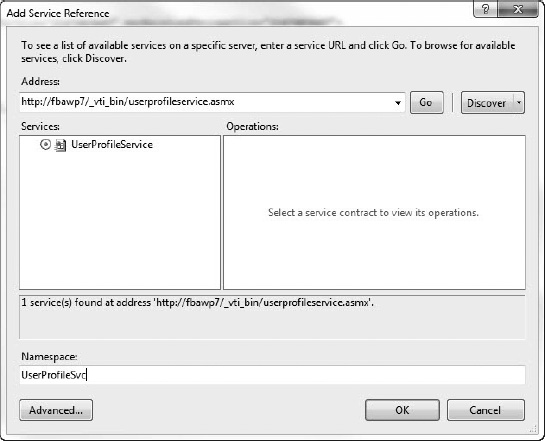
- In Visual Studio, right click on the Service References folder and choose Add Service Reference.
- In the Add Service Reference dialog, enter the address of the Lists.asmx web service, such as
http://fbaDemo/_vti_bin/lists.asmx. - Click Go and wait for Visual Studio to populate the list of services.
- Once the Lists service appears in the Services section, enter ListSvc for the Namespace value. The complete dialog should look like Figure 11-4.
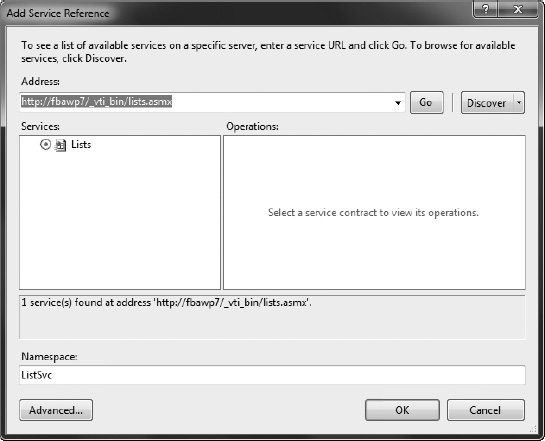
- Click OK to create the proxy for the Lists Web Service.
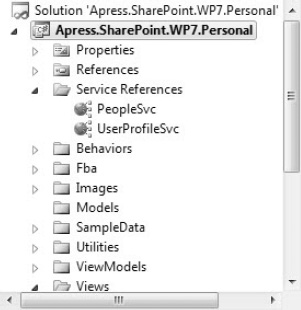
- You will see the new ListSvc reference added to your project, as shown in Figure 11-5.
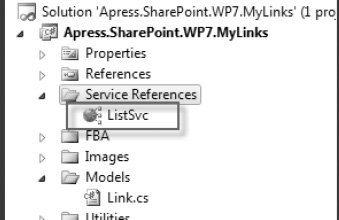
Figure 11-5. The new service reference in the project
- Open the
ServiceReferences.ClientConfigfile and locate the binding ListSoap and add the enableHttpCookieContainer="true" attribute to support FBA, as shown in Figure 11-6.

Figure 11-6. Setting enableHttpCookieContainer value
The enableHttpCookieContainer attribute is required to use FBA for SharePoint authentication in a Windows Phone 7 application. Enabling this attribute allows the code to access the CookieContainer, which will have the FEDAUTH cookie you need to access to SharePoint data and services. After the attribute is added to the binding element you will not be able to edit or remove the service reference until you manually remove the enableHttpCookieContainer attribute.
Add a Static Property to Store the FBA CookieContainer
- In Visual Studio, right click the
App.xamlclass and select View Code. - Scroll to the end of the file and add the definition for the Cookies property:
public static CookieContainer Cookies { get; set; }
The Cookies property is a static property available anywhere in the application. This property stores the CookieContainer that is returned from the SharePoint Authentication Web service. The CookieContainer is passed into SharePoint on subsequent remote method calls.
Review and Finalize Authentication code
This example uses the Authentication SharePoint Web Service to authorize remote users. The authentication code calls the Authentication Web Service, passing in the user's login name and password. The result is a success or failure response from the web service. If the authentication call is successful then the CookieContainer that includes the authentication cookie is stored in the App.xaml's Cookies property.
In this example, the code used to authenticate a user with SharePoint using FBA is located in the FBA class. The authentication code is responsible for submitting the user's credentials to the SharePoint Authentication web service and providing the caller with the CookieContainer containing the FEDAUTH cookie. The authentication code defines two events to notify the client of success or failure. Listing 11-5 displays the methods used to authenticate a user with SharePoint. Notice that the web service call is asynchronous. Silverlight only supports asynchronous communication with external services.
Listing 11-5. Authentication Code
public void Authenticate(string userId, string pwd, string authServiceURL)

{

   System.Uri authServiceUri = new Uri(authServiceURL);

   AuthHTTPWebRequest authRequest = new AuthHTTPWebRequest();
    HttpWebRequest spAuthReq = HttpWebRequest.Create(authServiceURL) as HttpWebRequest;

    authRequest.req = spAuthReq;

    authRequest.req.CookieContainer = cookieJar;

    authRequest.req.Headers["SOAPAction"] = "http://schemas.microsoft.com/sharepoint/soap/Login";

    authRequest.req.ContentType = "text/xml; charset=utf-8";

    authRequest.req.Method = "POST";

    authRequest.userId = userId;

    authRequest.pwd = pwd;


    authRequest.req.BeginGetRequestStream(new AsyncCallback(AuthReqCallBack), authRequest);

}


private void AuthReqCallBack(IAsyncResult asyncResult)

{

   string envelope =

    @"<?xml version=""1.0"" encoding=""utf-8""?>

         <soap:Envelope xmlns:xsi=""http://www.w3.org/2001/XMLSchema-instance""

                xmlns:xsd=""http://www.w3.org/2001/XMLSchema""

                xmlns:soap=""http://schemas.xmlsoap.org/soap/envelope/"">

             <soap:Body>

                <Login xmlns=""http://schemas.microsoft.com/sharepoint/soap/"">

                  <username>{0}</username>

                  <password>{1}</password>

               </Login>

            </soap:Body>

          </soap:Envelope>";


   UTF8Encoding encoding = new UTF8Encoding();

   AuthHTTPWebRequest request = (AuthHTTPWebRequest)asyncResult.AsyncState;

   Stream _body = request.req.EndGetRequestStream(asyncResult);

    envelope = string.Format(envelope, request.userId, request.pwd);

   byte[] formBytes = encoding.GetBytes(envelope);


   _body.Write(formBytes, 0, formBytes.Length);

    _body.Close();


    request.req.BeginGetResponse(new AsyncCallback(AuthCallback), request);

}
To finalize the code to authenticate the user via FBA, the AuthCallback method must be completed. This method looks at the authentication call result and raises the appropriate success or failure event to the caller.
- In Visual Studio, right click the FBA folder, and open the
FBA.csfile. - Copy the code in Listing 11-6 into the
AuthCallbackmethod located in the FBA class.
Listing 11-6. The AuthCallback Event Code
string authResult = "";
AuthHTTPWebRequest request = (AuthHTTPWebRequest)asyncResult.AsyncState;

HttpWebResponse response =

                    (HttpWebResponse)request.req.EndGetResponse(asyncResult);

Stream responseStream = response.GetResponseStream();


if (request != null && response != null)

{

  if (response.StatusCode == HttpStatusCode.OK)

  {

     XElement results = XElement.Load(responseStream);

     XNamespace n = "http://schemas.microsoft.com/sharepoint/soap/";


     var r = from result in results.Descendants(n + "ErrorCode")

             select result.Value;


     authResult = r.ToList().FirstOrDefault<String>();

   }

 }


 if (authResult == "NoError")

 {

   EventHandler<FBAAuthenticatedEventArgs> authenticated = OnAuthenticated;

   if (authenticated != null)

   { authenticated(this, new FBAAuthenticatedEventArgs(cookieJar)); }

 }

 else

 {

    EventHandler failedAuth = OnFailedAuthentication;

    if (failedAuth != null)

    { failedAuth(this, null); }

  }
The AuthCallback event is called when the Authentication Web Service call returns. This method parses the results and raises either the OnAuthenticated or OnFailedAuthentication event. The OnAuthenticated event will pass back the CookieContainer, which includes the authentication cookie. Clients can hook into these events to determine if the user has access to the site. Listing 11-7 displays the
Login.xaml.cscode, which includes the registration of the authentication events. TheLogin.xaml.csfile includes the code to save the CookieContainer to the App.Cookies property. - In Visual Studio, right click the Views folder, right-click
Login.xaml, and select View Code. - Copy the code in Listing 11-7 into the
LogInclass below the class constructors.
Listing 11-7. The Login.Xaml.cs Login Code
private void Login_Click(object sender, RoutedEventArgs e)

{

   if ((!String.IsNullOrEmpty(UserNameValue.Text)) &&

       (!String.IsNullOrEmpty(PasswordValue.Password)))

   {
      FBA fba = new FBA();

      fba.OnAuthenticated += new

               EventHandler<FBAAuthenticatedEventArgs>(fba_OnAuthenticated);

      fba.OnFailedAuthentication += new

               EventHandler(fba_OnFailedAuthentication);

      fba.Authenticate(UserNameValue.Text,

                       PasswordValue.Password,

                       Constants.AUTHENTICATION_SERVICE_URL);

   }

   else

   {

       MessageBox.Show("Please enter a user name and password.");

   }

}


void fba_OnFailedAuthentication(object sender, EventArgs e)

{

   this.Dispatcher.BeginInvoke(() =>

   {

      MessageBox.Show("Failed Login");

   });

}


void fba_OnAuthenticated(object sender, FBAAuthenticatedEventArgs e)

{

   App.Cookies = e.CookieJar;

   this.Dispatcher.BeginInvoke(() =>

   {

       NavigationService.Navigate(new Uri("/Views/MainPage.xaml",

                                          UriKind.Relative));

   });

}
The Login_Click method creates a new FBA class and registers the OnAuthenticated and OnFailedAuthenticated events. The method then calls FBA class's Authenticate method to attempt to authenticate the user. Depending on the result, either the OnAuthenticated or OnFailedAuthentication events are raised. When a user is authenticated, the CookieJar with the authentication cookie is sent back in the FBAAuthentication parameters and is stored in the App.Cookies parameter. The event then navigates the user to the MainPage.
Retrieve Links from a Links List
You have the FBA authentication in place, so let's now look at calling remote SharePoint APIs to work with list data. This example will retrieve list data from SharePoint using the Lists.asmx Web Service. The data access is accomplished in the MyLinksViewModel class. The ViewModel classes contain the methods used to interact between the view (user interface) and the model (in this case, the Link class). I will only review the SharePoint-specific code in this section. Remember that Silverlight only allows asynchronous communications. Therefore, the example has two methods to manage retrieving links from a links list: one to start the request and a method to handle the completed event. There is also a public ObservableCollection property that is used to store the individual links. It is this property that will be data-bound to the UI.
To begin the request to retrieve links from a links list, follow these steps:
- In Visual Studio, right click the ViewModel folder, and open the
MyLinksViewModel.csfile. - Copy the code in Listing 11-8 into the
MyLinksViewModelclass. This property should be placed between the class declaration and the first defined method.
Listing 11-8. The
MyLinksObservableCollectionprivate ObservableCollection<Link> myLinks;
public ObservableCollection<Link> MyLinks
{
get { return myLinks; }
set
{
myLinks = value;
NotifyPropertyChanged("MyLinks");
}
} - Copy the code in Listing 11-9 into the
LoadMyLinksmethod in theMyLinksViewModelclass.
Listing 11-9. The LoadMyLinks Method
XElement viewFields = new XElement("ViewFields",

                              new XElement("FieldRef",

                               new XAttribute("Name", "ows_URL")));

ListsSoapClient svc = new ListsSoapClient();

svc.CookieContainer = App.Cookies;

svc.GetListItemsCompleted += new

              EventHandler<GetListItemsCompletedEventArgs>

(svc_GetListItemsCompleted);

            svc.GetListItemsAsync("MyLinks", string.Empty, null,

                                  viewFields, null, null, null);
The
LoadMyLinksmethod defines the fields needed in the results. In this example you only need the ows_URL field. This field contains the URL and the text associated with the URL in a comma-separated string.The method will use the proxy generated when the service reference was added to define a new callback handler (
svc_GetListItemsCompleted) and calls theGetListItemsAsyncmethod. This will start the asynchronous get from the list. - Copy the code in Listing 11-10 into the
svc_GetListItemsCompletedmethod in theMyLinksViewModelclass.
Listing 11-10. The svc_ GetListItemsCompleted Method
IEnumerable<XElement> rows = e.Result.Descendants

                                (XName.Get("row", "#RowsetSchema"));

var myLinks = from element in rows

              select new Link(

                            (int)element.Attribute("ows_ID"),
                            (string)element.Attribute("ows_URL")

                          );


Deployment.Current.Dispatcher.BeginInvoke(() =>

{

  if (MyLinks == null)

  {

    MyLinks = new ObservableCollection<Link>();

  }

  MyLinks.Clear();

  myLinks.ToList().ForEach(a => MyLinks.Add(a));

 });
The svc_GetListItemCompleted method handles the return from the asynchronous call. Linq to XML is used to parse the results. Linq is also used to create a project Link model object for each row. The method clears and updates the MyLinks collection. The collection is data-bound to the UI controls. The Dispatcher object is used to run this code on the UI thread and therefore avoids a cross-thread error.
Add a Link to a Links List
Finally, the example will allow a user to add a new link to a link list. Adding a link to the link list is accomplished using the Lists.asmx Web Service. The NewLinkViewModel file includes the code required to add a new link to the link list.
- In Visual Studio, right click the ViewModel folder and open the
NewLinkViewModel.csfile. - Copy the code in Listing 11-11 into the
AddLinkmethod in theNewLinkViewModelclass.
Listing 11-11. The AddLink Method
XElement updateQuery =

    new XElement("Batch",

           new XAttribute("OnError", "Continue"),

           new XAttribute("ListVersion", "1"),

           new XElement("Method", new XAttribute("ID", "1"),

                 new XAttribute("Cmd", "New"),

                 new XElement("Field", new XAttribute("Name", "ID"), "New"),

                 new XElement("Field", new XAttribute("Name", "URL"),

                                Link.BuildSPLink(link.Title, link.HyperLink))

           ));


ListsSoapClient svc = new ListsSoapClient();

svc.CookieContainer = App.Cookies;

svc.UpdateListItemsCompleted += new

         EventHandler<UpdateListItemsCompletedEventArgs>

                                           (svc_UpdateListItemsCompleted);


svc.UpdateListItemsAsync(Constants.MYLINKS_LIST_TITLE, updateQuery);
The
AddLinkmethod includes batch instructions to add a new item. These instructions are created as XML and passed into theUpdateListItemsAsynchmethod of the Lists.asmx Web Service. This will update the list and call the defined callback,svc_UpdateListItemsCompleted. Notice the code uses the staticBuildSPLinkmethod to create a link with the text title as a comma-separated string. - Copy the code in Listing 11-12 into the
svc_UpdateListItemsCompletedmethod in theNewLinkViewModelclass.
Listing 11-12. The svc_UpdateListItemsCompleted Method
Deployment.Current.Dispatcher.BeginInvoke(SaveCompleteAction);
The svc_UpdateListItemsCompleted method is simple. Once the update is complete, the SaveCompleteAction delegate is called on the UI thread. The delegate is passed in from the Save button's click event in the user interface. This action will set a flag to alert the user interface to refresh the list and navigate the phone back one page.
Save and Run the Application
The application should now compile and run.
- In Internet Explorer, open the link list to view the links in the list. If there are no links in the list, create links to use in this example. Figure 11-7 shows the links in the link list used in this example.

Figure 11-7. Links in the example's list
- Select Windows Phone 7 Emulator as the deployment location (see Figure 11-8).
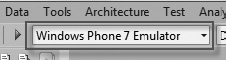
Figure 11-8. Windows Phone 7 Emulator selected
- Press F5 to run the program.
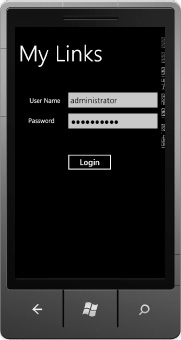
- Enter the user name and password in the login screen, as shown in Figure 11-9. The user must be a FBA user with access to the link list used in this example.
- Click Login.
- After you log in you will see the links in the links list, as shown in Figure 11-10.
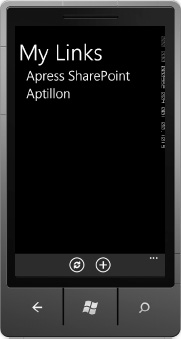
Figure 11-10. The main screen displaying links
- Click a link to view the associated web page (see Figure 11-11).
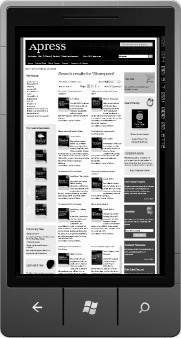
Figure 11-11. Apress web site displayed in the browser
- Click the back button on the phone to return to the list of links.
- Click the plus icon to add a new link.
- Enter the link title and URL. The URL field must start with http:// (see Figure 11-12).
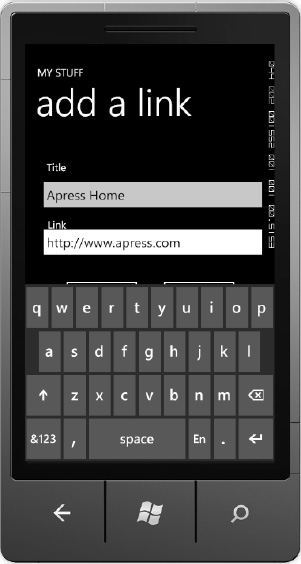
- Click Save to add the link. You can see the result in Figure 11-13.

Figure 11-13. The new link displayed in the phone application
- Return to Internet Explorer displaying the list and press F5 to refresh. Figure 11-14 displays the new link in the example's list.
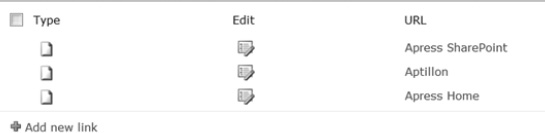
Figure 11-14. The new link displayed in the list
This exercise demonstrates how easy it is to create an application that can read and write SharePoint list data. The patterns shown in this example can be used for any SharePoint list template. In the next section you will see how to create a Windows Phone 7 application that works with non-list data.
Call User Profile Web Service
The SharePoint Server 2010 User Profile service application provides a means to import user profile information from Active Directory and other LDAP stores. Once imported, this user information store can be enhanced and made available to the SharePoint Search and Social services to greatly improve employee social interaction through SharePoint. As an application developer, you can enhance your SharePoint-connected applications with “people information” by leveraging the data stored in the User Profile service through the User Profile web service. The SharePoint User Profile web service provides the ability to view, create, edit, and manage user profile information in SharePoint 2010. The web service is the primary entry point for the application to retrieve information about user colleagues and user profiles.
![]() Note The User Profile service application and User Profile web service are features of SharePoint Server 2010. The code presented here uses the User Profile web service to retrieve a user's profile and colleagues. To make this code work, you must connect to the site using an account that has a user profile and colleagues.
Note The User Profile service application and User Profile web service are features of SharePoint Server 2010. The code presented here uses the User Profile web service to retrieve a user's profile and colleagues. To make this code work, you must connect to the site using an account that has a user profile and colleagues.
In this section, you will learn how to connect your application to the SharePoint User Profile web service to retrieve the user profile for the current user and the colleagues for the test user. The process is very similar to working with SharePoint lists and libraries. There are specific considerations for working with the returned data, like the profile photo, when the URLs returned are not part of the FBA site you are authenticated against. Creating a My Site host that is accessible through FBA is required if you want to serve the images from the profile. Additionally, FBA does not require the user to provide the full account name for authentication. Calls to the User Profile web service do require the full account name. The code sample uses the People.asmx service to determine the full account name for the user after authentication is successful. The details of this procedure are in the LogIn.xaml.cs file. This sample will detail how to call the User Profile web service from the phone and work with the text data that is returned.
The steps are as follows:
- Add a service reference to the User Profile Service. The service reference will create a proxy class that contains all of the necessary code for working with the methods and objects used by the User Profile Service.
- Create a ViewModel for the Colleagues and populate the collection. The ViewModel will define the properties of the Colleague object that will be bound to the user interface controls.
- Data bind a list to the Colleagues collection and add text boxes to display the results. In order for the application to update the UI, you will data bind the controls to the selected item in the Colleagues list.
Open the Apress.SharePoint.WP7.Personal Project
The complete project source code and starting source code for the Personal application is included with the book's source code. The application includes all of the FBA authentication code configured so you can focus on the parts of the project that pertain to the User Profile Service. This example details the specifics of the interaction between SharePoint and Windows Phone 7.
- Locate the Apress.SharePoint.WP7.Personal solution from the start folder.
- Open the Apress.SharePoint.WP7.Personal solution.
Modify the Application Constants
The Constants.cs file contains the values used in this application. You will need to provide the correct values for your environment.
- In Visual Studio, expand the Utilities folder in the project. Open the
Constants.csfile. - Modify the AUTHENTICATION_SERVICE_URL value to reference the site that is configured for FBA.
- Example:
public const string AUTHENTICATION_SERVICE_URL = “http://fbaDemo/_vti_bin/authentication.asmx”; - Modify the USERPROFILE_SERVICE_URL value to include the site configured for FBA.
- Example:
public const string USERPROFILE_SERVICE _URL = “http://fbaDemo/_vti_bin/userprofileservice.asmx”; - Modify the PEOPLE_SERVICE_URL value to reference the site configured for FBA.
- Example:
public const string PEOPLE_SERVICE _URL = “http://fbaDemo/_vti_bin/people.asmx”;
Add a service reference
- In Visual Studio, right click the Service References folder and choose Add Service Reference.
- In the Add Service Reference dialog, enter the address of the User Profile Service.
- Example:
http://fbademo/_vti_bin/userprofileservice.asmx - Click Go and wait for Visual Studio to populate the list of services.
- Once the UserProfileService appears in the Services section, in the Namespace textbox, enter UserProfileSvc. The complete dialog should look like Figure 11-15.
- Click OK to create the proxy class for the User Profile Service.
- You will see the new UserProfileSvc service reference added to your project, as shown in Figure 11-16.
- Open the ServiceReferences.ClientConfig file and locate the binding UserProfileServiceSoap element. Add the enableHttpCookieContainer="true" attribute to the binding element to support FBA. Locate the binding PeopleSoap element. Add the enableHttpCookieContainer="true" attribute to the binding element.
Complete the Colleagues ViewModel Class
- In Visual Studio, open the ViewModels folder and right click on
ColleaguesViewModeland select open. - In the
ColleaguesViewModelclass, add the code in Listing 11-13. This code defines the properties of the Colleague that you will display in the application.
Listing 11-13. The ColleagueViewModel Class
  private string _fullName;

  /// <summary>

  /// Colleague ViewModel FullName property;

  /// this property is the Full Name of the colleague.

  /// </summary>

  /// <returns></returns>

  public string FullName

  {

    get

    {

      return _fullName;

    }
    set

    {

      if (value != _fullName)

      {

        _fullName = value;

        NotifyPropertyChanged("FullName");

      }

    }

  }


  private string _accountName;

  /// <summary>

  /// Colleague ViewModel AccountName property;

  /// this property is the Colleagues Account Name.

  /// </summary>

  /// <returns></returns>

  public string AccountName

  {

    get

    {

      return _accountName;

    }

    set

    {

      if (value != _accountName)

      {

        _accountName = value;

        NotifyPropertyChanged("AccountName");

      }

    }

  }


  private string _personalUrl;

  /// <summary>

  /// Colleague ViewModel PersonalUrl property;

  /// this property is the URL to the Colleagues Personal Site.

  /// </summary>

  /// <returns></returns>

  public string PersonalUrl

  {

    get

    {

      return _personalUrl;

    }

    set

    {

      if (value != _personalUrl)

      {

        _personalUrl = value;

        NotifyPropertyChanged("PersonalUrl");

      }

    }

  }
  private string _title;

  /// <summary>

  /// Colleague ViewModel PersonalUrl property;

  /// this property is the Title from the User Profile.

  /// </summary>

  /// <returns></returns>

  public string Title

  {

    get

    {

      return _title;

    }

    set

    {

      if (value != _title)

      {

        _title = value;

        NotifyPropertyChanged("Title");

      }

    }

  }


  private string _email;

  /// <summary>

  /// Colleague ViewModel PersonalUrl property;

  /// this property is the E-mail from the User Profile.

  /// </summary>

  /// <returns></returns>

  public string EMail

  {

    get

    {

      return _email;

    }

    set

    {

      if (value != _email)

      {

        _email = value;

        NotifyPropertyChanged("EMail");

      }

    }

  }
Create the ColleaguesViewModel Collection
- In the project ViewModels folder open the
MainViewModel.csfile. - Create a new public property in the
MainViewModelclass for theObservableCollectionofColleagueViewModels. To do this, add the code in Listing 11-14 to theMainViewModelclass. This collection will be bound to the user interface for display of the data in the collection.
Listing 11-14. The ColleagueViewModel Observable Collection
/// <summary>

/// A collection for ColleagueViewModel objects.

/// </summary>

public ObservableCollection<ColleagueViewModel> Colleagues { get; private set; } - In the constructor of the
MainViewModeladd the code to create theColleaguesObservableCollection. For clarity, the code in Listing 11-15 shows the entire constructor.
Listing 11-15. The New ColleagueViewModel Collection
public MainViewModel()

{

  this.Colleagues = new ObservableCollection<ColleagueViewModel>();

} - In the
LoadMyColleaguesmethod in theMainViewModelclass, add the code in Listing 11-16. This method sets the authentication header for FBA and then calls the web methodGetUserColleaguesAsyncto return the colleagues for the user.
Listing 11-16. The LoadMyColleagues Method
UserProfileSvc.UserProfileServiceSoapClient svc = new

        UserProfileServiceSoapClient();

svc.CookieContainer = App.Cookies;

svc.GetUserColleaguesCompleted +=

        new EventHandler<GetUserColleaguesCompletedEventArgs>(

        svc_GetUserColleaguesCompleted);

svc.GetUserColleaguesAsync(App.UserName); - In the
svc_GetUserColleaguesCompletedmethod in theMainViewModelclass, add the code shown in Listing 11-17. This code takes the return result of theGetUserColleaguesAsyncmethod and extracts theContactDatato createColleagueobjects and load them into theColleagues ObservableCollection.
Listing 11-17. The svc_GetUserColleaguesCompleted Method
  if (e.Error == null)

  {

    Deployment.Current.Dispatcher.BeginInvoke(() =>

    {

      Colleagues.Clear();


      foreach (ContactData contactData in e.Result.ToList())
{
Colleagues.Add(new ColleagueViewModel()
{
AccountName = contactData.AccountName,
FullName = contactData.Name,
Title = contactData.Title,
EMail = contactData.Email,
PersonalUrl = contactData.Url
});
}
});
}
else
{
Debug.WriteLine("Error: {0}", e.Error.Message);
}
Databind The Colleagues Collection to a ListBox
The last step is to add a ListBox to the UI and data bind the list to the Colleagues ObservableCollection. This step is performed in the XAML for the Pivot Item.
- Expand the Views folder and open
MainPage.xamland locate the Pivot control. Locate the Pivot Item with the header “my colleagues”. - Inside the PivotItem markup, add the code in Listing 11-18. This XAML creates a ListBox with a template that is composed of StackPanel and TextBlock controls to present the data from the Colleagues ObservableCollection. The controls are bound to the collection using element binding.
Listing 11-18. The ColleaguesListBox XAML
<ListBox x:Name="ColleaguesListBox" Margin="0,0,-12,0"

  ItemsSource="{Binding Colleagues}">

  <ListBox.ItemTemplate>

    <DataTemplate>

      <StackPanel Margin="0,0,0,-2" Height="134">

      <TextBlock Text="{Binding FullName}"

                 TextWrapping="NoWrap"

                 Margin="12,0,0,0"

                 Style="{StaticResource PhoneTextExtraLargeStyle}"

                 Height="50"/>

      <TextBlock TextWrapping="Wrap"

                 Text="{Binding Title}" Margin="12,0,0,0"/>

      <TextBlock TextWrapping="Wrap"

                 Text="{Binding EMail}" Margin="12,0,0,0"/>

      <TextBlock Text="{Binding PersonalUrl}"

                 TextWrapping="NoWrap"

                 Margin="12,-6,0,0"

                 Style="{StaticResource PhoneTextSubtleStyle}"/>
</StackPanel>
</DataTemplate>
</ListBox.ItemTemplate>
</ListBox> - Save and run the project. You should see results similar to Figure 11-17 after logging in with an account with associated colleagues.
 Note This example is based on users in the “Contoso Demo” available from Microsoft. The profile data rendered in your demo will be based on the names and titles you entered in your demo environment. The FBA user that is used to log in must have colleagues in order for this code to display results.
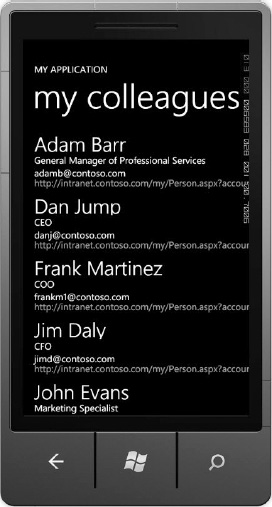
Figure 11-17. The colleagues list
- End the debugging session and return to Visual Studio.
Retrieve the User Profile Properties for a Specific User
The SharePoint User Profile contains over 50 properties out of the box. The User Profile is configurable and more properties can be added to define user attributes that are specific to your enterprise. If you want to use the properties of the User Profile in your custom applications, you need to request the User Profile from the User Profile Web Service and then parse the resulting PropertyData object to get the property names and values. In this exercise, you will retrieve the User Profile for the current user and then display the resulting properties in the Windows Phone 7 application.
The steps are similar to retrieving Colleagues. Since you already created a reference to the SharePoint User Profile web service, you will reuse that service reference. The steps are as follows:
- Create a ViewModel for the User Profile. Since you are only retrieving a single user profile, you only need a single ViewModel instance for the profile.
- Call the User Profile Service
GetUsetProfileByNamemethod and store the result in the User Profile ViewModel. - Data bind the text boxes to the User Profile object to display the values.
![]() Note In the current version of Silverlight for Windows Phone there is a known issue with calling certain methods of the User Profile Service. What you will encounter is an error indicating that the application is unable to deserialize known types like GUIDs when using web methods that return the PropertyData type. The details of the issue are beyond the scope of this chapter, but the solution is included with the source code download in the project Behaviors folder.
Note In the current version of Silverlight for Windows Phone there is a known issue with calling certain methods of the User Profile Service. What you will encounter is an error indicating that the application is unable to deserialize known types like GUIDs when using web methods that return the PropertyData type. The details of the issue are beyond the scope of this chapter, but the solution is included with the source code download in the project Behaviors folder.
Complete the MyProfileViewModel Class
- Open the
MyProfileViewModelclass located in the ViewModels folder. - Complete the
MyProfileViewModelclass definition by inserting the code in Listing 11-19. This code defines the properties for the User Profile.
Listing 11-19. MyProfileViewModel Class
  private string _fullName;

  /// <summary>

  /// Sample ViewModel property; this property is used

  ///  in the view to display its value using a Binding.

  /// </summary>

  /// <returns></returns>

  public string FullName

  {

    get

    {
      return _fullName;

    }

    set

    {

      if (value != _fullName)

      {

        _fullName = value;

        NotifyPropertyChanged("FullName");

      }

    }

  }


  private string _title;

  /// <summary>

  /// Sample ViewModel property; this property

  ///  is used in the view to display its value using a Binding.

  /// </summary>

  /// <returns></returns>

  public string Title

  {

    get

    {

      return _title;

    }

    set

    {

      if (value != _title)

      {

        _title = value;

        NotifyPropertyChanged("Title");

      }

    }

  }


  private string _pictureUrl;

  /// <summary>

  /// Sample ViewModel property; this property

  ///  is used in the view to display its value using a Binding.

  /// </summary>

  /// <returns></returns>

  public string PictureUrl

  {

    get

    {

      return _pictureUrl;

    }

    set

    {

      if (value != _pictureUrl)

      {

        _pictureUrl = value;
        NotifyPropertyChanged("PictureUrl");

      }

    }

  }


  private string _aboutMe;

  /// <summary>

  /// Sample ViewModel property; this property

  ///  is used in the view to display its value using a Binding.

  /// </summary>

  /// <returns></returns>

  public string AboutMe

  {

    get

    {

      return _aboutMe;

    }

    set

    {

      if (value != _aboutMe)

      {

        _aboutMe = value;

        NotifyPropertyChanged("AboutMe");

      }

    }

  }
Add the MyProfileViewModel Property to the MainViewModel
- Open the
MainViewModel.csfile and add a new property for MyProfile to the class, as shown in Listing 11-20. This code creates the property that stores the User Profile and is data bound to the UI.
Listing 11-20. The MyProfileViewModel Property
private MyProfileViewModel _myProfile;

/// <summary>

/// MyProfileViewModel property; this property is used in

///   the view to display the current user profile

/// </summary>

/// <returns></returns>

public MyProfileViewModel MyProfile

{

  get

  {

    return _myProfile;

  }

  set

  {
if (value != _myProfile)
{
_myProfile = value;
NotifyPropertyChanged("MyProfile");
}
}
} - In the MainViewModel constructor, create the instance of the MyProfileViewModel. The complete constructor is shown in Listing 11-21.
Listing 11-21. The MainViewModel Constructor
public MainViewModel()

{

    this.Colleagues = new ObservableCollection<ColleagueViewModel>();

    this.MyProfile = new MyProfileViewModel();

}
Load Data from the User Profile Service
- Complete the
LoadMyProfilemethod located in theMainViewModelclass by inserting the code in Listing 11-22 This code adds a message inspector to the request to resolve a known issue in Silverlight described previously in this section. Then it calls theGetUserProfileByNameAsyncmethod to request the user profile data.
Listing 11-22. The Complete LoadMyProfile Method
  //Create the Message Inspector

  //ToDo : You MUST have the Behaviors folder from the sample for this to work

  SPAsmxMessageInspector messageInspector = new SPAsmxMessageInspector();

  //Apply the Message Inspector to the Binding

  BasicHttpMessageInspectorBinding binding = new

    BasicHttpMessageInspectorBinding(messageInspector);


  EndpointAddress endpoint = new

    EndpointAddress(Constants.USERPROFILE_SERVICE_URL);


  UserProfileSvc.UserProfileServiceSoapClient svc = new

    UserProfileServiceSoapClient(binding, endpoint);

  svc.CookieContainer = App.Cookies;

  svc.GetUserProfileByNameCompleted += new

    EventHandler<GetUserProfileByNameCompletedEventArgs>(

    svc_GetUserProfileByNameCompleted);

svc.GetUserProfileByNameAsync(App.UserName); - Complete the
svc_GetUserProfileByNameCompletedmethod in theMainViewModelclass by inserting the code from Listing 11-23. This code parses the returnedPropertyDataobject and populates theMyProfileobject with the data.
Listing 11-23. The GetUserProfileByNameCompleted Event Handler
  if (e.Error == null)

  {

    foreach (UserProfileSvc.PropertyData propertyData in e.Result)

    {

      switch (propertyData.Name)

      {

        case "PreferredName":

          MyProfile.FullName = propertyData.Values.Count > 0

            ? (propertyData.Values[0].Value as string)

            : String.Empty;

          break;

        case "Title":

          MyProfile.Title = propertyData.Values.Count > 0

            ? (propertyData.Values[0].Value as string)

            : String.Empty;

          break;

        case "AboutMe":

          MyProfile.AboutMe = propertyData.Values.Count > 0

            ? (propertyData.Values[0].Value as string)

            : String.Empty;

          break;

        case "PictureURL":

          MyProfile.PictureUrl = propertyData.Values.Count > 0

            ? (propertyData.Values[0].Value as string)

            : String.Empty;

          break;

      }

    }

  }

  else

  {

    Debug.WriteLine("Error: {0}", e.Error.Message);

  }
Add a PivotItem for the Profile
- Open
MainPage.xamland locate the second PivotItem with the header that reads “my profile”. - Add the code in Listing 11-24 between the start and end PivotItem elements. This code creates the UI to display the profile property information in the
MyProfileobject. This XAML creates a grid with TextBlock controls to present the data from the MyProfile property. The controls are bound to the collection using element binding.
Listing 11-24. The Profile PivotItem XAML
<Grid>

  <TextBlock TextWrapping="NoWrap" Text="{Binding MyProfile.FullName}"

    VerticalAlignment="Top" Margin="123,4,7,0" d:LayoutOverrides="Width"

    Style="{StaticResource PhoneTextLargeStyle}"/>

  <TextBlock TextWrapping="NoWrap" Text="{Binding MyProfile.Title}"

    VerticalAlignment="Top" Margin="127,45,0,0" HorizontalAlignment="Left"

    Style="{StaticResource PhoneTextSmallStyle}"/>

  <TextBlock TextWrapping="Wrap" Text="{Binding MyProfile.AboutMe}"

    Margin="8,124,12,16" Style="{StaticResource PhoneTextSmallStyle}"/>

</Grid> - Save and run your project. After you log in, flick the pivot to the second pivot item. You should see the user's profile, as shown in Figure 11-18.
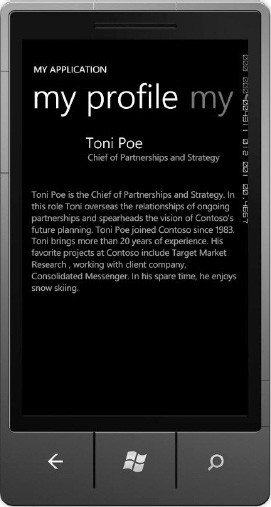
Figure 11-18. The current user's profile
Summary
This latest incarnation of Microsoft's mobile vision makes it easy for .NET developers to create rich mobile applications with familiar tools. Advances in the platform are under development and new features will make your job as a developer easier. Two things are certain: the mobile market will continue to grow as will Microsoft's market share, so investing time now in learning how to develop for Windows Phone 7 is a good choice.
At this time, Windows Phone 7 does not support Windows authentication in custom applications. Authentication must use either FBA or UAG. Depending on how your farm is configured, FBA may already be available or you may have to extend a web application to include FBA. UAG can provide alternatives to FBA and includes secure portal access to your SharePoint farms.
The SharePoint remote APIs work with little or no limitations, while the SharePoint Client Side Object Model is not supported on the current phone platform. Web services provide the most coverage because CSOM is not available. RESTODATA can be used but it can be complex to do anything more than read operations when using FBA. Again, UAG provides some relief when configured correctly.
Even though authentication and remote APIs can be challenging, with a little time and imagination you will find that there is always a way to get access to the data you require. As the Windows Phone 7 platform matures and business cases are made for mobile support, SharePoint developers will be well positioned to take advantage of the platform with this fundamental knowledge of SharePoint and Windows Phone 7.