![]()
Visual Studio Lab Management
Most projects today want short cycles and transparent development processes that allow for changing the plan after every cycle. This typically means that in two to four weeks a set of features need to go from developers to testers to stakeholders and perhaps even customers. To support this we need lots of different test environments to validate the development work. There is also a lot of work to keep the environment ready for test, which includes not only making sure the right version of the product is there but includes test data and dependent services as well. If we want to succeed with agile projects we must make sure to manage this complexity well. Unfortunately, it is often far from a simple process to implement in a project though.
Visual Studio Lab Management was introduced with TFS 2010 as a platform to build a lab infrastructure to support these new requirements. It has many features that can be used to speed up the process around managing environments. As a nice consequence it also improves the overall experience around testing and bug fixing with tooling for automated deployment and testing as well as collection of data from machines in the lab environments.
This section covers how to leverage Visual Studio Lab Management to implement a solution for test lab management, which can be used for manual testing, as well as automated processes such as deployment and testing. This will take our software factory to the next level!
Architecture
To set up Visual Studio Lab Management requires knowing more about the features it offers. In the next section we will look at the capabilities and components in the product that will enable us to define the architecture for a Lab Management configuration.
Capabilities
First let’s take a look at the capabilities Visual Studio Lab Management offers. Lab Management is all about making testing easier. We can use Lab Management to create labs to run manual and automated tests. Lab Management also extends the TFS build system with deployment and remote testing capabilities.
Improved Manual Testing
Perhaps the most tangible capability of Visual Studio Lab Management is doing manual testing more effectively. With Lab Management and virtualization is it now possible to create lab environments to allow for testing of complex test systems (database and web servers, integration services) as well as testing multiple configurations (operating systems, platforms, languages).
Environments for Automated Testing
It is also possible to use lab environments to run automated tests. The lab environment is then controlled by the Test Agent installed on machines in the environment. How tests should be executed on the target environment is controlled by settings in MTM and Visual Studio. The Test Agent can be configured to run both interactive and non-interactive tests.
Framework for Build-Deploy-Test Workflows
As mentioned at the beginning of the chapter, one of the key elements of an effective test process is to manage environments effectively. Apart from creating and using the environments, implementing automated build-deploy-test (BDT) workflows that can virtually rebuild a complete environment in minutes is a killer feature of Lab Management. BDT workflows is implemented using the standard build definitions in TFS Build and can be customized and extended to support the deployment needs of your application.
Cloning Environments
Working with complex environment can be challenging work. How many times have we had to struggle to get a test environment with all components set up? Wouldn’t it have been great if it was possible to take a copy of the environment when you have got it working and reuse it for future testing? Lab Management environments can do just that, if we want to create a copy of an environment, we can create a template and then use that to create clones for other testers, other configurations, or whatever our needs may be.
Of course cloning machines can have side-effects, particularly when it comes to starting up several instances of the same type of environment. The solution for this is to use network isolation to create isolated environments.
Network Isolation
To solve the problem with cloned environments, Lab Management allows us to create isolated environments. An isolated environment is simply put a lab environment with managed networking. When an environment is created with network isolation the machines in the environment are placed on a private subnet so that additional running environments with conflicting components can work independent of each other. Figure 23-1 shows an example where an original environment has been cloned. Using network isolation the internal addresses (and all other configuration data) are identical but the external addresses are unique.
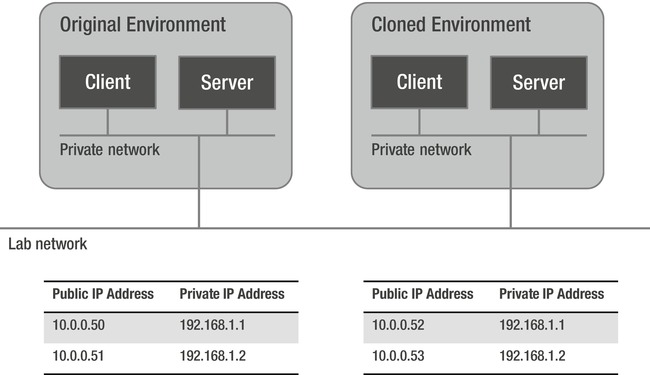
Figure 23-1. Isolated environments
Components
Now with the main capabilities of Lab Management covered, let us take a look at the components used to support those capabilities.
Test Controller
The Test Controller is a service responsible for controlling test execution. It can be used for controlling load tests, which we looked at in the Automated Testing chapter, and also for managing automated test runs, which is what we use it for in lab environments. Each test controller used with Lab Management is bound to a TFS Team Project Collection but can be used by any project in that project collection.
Test Agent
A test agent is a service installed on a test machine and enables three things:
- Test execution. Tests run on the machine are managed by the test agent (including things such as downloading test assemblies and test dependencies)
- Data collection. The test agent collects data as configured for a test run.
- Deployment workflow execution. If a machine is part of a build-deploy-test workflow the test agent will execute the deployment part of the workflow.
With Visual Studio 2012 Lab Management the test agent deploys automatically when a new lab environment is created from Microsoft Test Manager. A test agent is always connected to a test controller.
The test agent can be configured to run tests interactively (typically for running UI tests) or non-interactively as needed. If possible, you should run the test agent as a service to avoid having the test machine running with a logged on user.
System Center Virtual Machine Manager
System Center Virtual Machine Manager (SCVMM) is the component required if we want to create new virtual machines for lab environments directly from MTM.
The SCVMM client also has to be installed on the Team Foundation Server Application Tier to enable the SCVMM Lab Management functionality.
Lab Management 2012 supports the 2008 R2 and 2012 versions of SCVMM.
Architecture
With the preceding in place we can now take a look at a complete architecture for Lab Management. Figure 23-2 shows the components and its use cases.

Figure 23-2. Lab Management architecture
![]() Note For more details on how to design your lab see the “Planning Your Lab” on MSDN (http://msdn.microsoft.com/en-us/library/ff756575(v=vs.110).aspx).
Note For more details on how to design your lab see the “Planning Your Lab” on MSDN (http://msdn.microsoft.com/en-us/library/ff756575(v=vs.110).aspx).
Setting Up Visual Studio Lab Management for Kangreen
We will now look at building the Lab Management infrastructure for Kangreen to empower their testing process. Based on the understanding of the capabilities in Lab Management, Kangreen does not want to miss any part of this product and has asked for the setup shown in Figure 23-3.
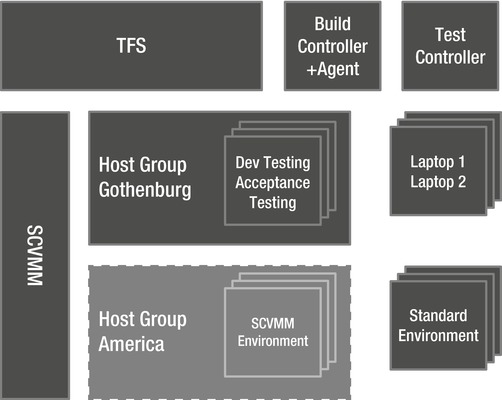
Figure 23-3. Kangreen Lab Environment topology
Install and Configure Test Controller
Let’s start by installing the Test Controller. The Test Controller, as we talked about earlier in this chapter, is responsible for integrating a lab environment with TFS. The installation in itself is a straightforward process; the most important thing to consider is where the Test Controller should be installed. If you only need one Test Controller, then you could install it on the same machine as the Build Controller (if you have one).
Once installed, the Test Controller must be configured to register with a Team Project Collection, as shown in Figure 23-4.
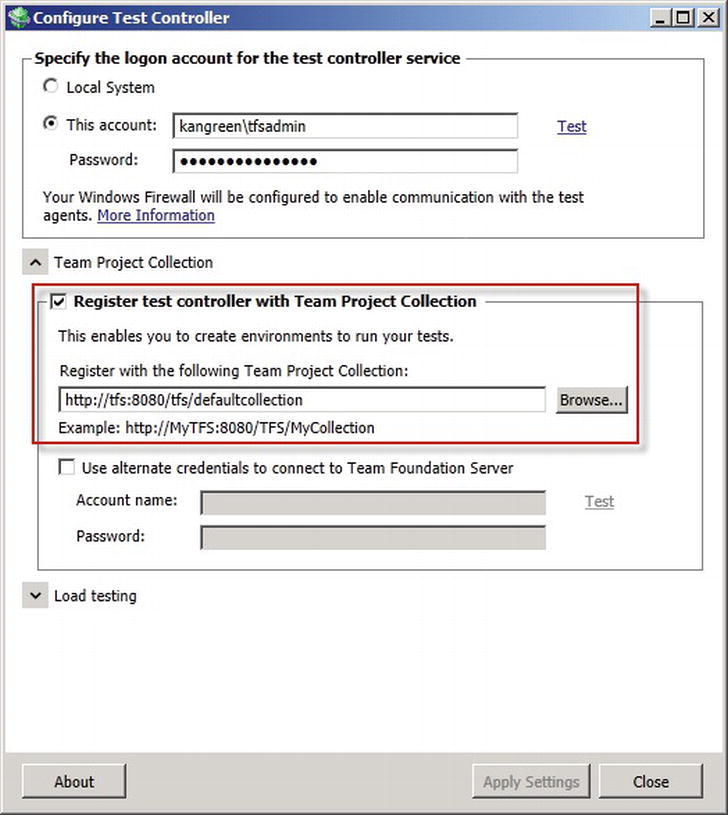
Figure 23-4. Test Controller configuration
Install and Configure Hyper-V and SCVMM
To support snapshots and the creation of new lab environments from templates, the next task is to enable Hyper-V and install the System Center Virtual Machine Manager (SCVMM) in the TFS environment. The high-level installation procedure is as follows:
- Enable the Hyper-V role on the virtualization server.
- Install and configure the SCVMM server and the SCVMM administration console on the virtualization server.
![]() Note We recommend using a separate host group for each team project collection. We also recommend configure a library share for each team project collection since it gives a better control over which VMs and templates are used by which collection.
Note We recommend using a separate host group for each team project collection. We also recommend configure a library share for each team project collection since it gives a better control over which VMs and templates are used by which collection.
- 3. Install the SCVMM client on the TFS application tier. This enables the integration between TFS and SCVMM.
For a detailed description on how to set up Lab Management, look at the product documentation on configuring and administrating Lab Management1.
Configure TFS for Lab Management
After SCVMM has been set up we can now configure TFS to enable the Lab Management capabilities for a Team Project Collection and its Team Projects. To enable Lab Management do the following:
- Enable Lab Management for the Team Foundation Server (see Figure 23-5).
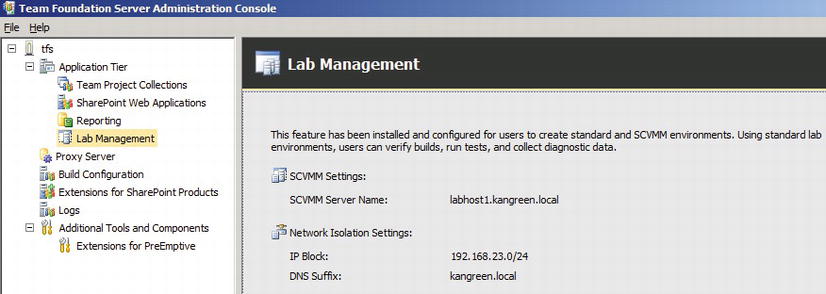
Figure 23-5. TFS Lab Management configuration
a. Open the TFS Administration Console and go to the Lab Management tab.
b. Provide the name of the SCVMM server.
c. Provide credentials on SCVMM used to provision the TFS service account to the SCVMM Administrators role.
![]() Note The credentials provided must be a member of the SCVMM Administrators role.
Note The credentials provided must be a member of the SCVMM Administrators role.
d. Provide information about network isolation.
The TFS service account needs to have permission to register the DNS alias in the DNS zone provided.
- 2. Enable Lab Management for each Team Project Collection (see Figure 23-6).
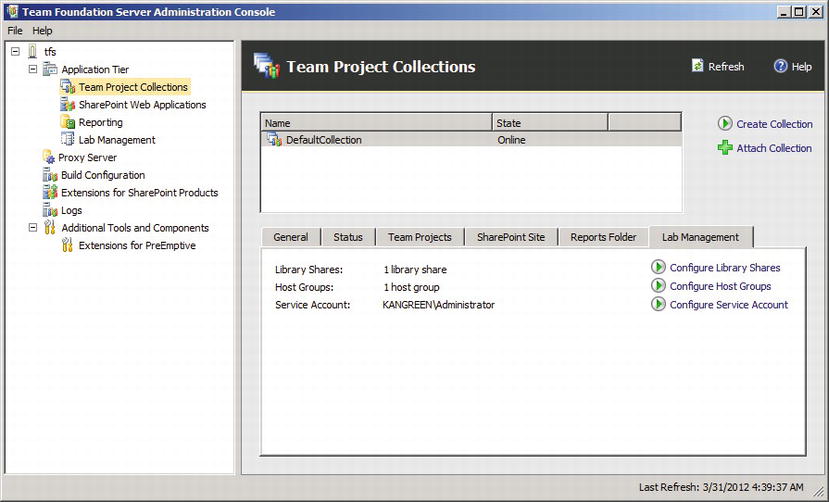
Figure 23-6. TFS Lab Management Team Project Collection configuration
a. Open the TFS Administration Console, select the Team Project Collection to configure and choose the Lab Management tab.
b. Provide the library shares and host groups to use for the team project.
c. Provide a service account.
![]() Note This account must be a domain account and should have limited privileges because it can be used to run build workflows on the test and build agents.
Note This account must be a domain account and should have limited privileges because it can be used to run build workflows on the test and build agents.
Environments
A Lab Management environment is a collection of properties that defines a lab environment by
- Name and type of environment.
- Host group for deployed environments.
- The machines in the lab environment and their role (client, app server, database server, etc.). The role can be used to select machines in scenarios such as deployment or test settings.
- Machine properties. Characteristics for the lab machine including tags. The tags are a convenient way to select machines in, again for instance in a deployment scenario.
Designing Environments
With the understanding of capabilies and the installation requirements we can now start thinking on how the environments should be created. Typical points for discussion when looking at types of environments are things like:
- What defines an environment? One machine? A group of machines?
- Are physical machines required for testing or can virtual machines be used?
- Should environments be possible to revert to an earlier state?
- If yes, we need to use SCVMM (or at least virtual) environments.
- Is the database inside the environment?
- If no, then how can we control state if an environment is reverted?
- Should environments be cloned and run concurrently?
- If yes then we should use isolated environments (requires SCVMM environments).
Ideally you want to simulate the different types of environments needed to perform relevant tests, which often means a set of Dev, Test, QA, and Pre-production environments per product version you need to test. Each lab environment contains the machines representing the system under test (which can be a single machine or a complete infrastructure setup including clients, application servers, database servers, firewalls, and so on). Then factor in the need for different operation systems, languages and browser versions. This can quickly build up to a good number of environments and machines to maintain.
This is just what Lab Management is here to help us with! It should not be impossible to manage the need for realistic testing, instead focusing on defining repeatable processes for setting up environments and deploying updates of your product to environments.
Working with Standard Environments
With Visual Studio 2012 Lab Management it is possible to create an environment based on existing infrastructure without installing SCVMM. This is great because we can now start using Lab Management without any additional installation required. The lab machines in a standard environment can be physical or virtual (or both) and the virtual machine does not have to be managed by SCVMM or Hyper-V.
To create a standard environment you only need to know the names of the machine you want to add to the environment and a user account to be used to log in and deploy the test agent service onto the machine.
A standard environment can be connected to directly from MTM and the Test Runner making the integration with lab environments really smooth.
SCVMM Environments
The alternative to standard environments is to use a SCVMM environment. The key features of a SCVMM environment include
- Create new machines from templates. New lab machines can automatically be created by anyone (having permissions) running MTM. It is no longer required to send a request to the operations department to get machines created for a new environment or to do other maintenance operations such as starting, stopping, snapshotting, or restoring machines.
- Support for snapshots. It is possible to work with snapshots from MTM, which enable testers to save state during testing. This is a powerful feature both to unlock the tester if a test case fails (no need to block an environment while waiting for a resolution) but also to give a developer a fixed point in time to reproduce a bug.
- Connection inside MTM. A SCVMM environment can be connected to MTM and the Test Runner just like with the standard environment.
![]() Note Taking a snapshot on an environment snapshots all machines in the environment at the same time, a great way to manage state for a complete test scenario!
Note Taking a snapshot on an environment snapshots all machines in the environment at the same time, a great way to manage state for a complete test scenario!
What About Support for VMware?
At this point there is no built-in support for managing virtual environments using VMware the same way as virtual machines in Hyper-V. You can of course create standard environments based on machines managed by VMware but you will not get support for snapshots and direct integration with machines in the environment from inside MTM.
Integration with the build system works with VMware environments just like for any physical environment. If you want to get more integration with VMware, check out the following open-source project: http://vmwarelab.codeplex.com. This project adds additional build workflow activities that allow you to use snapshots as part of a deployment process and you use a custom build process wizard to define the workflow using VMware, as shown in Figure 23-7.

Figure 23-7. Configure a VMware environment for build-deploy-test
Test Settings for Lab Environments
As we saw in Chapter 21 we can use a Test Settings configuration to control how data is collected from an environment when tests are run. Test Settings for a lab environment works exactly the same and lets us add data collection for the remote machines in our environments, Figure 23-8 shows how this is configured for a test plan.
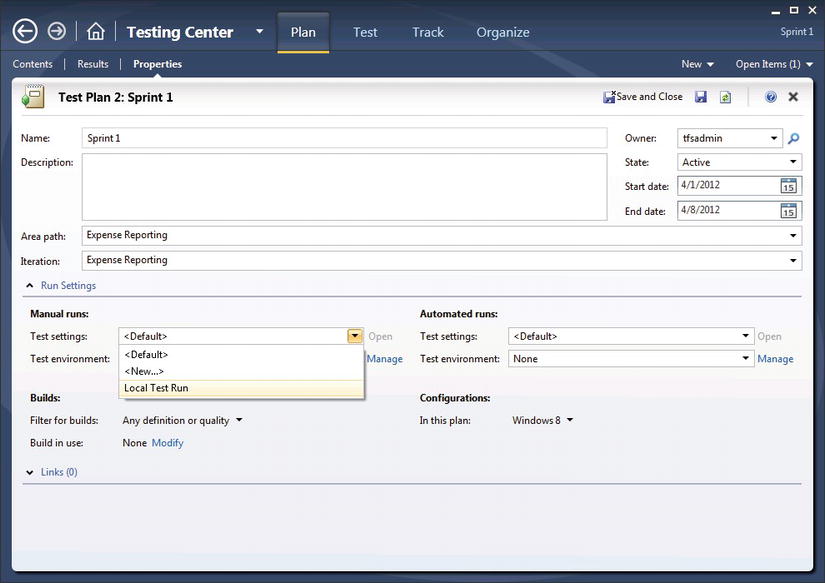
Figure 23-8. Test settings for environment
Creating Environments for Kangreen
Kangreen is now ready to start creating environments for the Expense Reporting project. Initially, environments to support the following are requested:
- Manual testing on laptops
- Manual testing on different browsers and operating system versions
- Automated testing
- Automated deployment
Create Standard Environment for a Physical Machine
Let’s start with a simple scenario and create a standard environment for an existing machine. A standard environment can be used to group any physical or virtual machine and enables the build and test feature of Lab Management for the provided machines. We will use the Lab Center and Lab view in MTM to define our environments. Simply click New Environment and choose Standard environment (see Figure 23-9).
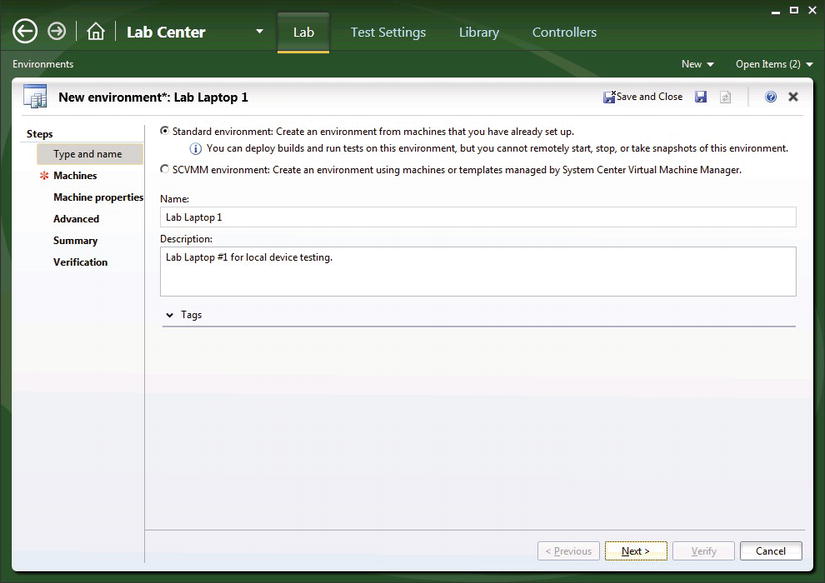
Figure 23-9. Creating a standard environment for a physical machine
Next add existing machines to the environment. We need to provide the name of the machine and an account to be used to log in and install the test agent on the machine as shown in Figure 23-10.
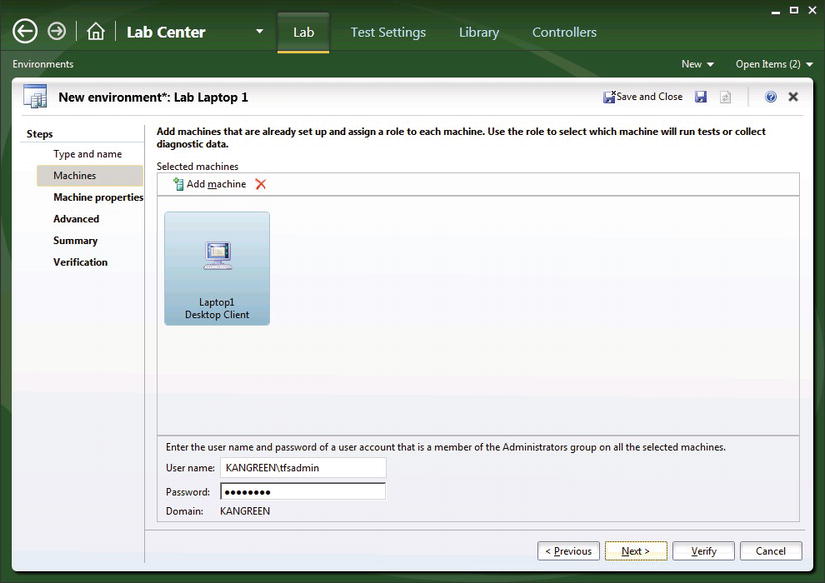
Figure 23-10. Adding an existing machine to a standard environment
We use the additional tabs to provide more details about the environment as described in the beginning of this section. Clicking Verify checks the provided information and when we click Finish MTM sets up the environment. This may take a few minutes as the test agent is automatically deployed to each machine in the environment by the environment creation process. If the machines in the environment already have the test agent installed it will only be verified and the creation process will go faster.
Create Template in SCVMM
So now we have a standard environment to use for testing on existing machines. Our next challenge is to create environments for testing different configurations. A good approach for managing scenarios, including many machines, is to create templates for each type of machine and then use the templates to create new environments. First let’s look at the steps to create a template in SCVMM that we later can use to create SCVMM environments from inside MTM.
- Start the SCVMM administration console and go to the virtual machines tab.
- Create a new virtual machine for the template.
a. We recommend a naming convention that shows that this is a master image for a VM template, for example, use the form [OS] [Architecture] Master, i.e. “Windows 7 x64 Master.”
- 3. Install Windows and all the prerequisites for the template.
- 4. Make a clone of the VM that will be used to create the template.
![]() Note It is possible to use the created VM as-is to create a template but the recommendation is to clone the VM and create a template from the clone. This extra step allows us to maintain the master and easily create a new template as the requirements for the template changes.
Note It is possible to use the created VM as-is to create a template but the recommendation is to clone the VM and create a template from the clone. This extra step allows us to maintain the master and easily create a new template as the requirements for the template changes.
- 5. Create a template from the cloned VM.
a. Same recommendation goes for the template—try to include the name of the master VM for correlation, for example [VM] Template, i.e. “Windows 7 x64 Template.”
![]() Note We are only scratching the surface of what you can do with SCVMM when it comes to creating templates and automating the customization of the machines created from templates.
Note We are only scratching the surface of what you can do with SCVMM when it comes to creating templates and automating the customization of the machines created from templates.
Create SCVMM Environment
Now when we have created a template in SCVMM the process of creating environments for use by Lab Management is very straightforward, we more or less pick and choose from the library and let SCVMM/Hyper-V generate our new machines. To create a new environment from the Lab Center in MTM based on SCVMM we use the same wizard as for creating a standard environment. Selecting to create a new SCVMM environment changes the behavior of the wizard to use templates from SCVMM when building up the environment (see Figure 23-11).
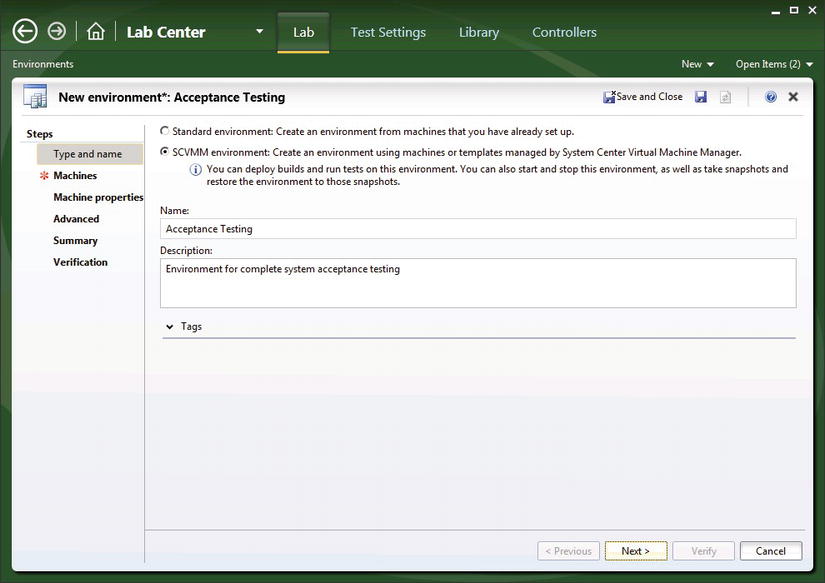
Figure 23-11. Create new SCVMM environment
Next on the machines tab we can now choose from the available templates (see Figure 23-12).
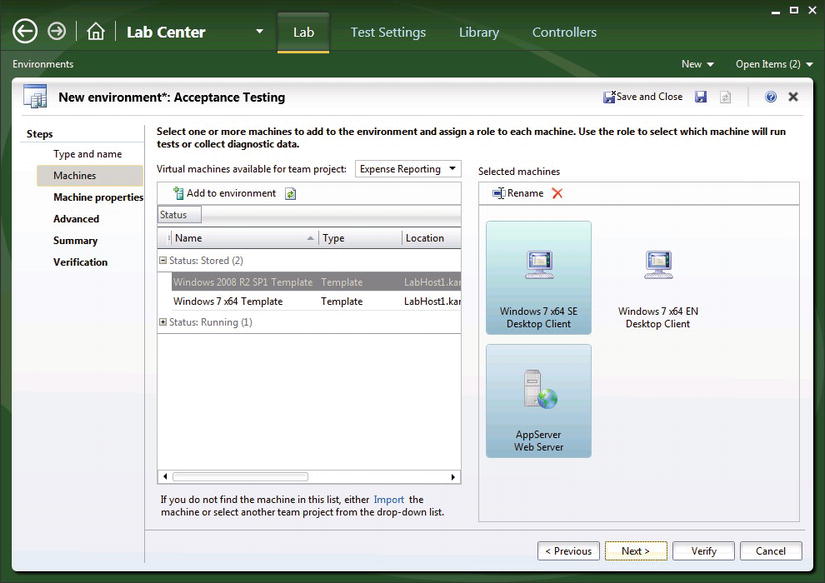
Figure 23-12. Add machines to SCVMM environment
The rest of the settings work the same as for a standard environment.
Cloning Environments
Earlier we talked about how we can use Lab Management to quickly create new environments. With SCVMM templates the time it takes to create a new environment is more or less the time it takes to copy the VM templates and customize them. Unfortunately what often does take time is to get the machines configured with application configuration (installing third-party software, application configurations, and so on). If we just want to copy a working environment, for instance to create labs for different testers or to test different versions of a product, we can further speed up the lab management process but cloning complete environments and deploying the clone as a new environment.
Clone Environment
To clone an existing environment do the following:
- Go to the Lab Center in MTM.
- Select the environment to clone and click Store in Library.
- Give the environment a name, a description, and a location on SCVMM and click Store as shown in Figure 23-13.
- The environment is now copied to the SCVMM library share.
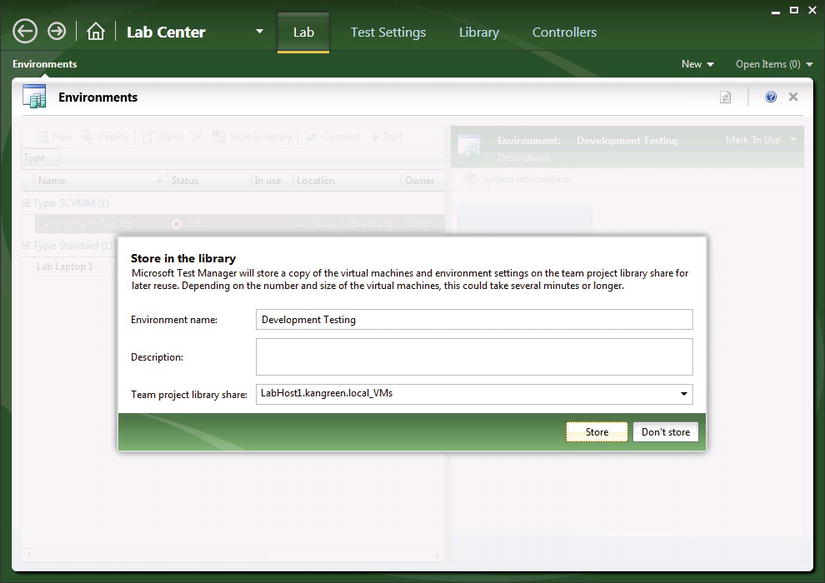
Figure 23-13. Store environment in library
Later when you want to deploy a stored environment:
- Go to the Lab Center in MTM.
- Select Deploy and pick a stored environment.
- Give the new cloned environment a new name, a description, and select the location in SCVMM for the new environment (see Figure 23-14).
- Click Deploy environment to start the deployment process.
- The environment is created on the provided host.
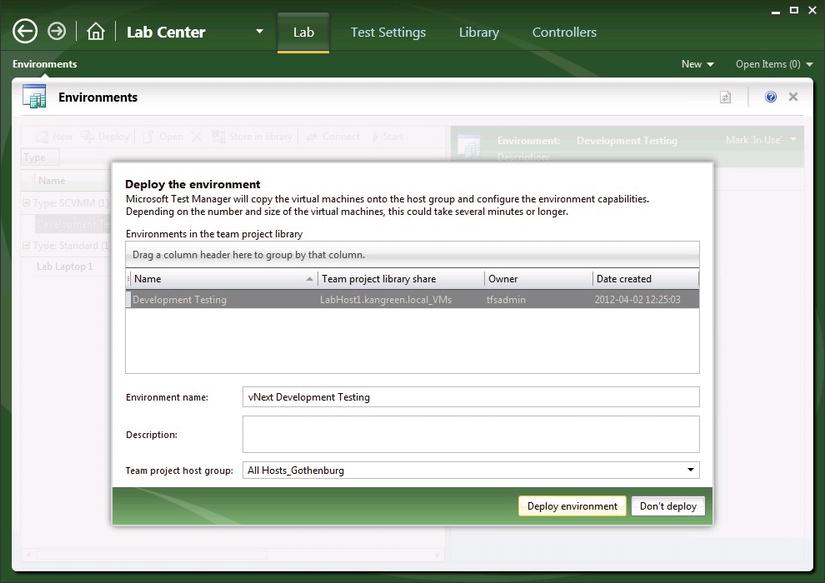
Figure 23-14. Deploy environment from library
![]() Note To run multiple cloned environments we need to handle how the machines in the started environments work. The best way to do this is to use network isolation so that each copy of an environment runs virtually separated from each other.
Note To run multiple cloned environments we need to handle how the machines in the started environments work. The best way to do this is to use network isolation so that each copy of an environment runs virtually separated from each other.
Using Lab Management for Manual Testing
Now with the model for the test labs in place we can immediately take advantage of this and start using the labs for manual testing. This is great because it is important to show the effect of any change quickly to get confidence and support from the stakeholders.
Manual testers can take advantage of the lab infrastructure in several ways:
- Connect to an environment
- Collect data from environment
- Start and stop environment for test (SCVMM environments)
- Snapshot environment (SCVMM environments)
So why waste time? Let’s go testing!
Selecting an Environment to Use
The first step is to find the environment to use and make sure it’s available for testing. A virtual machine can be stopped and need to be started or an environment can be used by someone else running tests on it. Fortunately MTM will help us get control of this so we can pick our environment and start testing. For the Lab Center in MTM you can manage the environments and use the “In use” marker to tag an environment as in use as shown in Figure 23-15.
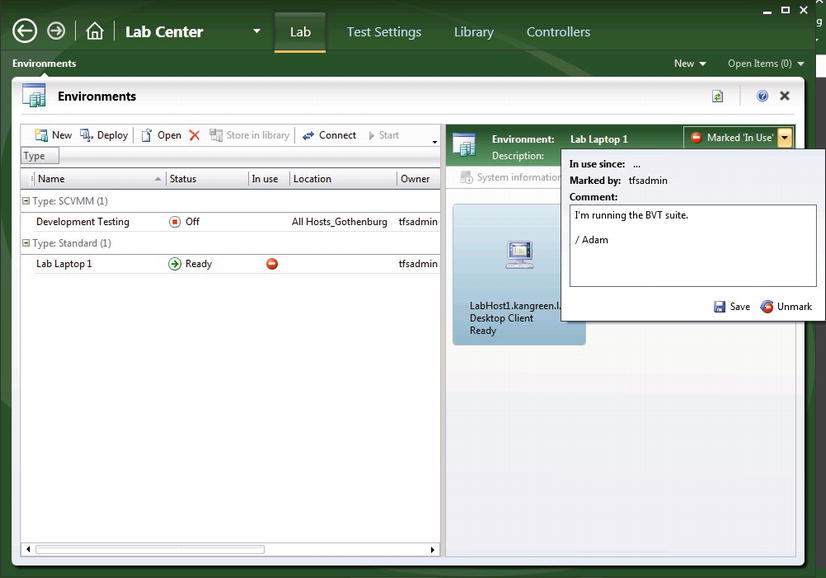
Figure 23-15. Setting the In Use marker
Connecting to an Environment for Testing
After we have made sure the environment is started and reserved for us, it is time to run some tests on it. Select “Run with Options” when starting a test run and select the environment to use (see Figure 23-16).
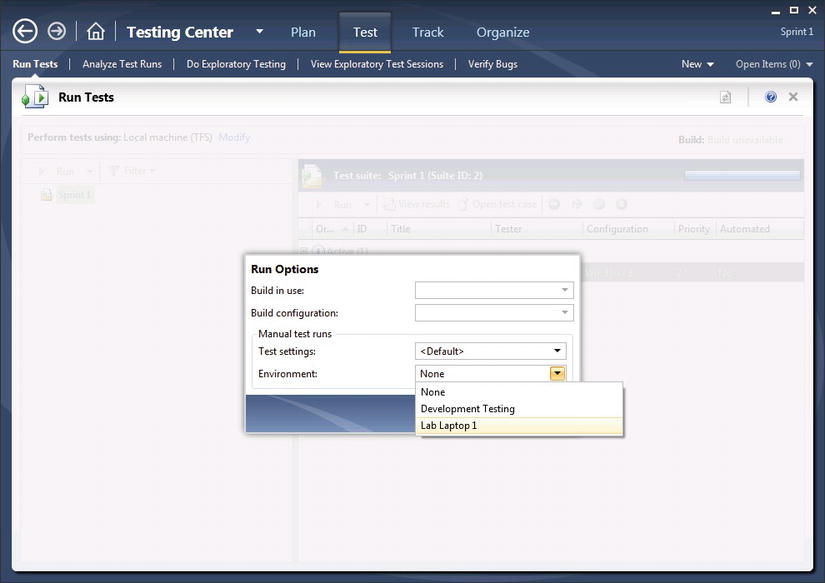
Figure 23-16. Select environment for running tests
Next if we want to run tests on a machine in the environment (and not only collect data) we can easily connect to the environment from the Test Runner. This opens up the Environment Viewer window where all machines in the environment are listed and you can quickly connect to any machine in the environment (see Figure 23-17).
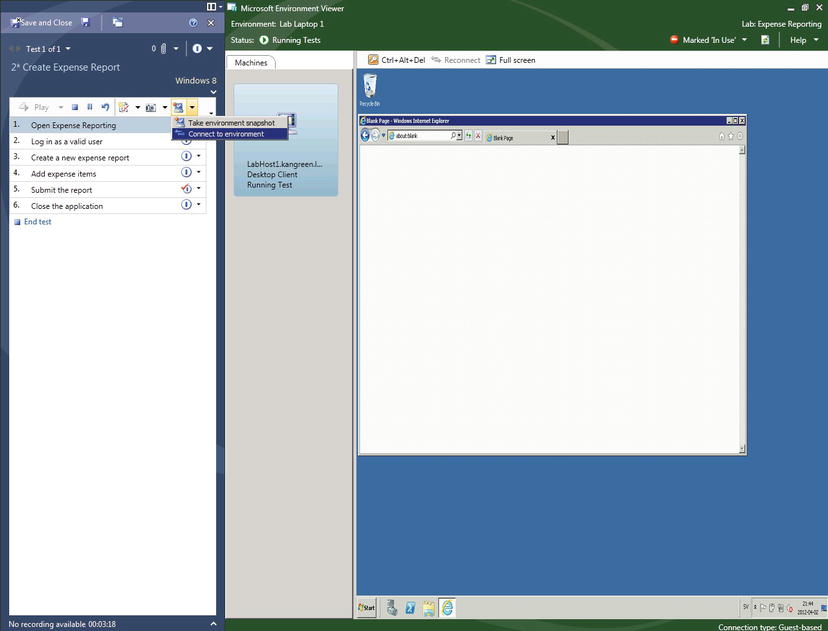
Figure 23-17. Using the Environment Viewer from the Test Runner
![]() Note The Environment Viewer uses the Remote Desktop protocol to connect to the environment so the port for RDP must be open (default 3389).
Note The Environment Viewer uses the Remote Desktop protocol to connect to the environment so the port for RDP must be open (default 3389).
By default the owner of the environment connects using a host-based connection; others use guest-based connections. A host-based connection is routed using hyper-v virtual machine connection protocol, which will let you interact with the machine even when it does not have an IP address. This can be very valuable if you need to do low-level tasks, such as install the operating system.
You can also right-click on the machine in the environment and connect using the standard Remote Desktop client. This is typically something you want to do if you want to bring local resources to the test machines (such as printers, disks, or USB devices) or to use the clipboard to copy and paste stuff between machines.
It is also possible to set the default environment for manual testing on test plan as Figure 23-18 shows.

Figure 23-18. Setting the Test Environment for manual runs on the Test Plan
Manual testing can be performed both outside and inside an environment. Testing from the outside is often the choice for applications where the client can be run on the local machine and simply connects to sites and services in a test environment. If the client should be run inside the environment, then you many want to install and run MTM on the machine where the test is run, typically for the possibility to create an action recording.
Snapshot Test in Lab
For a SCVMM lab environment we can take a snapshot of the complete environment. This is a great way to set a label on a test environment as a given point in time and allows us to do things like
- Continue working on other test cases in the environment and still have the context left when you want to go back to a paused test case.
- Pause testing and let someone else use the environment without messing up your test data.
- Associate the state of test with a bug report. A classic problem in bug reporting is that when a developer gets to look at a bug the environment in which it was found has been changed and it is no longer possible to reproduce the problem. With a snapshot the developer can revert to the snapshot when time comes to repro the problem.
When working with a SCVMM environment we can take a snapshot from the Environment Viewer (see Figure 23-19) or the test runner.
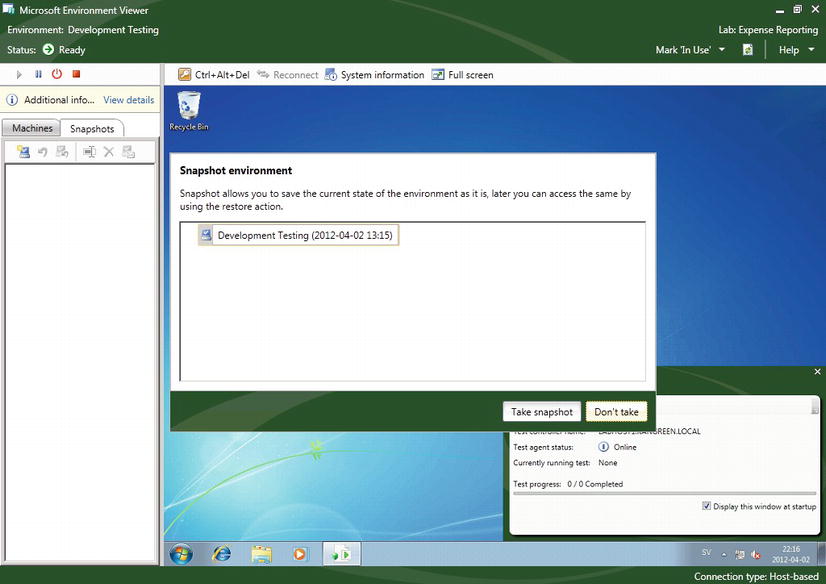
Figure 23-19. Create an environment snapshot from the Environment Viewer
From the snapshot we can quickly move back to a previous state to continue testing or to analyze a cause of a problem. If a snapshot is taken from a test run, the link to the snapshot is automatically added to a reported bug that in turn can easily be accessed by a developer when starting a debug session as shown in Figure 23-20.
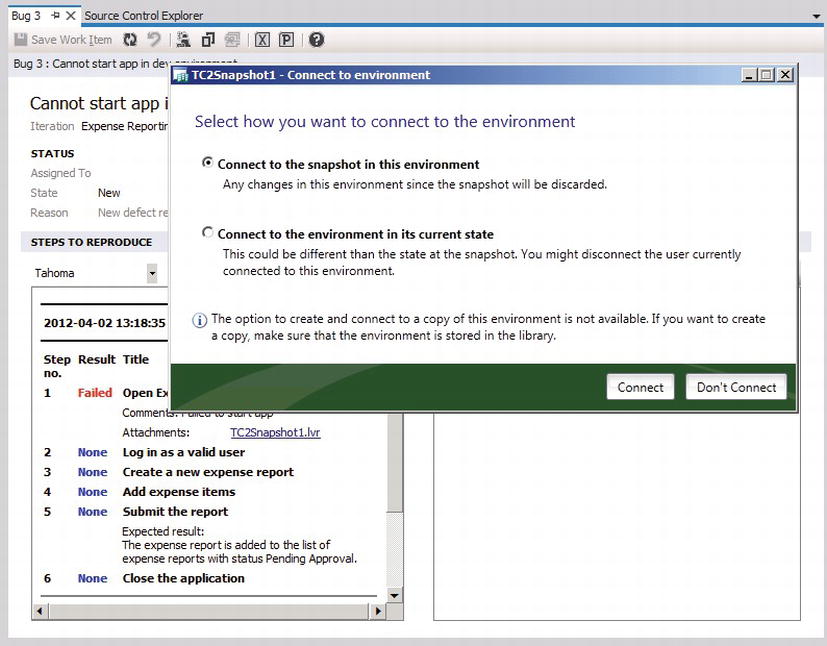
Figure 23-20. Connecting to a snapshot from Visual Studio
Automated Testing and Lab Management
In the previous chapter on automated testing we looked at how automated tests can be associated with a test case. The connection between automation and test case allowed us to track how and where test cases have been automated. Figure 23-21 shows a test case with an associated automated test.
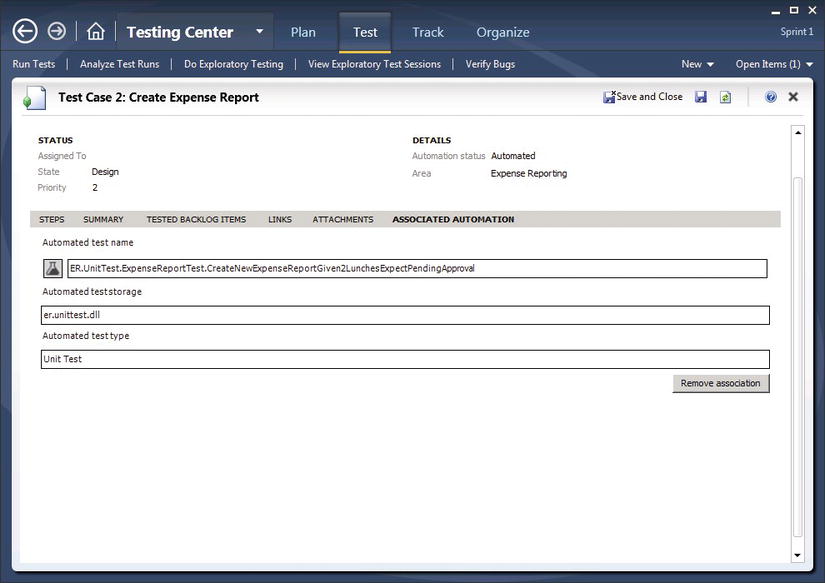
Figure 23-21. Test case with associated automation
To run an automated test in a lab environment from MTM we must select the following when starting the test:
- A build. The build is used to find the automation component specified on the test case.
- A test settings definition. Test settings define properties for the test run, such as deployment items and data collectors.
- The target environment. This is where the tests should run.
Just as for a manual test run it is possible to define all this on the test plan as well, as shown in Figure 23-22.
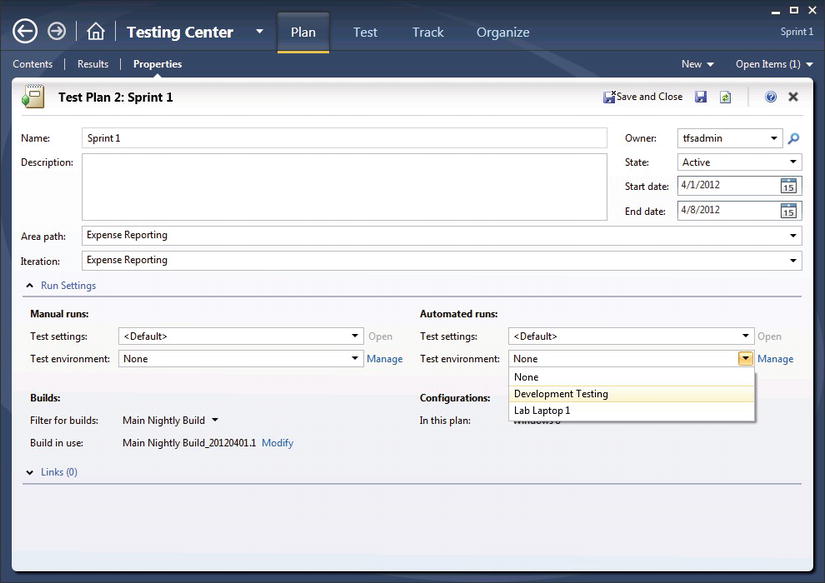
Figure 23-22. Setting the test environment for automated runs on the Test Plan
When executing automated tests in MTM we should pick out the environment the same way as for manual testing to make sure others know the environment is in use. This can be automated in build-deploy-test workflows by customizing the default lab workflow; we will look at how to do this in Chapter 27 when we look at automating deployment to lab environments.
Running Automated Tests from MTM
Now let’s look at running the automated tests created for the Expense Reporting application directly from MTM. It turns out that running an automated test is very similar to running a manual test, we just have a different view for monitoring the test progress (see Figure 23-23).
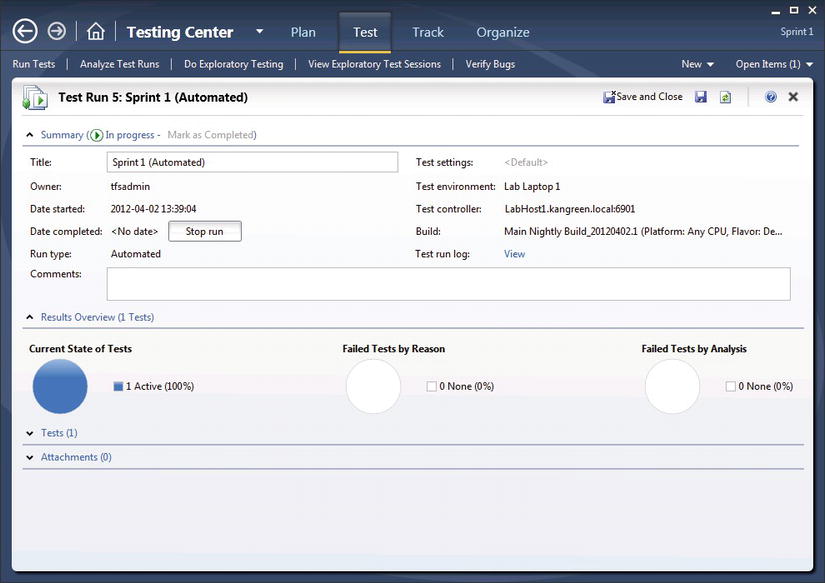
Figure 23-23. Automated test execution
If we want to view the execution steps for the test run we can click to view the test run log (see Figure 23-24), this is a good place to start looking when troubleshooting failing tests.
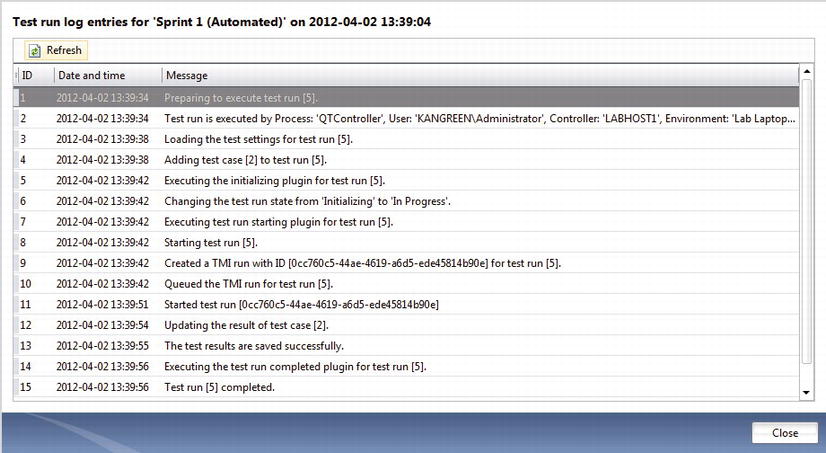
Figure 23-24. Automated test run log
Running Automated Tests as Part of a Build
A key scenario to support is of course running automated tests in a lab environment as part of a build-deploy-test workflow. Chapter 27, where we go through the automated deployment process in detail, shows how to set this up.
Running Automated Tests from the Command-line
A third option for starting automated tests is to run them from the command-line. This may sound like an edge-case but it actually quite nice to be able to start a test run without having to open up MTM. Tcm.exe is the tool to do this and we can use the same settings as in MTM when starting a test run:
tcm run /create
        /title:title
        /planid:id
        /collection:teamprojectcollectionurl
        /teamproject:project
        (/suiteid:id /configid:configid | /querytext:query)
        [/settingsname:name]
        [/owner:owner]
        [/builddir:directory]
        [/testenvironment:name]
        [/login:username,[password]]
        [/include]
Which with our manual example would translate to:
tcm.exe run /create /title:"Automated BVT" /planid:2 /collection: http://tfs:8080/tfs/teamproject:"Expense Reporting" /suiteid:2 /configid:2
- planid: is the id for the test plan to run tests from, the plan id is displayed under Organize, Test Plan Manager in MTM.
- collection: is the name of TFS project collection.
- teamproject: is the name of team project.
- suiteid: is the id of the test suite to run tests in, the suite id is displayed when selecting a suite in the Plan or Test views in MTM.
- configid: is the id of the test configuration to run tests on, we find this id on the Organize, Test Configuration Manager tab in MTM.
An example of a running test is shown in Figure 23-25.
Figure 23-25. Automated test running
Summary
In this chapter we have looked at how Visual Studio Lab Management can be used to enable a more efficient test process. Lab Management makes it possible to dynamically create test environments for manual and automated testing. The agents in the infrastructure also simplify data collection during testing which helps developers troubleshoot reported bugs. With the use of SCVMM and virtualization a tester using Lab Management can create snapshots of the system under test, making it possible to easily save its state to be used later for debugging or to run tests repeatedly off the same baseline.
In Chapter 27 we will further explore the capabilities of Lab Management when we look at implementing a complete automated build-deploy-test workflow.
1 http://msdn.microsoft.com/en-us/library/dd936084(v=vs.110).aspx