![]()
Automated Testing
In the previous chapters we looked at the test process in general and how it can be designed to support agile teams and agile testing. Initially we can (and probably should) define and run our tests manually by using Microsoft Test Manager.
In this chapter we look at how we can evolve from manual tests to automated tests as we learn more about how our system needs to be tested.
Automated tests can also be used to test non-functional requirements. We can continue to build on the same automated tests and create performance and load test sessions to validate production-like use of the system we are developing.
From the ALM perspective we should think about more than just the technicalities of writing automated tests. To get the most of the effort we put into automated testing we need to look at how the automated tests fit into the overall process. How can we track tests against requirements? How can we manage the environments where tests are run? How can we run the tests in an efficient way? These questions and more need to be addressed to get the most value out of the automated tests.
Working with Automated Tests
To achieve the goals of automated testing, we need to plan ahead and think about what we really want to get out of our automation efforts. This section looks at the infrastructure available in Visual Studio to create different types of tests. We also look at how we can set up and manage the test environments so that we can run the tests in an efficient way. Finally, we are also going to look at how we can structure our tests to make it possible to follow up the tests and also get traceability between tests and requirements.
Visual Studio 2012 has support for a number of different test types ranging from basic unit tests to automated UI tests up to complete load testing capabilities. What is really nice with working with tests in Visual Studio is its shared tooling for designing and running tests. This is very convenient because now we can start by learning the type of test we want to begin working with, leverage the framework and how we design, run and follow up test runs. As we add additional types of automated tests we do not have to learn new practices, just add the new ones to the existing platform. Figure 22-1 shows how consistent it is to add different test types in Visual Studio.

Figure 22-1. Test types supported in Visual Studio 2012
Table 22-1 explains the purpose of each type of test.
Table 22-1. Description of Test Types Supported in Visual Studio 2012
| Test Types | Purpose |
|---|---|
| Basic Unit Test | An empty unit test. |
| Unit Test | A basic unit test with a TestContext and additional test attributes. |
| Coded UI Test | A Coded UI Test. |
| Coded UI Test Map | Creates a UI Test Map that can be used to split the UI definitions in a Coded UI test into smaller pieces. |
| Generic Test | The generic test can wrap an existing function into an MSTest test. |
| Ordered Test | An ordered test can be used to control a set of tests are executed. |
| Web Performance Test | Records a web test using Internet Explorer. |
| Load Test | Launches a wizard to generate a load test configuration. |
Creating a Test Environment
Before we get started writing automated tests we should look at where the tests should run once they have been created. A common mistake is to under estimate the challenge of setting up a working environment for the tests, which many times can cause the initiative around automated testing to come to a complete stop. So, before we start writing tests we should analyze the requirements for testing our product by asking the following questions:
- Which kinds of tests should we write?
- Where are tests designed and developed?
- Where should tests run?
- How do we manage updates to the system under test?
- How do we manage updates to the tests?
- How do we run the automated tests?
Going through these topics should help us understand what is needed for our test environment, which we can then design and set up to meet the requirements.
Typical Test Environment
For Kangreen we want to set up the test infrastructure to support the following requirements:
- Developers create automated unit and integration tests.
- Developers run tests on their local environment.
- Testers design manual tests.
- Testers run manual tests in a managed environment.
- Selected scenarios are converted to automated tests for regression and performance testing.
- Environments are created on demand using Visual Studio Lab Management.
- The system under test is deployed by the tester on demand using the TFS Build system.
Figure 22-2 shows how an environment can be setup to support these requirements. A Test Controller registers with a Team Foundation Server and is responsible for publishing test results and diagnostics data to TFS. The Test Controller also coordinates a test session so that the Test Agents run the tests and collect diagnostics data. The test environment is composed of different virtual machines managed by Visual Studio Lab Management. Finally, the TFS build system is used to create and deploy updates to the test environment, as well as to trigger automated testing on the test environment (implementing a so called build-deploy-test workflow).

Figure 22-2. A typical test environment
![]() Note Microsoft Test Manager communicates bi-directionally with the Test Agent when an automated test is started from MTM. This is something to be aware of because it will require the MTM client to have direct access to the test machines, which might be against corporate policies.
Note Microsoft Test Manager communicates bi-directionally with the Test Agent when an automated test is started from MTM. This is something to be aware of because it will require the MTM client to have direct access to the test machines, which might be against corporate policies.
The installation of a Test Controller for running automated tests is essentially a matter of connecting the controller with the TFS collection it will be working with. The Test Controller is installed from its own installer and separate from the TFS installation. We can also specify the account the Test Controller will run as. Figure 22-3 shows the Test Controller configuration options.

Figure 22-3. Configuring the Test Controller
![]() Note The Test Controller has two modes; it can either be set up to work with automated tests in MTM or to control a Load Test process. If we want both, then we need to setup two controllers, They cannot be installed on the same machine, so we need to machines to enable both MTM integration and load testing.
Note The Test Controller has two modes; it can either be set up to work with automated tests in MTM or to control a Load Test process. If we want both, then we need to setup two controllers, They cannot be installed on the same machine, so we need to machines to enable both MTM integration and load testing.
An important part of the configuration of the Test Controller is how it handles security for the tests. The following Windows groups are created as part of the setup and need to be managed:
- TeamTestControllerUsers: Users in this group can start test runs and view test results.
- TeamTestControllerAdmins: Same as TeamTestControllerUser plus users in this group can also delete and pause test runs, manage test agents and create test environments.
- TeamTestAgentService: Users in this group can connect to a test controller.
Installing a Test Agent is also a simple process once the overall test environment design has been done (see Figure 22-4). The standalone Test Agent installer is found in the same agent distribution as the Test Controller. After the installation is complete we can configure the following aspects of the agent:

Figure 22-4. Configuring the Test Agent
- Identity: We can run the Test Agent as Network Service or as a specific user.
- Associated Test Controller: The Test Agent registers with a Test Controller so we need to provide the name of the machine and the port the controller is listening on.
- Run Mode: The third option is to specify how tests are run. The agent can be setup in two modes:
- Service: Test Agent runs as a Windows Service and is used for non-interactive tests.
- Interactive Process: We can also configure the Test Agent to run interactively under a specific account, as well as to have the agent log on to the machine automatically or disable the screen saver.
The complete workflow to integrate automated tests with MTM and TFS can be distilled to the following checklist:
- Design the test environment and install the necessary components.
- Create a test plan and assign the environment to the plan.
- Create test cases in MTM.
- Create automated tests and associate the tests with test cases. Check in the tests to TFS.
- Create automated test settings and associate with the test plan.
- Create automated builds for the system under test, as well as the automated tests.
- Assign a TFS build to the test plan.
- Run tests in the environment.
In this chapter and the following chapters on lab management and build automation we will show how to use Visual Studio and Team Foundation Server to complete this process.
Ideally we want to be able to know which requirement an automated test is testing. This can be achieved by using test cases and associating the test case with the automated tests as shown in Figure 22-5. By associating the test case with the automation code we have a mechanism to find where the test method is located. This is something that automation tools can take advantage of to automatically find the method to load when the test is to be run.

Figure 22-5. Test case marked as Automated
Based on this we can then create a query-based suite in MTM to track (and run) all automated tests as shown in Figure 22-6.

Figure 22-6. Creating a query-based suite in MTM for automated tests
We can also use the TFS Build system to improve traceability and visibility from the automated tests (in fact many features in TFS and MTM, such as Test Impact Analysis and Assign Build, require automatic tests and automatic builds to work). If we integrate our tests with a nightly build, we will get a heartbeat that every day gives us a signal about the quality from the system under test. See Chapters 26 and 27 on how to implement a build-deploy-test process, as well as details on how to automate data collection from test execution, code coverage, and code metrics.
Automating Test Cases Using Coded UI Tests
We begin our journey toward automated testing by looking at how we can create an automated test from a manual test with an associated action recording. The example test case is shown in Figure 22-7.

Figure 22-7. Test steps in a test case
To create an automated test we need to create a test project in Visual Studio (see Figure 22-8). We can add any test project but because this is be a user interface test, the coded UI test project is the best starting point.

Figure 22-8. Creating a new coded UI test
With the test project in place we can add a new UI test to the project. When the file is added we get three options as shown in Figure 22-9:

Figure 22-9. Adding a new coded UI test from an action recording
- Record actions, edit UI map or add assertions: This option takes us to a recording mode where we can run a test and record test scripts using a test recorder. More on how to use this feature later in the chapter.
- Use an existing action recording: Choosing this lets us pick an existing action recording and convert the recording into a coded UI test.
- Cancel: Pressing Cancel exits the wizard and lets us start writing a new UI test directly, using the coded UI test API.
In this scenario we will choose the second option and create a test from an action recording. To locate the recording we use a work item filter (existing query, by id, or by using a filter) and pick the test from the result list (see Figure 22-10). Only test cases with an associated action recording can be added—the rest are shown with a stop sign.

Figure 22-10. Selecting the action recording to generate a test from
Visual Studio now adds the test to the project and generates code from the action recording. The structure is actually quite nice if the action recording is created with the test in mind. By recording the test steps as distinct steps, the generated code will be very similar to the steps in the test case, which of course makes it easier to understand and maintain. Figure 22-11 shows the code generated from the action recording.

Figure 22-11. Generated code from an action recording
With the code in place we can make sure it works by compiling and running the test. Coded UI tests run just as any unit test in the Test Explorer so you may want to refer to Chapter 16 about unit testing to have a look at how to use that. Figure 22-12 shows how the UI test was successfully run in the Test Explorer.
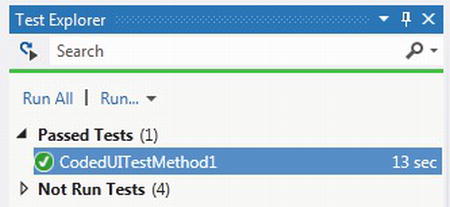
Figure 22-12. Successful run of a coded UI test
The last thing to do is connect the test method with the test case. We typically do this for traceability, but it also lets us run the automated test as part of a test plan (in MTM or in a TFS build).
We connect the test case and the test method by opening the test case, browse all the tests in the current solution from the Associated Automation tab, and select the test method to associate (see Figure 22-13).

Figure 22-13. Associating an automated test to a test case
![]() Note As you can see, it is only possible to connect one automated test to each test case. One way to work around this problem is to use another test type, for instance, the Ordered Test, and then group a number of tests into one and the map containing the test to the test case.
Note As you can see, it is only possible to connect one automated test to each test case. One way to work around this problem is to use another test type, for instance, the Ordered Test, and then group a number of tests into one and the map containing the test to the test case.
This was the quick tour of how to create a coded UI test based on a manual test case. In the next section we will extend the generated test to make it a complete automated test.
Coded UI Tests
We have seen how we can evolve from manual tests with action logs to fully automated UI tests. The generated tests are a good start, but to make them really useful we need to look at the generated code, refactor, and extend it so that it makes up a good test.
The Coded UI test framework consists of a layer of components:
- Test Runner: The Test Runner from MTM can create action recordings from a manual test. The action recording can later be used to play back the test session in MTM or to generate a Coded UI test from the recorded steps.
- Coded UI Test: The implementation of the actual test written in C# or VB.NET. The Coded UI Test is either generated by the Coded UI Test builder code generator or coded directly against the Coded UI Test API.
- Test Recorder: Records actions from a test session, which then can be used by the Test Runner to automate a generated test or by the coded generator to create a Coded UI test.
- Coded UI Test API: The Coded UI Test API can be used to create UI tests which are more tightly connected to the UI elements
- Technology Managers. These are the core components responsible for mapping UI elements to the underlying technology (i.e. web browser or a rich client). We can implement custom plug-ins to support platforms which the native plug-ins does not support.
The complete architecture is shown in Figure 22-14.

Figure 22-14. Architecture of Coded UI Tests
As we can see from the architecture overview, the Coded UI tests require support from the platform being tested. For Visual Studio 2012 the following platforms are supported for Coded UI tests as well as action recordings:
- Internet Explorer 8, 9, 10.
- Windows Forms 2.0 and later
- WPF 3.5 and later
- Windows Win32 (not officially supported but may work)
- MFC (partially)
- SharePoint (partially)
- Dynamics CRM
- Citrix/Terminal Services (partially)
- PowerBuilder (partially)
As you can see from the list many platforms are supported in Visual Studio 2012 but many also have only partial support so we recommend you try for yourself what works with your application.
Elements of a Coded UI Test
A coded UI test consists of four core elements created by the test framework:
- UIMap.Designer.cs: This file contains the .NET code generated from the Coded UI Test builder. The file is auto-generated and will be re-created whenever the test is changed. The core implementation class, UIMap, is marked as partial to allow extensibility.
- UIMap.cs: This file contains an empty partial class for UIMap and this is where we make the extensions to the test when we want to.
- CodedUITest.cs: This is the implementation of the test method for the generated test, the content is generated when file created but will not be changed when we make changes to the test. The name of the class is generated when the test is added to the project but can of course be changed like any other class.
- UIMap.uitest: This is a XML file that defines the test elements and is used to create the auto-generated files. The UIMap.uitest can be edited using the UI map editor.
Using the Coded UI Test Builder
Creating a test from an action recording was easy but what about if we were to start from Visual Studio instead? The best way to get started with coded UI tests is to create some tests using the Coded UI Test Builder.
When we add a new coded UI test to our project we choose the option to “Create actions, edit UI map or add assertions.” We can also start the Coded UI Test Builder from the Unit Test menu in Visual Studio or by right-clicking in the test method we want to extend with more test steps (see Figure 22-15).

Figure 22-15. The Coded UI Test Builder
From the Test Builder we can create new recordings, add assertions, and generate code for recorded steps. We can start and stop the recording to get only the intended steps recorded.
To generate a coded test with the recorder:
- Start the Coded UI Test Builder.
- Press the Record icon.
- Perform action to the application under test.
- To view the recorded actions press the Show Recorded Steps icon. We can remove actions we don’t want directly from the list.
- To finish recording and generate a test press the Generate Code icon and give a name to the test method being generated.
The UI controls found when recording the test are added to the UIMap file together with relevant information from the test run. If we want to change the test case later, we can edit the UIMap using the UI Map editor as described later on in this chapter.
An automated test would not be complete unless we have a way to assert that the outcome of the test is what we expected. To do this for a Coded UI test is essentially no different from how we make these assertions in any MSTest test, we simply add an Assert statement to the test code. The code to make the assertion can be crafted by hand using the Coded UI test API or be generated from the Coded UI Test builder.
To add a validation point using the recorder:
- Start the Coded UI Test Builder.
- Run the application under test to a position where you want to add the validation.
- Click the crosshair and drag it over the application to locate the control. If the control is difficult to locate, then you can try using the navigation control in the Add Assertion dialog.
- After locating the control to validate, the Add Assertions dialog is shown (see Figure 22-16) and you can select the property to validate.

Figure 22-16. Add Assertions dialog
To completely match the manual test case we should add validation points to the automated test to check whether Dave has actually been logged on, as well as assert that the new expense report has been added to the list of pending expense reports. Figure 22-17 shows the result of adding an assertion step to the UI test.

Figure 22-17. The complete test case with automated validation of test steps
Creating the test was pretty easy; the recorders did a good job to help us get the test in place. But quite often the test needs to change—how can we keep up with this? Well, we can of course choose to remove the test and record it again. Sometimes that would be the best option but many times we just need to make small changes. Adding more steps or adding validations is easy to do using the Coded UI Test Builder. Fortunately for us we can also change the existing steps in a designer rather than editing the XML file by hand (remember we cannot edit the generated UIMap code because it will be replaced as soon as we make changes to the test).
To edit the test case, simply double-click on the UIMap.uitest file and the test code is shown in the UIMap Editor (see Figure 22-18).

Figure 22-18. The UI Map Editor
In the UI Editor we see UI actions to the left and the UI control map to the right. From these lists we can do things such as:
- Rename items.
- Remove items.
- Split lengthy sections of generated script into smaller methods.
- Insert delays in the script.
- Change properties on items.
A common requirement of automated tests is to be able to run the test a number of times with different parameters. In Chapter 16 we looked at how we can work with data-driven test in details. The same techniques are valid for coded UI tests as well except that the data source for a UI test often points to the data set managed in the associated test case. Using the test case to manage test data for the automated test is nice because then the tester can update the data directly from inside MTM.
Using Unit Tests as Automated Tests
Coded UI tests are probably the ideal type of test for regression testing because they give us the opportunity to automatically test the system just like a real user would. But there are a number of issues that make UI tests difficult as a general purpose solution for automation solution, including
- Requires a UI.
- Requires a desktop session to run.
- UI tests are more complex to design and maintain.
- Difficult to scale.
To work around these challenges we generally recommend considering “under-the-UI” tests as a complement to the UI tests. These tests could be written against the APIs in the system or against the controller layer in an MVC style of application.
A good approach is to use different types of tests for different purposes. Remember the test quadrant from Chapter 20. Some functional tests can be implemented as UI tests, but most would probably do just fine if we implement them as unit tests. Integration and component tests are by definition tests that run under the UI so here unit tests works great too. And for the abilities-tests, such as performance and security tests, we can write unit tests as drivers to these test frameworks.
See Chapter 16 on unit testing for more information about creating and running automated tests based on a unit test framework.
Running Automated Tests
We looked initially at how we can run an automated test within Visual Studio. While this is a great way to run tests in general and during development in particular, it is not the best way for any user or process. For a general tester it would be best to run the tests from inside MTM, for trend analysis it would be best to run the tests from the build process and for build verification tests it may be most suitable to run the tests from a command-line tool.
Of course, Visual Studio ALM gives us the option to choose here as well, so let’s take a look at the options.
Integration with TFS build impacts the automated tests in at least two ways; to get the most value out of the tests we want to run them continuously, which the build system can do of course. The other scenario is when we want to run the automated tests from Microsoft Test Manager.
For MTM to locate the components containing the automated tests, we need to provide a TFS build that produces the test components as part of a build, we can set this for all tests in a test plan (see Figure 22-19) or when starting the test run by choosing the build from Run with Options.

Figure 22-19. Assigning a build to the test plan
Running Automated Tests from MTM
If we have set up the test environment as discussed initially, we can now simply run the test in MTM again. By default the test will run automated with the test plan settings. Figure 22-20 shows how we can set the build to use, as well as the test settings and test environment for the automated test runs.

Figure 22-20. Test plan settings for automated testing
If we want to use specific settings for a test run, we can use the Run with Options dialog and kick off the test as shown in Figure 22-21.
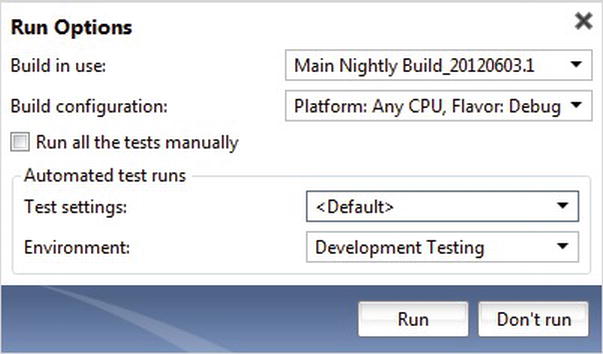
Figure 22-21. Starting an automated test in MTM
After the test has been started, we can watch the progress in MTM from the test run summary view as shown in Figure 22-22. From this view we can also stop the test if we need to.

Figure 22-22. Watching an automated test run in MTM
We can also look at the progress, for instance to troubleshoot, by clicking on the “Test run log” link (see Figure 22-23).
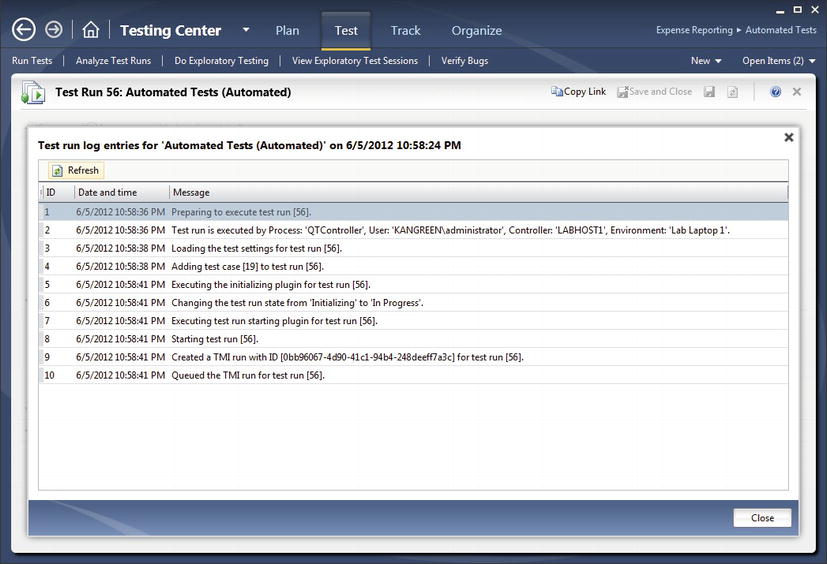
Figure 22-23. Looking at the test run log in MTM
Running Automated Tests from TFS Build
Integrating automated tests with TFS Build can be both simple and complicated. Running unit tests as part of a build is just a matter of setting the right properties in a standard build definition. But for tests that can or should not run on the build server we need to start the tests on a different machine. We also need to install the system under test and the test components on a remote machine for them to run. This means we need to deal with environments and complete end-to-end builds. If we can leverage the Visual Studio Lab Management tools, we get most of this out of the box if not, then we need to figure out ways to solve this in our process.
See Chapter 26 for more details on build in general and 27 on how to implement the build-deploy-test workflows.
Running Automated Tests from the Command Line
There are two ways to run automated tests created in Visual Studio, using MSTest.exe to invoke the test methods from the command-line or by using TCM.exe to run automated tests associated with Test Cases in TFS.
Running tests with MSTest
Running tests with MSTest is very straightforward. By default MSTest is installed under
C:Program Files (x86)Microsoft Visual Studio 11.0Common7IDEMSTest.exe
And to run any automated test we only need to point it to the assembly containing the tests
Mstest /testcontainer:ER.Web.UITests.dll
We can also add additional switches to filter tests to run, provide test settings, or publish the result to TFS. Figure 22-24 shows an example of a successful test run.

Figure 22-24. Running a test from the command-line using MSTest
Running Tests from Test Cases
Another option for running tests from the command-line is to use the Test Case Management command-line tool, TCM.exe. This tool is installed under
C:Program Files (x86)Microsoft Visual Studio 11.0Common7IDETCM.exe
There are several options for us to start a test run, for instance:
- Run all tests in a test suite. Locate the Suite Id from the test suite in MTM.
tcm run /create /title:"UI Test Run" /planid:5 /suiteid:11 /configid:2 /
collection:http://tfs.kangreen.com:8080/tfs /teamproject:"Expense Reporting"
You can use tcm.exe to figure out the Ids for plans, suites, and configurations as well:
- List plans
tcm plans /list /collection:http://tfs.kangreen.com:8080/tfs
/teamproject:"Expense Reporting"
- List suites
Tcm suites /list /collection:http://tfs.kangreen.com:8080/tfs /teamproject:"Expense Reporting"
- List configurations
tcm configs /list /collection:http://tfs.kangreen.com:8080/tfs /teamproject:"Expense Reporting"
![]() Note The plan id, suite id, etc. are also shown in MTM under the corresponding pages, but this is probably not something you noted unless you actively looked for it.
Note The plan id, suite id, etc. are also shown in MTM under the corresponding pages, but this is probably not something you noted unless you actively looked for it.
Figure 22-25 shows the output from creating a test run using tcm.exe.


After the test has been started we can view the result in MTM just like we have done with manual tests.
Performance Testing the Application
So far we have looked at how to create automated tests mainly for feature validation. Using the same framework and tools we can easily move to performance testing our application as well.
Writing good load tests can be a challenge just like any other test so it will require good design work to get value out of the load tests. Often writing the tests are the easy part, analyzing the results is the real challenge. To understand the outcome of load testing typically requires testers and developers to work closely together to figure out what is causing bottlenecks or other errors to occur.
In this final section we will look at how we can create a test session using Web Performance Test and then run those tests using the Load Test tools in Visual Studio. The Web Performance Tests are a good way to get started when performance testing web application but for general purpose load testing we can use any test implemented using the unit test framework in Visual Studio.
Creating Load Test Scenarios Using Web Performance Tests
First, we need to create a test scenario. For this purpose we can use the Web Performance Test type in Visual Studio. This test type lets us create a test by using Internet Explorer and record a test session. The test script that gets generated can then be customized similar to the Coded UI tests we looked at earlier in the chapter.
To create a Web Performance Test we can start by adding a Web Performance and Load Test project to our solution. Next, we add a new Web Performance Test which opens up an Internet Explorer session with the Web Test Recorder add-in shown. We then use the recorder to capture events as we navigate in the application we are testing as shown in Figure 22-26.

Figure 22-26. Using the Web Test Recorder to create a Web Performance Test
When we complete the recording we get back into Visual Studio and there we can use the Web Performance Test designer to enhance the recording (figure 22-27).

Figure 22-27. Web Performance Test designer in Visual Studio
In the designer we can design quite advanced tests without writing any code, for instance we can
- Add recording.
- Add data source.
- Generate code.
- Set request details. This is a nice feature where we can configure think time as response time goals (see Figure 22-28).

Figure 22-28. Request Details configuration
- Add validation rule. This is also a pretty advanced dialog where we can add assertions to the test, including field content validation and response time validation (see Figure 22-29).

Figure 22-29. Add validation rule for Web Performance Test
We can also add behavior logic to the test, such as
- Insert request.
- Insert Transaction. A Transaction is often used to mark a sequence of events which we can track during test execution; this is useful for us in order to track sections in a test like the time to login or to do a search.
- Insert Loop.
- Insert Call to Web Test. We can structure complex scenarios by combining simpler tests into a larger flow.
- Add parameters.
- Extract Web Test from steps. This is a convenient way to refactor our tests. Just select a number of steps and extract, they will be added as a new test and a call to it added to the test automatically.
When we want to run the test we can use the same tools as for any other automated test in Visual Studio. In the test run window shown in Figure 22-30 each recorded step is shown as the result, including interesting metrics such as response codes, response times, and bytes sent and received.

Figure 22-30. Execution result from a Web Performance Test
Setting Up a Load Test
The next step when we have created the core session tests is to create a load test to orchestrate the performance session. Creating a load test can be a complicated thing to set up in most tools, but in Visual Studio it is as easy as adding a new Load Test to our test project.
The wizard (see Figure 22-31) walks us through the process of defining the essential steps for our load test:

Figure 22-31. The new Load Test Wizard
- Scenario: First, we define the overall behavior of the test, including think times and time between iterations.
- Load pattern: Next, we can specify the type of load pattern to use for the test session. The most common pattern to start with is a step load with a low number of initial users and to add one user at a time. After we have seen the test working we can customize the pattern to more realistic values.
- Test mix pattern: The test mix defines which tests are run by the virtual users.
- Test mix: This is the heart of the test where we add the automated session tests to the load test. If we can several types running we can also specify the ratio of each type of test (see Figure 22-32).

Figure 22-32. Adding tests to the Load Test scenarios
- Network mix: Used to simulate different network types.
- Browser mix: Used to simulate different browser types.
- Counter set: In this page we can configure which measurements to track during test execution on each of the machines in the test environment.
- Run Settings: Finally, we get to specify the load test duration or number of test iterations to run.
Walking through the wizard then gives us a complete load test to start running as Figure 22-33 shows. Typically we would execute it pretty much as it is to see whether it works and then change it carefully to optimize the test. Just as with the Web Performance Test, we use a Visual Studio designer to configure the load test with additional properties.

Figure 22-33. The Load Test designer in Visual Studio
Finally we can run the load test. When the test is run a progress report is shown (figure 22-34) where we can track the progress and analyze the result live. We can configure the view in a number of ways to follow the test process, for instance by adding counters, zoom in on particular machines, and so on.

Figure 22-34. Running a load test from Visual Studio
When the test is complete, the result will be published to the load test store (if configured to do so) and we can go back and check earlier tests runs. By default, load tests create a repository on a local SQL Express instance. If running on a local machine, the user must run Visual Studio with administrative privileges to get access to the result store.
Summary
In this chapter we have looked at how we can move from manual testing to automated testing by evolving the test cases. With a structured approach we can save lots of work by reusing the knowledge we can build up around the tests and we can focus on getting the right tests automated.
First we looked at how test cases in MTM can be automated just by creating a Coded UI test off the action log associated with the test case. The UI tests can then be extended with additional test logic as well as validation steps, either by using the test recorder or by using the test APIs directly.
Even though UI testing is the most realistic automated test, it has some issues; in particular UI tests require more infrastructure to run, they are more fragile, and can be more costly to maintain. To get around these issues we can create tests at the layers under the UI by coding against the application model or APIs instead. Tests coded this way are easier to aintain and work great for testing nonfunctional requirements and can be used for stress- and load test scenarios.
We can also create load tests from Visual Studio. It is actually easy to get started—a load test is just another test type in Visual Studio. We can even reuse existing automated tests and run them in a load test scenario if it is suitable. When we need more advanced load tests, we can scale out the solution to a distributed load test rig using the same tools and tests which make it very efficient to run both small scale and large scale load tests.
Next up we are going to look at how and where tests are run. With MTM and Visual Studio we can improve the way we do testing but to be efficient we also need to have good practices our lab.