![]()
Deployment
We have come a long way toward the implementation of a continuous delivery process. We looked at unit testing in Chapter 16 and we went through other types of automated testing in Chapter 22. We covered build automation and running tests on the build server in Chapter 26. So now it is time to complete our work and enable a completely automated delivery process.
In this chapter we focus on application deployment and running automated tests on dedicated test servers. Figure 27-1 shows the overall build-deploy-test process and we will extend the default template by adding the deployment and test on test server activities with as little effort as possible.

Figure 27-1. The build-deploy-test process
Designing a Deployment Solution
There is a big problem with deployment: all solutions are unique. Probably very few applications built can use the exact same solution to install them.
But of course if we look at the requirements there are many similarities and for the most part quite simple steps that build up the deployment solution. Typically we need to assemble a set of files into a release package. We need to deal with configuration data such as connection strings and web service addresses. Then we may need to setup a target environment, for instance by creating and configuring a web service or a web site. Finally we often have a database that needs to be installed or upgraded as part of the deployment.
There are many different options for implementing a deployment solution, for instance we can use the following tools to package and deploy our application:
- XCopy or RoboCopy: The simplest solution is often the right choice. For an in-house application simply copying the application files to the target environment can be an easy and suitable solution.
Go to http://technet.microsoft.com/en-us/library/cc733145 for more information about RoboCopy. - ClickOnce: A good option for a Windows application that we want to make available on an intranet, for instance. With ClickOnce we can have the build process create a ClickOnce package and then copy that package to a file share from which the users run the application. ClickOnce installs and updates the application on the client machine.
You can read more about ClickOnce deployment at
http://msdn.microsoft.com/en-us/library/t71a733d(v=vs.110).aspx. - Windows Installer: There is no built-in support for creating a Windows installer package in Visual Studio 2012 so we have to use a third-party offering to create an installer. Using third-party solutions such as Wix or InstallShield LE for creating a Windows Installer MSI installation package is of course the most flexible solution for packaging an application. The MSI file can then be copied over to the target environment and installed using the Visual Studio Lab Management agents or using tools that supports remote execution such as PsExec, WMI or PowerShell.
Information about using Wix to create an installation package is available at
http://wixtoolset.org/. - WebDeploy: For web applications, we can use the WebDeploy framework introduced with Visual Studio 2010. The WebDeploy framework lets us either deploy to a target environment directly or it can create an installation package that we can distribute to the target environment and run there (for instance when we want to deploy on a production server running on a different network). WebDeploy contains many deployment features, including file copy, web site configuration, and database management. There is also a feature for managing environment specific web configurations called Web Config Transformations, which uses Xslt patterns to modify web config file to suit the target environment.
More information about WebDeploy can be found at the product site
http://www.iis.net/download/WebDeploy. - PowerShell: The PowerShell environment offers advanced scripting capabilities that can be used for everything from simple file copy operations to complete remote configuration of web sites.
Read more about PowerShell at
http://technet.microsoft.com/en-us/library/bb978526.aspx. - Database: To create or update databases we can use the tools for database deployment found in Visual Studio 2010 or SQL Server 2012 Data Tools. These tools can both deploy new databases or automatically generate upgrade scripts based on differences between two databases.
Deployment to Windows Azure
The previous discussion around deployment options applies mainly to on-premises solutions. With the cloud becoming more and more accepted as a hosting platform, we need to be able to implement deployment workflows in Windows Azure as well.
We will not cover deployment to Windows Azure, but if you are interested in a solution the following resources should get you started:
- Continuous Delivery for Cloud Applications in Windows Azure:
http://www.windowsazure.com/en-us/develop/net/common-tasks/continuous-delivery - Continuous Delivery to Windows Azure by Using Team Foundation Service Preview:
http://www.windowsazure.com/en-us/develop/net/common-tasks/publishing-with-tfs - TFS Build Extension activities for Windows Azure:
http://tfsbuildextensions.codeplex.com/wikipage?title=Getting%20started%20with%20the%20Windows%20Azure%20activities&referringTitle=Documentation
Running Automated Tests as Part of the Build
We have now looked at different strategies for deploying our application. With deployment comes the opportunity to update our development, test, and even production environments whenever we want. To make this automation predictable it is a good idea to add automated tests to verify that the new deployment works as expected.
There are several options for running automated tests as part of a build, the most common are:
- Running tests on the build server.
- Running UI tests on the build server.
- Running tests on a target server.
- Running UI tests on a target server.
Let’s now look at how to set up each of these options.
Running Tests on the Build Server
The first option is to run all tests on the build server. We have seen how easy it is to integrate unit tests in the build process (Chapter 26) and running other automated test types is necessarily not a big problem. We will just add the automated tests to the build just like the unit tests. We do however need to deal with any dependencies the tests need may have (integrations with other system, database and so on). We covered ways to handle dependencies in chapter 16 above what is covered in this chapter.
In general, we recommend avoiding running tests that introduce additional software on the server because it can affect the performance as well as stability of the build server. In particular, running interactive tests on the build server requires the build server to run in a special mode as described next.
Figure 27-2 shows the logical setup if we want to enable running tests on the build server.
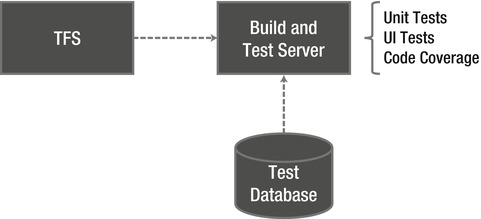
Figure 27-2. Automated testing on the build server
Running UI Tests on the Build Server
If we want to run tests against the user interface we typically need to have an interactive session running that can open application windows as part of the test. If we choose to run UI tests on the build server this means we need to be running the build service interactively. This is generally not recommended because it affects the way the service is run. But if we decide to set up the build service for interactive testing, we do so from the Build Service properties in the TFS Administration Console (see Figure 27-3). A good practice if you want to run interactive tests on the build server is to set up a dedicated build service for this and use build agent tags to direct builds with UI test to that particular environment.
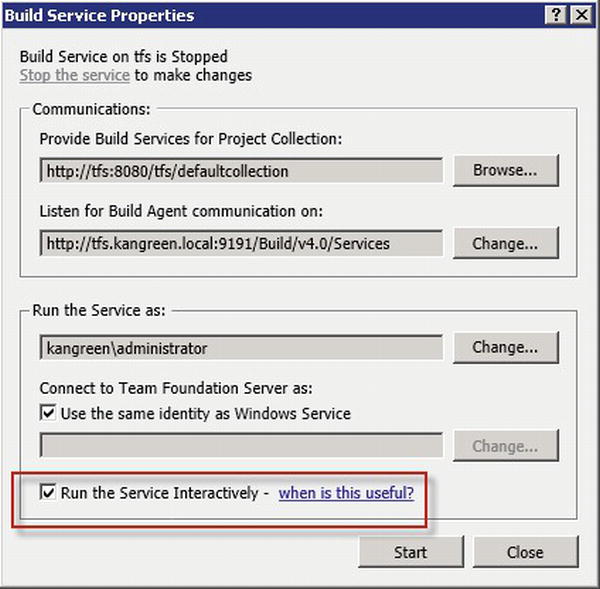
Figure 27-3. Configuring the build service to run in interactive mode
Figure 27-4 shows the TFS Build Service running in interactive mode. As the display text says, the service will run until someone exits the service. If someone logs off the interactive session or restarts the machine, it will unfortunately result in the build service not running.
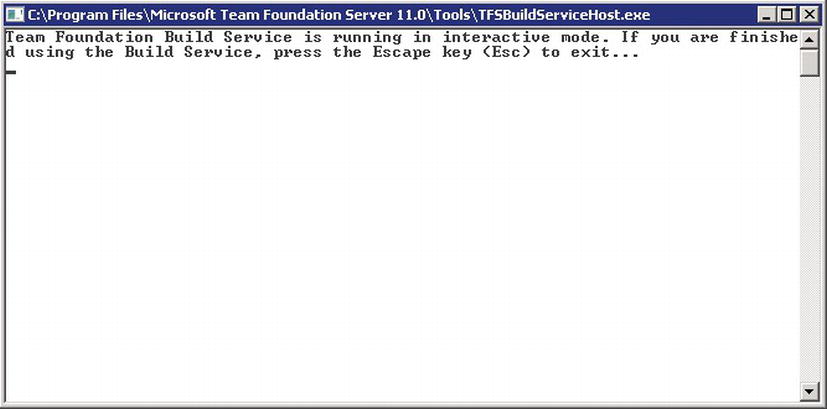
Figure 27-4. TFS Build Service running in interactive mode
Running Tests on a Test Environment
Running automated tests on a test environment requires us to create a test environment on which to run the tests. In Chapter 23 we covered how to use Visual Studio Lab Management to create test environments, but of course any physical or virtual machine can be used as a test environment.
Next we need a way to configure the build to run tests on a remote machine. With a test environment that is managed by TFS and Lab Management many of the pieces for running tests in a remote environment are already in place. Later in this chapter we will implement a complete build-deploy-test workflow implemented on the Lab Management services. If we are not using Lab Management, we can run MS Test remote and have the result published to TFS. See Chapter 22 for details on running MS Test from a command-line.
Figure 27-5 shows how we can design a lab for automated testing, both at the build level using unit tests and at the functional level using other types of automated tests.
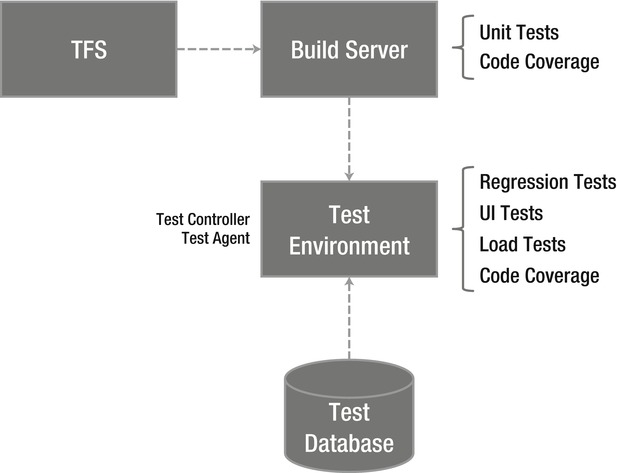
Figure 27-5. Automated testing on a build server and test environment
Running UI tests on a Test Server
If we want to run user interface tests on the test server we have the option to configure the Visual Studio Test Agent to run as an interactive process (see Figure 27-6). We can set a number of settings for the interactive process:

Figure 27-6. Configuring the Test Agent to run interactively
- Specify the user that will run the interactive process: For details on the requirements for the test agent account see http://msdn.microsoft.com/en-us/library/hh546459(v=vs.110).aspx.
- Have the test agent log on as the interactive user automatically: This is a good option if we want the labs to run unmanaged but it may have implications on corporate policies because the workstation will run unlocked.
- Disable screen savers to run: Most UI test will fail if the desktop session is locked, so by default we should disable screen savers.
By default, failing tests will not fail a build, only mark it as a partially successful build. There are reasons for completing the build regardless of test outcome for instance if we really need to get a new build out but tests are failing and we do not have time to fix them. But if we allow this to happen it is very easy to get into a situation where it is accepted to have failing tests and we soon lose the quality of the automated testing. We recommend failing builds on test to be the default and rather customize the build workflow to allow the behavior to be changed when starting a new build. Figure 27-7 shows how we configure the build definition to fail the build on test failure.
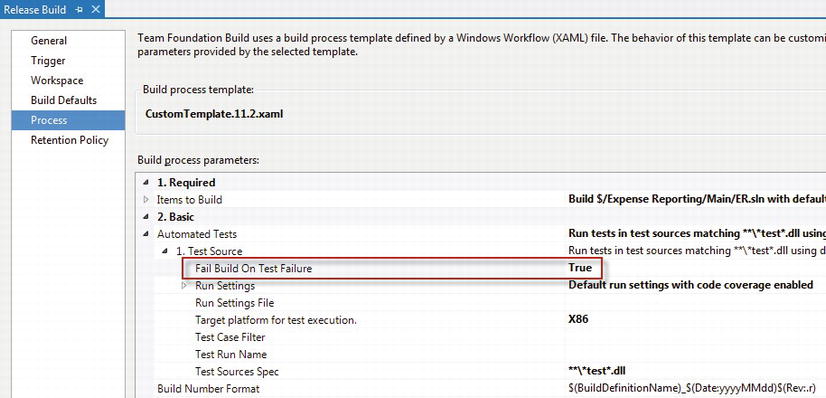
Figure 27-7. Configure a build definition to fail the build on test failure
Running a build with failed tests results in a failed build, as Figure 27-8 shows.
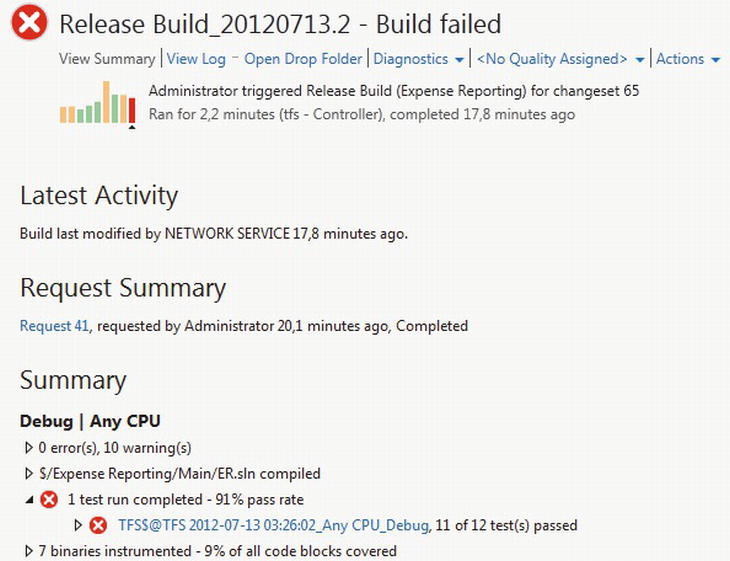
Figure 27-8. Build failed because of a failed test
Implementing the Build-Deploy-Test Workflow
Now we have looked at options for our deployment and we have gone through the ways to run automated tests. We are now ready to combine our skills of creating automated tests, creating test environments and setting up automated build processes to create a complete end-to-end scenario for the complete build-deploy-test workflow.
We will focus on using as much of the existing infrastructure in Visual Studio 2012 as possible, so we will base our implementation of a BDT workflow on TFS Build and Visual Studio Lab Management. A good BDT process allows us to quickly manage a large number of environments because the whole deployment process is now automated and with the validation from automated tests we can feel confident that the machines get updated in a controlled way. In other words we are ready to go into continuous delivery of or software!
Implementing a BDT Workflow
Even though it can be a complex task to implement a build-deploy-test workflow, a lot of work has been done for us with Visual Studio Lab Management. A BDT workflow in Lab Management is mostly implemented using shared infrastructure such as the build and test services. This means we can focus on what needs to be done and not so much how to do it. Figure 27-9 illustrates the built-in workflow in Lab Management.

Figure 27-9. A build-deploy-test workflow in Visual Studio 2012 Lab Manager
To make it easy to get started with a continuous deployment workflow, Team Foundation Build comes with a build template tailored for Lab Management that implements a build-deploy-test process.
The Lab Management build template LabDefaultTemplate.11.xaml contains the following core components:
- Capability to revert a lab environment to a known state.
- Select or run a compile build to get a version of the application to deploy and test. This is a normal TFS build that would include running unit tests if appropriate.
- Run deployment scripts to deploy the application. Test agents are used to run the scripts locally on each machine in the environment.
- Take a snapshot of the environment so we can revert to a clean state whenever we want without having to do a new deployment.
- Run tests on the machines in the lab environment.
- Create a build report.
In the sections that follow we will set up a BDT process for Expense Reporting to be used for deployment to the team’s test environment. It is important that the test environment is smoke tested using a set of the automated tests before letting testers get access to it. The test environment is based on SCVMM so snapshots can be used where appropriate. Physical or virtual machines not managed by SCVMM can still be used to create a lab environment and use the LabDefaultTemplate, except for snapshot functionality, which will be disabled.
Designing the BDT Workflow
When discussing the deployment process for the Kangreen Expense Reporting application we got the following high-level description of the desired process from the Configuration Manager:
“First we build a new version of the application to be used for deployment. Then we revert the environment to a known state to have a common baseline for the continuous delivery workflow. Next we deploy the solution using a command script. This can be the same script used to manually deploy to local developer machines or into the production environment. We then take a snapshot before the tests are run to have a known state to be used before any test suite is executed. Having this snapshot allows us to get back to a good state whenever we want to during testing without having to do another deployment. Finally we run a BVT test suite to validate the deployment.”
Based on these requirements we have created the topology in Figure 27-10.
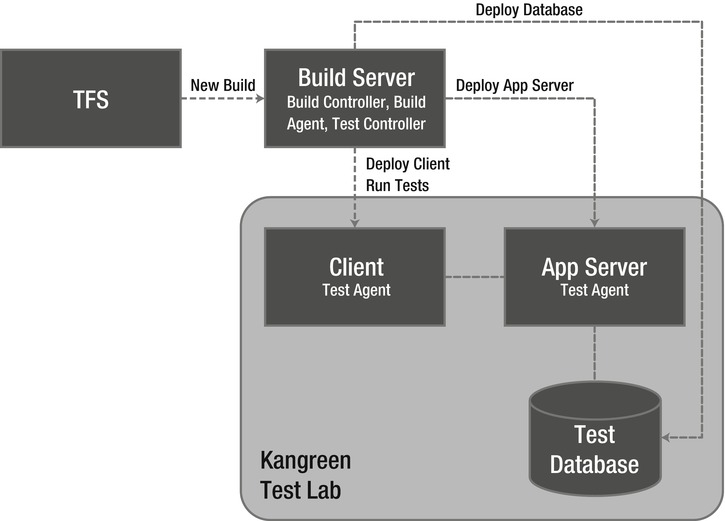
Figure 27-10. The build-deploy-test topology for Kangreen Expense Reporting
In summary, the figure shows the following:
- The TFS build server hosts the build controller and agent, as well as the test controller.
- The test lab is created using Visual Studio 2012 Lab Management and consists of a client and a server machine. The server machine hosts the web application, the services, and the database.
- The client has a test agent installed to run the test, as well as to collect diagnostic data.
- The app server has a test agent installed for diagnostic data collection from the test runs.
- The build controller orchestrates the overall build workflows.
- The build agent runs the compile build.
- The build agent runs the BVT workflow.
- The test controller orchestrates the test runs.
- Snapshots can be created over the complete lab environment to create a consistent view of the test lab (including database state since the database is part of the environment).
Let’s now go through the set up of the BDT workflow for Kangreen Expense Reporting.
Implementing the BDT Process
We will use as much of the existing Visual Studio 2012 features as possible to implement the BDT process. To implement the process we need to
- Create an environment for testing. This is described in Chapter 23.
- Create automatic tests to run as part of the build. Chapters 16 and 22 cover automated testing.
- Create a build definition to create a new version of the application. We covered build automation in Chapter 26.
- Create a build definition for the deployment and testing part of the workflow.
We will consider steps 1-3 complete and focus on step 4 to create the BDT workflow.
Create a BDT Build Definition
To create a build-deploy-test build definition we follow the procedure for a default build with the following exceptions:
- Workspace: May not be necessary as the BDT workflow will only deploy and test. If the BDT workflow has dependencies that the BDT build uses (for instance deployment scripts), then we may need to setup the workflow as well.
- Build Defaults: No drop folder is needed as the BDT workflow normally will not produce any output.
- Process: Select the LabDefaultTemplate.11.xml as the build process template.
Figure 27-11 shows our BDT workflow being setup.

Figure 27-11. Creating a build-deploy-test build definition
A special requirement to run Visual Studio Lab Management BVT workflows that queue a compile build as part of the workflow is that there needs to be at least two agents available. If only we have one build agent then the deployment build will be blocked by itself waiting for the build workflow to begin. Figure 27-12 shows a Build Controller with two build agents.
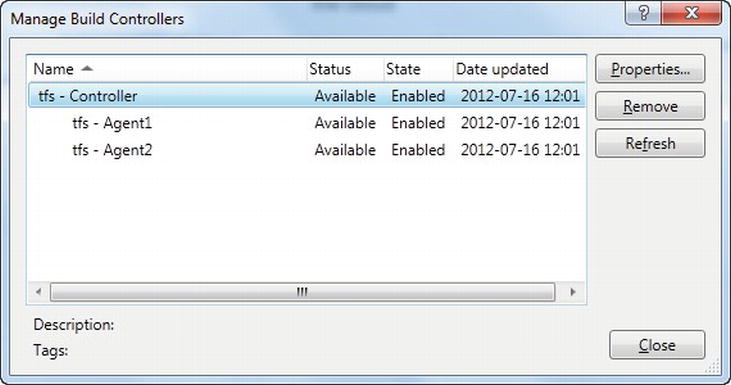
Figure 27-12. Configuring the build service to have at least two agents
The only required argument in the LabDefaultTemplate is that we open the configuration wizard and configure the build as described in the following section.
Selecting the Target Environment
The first step in the Lab Workflow wizard is to select the lab environment. We need to select an existing Lab Management environment and we can optionally configure the workflow to revert the environment to a specific state before the deployment is done given that the environment is using SCVMM (see Figure 27-13). See Chapter 23 for details on how to work with Visual Studio Lab Management to create test and lab environments.
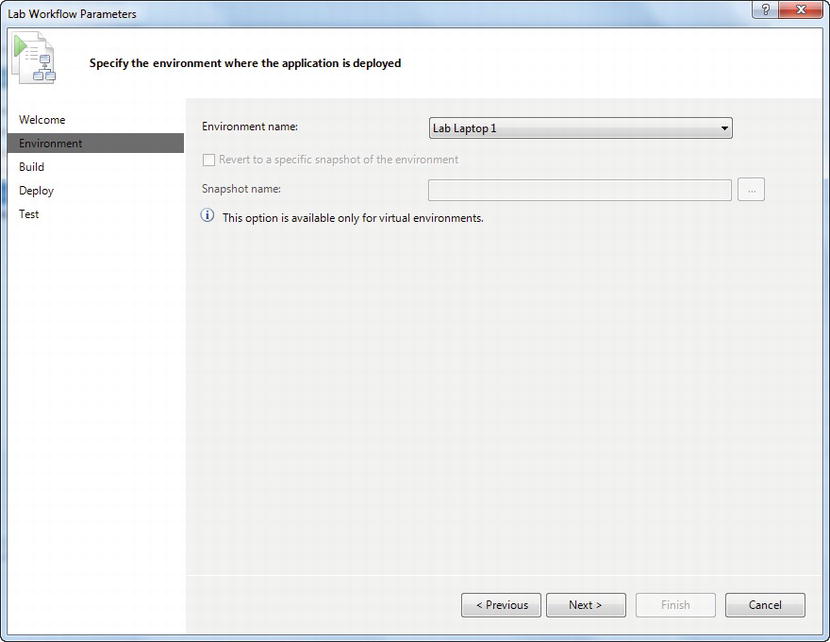
Figure 27-13. Selecting a Lab Management target environment
Selecting Application Build to Deploy
Next we select the build to deploy. We have the following options for picking a build that the workflow should use:
- Use a Team Foundation build: Here we can either queue a new build as part of the BDT workflow or we can pick an existing build.
- Use a build from a specified location: We can also choose to deploy a build from a selected location; this is useful if other tools are used to produce builds to deploy.
Figure 27-14 shows the build to deploy configuration dialog.
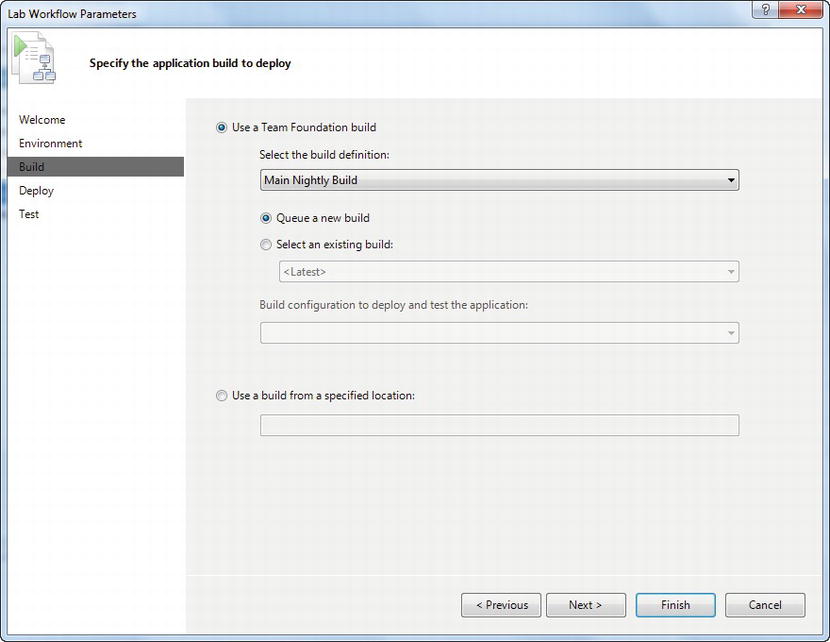
Figure 27-14. Setting up the build to deploy in a lab workflow
Defining the Deployment Steps
With target environment and build to deploy selected, we can now add the deployment steps (see Figure 27-15). The Lab Workflow is very generic; it allows us to run commands or scripts on each of the machines in the environment. We can address the machines either by role or by name—whatever is most suitable.
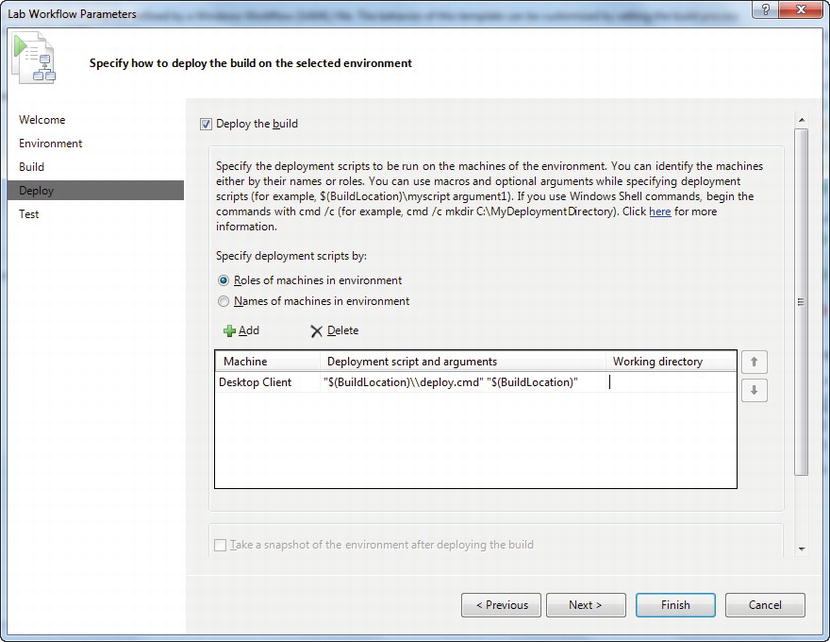
Figure 27-15. Configuring deployment for a lab workflow
The scripts are run locally on the target machine so it needs to be available as specified on the target machine. If necessary, we can also specify a working directory.
When we add deployment commands we may need to pass in arguments from the build process. Currently we can use the following properties:
- $(BuildLocation): This is the location of the build. If you specified to use the build from a shared location, then this variable represents that path. For the other options, this is the full path for the build based on the configuration that you selected to build and the build drop location in the build definition. If you build your application as part of your workflow, you can use this to access the latest files that were created by that build.
- $(InternalComputerName_ <VM Name>): This is used to obtain the computer name for a virtual machine that is part of a virtual environment. You might know the virtual machine name, but not the computer name. If you have a deployment script to set up a web server that requires the computer name, you can pass this as an argument to the script. For example, if the virtual machine name for the web server was VM1 and the computer name was MyWebServer, you would type $(InternalComputerName_VM1) as the argument for your script and this would pass the value MyWebServer to your script.
- $(ComputerName_ <VM Name>): This is the fully qualified domain name of the virtual machine. This can be used to access the computer even from outside the virtual environment. You might want to pass this as an argument to set up a web server. For example, if the virtual machine name for the Web server was VM1, you would type $(ComputerName_VM1) as the argument for your script to pass the fully qualified domain name of the virtual machine.
In the example in Figure 27-16 we locate the deployment script on the drop folder of the build. We also pass in the build location (drop folder) as an argument to the deployment script so the script can find the application to deploy.
The following simple deployment script is sufficient to deploy the built application to the app server.
REM ---
REM --- Map arguments passed from build
REM ---
SET DropPath = %1
SET DeploymentPath = c:ExpenseReporting

REM ---
REM --- Deploy application
REM ---
RD %DeploymentPath% /S /Q
XCOPY %DropPath%\_PublishedWebsitesMvcMusicStore %DeploymentPath% /S /Y /I
Adding Tests
Finally we add the tests we want to run as part of the BVT workflow (see Figure 27-16). The tests to run need to be defined in a test plan in Microsoft Test Manager and we can then filter out tests to run by test suite and configuration, for instance to specify that for this BVT workflow we will only run Windows 8 tests. Chapter 21 contains information on how to create and manage a test plan in MTM.
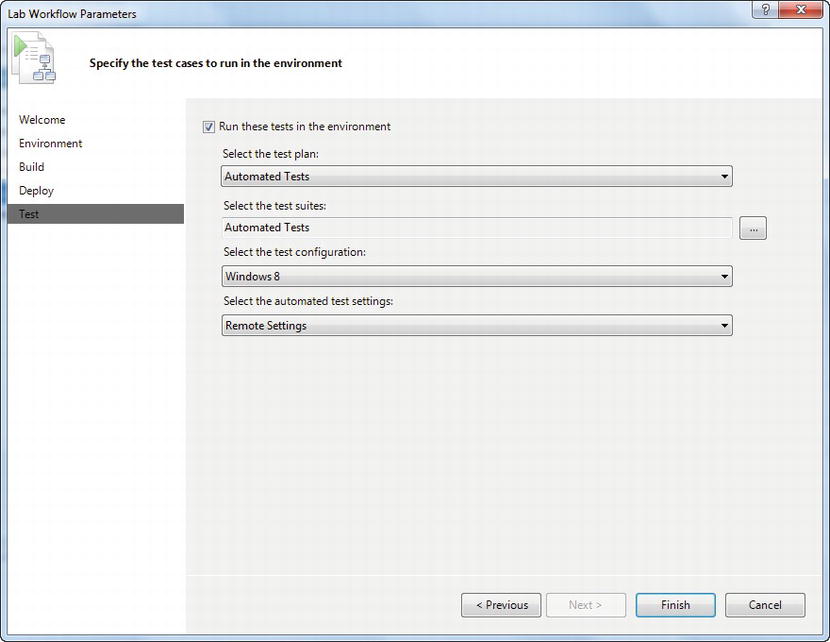
Figure 27-16. Configuring testing for a lab workflow
Running the BDT workflow is just like running any other build in TFS, we can use the Team Explorer – Builds to queue a new BDT build manually or we can set the build definition to trigger based on other criteria. Figure 27-17 shows a build report for a completed lab workflow build.
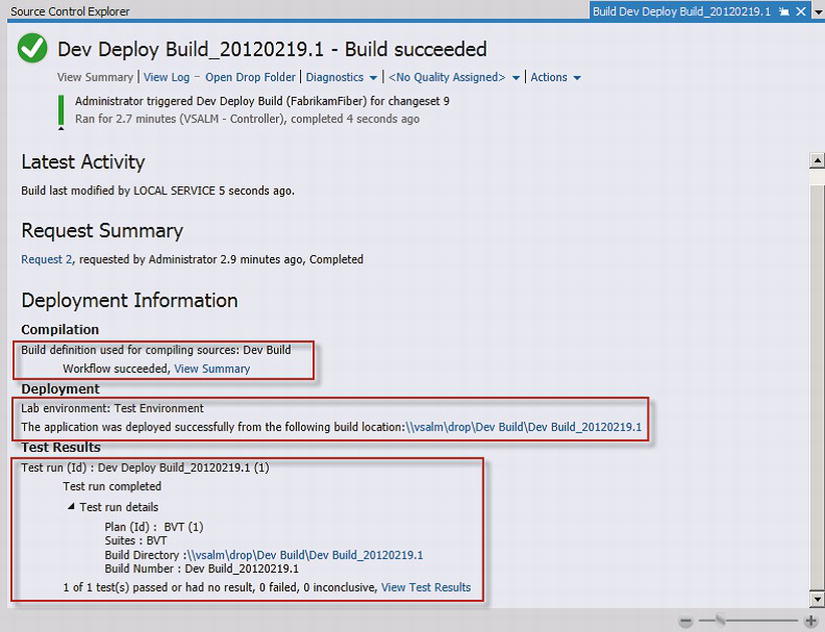
Figure 27-17. Build Report for a completed build-deploy-test workflow
Note how nicely we get information about which build was deployed to which environment. We also get a good view over the test result.
This completes the setup of a build-deploy-test workflow. As we can see it really ties together the work we already have done, which means little extra work is needed to get a continuous delivery process in place. This is just what TFS and ALM is all about; adding separate practices is good but integrating them can really create an impressive process!
Customizing the Lab Build Template
Even though there is enough flexibility in the default template to solve much of the deployment and testing work there are always scenarios where you want to do something different (or even better). Some common customizations are
- Database backup and restore.
- Inserting test data.
- Start/Stop the lab environment.
- Finding an environment for a configuration based on tags.
In Chapter 26 we looked at how to customize and extend a TFS build workflow; customizing a Lab Workflow just the same, we are only working on a different part of the process.
For more details lab workflow customization, look at the ALM Rangers Visual Studio Lab Management Guide (http://vsarbuildguide.codeplex.com) and the TFS Build Extensions (http://tfsbuildextensions.codeplex.com/) open source project.
Lab Activities
Just as for normal builds there is a set of built-in lab activities to support the LabDefaultTemplate, which we can take advantage of when we want to customize or extend a lab workflow.
Table 27-1 shows some of the built-in lab workflow activities, for a complete list see http://msdn.microsoft.com/en-us/library/ff934562(v=vs.110).aspx.
Table 27-1. Built-in Lab Workflow Activities
| Activity | Description |
|---|---|
| CreateLabEnvironment | Creates a new environment from a stored template and deploys it on the specified host group. |
| ExecuteRemoteTestRun | Creates a test run on an environment and waits for it to finish. |
| GetBuildLocationAndBuildNumber | Returns the build location and build number for a build, deploy, and test scenario. |
| ReleaseEnvironmentFromDeployment | Releases the environment from deploying a build. |
| ReserveEnvironmentForDeployment | Marks the environment as deploying a build. |
| RestoreLabEnvironment | Restores the environment to the specified snapshot. |
| RunDeploymentScript | Runs the deployment script. |
| RunWorkflow | Queues a new workflow on a build controller of a build server. |
| SnapshotLabEnvironment | Takes a snapshot of an environment. |
| StartLabEnvironment | Starts the environment. |
| StopLabEnvironment | Stops the environment. |
| WaitForEnvironmentReady | Waits for the enviroment to get in a Ready state. |
Lab Activities in the TFS Build Extensions
In Chapter 26 we introduced the TFS Build Extensions, a community driven project for TFS build extensibility (http://tfsbuildextensions.codeplex.com). The project contains several build activities for lab management workflows as well; some of them are listed in Table 27-2. Chapter 26 describes what is needed to integrate the TFS Build Extension activities into a custom build workflow.
Table 27-2. Lab Build Activities in the TFS Build Extensions
| Activity | Description |
|---|---|
| GetEnvironment | Retrieves a Lab Management environment by its name. |
| ListEnvironments | Retrieves a list of all of the environments that matches the specified set of Tags. |
| LockEnvironment | Locks a specified environment, indicating that the environment is now “owned” by the requesting build. |
| PauseEnvironment | Set a Team Foundation Server Lab Management Lab Environment in a Paused state. |
| ShutdownEnvironment | Shuts down a Team Foundation Server Lab Management Lab Environment. |
| UnlockEnvironment | Unlocks the environment specified. |
In the next section, we will look at how we can use the TFS Build Extension.
Adding Support to Start and Shut Down the Environment
As an example we will look at how to create a customized lab workflow to implement the logic for starting the environment (if not running), running the deployment as usual, and then shutting it down (if we started it). We will use activities from the TFS Build Extension project as building blocks.
We customize the lab workflow by making a copy of the LabDefaultTemplate11.1.xaml workflow file.
Start Lab If Not Running
First, we need to add logic to start up a lab environment if it is not running. Again, a pretty simple customization once we have designed what the logic looks like. We need to do the following to the default lab workflow:
- Define a variable DidStartLab (bool) to hold a flag as we started the environment so we know if we should shut it down later.
- Define a variable LabState (LabEnvironmentStatus) to hold the current lab environment status. (LabEnvironmentState).
- Add a workflow sequence after the GetEnvironment activity in the default template.
- Add a GetEnvironmentStatus activity to get the current environment state. Use the LabEnvironmentUri variable to identify the environment.
- Add an If condition to test if the lab state is stopped.
- In the true lane add a StartLabEnvironment activity. Use the LabEnvironmentUri variable to identify the environment.
- Set the DidStartLab flag to True using an Assign activity.
- Write a message to the build log using a WriteBuildMessage with BuildMessageImportance set to High.
Figure 27-18 shows the complete workflow for starting a lab environment if it was in a stopped state.
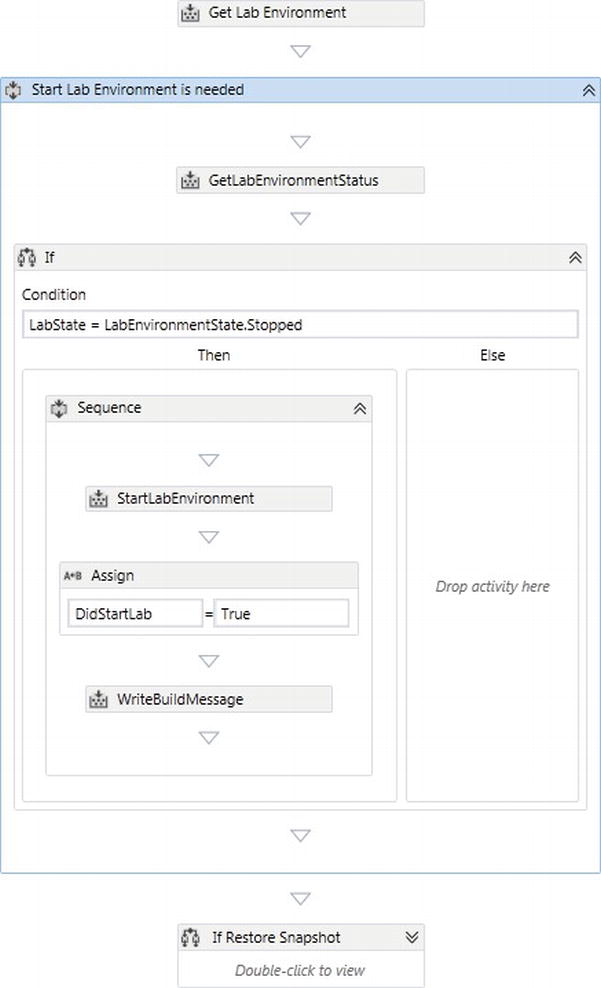
Figure 27-18. Workflow logic to start a stopped lab environment
Shutdown Lab If Started by the Workflow
The other end of this exercise is to shut down the lab environment if we started it in the previous step. For this we can use the TFS Build Extension activity ShutdownEnvironment because the built-in lab activities only allow us to stop an environment. In our case, a graceful shutdown is more appropriate.
We can add the logic to shut down the lab after the Run Tests on Environment sequence in the default template. The custom workflow will do the following:
- Check whether we started the lab environment by testing on the DidStartLab flag set in the Start Lab sequence earlier.
- In the true lane, add a ShutdownEnvironment activity. The activity takes the name of the environment to shut down, which we can get from the LabEnvironment.Name variable.
Figure 27-19 shows the custom workflow for shutting down a lab environment.

Figure 27-19. Workflow logic to shut down a running lab environment
Custom Lab Workflow Parameters
When we created the BDT workflow earlier in this chapter we saw how there are a few predefined macros we can use to pass information to the deployment scripts. But if we would like to create a custom workflow argument and be able to pass that into the deployment script, the default template will not allow us because the known macros are validated when we add the deployment command.
We can solve this problem in a couple of ways
- Replace the Lab Workflow Wizard dialog. This gives us the power to do whatever we want to configure the process but it is quite some work to implement the code in the wizard.
- Extend the lab workflow with custom logic to handle a custom argument.
Because the second option seems to require less work let us take a look at what this could look like.
The customized deployment template extends the default lab template by allowing us to provide custom build process parameters using $[] instead of $() to reference the arguments in the Lab Workflow wizard. The custom deployment arguments are replaced before the execution of the deployment command. Figure 27-20 shows how we can use the custom parameter in the deployment script arguments.
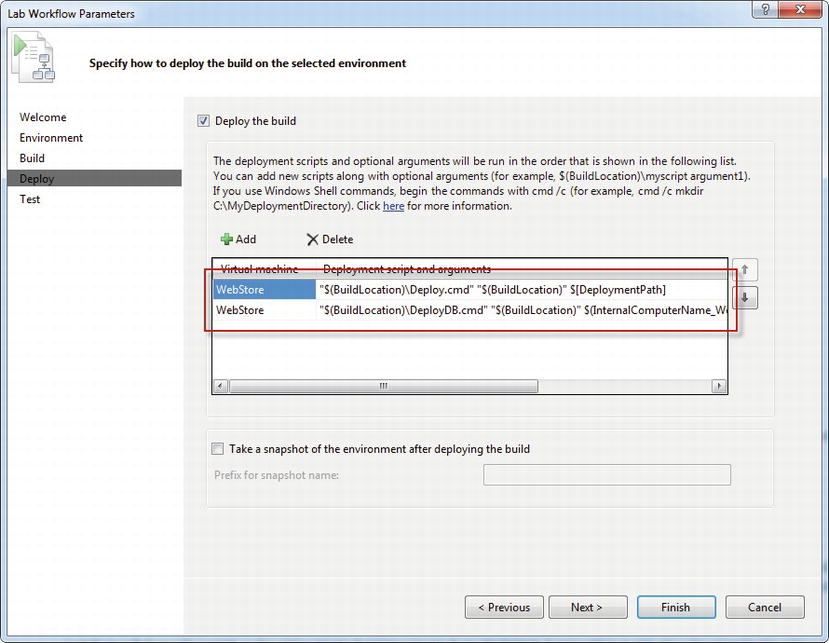
Figure 27-20. Using custom parameters in the Lab Workflow Wizard
The custom deployment parameters are added to the build definition as name-value pairs as shown in Figure 27-21.
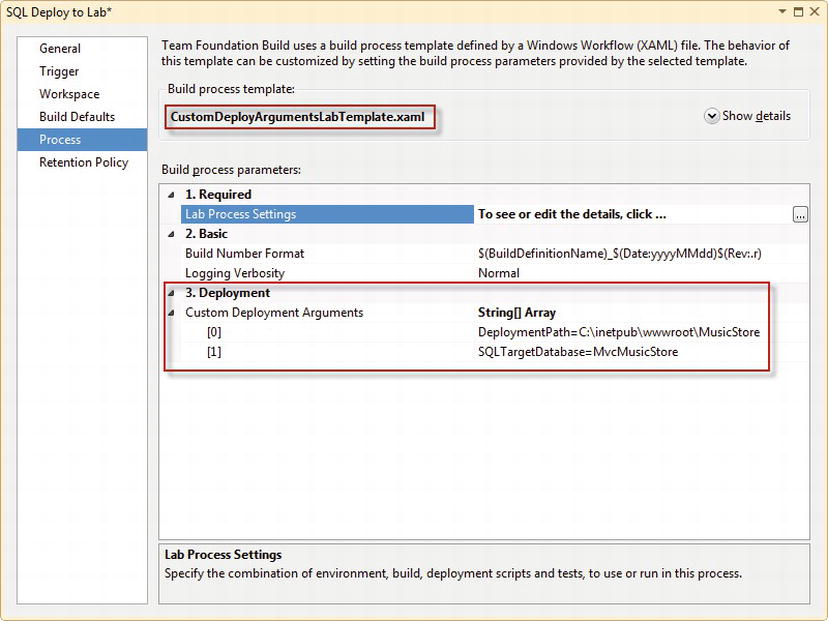
Figure 27-21. Passing custom deployment parameters to a lab workflow
To implement this customization, we can add the workflow logic before the Lab Agent scope, where the deployment scripts are run (see Figure 27-22).
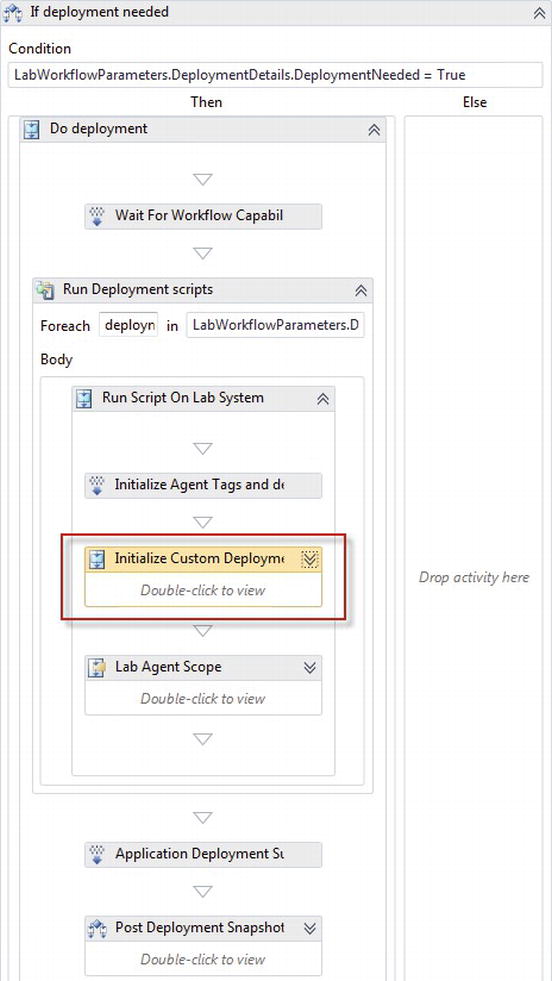
Figure 27-22. Workflow logic replaces custom lab workflow macros with parameter values
In the Initialize Custom Deployment Arguments section each custom argument is split on the “=” sign. The argument name is then replaced with its value in the command string defined in the lab process wizard (see Figure 27-23).
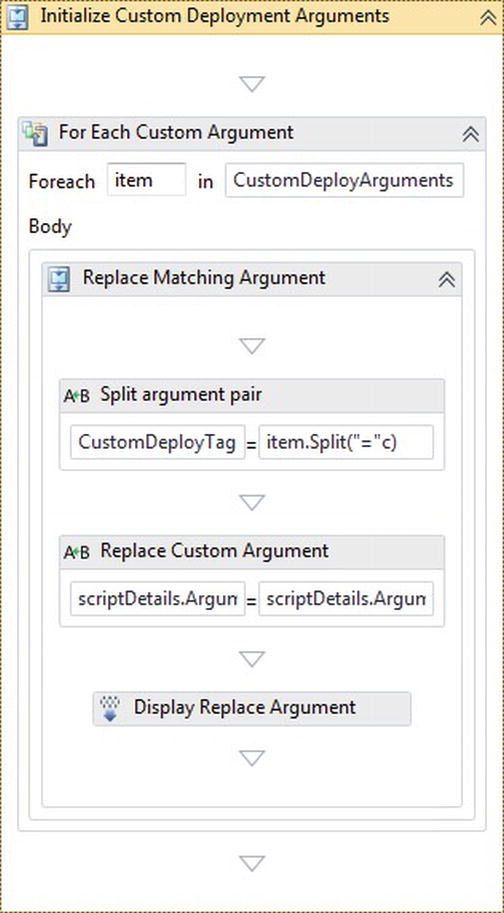
Figure 27-23. Workflow logic to shut down a running lab environment
![]() Tip The ALM Rangers Visual Studio Lab Management Guide (http://vsarbuildguide.codeplex.com/) contains several examples of lab workflow customization, including a custom template for managing custom deployment arguments.
Tip The ALM Rangers Visual Studio Lab Management Guide (http://vsarbuildguide.codeplex.com/) contains several examples of lab workflow customization, including a custom template for managing custom deployment arguments.
Summary
In this chapter we have seen how Visual Studio 2012 Lab Management can be used to create a continuous delivery process. What is really nice is that we can achieve this without exceptional work; it is more a work of adding different good practices into a great end-to-end workflow.
And if we choose to build our own deployment solution we have looked at different solutions to packaging, deployment, and testing—all of which can be integrated with the TFS build system.