
![]()
Building Rich Interactive Forms
In the previous chapter we walked you through a step-by-step guide on how to use the new search-driven content capabilities. In this chapter we demonstrate how you can build feature-rich forms on SharePoint 2013 that leverage the new client-side enhanced APIs. We continue to make use of the Twitter Bootstrap framework; in this scenario we integrate with SharePoint 2013 some of Bootstrap's built in components such as the Typeahead, which provides autocomplete functionality, in addition to the built-in CSS styles that we apply to our form. We also make use of several open source jQuery plug-ins to handle validation and date formatting to enhance the user experience before data is posted to SharePoint.
Our Scenario
As with every other chapter in this book, we would like to provide you with a solution within the context of building the Specter Group public web site features. Specter Group would like to have an online Open House Registration system to allow potential buyers to attend any scheduled event. Users will fill out a short form that allows them to select the Open House and fill out basic information. This information will then be saved for Specter Group internal staff to review.
SharePoint 2013 offers a new App development model and also includes several client-side APIs. One of the most appealing ones is the REST API, which allows you to retrieve data such as list, web, and site information from custom applications or components, both inside and outside of your SharePoint site. We use this API throughout our exercise.
If you are familiar with REST, then it will be simple enough for you to call this API. For example, if you wanted to get all the publishing pages from your site and in particular only the Title field, you can do this either programmatically via JavaScript or typing the following URL in the web browser:
http://spectergroup.com/_api/web/lists/Pages/items/?$select=Title.
The response you get from the server is shown in Listing 10-1.
Listing 10-1. Server Response When Typing the URL in the Browser
<?xml version="1.0" encoding="utf-8"?>
<feed xml:base="http://spectergroup.com/_api/" xmlns="http://www.w3.org/2005/Atom"
xmlns:d="http://schemas.microsoft.com/ado/2007/08/dataservices"
xmlns:m="http://schemas.microsoft.com/ado/2007/08/dataservices/metadata"
xmlns:georss="http://www.georss.org/georss" xmlns:gml="http://www.opengis.net/gml">
<id>ec6b06fe-6c82-4269-85dc-3a5c65746f4b</id>
<title />
<updated>2013-01-17T20:38:40Z</updated>
<entry m:etag=""52"">
<id>11b04758-94bc-445c-9c95-16841ace8552</id>
<category term="SP.Data.PagesItem"
scheme="http://schemas.microsoft.com/ado/2007/08/dataservices/scheme" />
<link rel="edit" href="Web/Lists(guid'0ba42e94-8f5c-444d-b7b1-14280729ed5b')/Items(2)" />
<title />
<updated>2013-01-17T20:38:40Z</updated>
272103_1_En
<name />
</author>
<content type="application/xml">
<m:properties>
<d:Title>Home</d:Title>
</m:properties>
</content>
</entry>
<entry m:etag=""8"">
<id>f0adff88-b414-4148-b214-454c5fbd08ba</id>
<category term="SP.Data.PagesItem"
scheme="http://schemas.microsoft.com/ado/2007/08/dataservices/scheme" />
<link rel="edit"
href="Web/Lists(guid'0ba42e94-8f5c-444d-b7b1-14280729ed5b')/Items(13)" />
<title />
<updated>2013-01-17T20:38:40Z</updated>
272103_1_En
<name />
</author>
<content type="application/xml">
<m:properties>
<d:Title>ContactUs</d:Title>
</m:properties>
</content>
</entry>
</feed>
There are many complex API calls you can make with REST. You can select the response format by specifying this at the time of making the call using either 'application/json:odata=verbose' in the accept header to get a JSON response or 'application/atom+xml' in the accept header to get an Atom formatted response. The default format is Atom, however, and it is shown in Listing 10-1.
![]() Tip To learn more about supported REST Services Architecture, URL syntax, and namespaces, visit http://sprwd.com/aakzgfp. JSON is a widely used lightweight data interchange format; you can learn more at JSON.org.
Tip To learn more about supported REST Services Architecture, URL syntax, and namespaces, visit http://sprwd.com/aakzgfp. JSON is a widely used lightweight data interchange format; you can learn more at JSON.org.
Creating a Registration Form
The sample form we will create in this walkthrough will be created using a page layout that includes all the necessary scripts and logic. We then create a new publishing content page from this layout and publish it on the web site for anonymous users to fill out. The form uses two SharePoint lists, "Open Houses," which is used to retrieve all Open House events, and "Open House Registrations," which is used to save user registrations, as shown in Figure 10-1.
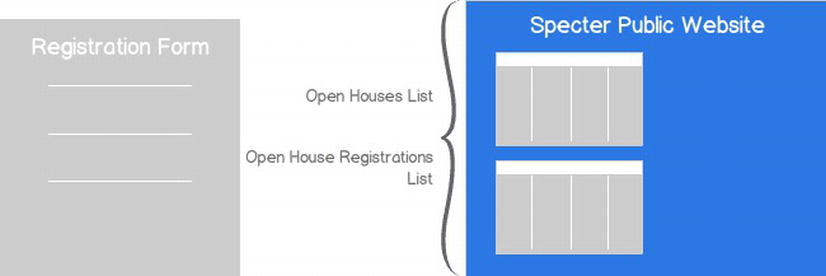
Figure 10-1. The event registration system design
![]() Tip To learn how to create SharePoint Apps go to http://sprwd.com/42etghp. To learn about creating page layouts, see Chapter 7.
Tip To learn how to create SharePoint Apps go to http://sprwd.com/42etghp. To learn about creating page layouts, see Chapter 7.
Creating the Page Layout
Our first task is to create a page layout, a topic we covered in Chapter 7. The following steps describe how to create a page layout for our rich form.
- Navigate to the Design Manager in a browser.
- Click Step 6 on Design Manager’s left navigation pane, Edit Page Layouts.
- In the middle of the page, click the Create Page Layout link to open a dialog box.
- Provide a Name, select the Specter Group master page and the Welcome page content type.
- Click OK.
- Open the page layout via Dreamweaver. You will find this recently created layout in the root of the Master Pages and Page Layouts Location.
 Tip A good place to move our recently created page layout is the design folder we originally created (SpecterGroup) where all other design artifacts reside and that also resides within the root of the Master Page Gallery.
 - Add the Form HTML markup inside PlaceHolderMain, which already has the Bootstrap CSS classes referenced as shown in Listing 10-2.
Listing 10-2. The HTML Form Using the Bootstrap Styles
<div class="container-fluid">
     <div class="row-fluid">
        <div class="span4 offset4 well">
            <form class="form-horizontal" id="openHouseRegistration" action="">
             <fieldset>
                 <div class="control-group">
                       <label class="control-label" for="firstname">First Name</label>
                        <div class="controls">
                           <input type="text" id="firstname"
                                      name="firstname" placeholder="" />
                          </div>
                  </div>
                  <div class="control-group">
                         <label class="control-label" for="lastname">Last Name</label>
                          <div class="controls">
                              <input type="text" id="lastname"
                                         name="lastname" placeholder="" />
                           </div>
                   </div>
                   <div class="control-group">
                        <label class="control-label" for="email">E-mail</label>
                          <div class="controls">
                              <div class="input-prepend"><span class="add-on">
                                   <i class="icon-envelope"></i></span>
                                      <input type="text" id="email" name="email" />
                               </div>
                             </div>
                    </div>
                    <div class="control-group">
                       <label class="control-label" for="spectertypeahead">
                                           Select an Open House</label>
                           <div class="controls">
                             <div class="input-append">
                                 <input type="text" id="spectertypeahead"
                                     name="spectertypeahead"/>
                                 <span class="add-on"><i class="icon-calendar"></i></span></div>
                              </div>
                     </div>
                     <div class="control-group">
                         <div class="controls">
                            <button class="btn btn-success">Register me!</button>
                          </div>
                           </div>
                      </fieldset>
             </form>
         </div>
   </div>
Because the Specter HTML master page references all the necessary Bootstrap JavaScript and CSS we included in Chapter 5, our form should display as shown in Figure 10-2 when previewed.
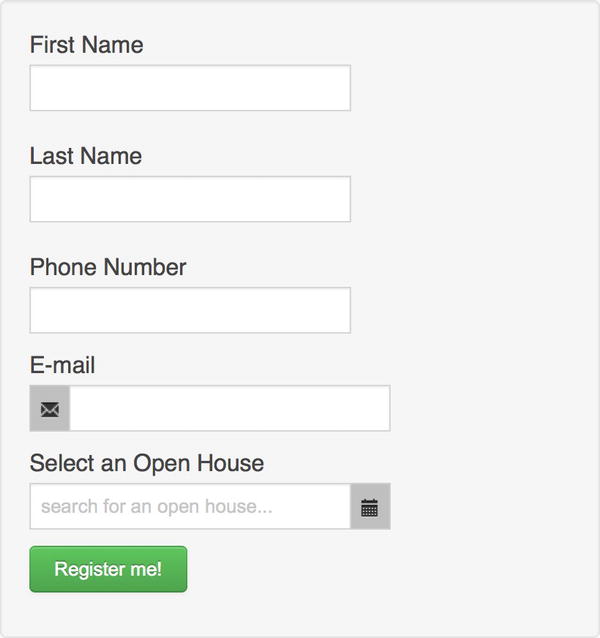
Figure 10-2. The Open House Registration form using Bootstrap styles
Now that we have our HTML, we need to include JavaScript code to the <HEAD> section of our page layout as the open source JavaScript libraries we use throughout this exercise were not included in the general design and therefore are not included in the HTML master page created in Chapter 4. To ensure these libraries are added to the <HEAD> tag of your page, you must place your code within the content placeholder, PlaceHolderAdditionalPageHead. The JavaScript code starts by creating an array called openHouseEvents that will hold retrieved items. A shell for the function responsible for making the REST call to retrieve these items is added that we will call GetOpenHouseEvents, as shown on Listing 10-3.
Listing 10-3. The Initial Script Tag With Declared Array and Shell for our Function That Retrieves Open House Events via REST
<script type="text/javascript">
    var openHouseEvents=[];
     jQuery(document).ready(function($) {
        //retrieve all open house events
        GetOpenHouseEvents($);
    });
    function GetOpenHouseEvents($){
    }
</script>
In Listing 10-4, we present the entire JavaScript function that will retrieve the events, GetOpenHouseEvents.
Listing 10-4. The Full Contents of the GetOpenHouseEvents Function
function GetOpenHouseEvents($) {
    $.ajax({
        url: _spPageContextInfo.webAbsoluteUrl + "/_api/web/lists/GetByTitle('Open Houses')/items",
        type: 'GET',
        async:false,
        headers: {"accept": "application/json;odata=verbose",},
        dataType: 'JSON',
        success: function(json) {
            var obj = $.parseJSON(JSON.stringify(json.d.results));
            $.each(obj, function() {
                if(this['Title']!=null || this['Title']!='') {
                    openHouseEvents.push(""+this['Title']+"");
                }
            });
        },
        error: function (XMLHttpRequest, textStatus, errorThrown) {
            alert("error :"+XMLHttpRequest.responseText);
        }
    });
}
There are many things going on within this function. A standard jQuery-based Ajax call is used, but the URL parameter value is of special interest. Notice how the code uses the existing page client-side variable available to you _spPageContextInfo.webAbsoluteUrl and concatenate it with the actual REST query. In other words, you don't have to hard-code the base URL. The _spPageContextInfo variable is set by SharePoint for every page; it includes other useful properties such as WebTitle, webLogoUrl, and userId to name a few.
![]() Caution If you find that your REST calls are not working, always ensure you have the proper headers. The ACCEPT header value must be set to "application/json;odata=verbose".
Caution If you find that your REST calls are not working, always ensure you have the proper headers. The ACCEPT header value must be set to "application/json;odata=verbose".
Once you receive a successful response from the server, each items is stored in a variable. You then take each item's Title property and add it to the global array that was created, openHouseEvents. You do this because Bootstrap Typeahead (see the section "Using Bootstrap Typeahead" later in this chapter) expects a properly formatted JSON string. The response for this query actually returns a lot of metadata for each of the items, as shown in Figure 10-3.
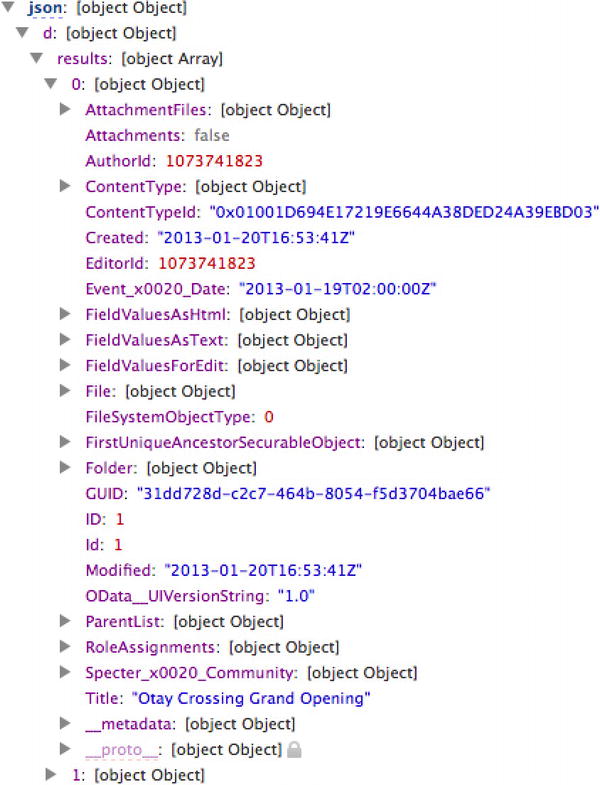
Figure 10-3. REST call response without selecting specific fields returns all metadata for each List item
What if you wanted to only get specific List item fields? You can modify the url value in Listing 10-4 with the following URL:
"/_api/web/lists/GetByTitle('Open Houses')/items/?$select=Title,Event_x0020_Date"
This indeed returns only the fields we wish to retrieve, as shown in Figure 10-4.
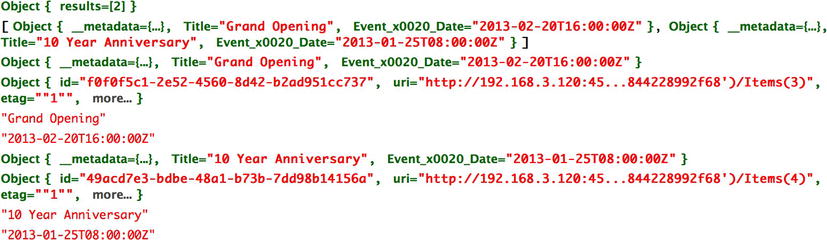
Figure 10-4. Retrieving specific metadata yields this response, which contains only the Title and Event Date
Using Bootstrap Typeahead
One of the features we'd like to implement on our registration form is the ability to autocomplete or suggest events available when a user starts typing. This is a common feature found in many custom apps and web sites. For example, when using Google search, as you start typing, autocomplete shows up to assist in finding what we need.
Typeahead is the perfect component to help us make this happen. Now that our JavaScript function GetOpenHouseEvents is working and storing data in our array, we use a single line of code to implement the Typeahead.
You only need to modify the previous function triggered on the document ready event, and add code to initialize the Typeahead component as shown in Listing 10-5.
Listing 10-5. The Modified Document Ready Function to Include Initializing Typeahead
jQuery(document).ready(function($) {
    //retrieve all open house events
    GetOpenHouseEvents($);

    //initialize the typeahead
    $('#spectertypeahead').typeahead({source: openHouseEvents });
});
In Listing 10-5, you are getting a handle of the input text field with the ID spectertypeahead. The code then initializes the typeahead plugin on that selector and passes the contents of your array as the data source. At this point your Typeahead functionality should be fully working on your form and should look similar to Figure 10-5.
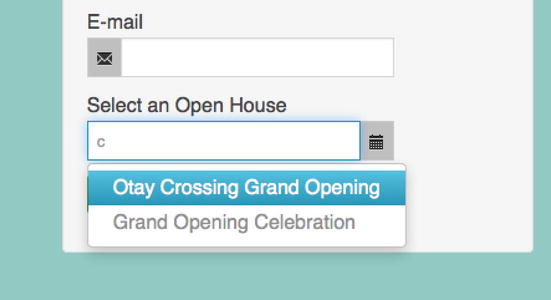
Figure 10-5. fully working Typeahead showing open house events by title
You may extend the previous example in many ways, including adding columns to what is displayed on autocomplete. To add a column such as the date you must modify your JavaScript function GetOpenHouseEvents, in particular the portion where each event is added to the array. The previous code currently only adds the Title property, but you are retrieving the Event Date as well. To use the Event Date column, refer to Listing 10-6.
Listing 10-6. Adding the Event Date to Each Array Item
function GetOpenHouseEvents() {
    $.ajax({
        url: _spPageContextInfo.webAbsoluteUrl + "/_api/web/lists/GetByTitle('Open Houses')/items",
        type: 'GET',
        async:false,
        headers: {"accept": "application/json;odata=verbose",},
        dataType: 'JSON',
        success: function(json) {
            var obj = $.parseJSON(JSON.stringify(json.d.results));
            $.each(obj, function() {
                if(this['Title']!=null || this['Title']!='') {
                    openHouseEvents.push(""+this['Title']+ " - "+ this["Event_x0020_Date"] +"");
                }
            });
        },
        error: function (XMLHttpRequest, textStatus, errorThrown) {
            alert("error :"+XMLHttpRequest.responseText);
        }
    });
}
Once you update the code shown in Listing 10-6, the date displays; however, it is not formatted correctly, as shown in Figure 10-6.
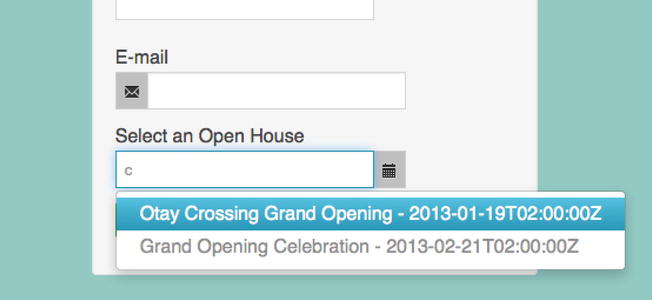
Figure 10-6. Typeahead displays our open house event title and event date in ISO format
It would be nice to display the date to the right of the title of every event in the friendly format of, for example, “01 Jan”. There are many ways to format a date using JavaScript including open source frameworks, jQuery plug-ins, and even your own Date string processor. In the next example we leverage the Data.js framework, which is extremely powerful and can be used for more complex use cases.
![]() Tip We use the open source Date.js library for our formatting. Download and learn more about this framework at http://sprwd.com/ddd9ztv.
Tip We use the open source Date.js library for our formatting. Download and learn more about this framework at http://sprwd.com/ddd9ztv.
After adding the Date.js library to your Specter HTML master page, you are ready to implement the formatting of your event date (see Listing 10-7).
Listing 10-7. The Success Function Portion of the GetOpenHouseEvents Function Applying Friendly Date Formatting
$.each(obj, function() {
    if(this['Title']!=null || this['Title']!='') {
        openHouseEvents.push(""+this['Title']+ " - "+
            new Date(this["Event_x0020_Date"]).toString("d MMM")+"");
    }
});
Once you make this modification to your function, the date is shown in the desired format, as shown in Figure 10-7.
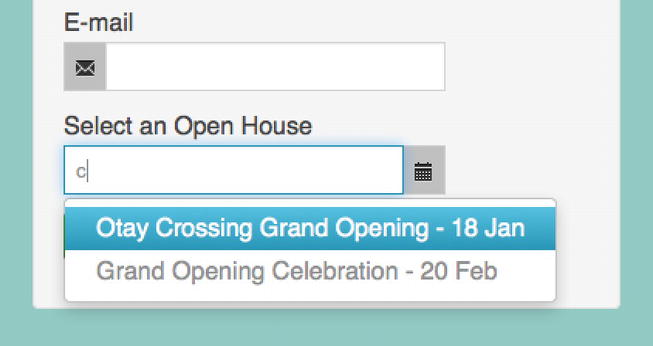
Figure 10-7. Typeahead shows open house title and formatted date
Once the date is included in the values shown on the Typeahead drop-down, users can search for an open house by date or any keyword.
Saving Form Data to SharePoint List
At this point we have seen how we can use SharePoint 2013's REST API to retrieve information from our SharePoint site, so we are now ready to see how we can save information to a SharePoint list.
The REST URL is similar, however we must add data in JSON format with the name and values of the fields that correspond to the List fields that we wish to save values for.
Determining the Entity Type of Our List Item
To successfully save a new SharePoint list item, we must specify the entity type of the object. You’ll notice the type of item is set to SP.Data.Open_x0020_House_x0020_RegistrationsListItem and this certainly does not seem generic. So how do we obtain this?
We can determine the object type by going to the following URL on the web browser:
Querying for this metadata allows us to retrieve the information we need to be able to save new items, and the response is shown in Listing 10-8.
Listing 10-8. The Response We Get Shows the Entity Type Full Name for the List Item We Want to Save
<?xml version="1.0" encoding="utf-8" ?>
<feed xml:base="http://spectergroup.com/_api/" xmlns="http://www.w3.org/2005/Atom"
        xmlns:d="http://schemas.microsoft.com/ado/2007/08/dataservices"
        xmlns:m="http://schemas.microsoft.com/ado/2007/08/dataservices/metadata"
        xmlns:georss="http://www.georss.org/georss" xmlns:gml="http://www.opengis.net/gml">
  <id>17f84048-d7a5-4e31-b2d2-e492aec29dc7</id>
  <title />
  <updated>2013-01-17T01:20:22Z</updated>
  - <entry m:etag=""3="""">
    <id>http://spectergroup.com/_api/Web/Lists(guidSPI_AMP#x0027;8b581a1a-0789-4b4c-8f23-58fcee487feb')
    </id>
    <category term="SP.List"
           scheme="http://schemas.microsoft.com/ado/2007/08/dataservices/scheme" />
    <link rel="edit" href="Web/Lists(guid'8b581a1a-0789-4b4c-8f23-58fcee487feb')" />
    <title />
    <updated>2013-01-17T01:20:22Z</updated>
    - 272103_1_En
      <name />
    </author>
    - <content type="application/xml">
      - <m:properties>
        <d:BaseTemplate m:type="Edm.Int32">100</d:BaseTemplate>
        <d:Description />
        <d:Id m:type="Edm.Guid">8b581a1a-0789-4b4c-8f23-58fcee487feb</d:Id>
          <d:ListItemEntityTypeFullName>
              SP.Data.Open_x0020_House_x0020_RegistrationsListItem
         </d:ListItemEntityTypeFullName>
        <d:Title>Open House Registrations</d:Title>
      </m:properties>
    </content>
  </entry>
</feed>
Now that we know the entity type of the list item we would like to save, we can create our JavaScript function, which we will name RegisterUserForEvent as shown in Listing 10-9.
Listing 10-9. The JavaScript Function to Save New User Registrations Uses the REST API
function RegisterUserForEvent(){
    $.ajax({
        url: _spPageContextInfo.webAbsoluteUrl +
            "/_api/web/lists/GetByTitle('Open House Registrations')/items",
        type: 'POST',
        dataType:"JSON",
        data: JSON.stringify({
            '__metadata': {
                'type': 'SP.Data.Open_x0020_House_x0020_RegistrationsListItem'
            },
            'Title': $('#firstname').val() +" "+ $('#lastname').val() + " registered!",
            'Last_x0020_Name': $('#firstname').val(),
            'First_x0020_Name': $('#lastname').val(),
            'Email': $('#email').val()
        }),
        headers: {
            'accept': "application/json;odata=verbose",
            'content-type': "application/json;odata=verbose",
            'X-RequestDigest': $('#__REQUESTDIGEST').val()
        },
        success: doSuccess,
        error: doError
    });
}
Taking a closer look at this function, you will see that we use jQuery to get a handle on each form text field by ID and map it to the appropriate List field. For the List Item Title field, we simply concatenate the first name and last name plus another string.
![]() Tip You will also notice on our function shown in Listing 10-9, we include additional header information. Of special interest is the X-RequestDigest the value of which we obtain from the hidden form field. We include as it is a security measure related to Cross-Site Request Forgery (CSRF). You can learn more about security best practices for SharePoint at http://sprwd.com/56hfm9n.
Tip You will also notice on our function shown in Listing 10-9, we include additional header information. Of special interest is the X-RequestDigest the value of which we obtain from the hidden form field. We include as it is a security measure related to Cross-Site Request Forgery (CSRF). You can learn more about security best practices for SharePoint at http://sprwd.com/56hfm9n.
Within our Ajax code snippet we have specified the success and error statuses to be handled by a function. Both functions are shown in Listing 10-10. Both functions are very straightforward. In the case of a successful save action, we simply output an alert message indicating this. In the case when we receive an error, we output the actual error in a friendly format.
Listing 10-10. The Success and Error Handling Functions
doSuccess= function () {
    alert('You are now registered, thank you!'),
}
doError= function (err) {
    alert(JSON.stringify(err));
}
Using Twitter Bootstrap Modal to Show Success Message
We are only displaying a simple JavaScript alert for a successful save, but we can certainly make use of enticing Twitter Bootstrap features to make this look better! To do this, you can modify the doSuccess function, as shown in Listing 10-11 and add Bootstrap's Modal component.
Listing 10-11. Using Bootstrap Modal Component on Successful Registration
doSuccess= function () {
    $('.modal').modal('show'),
}
In addition to modifying the doSuccess function, you must also add the HTML markup to the custom page layout you created earlier in this chapter to declare the Bootstrap styled modal as shown in Listing 10-12.
Listing 10-12. The Bootstrap Modal HTML Markup to Display on Successful Open House Registration
<div id="myModal" class="modal hide fade" tabindex="-1" role="dialog"
        aria-labelledby="myModalLabel" aria-hidden="true">
    <div class="modal-header">
        <h3 id="myModalLabel ">SUCCESS! - You are registered.</h3>
    </div>
    <div class="modal-body">
        <p>We have registered you for this Open House, you will receive an email confirmation shortly.
        <br/><br/>-Specter Group.
        </p>
    </div>
    <div class="modal-footer">
        <button class="btn" data-dismiss="modal" aria-hidden="true">Close</button>
    </div>
</div>
After a successful registration, users will now see the modal as shown in Figure 10-8.
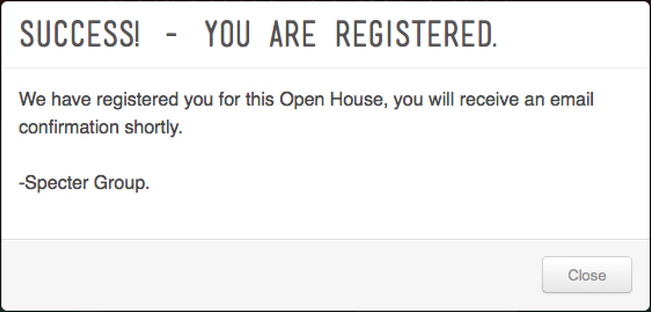
Figure 10-8. Bootstrap modal dialog box shown on successful open house registration
The data that is saved is shown in Figure 10-9.
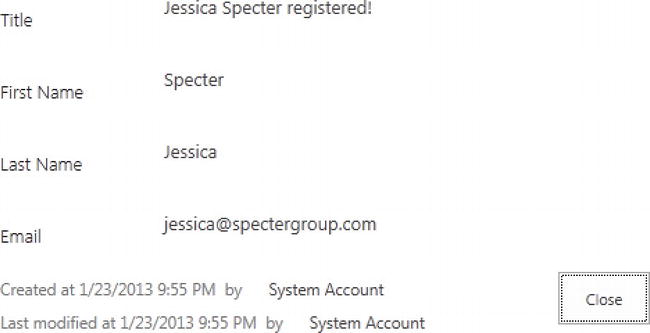
Figure 10-9. The saved open house registration list item
Specter Group would like to ensure as much as possible that they receive valid information when a user submits a registration for an open house. Just as with Date formatting, there are multiple methods to provide client-side form validation, including plug-ins, frameworks, and even custom code. We will implement basic validation by leveraging a powerful, preexisting plug-in, an open source jQuery plug-in for Bootstrap, jqBootstrapValidation. You can download jqBootstrapValidation from http://sprwd.com/8qwfa32.
Once you have included the jqBootstrapValidation plugin JavaScript file on your HTML master page, you are ready to use the plugin. First, you will need to tell the validation plugin what type of fields you would like to validate, as shown in Listing 10-13. Add this code block to your page layout placeholder called PlaceHolderAdditionalPageHead as you did in previous examples.
Listing 10-13. Configuring the Validation Plug-In
<script>
    jQuery(document).ready(function ($) {
        $("input,select,textarea").not("[type=submit]").jqBootstrapValidation();
    });
</script>
You can then modify your HTML markup to perform the desired validation as shown in Listing 10-14. The code checks for a valid e-mail address and at least two characters for the first and last names.
Listing 10-14. HTML Markup Using Validation Plug-In
<form class="form-horizontal" id="openHouseRegistration" action="">
    <fieldset>
        <div class="control-group">
            <label class="control-label" for="firstname">First Name</label>
            <div class="controls">
                <input type="text" id="firstname" name="firstname" minlength="2"
                    data-validation-minlength-message="Please type your first name.No initials."/>
            </div>
        </div>
        <div class="control-group">
            <label class="control-label" for="lastname">Last Name</label>
            <div class="controls">
                <input type="text" id="lastname" name="lastname" minlength="2"
                      data-validation-minlength-message="Please type your last name. No initials."/>
            </div>
        </div>
        <div class="control-group">
            <label class="control-label" for="phone">Phone Number</label>
            <div class="controls">
                <div class="input-prepend">
                    <input type="text" id="phone" pattern="^(?([0-9]{3}))?[-. ]?([0-9]{3})
                        [-. ]?([0-9]{4})$" data-validation-pattern-message="How about a valid
                        phone number?"/>
                </div>
            </div>
        </div>
        <div class="control-group">
            <label class="control-label" for="email">E-mail</label>
            <div class="controls">
                <div class="input-prepend">
                    <span class="add-on"><i class="icon-envelope"></i></span>
                    <input type="email" id="email"
                        data-validation-email-message="How about a valid email address?" />
                </div>
            </div>
        </div>
        <div class="control-group">
            <label class="control-label" for="spectertypeahead">Select an Open House </label>
            <div class="controls">
                <div class="input-append">
                    <input type="text" id="spectertypeahead"
                         name="spectertypeahead" placeholder="search for an open house..." />
                    <span class="add-on"><i class="icon-calendar"></i></span>
                </div>
            </div>
        </div>
        <div class="control-group">
            <div class="controls">
                <button class="btn btn-success"
                     onClick="javascript:RegisterUserForEvent();return false;">Register me!
                </button>
            </div>
        </div>
    </fieldset>
</form>
The validation plugin is very flexible. As an example, you can specify a RegEx pattern to validate the phone number. Entering incorrect information displays the error messages configured as shown in Figure 10-10.
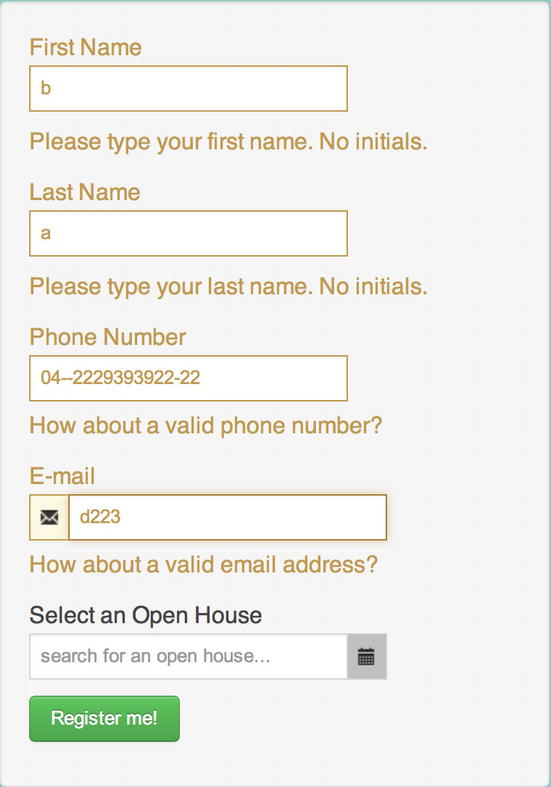
Figure 10-10. The validation on the open house registration form fully working, displaying error messages instantaneously
![]() Tip For more complex validation, be sure to take a look at the documentation for the jqBoostrapValidation plugin at http://sprwd.com/8qwfa32
Tip For more complex validation, be sure to take a look at the documentation for the jqBoostrapValidation plugin at http://sprwd.com/8qwfa32
Summary
In this chapter we worked with the REST API in the context of building a rich open house registration form for the Specter web site. We showed how you can retrieve and save information and the specific syntax needed. In addition, to further enrich the form functionality, we implemented the Bootstrap Typeahead and used other open source frameworks to demonstrate instant form validation. In Chapter 11 you will learn how to use new client-side APIs and HTML5 to upload multiple files that are larger than 1.5 MB to SharePoint.