
A wiki is a web page that users create and edit collaboratively. The wiki server in Lion Server can be used to provide a centralized, guided means of accessing content on a server. For example, a teacher may allow students to upload assignments to a wiki, a company may use a wiki to house standard operating procedures, or a family may use a wiki to collaborate on their next daunting trip to the grocery store.
The best-known example of a wiki is Wikipedia, where global collaborators have built and continue to expand on what amounts to probably the largest and most comprehensive repository of encyclopedia-style knowledge. Articles are indexed, searchable, and freely editable from anywhere in the world. While most wikis aren’t quite as prolific, I certainly hope that yours will be equally as successful, whatever task you assign to it.
To start using Lion Server’s Wiki service, first turn it on. Assuming you are already using the web server, open the Server application to do so. From Server, click on the Wiki service, listed in the SERVICES section of the Server sidebar. Then, click on the field for “Wikis can be created by.” Here, there are two options: “all users” and “only some users.” The “all users” option allows any user of the server to create a new wiki article.
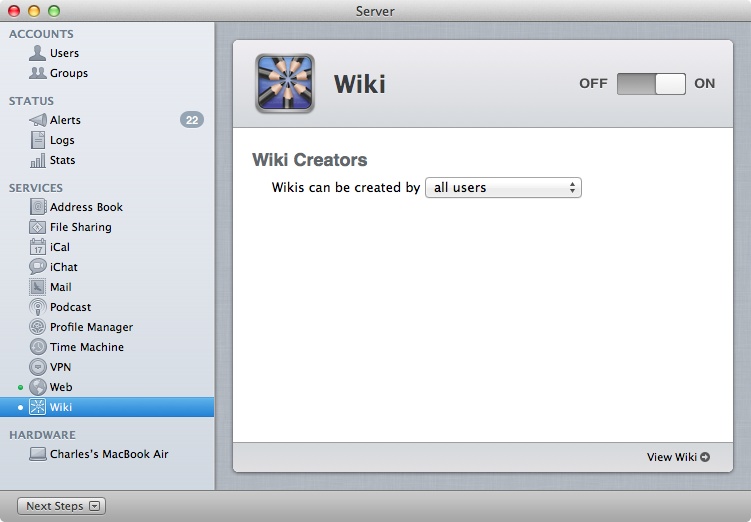
Once you have selected the appropriate settings for who can create a wiki, click the ON button. The Wiki server will then start. Once started, click on the View Wiki link to bring up Lion’s wiki portal.
Once the wiki services have been configured and started, it is time to start laying out how people will interact with the wiki. A wiki is a repository. Each page is considered an article of the main repository. Pages can be linked to one another, but do not have to be. No main index of articles is automatically stored, although there are a number of ways to find and link content together. Such a random layout to data puts the onus on the wiki creators and administrators to bring some kind of structure to the environment.
Each topic should have its own wiki, and with each wiki, there can be several ways to lay data out for users to interact with the wiki. One of the easiest structures is to set up a single page that acts as an index to other pages. Another structure would be to have guided lesson plans, where each page links to the next in sequence, much like a Choose Your Own Adventure book. There are about as many strategies to take when deciding how the pages will link to one another. The most important thing is to think it through ahead of time.
When there are a lot of pages (exactly how many “a lot” is being up to you), then lay pages out ahead of time graphically. For such a task, consider a tool like OmniGraffle. OmniGraffle allows you to insert pages as, let’s say, boxes. Each box can then have arrows that point to other boxes that are in fact pages. Given that many are graphically inclined, this allows everyone to be on the same page quickly and effectively with how pages will link to one another. Many also give users the ability to edit certain wiki articles and therefore will color code each box that represents a page with whether the page is editable by users.
The previous example of a bunch of pages linked from an index page is common in an environment where standard operating procedures are stored in a wiki. Other layouts might include a lesson plan, where an outline may suffice as a map to get to pages from the main page. Another layout might be similar to that used by Wikipedia, where each page only links to items from other pages and with enough total pages, all are linked to one another. A final layout that can be a bit difficult to maintain is a mesh, wherein every page links to every other page.
Finally, when laying out the wiki, take into account that the sidebar will show links to users as well. These include Updates (pages that have been updated since last viewed) and recent documents (the few pages most recently updated). We’ll discuss leveraging these further in the section Accessing Content.
To create your first wiki, open the Lion Server web portal by entering the server’s address (name or IP address) into a web browser (assuming no custom URL or port must be used to access the site). At the first screen (the home page if you will), click on the link for Wikis, bringing up the URL for the site followed by /wiki/projects. For example, if the site is https://wiki.krypted.com, the full path to the wiki would be https://wiki.krypted.com/wiki/projects.
At the Wikis page, the bar at the top is used to navigate through content. The button to the far left of the bar opens a ribbon in the center of the screen reminiscent of MobileMe accounts, giving the options to navigate to the items on the home page. The Wikis link to the immediate right of use the ribbon takes users to the list of wikis, with individual wikis listed underneath (if you have navigated into them) and articles within wikis listed under that. To the right side of the screen are actions, including a search box (reminiscent of Spotlight) used to search content, the lock icon used to authenticate or log out of the wiki, the cogwheel, used to delete wikis and access settings and the plus sign to create wikis.
Click on the plus sign and a menu appears giving the option to create a New Wiki as well as create wikis and documents within My Documents. My Documents are private and for this example we will create a wiki that is accessible to a group. Click on New Wiki to do so.
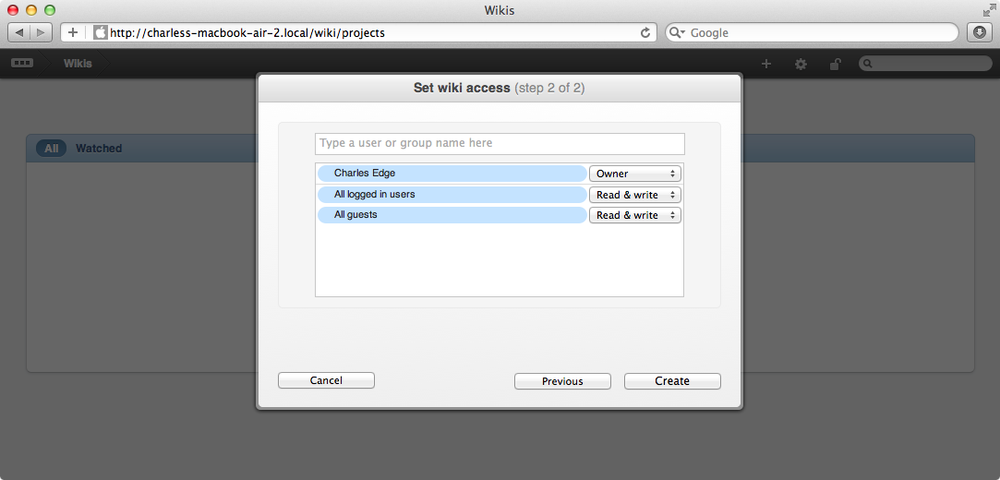
The Create a new wiki screen then opens. Provide a name and description for the wiki in the appropriate fields (try to use as many keywords as possible in the description field to increase the likelihood that users can find relevant content). You can also use the Upload image… button in the Wiki Icon section to define a badge, or icon, that is displayed when opening the wiki. Click on the Next button to then define who has access to the wiki (Figure 5-3). Here, add all users that will need access to the wiki, similar to how permissions are handled with regards to file sharing (covered further in Chapter 3).
Note
When defining permissions, the “All guests” entry includes users who have not entered a username and password, whereas the “All logged in users” covers users who have authenticated, no matter the groups they are or are not in.
Once comfortable with the permissions settings, click on Create to create the new wiki. The Setup Complete screen is then displayed with a button to Go to Wiki. Click on the button to enter into the newly created wiki.
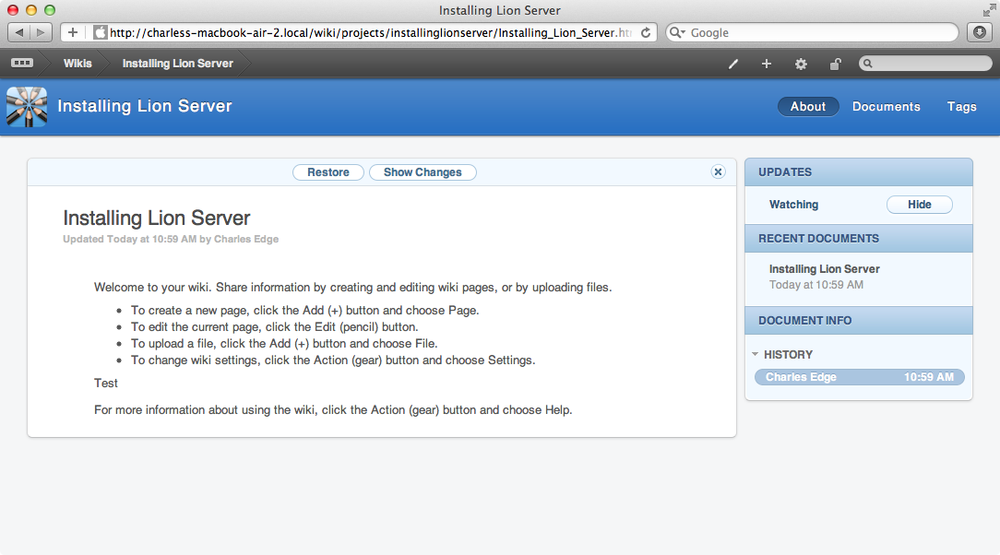
At this point, the first wiki page is displayed. The navigation bar at the top of the screen shows a new icon (a pencil). Clicking on the pencil changes the bar to a WYSIWYG editor, which can be seen in Figure 5-4. Here, the icons (from left to right) allow you to attach a file, embed an image, embed an audio or video clip, insert a table, embed HTML (yes, even YouTube embeds), choose styles for text, select formatting for text, insert links (useful for keeping pages you create connected to one another), justify text within a page, insert bulleted lists, and indent content. To the far right of this screen, click on Save to commit any changes you make and click on Cancel to undo any changes.

According to their permissions, some pages can only be edited by single users. Others can be edited by a lot of different people. It can then become difficult to identify who changed certain parts of pages (and why) in topologies where multiple users are contributing content. To provide a little sanity here, each change and the user who made each change is tracked in the DOCUMENT INFO sidebar. Here, each update is shown, along with the time the update was made and the user who made the update. Clicking through each will show old versions of pages as well as a button to Show Changes, which highlights changes and shows deleted items with a strike-through. The Restore button can then be used to revert to a saved version of the page if content was inappropriately changed (Figure 5-5).
Having a transparent history of who changed each aspect of the system then strengthens the argument for collaboration. Being able to revert to old versions means that more people can change content, allowing for more content contributors.
Wikis are dynamic content that is user generated. But because the wiki service is integrated with other parts of the server, if you are running calendars and blogs, content from those services can also be dynamically loaded into the wiki. To insert blocks (similar to blocks in Moodle, or Widgets in WordPress), to the righthand sidebar of the wiki, go to the wiki settings (using the cogwheel icon in the navigation bar at the top of the screen) and then click on Services for checkboxes to enable Calendar and Blog integration.
You can also customize the look and feel of the pages that are loaded. Apple is known for its beautiful design, so it’s hard to second-guess them on these things.
Customizing the look and feel of the wiki server is one of those things people will do less in Lion Server than in previous versions of OS X Server. Gone are the big banners that say “Mac OS X Server” and footers that rub in what operating system the wiki is running on. Apple no longer includes a dozen or so templates to choose from. Instead, it’s a single, highly integrated and functional collaboration server portal.
But you can still customize the look and feel if you want to. Graphics files are stored in /usr/share/collabd/coreclient/public/stylesheets/cc/img. While most graphics are stored here, not all elements are. For example, a common task might be replacing the login picture icon with that of a school’s mascot by replacing the /usr/share/collabd/webauthd/public/images/user.png image with an image of your own. To add a custom banner or edit the look and feel, edit the .css files stored in the /usr/share/collabd/coreclient/public/stylesheets/cc. For example, to change the color of text, use the color setting in the body section of the core.css file. Or change the background color of unused space using the background-color setting of the main section.