
Lion Server has three features used to centrally manage Mac OS X and iOS-based devices. Traditionally, the most common feature used is Managed Preferences, an extension to Open Directory that allows administrators to control settings, or preferences, on Mac OS X-based computers. In Lion, a new feature, called Profile Manager is included.
Profile Manager is the future of managed clients for Mac OS X and iOS-based devices (iPhone, iPad, and iPod Touch). Profile Manager provides an enrollment system for Mobile Device Management, allowing administrators to remotely control settings, such as controlling the dock, locking down application access, and setting up policies for device access. Profile Manager also allows administrators and users to lock or wipe devices in the event they fall outside the control of the organization (e.g., they are lost or stolen).
Additionally, Lion Server includes Software Update Server for Mac OS X clients. Software Update Server is a tool used to cache software updates. Once cached, administrators of Lion Servers can choose which updates to send to client computers. Having a centralized update server can be an extremely useful tool. Not only does the software cache help keep all users running the same version of the operating system, but the shared cache also reduces wasted bandwidth on the organization’s Internet connection by hosting updates inside the network.
In this chapter, we will look at each of these, giving administrators of Lion Server powerful tools to streamline the client systems that are in their care. These tools then comprise a considerable part of the client deployment strategy and mobile device management strategy for small and large organizations alike.
Profile Manager is the latest addition to the features that comprise Mac OS X Server. Once set up and configured, Profile Manager acts as a web portal that gives administrators granular control over devices in their care. Profile Manager can remotely manage Mac OS X and iOS devices, and does so through a web portal that is both easy for administrators to use and available and simplistic enough to provide access to end users as well.
Before you set up Profile Manager, first complete a few basic tasks:
Verify Connectivity to the Internet
Verify that you have a valid Apple ID (preferably a generic account, as it will be used on the server)
Download and install Lion Server (described further in Chapter 2)
Configure incoming TCP ports for the server for ports 443, 1640, and 5223 (see Chapter 9 for more information on managing TCP ports on OS X Servers if you are using an OS X Server as a firewall)
Either create a self-signed SSL certificate or purchase one from a certificate authority (CA)
Verify that the hostname is in alignment with the hostname defined in DNS
Additionally, Profile Manager will need to be connected to a directory service. If the server is not a member of a directory service, such as Apple’s Open Directory or Microsoft’s Active Directory, then the server will be set up as an Open Directory Master (described further in Chapter 2) during the setup process for Profile Manager.
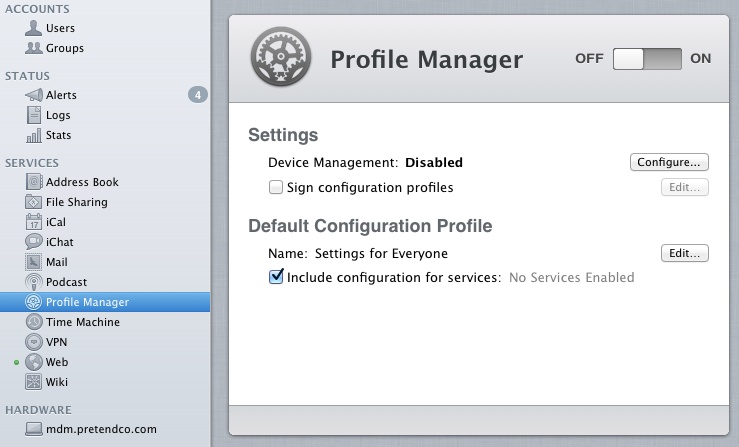
Once all of the prerequisites are met, to get started with the installation, open the Server application and click on the Profile Manager in the SERVICES section of the Server sidebar. Then, click on the Configure… button at the Profile Manager screen (Figure 8-1).
The Configure Device Management wizard then opens. Click on the Next button to begin configuration. If the server is not running as an Open Directory Master, the Configure Network Users and Groups screen will appear, indicating that the server will be configured to be an Open Directory Master. Click on the Next button to bring up the Directory Administrator screen, where the login information is displayed for the Open Directory Master.
The username is diradmin by default, given that the directory has a different username and password than the local administrative accounts. The username can be changed. Provide a password for the directory administrative account and then click on the Next button.
At the Organization Information screen, provide a name for the organization in the Organization Name field (e.g., O’Reilly) and an email address for the administrator of the domain (preferably a generic address, such as [email protected]). Then click on Next and click Set Up at the Confirm Settings screen, provided the Open Directory settings match the desired configuration.
The Open Directory Master will then be set up. If the server is using a self-signed certificate then you will see the Configure an SSL Certificate screen, where the certificate that you configured in Chapter 2 should be selected (Figure 8-2). The name on the certificate should match the hostname of the server. Once the appropriate SSL Certificate is selected, click on the Next button.

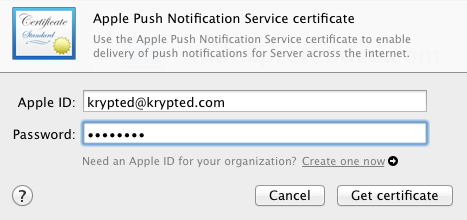
At the Get an Apple Push Notification Service certificate screen, provide a valid Apple ID and the correct password for that Apple ID. Click on the “Get certificate” button when you have provided the correct information for the Apple ID (Figure 8-3).
Note
You do not need to have an Apple Developers account for the Apple ID used with Profile Manager.
The Apple push certificate that enables MDM is then installed (a process that requires the server to connect to the Internet). When the APNS certificate (Apple Push Notification Service) is installed, the server will indicate that your server meets all Profile Manager requirements. Click Finish at this screen and the final settings will be written to the server.
Back at the Profile Manager screen, just click the ON button to start the service and you should then be able to access Profile Manager using the URL of the server followed by /profilemanager. For example, if your server is called MDM.krypted.com, then you would access Profile Manager by opening the URL https://MDM.krypted.com/profilemanager and authenticating with a user configured to have access to Profile Manager (more information on configuring Service Access Control Lists in Chapter 2).
Once Profile Manager is enabled, the next step is to actually create profiles. When planning for profile deployment for users, groups, and computers, it is important to consider the order with which profiles are applied in the event of a conflict. Profiles are applied in the following order:
User
Computer
Computer Group
Everyone
User Group
What this means is that when you apply a profile, if you set a setting for both a user and a group that the user is a member of, then the setting for the user is the setting that is applied. Consider this as indicating that the most user-centric setting is applied.
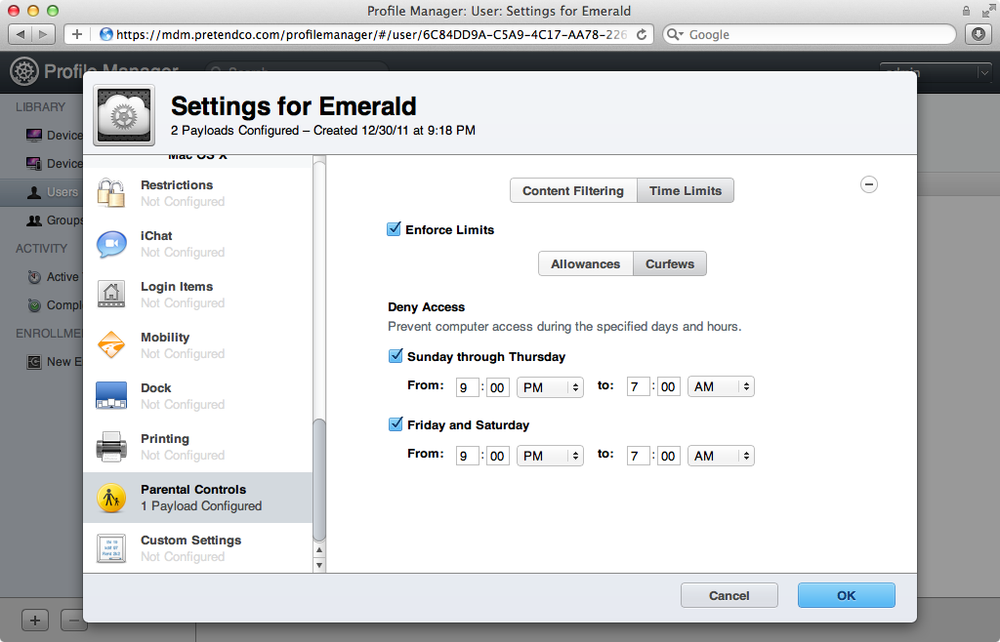
A common example of a profile to set is restricting login times, or the times that users in an OS X environment are able to actually use a computer. To do so, open Profile Manager and click on the profile you wish to edit (in this example, we use a specific user who is playing with the computer past her bedtime). By default, login times are not managed with profiles, so click on Enable to enable managing printers (Figure 8-4).
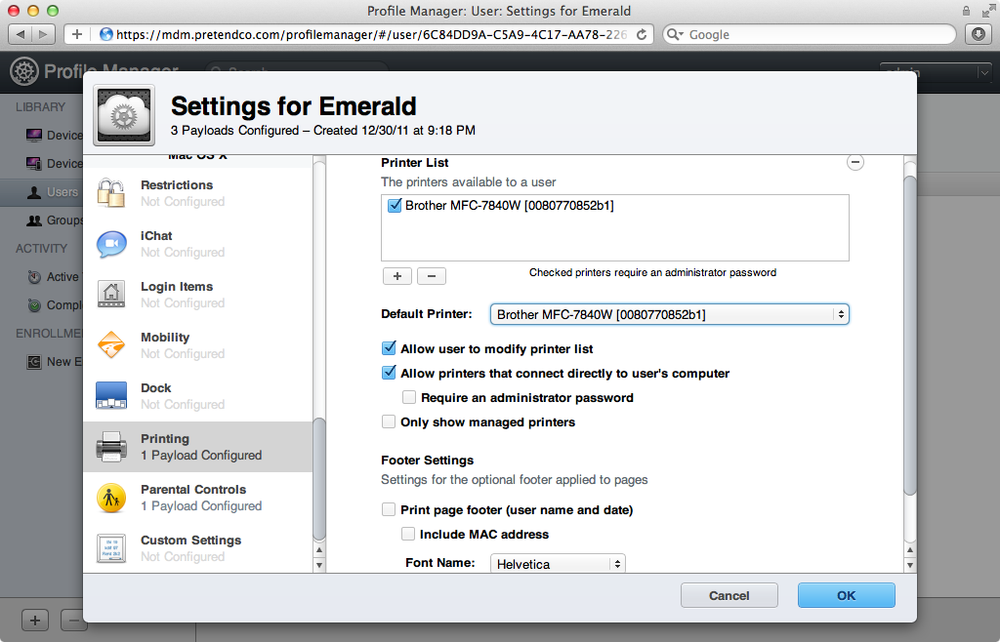
Restricting login times is a common example of a restriction that can be set with Profile Manager. But the real power of profiles is automating aspects of pushing new users or computers out. A great example of this is pushing out new printers to users. Doing so with profiles does come with a caveat: the printer driver. First we’ll look at pushing out a new printer. To do so, open Profile Manager and click on the profile you wish to edit (in this example, we use a specific user). By default, printing is not managed with profiles, so click on Enable to enable managing printers (Figure 8-5).
Another aspect of leveraging a profile to automate user and computer setup is pushing a dock item to users. For example, if you have Keynote installed on computers, you can use a profile to drop pages into the dock of each user. In this example, we’re going to push a dock item for a group of users called “Marketing” for Keynote. To get started, open Profile Manager and click on the profile you wish to edit (in this example, we will use the Marketing group). By default, the dock is not managed with profiles, so click on Dock in the Settings sidebar and then click on Configure to enable managing docks (Figure 8-6).
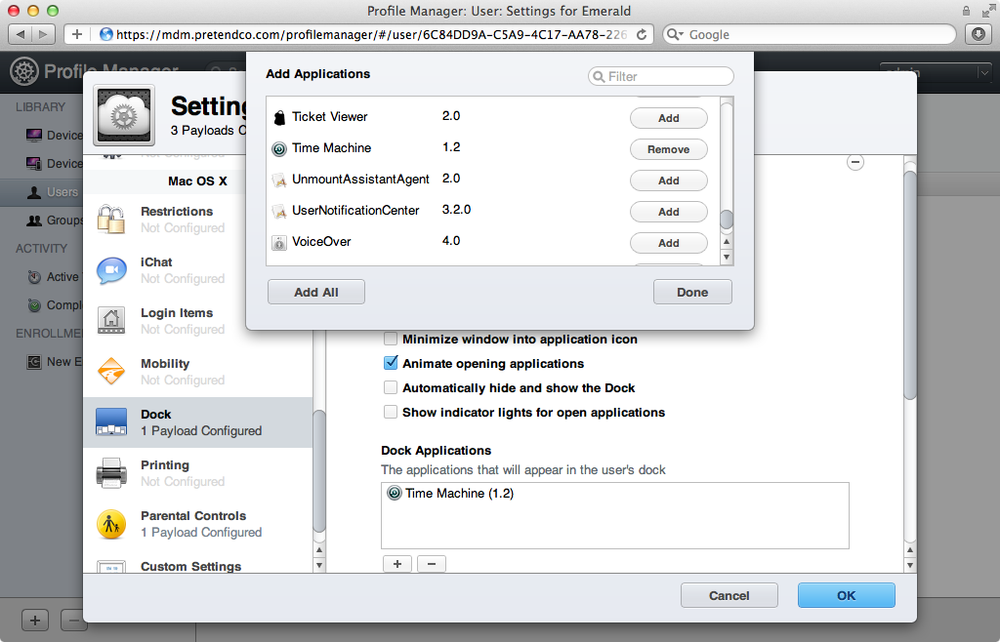
You will then see the Display settings. Here, there are options to change the size of the dock, magnification options, location, and other settings. To add an item to the dock of managed clients, click on the plus sign (“+”) and then select Keynote from the list of available applications, as seen in Figure 8-7. Once selected, click on Done to move on to other settings.
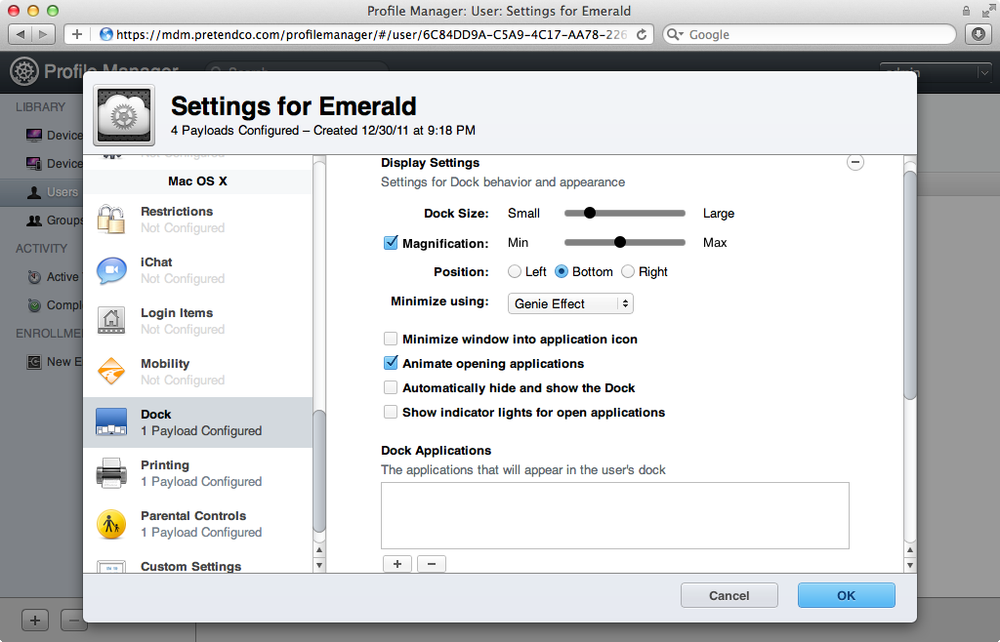
Once applied, the Dock on managed clients will have Keynote. There is a Merge with User’s Dock checkbox. When this option is checked (which is the default), the items in a user’s dock will stay and any additional items from the profile will be added. When the merge option is disabled, the items in a user’s dock will be removed and only the items in the profile will be displayed.
One of the most useful aspects of configuration profiles is the ability to set up the user environment for Mail, Contacts, and Calendars to access your environment. When you are configuring such settings, you will first want to have the relevant information for accessing these services handy (each is covered in this book, if you are using a Mac OS X Server to provide these services). To configure Mail, open a profile and then click on Email in the left profiles sidebar (unless you are installing an Exchange account, in which case you should likely be using the Exchange settings). At the Configure Email screen, click on Configure.
At the Mail configuration screen, fill out the settings as you would with an email client, according to your setup.
If the User Name and Password fields are left blank, then the user will be prompted for her username and password when she installs the profile. Once the settings are configured appropriately for both incoming and outgoing mail, click on the OK button.
To configure the Calendar, click on the CalDAV option in the Settings sidebar and then click on the Configure button, as with other profile settings. At the configurations screen, provide the settings as you would for a client computer. In we show the settings for a server called calendar.krypted.com and the same username as was previously used.
Once the settings are configured appropriately for the Calendar client in iOS, click on the OK button to save the changes to the profile. Then click on CardDAV to configure the Address Book client. Here, provide the settings as you would with the client on a computer, clicking on OK when they have been appropriately configured.
In each of the previous examples, we only configured one connection to mail, contacts and calendars. However, it is worth noting that you can configure multiple accounts for each using the plus sign in the upper-right corner of the settings for that category.
Now that you have built a bunch of profiles and settings, it is time to distribute them. The easiest way to distribute profiles is to have a user tap on them from within the client portal of Profile Manager. The client portal is different from the administrative portal, and typically made available to all users of the server. The client portal, known as MyDevices, is available at the address of the server with a /mydevices folder at the end. For example, if the portal is available at https://mdm.krypted.com, then you would access the client portal at https://mdm.krypted.com/mydevices.
Because users who have enrolled in Profile Manager are able to lock, wipe, and do other powerful tasks to their devices, the MyDevices portal is by default protected with the SSL certificate used to secure the Profile Manager service. When accessing the portal for the first time, users may be asked to accept the certificate if it is self-signed (see Chapter 2 for more information on SSL).
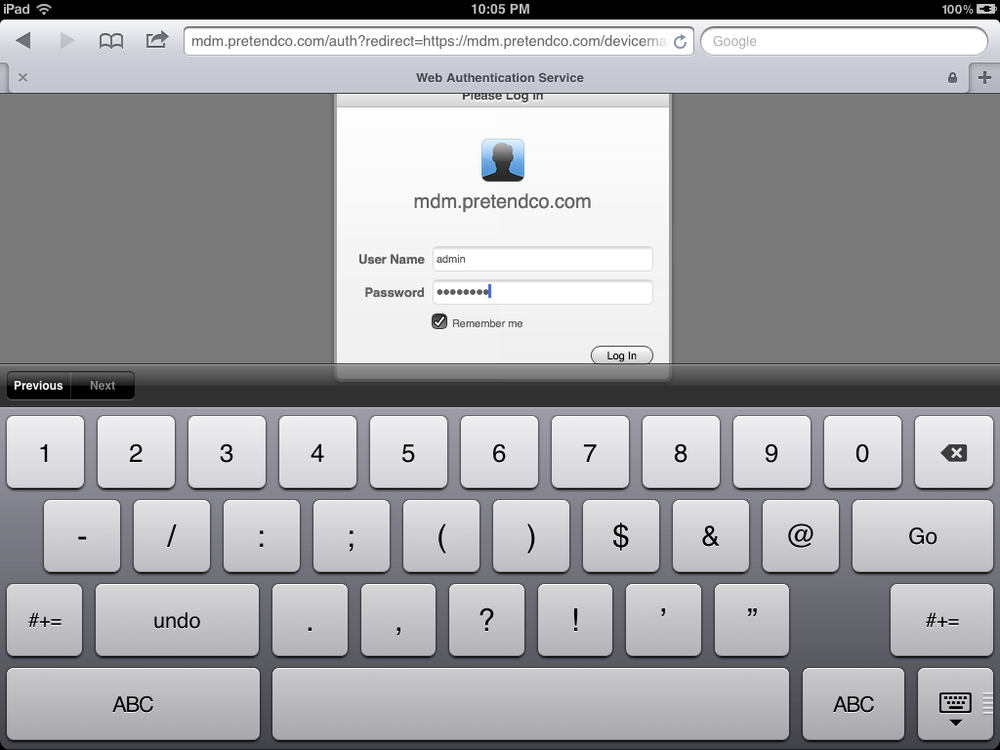
To enroll a device, first open the web portal from the device. Once open, authenticate when prompted (as you can see in Figure 8-8), using a username and password combination with access to the Profile Manager service.
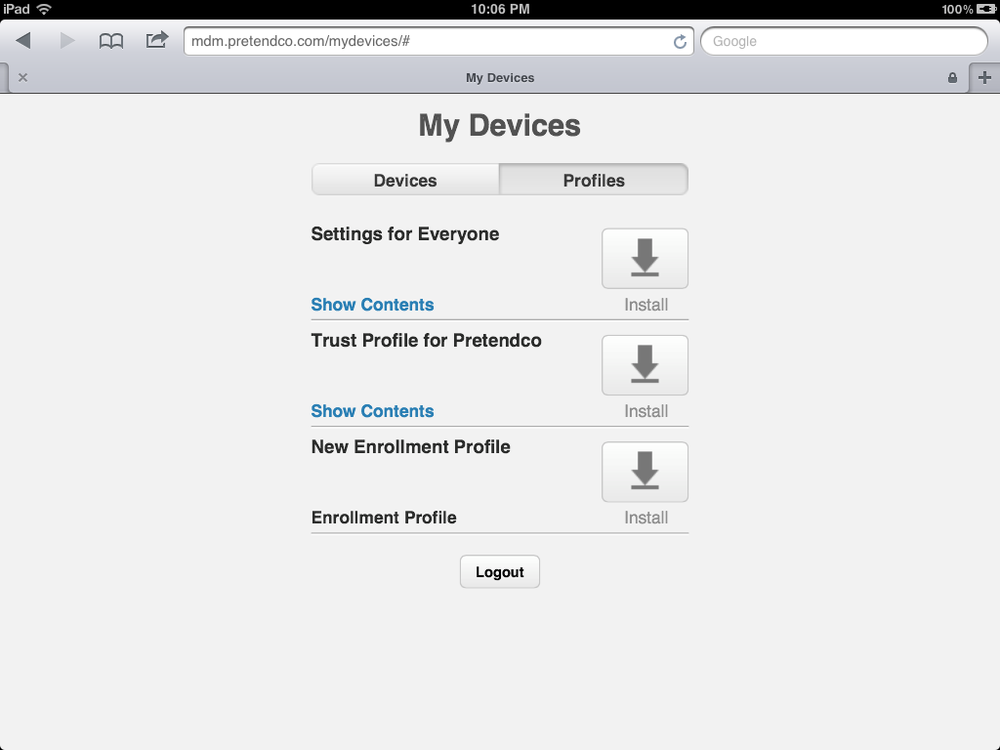
Once authenticated, you will see two tabs. The first tab, Devices, shows any devices enrolled by that user. Enrollment configures the device for Mobile Device Management. Updates sent via Mobile Device Management are instantly delivered to the device. The second tab, Profiles, shows all of the profiles available to the user that authenticated when prompted. To begin device enrollment, first click on Profiles.
From the Profiles tab, click (or tap) on any profile to begin the installation process for that profile. If you are enrolling the device for MDM, the Trust Profile for the server must first be installed. Tap on Install to install that profile, as seen in Figure 8-9.
Once installed, click or tap back on the Devices tab. Click on Enroll and the device will then prompt with the same screens as with the Profile installation. Once the device has been enrolled, the options to Wipe (erase all contents by revoking the encryption key) and Lock will be available (in Lion, this requires FileVault and a Recovery Partition whereas in iOS-based devices these options are built in). Additionally, controlling the device can now be done from within the Profile Manager web portal, as shown previously in this section.
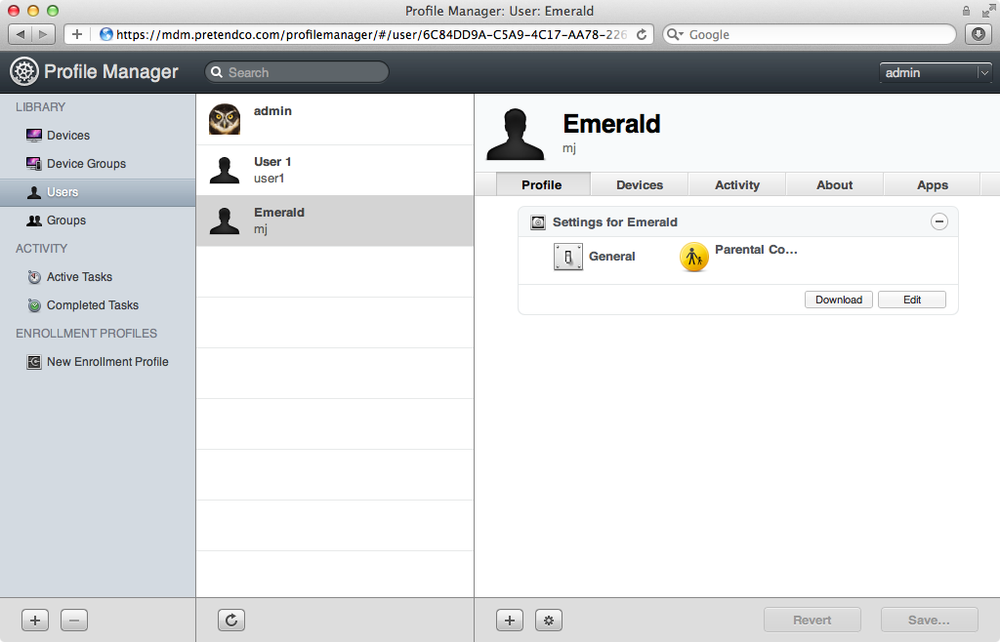
Another way to distribute profiles is to save them from Profile Manager and then email them or use a website to distribute them without the Profile Manager component. To save the profile files, open the Profile Manager web interface. Then, choose a profile that you would like to export to a file. In the Profile tab for the profile, click on the Download button (Figure 8-10).
The Profile immediately downloads and starts the installation process. If you are installing the profile on the client you are downloading the profile from, then you can click through the installation process. Otherwise, cancel and then the Profile will be saved in the Downloads directory for the user who you are logged in as. Once downloaded, Profiles can be edited, emailed, or installed through custom web interfaces.