Web browsing is the most common activity that users do on computers. Unfortunately, the web browser that comes with Windows is limited, insecure, and not private. Fortunately, there is an open source web browser that is available for free, Firefox, which doesn’t have these problems.
In this chapter, we discuss the most useful advanced features of this browser.
Tab muting: This is a way of silencing the autoplay videos and ads, as well as anything else you want to silence.
Private browsing: This is the ability to browse the Web without being tracked.
Tab and bookmark synchronization: This feature makes sure that you have the same information on both your home and office computers.
Reading mode: This is a way of displaying a screen without the clutter.
Ad blocking: You can install an add-on to block ads from appearing on your screen.
Video downloader: You can download videos from YouTube or other places for later viewing.
Note
Google Chrome is another popular open source web browser with a comparable set of features, but our preference is Firefox, so we’ll focus on that.
Getting Firefox
You can download the Firefox browser by searching for Firefox in a different browser and clicking Download in the search results. Or you can go straight to www.mozilla.org and then click Get Firefox Today Link. Firefox will detect your language settings and give you a download customized for your language.
After downloading the file, run it (you’ll probably have to tell the Windows security system that you do really want to run the program). Then select all the defaults during installation, with one exception. When it comes to making Firefox your default browser, we suggest you answer no. We’ve encountered programs, especially those made by Microsoft, that get upset if you change this setting.
If you want to create an account, you can do so now. However, you can also wait until you get to the “Setting Up an Account” section, where we cover account creation and what you can do with a Firefox account.
Using Mute Tabs
The Web can be a wonderful place, but video ads that play automatically can be annoying. Firefox has a nice feature called tab muting that allows you to shut off the annoying ads, videos, and other sounds without having to turn off the sound for your entire browser.
You will find a small speaker icon that appears on any tab playing sound, as shown in Figure 1-1.

Figure 1-1 Speaker icon
Click this icon, and you will see a line across the speaker icon to indicate that the sound is muted, as shown in Figure 1-2. The absence of a loud and annoying sales pitch is a good indicator that the tab muting feature is working.

Figure 1-2 Mute tab
The speaker appears only when the tab is playing sound. You can mute silent tabs that might play sound in the future by right-clicking the tab and selecting Mute Tab, as shown in Figure 1-3.

Figure 1-3 Mute tab
Although simple, this control is extremely useful when it comes to browsing the Web.
Browsing Privately
The Internet has lots of techniques to track you as you browse. But sometimes you don’t want “big data” looking over your shoulder. That’s where private browsing comes in. It prevents the browser, and to some extent the Internet, from remembering what you were doing while online.
For example, you’ve probably noticed that after making a big purchase, such as buying a 3D printer, you’ll get bombarded with ads for 3D printers. That’s because advertisers go to a great deal of trouble to track every web page you visit and target you with ads for what you just bought. It’s annoying.
The browser also remembers your history and uses it to supply helpful suggestions when you are entering web addresses.
If you don’t want someone to know where you’ve been browsing, you need private mode.
Private mode does have one drawback. If for some reason the browser crashes, it will not remember what tabs you had open before the crash. This is by design; no record of what’s going on in a private window is recorded. This also means your private pages are not shared between computers.
However, not everything is totally secret. If you bookmark a page, that bookmark will be available after the private session is closed. Downloaded files are not erased (just the fact you visited a downloaded page is forgotten).
Private browsing is useful if you don’t want people to know you’ve been at certain sites. In some countries, this means going to blogs or sites that discuss things your government doesn’t approve of. In other cases, it could be because you need to search the Web for a private matter. Or it could be just because you don’t want “big data” tracking you and selling your information to people for targeted ads or some other reason.
Starting Private Browsing
To open a private window in Firefox, follow these steps:
Start Firefox normally.
Click the Menu icon (the three lines).
Click the New Private Window button, as shown in Figure 1-4.

Figure 1-4 Creating a private window
You can tell that you are in a private window because there is a little mask in the upper-left corner of the browser. The big purple screen saying that you are now browsing privately is a big giveaway too, as shown in Figure 1-5.

Figure 1-5 Private window
Synchronizing Tabs and Bookmarks
Suppose you find that perfect recipe online and want to transfer this bookmark to your home computer. With bookmark synchronization, bookmarks you make on any machine with synchronization enabled are automatically transferred to all other machines using the same synchronization account.
In another example, let’s say you get up in the morning and start to work on five different projects using five different tabs in your browser. But then you have to take your daughter to school and go to work. You’d like to continue at the office where you left off at home, but you need those open tabs to do this. With tab synchronization, you can grab the open tab list from one machine and transfer it to another.
To do this, you’ll need to set up an account in Firefox. The process is simple, and the result is that your browsing sessions are now portable between machines.
Setting Up an Account
First you need to create an account or sign in to an existing account. Start by clicking the Menu icon and then select Sign in to Sync , as shown in Figure 1-6.

Figure 1-6 Signing in to sync
A welcome screen appears , as shown in Figure 1-7. If you don’t have an account, click Create Account. If you do, skip down to where you sign in for the second time.

Figure 1-7 Signing in
The next screen (shown in Figure 1-8) asks for the information needed to create the account. Fill it in and click “Create account.”

Figure 1-8 Account creation information request screen
You now go to a screen asking what you want to sync, as shown in Figure 1-9. You probably want everything, so just click “Save settings .”

Figure 1-9 Saving your settings, the final account creation step
To make sure you are who you say you are, the system will send you a confirmation e-mail. We used a Gmail account for this example, so it gives us the option to go our Gmail box directly, as shown in Figure 1-10.

Figure 1-10 Opening the Gmail screen
Now all that’s needed is to open the message and confirm the account, as shown in Figure 1-11.

Figure 1-11 Verification e-mail
Finally, you are done creating the account and receive the confirmation screen, as shown in Figure 1-12.

Figure 1-12 Confirmation
Performing the Synchronization
Now surf the Web, find lots of interesting places, and bookmark them. Firefox will automatically upload your changes to the Firefox Sync Server on its own internal schedule. If you are nervous and want to make sure your changes are uploaded, click the Menu icon and then click the Manual Sync icon (the circling arrows) next to the account name (e-mail address), as shown in Figure 1-13.
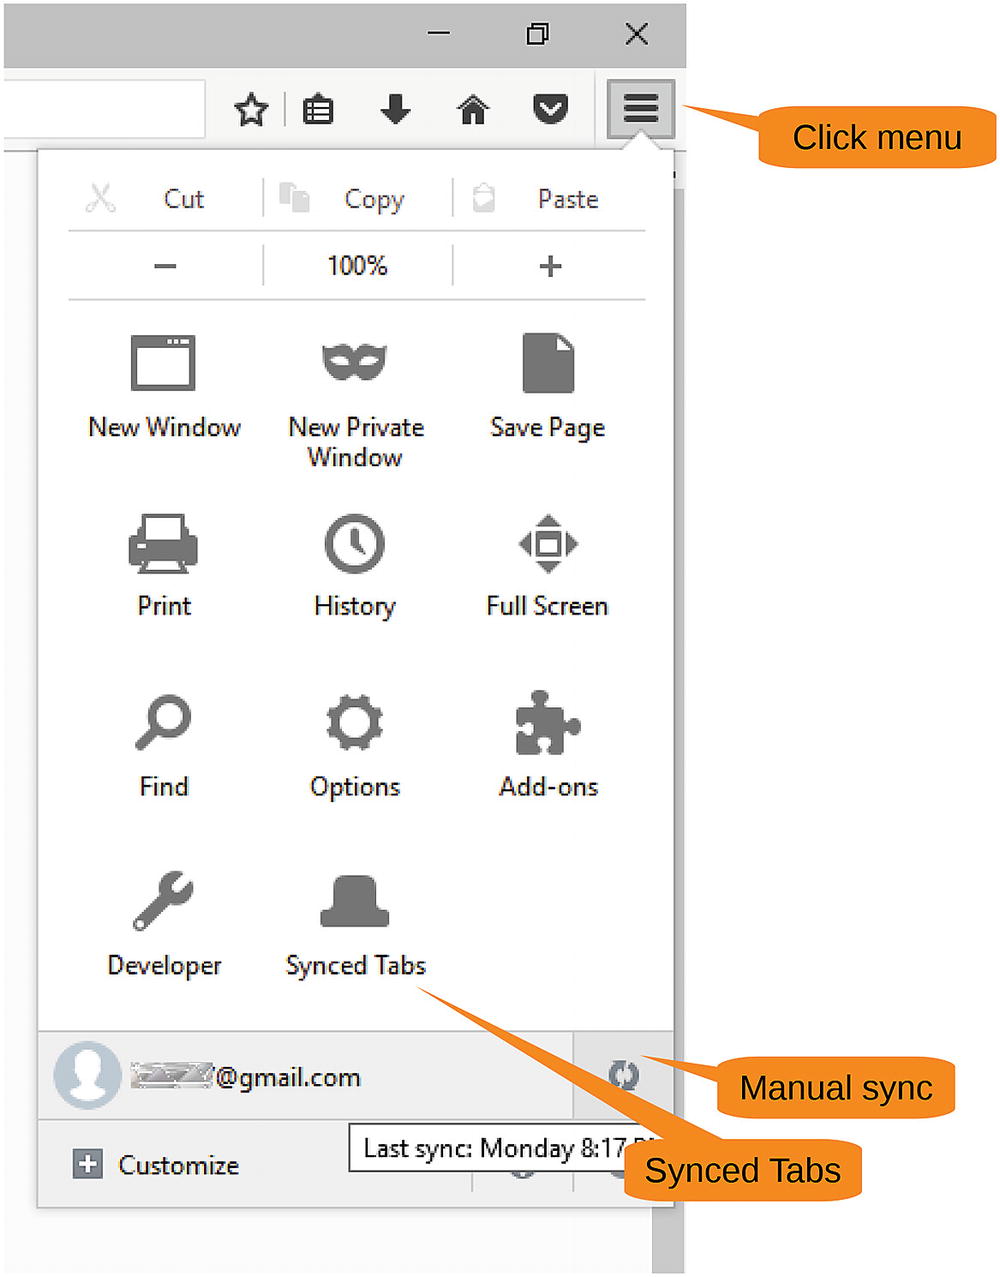
Figure 1-13 Manual Sync icon
Now go to another computer, set up Firefox, and sign on to your sync account. Take a look at your bookmarks. Notice that they are the same as your original machine. They have moved from one machine to the other.
Now click the Menu icon and Synced Tabs again (as shown in Figure 1-13).
Firefox displays a list of tabs on the other computer , as shown in Figure 1-14. In this example, the other computer is named “user2-PC,” and we’ve opened a lot of tabs on our favorite publisher’s web site.

Figure 1-14 Tabs from the other computer
Click any of those tabs, and the page will appear in your local browser.
Using Reading Mode in Firefox
On some web pages you will find a banner ad at the top, a navigation bar under that, advertisements on the left, links to related stores on the right, and the actual text you want to read in the middle as an afterthought. Firefox has a feature called reading mode, which is designed to put the text you want to read front and center on the screen and get rid of all the other garbage.
Figure 1-15 shows a typical web article. You will notice that there is some clutter on the page from the junk important marketing information on the side.

Figure 1-15 Typical article
Now click the Reading Mode icon at the top of the page. This causes Firefox to reformat the article to make readable, removing all the clutter in the process, as shown in Figure 1-16.
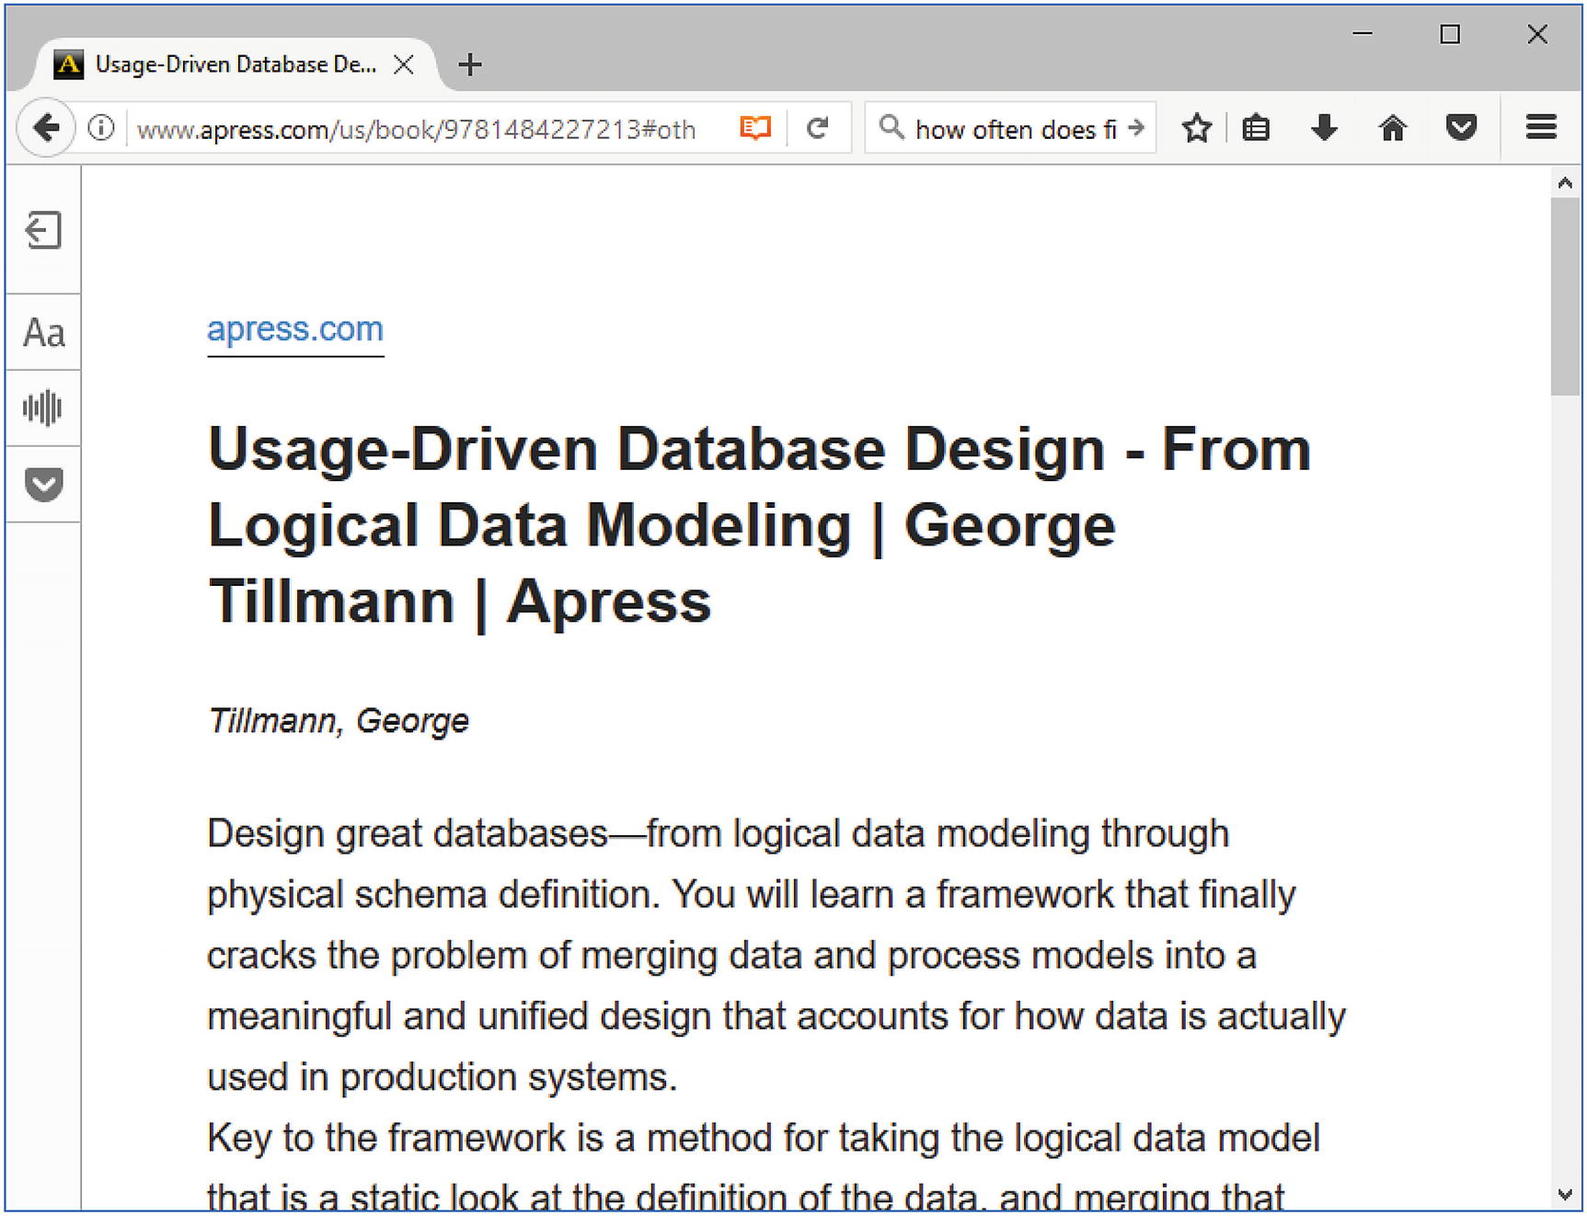
Figure 1-16 Reading mode view of the same page
As you can see, Firefox removes all the extra junk on the page and gives you a nice, clean article, making it much easier to read.
Blocking Ads
An ad blocker keeps ads from appearing on your screen and has two advantages . The first is that the clutter on the screen is reduced. The second is that you use less bandwidth and therefore your pages load faster. Let’s start by going to http://simple-adblock.com/faq/testing-your-adblocker/ , as shown in Figure 1-17.

Figure 1-17 “Ad”-filled web pages
This page is filled with two big “ads” that say “Not working.” (This is not the most effective product name in the world, but it does get the point across.)
Notice that the top of the screen contains a real ad for Adblock Plus for Internet Explorer. Figure 1-17 was taken on Windows 10, which uses the Edge browser and doesn’t have Internet Explorer installed.
Now we show how to install an ad blocker and see what happens to this page.
Getting the Ad Blocker
To install an ad blocker extension, click the Menu icon and then Add-ons , as shown in Figure 1-18.

Figure 1-18 Getting to the add-ons
This brings you to the screen shown in Figure 1-19, which lists the add-ons Firefox thinks you might want to install. But the ad blocker is not there. So, scroll to the end and click “See more add-ons!”

Figure 1-19 Getting more add-ons
The next screen allows you to enter a search term. Enter ad blocker and click the arrow to perform a search, as shown in Figure 1-20.

Figure 1-20 Add-on search/install page
Click Add to Firefox to install the extension called Ad-Blocker. A confirmation window will appear, as shown in Figure 1-21. Click Install.

Figure 1-21 Confirmation screen
This brings up the Ad-Blocker home page, as shown in Figure 1-22.

Figure 1-22 Ad-Blocker home page
Now go back to the ad test page at http://simple-adblock.com/faq/testing-your-adblocker/ . All those red “ads” will have turned to green, indicating that ads are being blocked, as shown in Figure 1-23.

Figure 1-23 No more ads
Some web operators are getting smart. They detect ad blockers and refuse to show you their content until you turn them off. To disable the blocker for a single page, click the down arrow next to the blocker icon and select “Disable on this page only.” Figure 1-24 shows you the steps.

Figure 1-24 Disabling some ad blocking
Using Video DownloadHelper
Video DownloadHelper is an add-on designed to combat the “pausing” that occurs when you download shows, and it works on YouTube and most other steaming providers. It also lets you download videos for offline use when you don’t have access to the Internet.
For example, have you ever started watching a movie from a slow server in another country and have to deal with the video continually pausing? Video DownloadHelper lets you download your shows and watch them offline with no buffering.
Getting Video DownloadHelper
You can get Video DownloadHelper for Firefox via the Add-ons menu using the same techniques you used to get Ad-Blocker. Searching for videodownload helper in the extension manager results in the screen shown in Figure 1-25.

Figure 1-25 Search results with Video DownloadHelper
After installation, you will be taken to the Video DownloadHelper home page , as shown in Figure 1-26.

Figure 1-26 Video DownloadHelper home page
Now let’s go to a web page with video content, such as YouTube , as shown in Figure 1-27.

Figure 1-27 A popular video web site (source: public domain)
Let’s play a video. Notice that the Video DownloaderHelper icon becomes active (changes to a color icon). Click this icon to bring up the download menu. It lists the various videos that are available. Click a selection to download it. This will open a dialog asking you where to save the result, as shown in Figure 1-28.

Figure 1-28 “Save file” dialog
Sometimes the Video DownloaderHelper needs the help of an external program to convert the video. When that happens, a pop-up dialog (Figure 1-29) will appear asking you to install it.

Figure 1-29 Converter request
Clicking “Install converter” takes you to the screen in Figure 1-30, which allows you to download the given program.

Figure 1-30 Download page
After downloading, click the Download icon and select the ConverterHelper.exe entry to install it, as shown in Figure 1-31.

Figure 1-31 Installing the helper
Now all you have to do is to start a video, and you can download it. Then close the window (but not the browser) and let the download finish. Watch it at your leisure. This avoids the buffering problem and other issues caused by slow servers and a long Internet connection to Hong Kong, for example.
Using Other Firefox Features
There are lots of other features available for Firefox. It has been designed to be highly customizable and highly extensible. In fact, you can customize its appearance until it’s almost unrecognizable.
There are thousands of add-ons, including custom search tools, download managers, games, and translation tools.
Summary
The best thing about Firefox is that it was written by people who want a good web browser, not one designed by a marketing department and not one designed to steer you toward certain web pages or search results. The designers wanted a web browser to make web surfing better. For the most part, the Firefox designers have succeeded in that goal.