
13
snatcher: the autonomous robotic arm
Previous chapters taught you a great deal about programming NXT robots. Now that you’ve reached an advanced level of programming, you’re ready to build some more complicated robots in this and the next chapters. This chapter will teach you to build the Snatcher, an autonomous robotic arm that can find and pick up objects, as shown in Figure 13-1.
The Snatcher uses two NXT motors to control a set of treads, allowing the robot to move in any direction. You control its movement like you controlled the Explorer in Chapter 4 by adjusting the power and direction of the Driving motors to control the robot’s speed and driving direction (as shown in Figure 4-4).
understanding the grabber
Driving around on treads may be interesting, but the really cool part of this robot is its multifunctional grabber. Normally grabbing and lifting objects requires two motors: one to grab the object and another to lift it. The Snatcher robot requires just one motor (which I call the Grabber motor) to accomplish both tasks, because of a unique construction of LEGO beams, axles, and gears. You’ll take a look at this technique now, but you will really understand how it works when you build the robot.
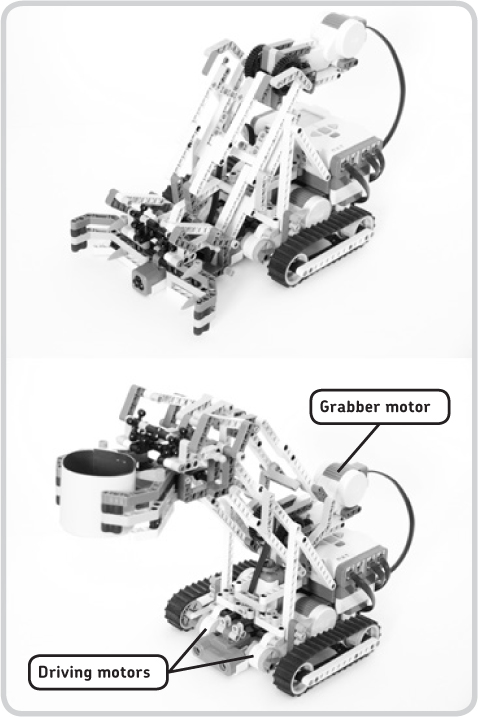
Figure 13-1: The Snatcher can find and pick up objects.
the grabbing mechanism
Figure 13-2 shows how the Snatcher grabs objects. As the NXT motor spins forward, a small gear (indicated with a number 1) makes a bigger gear (2) rotate in the direction shown by the arrow in the figure. This rotation starts a chain reaction of moving beams, which ultimately causes the grabber to grasp objects positioned between its fingers (6). When the motor spins backward, the reverse occurs, and the grabber opens. The beams marked 3, 4, and 5 simply transfer the rotational movement of the motor to the grabber so it can close its claws. Construction 4 connects the beams numbered 3 and 5 in order to allow smooth movement, even when the grabber arm is positioned as shown in the second image of Figure 13-1.
the lifting mechanism
Once the Snatcher has grabbed an object, it can lift it. But before you look at how the robot does this, you’ll see a simplified version of the situation.
As shown on the top of Figure 13-3, as you move the big gear (2) with your hand, the beams numbered 7, which represent the grabber and the motor, move as indicated by the gray arrows. No matter what the movement is, these parts remain parallel to the ground, and the parts labeled 8 remain perpendicular to the ground. To really understand how this works, build the structure shown with the parts in your NXT robotics kit.
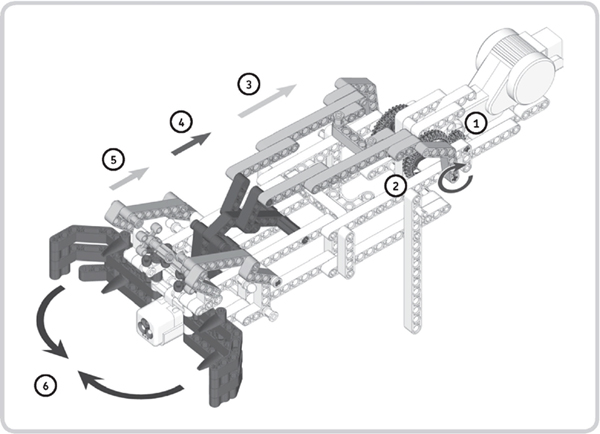
Figure 13-2: Grabbing objects by turning the motor forward
This mechanism works only because gear 2 does not move relative to the beam labeled 9, since they’re connected with a pin (10) as shown in the figure (it makes parts 2 and 9 form one fixed part). So, turning gear 2 directly makes the beam labeled 9 move.
The bottom of Figure 13-3 shows how the Snatcher lifts objects. The mechanism is actually quite similar to the one shown on the top, except that the real Snatcher doesn’t have this pin (10), which would turn parts 2 and 9 into one fixed part, enabling the gear (2) to directly control the beams labeled 9. This robot uses different parts to lock the beams to the gear.
Once the Snatcher has grabbed an object, the parts labeled 10 (shown on the bottom of Figure 13-3) no longer move as they did in Figure 13-2. Instead, they lock in position and move just like the beams numbered 9 shown in this image. Since the gear (2) is connected to the number 10 parts, it is now indirectly also connected to the number 9 parts (because the constructions are fixed), and the robot can lift objects.

Figure 13-3: Once the Snatcher has grabbed an object, it can lift it. Here is a simplified overview of the lifting technique (top), with an illustration of the actual robot (bottom).
building the snatcher
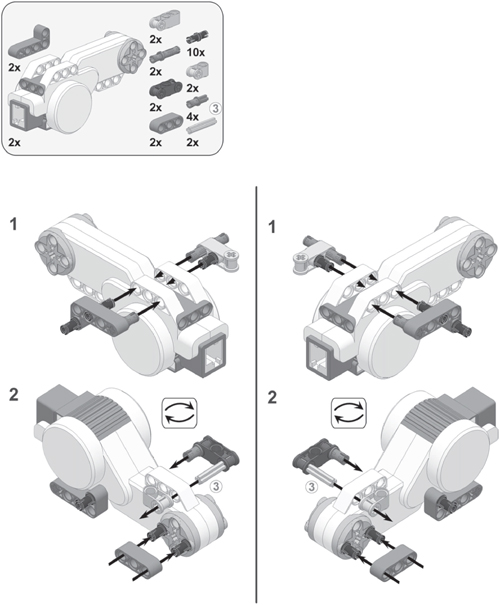
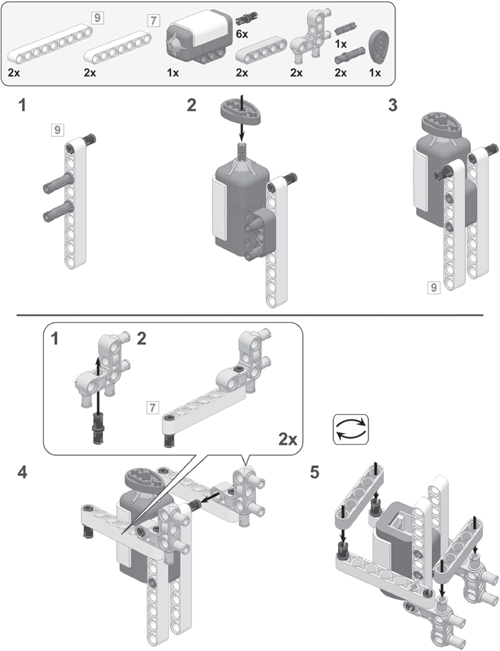
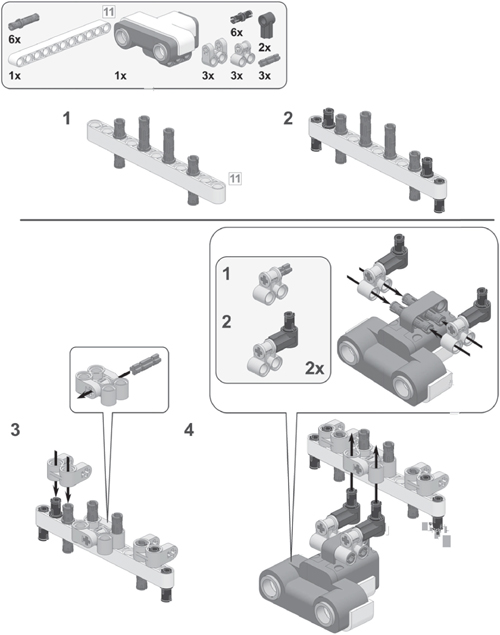
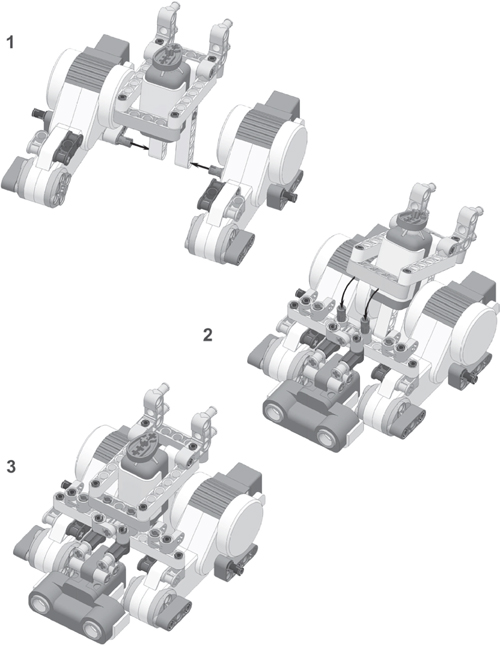
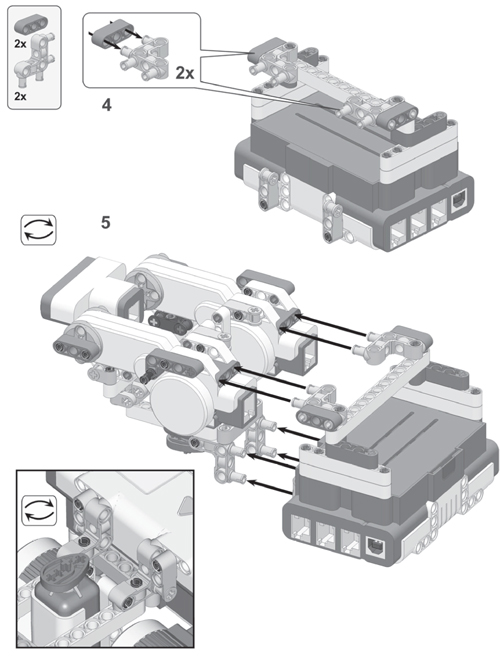
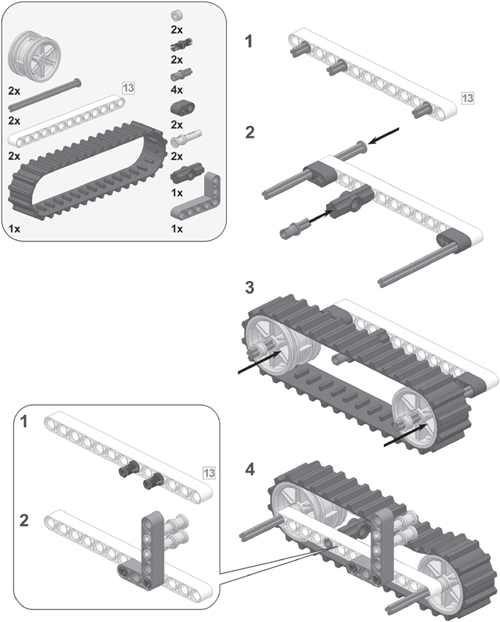
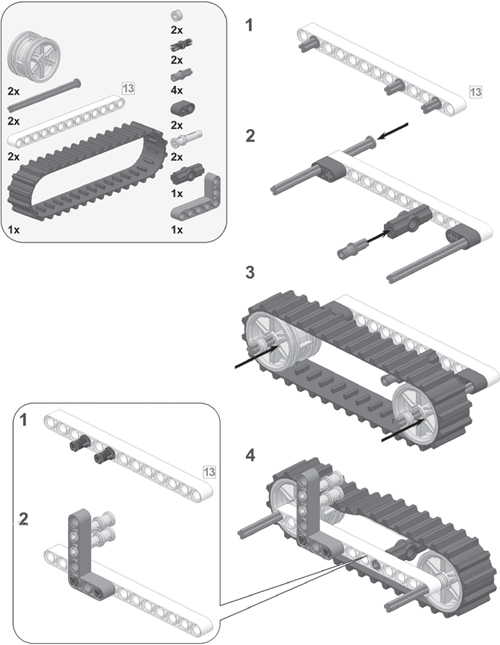
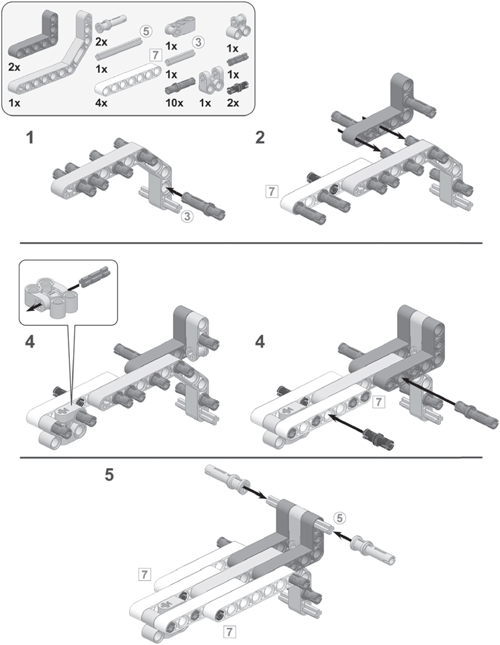
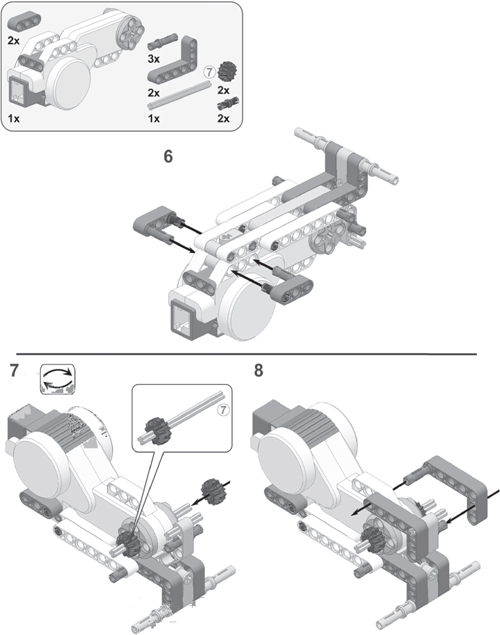
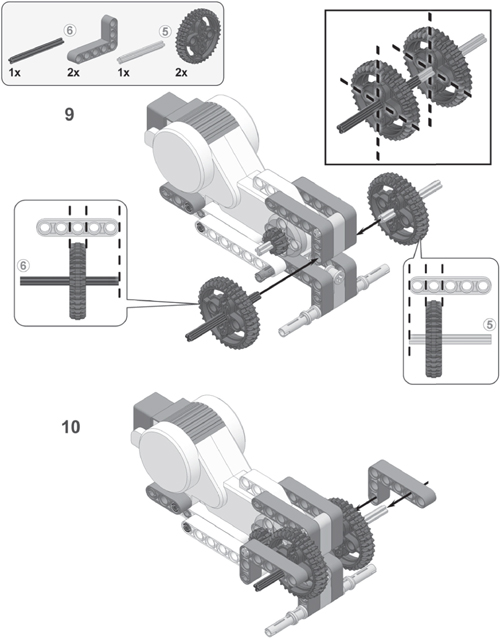
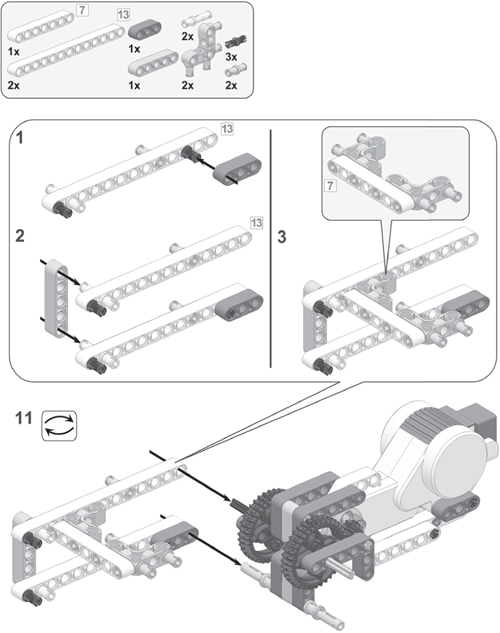
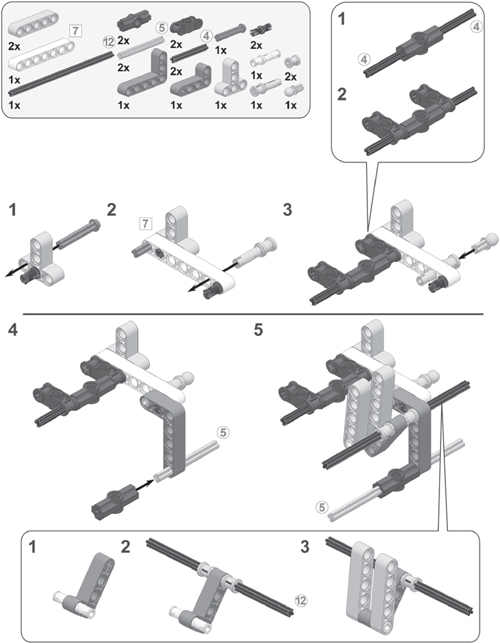
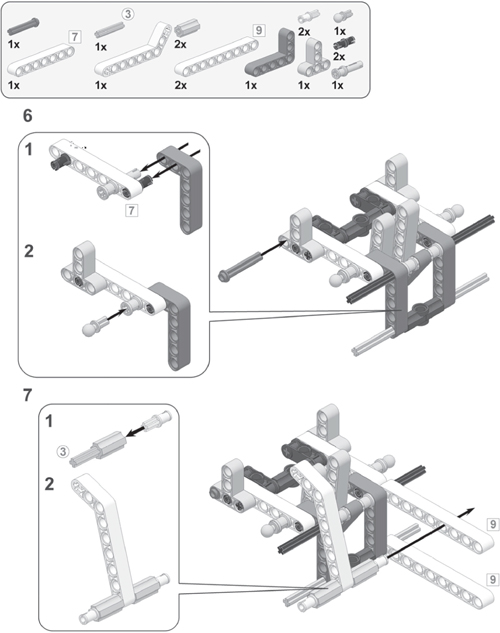
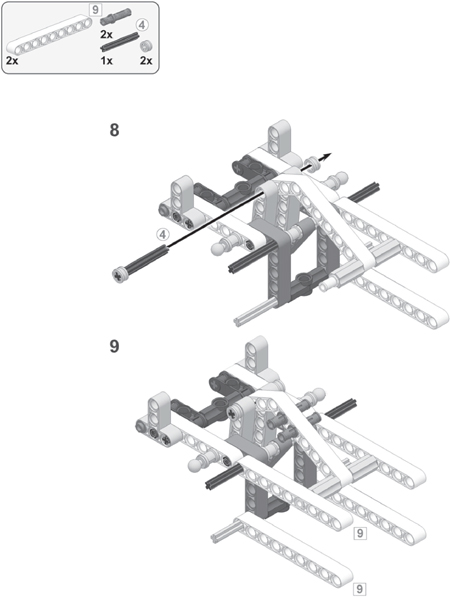
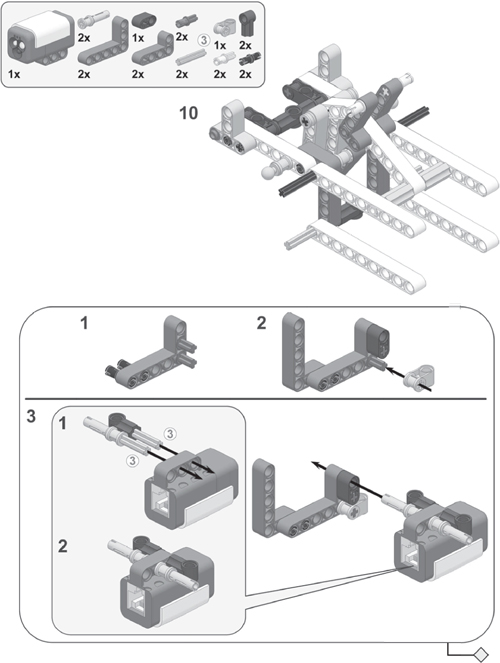
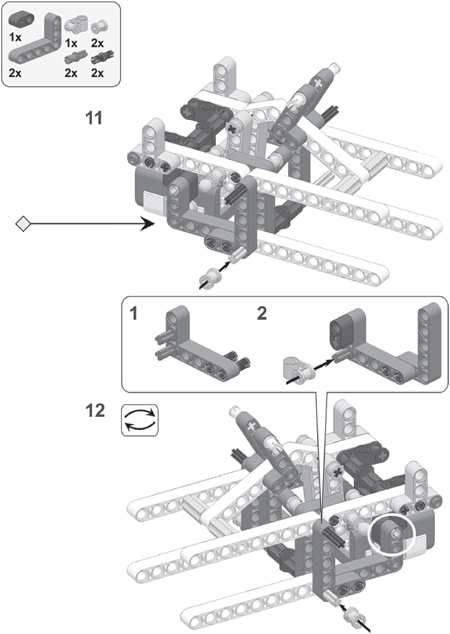
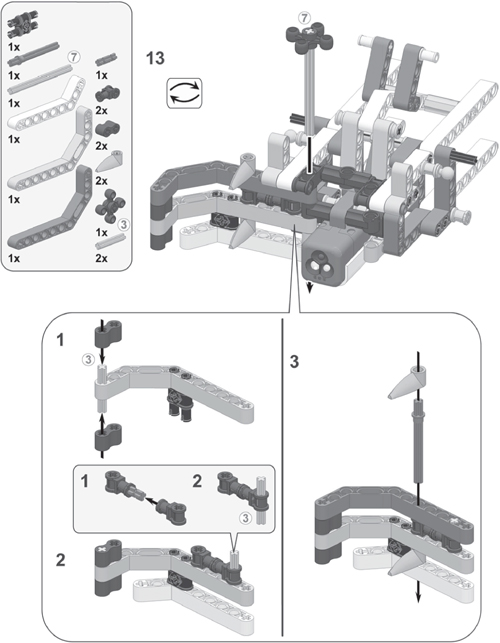
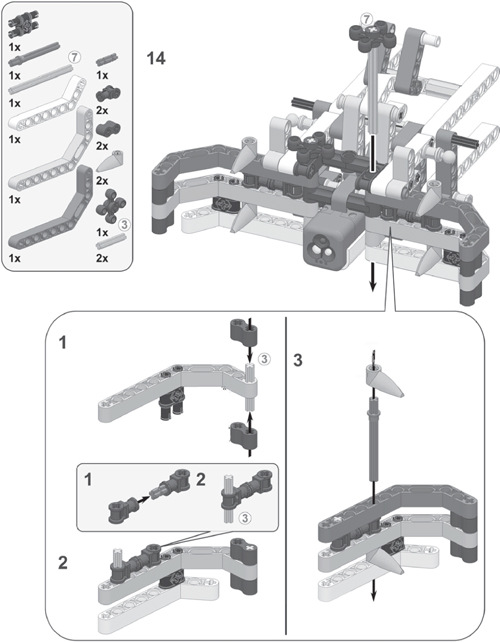
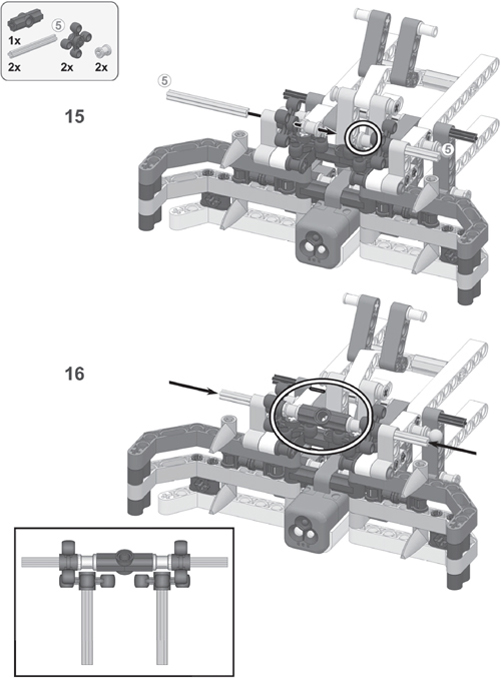
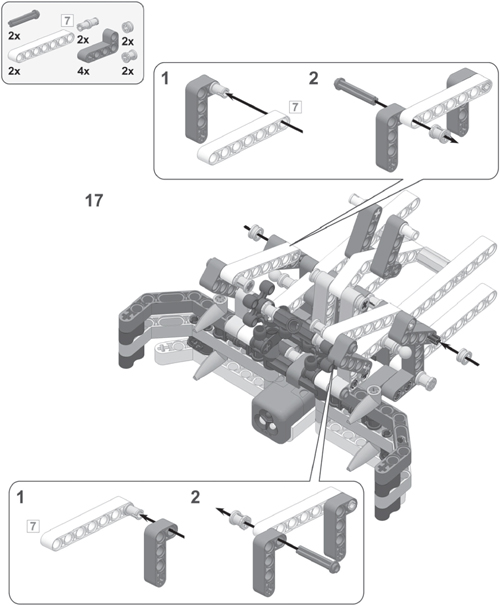
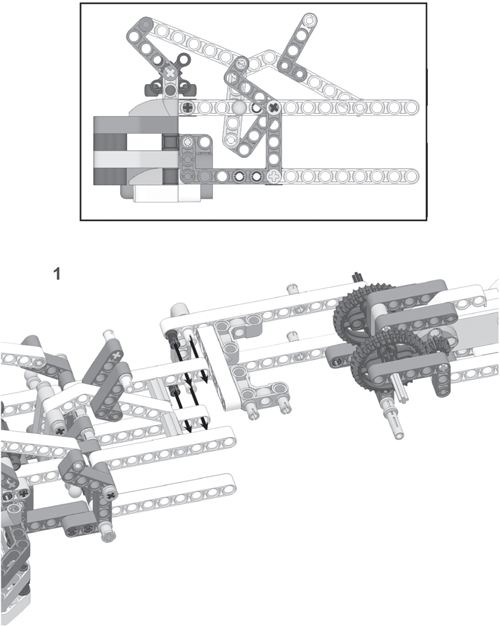
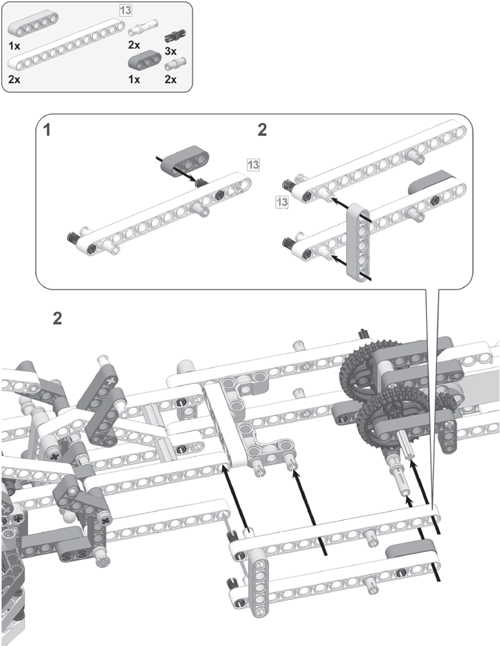
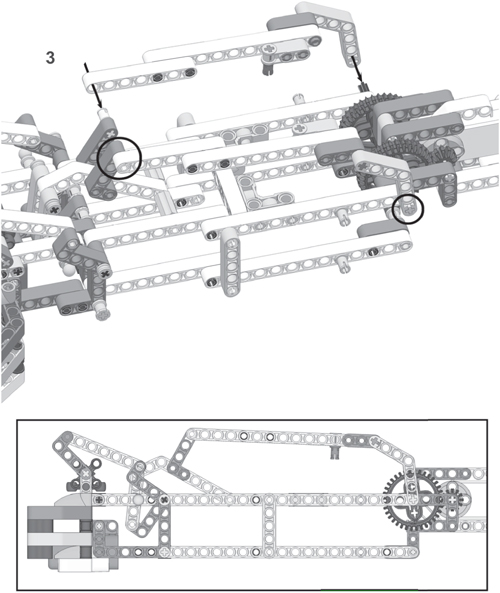
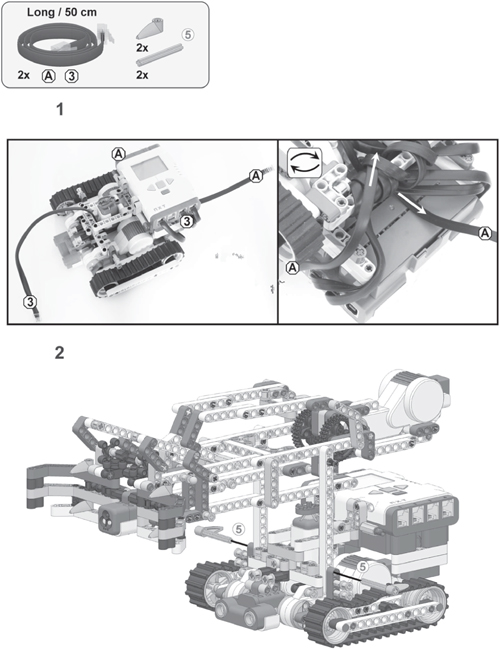
Now that you’ve gotten a sense of how the Snatcher’s grabber mechanism works, it’s time to build the robot to learn how it really works. To do so, follow the directions on the next pages, but first select the pieces you’ll need, as shown in Figure 13-4.
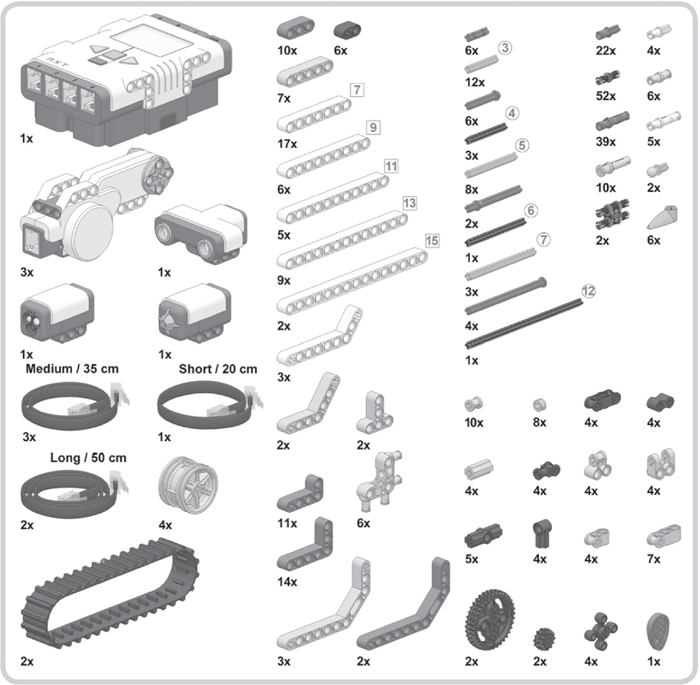
Figure 13-4: The required pieces to build the Snatcher


creating objects
You can modify the Snatcher’s arm to grab almost anything as long as the object isn’t too heavy, but the version you’ve just built is designed to pick up paper rings, like the ones shown in Figure 13-5. Use construction paper to make about four paper rings in different colors (yellow, blue, red, and green) before you program the robot.
programming the snatcher
Having built the Snatcher and created objects for it, you’re ready to program it. You’ll create a program that makes the Snatcher find, grab, lift, and move an object, as well as identify the object’s color. Each task should run autonomously, which means that all tasks must be performed without human interaction.
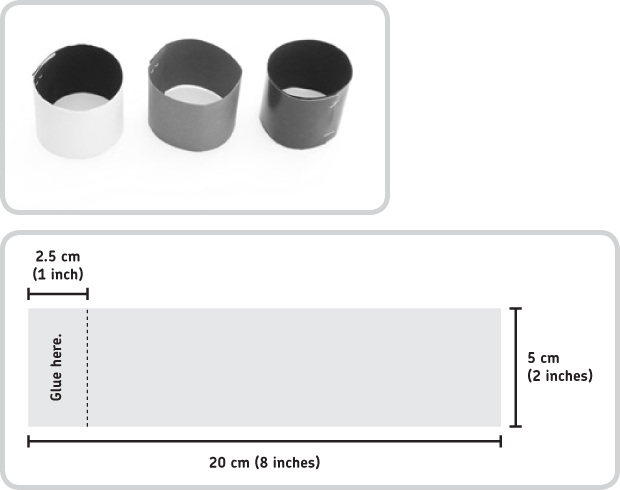
Figure 13-5: The Snatcher will grab these objects. Instead of gluing the objects, you may also staple them. If you don’t have construction paper in different colors, pick thick paper of any color, such as black or brown, and staple or glue lighter-weight, colored paper around it.
You’ll use the Ultrasonic Sensor to find the object and use the Driving motors to approach the object and position it between the robot’s fingers. The Grabber motor will grab and lift the object, and the Color Sensor will identify the color of the object that was picked up. Finally, the robot will turn around and then drop the object elsewhere. Figure 13-6 shows an overview of the Snatcher program.
creating the my blocks
Because this program will require many programming blocks, you’ll use five My Blocks to make the final program easier to understand and create, as shown in Figure 13-6.
NOTE If a programming figure in this chapter doesn’t mention changing a particular setting on a block, just leave that setting unchanged.
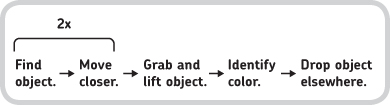
Figure 13-6: An overview of the Snatcher program. Note that the robot searches for the object and moves closer to it twice. After the first search and approach, the robot has a better view of the object, which allows it to more precisely find the object’s position during the second search.
my block #1: grab
This block will make the robot grab and lift the object positioned between the robot’s fingers. If there’s nothing to grab, this block simply closes and raises the grabber.
You configure the Grabber motor to turn forward until the Touch Sensor inside the Snatcher detects that the grabber is lifted all the way up. Configure the blocks that do this as shown in Figure 13-7, and then turn them into a My Block called Grab. (Also, select some appropriate icons to make it easier to remember what the blocks do.)
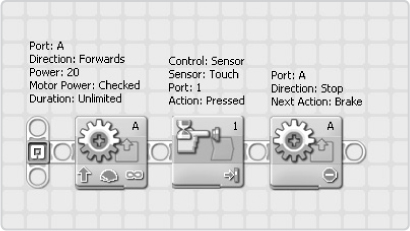
Figure 13-7: The configurations of the blocks in the Grab My Block
my block #2: release
This next My Block lowers the robot’s grabber and opens its claws, releasing the object.
You should use this block only when the grabber is already lifted up (because of the Grab My Block). Although only one block is required to release an object, you’ll create a My Block for this action to make the main program easier to understand. Configure the block as shown in Figure 13-8, and then turn it into a My Block called Release.
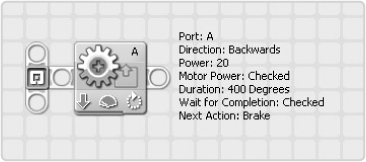
Figure 13-8: The configuration of the block in the Release My Block
my block #3: find object
Figure 13-9 shows how the Snatcher finds objects. When pinpointing objects, Snatcher looks for the closest object in range while turning to the right. After scanning, it turns in the opposite direction to the point where it saw the closest object. Once the Snatcher has run this block, it should be facing the object.
As the robot turns for 180 degrees, the Ultrasonic Sensor constantly measures distances. The lowest value it records is the distance to the object, and you store it in a variable called Closest. You set Closest’s initial value to 256 (cm) because the sensor cannot measure anything farther away. Any time the sensor measures a distance closer than the value in Closest, the old value is thrown away, and the new sensor measurement is stored. This way, you have the robot forget all but the closest measurement.
The values of the motors’ Rotation Sensors change as the robot turns. Because the robot needs to remember where it saw the closest object, you store the Rotation Sensor value of motor C in a variable called Direction whenever the Closest value is updated with a new value. In the end, the Direction variable should contain the value of the Rotation Sensor as measured when the robot saw the closest object. After turning for 180 degrees, the Snatcher turns left and stops when the Rotation Sensor value equals that of the Direction variable. When it stops, the robot should point straight at the object and be ready to approach and grab it.
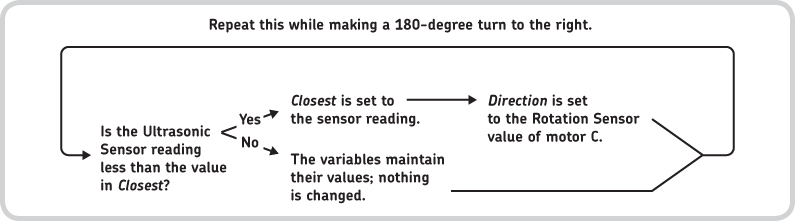
Figure 13-9: Finding the closest object in range
Define two variables called Closest and Direction (both numerical variables), configure the required blocks to find objects as shown in Figures 13-10 to 13-12, and then turn them into a My Block called Find Object.

Figure 13-10: These blocks prepare the Snatcher to find objects: the robot turns left, initializes the variables, resets the rotation sensor in motor C, and starts turning right.
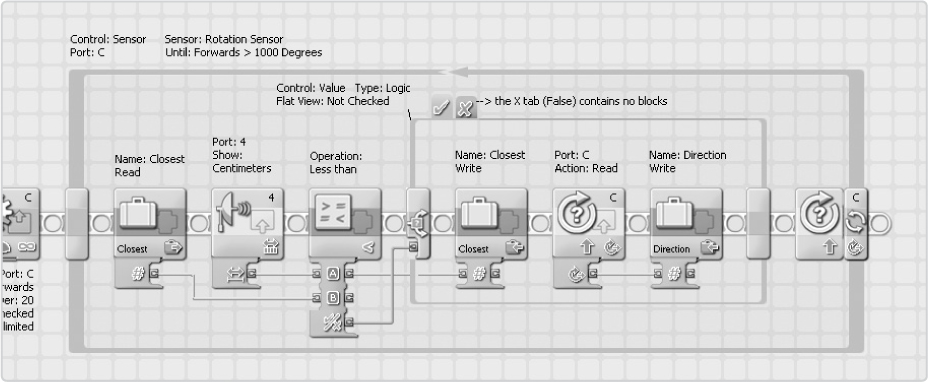
Figure 13-11: These blocks take care of searching for objects, as discussed in Figure 13-10.
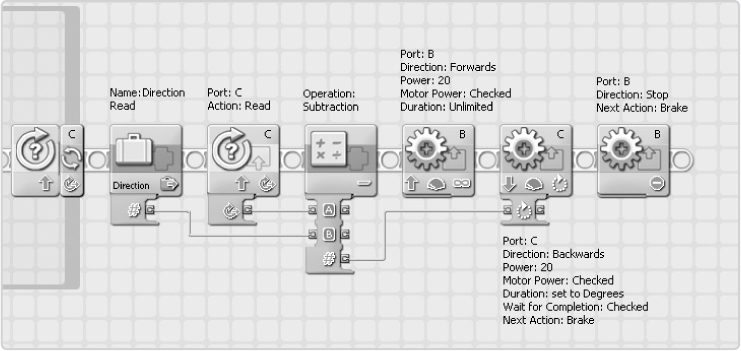
Figure 13-12: Once the search completes, these blocks make the robot return to the place where it spotted the closest object.
my block #4: move closer
This block makes the Snatcher move closer to the found object, based on the previously measured distance to it. If the object is far away, the Snatcher moves farther than when it is close already. To accomplish this, a Math Block multiplies the value of the Closest variable by 45 and transfers the result to the Duration setting of the Move Block. For example, a closest recorded distance of 10 cm would make the robot approach the object by turning the motors 450 degrees, while a measurement of 5 cm would make it turn only 225 degrees.
Configure the required blocks to make this movement as shown in Figure 13-13, and turn them into a My Block called Move Closer.
my block #5: say color
This My Block simply plays a sound file (such as “Red”) based on the detected color of the object. You may have already created this block. If you haven’t, do so by following the directions in Figure 7-16, or download it from the companion website.
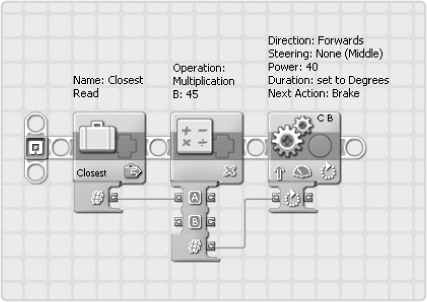
Figure 13-13: The configurations of the blocks in the Move Closer My Block. To be able to select Closest in the Variable block, you may need to define this variable again.
creating the final program
Now that you’ve created your My Blocks, you can use them to create the main program (shown in Figure 13-6) to make the Snatcher autonomously find, grab, lift, and move an object. Figure 13-14 and Figure 13-15 show how to create the final program.
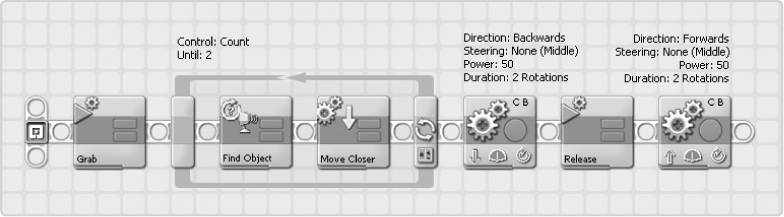
Figure 13-14: Before the robot starts looking for objects, it lifts up the grabber (using the Grab block) so that the Ultrasonic Sensor’s sight isn’t blocked by the grabber. After searching and before grabbing an object, it lowers the grabber (Release). The Move Blocks here prevent the grabber from crushing the object when it is being lowered.
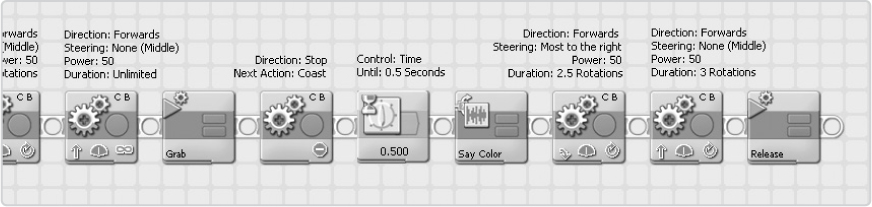
Figure 13-15: The next step is to grab the objects. To make sure that the object remains positioned between the robot’s fingers, the Snatcher moves forward as it grabs. Next it identifies the object’s color and drops it elsewhere.
troubleshooting the snatcher
If the Snatcher’s program isn’t functioning properly, carefully reconfigure the blocks or download (and examine) a functioning program from the companion website.
If the grabber arm on the Snatcher doesn’t seem to work properly, you may have connected some LEGO parts too tightly. Try removing the small gray part as shown in Figure 13-16 to free up some space around the dark gray beam that connects to the axle.
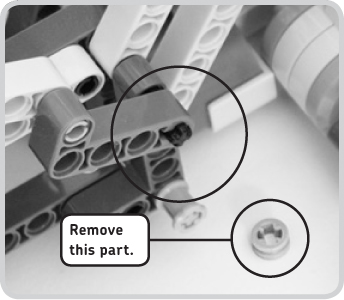
Figure 13-16: Remove the part shown here and then free up space around the highlighted dark gray beam if the Snatcher’s grabber jams while trying to grab something.
further exploration
You’ve just completed one of the most complex robots in this book. Congratulations! Now that you’ve built and programmed it, you’re probably looking for more things to do with the Snatcher. The following discoveries will help you further improve your programming and building skills.
NOTE The Snatcher’s grabber was specifically designed to grab the objects you’ve used in this chapter, but you can easily modify it to grab anything you like, as long as it is not too heavy. To begin, remove the orange teeth-shaped parts from the Snatcher’s grabber, and extend the fingers by adding extra LEGO beams.