
14
hybrid brick sorter: sort bricks by color and size
The LEGO MINDSTORMS NXT 2.0 robotics kit comes with instructions to build a robot that sorts the colored balls in the set. This chapter goes a bit further by showing you how to build and program a sorter that sorts by both color and size. The Hybrid Brick Sorter robot separates regular LEGO bricks (2-by-4 studs) from smaller bricks (2-by-2 studs) and also separates red, yellow, green, and blue bricks, as shown in Figure 14-1. It drops each type of brick into different buckets or simply onto different places on the ground as shown in the figure.
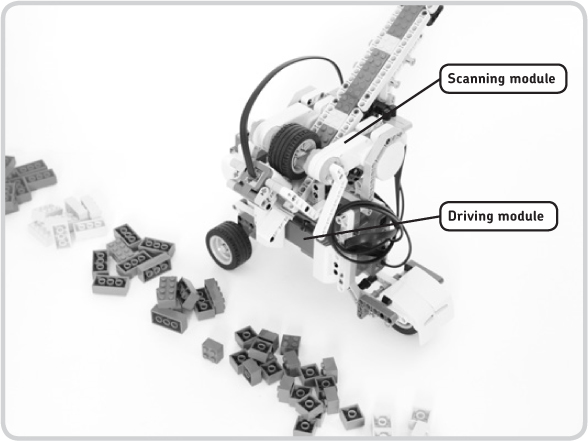
Figure 14-1: The Hybrid Brick Sorter sorts LEGO bricks by color and size.
understanding the sorting technique
The Brick Sorter consists of two modules, as shown in Figure 14-1: the Scanning module, which identifies the size and color of each brick, and the Driving module, which moves the robot toward the appropriate bucket to drop the brick.
the driving module
The Driving module navigates the robot to different buckets before it drops the bricks by turning the Driving motor as shown in Figure 14-2. The motor’s Rotation Sensor tells the NXT where the robot is positioned.
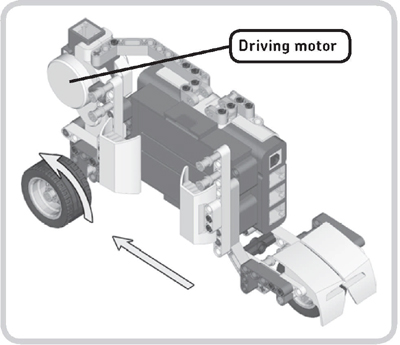
Figure 14-2: The Driving motor allows the robot to move back and forth in a straight line between different buckets. The arrows show what happens when the motor turns forward.
the scanning module
The Scanning module identifies the color and size of a LEGO brick and drops the brick once the robot has moved to the correct bucket. Before the bricks are sorted, they’re stacked in the chute, and the sorter wheel prevents the bricks from sliding down, as shown in Figure 14-3. As this sorter wheel rotates, one brick slides down the chute until it is stopped by the brick lock. At this point, the Color Sensor identifies the brick’s color, after which the brick lock is raised, and the brick falls out of the sorter into the appropriate bucket.
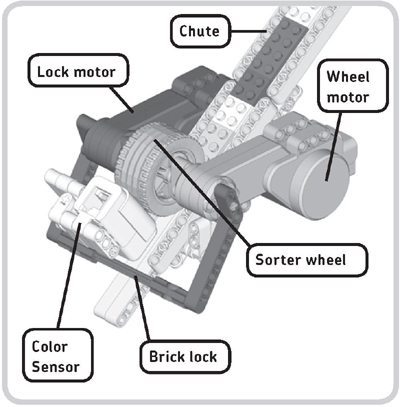
Figure 14-3: The Scanning module. Some parts have been removed here for clarity.
identifying a brick’s size
You’ve just learned how the sorter reads the color of a brick, but how do you find its size? The answer lies in how much the sorter wheel should turn in order to let one brick slide down to the Color Sensor, where it is scanned. Tests with the sorter show that turning the Wheel motor (and thus the sorter wheel) by 46 degrees is just enough to let one small brick (2-by-2 studs) slide down toward the brick lock. A big brick (2-by-4 studs) requires a 92-degree turn in order to reach the sensor.
You identify the size of a brick by first turning the sorter wheel by 46 degrees. If you do this and the Color Sensor then sees a brick, you know that you have a small brick; if it doesn’t, you have a big brick. (The sensor knows that it sees a brick when it doesn’t see the white chute in the background.) If you have a big brick, the sorter wheel should turn another 46 degrees to allow the brick to slide down to the sensor, as shown in Figure 14-4. Once the sorter knows which brick it is dealing with, it moves to the correct bucket, and the brick lock is raised to release the brick.
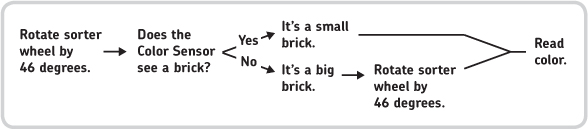
Figure 14-4: Finding the size and color of a brick
building the hybrid brick sorter
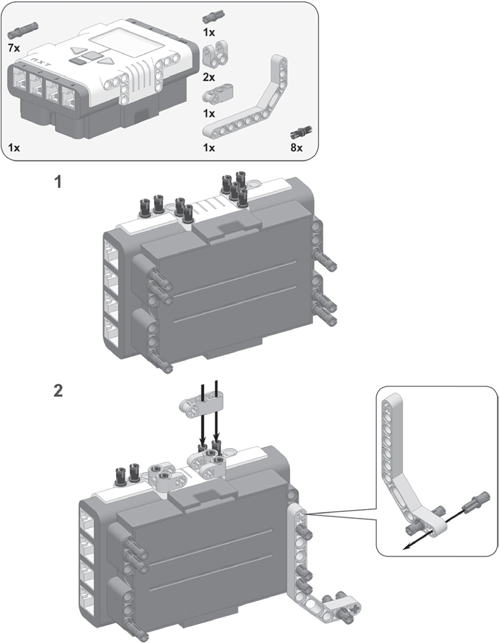
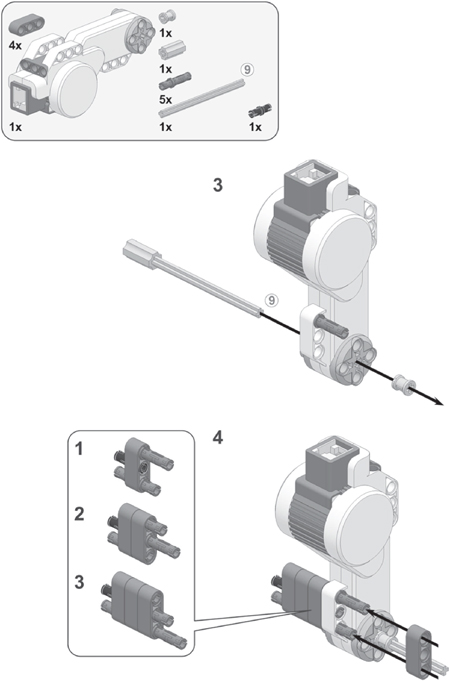
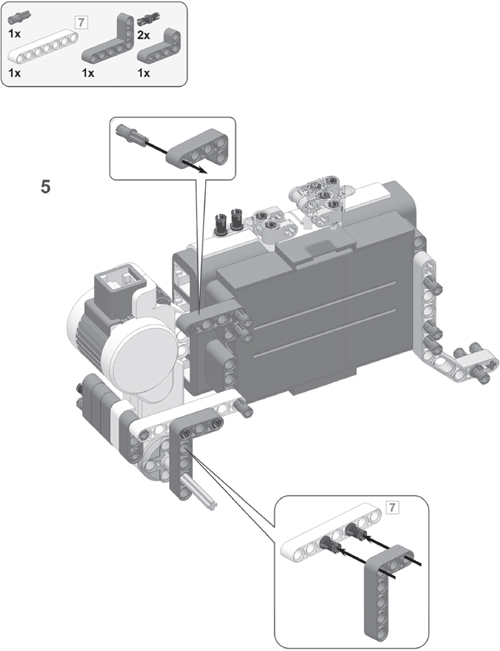
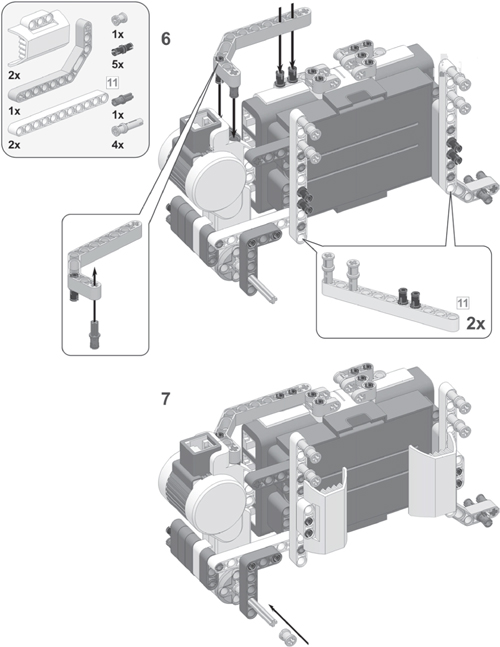
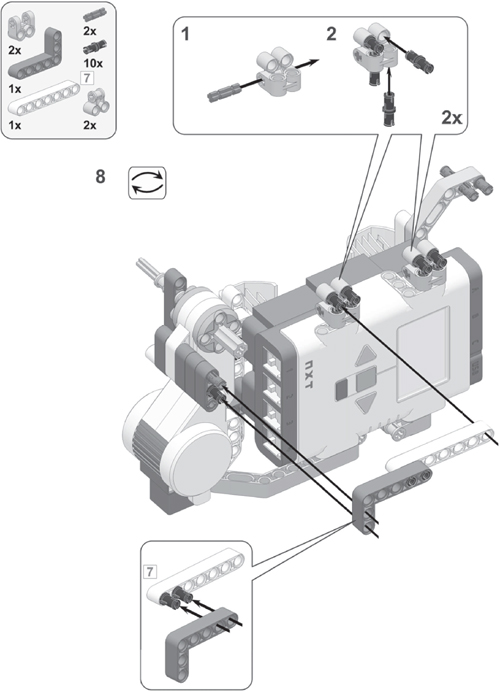
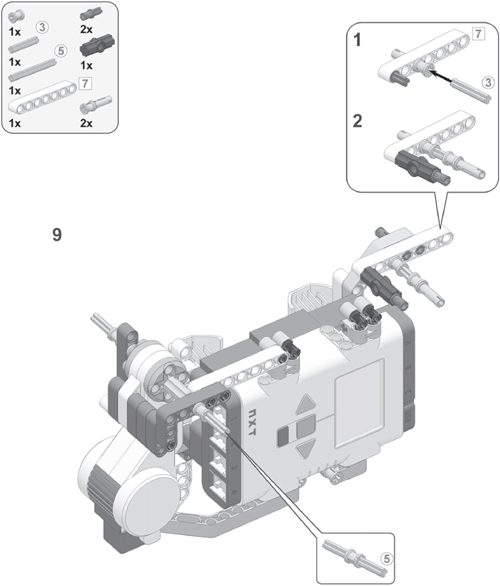
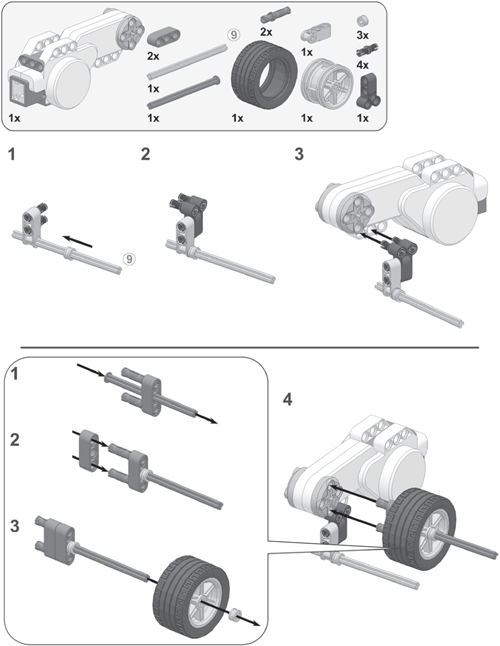
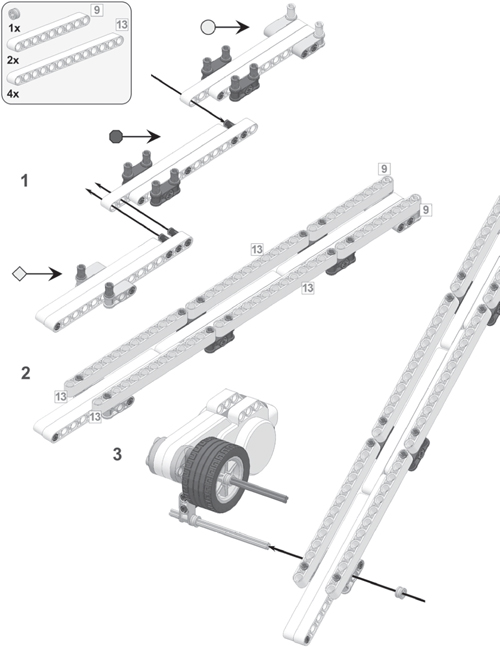
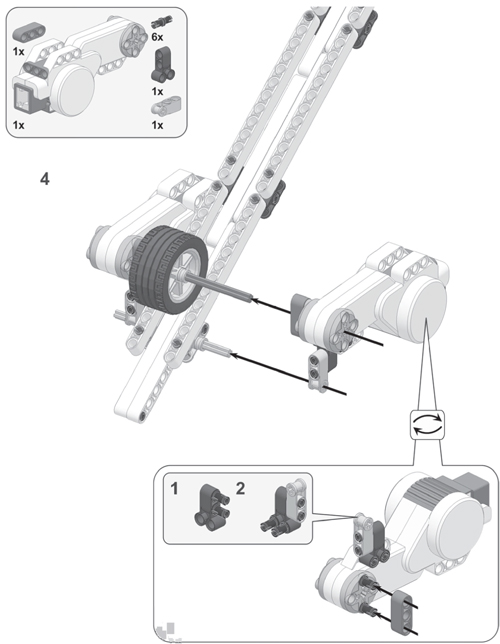
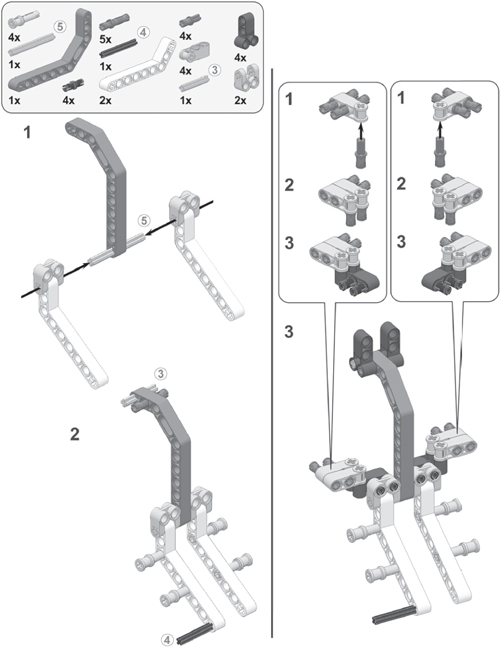
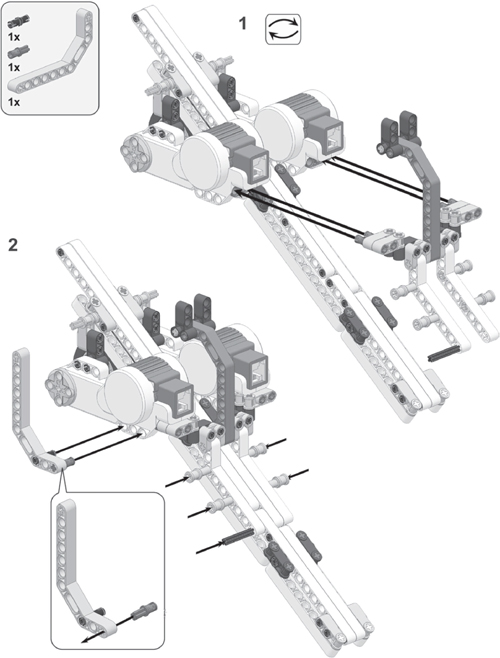
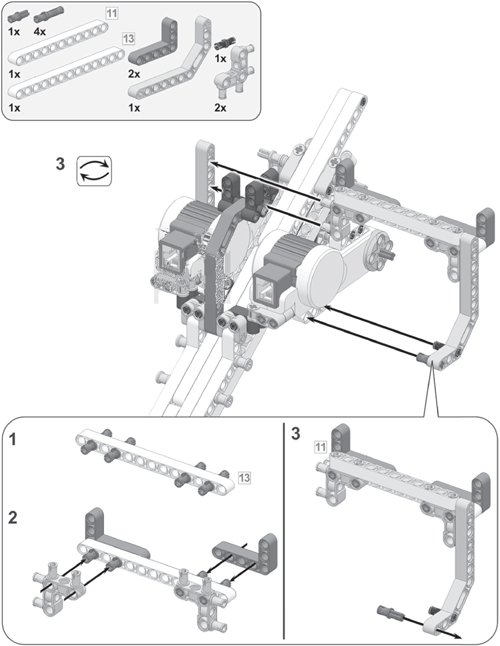
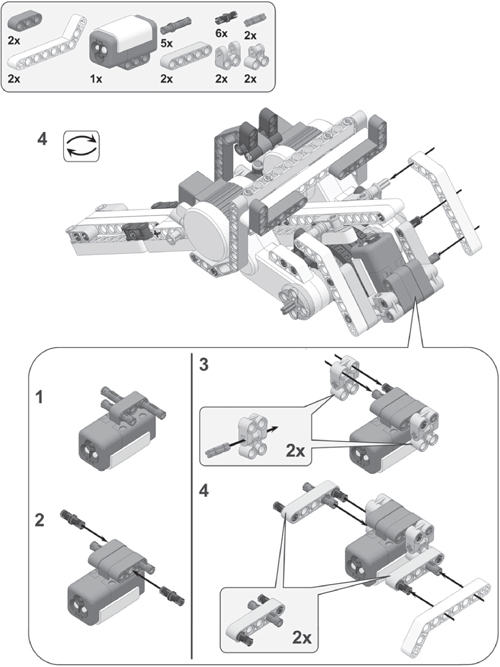
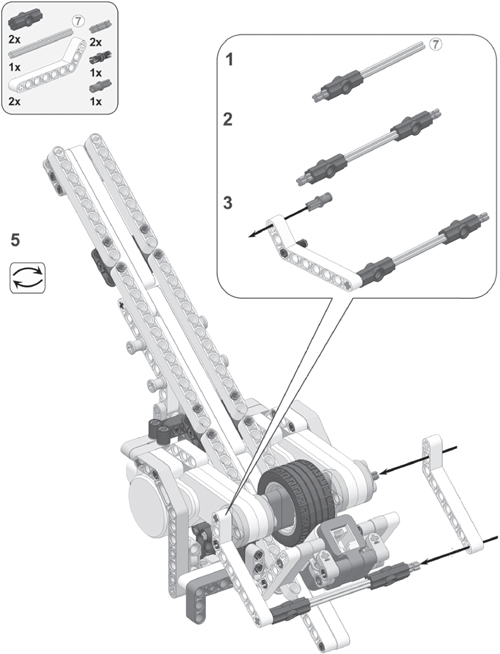
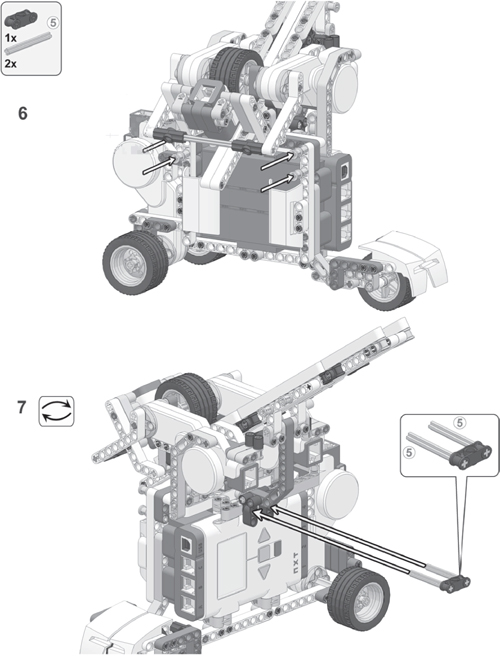
Before you build the sorting machine, select the required pieces, as listed in Figure 14-5. Once you have all your pieces, follow the building instructions to build it.
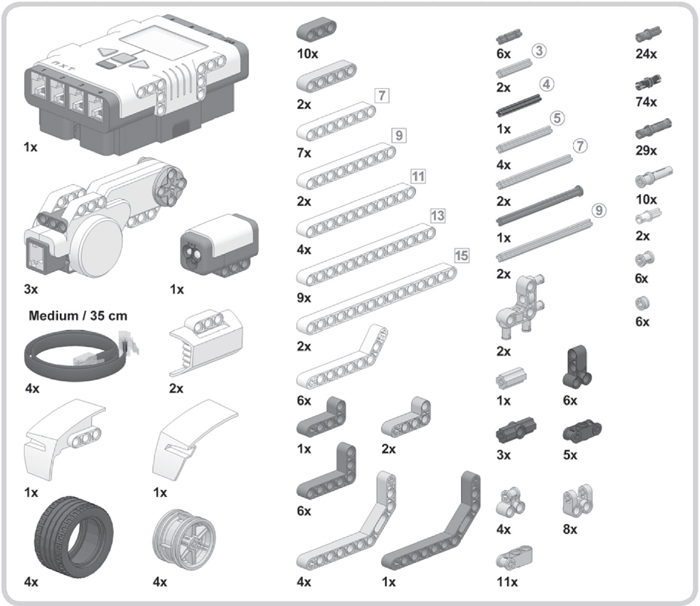
Figure 14-5: The required pieces for the Hybrid Brick Sorter


connecting the cables
Having built the sorting machine, it’s time to connect the cables, as shown in Table 14-1. Make sure not to connect the Color Sensor cable too tightly, or it will make the Color Sensor interfere with the sorter wheel.
table 14-1: cable placement for the hybrid brick sorter
From motor/sensor |
To NXT brick port |
Cable length |
Wheel motor |
Output port A |
Medium (35 cm/15 inches) |
Driving motor |
Output port B |
Medium |
Lock motor |
Output port C |
Medium |
Color Sensor |
Input port 3 |
Medium |
finding bricks to use with your sorter
Your Brick Sorter requires a handful of regular LEGO bricks in various colors and two sizes. The program you’ll create is designed to sort green, blue, red, and yellow bricks, and to separate 2-by-4 studs from 2-by-2 studs, but if you modify it slightly, you can make it sort black and white bricks as well. (If you don’t have these basic bricks in another LEGO set, visit the companion website for hints on finding them.)
finding buckets
Since your sorter will sort bricks in four colors and two sizes, you’ll need eight buckets to store the bricks. Make your own buckets out of paper or other LEGO bricks or use readymade buckets such as small cups, as shown in Figure 14-6.
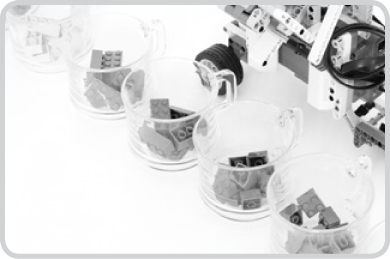
Figure 14-6: An example of buckets the machine can store its bricks in
programming the hybrid brick sorter
You’ll now program your machine to sort LEGO bricks. Figure 14-7 shows an overview of the complete Hybrid Brick Sorter program.
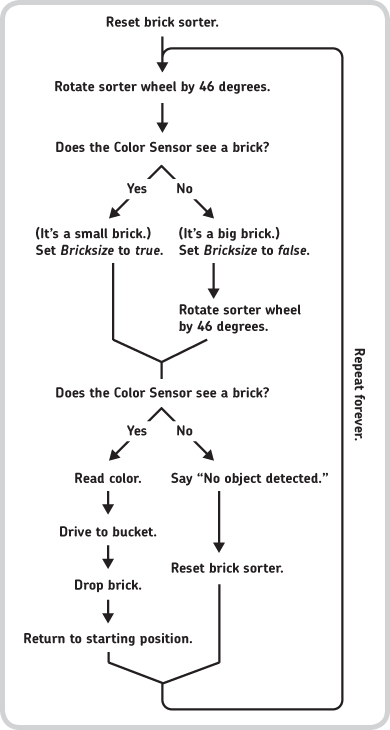
Figure 14-7: An overview of the program for the Hybrid Brick Sorter
Notice that this overview is an expanded version of the one in Figure 14-4. In addition to identifying the size of a LEGO brick, this program also checks to see whether there are any bricks left to sort. If the sorter wheel has turned 46 degrees twice and if the sensor still doesn’t see a brick, there are no bricks left to sort, or there’s been an error (that is, a brick got stuck). In this case, the sorter will report “No object detected!” and reset by turning the sorter wheel in the opposite direction so that bricks that got stuck can be sorted again. If there is no error and if the machine can identify the size and color of a brick, it proceeds to the appropriate bucket to drop the brick, after which it returns to its starting position to sort out the next brick.
creating the my blocks
You’ll create two My Blocks for this program—Reset Sorter and Drop Brick—both of which will contain a selection of programming blocks that you’ll use twice in the final program. You’ll also use the Say Color block that you created in Discovery #30 on page 80.
my block #1: reset sorter
The Reset Sorter block will prepare the sorting machine by first turning the sorter wheel in the direction opposite from the way that it normally turns while sorting, moving any potential error-causing brick back up the chute. It will also lower the brick lock if it’s raised and put the first brick from the chute directly under the sorter wheel to prepare it to be sorted. Configure the blocks that perform these actions as shown in Figure 14-8, and turn them into a My Block called Reset Sorter.
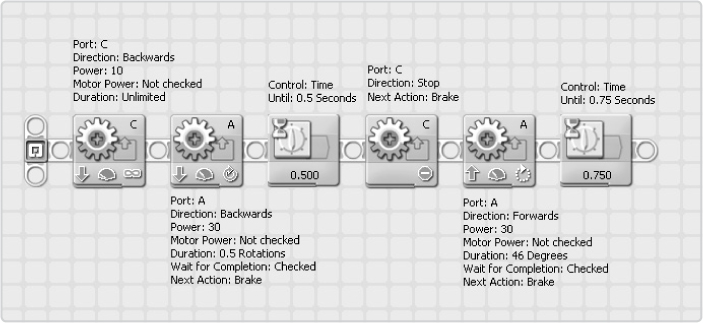
Figure 14-8: The configurations of the blocks in the Reset Sorter My Block
my block #2: drop brick
This simple block raises the brick lock, pauses the program to allow the brick to slide down to the bucket, and then lowers the brick lock again. Configure the blocks as shown in Figure 14-9, and then convert them into a My Block called Drop Brick.
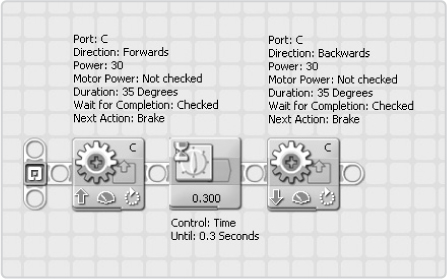
Figure 14-9: The configurations of the blocks in the Drop Brick My Block
creating the final program
Before you create your final program (see the overview in Figure 14-7), you’ll define a logic variable called Bricksize and a numerical variable called Bucket.
step 1: getting the brick’s size
You begin the program with the Reset Sorter My Block; you place all other blocks in a Loop Block configured to loop forever so that the robot will keep sorting bricks until you abort the program. You’ll first place the blocks that identify the brick’s size. If a small brick is detected, the robot says “Positive,” and the Bricksize variable is set to true. If a big brick is detected, the robot says “Negative,” and the variable’s value is set to false. Configure this part of the program as shown in Figure 14-10.
step 2: checking where there is a brick to sort
Continue by configuring the blocks that check to see whether a brick is available to be sorted. (The robot will know when it sees a color other than the white of the chute.) If no brick is available, the robot says “No object detected!” and the Reset Sorter block runs.
As shown in Figure 14-10, the program first rotates the sorter wheel by 46 degrees. If the robot spots a brick at this point, it knows that it’s a small one. If it doesn’t spot a brick, there’s either a big brick in the chute or none at all. To find out, the wheel rotates another 46 degrees, and the blocks that you add in this step check to see whether there is a brick to sort.
It might sound strange to first configure blocks to check the size of a brick (step 1) and to then check whether there’s a brick to sort at all (step 2), rather than reverse. However, the reverse is impossible: If you were to check the availability of a brick first, that brick would already have moved all the way down to the brick lock, making it impossible to check its size.
Configure this part of the program as shown in Figure 14-11.
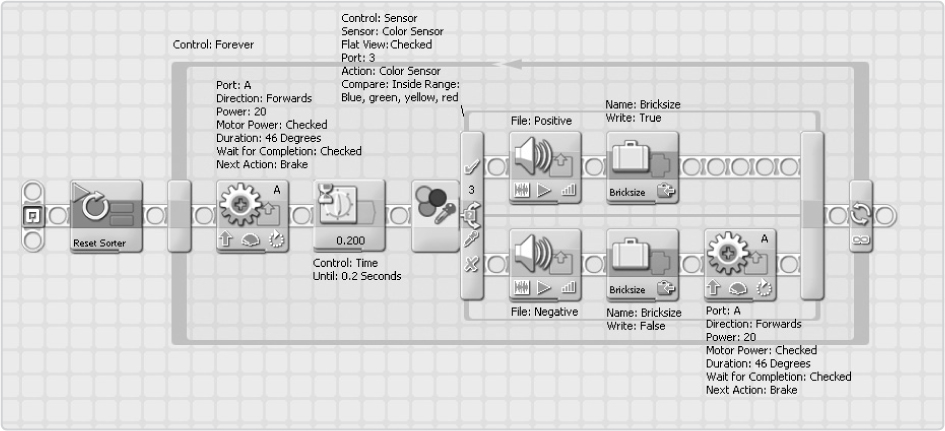
Figure 14-10: The configuration of the blocks that identify the brick’s size. The Wait block shown here gives a small brick some time to slide down to the Color Sensor before the sensor detects it.

Figure 14-11: The configuration of both the blocks that check whether a brick is available to be sorted and the blocks that run when there isn’t a brick left to sort
step 3: calculating the position of a bucket
Now you’ll configure the blocks that run when the Color Sensor sees a brick. Figure 14-1 (page 237) shows how the bricks end up if you run this program. Notice that the sorter drops small bricks to the right and big bricks to the left of the starting position (in between the big and small blue bricks).
For example, when sorting large green bricks, the driving motor moves forward a certain number of degrees to reach the appropriate bucket. It moves the same number of degrees when sorting small green bricks, but in the opposite direction. The programming blocks in this step calculate this number of degrees based on the detected color and stores that number in the Bucket variable. Configure the blocks in this step as shown in Figure 14-12.
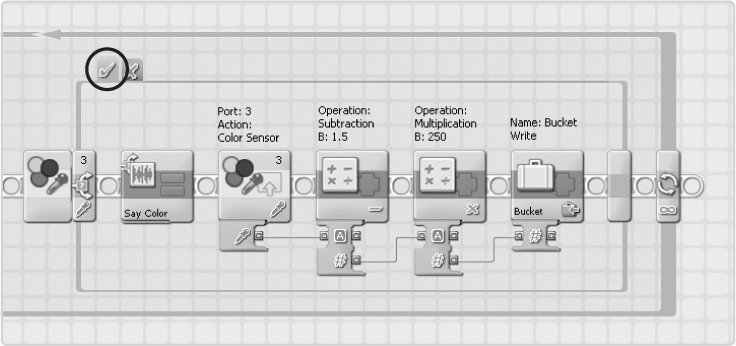
Figure 14-12: The configuration of the blocks that find the right bucket position based on the detected color
step 4: dropping a brick in the right bucket
Once you know how many degrees you need to move in order to reach the right bucket, you use this number together with the value in the Bricksize variable. You transfer the value in Bricksize to a Switch block specified to run the blocks in the upper part of the switch when the Bricksize variable is true (a small brick) and specified to run the blocks in the lower part of the switch when the value is false (a big brick).
The blocks in the switch make the robot drive toward the bucket (based on the value in the Bucket variable), drop the brick, and then return to the starting position. You use a Wait block in the loop to pause the program briefly each time it sorts a brick. Configure the blocks in this step as shown in Figure 14-13.
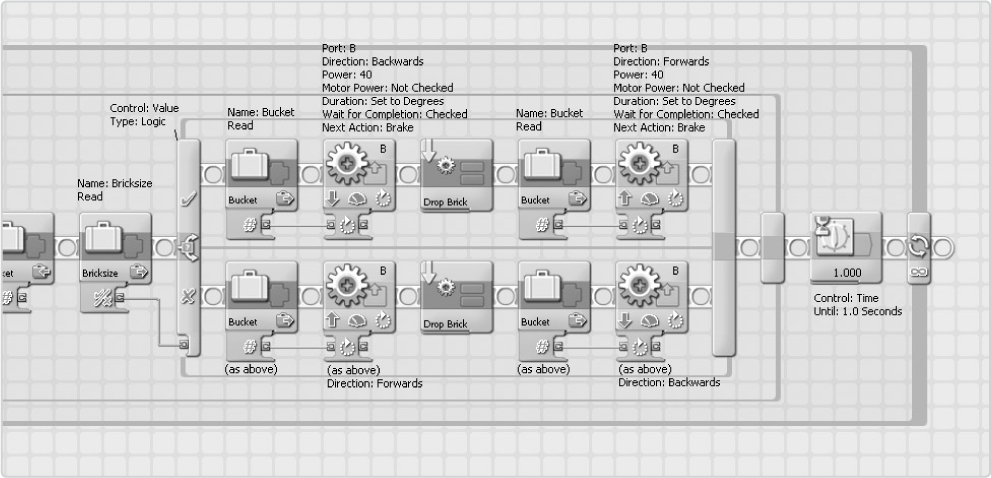
Figure 14-13: The configuration of the blocks that make the robot move to the right bucket, drop the brick, and return to the starting position
Now it’s time to test everything to make sure that it works. Insert LEGO bricks into the brick chute with the studs facing upward, download this program to your robot, run it, and get ready to sort your bricks!
further exploration
You’ve just completed another advanced NXT 2.0 robot. Well done! Of course, you should enjoy this machine by running the sorting program a couple of times, but it’s even more fun to make this robot a starting point for your own creations. The following discoveries will help you get started doing so. Let others know about your creations by sharing ideas on the companion website!