
A server by definition is a dedicated computing system running services to users and other computers on a network. Examples of service range from public services such as online gaming to sharing sensitive files inside a large organization. In the context of client-server architecture, a servers is a computer program running to serve the requests of other programs, known as the "clients". Thus, the server performs some computational task on behalf of "clients". The clients either run on the same computer, or connect through the network. For example, a server would host a game to the world while clients would access the game remotely. There are various forms of providing services to clients such as an Apache Web Server limited to HTTP or a BEA WebLogic Application Server that does HTTP plus more.
Network servers are typically configured to handle the load of servicing large volumes of clients. This means adding additional processing, memory and storage making these assets valuable targets for hackers. Organizations typically manage servers remotely and don't actively monitor activity, meaning small hits in performance or other indicators of being compromised may go unnoticed. It's common to find malicious users have accessed compromised servers for long periods of time prior to the owners identifying the vulnerability used to access the system.
This chapter will focus on identifying and exploiting vulnerabilities in web application servers. We will start out with showcasing tools available in Kali used to identify vulnerabilities. Next, we will focus on exploiting vulnerabilities to gain access to web application servers. We will conclude with other methods to access web application services.
Server-side attacks are exploiting and finding vulnerabilities in services, ports, and applications running on a server. For example, a web server has several attack vectors. It is a server running an operating system and running various pieces of software to provide web functionality. It has many open TCP ports. Each one of these vectors could harvest a vulnerability that an attacker could exploit to get into the system and obtain valuable information. Many protocols on servers are handled through readable non-encrypted text.
Let's take a look at some tools available in Kali for identifying vulnerabilities on servers.
Webshag is a multi-threaded, multi-platform tool used to audit web servers. Webshag gathers commonly useful functionalities for web servers such as port scanning, URL scanning and file fuzzing. It can be used to scan a web server in HTTP or HTTPS, through a proxy and using HTTP authentication (basic or digest). In addition, Webshag can use IDS evasion capabilities aimed at making correlation between requests more complicated.
Webshag provides additional innovative capabilities such as retrieving the list of domain names hosted on a target machine as well as fuzzing using dynamically generated filenames. Webshag can perform fingerprinting of web pages while being resistant to content changes. This feature is designed as a false positive removal algorithm aimed at dealing with "soft 404" server responses.
Webshag is accessed through a GUI or a command-line console and available with the Linux and Windows platforms. Webshag can be found under Web Applications | Web Vulnerability Scanners as webshag-gui.
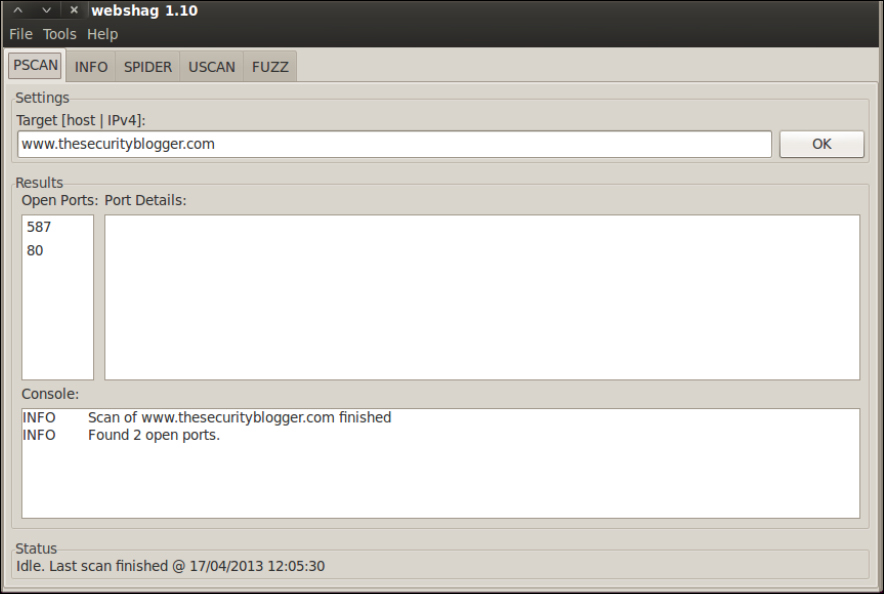
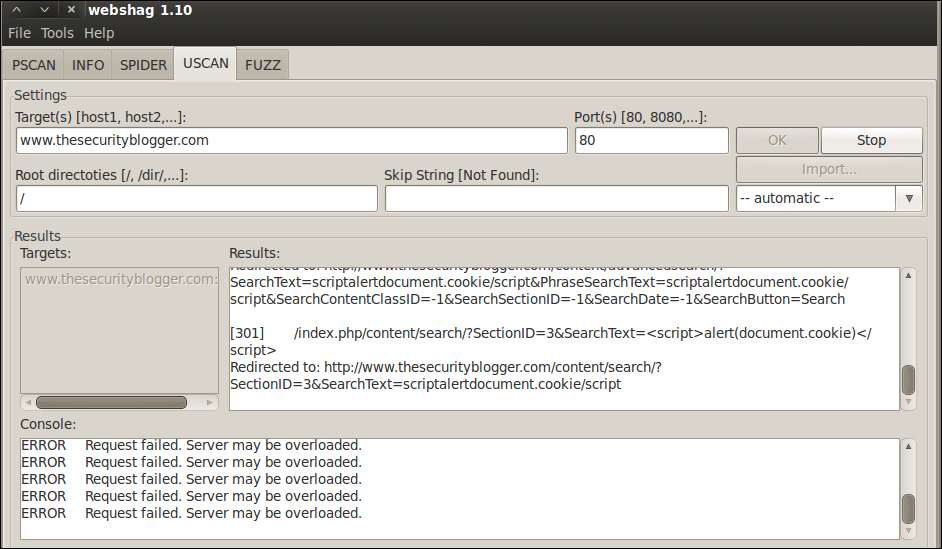
Webshag is easy to use. Each feature has a tab on the top. Select the desired feature tab, enter in your target URL under the target space and click on OK to execute. You can run multiple tabs simultaneously. Features include Port Scanning, Spider, URL Scan, and Fuzzing. The next four screenshots show Webshag performing a port scan, web spider crawl, URL scan, and file Fuzz of www.thesecurityblogger.com:


Webshag offers exporting all data found during an audit in the XML, HTML, and TXT file formats. Webshag's final report is organized in a logical format making it worthy of use as a standalone document or article of reference for a Penetration Test delivery report. The next two screenshots show exporting options and the top of a audit report:


Note
More information about Webshag can be found at http://www.scrt.ch/en/attack/downloads/webshag.
Skipfish is a web application security Reconnaissance tool. Skipfish prepares an interactive sitemap for the target using recursive crawl and dictionary-based probes. The resulting map provides output after being scanned by security checks.
Skipfish can be found under Web Applications | Web Vulnerability Scanners as skipfish. When you first open Skipfish, a Terminal window will pop up showcasing the Skipfish commands. Skipfish can use built-in or customizable dictionaries for vulnerability assessment.
Note
Note that some dictionaries may not be found in Kali. You can download the latest version of Skipfish and default dictionaries from https://code.google.com/p/skipfish/.
The available dictionaries are located in the dictionary file.
There are various command options available in Skipfish. To run Skipfish against a target website using a custom wordlist, enter skipfish, select your wordlist using the -W option followed by the location of the wordlist, select your output directory using -o followed by the location, and finally the target website.
Skipfish –o (output location) –W (location of wordlist) (target website)
The following example shows a scan using a wordlist called complete.wl on securityblogger.com. Skipfish will create a folder called Skipfishoutput on the desktop. This is run using the keyword skipfish, –o /root/Desktop/Skipfishoutput to specify the location to which send the output, -W /root/Desktop/complete.wl to specify the location of the dictionary and http://www.thesecuirtyblogger.com as the target to scan against.

If there are no compiling errors, you will be presented with a launch screen that states the scan will start in 60 seconds or on pressing any key.

You can press the Spacebar to see the details on the scan or watch the default numbers run. Scanning a target can take anywhere from 30 seconds to a few hours to complete the process. You can end a scan early by typing Ctrl + C.

Once the scan is complete or if you end it early, Skipfish will generate a ton of output files in the location specified when using the –o option to designate an output folder. To see the results, click on the index.html file, which will bring up an Internet browser. You can click through the drop-down boxes to see your results. See the example reports section for more information.

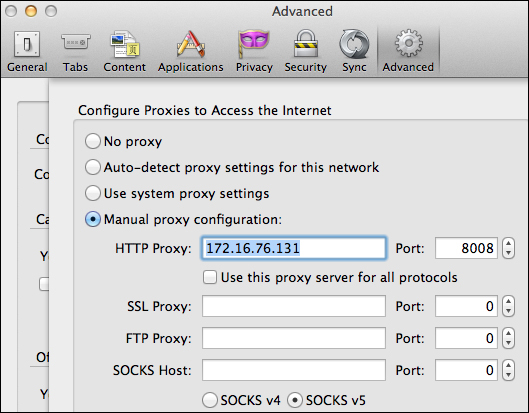
ProxyStrike is a web application proxy built to identify vulnerabilities while browsing an application. It runs like a proxy listening on port
8008 by default, meaning you have to configure your Internet browser to run through ProxyStrike so that it can analyze all the parameters in the background while your surf the target's website. The proxy features are great for identifying, intercepting, and modifying requests.
To configure an Internet browser such as Firefox to use ProxyStrike, select in FireFox Preferences | Advanced | Network and select Settings. Select Manual Proxy and enter the IP address of your Kali server followed by the port of 8008 (unless you plan to change the ProxyStrike default port).
To use ProxyStrike, go to Web Applications | Web Vulnerability Scanners and select ProxyStrike. Assuming your Internet browser is sending traffic to ProxyStrike, you should see captured traffic in the Comms tab. We will spend more time using Proxies in Chapter 6, Web Attacks.

The crawler features are an easy way to scan a target website for SQL or SSL and XSS plugin vulnerabilities. You do not have to have ProxyStrike set up as a proxy to use the crawler features. To run the crawler feature on a website with XSS plugins, click on the Plugins tab, scroll to the XSS plugs, and select to enable the plugins using the checkbox. Next, select the crawler tab. Enter the target website including http://, check the crawl using the plugins box and click on the large Stop button to change it to Running. Adding the plugins will increase the time to complete a scan. ProxyStrike will display a status bar providing an estimate on how long a scan should take.


The Plugins tab shows the results of a crawl after a scan is launched. Attacks identified can be exported via HTML or XML.

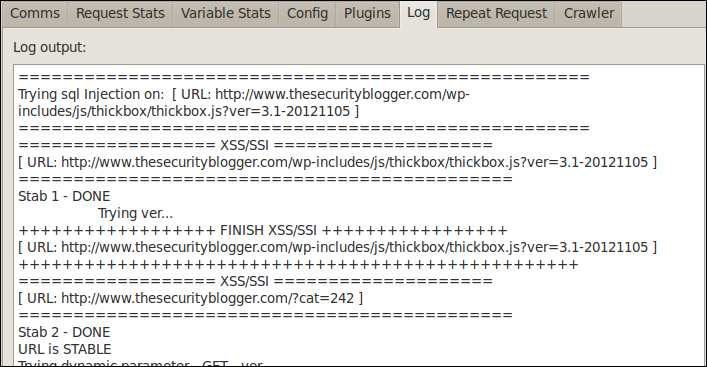
The Log tab shows what tasks are being run against the target website and the level of success for each attack. This file can be copied into a text file for a final deliverable. The Crawler tab lists out all the identified unique web links associated to a target.
ProxyStrike offers other useful features. More on ProxyStrike can be found at http://www.edge-security.com/proxystrike.php.

Vega is a security testing tool used to crawl a website and analyze page content to find links as well as form parameters.
To launch Vega, go to Web Applications | Web Vulnerability Scanners and select Vega. Vega will flash an introduction banner and display a GUI.

Vega has Scanner and Proxy tabs on the top-right corner. To use Vega as a Scanner, click on the Scanner tab on the top-right corner, click on Scan on the top-left corner, and select to start new scan.

You will see an input field asking for the target. The following example is targeting www.thesecurityblogger.com. Choose your target and click on Next:

The next sections are options you can assess your target against. There are two main modules (Injection and Response Processing) with many options to scan against. Click on the small carrot under each module, select the options you want to scan for, and click on Next.

The following two screenshots offer the ability to add cookies and exclusion patterns to avoid fuzzing, which are both optional. You can leave the defaults and click on Next for both screens. Click on Finish to start your scan.
Vega will display the active scan and map vulnerabilities found to what level of risk they pose to the target system.
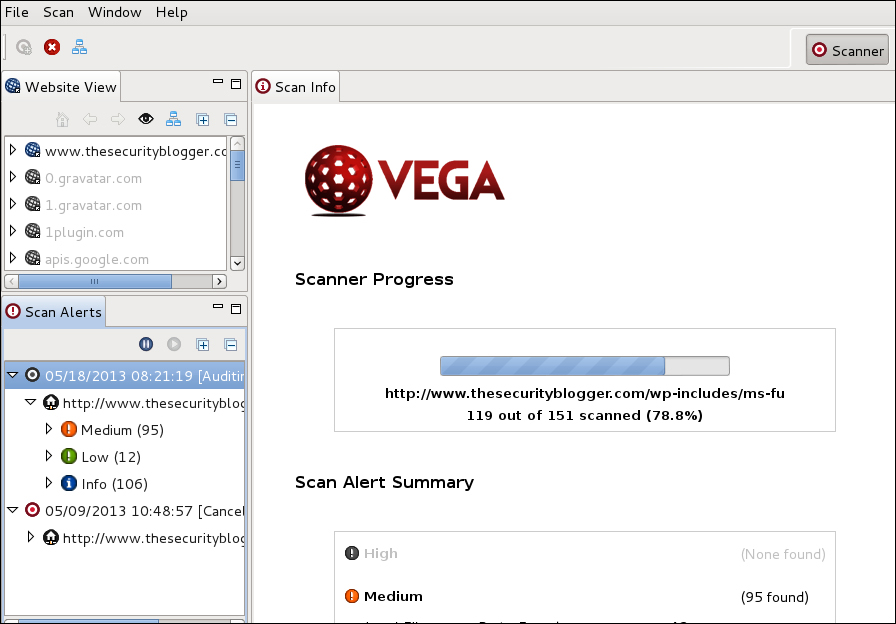
The top left window titled Website View displays the target(s) being scanned and other targets associated with the primary target. The bottom left window titled Scan Alerts shows the categories of vulnerabilities found. You can click on the carets beside the Alerts to see what vulnerabilities Vega finds. When you click on any vulnerability, Vega displays a definition of what is found with a detailed explanation of its possible impact.
The following screenshot shows a possible cross-site scripting vulnerability on www.thesecurityblogger.com:

Vega's Proxy section provides the ability to see the requests and responses from a target website. The Proxy section will be populated as a scan occurs.

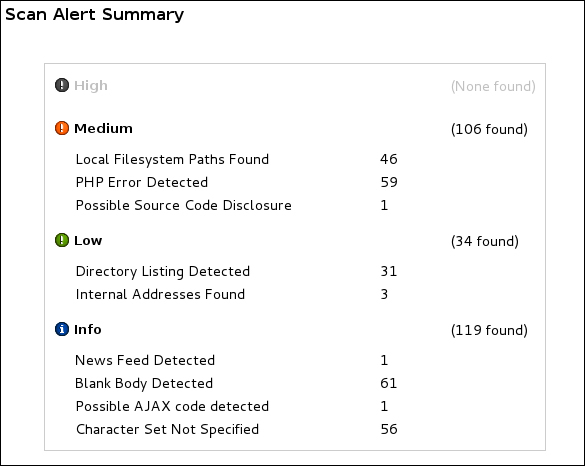
Vega offers details about vulnerabilities found in the central display window as well as a summary page. These details can be copied into a final deliverable.
Owasp-Zap also known as Zaproxy is an intercept proxy designed for the security testing of web applications.
Open Zaproxy by going to Web Applications | Web Application Fuzzers and selecting owasp-zap. There will be a disclaimer pop-up that must be accepted to start the program.
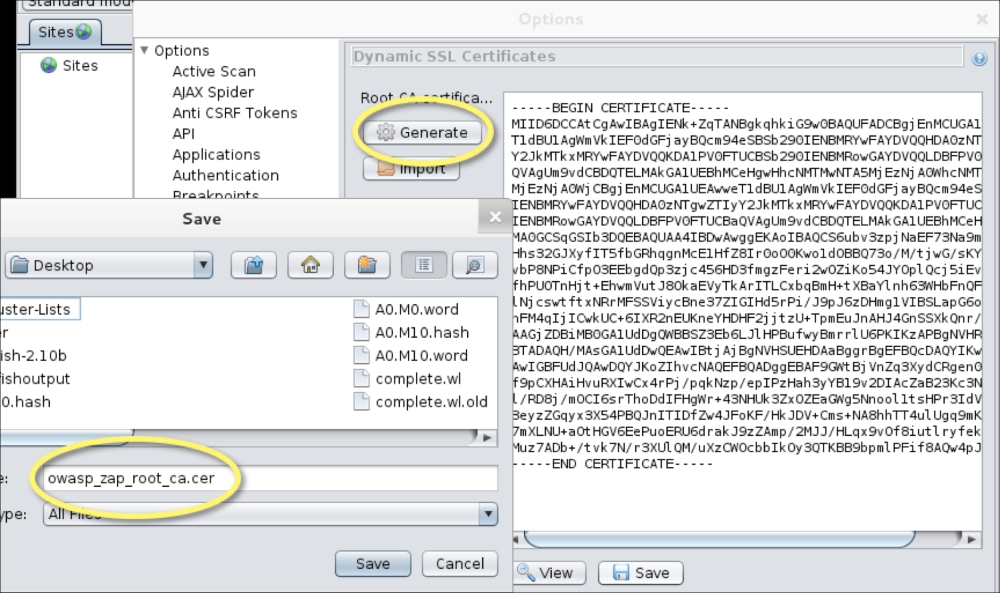
Upon accepting the license disclaimer, Owasp-Zap will open and display another pop-up asking if you would like to create an SSL Root CA certificate. This allows Zaproxy to intercept HTTPS traffic over SSL in a browser. This is important to test applications that use HTTPS. To generate an SSL certificate, click on the Generate button.

There will be a window that pops up asking to generate or import a certificate. You can generate a certificate by clicking on Generate. You can save the new certificate by clicking on Save and selecting where you want to place it. The new certificate file is called owasp_cap_root_ca.cer.
Once you have saved the CA file, click on OK and open your browser. For Firefox, go under Edit | Preferences and click on the Advance tab. Click on the Encryption subtab and click on View Certificates. Next click on Import and select the certificate you generated in Zaproxy (the .cer file). Firefox will ask whom to trust with the new Certificate Authority. Check all three options, which are trust websites, e-mail users, and software developers. Click on OK twice.

The next step is setting Firefox to proxy all the traffic through Zaproxy. Do this by going to Edit, Preferences, selecting the Advanced tab, and then selecting the Network tab. Click on the Configure button, click on Manual proxy configuration, type localhost and port 8080, which is the default for Zaproxy. Click on the checkbox next to Use this proxy server for all protocols and click on OK. The following screenshot demonstrates this configuration:

Open Zaproxy and you should see a Sites window on the top-left side. This will populate as you surf the Internet using Firefox. You can view all the requests and responses for each page on the right window. Zaproxy gives an easy view of all the resources being used by each webpage.
You can also do a targeted evaluation of a website by going to the quick start window and typing in a website in the URL to attack space. The following screenshot is Zaproxy performing a scan of www.thesecurityblogger.com:
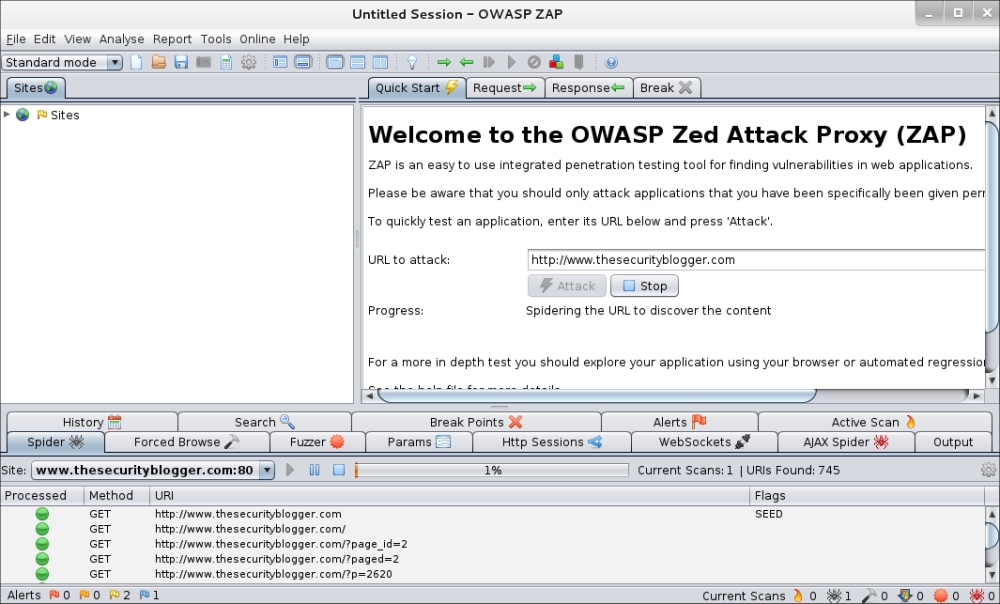
Zaproxy will perform a spider crawl of the target website to identify all the links associated with the target as well as scan for vulnerabilities. To see the vulnerabilities, click on the Alerts tab.
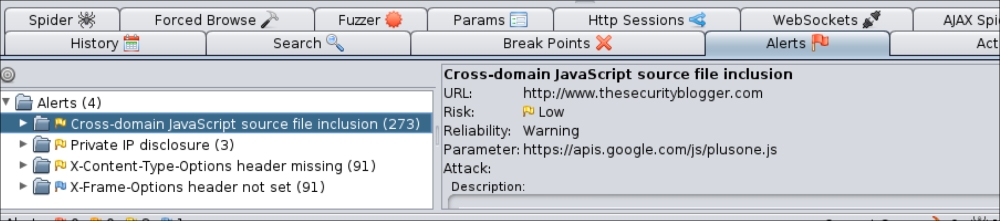
You can set up automatic login using Zaproxy; however, you will have to first manually log into a website while Zaproxy is enabled, tell Zaproxy where the login and logout requests are and enable the auto-login feature. The GET requests will appear in the Sites window and you must highlight both the login and logout responses under the Responses tab by right-clicking on the response, clicking on Flag as Content and selecting if it's the login or logout.
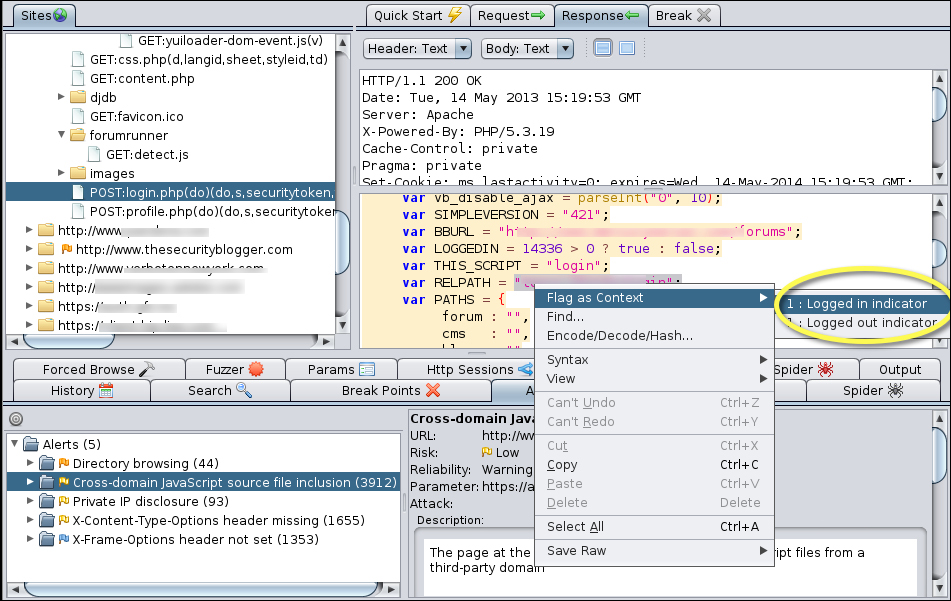
An icon with a brown line will appear on the toolbar representing automatic authentication. Click on that icon to enable automatic authentication so that Zaproxy can automatically log in to any authentication request while doing an automated assessment of a target. This feature is helpful to auto-explore a website that requires authentication.

Zaproxy has a market place found under Help | Check for updates that offers other features that can be added to the Zaproxy arsenal.

Zaproxy offers different reporting options found under the Report tab.

Here are examples of an HTML report for www.thesecurityblogger.com.


Websploit is an open source project used to scan and analyze remote systems to find vulnerabilities.
To access Websploit, go under Web Applications | Web Application Fuzzers and select websploit. A Terminal window will pop up with the Websploit banner. You can see all the available modules and what is required to run a specific module by typing show modules.

Type USE followed by the module you want and fill in the requirements to execute. For example, to run the webkiller module, type use network/webkiller and fill in the target to attack using the set TARGET commands. Type RUN to run the module.
