
The next section will cover tools used for Penetration Testing web sessions. Some tools are not available in Kali1.0; however, they can be obtained online.
The manual method to perform a session hijack is stealing a victim's authentication cookie. One way to accomplish this is injecting a script on a compromised web application server so cookies are captured without the victim's knowledge. From there, the attacker can harvest authentication cookies and use a cookie injector tool to replace the attacker's cookie with an authorized stolen cookie. Other methods used to steal cookies are packet sniffing, network traffic, and compromising hosts. Stealing cookies will be covered later in this book.
The Firefox web browser offers many plugins that can be used to inject stolen cookies into an attacker's browser. Some examples are GreaseMonkey, Cookie Manager, and FireSheep. We suggest browsing the Firefox plugins marketplace for various cookie management offerings to fit your penetration requirements.
Firesheep is a classic Penetration Testing tool used to audit web sessions. Firesheep is an extension for the Firefox web browser; however, some versions have been unstable with recent Firefox releases. Firesheep acts as a packet sniffer that intercepts unencrypted cookies from websites while they transmit over a network.
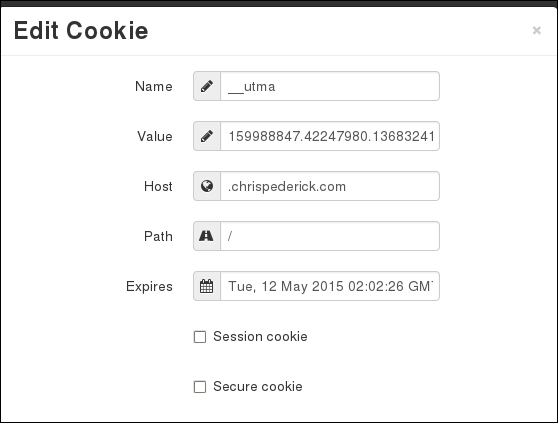
Web Developer is an extension for Firefox that adds editing and debugging tools for web developers. Web Developer can be downloaded for free from the Firefox plugin store. One feature in Web Developer useful for session hijacking is the ability to edit cookies. This can be found as a drop-down option from the Firefox browser once Web Developer is installed, as shown in the following screenshot:
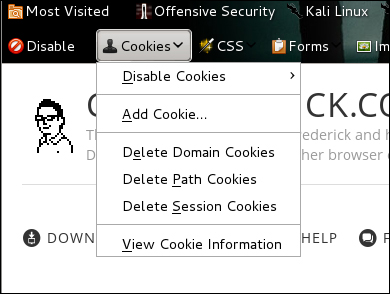
Select View Cookie Information, and you will see stored cookies. You can click on Edit Cookie to bring up the cookie editor and replace the current cookie with a victim's stolen cookie.

Greasemonkey is a Firefox plugin that allows users to install scripts that make on the fly changes to web page content before or after the page is loaded. Greasemonkey can be used for customizing a web page appearance, web functions, debugging, combining data from other pages, as well as other purposes. Greasemonkey is required to make other tools, such as Cookie Injector, function properly.
Cookie Injector is a user script that simplifies the process of manipulating browser cookies. There are a lot of manual steps to import a cookie from a tool like Wireshark into a web browser. Cookie Injector allows the user to copy paste a cookie portion of a dump, and have the cookies from the dump automatically created on the currently viewed web page.
To install Cookie Injector, search Google for Cookie Injector to bring up a download link for the script. When you select to download Cookie Injector, Greasemonkey will pop up, prompting your approval for the install.

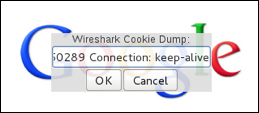
After installing the Cookie Injector script, press Alt+C to display the cookie dialog. Paste a copied Wireshark string into the input box and click on OK to inject cookies into the current page. See the Wireshark section on how to copy cookies for Cookie Injector using Copy, Bytes, and select Printable Text Only in Wireshark. The next two screenshots show pressing Alt+C, pasting a Wireshark Cookie Dump, and clicking OK to see the pop-up that the captured cookies have been written into the Internet browser.

Cookies Manager+ is a utility used to view, edit, and create new cookies. Cookie Manager+ shows detailed information about cookies, as well as can edit multiple cookies at once. Cookie Manager+ can also back up and restore cookies. You can download Cookie Manager+ from the Firefox plugin store.
Once installed, Cookie Manager+ can be accessed under Tools, by selecting Cookies Manager+.

Cookies Manager+ will show you all cookies captured by Firefox. You can scroll down or search for specific Cookie(s) to view and/or edit. In my example, I'm looking for any cookie associated with www.thesecurityblogger.com.

Cookies Manager+ makes editing existing cookies easy. This can be useful for performing various types of attacks such as session hijacking and SQL injection.


Cookie Cadger is a Penetration Testing tool used to audit web sessions. Cookie Cadger can include detailed HTTP request capturing and replaying insecure HTTP GET requests, such as requested items, user agents, referrer and basic authorization. Cookie Cadger can provide live analysis for Wi-Fi and wired networks; as well as load packet capture (PCAP) files. Cookie Cadger also includes session detection to determine if the user is logged into webpages like Wordpress and Facebook. Cookie Cadger is considered by some as Firesheep on steroids.
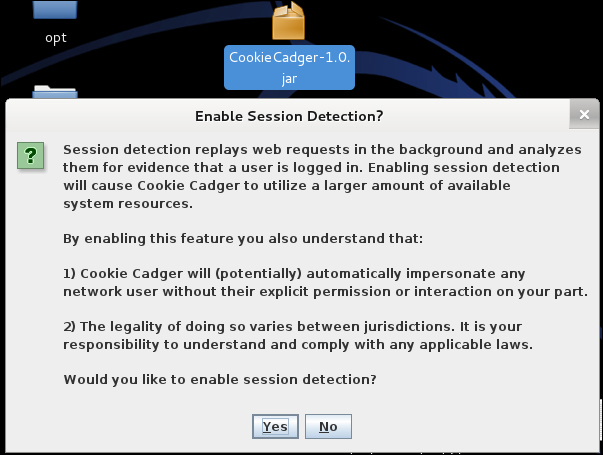
Cookie Cadger can be downloaded from www.cookiecadger.com. The download will be a JAR file. Double-click on the file to open Cookie Cadger. A warning will pop up asking if you want to enable session detection. Click on Yes, and the main dashboard will pop up. The next two screenshots show the Cookie Cadger 1.0 JAR file with the introduction warning message pop up and main Cookie Cadger dashboard.

To start, select the appropriate interface, and click on Start Capture. Cookie Cadger offers the ability to take in multiple interfaces if available.
Cookie Cadger can enumerate all the devices found on the available network. For example, the next screenshot shows a Linux i686 using Firefox and Iceweasel.

Recent activity found by Cookie Cadger is displayed in blue text for each field. You can view details about where the host is surfing such, as netbios names and hostnames. You can copy requests to the clipbox and export information such as user information, and MAC addresses. Filter tabs are available for each section to zero in on specific targets (For example, only looking at Facebook domains).
Anytime Cookie Cadger recognizes a login session, it captures it and gives the ability to load the session. The next screenshot shows a session capture of the administrator logging into www.thesecurityblogger.com. Cookie Cadger will show an icon and explain the type of session captured. This could be a Hotmail, Facebook, or in this example, Wordpress login.

To see the recognized sessions, click on the tab labeled Recognized Sessions and pick a session from the window, as shown in the previous screenshot. Once highlighted, click on the Load Selected Session button to replay the session. Cookie Cadger will display Loading on the bottom window, and a browser will open logged in as the user during the captured session. The following screenshot shows opening a Domain cookie captured from the victim. Once the loading is complete, the default Internet browser will open the captured page with the rights associated with the stolen cookie.

To see the session request information, right-click on the icon of the captured session and select View Associated Request. This will bring you back to the Requests tab and show that session.

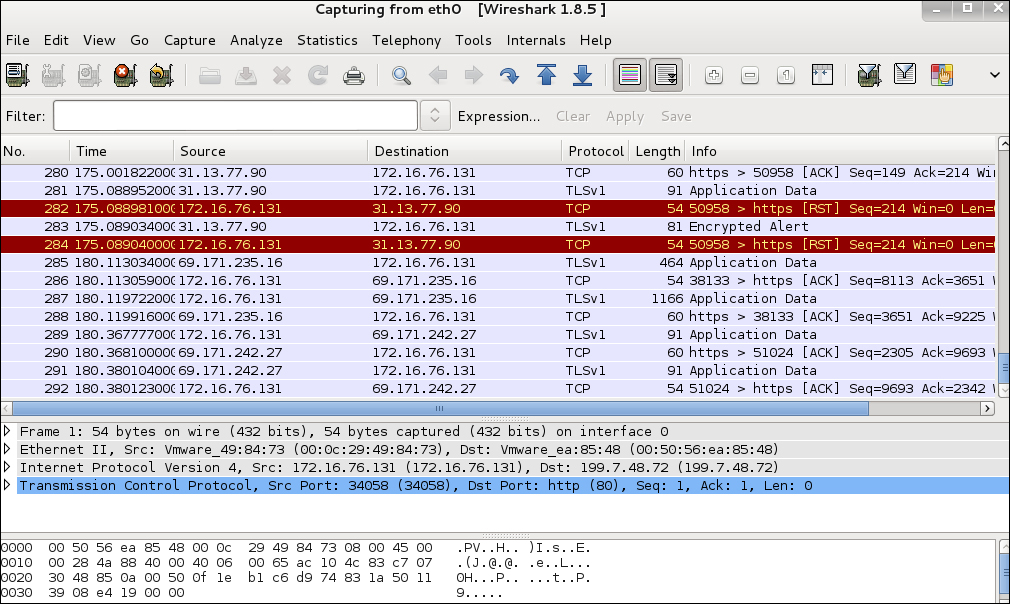
Wireshark is one of the most popular, free, and open source network protocol analyzers. Wireshark is preinstalled in Kali and ideal for network troubleshooting, analysis, and for this chapter, a perfect tool to monitor traffic from potential targets with the goal of capturing session tokens. Wireshark uses a GTK+ widget toolkit to implement its user interface and pcap to capture packets. It operates very similarly to a tcpdump command; however, acting as a graphical frontend with integrated sorting and filtering options.
Wireshark can be found under Sniffing/Spoofing | Network Sniffers, and selecting Wireshark as well as under the Top 10 Security Tools category.

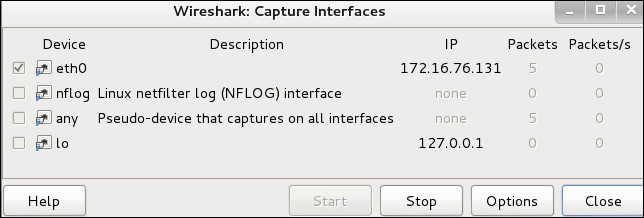
To start capturing traffic, select the Capture tab and Interfaces. You will see the available interfaces to capture. In my example, I'm going to select eth0 by clicking on the checkbox next to eth0 and selecting Start.
Note
You may not see traffic if the network interface on which you're capturing doesn't support promiscuous mode, or because your OS can't put the interface into promiscuous mode. More on the different capture modes and troubleshooting can be found at www.wireshark.org.
Wireshark will capture all traffic seen on the wire. Traffic can be filtered by typing specific items in the filter space or by adjusting the organization of data via the top tables, such as protocol or destinations.
Wireshark captures a lot of details, so it is important to filter for specific things, such as parameters for unsecured cookies like http.cookie. For example, Gmail by default is encrypted; however, you can turn off https and seek out the GX parameter contained in a http.cookie to identify unsecured Gmail cookies. The following screenshot shows capturing the cookie from logging into a Wordpress blog:
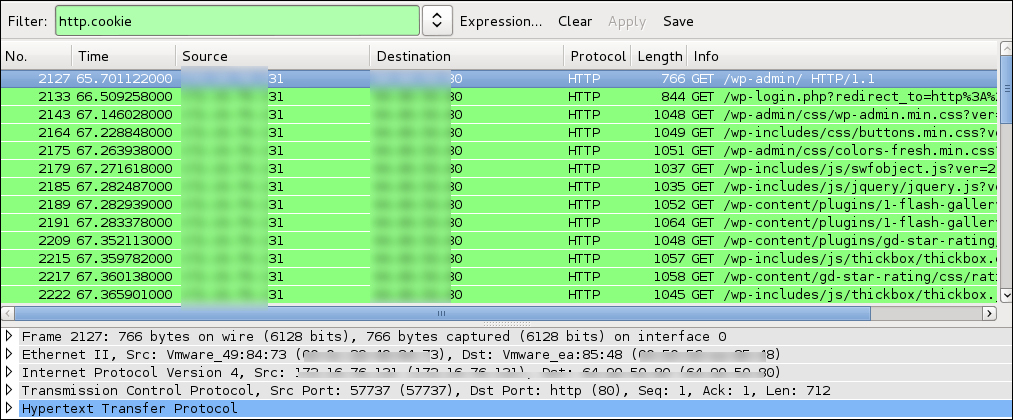
Once you capture an unsecured cookie, you must use another tool to inject it into your browser to complete the session hijacking. Choose the victims cookie, right-click on the line, and select Copy | Bytes | Printable Text Only. Now, you can paste this into a Cookie Injector, such as the Firefox plugin Cookie Injector. See Cookie Injector to complete the session hijacking attack under Firefox plugins.
There are many useful tools available that support Wireshark captures and simplify data found. An example is NetWitness Investigator that can be downloaded for free from www.emc.com.
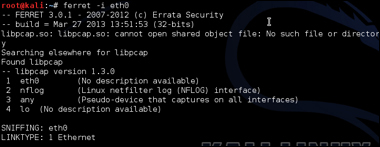
Hamster is a utility used to steal cookies using HTTP session hijacking with passive sniffing also known as Sidejacking. Hamster eavesdrops on a network, captures any seen session cookies, and imports stolen cookies into a browser GUI environment so the attacker can replay the session. Hamster uses Ferret to grab session cookies.
Hamster can be accessed by navigating to Sniffing/Spoofing | WebSniffers and selecting Hamster.
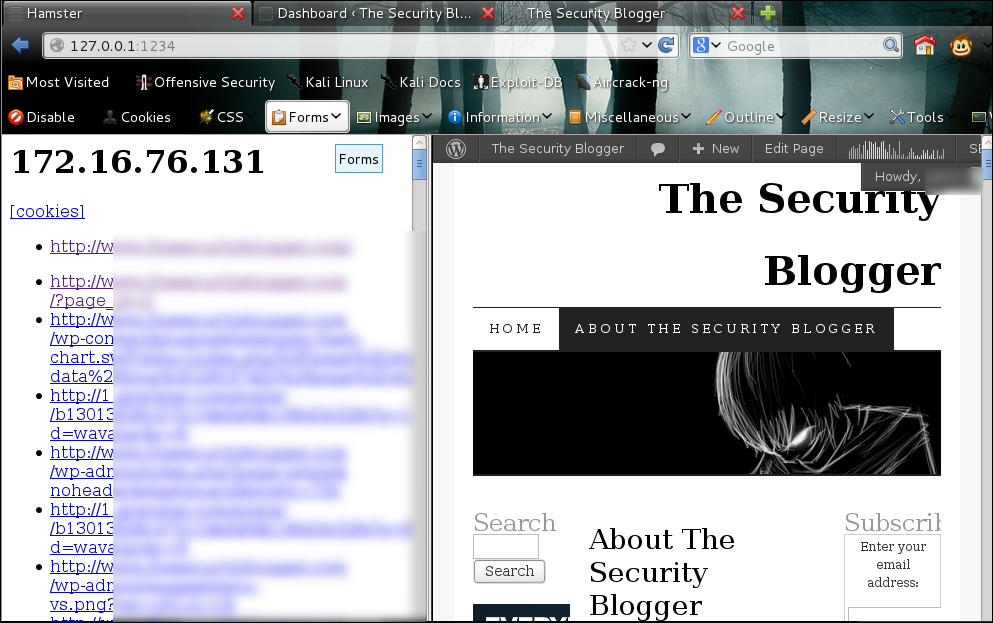
When you launch Hamster, a Terminal will open starting the Hamster service. The default proxy IP will be 127.0.0.1:1234.

You can access Hamster by opening a browser and navigating to http://127.0.0.1:1234.

Traffic must travel through Hamster for it to do its job. You can select which adapter to use by clicking the adapters link. For my example, I'm going to sniff eth0.

Hamster will redirect you to a Sidejacking activity page. You will notice you are not receiving any packets. Hamster needs a sniffer to grab traffic. You can use Ferret by accessing Sniffing/Spoofing | Web Sniffers and selecting Ferret. A Terminal window will pop up with some options. Type in ferret -i INTERFACE to select the interface to sniff with Ferret. Ferret will tell you it's sniffing and the command prompt will hang in a running state. As you see traffic, the traffic capture will appear as text in Ferret.
Once Ferret is running, navigate back to Hamster, and you should start to see packets. Any targets on the network will appear. Click on a target to see captured cookies.

Click on any cookie to access the capture session. In my example, I replay accessing www.thesecurityblogger.com.
A man-in-the-middle attack is a form of active eavesdropping in which the attacker makes a connection with victims and relays messages between victims, making them believe they are talking directly to each other. There are many forms of this attack, such as using a Hak5 Pineapple wireless router that pretends to be a trusted wireless access point while really acting as a man-in-the-middle between a victim and wireless network. Another example is using Kali to forward traffic between a victim and default router while sniffing for useful information, such as login credentials.
Note
Many cloud services such as Facebook and Gmail leverage secure login via HTTPS, which prevents a generic man-in-the-middle attack. To bypass HTTP Secure, you can use SSLstrip, which will reveal all login information to your man-in-the-middle attack. The SSLstrip / man-in-the-middle combination is a very effective method to steal victim's login credentials, if you have an attack system on the same network as the target system(s).
dsniff is a set of password sniffing and network traffic analysis tools designed to parse different application protocols and extract relevant information.
arpspoof is used when an attacker sends fake address resolution protocol (ARP) messages into a local area network. The goal of this process is to associate the attacker's MAC address with the IP address of another host, causing any traffic meant for the IP address to be sent to the attacker instead.
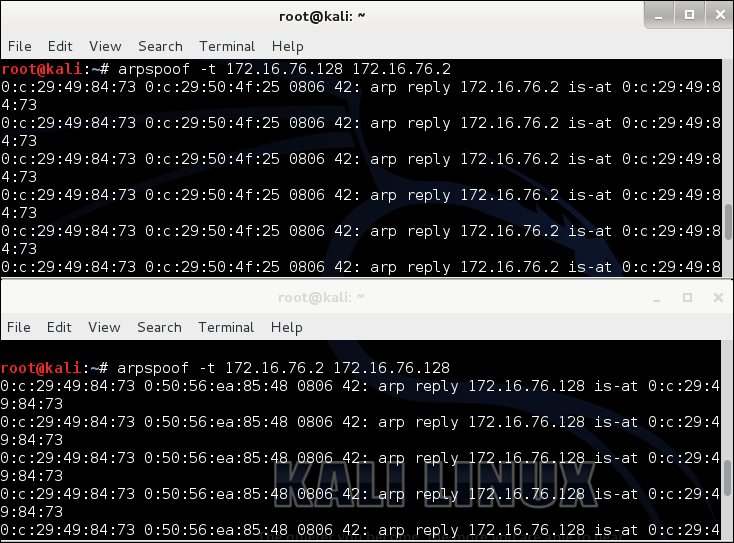
One manual method to perform a man-in-the-middle is using arpspoof and dsniff to sit between systems. The first step is identifying the IP address of your victim and default gateway of the network using techniques from Chapter 2, Reconnaissance – Core Concepts, Once you know the IP addresses, you need to tell your victim you are really another system or the default gateway. For example, if victim one is 172.16.76.128, the default gateway is 172.16.76.2, and the attacker is 172.16.76.131, you would set your 131 IP address to look like the victim and default gateway using the arpspoof command.
Open two Terminal windows and type the following commands in each window to spoof your victims:
TERMINAL 1:
arpspoof -t 172.16.76.128 172.16.76.2 // tells victim 2 you are the default gateway
TERMINAL 2:
arpspoof -t 172.16.76.2 172.16.76.128 // tells victim 1 you are the default gateway
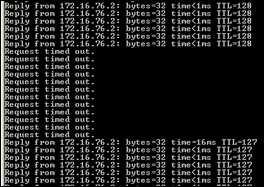
If you enter the commands correctly, you should see that traffic is being replayed through the attacking system. Traffic is not going to and from the victim, so the victim would not see traffic going out of the network at this point. To complete the attack, you need to enable IP forward so traffic will continue to flow from the default gateway to the victim and vice versa, while the attacker is watching traffic between the victim and default gateway.
Open a third Terminal window and type:
echo 1> /proc/sys/net/ipv4/ip_forward
At this point, traffic should be flowing between the victim and default gateway while going through the attacker system. The following screenshot shows the ping fail while IP forward is not enabled.
Next, launch dsniff to watch the traffic. dsniff can be found under Sniffing/Spoofing | Network Sniffers, and selecting dsniff. A Terminal window will open, displaying the usage commands for dsniff, as shown in the following screenshot:

To start dsniff, type dsniff and select the interface to sniff using -i and the interface. For my example, I typed dsniff to sniff all traffic on eth0 as shown in the following screenshot:
dsniff will catch any login information. If a victim logs into a system via FTP for example, you will see the login attempt and credentials once the session is closed, because dsniff needs to see the entire session.

Ettercap is a free and open source comprehensive suite for man-in-the-middle-based attacks.
Ettercap can be used for computer network protocol analysis and security auditing, featuring sniffing live connections, content filtering, and support for active and passive dissection of multiple protocols. Ettercap works by putting the attacker's network interface into promiscuous mode and ARP for poisoning the victim machines.
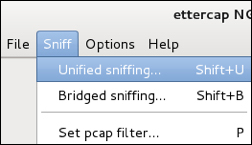
To launch Ettercap, navigate to Sniffing/Spoofing | Network Sniffers and select the Ettercap graphical.

The first step is selecting what interface you plan to sniff. Navigate to the Sniff tab, select sniffing type (Unified sniffing or Bridged sniffing) and the interface you plan to sniff.

Now; Ettercap will show more menu options, as shown in the following screenshot:

Let's scan the network for available hosts. Navigate to the Hosts and select Scan for hosts. Ettercap will quickly scan the entire class C and list all identified hosts. Usually the router is the first host that is found. The following screenshot shows four devices found during a scan.
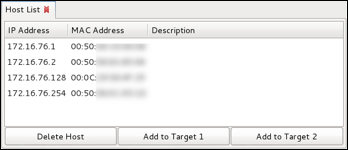
In this example, we found four devices. We can assume .1 is the router, and we will be targeting the victim machine .128. Let's select the router for Target 1 and the victim .128 for Target 2. This will place our system between both the victim and router for a classic man-in-the-middle attack. Select each target, and click the appropriate check box. You can verify the targets by navigating to Targets and selecting Current Targets.

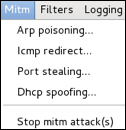
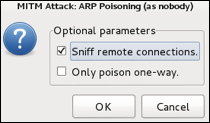
Next, we can look at the man-in-the-middle options found under the tab Mitm. There are options for Arp poisoning..., ICMP redirect..., Port stealing..., and Dhcp spoofing.... For this example, we will select Arp poisoning... and choose the Sniff remote connections parameter.
Now, we are ready to capture traffic between the router and our victim. Interesting information, such as username and password information, can be captured and displayed in the execution window.
Driftnet is a man-in-the-middle tool used to capture images from live network traffic. Driftnet requires a man-in-the-middle attack to be established prior to working. You can leverage the arpspoof and dsniff or Etthercap methods previously covered to launch your man-in-the-middle attack prior to launching Driftnet. Driftnet can be run simultaneously to give you quickly the visibility of all images flying across the wire.
Driftnet can be found under Sniffing/Spoofing | Web Sniffers and selecting Driftnet. Driftnet will open as a Terminal displaying how to use the tool. You will need to specify which interface you want to sniff and what you want to do with images captured off the wire. For example, you can choose to have a beep sound for every image using the –b command, display images on the terminal screen, or send captured images to a directory. The screenshot provided shows an example of capturing images from eth0 and placing those images in a folder located at /root/Desktop/CapturedImages.
Once Driftnet is launched, a separate blank Terminal window will pop up. If you have told Driftnet to display images, they will appear in this window. If you selected not to display images, such as using –a, images will not appear; however, be sent to the folder specified in the execution command. The following screenshot is driftnet capturing images from a victim surfing to www.drchaos.com.
