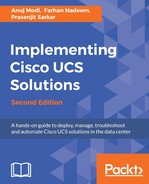
In our example, we will connect the SAN directly with Fabric Interconnects with zoning configured on FIs. With UCS Version 2.1, it is now possible to configure zoning directly on the Fabric Interconnects using different SAN policies. In our example, we will configure VSANs and zoning directly on the Fabric Interconnects to attach SAN using the FCoE protocol.
The following diagram shows the physical connectivity between the chassis, Fabric Interconnects, and SAN:
In order to configure VSANs for Fabric Interconnects, perform the following steps:
- Log into UCS Manager.
- Click on the SAN tab in the navigation pane.
- In the SAN tab, expand SAN and then SAN Cloud.
- Right-click on VSANs and click on Create VSAN.

- In the pop-up window, assign a name to the VSAN.
- For the FC Zoning section, click on the Enabled radio button.
- Attach a zone to Fabric Interconnect A or Fabric Interconnect B. Unlike common VLAN configuration, VSANs should be should be different for Fabric Interconnect A and B.
- Assign a VSAN ID and its corresponding VLAN ID. The VLAN ID does not need to be the same number as VSAN ID; however, it is a good practice to keep it so. Also, a VLAN ID used for VSAN mapping cannot overlap with that of an Ethernet VLAN.

Once VSANs will be created in both Fabric Interconnect, it should be visible as shown in the screenshot.

Create the required VSANs and configure ports for VSAN membership. In our example, we created two VSANs for connecting to two separate SAN processes.
Once the physical connectivity is established, the following will configure the zoning for the servers and SAN:
- Storage connection policies: These configure the storage connectivity including the WWPN target numbers for the SAN
- SAN connectivity policies configuration: This configures vHBAs for the servers and will provide WWPN initiator numbers for them
First, we will configure the storage connection policy by performing the following steps:
- Log into UCS Manager.
- Click on the SAN tab in the navigation pane.
- In the SAN tab, expand SAN and then expand Policies.
- Right-click on Storage Connection Policies and click on Create Storage Connection Policy.

- In the pop-up window, assign a name to the storage connection policy.
- Select Zoning Type. The recommended and most secure zoning option is the Single Initiator Single Target. Consult your storage documentation for zoning recommendations.
- Click on the + sign to define FC Target Endpoints. This is the WWPNs of the SAN and this information will be available from the SAN storage processors.

- On the next screen, manually type the WWPN of the SAN storage processors.
- Select the Fabric Interconnect A or B and select a VSAN membership for the storage processors. Click on OK:

- Repeat the steps for the second storage processor for the other Fabric Interconnect and VSAN.
Now we will configure the SAN connectivity policy by performing the following steps:
- Log into UCS Manager.
- Click on the SAN tab in the navigation pane.
- In the SAN tab, expand SAN and then expand Policies.
- Right-click on SAN Connectivity Policies and click on Create SAN Connectivity Policy.

- In the pop-up window, assign a name to the SAN connectivity policy.
- Select a predefined WWNN pool for the servers or create a new pool by clicking on the + sign close to Create WWNN Pool.
- Click on Add to create vHBAs for the servers. vHBAs can be created in a number of different methods. However, as with vNICs, the recommended method is to create vHBA templates and then use those templates for creating the vHBAs.

- Clicking on Add in the previous step pops up a new window for the vHBA creation.
- Provide a name for the vHBA and select Use vHBA Template for the creation of the vHBA.
- Select the required vHBA template and an appropriate Adapter Performance Profile for the creation of the vHBAs:

- New vHBAs will appear in the policy. When this policy is applied during a service profile creation, the vHBAs are automatically created with all configurations for the server:

- Once the SAN connectivity policy is configured, expand it in the navigation pane. In the work pane, click on the vHBA Initiator Groups tab and create vHBA initiators for both the vHBAs by clicking on the + sign on the right-hand side of the work pane.

- In the new window, type a name and a short description for the vHBA Initiator Group, and select a Storage Connection Policy. Repeat the steps for the other vHBA initiator groups:

- New vHBAs will appear in the policy. When this policy is applied during a service profile creation, the vHBAs are automatically created with all configurations for the server.
Zoning is automatically configured for the server vHBAs during the service profile creation using the SAN connectivity policy and storage connection policy. The policies could be applied directly to a service profile or to a service profile template (the procedure for both is the same).
In order to create vHBAs during the service profile or a service profile template creation, perform the following steps:
- Log into UCS Manager.
- Click on the Servers tab in the navigation pane and click on Create Service Profile (expert) or Create Service Profile Template.
- In the third step, where vHBAs for the storage are created, select Use Connectivity Policy and click on Next:

- This will create the vHBAs for the new server:

- Create vHBA initiator groups for both vHBAs.
- Assign a name to the vHBA Initiator Group.
- Assign the previously created storage connection policy. This will associate the FC target endpoint (storage processor WWPN) and VSAN to the vHBA initiator group.
- Repeat the same steps for the second vHBA initiator group for the second storage processor and VSAN connectivity.

Once the service profile creation is complete, the zoning configuration can be verified by performing the following steps:
- On the Servers tab in the navigation pane, select FC Zones from the work pane.

- Click on the + sign to expand the information which will provide an initiator to target zone mapping: