We will now configure the AD/LDAP authentication integration for UCS. We will integrate UCS Manager to the Microsoft Active Directory domain controller. On the AD side, appropriate user groups should be created that can be used to provide mapping to UCS roles that provide privileges to the AD authenticated users accordingly.
Perform the following procedure to enable Active Directory authentication:
- Log in to UCS Manager.
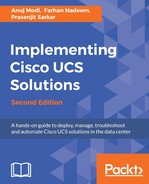
- Click on the Admin tab in the navigation pane.
- On the Admin tab, click on User Management to expand its content.
- Click on LDAP in the navigation pane and click on Create LDAP Provider in the work pane:
- In the pop-up window, provide the following AD configuration details:
- Provide a DNS hostname or IP of the domain controller.
- Type in lowest-available in the Order field.
- Provide the distinguished name (DN) of the user with read and search permissions in the Active Directory in the Bind DN field. It is recommended to use the normal user or service account with read permissions only and not an administrator account for Bind DN.
- Provide a specification location of the AD where the search should start in the Base DN field. You may start from the root of the AD for smaller organizations. For a large AD implementation, it is recommended to start the search from the OU where the AD users/groups are located.
- Type 389 in Port and leave Enable SSL unchecked for regular communication without SSL or check Enable SSL with the appropriate AD port.
- Type sAMAccountName=$userid into the Filter field.
- Leave the Attribute field blank.
- Type in a password for the bind user configured in step 3 and reconfirm the password. Type in a Timeout value in seconds:

- Click on Next and configure Group Authorization by clicking on the Enable button.
- Leave the other two settings, Group Recursion and Target Attribute, with the default values.
- Click on Finish.
- Repeat the steps for the other domain controllers:

- Create an LDAP provider group adding all domain controllers in the provider group and perform the following steps:
- Click on LDAP in the navigation pane and click on Create LDAP Provider Group in the work pane.
- In the pop-up window, assign a Name for the LDAP Provider Group.
- Select domain controllers in the left-hand side pane and click on >> to add them to the group.

- Create an LDAP group map for mapping AD users/groups to UCS local roles in order to provide access privileges. Perform the following steps to do so:
- Click on LDAP in the navigation pane and click on Create LDAP Group Map in the work pane.
- In the pop-up window, type in the LDAP Group DN of the AD user group to be mapped to a local role.
- Select the local UCS role from the Roles field.
- Repeat the same procedure for adding all the roles.

- The next screenshot shows an example of some LDAP groups mapped to UCS roles. You can create different LDAP groups and map them to UCS local roles as per your environment:

- The last step for the Active Directory configuration is to define the authentication domain for UCS Manager:
- Expand Authentication in User Management and right-click on Authentication Domains to create a new domain:

- In the pop-up window, assign a Name to the domain.
- In the Realm field, select the Ldap radio button.
- Select value for Provider Group from the drop-down menu and select OK:
