Server pools are used to organize servers based on specific criteria, such as CPU family, amount of RAM, type of mezzanine card, and power. Each server is associated with a unique service profile to receive all the settings. A server pool can be associated with a service profile. UCSM automatically selects an available server in the server pool and associates it with a service profile.
Server pools can be manually populated, or they can be autopopulated using server pool policies. Server pools make the servers available for association with service profiles. It is possible to have a server in more than one server pool at the same time.
In order to create and manually populate the server pool, carry out the following steps:
- Log in to the UCSM screen.
- Click on the Servers tab in the navigation pane.
- Click on the Pools tab and expand root.
- Right-click on Server Pools, and click on Create Server Pool, as shown in the following screenshot:

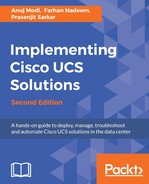
- In the pop-up window, assign the Name and Description values to the server pool.
- Click on Next:
- Add servers to the pool by selecting the servers provided on the left-hand side and adding them to the list of Pooled Servers on the right-hand side.
- Click on Finish after adding servers to the pool:
