Server pools can be automatically populated with servers that match the specifications based on the defined policy settings using Server Pool Policy Qualifications and by applying these qualification policies using Server Pool Policies under the Servers tab in the navigation pane.
First, we will discuss how to create server qualification policies using the options available in the Server Pool Policy Qualifications policy.
The steps to create this policy are as follows:
- Log in to the UCSM screen.
- Click on the Servers tab in the navigation pane.
- Click on the Policies tab and expand root.
- Right-click on Server Pool Policy Qualifications, and click on Create Server Pool Policy Qualification, as shown in the following screenshot:

- In the pop-up window, assign the Name and Description values to the server pool policy qualifications.
- In the left-hand pane, click on the options to define the new server pool policy qualifications, as shown in the following screenshot:

- The first option in the left-hand pane is Create Adapter Qualifications. This setting defines the type of adapter a qualifying server must have. Select the Type of the adapter from the drop-down list. It is also possible to select a unique adapter based on the process identifier (PID) and capacity, which could be from 1 to 65535, as shown in the following screenshot:

- The second option in the left-hand pane is Create Chassis/Server Qualifications. This setting defines the list to select the servers from the chassis. Select the values for First Chassis ID and Number of Chassis, which is the total number of chassis to be included, starting with First Chassis ID as shown in the following screenshot:

- Click on the Add sign to select the server slots in each qualified chassis.
- Select the values for First Slot ID and Number of Slots, which is the total number of server slots to be included, starting with First Slot ID.
- Click on OK, as shown in the following screenshot:

- The minimum and maximum slot ID will be automatically populated in the previous screen.
- Click on OK to complete the policy creation, as shown in the following screenshot:

- The third option is Create Memory Qualifications. This option defines the memory characteristics of the servers for qualification. The options include clock speed Clock (MHz), Latency (ns), minimum and maximum memory size Min Cap (MB) and Max Cap (MB), data bus Width, and data bus width measurement Units, as shown in the following screenshot:

- The fourth option is Create CPU/Cores Qualifications. This option defines the CPU characteristics of the servers for qualification. The options include Processor Architecture, PID (RegEx), Min Number of Cores, Max Number of Cores, Min Number of Threads, Max Number of Threads, CPU speed (MHz), and CPU Stepping, as shown in the following screenshot:

- The fifth option is Create Storage Qualifications. This option defines the storage features of the qualifying servers. The options include the Diskless disk status, the Number of Blocks value in the disk, Block Size (bytes), minimum/maximum storage capacity across all disks Min Cap (MB) and Max Cap (MB), minimum storage capacity per disk Per Disk Cap (MB), and number of Units, as shown in the following screenshot:

- The sixth option is Create Server PID Qualifications. This is a regular expression string that the server PID must match in order to qualify, as shown in the following screenshot:

- The seventh option is Create Power Group Qualifications. This policy could match a server based on the server Power Group value, as shown in the following screenshot:

- The last option is Create Rack Qualifications. This option is only applicable if there are some rack-mount servers managed by the UCSM. The First Slot ID value is the first server to be included, and the Number of Slots value defines the total number of servers to be included starting from the First Slot ID, as shown in the following screenshot:

Once we have defined the desired Server Pool Policy Qualification policies, we can use the Server Pool Policies tab to associate qualifying servers to be automatically added to an already created empty server pool.
In the following example, we will create a CPU qualification policy and assign it to a server pool:
- Log in to the UCSM screen.
- Click on the Servers tab in the navigation pane.
- Click on the Policies tab and expand root.
- Right-click on Server Pool Policy Qualifications, and then click on the Server Pool Policy Qualifications option.
- In the pop-up window, assign the Name and Description values to the Server Pool Policy Qualifications policy.
- In the left-hand navigation pane, click on the Create CPU/Core Qualifications policy to define the CPU features for the qualifying servers. We created a CPU qualification policy, as shown in the following screenshot:

- Click on OK to finish the creation of the Server Pool Policy Qualifications.
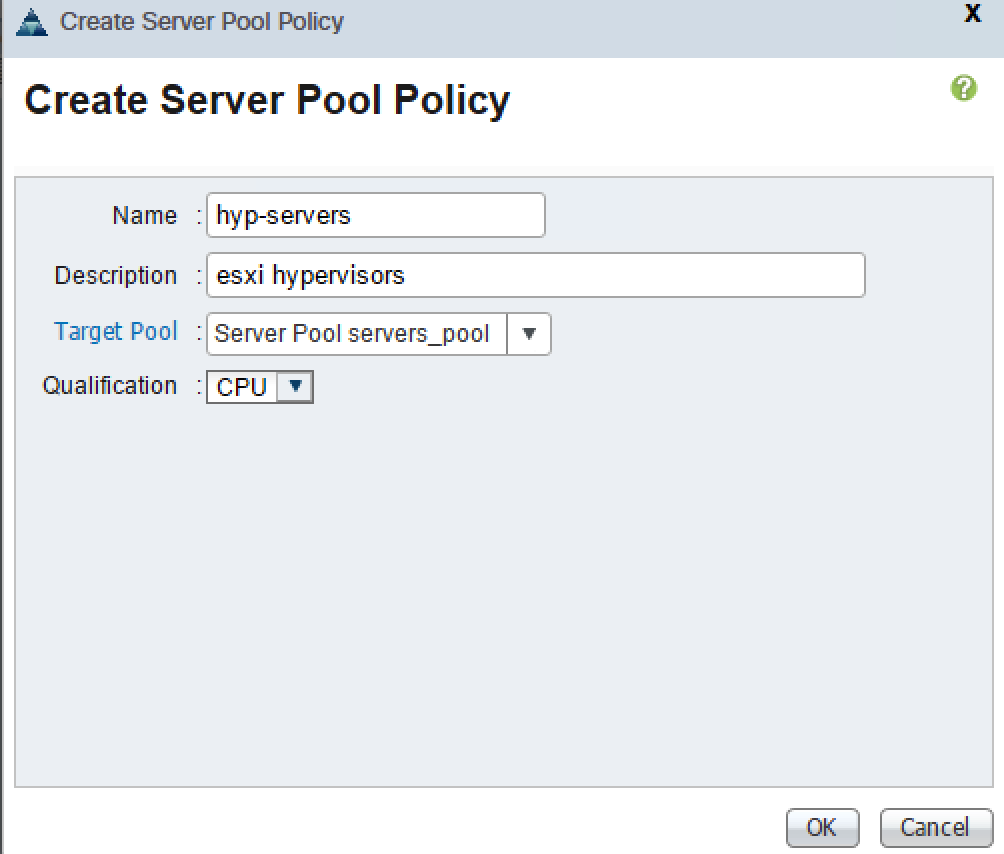
- Right-click on Server Pool Policies in the navigation pane, and click on Create Server Pool Policy.
- In the pop-up window, assign the Name and Description values to it. Select the Target Pool value from the drop-down menu, which is already defined, and the Qualification policy already created in step 6 (in this case, CPU), as shown in the following screenshot: