Let us start looking at the configuration steps for UCS integration in vCenter Server.
- Log in to the UCS Manager.
- From the main page, click on the VM tab:

- Click on Export vCenter Extension.
- Choose a location to save and click on OK:

- After exporting the XML file, copy this to VMware vCenter Server.
- Log in to the vCenter Server.
- From the Plug-Ins menu, choose Plug-In Manager.
- Right-click on the Plug-In Manager window and select New Plug-In.
- In the Register Plug-In window, click on the Browse button and select the XML file you copied to the server.
- After installing the extension XML file, click on the Register Plug-In button in the Register Plug-In window.
- Once the plugin registration process is done, return to the UCS Manager window.
- Click on Configure VMware Integration.
- Click on Next.

- In the vCenter Server area, complete the fields to define the connection to VMware vCenter.
- In the Datacenter area, complete the fields to create the data center in VMware vCenter.
- In the DVS Folder area, complete the fields to create a folder to contain the distributed virtual switch in VMware vCenter.
- In the DVS area, complete the fields to create the distributed virtual switch in VMware vCenter.
- Click on Next.
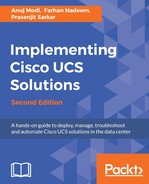
- In the Port Profile area, complete the fields to define the port profile.
- In the VLANs area, do the following to assign one or more VLANs to the port profile:
- In the Select column, check the checkbox in the appropriate row for each VLAN that you want to use in the port profile.
- In the Native VLAN column, click on the radio button in the appropriate row for the VLAN that you want to designate as the native VLAN:
- In the Client Profile area, specify the information on those fields to create a profile client for the port profile:

- Click on Next.
- Review the text on the page in the Configure VMware Integration wizard.
- Click on Finish.
Cisco UCS Manager connects to the vCenter Server, creates the specified DVS, and applies the port profiles.